How to Crochet a Granny
Square


Granny Square
By: Abby Davis By: Abby Davis


How to Crochet a Granny Square

1 Contents: Intoduction.................................................................................2 Materials and supplies...............................................................3 Important Pattern Notes ..........................................................5 Pattern.......................................................................................8 Finishing...................................................................................14
Introduction:
Looking for a granny square pattern tutorial? You’ve come to the right place! This step by step guide will show you how to crochet a granny square that looks like a sunflower. This project is great for beginners and for using up scrap yarn!
This pattern is worked in rounds and each round is worked in a new color. For this tutorial, I’ve I used brown, gold, yellow, and cream to create a sunflower look. You however can use any colors you want!
2 How to Crochet a Granny Square
Cream Yellow Gold Brown
For this granny square you will need worsted weight yarn in four colors. (those colors are up to you!)
You can use whatever yarn you want as long as they are a similar weight and recommended gauge
You will also need a crochet hook. I recommend using a J-10 sized hook. You can also use the size recommened on the yarn’s packaging.
3 How to Crochet a Granny Square
Materials and Supplies:
OptionalMaterials: Stitch markers Rulertapemeasure Level: FinishedBeginner-Intermediate Size:5inchsquare Notes Notes
Use a light colored yarn so you can see your stitches easily
Pro Tips!
Count your stitches as you go to make sure you don’t loose your place
Block you granny squares to make them straight and square before joining
4 How to Crochet a Granny Square
Important Pattern Notes:
This pattern is written in US terms. Here is a list of all the stitches used and their abbreviations:
sl st= slip stitch st/sts: stitch/stitches ch= chain hdc= half double crochet dc= double crochet tr= treble crochet (triple crochet)
Special stitches such as a puff stitch and a cluster stitch are used in this pattern
Special Stitches:
Puff= Puff stitch: *Yarn over, inset hook in indicated stitch, yarn over and ull up a loop* three times (7 loops on hook). Yarn over and pull through all loops on hook. Chain 1 to secure the puff stitch.
Cluster= Cluster Stitch: *Yarn over, insert hook in the indicated stitch, yarn over and pull up a loop, yarn over and pull through 2 loops* 4 times (5 loops on hook). Yarn over and pull through all loops on hook.
5 How to Crochet a Granny Square
Puff Stitch:
Yarn over, insert hook into the indicated stitch, and pull up a loop (3 loops on hook).
Yarn over, insert hook into the same stitch, and pull up a loop. (5 loops on hook).


Yarn over, insert hook into the same stitch, and pull up loop. (7 loops on hook).
Yarn over, and pull yarn through all loops on the hook. Chain 1 to secure the stitch.
6 How to Crochet a Granny Square
Cluster Stitch:
Yarn over, insert hook into the indicated space, and pull up a loop. Yarn over and pull through 2 loops (2 loops on hook).


Yarn over, insert hook into the same space, and pull up a loop. Yarn over and pull through 2 loops (3 loops on hook).
Yarn over, insert hook into the same space, and pull up a loop. Yarn over and pull through 2 loops (4 loops on hook).
Yarn over, insert hook into the same space, and pull up a loop. Yarn over and pull through 2 loops (5 loops on hook).
Yarn over, and pull through all loops on the hook.
7 How to Crochet a Granny Square
Pattern:
Round 1 (brown yarn)

Start with a magic ring
Next, ch 3 (counts as the first dc) work 15 more dc into the ring.
Join with a slip stitch to the top of the beginning ch-3. (16 sts)
Cut yarn, fasten off. Completed round 1
8 How to Crochet a Granny Square
Round 2 (gold yarn)

Join new yarn with a slip stitch to any dc.
Ch 2, puff stitch in the same stitch and in each dc around.
Join with a slip stitich to the first puff stitch. (16 puf sts).
Cut yarn, fasten off.
9 How to Crochet a Granny
Square
Completed
round 2
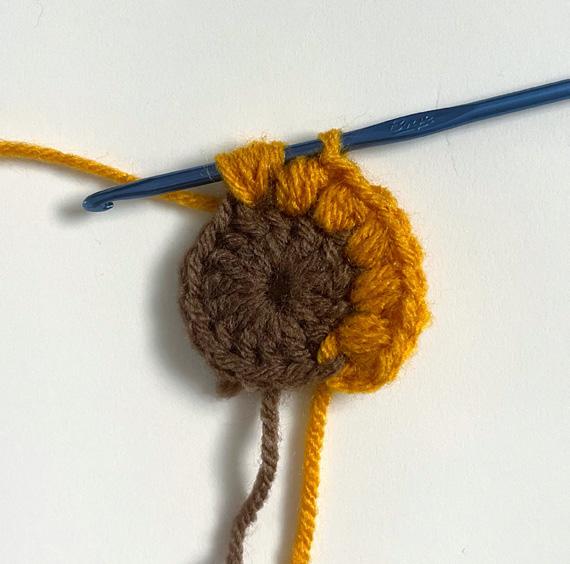
Round 3 (yellow yarn)
Join new yarn with a slip stitch in any chain-1 space. Ch 2.
The first cluster stitch of the round is a little different, to ac count for the starting ch-2.
To make the first cluster stitch: *Yarn over, insert the hook into the same stitch, yarn over and pull up a loop, yarn over and pull through 2 loops.* Repeat 2 more times. there will be 4 loops on the hook. Yarn over and pull through all 4 loops to complete the stitch. Ch2

Then, chrochet the rest of the cluster stitches: (Cluster stitch, ch2) in the next ch-1 space and in each ch-1 space around. Join with a slip stitch to the beginning of the cluster stitch. (16 cluster sts)
Cut yarn, fasten off.
10 How to Crochet a Granny Square

11 How to Crochet a Granny Square
Completed round 3
Round 4 (cream yarn)
Join new yarn with a slip stitch in any ch-2 space. Chain 4 (counts as the first tr) and then crochet 2 tr in the same space.
Crochet the first side: 3 dc in the next ch-2 space, then 3 hdc in the next ch-2 space, 3 dc in the next ch-2 space. This forms the first side of the square.
Next, make the first corner: 3 tr in the next ch-2 space, ch3, 3 tr in the same ch-2 space. this forms the first corner.
Crochet the second side: 3 dc in the next ch-2 space, 3 hdc in the next ch-2 space, 3 dc in the next ch-2 space.
Crochet the second corner: 3 tr in the next ch-2 space, ch3, 3 tr in the same ch-2 space
Crochet the third side: 3 dc in the next ch-2 space, 3 hdc in the next ch-2 space, 3 dc in the next ch-2 space.
Crochet the third corner: 3 tr in the next ch-2 space, ch3, 3 tr in the same ch-2 space
Crochet the last side: 3 dc in the next ch-2 space, 3 hdc in the next ch-2 space, 3 dc in the next ch-2 space.
12 How to Crochet a Granny Square

13
to
3 ch 3 ch 3 ch 3 tr 3 tr 3 tr 3 tr 3 tr 3 tr 3 tr 3 dc 3 dc 3 dc 3 dc 3 dc 3 dc 3 dc 3 dc 3 hdc 3 hdc 3 hdc 3 hdc 3 ch 3 tr
How
Crochet a Granny Square To finish your last corner: Crochet 3 tr in the same space as the beginning tr stitches, ch3 and join with a slip stitch to the top of the beginning ch-4
Finishing:
And that’s it! Your granny square is complete! To finish your square, cute yarn and fasten off. Then, weave in the ends.
If you’ll be sewing a bunch of these granny squares together, you can block them to make the sides nice and straight.
Notes
Your completed granny square can be made into all kinds of things such as: tote bags, blankets, cardigans/sweaters, hats, and more! Simply make as many as needed and sew them together with a whip stitch or slip stitch!
14 How to Crochet a Granny Square
The End!
Happy Crocheting!
Full credit to the creator of this pattern sarahmaker.com
15 How to Crochet a Granny Square