15 minute read
Skills Workshop
from HVAC&R Nation October 2020
by AIRAH
AIR FILTRATION FOR YOUR FACILITY Airborne Containment Systems MODULE 134 FILTER SERVICING • Bag In/Bag Out (BIBO) systems ph:1300 733 277 www.camfil.com • terminal & inline HEPA housings • off the shelf/custom designed FOR HOSPITALS AND
HEPA Filters & On-Site NATA Testing
Advertisement
PC3/PC4 FACILITIESPROUDLY SPONSORED BY ph:1300 886 353 www.airepure.com.au • stocked gasket/gel seal filters • HEPA filter integrity testing • HEPA replacement/validation Comprehensive range of stocked HEPA and HVAC filters National on-site HEPA filter replacement & NATA testing Locally supported, custom client focused systems
Skills summary
■ What? A look at filter servicing for hospitals and PC3/PC4 facilities, specifically high-risk containment filtration applications. Given the current climate and precautionary regulations in place to reduce the spread of the coronavirus known as COVID-19, there are several highly important and potentially lifesaving steps that must be considered when administering safe filter changing procedures. This is particularly true for those venturing into higher risk areas such as hospitals with isolation rooms and facilities with PC3/PC4 rated areas. The first part of this Skills Workshop looks at in-line HEPA filter change-out procedure guidelines for service technicians in a hospital setting, including considerations for conventional systems prior to the change-out.
■ Who? Relevant for filter technicians working in mechanical contractors/service companies. The second part looks at service considerations for high-risk physical containment facilities. This includes exploring what a PC3- or PC4-rated facility is, the service considerations for such a facility, preparation works and filter change-out procedures.
In-line HEPA filter servicing for hospitals
In-line HEPA containment exhaust filtration systems may be used within hospital and healthcare areas, such as isolation rooms, cytotoxic areas, research laboratories, pathology areas, and cyclotron or nuclear medicine areas.
In-line containment exhaust filtration systems are typically located in plant or roof spaces away from the area served – which allows for filter changeout and integrity testing access outside of patient areas. They can be larger in size than terminal HEPA modules, and in turn provide enough space for higher grade, high-capacity pre-filters and high-capacity HEPA filters.
Types of in-line containment systems can vary greatly, depending on the potential risk and housing location. An in-line system may be as simple as an upstream injection port for introducing challenge aerosol into the duct system and an in-line HEPA housing containing a HEPA filter and an access door for scan testing. As the potential risks increase, and the system requirements become more complex, laboratory-type Bag-In/Bag-Out (BIBO) systems with decontamination facilities may be used.
The following functional procedures should be considered, alongside the actual change out of the filters: • Internal risk assessments • Room pressure regimes • Decontamination • Shutdown and restarting of the system HEPA testing Waste disposal.
By default, the filters should not be changed out unless the conditions are deemed safe to do so.
It is also recommended that when changing out filters that are considered “safe”, minimum personal PPE, safety glasses, gloves and face masks should still be used.
The “safe” status needs to take into consideration the whole of the system, including the area served and the associated duct systems.
In-line HEPA filter change-out procedure (this is indicative only and subject to site-specific SWMS)
Assuming that there is not a duty stand-by filtration system, and the system does not have isolation dampers on either side of the housing: • Prepare all change-out procedures and undertake associated risk assessments with all involved personnel • Ensure that the isolation room is “safe” and that deviation from the control pressures can be undertaken • Ensure that the interconnecting duct is “safe”, which may include: – Written advice from the facility operator stating the system has not been exposed to any hazardous substances/biologicals etc. – Written advice from the facility operator stating the system has been decontaminated and that there are no hazardous substances/biologicals etc. – If this cannot be provided the method of filter change-out will need to be reviewed. Ensure that the correct replacement filters are available (and ready to be changed out) Ensure that waste disposal bags are available (for disposal of filters as hazardous waste) Wind back the supply and exhaust of the plant serving the isolation room (maintaining a negative pressure in the system). Technically the supply can be shut off, and the exhaust should be running to just maintain the duct at a negative pressure (more than -10Pa to adjacent spaces). Ensure the plant room is positive to the exhaust system (you do not want air to be sucked out of the housing and into any other systems or outside air intakes) While wearing the appropriate, “and agreed”, PPE, (minimum of facemask, goggles, gloves; it may also be prudent to wear coveralls, Tyvek suits). – Open the housing filter access door, remove gradually to ensure that there is a slight flow of air being drawn into the housing, and place to the side. If airflow is excessive, wind back the fan or restrict the airflow further. – Remove the appropriate filters (pre-filter and/ or HEPA filter) if removing and replacing both.
Remove the pre-filter first (this allows any loose dust to be picked up by the HEPA). – Place removed filters into waste disposal bag. – Wipe down internal HEPA filter mating faces. Dispose of cleaning materials with the dirty filter. – Reinstall filters (if both filters are being changed out, reinstall the pre-filter first). – Ensure the HEPA filter is centered correctly and tighten the mounting fixture (nuts/bolts/ clamps), so that the filter gasket seals. · For gel seal the knife edge only
needs to embed in the gel 2–5mm.
Do not use excessive force. · For gasket seal filters, the entire gasket should be pressed up firmly but not compressed excessively as this can damage the gasket and filter.
Do not use excessive force. – Check all fittings and fixtures are firmly fitted and secure. – Close the filter installation access panel. – Remove any airflow restrictions (dampers) and start to ramp up the exhaust fan system.
The supply air fan will need to be brought online to maintain the required pressures within the isolation room. – Once at design, or a satisfactory test velocity (0.5m/s through filter) the HEPA filter can be tested/scanned AS1807.7 to confirm integrity (please refer to separate NATA test procedure for this). – Discard disposable PPE and wipe down any other equipment with IPA, dispose of with hazardous waste. Reinstate system back to original room pressure set-points. Record initial speed drive set-points and room and filter pressure readings. Submit final NATA test results.
Important notes
• Some of the above-mentioned steps form part of other functions (i.e., NATA filter testing, but have been included). • Some steps may be moved around to suit individual systems. • It is possible to undertake filter change-outs with all fans off, however, it is desirable to maintain a slightly negative pressure to reduce the risk of any dust or potential contaminants escaping to the area the in-line housing is located in (be aware of internal hospital pressures and stack effects). • It is suggested that the HEPA filter be integrity tested prior to removal to confirm performance up to the date of its replacement.
The new filter will also need to be tested to confirm its integrity. • We recommend the use of hand tools rather than power tools for removal and replacement of fixings, due to the potential for thread damage. • Ensure any threads are lubricated with acceptable thread lubricant (Vaseline may be all that is accepted).
Terminal exhaust HEPA filtration systems
Terminal-mounted exhaust HEPA filtration systems allow contaminants to be contained within their locations (isolation rooms, cytotoxic areas, research laboratories, pathology areas and cyclotron or nuclear medicine areas). Typically, room exhaust HEPA filters are located at low level, at a bio-cabinet discharge level or at high level in isolation room ensuites.
Some terminal mounted exhaust housings may include pre-filters, but others may not due to space issues. In the absence of a pre-filter to protect the HEPA filter, there is greater risk of physical damage to the HEPA filters from cleaning sprays/devices and physical cleaning procedures.
Sealed ceiling access panel
Raised access Ladder platform or similar Line of sight Access panel, typically with clear plastic taped over opening
HEPA
Negative (-ve)
SPARGE PIPE
Aerosol introduction
Photometer Negative air pressure (-ve)
100 % Port Concentration and pressure
Ceiling
EXHAUST
Aerosol Generator (Laskin nozzles)
Exhaust HEPA Testing Diagram – Conventional Ceiling Exhaust
Terminal-mounted HEPA housings/ units can pose decontamination and removal issues, and when needed can rule fumigation out as a valid decontamination option.
EXHAUST
Locating and accessing HEPA filters for testing/ validation purposes may be also be challenging for HEPA filter service and testing personnel.
Line of sight
HEPA
100 % Port Positive (+ve)
FAN
Negative (-ve) Aerosol introduction
Admission to Photometer Rear access point, from in-room service adjacent space spaces or adjacent Floor Level rooms may be required to Exhaust HEPA Testing Diagram introduce an – Roomside Access Low Level even distribution of the challenge aerosol and access the air off Areas within these facilities are negatively side of the HEPA to allow filter surface scanning pressurised to assist with the strict control to HEPA integrity test methods as described of airborne contaminants, for the safely of all in AS1807.6 and 1807.7. personnel and the external environment. •
Access is required to the air off side of the
HEPA filter (within the exhaust duct), so that a NATA technician is able to view and scan the HEPA filter surface at 25mm from the installation for traces of the test aerosol.
Access to the exhaust duct via access panel may cause a decrease in air pressure within the exhaust stream, affecting the required flow of test aerosol that is pulled through the HEPA. In this instance it is sometimes necessary to use blower fans to provide a flow of air across the filters.
Filter servicing for PC3/PC4 facilities
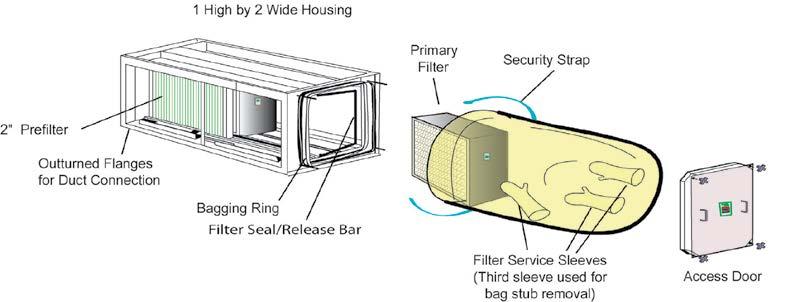
PC3- or PC4-rated (QC3/QC4) facilities are considered high risk because hazardous airborne agents that pose a threat to health are (or may potentially be) present and containment systems that include HEPA air filtration are used. Within the plant rooms of these PC3- or PC4-rated facilities, HEPA filtration containment housings or Bag In/Bag Out (BIBO) containment filtration systems may be installed. BIBO systems include HEPA and/or HEGA filters (PC4 have two stages of HEPAs), bubble tight isolation dampers, decontamination/fumigation ports, a remote scan arrangement for testing and BIBO arrangements for filter change out.
The filter service requirements of a PC3- or PC4-rated facility are significantly different to the filter service requirements of a standard commercial building.
What effects will opening the system have on operation? What facility procedures need to be followed?
1 High by 2 Wide Housing
As a service technician, you would not simply walk into the plant room of a PC3- or PC4-rated facility and open the door of the filter housing to check and change out the filters. This would risk your own health, the health of building occupants (and potentially the entire living environment).
Prefilters
Outturned Flanges for Duct Connection
Bagging Ring
Primary Filter Security Strap
Written approval from the facility manager/ Filter Seal/Release Bar operator of a PC3- or PC4-rated facility should be sought prior to any service work being undertaken, Filter Service Sleeves (Third sleeve used for bag stub removal) Access Door along with details of standard operating procedures, the required SWMS/JSA etc. CamContain Housings are designed with safety in mind. Each housing is shipped with an instruction book detailing how to Bag In/Bag Out Concept Depending on the nature of each PC3- or PC4-rated facility, it would be expected that a range of standard operating procedures in various scenarios would be available for potential service personnel to follow. STEP 1 • Decontamination of personnel (as per hospital/containment facility risk assessment requirements and developed procedures for SWMS) Bag-In/Bag-Out Concept Bag-In/Bag-Out Concept Bag-In/Bag-Out Concept Re-establishing filter operating status and certification Actions required to re-establish the operating status and certification of replacement STEP 2 CamContain GB Housing CamContain GB Housing CamContain GB Housing A separate set of standard operating procedures may be required for: • Emergency filter change-out BIBO HEPA filter change-out procedure containment filtration HEPA/HEGA filters include: • Replacement HEPA filters would require onsite testing and certification by a NATA-accredited • Scheduled filter change-out Designed with safety in mind, the filter technician using an acceptable upstream • Pre-filter change-out change-out procedure for BIBO containment housings include installing the new filters in challenge gas and calibrated and certified photometers. • HEPA/HEGA filter change-out. the change-out bag, securing the bag over • Replacement HEGA filters may require onsite Each set of these standard operating procedures may include: the ribbed openings on the housing door opening, and performing the filter change testing by a qualified technician using an acceptable upstream challenge gas and and the bag is stored in the door CamContain Housings are designed with safety in mind. Each housing is shipped with an instruction book detailing how to • Preparation works prior to filter change-out entirely within the bag. calibrated and certified halide detectors. ■ (including fumigation/decontamination) STEP 3 STEP 4 STEP 5 CamContain Housings are designed with safety in mind. Each housing is shipped with an instruction book detailing how to CamContain Housings are designed with safety in mind. Each housing is shipped with an instruction book detailing how to • Operation of the facility during change-out • Filter change-out procedure STEP 1 STEP 2

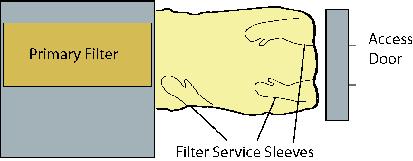

• Actions required re-establishing operating STEP 1 STEP 2 status and certification Primary Filter STEP 1 Access Door Primary FilterSTEP 2 Access • Restart of system Access Door • Associated risk analysis and SWMS/JSA requirements. Primary Filter Primary Filter and the door opening. Cut the bag with shears to Bag Stored in Door Between Changes Primary FilterDoor Primary Filter Access Door new bag opening to the housing door opening. Move the old bag stub into the new bag cavity Access Door Access Door Filter Service Sleeves Bag Stored in Door Preparation works prior to filter change-out STEP 6 STEP 7 and the bag is stored in the door STEP 3 STEP 4and the bag is stored in the door Between Changes Bag Stored in Door Between Changes Bagging Flange Detail STEP 5 Filter Service Sleeves Filter Service Sleeves This may include the activation of complete and the bag is stored in the door duty/standby systems. STEP 3 Filter STEP 4 Filter STEP 5 Filter
STEP 3 STEP 4 STEP 5
It should be noted that if complete duty/standby Filter Filter Filter systems are not used, the area protected by the Filter Filter Filter containment system will be affected by air pressure variances that may pass out of normal operating ranges during the filter change out. Subject to the type of hazardous airborne agents Move the old bag stub into the third service glove sleeve and seal the sleeve with banding ties between the bag body and the glove sleeve. STEP 6 Carefully fold the bag and place in the door cavity. Replace door. The illustration above portrays how the bag is placed over the ribs and held in place there by an elastic shock cord and security strap. new bag opening to the housing door opening. Move the old bag stub into the new bag cavity and the door opening. Cut the bag with shears to STEP 7 Bagging Flange Detail new bag opening to the housing door opening. Move the old bag stub into the new bag cavity and the door opening. Cut the bag with shears to new bag opening to the housing door opening. Move the old bag stub into the new bag cavity and the door opening. Cut the bag with shears to exposed to the containment filtration system, the Bagging Flange Detail system may require decontamination (fumigation/ Filter STEP 6 Filter STEP 7 Bagging Flange Detail bio strips etc.) prior to starting works. Filter STEP 6 www.camfil.comFilter STEP 7
Additional operating procedures
A separate set of standard operating procedures may be required for: • Filter change out procedure for non-BIBO containment housings (refer to In-line HEPA filter change-out procedure) • Filter change out procedure for BIBO containment filtration systems (setup as per
In-line HEPA filter change-out procedure, however filter changeout as per below –
BIBO HEPA filter change-put procedure)
Filter
Move the old bag stub into the third service glove sleeve and seal the sleeve with banding ties between the bag body and the glove sleeve. Move the old bag stub into the third service glove sleeve and seal the sleeve with banding ties between the bag body Move the old bag stub into the third and the glove sleeve. service glove sleeve and seal the sleeve with banding ties between the bag body and the glove sleeve.

Filter Carefully fold the bag and place in the door cavity. Replace door. Carefully fold the bag and place in the door cavity. Replace door. Carefully fold the bag and place in the door cavity. Replace door. The illustration above portrays how the bag is placed over the ribs and held in place there by an elastic shock cord and security strap.
The illustration above portrays how the bag is placed over the ribs and held in place there by an elastic shock cord and security strap. The illustration above portrays how the bag is placed over the ribs and held in place there by an elastic shock cord and security strap.
www.camfil.com Bag In/Bag Out Steps www.camfil.com www.camfil.com This month’s skills workshop has been provided by Camfil Airepure. For more information visit www.airepure.com.au
Disposal of contaminated items including filters (as per hospital/containment facility requirements for disposal of contaminated waste)
QUALITY AIR FILTRATION
FOR YOUR FACILITY NEEDS
Ultra-Clean HEPA / ULPA Filters
• stocked gasket & gel seal filters • E11, H14, U15 rated to EN1822:2009 • individually tested & certified
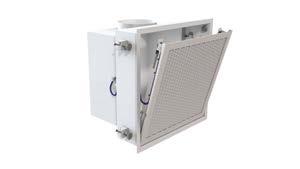
Supply / Exhaust Air Modules
• terminal & inline HEPA housings • off the shelf and custom designed • insect screen housing options
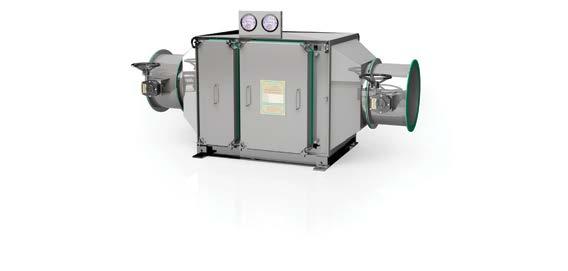
On-site NATA Testing Services
• HEPA filter integrity testing • HEPA validation & certification • fumigation services
Custom Laminar Airflow Systems
• unidirectional & UCV systems w/ integrated return air / lighting • air showers & pass through boxes
Airborne Containment Systems
• Bag In/Bag Out (BIBO) systems • advanced HEPA & HEGA filtration • bubble-tight isolation dampers
Custom Engineered Solutions
• in house engineering department • custom designed solutions • national system design & support


