11 minute read
Thesis Preparation
from Terra Dispositions
Investigations began with the extraction of material at natural sites. A clay deposit was identified at Chimney Bluffs State Park, located halfway between Syracuse and Buffalo, NY on Lake Ontario. This site features unique “bluffs” that are formed from eroded drumlins, or teardrop-shaped hills of glacial deposits formed during the most recent ice age. Wind, rain, snow and waves from the lake further eroded these bluffs into sharp pinnacles. These bluffs continue to erode at an average rate of one to five feet per year.
2.1 Clay extraction site
Advertisement

2.2 The bluffs, formed during the last ice age
At the base of the bluffs, the clay deposit presents itself as a series of “cracked” nuggets along most of the coast line. A small portion of clay was extracted by an ice cream scoop and sealed in an air-tight container to be used for further testing in the studio.
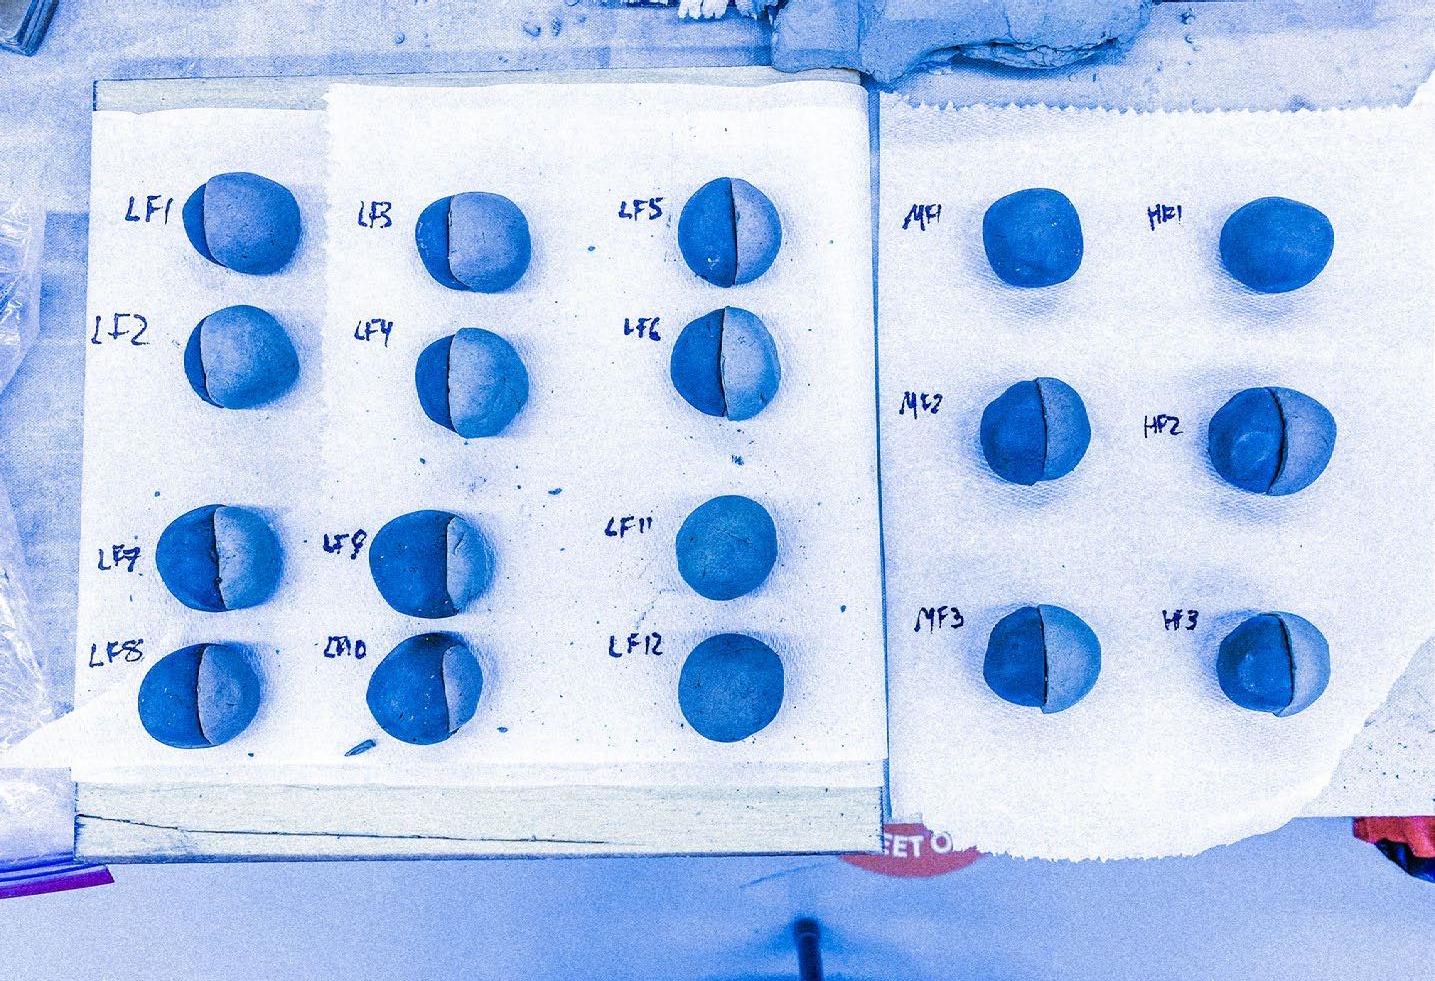
The sourced clay was then mixed in various amounts with purchased “clay-body.” Clay-body is a mixture of specific clay types and most often used in the studio due to its increased tolerance to heat and ideal elasticity. These clays were proportioned, mixed and formed into pinch pots.

2.3 Wet clay formed into pinch-pots

2.5 The pinch-pots after bisque firing

A pinch pot is one of the most basic techniques of hand-building. Each clay-body began as a rounded ball and is hand formed into a pot measuring about 3” - 4” in diameter. By forming it into this shape, there is less of a chance of air entrapment, which could cause an explosion. Additionally, it allows for a study of how the clay will self-support itself structurally. The pots were then labeled by etching a code onto its back. All pots will first be fired at low-fire temperatures (1850°F) in the electric kiln, and three of those will be re-fired at medium-high temperatures (2200°F).

2.6 Proportions of clay used in mixture

2.7 Mixed clay
KEY: CBC: CHIMNEY BLUFF CLAY (WETTEST) TCC: TERRACOTTA CLAY (MOIST) GWC: STONE WARE CLAY (DRIEST)
LOW-FIRE: LF 1: 1/4 CBC + 3/4 TCC LF 2: 1/4 CBC + 3/4 SWC LF 3: 1/3 CBC + 2/3 TCC LF 4: 1/3 CBC + 2/3 SWC LF 5: 1/2 CBC + 1/2 TCC LF 6: 1/2 CBC + 1/2 SWC LF 7: 2/3 CBC + 1/3 SWC LF 8: 2/3 CBC + 1/3 TCC LF 9: 3/4 CBC + 1/4 SWC LF 10: 3/4 CBC + 1/4 TCC LF 11: 100% SWC LF 12: 100% TCC
MEDIUM FIRE: MF 1: 100% CBC MF 2: 1/2 CBC + 1/2 TCC MF 3: 1/2 CBC + 1/2 SWC
HIGH FIRE: HF 1: 100% CBC HF 2: 1/2 CBC + 1/2 TCC HF 3: 1/2 CBC + 1/2 SWC
After firing, there were several noticeable changes to the material’s properties. The most profound was the change in color. It also became clear which pots contained more of the clay-body as they turned out lighter. In comparison, the pots that were heavier in sourced clay were redder, likely due to increased presence of natural metals. All of the pots were significantly lighter due to the absence of water.
Once the three medium-fire pots were re-fired, they turned into a much darker brown color and started to show significant cracking and bubbling. The pot with the most clay-body out of the three (MF3) was the only one that did not stick to the ceramic shelf. Pot MF2 retained its shape but became bonded to the shelf, whereas the pure sourced clay (MF1) did not survive the re-firing process and melted completely onto the shelf.

2.8 Simple pinch-pot and coil test

The next set of tests were a series of photogrammetry techniques involving a conventional camera or phone camera, in unison with 3D model stitching software such as Metashape. The premise of the tests was to understand the effects of texture, color, lighting and positioning on the quality of the resulting 3D object.

2.10 Inside-out view of a scanned 3D ceramic-printed object


2.12 Detail view of a scanned hand-built ceramic mug
2.13 View of a failed scan of “dwelling”

A selection of ceramic objects were used according to different techniques. Two hand-built objects were picked, one with a smooth finish, the other with considerable texture and ridges. A wheel-thrown vessel and a ceramic 3D printed sculpture were also included. Each object was selected from a different stage of the clay process. One was a wet ceramic object, another two were dried (greenware) and one was fully fired.
These tests found that smooth and reflective (wet) surfaces were the least compatible with the scanning process and caused glitching and odd shapes to occur.
When an object is scanned, the number of photos used will affect the quality and level of detail too. Smaller objects generally require less captures to receive adequate detail. Interestingly, during the digitization process, there is a loss of scale that occurs. Objects can easily be scaled up or down, and the detail respectively. This phenomenon is apparent in the images at right. The blue rock is significantly larger than the brown one. On the page, they appear nearly identical. In the image with the blue rock however, the brown rock (to scale) is seen to its bottom right.
The next test sought to take a physical found object and convert it into a digital mold. A rock sourced from the abandoned quarry at Skytop was used.

2.14 Scanned large quarry rock next to the small rock (opposite page) to scale

2.15 Scanned small quarry rock

2.16 Original found object

2.17 Object imprinted into clay block


2.19 Digital section mold in Rhino
2.20 Completed mold representation
2.21 Digital “slip-cast” from digital mold


A cyclical “pipeline” was developed to convert this found object to a digital one, which could then be re-created using mold-making to produce a new physical artifact that is a distant relative of the original one.
Once the object is sourced, it is imprinted in a block of clay. This “imprint” is then scanned into the photogrammetry software to produce a digital object. The object is then spliced and inserted into a digital mold which captures its form. The mold can then be produced through digital fabrication processes such as 3D printing or CNC milling. The completed mold can then be cast to produce a new physical object.

2.22 Resulting digital artefact next to the original scanned object
The resulting artifact is both an imprint and a defamiliarization of the matter it originally represented. Further, this object can once again be plugged into the pipeline to further be altered by both the physical and digital making processes.
Physically, the deterioration of the mold, lighting during scanning and other errors will affect the product. Digitally, software assumptions, de-resolution and triangulation will also affect the object. Additionally, in this case, holes required for hollowing the object to be 3D printed on the powder printer also altered the final form of the created artifact.

2.24 The three “dwellings”
2.25 Different views of the little “dwelling”
2.26 Overhead view of the three “dwellings”


This series of “dwellings” is an abstracted representation of human interventions within the lithosphere to create domestic space. These objects were created as a formal study to continue to experiment with photogrammetry and the effect of a “loss of thickness” during the digitization process. After scanning, these objects were digitally spliced to reveal the assumptions of the software of the interior spaces that could not be scanned externally. The result is a series of fine-line interior sections that are somewhere between physical reality and the false reality of digitization.
2.27 Sectional views of the scanned “dwelling”


The final portion of this exercise concerns indexing, in that it attempts to identify processes and change by the juxtaposition of the typical conditions identified by these studies. By indexing these typologies, a comparison can be made of the residual, or existing traces of the non-existent. The project attempts to be critical of what is produced through its studies, while attempting to assign meaning to the artifacts at each step of their production process.
There is a focus on embedding and documenting. As wet-matter becomes wetter or drier, the process attempts to capture “snap-shots” at significant points of the process. These captures can once again be both physical and digital. Physically, the mold-making process literally imprints traces of the objects and preserves it. Digitally, the scanning process can begin to track changes in great detail.
The ultimate goal is to expose the realities of wet-matter: to understand what is there. As with sediment layers within the lithosphere, there is an investigation of the lines of the object or place that registers time through the study of residue.
A dam typology was selected. The project is less interested in the dam itself, but rather the adjacent environment. A major hydrological displacement leaves the pre-damed area (impoundment) flooded and the post-dam (outlet) area deprived of water, resulting in an abundance of post-wet-matter at its banks. These are the areas where residue is most prevalent and best registered. To accomplish the registration process, a slip-casting protocol will be employed.
This process is similar to the primary cyclical process of the testing phase, in that it involves a series of molds, or “negatives” that are inverted several times. The potential for mass production through these mold-forming means allows for an iterative process that can deal with different variables including the type of clay used, its source, the slip saturation, color and firing temperature.
Additionally, each time a mold is used, it deteriorates and results in a de-resolution of the artifact, further altering each iteration. Triangulation and pixelation occur at the digital stages of the process. The bit’s line from the CNC mill, for example, will be transcribed over into the final object, as will other smudges as a memory of the process
The intention is to create a series of these artifacts, to embed these mishaps and to exaggerate to achieve desired outcomes. The seams themselves become an actual quality, as their exaggeration by the slip seepage during casting helps delineate the individual objects while simultaneously morphing them
These objects can then be arranged into a vertical assembly, creating a fictional landscape, affected by both terrestrial and digital erosion processes, which juxtaposes the conditions of lithospheric interventions and conditions. This collaging of residue can help expose the realities of what is in the terrain, out of which new manifestations of wet matter can arise.


2.29 Perspective view of contours produced from digital landscape collage
2.30 Top plan view of contours produced from digital landscape collage
2.31 Proposed installation of landscape collages


2.33 Contour chunk of digital landscape collage
2.34 Alternative proposed installation of landscape collages


