

BY TENIA NELSON

Stamp, Stencil, and Dies
Dynamic Duo: Always Smile & Add-on Die Bundle
Ornate Nesting Die Set
Inks
Permanent Black Pigment Ink Mini Cube
Obsidian Pigment Ink
Fresh Dye Inks: Grapevine, Ruby Red, and Coral Berry
Cardstock and Paper
Classic Crest Solar White Cardstock
Altenew Blends 6x6 Paper Pack
Other Supplies
Instant Dimension Foam Tape
Glue Tape
Crystal Clear Crisp Embossing Powder
Gradient Washi Tape - Green Valley
Sequins - Antique Gold
Mini Blending Brush
Stapler

1. Create a 4 ¼” x 5 ½” card base from Classic Crest Solar White Cardstock.
2. On another white card panel, adhere a strip of Green Valley Gradient Washi Tape, some Antique Gold Sequins, and staples. Set aside.
3. On a piece of white cardstock, stamp one of the flowers from Dynamic Duo: Always Smile Stamp Set using Obsidian Pigment Ink and heat set with Crystal Clear Embossing Powder.
4. Add colors to the stamped flower using the coordinating stencil, Grapevine, Ruby Red, and Coral Berry Fresh Dye Inks, and a mini blending brush.
5. Die cut the flower with the coordinating die.
6. Die cut one of the Ornate Nesting Dies out of a piece of patterned paper from Altenew Blends 6x6 Paper Pack.
7. Stamp sentiment from Dynamic Duo: Always Smile Stamp Set onto the Ornate Nesting die-cut using Obsidian Pigment Ink and heat set with Crystal Clear Embossing Powder.
8. Stamp sub-sentiment onto a strip of white cardstock using Permanent Black Pigment Ink Mini Cube.
9. Adhere the sentiment strip to the Ornate Nesting die-cut using foam tape.
10. Adhere the Ornate Nesting die-cut onto the panel using foam tape.
11. Adhere the flower die-cut onto the Ornate Nesting die-cut using foam tape and glue tape.
12. Adhere the whole image panel onto the card front using foam tape.
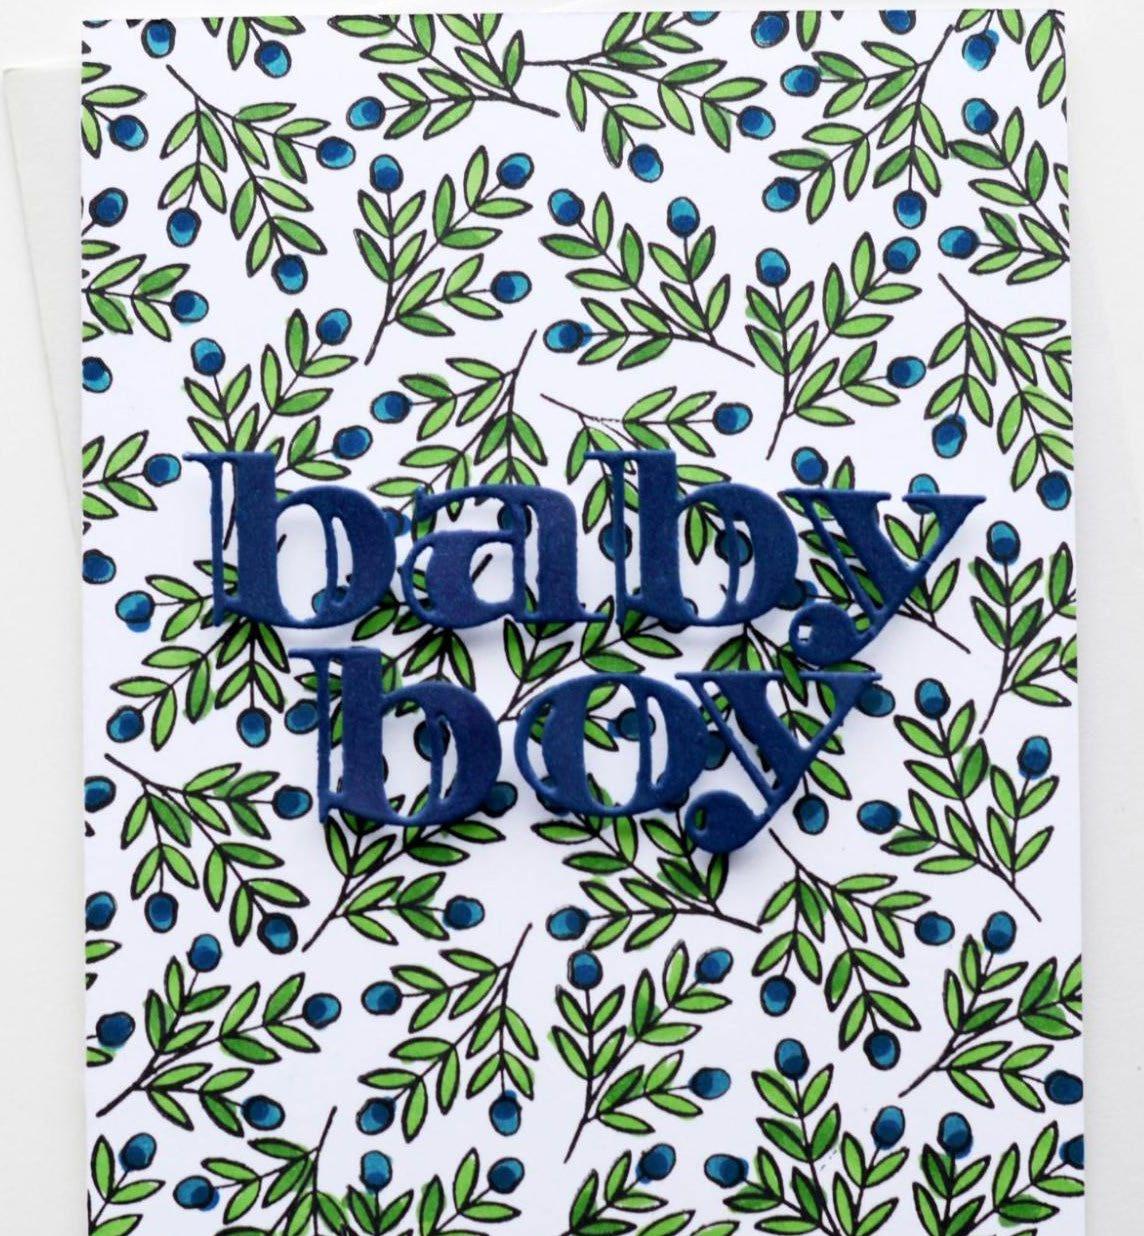
BY AGA MALYSZEK

Stamp and Die
Botanical Wreath Builder Stamp Set
Inline Alpha Die Set
Inks
Obsidian Pigment Ink
Coloring Medium
Artist Alcohol Markers: Dusk and Desert Night from Cool Summer Night Set, Grass Field from Sunshine Valley Garden Set F
Cardstock
Classic Crest Solar White Cardstock
Other Supplies
Instant Dimension Foam Tape

1. Create a 4 ¼” x 5 ½” card base from Classic Crest Solar White Cardstock.
2. To create the background, stamp a small image from the Botanical Wreath Builder Stamp Set repeatedly on another card panel using Obsidian Pigment Ink.
3. Add colors with Dusk and Desert Night markers from Artist Alcohol Markers Cool Summer Night Set along with Grass Field from Sunshine Valley Garden Artist Alcohol Markers Set F.
4. Use letters from Inline Alpha Die Set to create the sentiment.
5. Die cut “BABY BOY” out of white cardstock.
6. Use Desert Night Alcohol Marker to color the letters.
7. Adhere the die-cut letters to the card front with foam tape for a little dimension.


BY ERUM TASNEEM

Stamps and Dies A Fresh Start Stamp and Die Set
Checkerboard Stamp Set
Halftone Circles Nesting Die Set
Inks
Obsidian Pigment Ink
Fresh Dye Inks: Lemonade Stand, Tangerine Dream, Lettuce Celebrate, Easy Breezy, Be Grapeful, Tickled Pink (from Summer Dream Fresh Dye Ink Set)
Cardstock and Paper
Classic Crest Solar White Cardstock
Watercolor Paper Set (A2 loose sheets)
Other Supplies
Instant Dimension Foam Tape
Glue Tape
Mini Blending Brush
Watercolor Palette - Large
Must-have Gel Pen Set
Heat tool
1. Create a 4 ¼” x 5 ½” top folding card base from Classic Crest Solar White Cardstock.
2. Cut an A2 Watercolor Cardstock into half.
3. Stamp images from A Fresh Start Stamp Set randomly on both panels using Obsidian Ink to build an interesting pattern.
4. Smoosh Lemonade Stand, Tangerine Dream, Lettuce Celebrate, Easy Breezy, and Be Grapeful from the Summer Dream Fresh Dye Ink Set onto a watercolor palette.
5. On Panel 1, apply Tangerine Dream, Lemonade Stand, Lettuce Celebrate, and Easy Breezy. Add Tickled Pink to the top left corner with a Mini Blending Brush. Set aside to dry.
6. On Panel 2, apply water to the panel and add Be Grapeful and Easy Breezy. Set aside to dry, or use a heat tool.
7. Stamp several sentiments and hearts on white cardstock using Obsidian Ink.
8. Die cut these with the coordinating dies.
9. Cut two black cardstock mats that are slightly larger than the panels.
10. Adhere these behind the panels at an angle using foam tape.
11. Stamp the Checkerboard Stamp Set image onto a card panel using Obsidian Ink.
12. Die cut the panel using one of the circles from Halftone Circles Nesting Die Set.
13. Cut the circle in half and adhere it behind panel 1 using foam tape.
14. Out of the same checkered panel, cut out more tabs to embellish the second panel.
15. On panel 2, add details with a white gel pen.
16. Adhere the panels to the card bases using glue tape.
17. Adhere the sentiment die-cuts onto the panels using foam tape.

BY JAYCEE GASPAR

Press Plates
Floral Engravings Press Plates
Dainty Flower Garden Press Plates
Ink
Obsidian Pigment Ink
Coloring Medium
Watercolor 36 Pan Set
Cardstock
Classic Crest Solar White Cardstock
A2 Cotton Cardstock Panel
Other Supplies
Glue Tape
Jet Black Ink Spray
Pure White Ink Spray
Artists’ Watercolor Brushes - Round
1. Create a 4 ¼” x 5 ½” card base from Classic Crest Solar White Cardstock.
2. Press the flowers from Floral Engravings Press Plates and the sentiment from Dainty Flower Garden Press Plates on an A2 cotton panel using Obsidian Pigment Ink.
3. Start adding colors to the letterpress images using the Watercolor 36 Pan Set and Round Watercolor Brushes.
4. Tip: Don’t add too much water to the panel so you won’t lose the texture of the letterpress designs.
5. Let the panel dry.
6. Add Jet Black Ink Spray and Pure White Ink Spray splatters.

7. Adhere the panel onto the card base using glue tape.
BY SVITLANA SHAYEVICH

Stamp, Dies, and Stencil
Craft-A-Flower: Stargazer Lily
Tree Ring Stencil
One-Go Birthday Greetings Stamp and Die Bundle
Inks
Obsidian Pigment Ink
Crisp Dye Inks: Yellow Ochre, Vineyard Berry, Espresso
Cardstock
Classic Crest Solar White Cardstock
Parchment Cardstock (25 sheets/set)
Solid Cardstock Set - Pink Diamond (32 sheets/set)
Gradient Cardstock Set - Coffee Break
Gradient Cardstock Set - Summer
Afternoon
Other Supplies
Instant Dimension Foam Tape
Glue Tape
Fine Liner Pen Set
Fine Mister - Perfect Craftroom Companion
Mini Blending Brush
Liquid Adhesive
Red Jute Twine
Distress Tool

1. Create a 4 ¼” x 5 ½” card base from Classic Crest Solar White Cardstock.
2. Die cut the Craft-A-Flower: Stargazer Lily flowers out of yellow and pink cardstock, and the leaves out of brown cardstock. Create three different lily die-cuts.
3. Distress the petal and leaf edges using a distress tool for a slightly aged look.
4. Add shading to the petal bases and a little bit along the edges using Yellow Ochre Ink for the yellow flowers and Vineyard Berry Ink for the pink flower.
5. Spray all the inked elements with water, let the ink move, and blot them.
6. Assemble the flowers by stacking their layers and adhering them using liquid adhesive.
7. For a more realistic look, add black dots to the flowers using a black liner pen.
8. Create a panel out of Parchment Cardstock and tear the bottom edge to achieve a distressed look.
9. Ink blend the design from Tree Ring Stencil onto the panel using Espresso Ink and add some brown splatters to it.
10. Wrap red jute twine around the bottom part of the panel and foam-mount it onto the card base.
11. Adhere the Stargazer Lily flowers and leaves onto the panel using foam tape and glue tape.
12. Stamp a sentiment from the One-Go Birthday Greetings Stamp Set onto a piece of white cardstock using Obsidian Ink.
13. Die cut the sentiment with the coordinating die.
14. Adhere the sentiment die-cut onto the panel using foam tape.
BY THERESE CALVIRD

Press Plate and Die
Floral Engravings Press Plate
Fancy Hello Die
Ink
Frayed Leaf Fresh Dye Ink (from Green
Fields Fresh Dye Ink Set)
Cardstock
Classic Crest Solar White Cardstock
Jet Black Cardstock
A2 Cotton Cardstock Panel
Other Supplies
Ultra Sticky Double Sided Tape (1/2 inch × 50m)
Liquid Adhesive
Fun Foam

1. Create a 4 ¼” x 5 ½” card base from Classic Crest Solar White Cardstock.
2. Press the Floral Engravings Press Plate twice onto an A2 cotton panel using Frayed Leaf Fresh Dye Ink.
3. Die cut Fancy Hello Die out of black cardstock and fun foam.
4. Adhere sentiment die-cuts together using liquid adhesive.
5. Adhere the letterpress panel onto the card base using Ultra Sticky Double-Sided Tape.
6. Adhere the sentiment die-cut onto the panel using liquid adhesive.

BY ERUM TASNEEM

Stamp
Dainty Flowers Stamp Set
Ink
Obsidian Pigment Ink
Coloring Medium
Woodless Coloring Pencils
Cardstock
Classic Crest Solar White Cardstock
Toned Gray Paper
Other Supplies
Glue Tape
Must-have Gel Pen Set
Fine Liner Pen Set
1. Create a 4 ¼” x 5 ½” top folding card base from Classic Crest Solar White Cardstock.
2. On 4 ¼” x 5 ½” toned gray paper, stamp images from the Dainty Flowers Stamp Set using Obsidian Ink.
3. Use Woodless Coloring Pencils to color the images. Apply the White pencil to the tips of all the leaves, then add a layer of Lemonade pencil over it.
4. Use Limeade on the middle section of the leaf, and then apply Green Meadows to the base.
5. For the daisy-like flowers, apply the White pencil to the tip of the flower center, then cover it with Fresh Lemon.
6. To add shading, apply Maple Yellow and Orange Cream to the base.
7. Color the petals with the White pencil and then add a hint of blue using the Dew Drops Woodless Coloring Pencil.
8. For the six-petal flower, apply white to the petal tips, then add Fresh Lemon, extending it to the flower center.
9. Apply Coral Bliss next to the flower center, diffusing it into the yellow color.
10. For the cupped flowers, apply white pigment to the tips and then add Rubellite starting from the tips to the middle of the flower.
11. Apply Cosmic Berry to the base and extend it to the midpoint. Blend it well with the Rubellite to form a gradient.
12. Use Dew Drops to add a soft halo around the lower edge of the images, specifically around the stems and leaves.
13. Use a white gel pen and add dots of various sizes along the stamped images.
14. Stamp sentiment using Obsidian Ink.
15. Add faux stitching with a black pen around the edges.
16. Adhere the panel onto the card base using glue tape

A FRESH START

DYNAMIC DUO: ALWAYS SMILE

BOTANICAL WREATH BUILDER

CHECKERBOARD DAINTY FLOWERS


CRAFT-A-FLOWER: STARGAZER LILY FANCY HELLO


INLINE ALPHA ORNATE NESTING


HALFTONE CIRCLES NESTING

DAINTY FLOWER GARDEN FLORAL ENGRAVINGS


altenew.com blog.altenew.com
facebook.com/altenew
instagram.com/altenewllc
pinterest.com/altenew
youtube.com/altenew
tiktok.com/@altenew


