15 minute read
Blender 3.3 LTS
3D Graphics and Animation
Blender 3.3 LTS - 3D Graphics and Animation
Advertisement
An Introductory Guide
(The release 3.3 LTS, released in September 2022, will be supported until 2024)
Author:
Gabriele Falco
Copyright © 2022 - Gabriele Falco
All rights reserved. Names and trademarks mentioned in the book are registered by their respective owners. All 2D/3D computer graphics images are the work and property of the author unless otherwise noted gfalcoct@gmail.com librologica.it
Cover image: “The Immortal (chess)”
Rendered with Blender - Cycles
“Color is the shape of things, the language of light and darkness.
(Hugo von Hofmannsthal)
For proper display of the PDF, it is recommended to set the following options in the reader:
‘Two-page view’
‘Show cover page in two-page view’
Blenderis a popular free software that has gained a prominent place in the 3D computer graphics industry thanks to its powerful features. With a simple free download weighing just a few hundred megabytes, you’ll get everything you need to produce and develop any element or entire project in the field of 3D graphics. To take the first steps in this important branch of contemporary graphic art, you don’t need to own expensive workstations or software with licenses worth thousands of euros, as many of the personal computers on sale today in shopping centers have the power to start exploring the world of 3D rendering and computer animation, as well as the production of models and textures for the development of video games. Blender’s almost thirty-year history began in 1994 as a proprietary application of the Dutch animation studio NeoGeo; subsequently it was distributed to the public in freeware version, gaining a decent following of enthusiasts. In 2001, the crisis of the NaN company nearly caused the permanent interruption of Blender’s development, but this was avoided through an agreement with creditors that allowed the release of the code under the GNU license and the payment of one hundred thousand euros raised through an extraordinary fundraising campaign organized by Blender’s creator, Ton Roosendaal. And this is how today we can enjoy an extraordinary professional quality graphic application, constantly evolving and constantly updated, all for free. Currently, the Blender Foundation is leading the tireless work of developers that makes this software increasingly loved by enthusiasts. Blender is used in 3D modeling, animation and post-production of real films, photorealistic rendering of scenes depicting environments or buildings of architectural interest, and much more.
The following system requirements are indicated on the www.blender.org website
Minimum:
• 64-bit quad core CPU with SSE2 support
• 8 GB RAM
• Graphics card with 2 GB RAM, OpenGL 4.3
Recommended:
• 64-bit eight core CPU
• 8 GB RAM
• Graphics card with 8 GB RAM
The revolutionary 2.80 release has undoubtedly introduced Blender into the pantheon of 3D software. The break with the past was particularly evident especially for the lack of the famous rendering engine: Blender Render (also known as Blender Internal) and its related OpenGL preview (GLSL). In its place today is the prestigious real-time engine Eevee, scalable and intimately connected to the photorealistic Blender Cycles, with which it shares the PBR (physically based rendering) approach. The decision to abandon blender render after twenty years of honorable career initially appeared far too drastic, in fact until the 2.7x releases it still enjoyed many users. Just think that the animated film Cinderella the Cat (Italian: Gatta Cenerentola - 2017) winner of many awards was made with this engine. In reality, the scope and necessity of such a change is quite simple to understand.
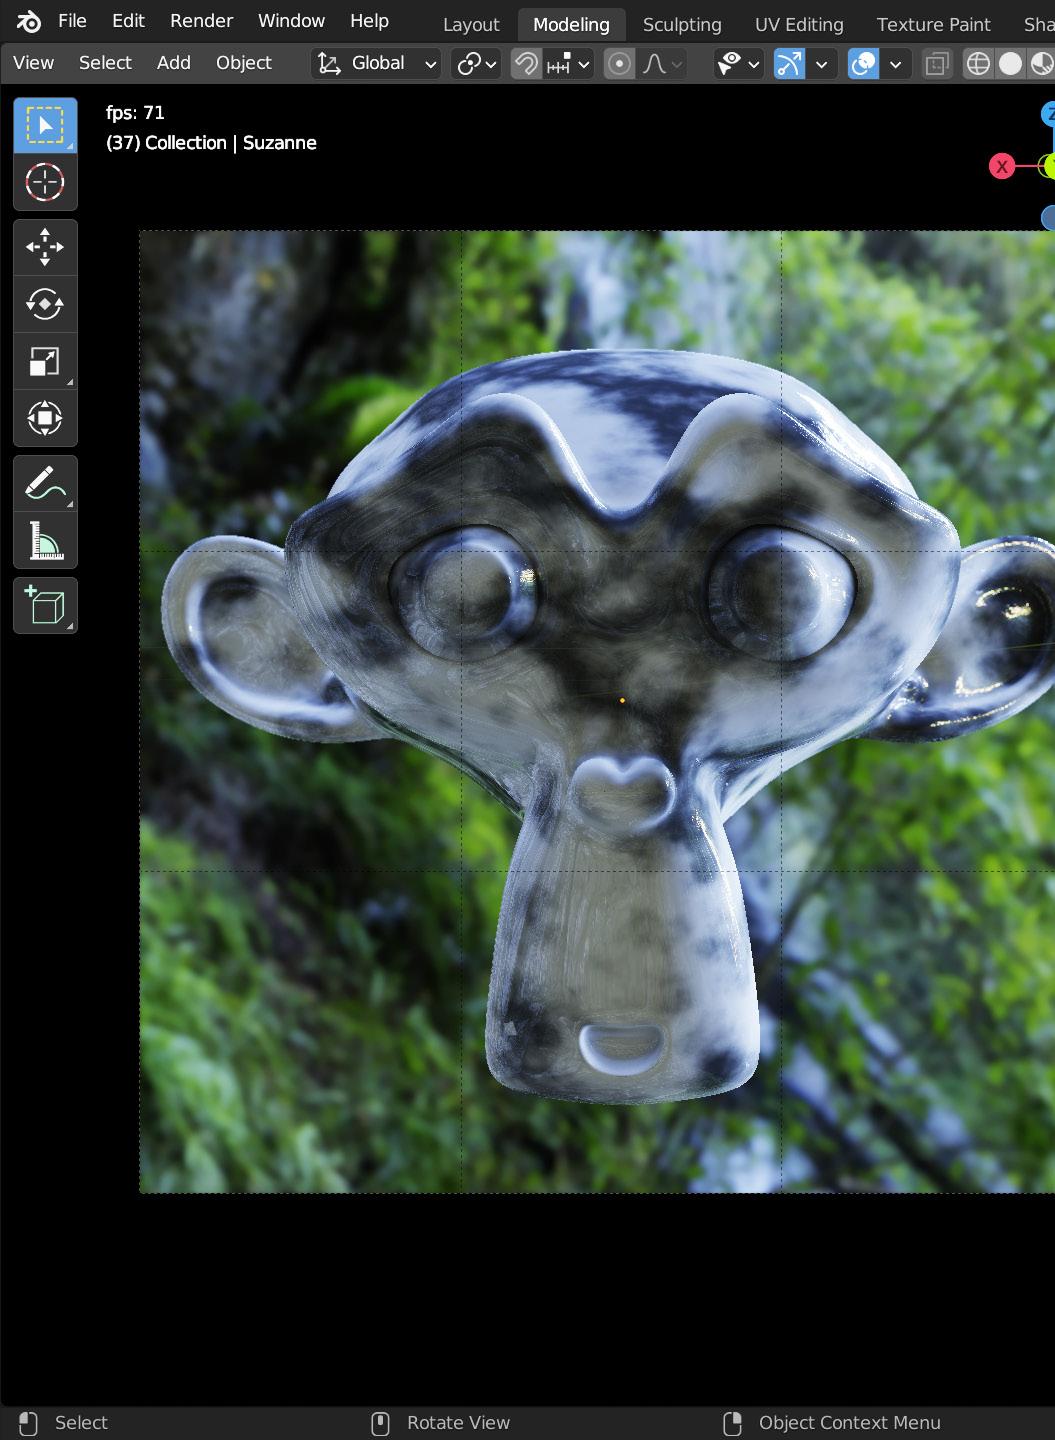
By observing the image above, you will notice two renders: on the right a scene originally rendered with blender render (release 2.79) while on the left the same scene rendered in real-time by the eevee engine. Yes, you got it right, eevee takes less than 1/60° of a second to generate an image similar to one that blender render takes several minutes of processing on a multi-core CPU. In defense of blender render, it must be said that to obtain a partially photorealistic rendering (certainly superior to that of eevee) it is necessary to activate a complex Raytraced algorithm very precise in the calculation of shadows and reflections, but also quite heavy. In Blender, the real photorealism will be obtained using the powerful Cycles engine, which uses the GPU and CPU together or individually. Although the Eevee engine is definitely indicated for non-photorealistic rendering or for generating partially photorealistic images, its usefulness is also to give the user an excellent real-time approximation of the scenes that we will finally render in Blender Cycles. To begin using Blender 3.3 and learn the fundamental techniques of 3D graphics, no previous knowledge or studies are required; it takes the right amount of passion for what has been one of the most fascinating fields of computer graphics for decades, together with a good dose of patience and a desire to experiment. Blender is primarily a tool for graphics, and as such its purpose is to make the artist productive after a reasonable learning period. Therefore, the initial knowledge of the theoretical foundations of 3D graphics, whose general concepts are presented in this guide with the practical analysis of examples of neither banal nor high complexity, is not necessary. You will not find entire projects to follow step by step as happens in many guides dedicated to graphic software of this kind. The reason for this choice is very simple: on the web there are already thousands of tutorials (almost all HD video) many of which are free that show how to achieve particular effects or how to create various types of 3D models complete with materials and textures. Therefore, I thought that a guide like this should primarily concern itself with leading the beginner (but also those who already have knowledge of similar software) on an ideal path of orientation among the many tools used in the field of 3D graphics. The main function of a software like Blender is the design of various types of scenes within a virtual three-dimensional space, where from a virtual observation point, we will obtain more or less realistic images called Renders. We can consider 3D rendering as perspective representation of any scene through the combination of four closely interrelated elements: light, shape, shadows, color. The main of our five senses is certainly sight, that is, the perception of the physical behavior of light (visible spectrum). Sight allows us to distinguish the shapes and colors of the world thanks to the property of light to be partially or fully reflected by surfaces (as well as absorbed and refracted by volumes) forming complex shadings that, together with the eventual projection of shadows on other surfaces, will highlight the three-dimensional shape of bodies. Despite the fact that many 3D artists like to create still images, the power of software like Blender is best applied in the creation of animated sequences. That is why we will come to study the principles of movement, both that determined moment by moment by the artist/director, and that defined by precise physical dynamics. First of all, we will deal with the form by exploring the basics of 3D modeling. Then we will delve into the remaining subjects: light, shadows, and colors, which all derive from the action of the rendering engine, whose purpose is, as mentioned, to transform the virtual scene into the digital images that will finally represent our project.
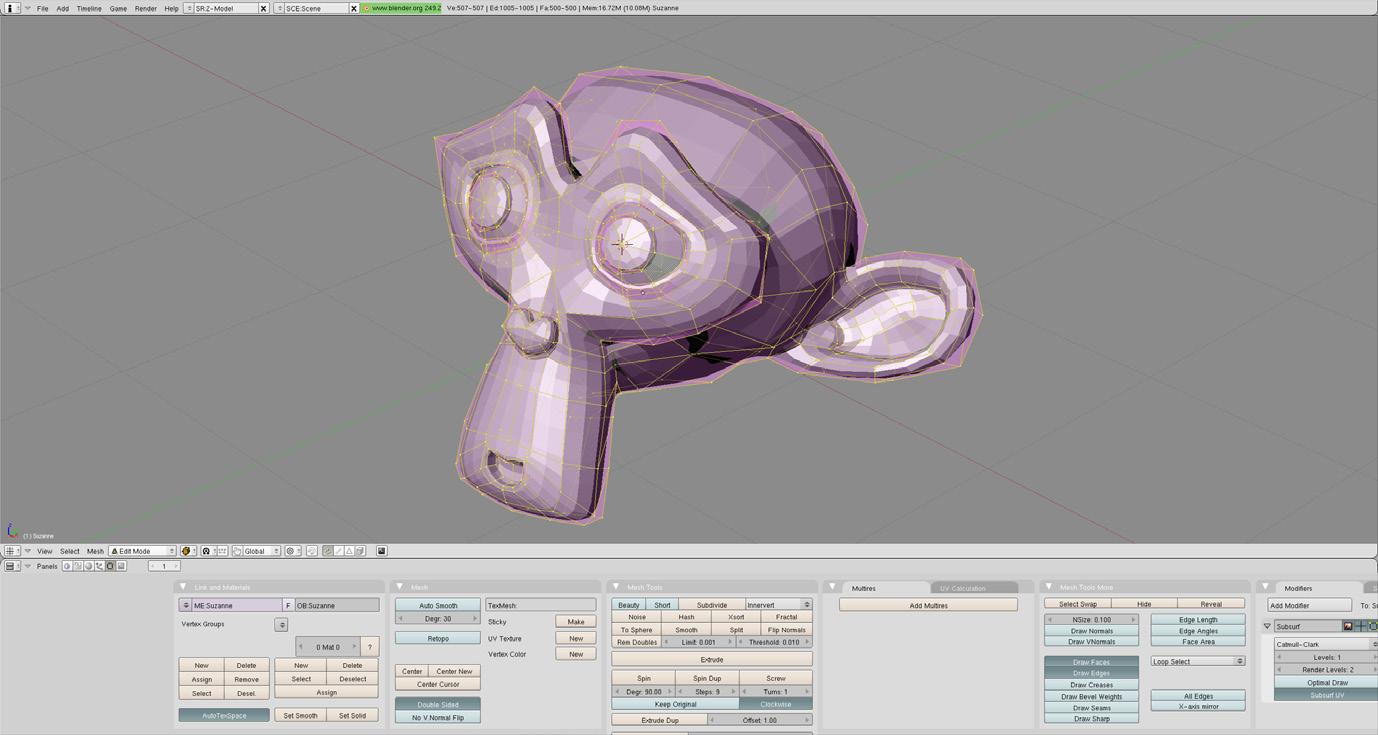
On this page, you can see a direct comparison between Blender 2.49 (at the top) and Blender 2.79 at the bottom. Although both releases share many tools, as well as the same base engine (Blender Internal), version 2.79 is much more advanced than 2.4x because it is the offspring of the great revolution that began in 2010 with the 2.5x releases that launched the now famous Cycles engine. Blender

2.8 (from which the current 3.30 release directly derives) was an even greater turning point than the one experienced years earlier, not only for the many technological innovations, but also for the investments in software development and other collateral projects such as open movies. The Blender Foundation, an independent and non-profit entity, now has its headquarters in an entire building located in the center of Amsterdam. The constant growth of the Blender universe is therefore an excellent guarantee for anyone who wants to start studying Blender, whether they are beginners or experienced artists in other 3D software.
Learning a complex software like Blender necessarily starts with studying its graphical user interface (GUI), whose understanding will certainly facilitate the use of many of the functions covered in the whole book. Until version 2.49, Blender was known not only for its power and versatility, but also for its difficult and not particularly attractive GUI. The user interface still reflected the origins of the program, which was born in the mid-90s as an internal application of the NaN company, and was not designed to simplify its use or study by a wide audience; this did not prevent the subsequent spread of the software and the subsequent formation of a productive community capable of proposing appropriate GUI modifications over the years, which finally resulted in Blender’s “modern” turning point, first with the 2.5x beta versions (complete code rewrite) and then with the stable 2.6x and 2.7x releases enriched with further modifications to the GUI itself. From Blender 2.8 we can say that the GUI has finally become a strength of the software that can attract new users, without ever intimidating the beginner.
We consider the initial screen of Blender as the composition of some distinct regions (which we will call windows). The one with the largest dimensions is the 3D View where the preview of our work is displayed. The areas of the interface highlighted in red (dotted) are visible regardless of the layout adopted and inside them we find various information about the scene and the commands related to the tools in use. The one at the top is the header with Blender’s main menus. From the file menu, in addition to the classic loading and saving functions, we can access some important import and export functions for 3D (including .3ds, wavefront .obj) and 2D vector (.svg) content.
At the top of the right side, we find the Outliner, which is the ordered list of all the elements present in the scene and divided into collections (by default we will find two, one of which with the three elements: camera, cube, lamp). By clicking on the icons on the right of the listed items, we can deactivate or activate them in order to make the object (or the entire collection) invisible in the 3D View. We can increase these restrictions by clicking at the top of the outliner, so that the filter menu appears with the various

Restriction Toggles
I recommend keeping the arrowhead icon always active, which makes the object selectable or not, and the camera icon to include or exclude the element from rendering. Objects selected in the outliner will also be selected in the 3D View. Below the outliner is the set of Properties: up to fourteen contextual tabs to be selected by clicking on the icons on the side. Some of these tabs are dedicated to the properties of the selected object (active element), others relate to generic properties of the Blender scene, such as the Render context.
At the bottom of the screen is the Timeline for animation control, a topic covered in Chapter 6. Going back to the main header, located at the top, we notice the presence of eleven tabs representing
Outliner
Properties
eleven workspaces, that is, predefined configurations of the GUI, designed for: modeling, 3D sculpting, UV mapping, texturing, shading, animation, rendering, and compositing (all topics that will be covered in the book).
Since Blender’s interface is fully customizable, we also find the + button to create new workspaces, for example by modifying the predefined ones. Also on the main header we see on the right two different selectors: the first concerns the possibility of choosing one of the different scenes that Blender allows you to manage simultaneously in a single project. Initially, this possibility may seem unnecessary to you as it is very likely that your project will only need one scene. The real usefulness of being able to manage multiple scenes will become clear when you start managing more complex projects, or when we understand the concept of Compositing. For now we can peacefully work on one scene at a time without worrying about this selector. The second selector concerns the View Layers, a topic covered later.


The size of any window can be changed by bringing the mouse pointer to one of its edges, where it becomes a horizontal or vertical double arrow.
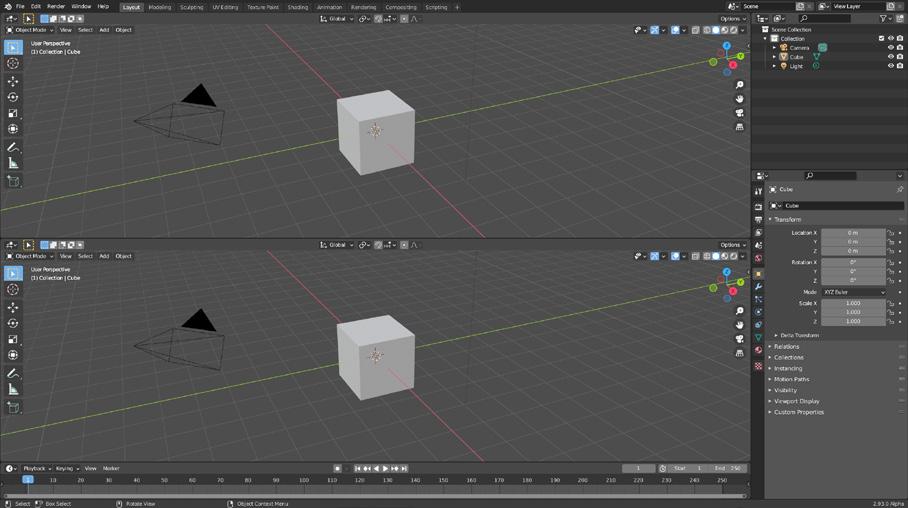
With the simultaneous press of the left button and the movements of the mouse, we will move the position of the edge by increasing or decreasing (up to canceling) the portions of the screen that this edge delimits. Instead, by bringing the pointer closer to one of the four round edges of any window, it changes to the shape of a cross at this point, by keeping the pressure on the left mouse button and moving it in the x and y directions within the window, we will create a new one (a copy of the original one). For example, let’s observe the images next to us, in the first one (at the top) I positioned the mouse on the top right corner of the 3D view, and then pressed the left mouse button dragging it towards the left. In this way I obtained a vertical division of the window. Conversely (second image), by dragging the mouse down, a horizontal division is obtained. What happens instead when we drag the mouse in one of the directions outside the window in use?
In this case, we will remove the one next to it (but only if both windows have the same size along the edge that delimits them). As you can see from the image below, by doing this with the mouse pointer initially placed on the top left corner of the right window and dragging the mouse to the left, the pointer takes the form of an arrow within the area to be eliminated.
It is also possible to change the position of the header of each window (that is, the bar located at the bottom or top in the various windows and containing the main menu options) simply by clicking on it with the right mouse button and choosing from the menu that will appear:
• Flip to Top (header at the top of the window)
• Flip to Bottom (header at the bottom)
• Show Menus (unchecking this will replace all menus with the icon )
At the top of this page, you will find as an example the very important header of the 3D View.
To change the nature of any window, you must click on the icon on the left in the header (the icon obviously changes depending on the window in use); the complete list of windows in Blender will then appear (image at the top right).

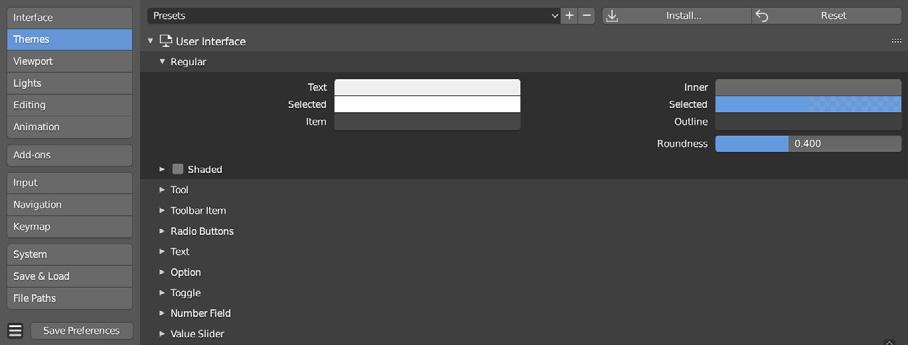
Properties, Timeline, and 3D View are already present in the Default layout. In the course of the guide, we will also delve into the windows: Compositing, UV/Image Editor, Dope Sheet, Graph Editor. Remember that of all the layout windows, the focus belongs to the one where the mouse pointer is positioned, and in it the header appears slightly lighter gray. You will find many options for customizing the GUI within the User Preferences, accessible from the main header’s Edit menu. The User Preferences panel is divided into 13 tabs full of options. We leave the default settings and go to the Themes tab where you can change the color combinations, choose between two presets (Dark and Light), or install different themes (XML). Personally, I find the default color combination (Blender Dark) optimal as it does not tire the eyes even after hours of work and the screen elements are always perfectly distinguishable. Using a high native resolution monitor (2K or 4K) makes the Display -> Resolution Scale setting in the Interface tab very useful. Increasing the value (which is set to 1 by default) will allow you to increase the size of both the fonts and the icons of the graphical interface to your liking.
A choice that awaits you at the first startup of Blender concerns mouse and keyboard controls. You can choose whether to keep the default setting that involves selecting objects in the 3D View with the left mouse button, or opt for the old Blender system used until release 2.79, which focused on selection using the right mouse button. Using the left button is a new feature (introduced in releases 2.8x) that aligns Blender with various mainstream software and is particularly useful for those using a touchscreen device with a graphics pen. The book will use this setting. If you come from old releases of Blender, I recommend getting used to it, or alternatively you can go to the Keymap tab and choose Blender 2.7x as highlighted in the image.
An immediate example of the modern setting is the Ctrl-Spacebar combination, which will cause any window with active focus in Blender to occupy the entire interface (or restore it to its original size if it has already been enlarged).
Another feature of the default keymap is the convenient Object Context Menu that appears on the screen when you right-click anywhere in the 3D View. It contains several frequently used options that we will see in action in the next paragraphs and chapters.

One important tab in the User Preferences is the Add-ons tab, where we will find a list of all the additional (plug-in) functions of Blender that can be activated by checking the box to the right of each entry. Some add-ons are official and active by default (such as the Cycles rendering engine), while the majority are inactive because they are unofficial add-ons, i.e. produced by the community, and the choice of making them available in Blender is left to the user. Scrolling through the list of add-ons, you will realize that there are many additional functions and they are divided into several categories that can be viewed by clicking on


At this point, you just need to do some field testing to realize how easy it is to dynamically transform the layout, depending on the type of work you are doing. Blender breaks the classic schema of 3D software, whose roots date back to about thirty years ago, and puts the Viewport at the center of attention, helping the artist from the start to get into the mindset useful for manipulating and transforming objects directly in the 3D view; an example of this is the default absence of the classic quad view, optional in Blender (CtrlAlt-Q), which divides the screen into four parts for a simultaneous view of the three orthographic projections plus the frame reserved for the perspective view.
To conclude the paragraph dedicated to the GUI, it is necessary to point out to anyone who has a second monitor the useful possibility of duplicating the Blender window in order to work on a single scene using two different layouts of the interface at the same time. This is possible from the Window menu simply pressing the R key and then moving the mouse to rotate the cube around a certain axis (we don’t need to know which one at the moment) and then confirming and completing the rotation with a left mouse click; keeping in mind that the Esc key cancels the ongoing rotation, while the Undo (Ctrl-Z) transformation has already been completed. The orientation for the transformations is chosen by clicking the button:: with which the list of available transformations appears: Global, Local, Normal, Gimbal, View, Cursor. The trio of vectors of the Global orientation is always visible in the Gizmo at the top right of the Viewport.
The3D View is the Blender window where you can insert and modify the various elements of the scene, interacting directly with them within the preview called the Viewport. At startup, the default scene consisting of a single primitive element, the cube, along with a camera and a point light source is visible in the 3D View. You will notice that the icon of an arrow inside a square is active by default at the top left of the 3D View. The icon below it, a circle, is inactive (both cannot be active at the same time). The first indicates the selection mode (Box), which means that to select any object in the 3D View, you must click on it with the left mouse button (Shift + left mouse button, or left mouse button on an empty area, to deselect). The selected (active) object is highlighted by an amber border. The two icons seen previously belong to the 3D View Toolbar (which appears/disappears when the T key is pressed). In it, we also find the icons related to the three basic transformations: Move, Rotate, and Scale (from top to bottom).
This other icon instead activates all three transformations listed above. With the default cube selected, we activate the Move transformation. Three red, green, and blue vectors appear, indicating the orientation for the transformations. By default, these vectors are aligned with the x, y, and z axes that define the Global space; we will see immediately that it is also possible to use a different and important Local space, the one integral with the object.
To better understand what this is about, we select the cube and rotate it in 3D space. You can do this by in the center of the 3D View header,

In the Global system, the vectors remain fixed regardless of the orientation or rotation of the object. In the Local reference system, the three axes remain anchored to the object during any rotation.
In the View reference system, the blue vector (z) is always directed towards the point of view: a system useful for translating the object along the x and y directions orthogonal to the direction we are looking in. We will address the Normal coordinate system later on.
The type of options present in the 3D View change depending on the mode in use, which is by default the Object Mode, useful for:
• Inserting primitives into the scene
• Transforming the main attributes of any object such as size, position, and orientation in space
• Creating relationships between objects in the scene.
To change the mode, simply click the button: in the header and choose from the menu that appears on the screen. Immediately after the Object Mode, we will explore the fundamental Edit
Mode where we can modify the object’s geometry by precisely acting on each individual vertex. In the guide, other interesting modes will also be illustrated, such as the Sculpt Mode, Texture Paint, and Vertex Paint.

