1 minute read
SOME PHOTOSHOP INSPIRATION by Andrew Haysom
The Sky Replacement dialog offers four tools, the use of three of these is fairly self-explanatory, The Move Tool allows you to move the sky around (you may have to scale it up first to avoid the edges showing as you move it), the Hand Tool allows you to move your image window around and the Zoom Tool to zoom in an out.
The scale, orientation and position of the sky can all be modified later using the Move/Transform tool on the Sky layer. Note that the mask on the Sky layer is already unlinked from the image so you don’t need to worry about it moving.
The final tool, the Sky Brush allows you to paint in and out the sky. Here you are essentially painting with a black or white brush on the mask of the Sky layer, with a brush that has been put into Overlay mode for you. Overlay mode means that when painting “in” the sky (same as painting mask with white) you will only affect areas that are lighter than 50% grey, and when painting out the sky you will only affect areas that are darker than 50% grey). Obviously, this can also be done later, and is probably easier to do later once you have visually examined the mask.
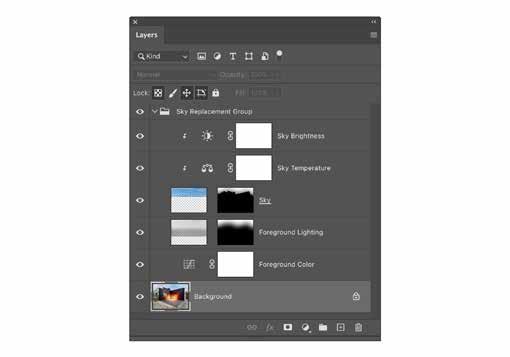
Figure 4 shows the Sky Replacement layer group that is created with the tool. Obviously you can also change it’s opacity to “tone down” the replaced sky if required.
[Figure 4 – Sky Replacement layer group]

Overall I think this tool does a good job, but not as good a job as doing the job totally manually with Luminosity Masks, but it is much quicker, and with some careful tweaking of the layers afterwards a very good result can be had.
Andrew Haysom


