
6 minute read
TOUCH SCREENS


We continually strive to bring you the highest quality, full-featured products . As a result, you may find that your actual display screens may be slightly different than what is represented in this manual at the time of printing .
CARE AND MAINTENANCE
General maintenance is not required; however, a soft cloth can be used for cleaning the unit . Window cleaner or alcohol can also be used to clean the glass portion of the display . Do not use harsh or abrasive cleaners on the unit .
BASIC NAVIGATION FUNCTIONS
Press the menu button in the lower left hand corner on any screen to switch between the Cruise, Stereo, Go Touch and Switches screens . TOUCH SCREENS | 56
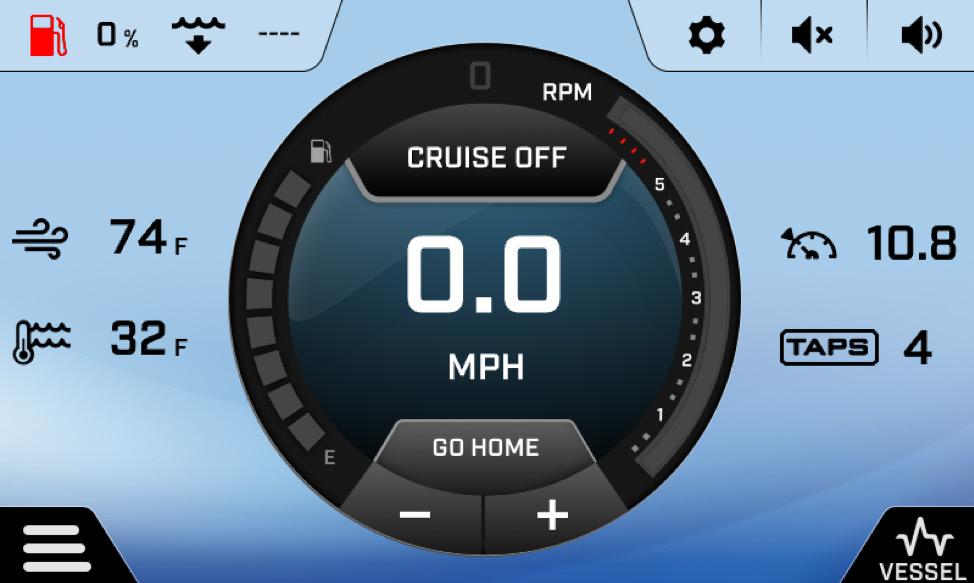

CRUISE STEREO GO TOUCH SWITCHES
FIRST PAGE: MAIN/HOME SCREENS
When the screen is powered on, the cruise control screen will pop up by default . This screen contains the following information and controls: • Paddlewheel Cruise Control Settings (ZeroOff GPS Cruise Control available as an option) • Configurable settings (Persists on all pages) • Fuel Level (Persists on all pages) • Water Depth (Persists on all pages) • Air and Water Temperature (Persists on all pages except stereo) • Volume level and mute button (Persists on all pages) • Current speed • Go Home Button • Cruise Control Set Speed (Persists on all pages except stereo) • TAPS Position (Persists on all pages except stereo) • Screen menu button (Persists on all pages) • Vessel information (Oil Pressure, Engine Temp, Battery Voltage(s), and Engine Hours) (Persists on all pages)
CRUISE CONTROL
The cruise control can be toggled off using the Cruise On/Off button . The button displays the current state of the cruise control . To adjust the set speed, use the +/- buttons below the speedometer . TOUCH SCREENS | 57
FUEL LEVEL AND DEPTH CRUISE ON/OFF CONFIGURABLE SETTINGS VOLUME CONTROLS
SCREEN MENU BUTTON CURRENT SPEED GO HOME BUTTON
PADDLEWHEEL CRUISE CONTROL SETTINGS
TAPS POSITION
VESSEL INFORMATION
SECOND PAGE: STEREO SCREEN
To turn on your stereo, navigate to the stereo screen through the screen menu button and press the stereo on/off button at the top of the screen .
The ATX stereo can play music from a Bluetooth device, AM/FM Radio, or NOAA weather radio . The sources are selectable by pressing the appropriate button on the edges of the screen .
AM/FM Radio AM/FM radio stations can be saved as favorites . To do this, tune to the station of your choice, and press and hold the number you would like to associate with that station .
Bluetooth To pair a Bluetooth device, turn on the stereo and select the Bluetooth input on the right side of the screen . Press the “Connect a Device” button in the center of the screen . Either choose a device from the list of previously paired devices, or scan for a new device . If you are pairing a new device, make sure you have the Bluetooth settings open on the device and it is discoverable . When the screen finds your device, press the + button next to its name, then press pair on your device when prompted .
Devices can be forgotten from the same list where they are added . Simply press the X next to the devices name to forget it . TOUCH SCREENS | 58


Zone Controls There are 3 possible stereo zones on your ATX sound system: Interior, Sub and Tower (if equipped) . Each zone’s volume can be controlled individually . To do this, select zones at the bottom of the stereo screen .
The volume of each zone can be adjusted using the sliders . You are also able to mute each zone individually by pressing the mute/unmute button to the right of each zone slider .
There is also a master volume slider that works as a multiplier for the zones . For example, if your interior volume is at 50%, and your master volume is at 50%, your interior speakers are at 25% of their possible output . For maximum volume, ensure all sliders are set to 100% .
Auto Volume A useful feature for using the stereo while enjoying watersports is Auto Volume . Auto Volume allows the stereo to be at a low volume while the boat is moving at a slow speed, and a higher volume while the boat is moving at a faster speed . To adjust the set volumes and speeds, press the settings button in the bottom right hand corner of the stereo screen . In this menu, you can choose your maximum and minimum speeds, as well as maximum and minimum volumes . Once you have adjusted your settings, toggle Auto Volume to on . The volume will now automatically adjust according to your speed . TOUCH SCREENS | 59


THIRD PAGE: GO TOUCH CONTROLS
To enable the Go Wake, Go Ski, or Go Surf system, navigate to the Go Touch screen through the screen menu button . When you first navigate to this screen, you will see 3 options above the word go . Select what you would like to do, and then press go .
Go Wake/Go Ski When Go Wake is enabled, the first choice you will need to make is Beginner, Intermediate, or Pro . Your choice affects the initial speed and TAPS plate position . Speeds and positions vary by model . Once a selection is made, the system will automatically set your cruise control and TAPS plates . The Go Ski setting is very similar to the Go Wake setting . Choose beginner, intermediate or pro and the system will set your TAPS and cruise control appropriately .
Go Surf When Go Surf is enabled, the default is set up to surf the port side of the boat . To switch sides, press the right arrow near the Go Surf indicator . The default values for the Go Surf system will yield a steeper, larger wave . The height/ length of the wave can be adjusted using the Mellow-Steep keys or the Wave Tune button . The Mellow-Steep keys alter the position of the outer TAPS 3 plates and Wave Tune adjusts the position of the center TAPS plate . To adjust the center TAPS plate, you can either use the rocker switch on the throttle or press “Wave Tune” and use the +/- buttons . The Go System is set up to give a good starting point for each watersport .
Depending on boat loading and personal preference, you may need to adjust from the default settings provided . Cruise control can still be manually adjusted on the cruise page .
To exit out of the Go System and regain manual control of the boat, press the icon at the top of the circle that shows which Go System you are using . This will bring you back to the initial Go Touch screen where you can then select off . TOUCH SCREENS | 60


FOURTH PAGE: SWITCHES SCREEN
This screen contains the controls for many of the optional accessories on your ATX . See the full list of potential options below . Contact your ATX dealer if you would like to add any of these options to your boat .
• Courtesy lights (Standard) • Docking lights (Option) • Heater (Option) • Speaker lights (Option) • Underwater lights (Option)
The brightness of the courtesy lights can be adjusted by using the +/- buttons . TOUCH SCREENS | 61


