
21 minute read
Virtual Desktops

from AUGIWorld
by AUGI, Inc.

➲We’ve heard it many times: Virtual Desktops (VD) are going to be the future. Those of us who use Revit enjoy laughing at that statement. We’ve tested them and had countless problems with Virtual Desktop Infrastructure (VDI) Graphics Processing Units (GPUs). Or, ran into limitations with Revit as Revit only utilizes one core of a GPU, so why pay for a VD that can handle heavy work loads when it would be underutilized. We’ve also had some less-thanfun interactions with Remote Desktop Connections (RDCs) and Virtual Private Networks (VPNs).
WHAT IS VDI?
If you are – or were – anything like me, those series of words and acronyms would send me running. My eyes would glaze over, and I would think ‘this is for IT’. Well, if you are – or were – also like me, you’ve experienced how BIM and IT have a sordid history. Since I know where you’re coming from, I’ll make the following as painless as I can!
VDI is the concept of taking a localized computer system, or resources, and putting them on a server. This server can be local to a company or cloud based and hosted around the country, or even world. VDI has been around for a while – so long that it has a connotation in our head usually around an old server in our IT person’s closet office.
Virtual Desktops PRODUCT FOCUS
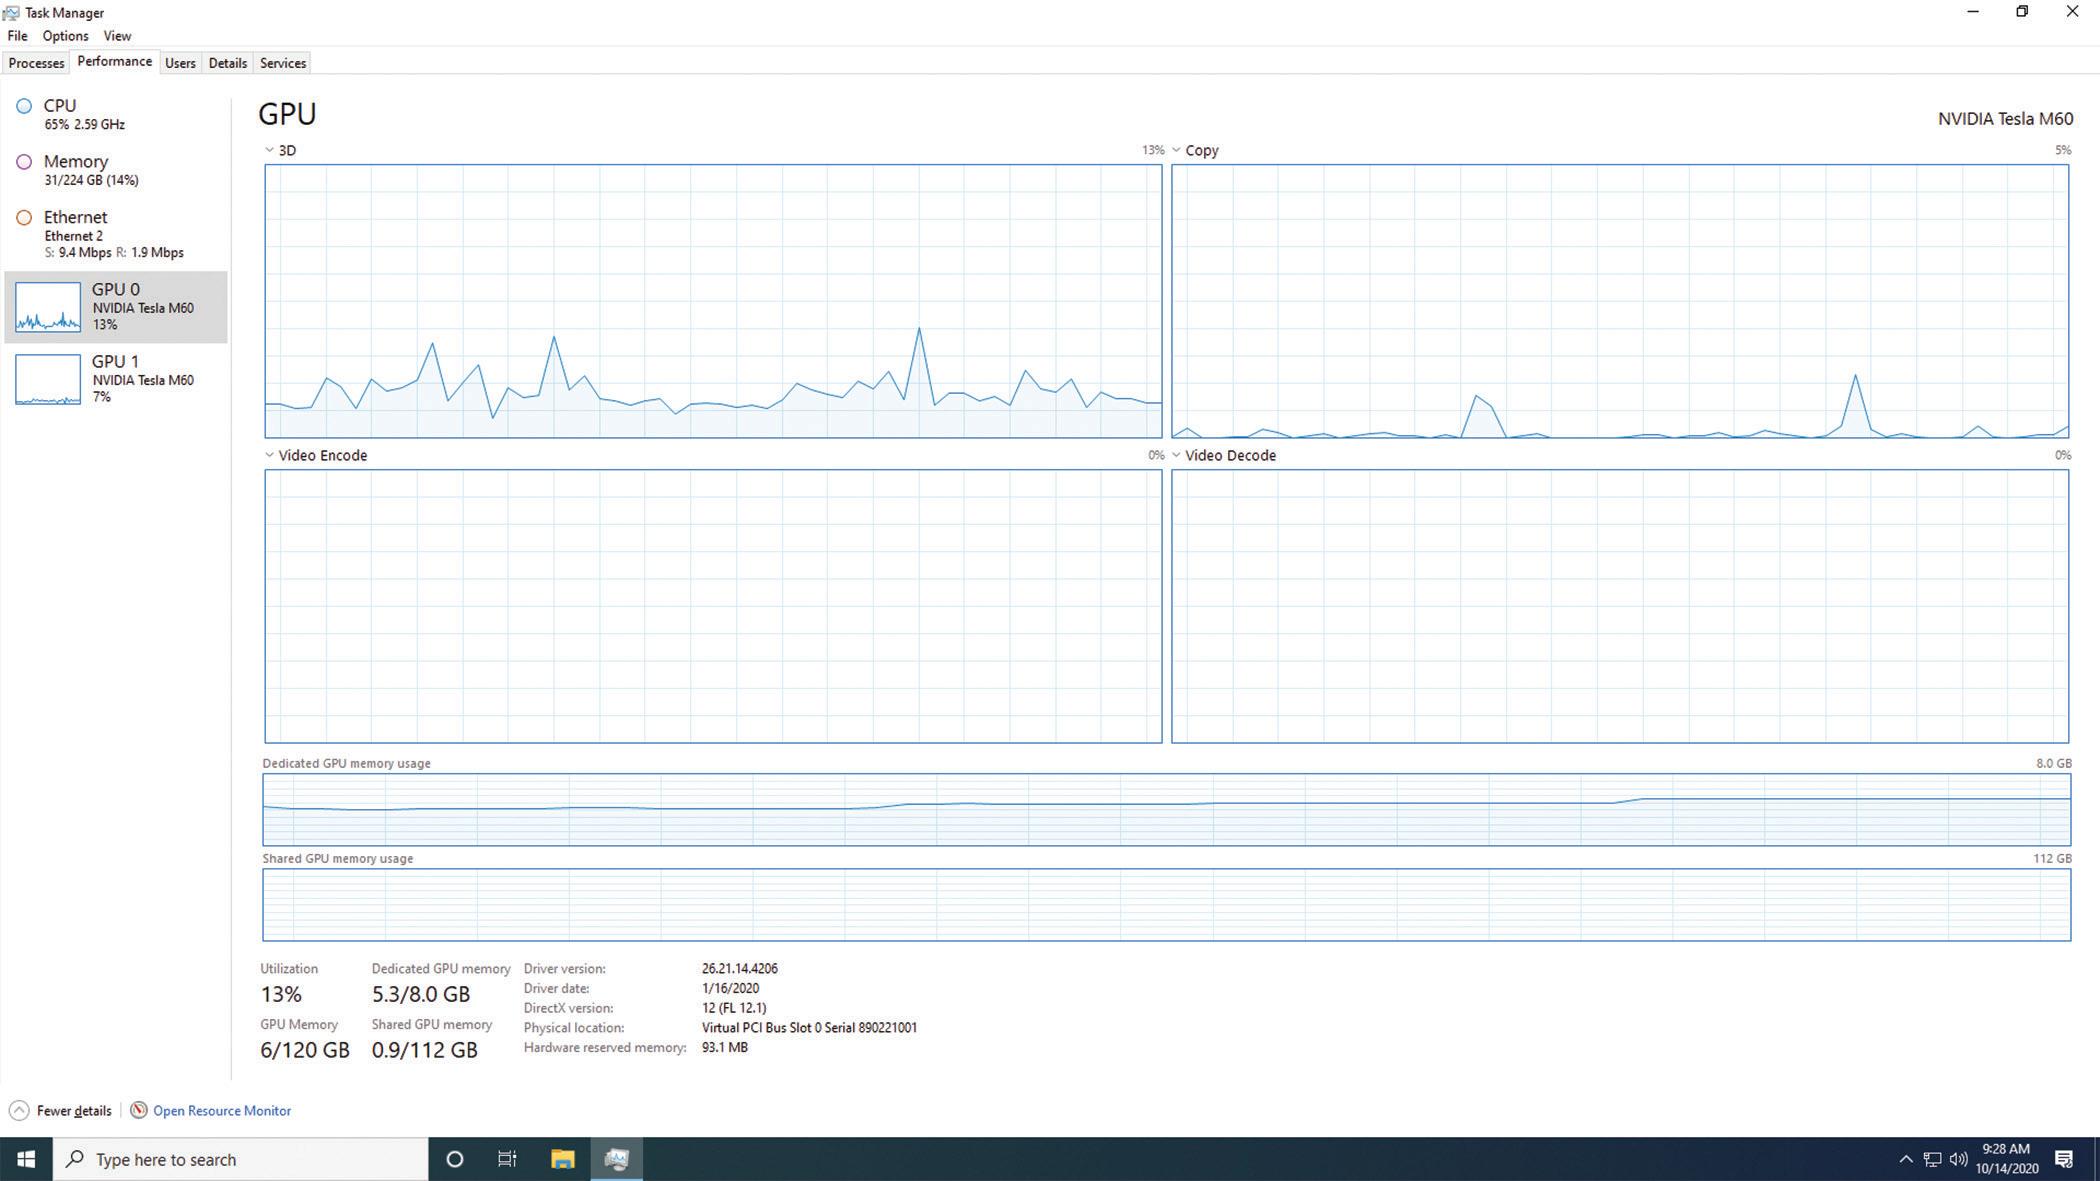
Figure 1
Today, you are far more likely to hear “Virtual Desktop” in association with the company that you are purchasing the solution from. For example, WVD or Windows Virtual Desktop. Virtual Desktops are smoother and more cost efficient than ever.
Today’s Virtual Desktops have multiple users accessing a shared pool of resources from a host system or network of host systems capable of handling all anticipated users. Host systems are usually made up of servers, which are interconnectable computers dedicated and optimized to perform specific tasks. The host system or network provides whatever processing power and memory is needed for its users, scaling up and down dynamically. How is that even possible? As demand grows, additional hardware resources are engaged to meet the demand. Over time, as the user base and software needs grow, hardware is added or upgraded (figure 1).
Each user has a local profile on this ‘supercomputer’ and functions as if the user were entirely on their own computer, but they can access it from any computer remotely (figure 2).
WHY WOULD YOU USE A VIRTUAL DESKTOP?
Virtual desktops alleviate a lot of IT Infrastructure challenges.
Are you having issues with bandwidth or connectivity when doing work remotely or over VPN? Virtual Desktops are a window into work that is actually happening in the remote host system. There’s no need for enormous files to be transferred back and forth over the user’s personal network connection. The files, software, and resources are in the same bubble, with optimized connections to each other. This effectively bypasses bottlenecks from VPNs or your personal computer’s network.
Have your IT costs gone up more than anticipated trying to keep up with software demands? With Virtual Desktops, you do not need a high-end computer for every user to connect to the host system. You can have a thin client (cheap computer) connect with a Virtual Desktop further reducing hardware costs. Virtual Desktops are also scalable, so you only pay for what you need when you need it. Within a short period of time, a baseline of the costs and usage would be established and therefore it is highly predictable. Think of it as a monthly subscription cost or fee instead of an upfront capital expense.
Is it difficult to keep everyone updated, on the correct versions, and to troubleshoot when there are differences and quirks that accumulate between every user’s computer? Virtual Desktops give your IT team centralized control over deployment, management, and updates with a lower failure rate. End-user experience is customizable, but access control is centralized. If something goes wrong, a new profile can be ‘spun up’ to allow a user to keep working while Virtual Desktop with an issue can be tested and sent through the troubleshooting battery of tests. That means less down time.
Have you tried a VDI solution before and had problems with multiple monitors? Today’s Virtual Desktops support that!
PRODUCT FOCUS Virtual Desktops
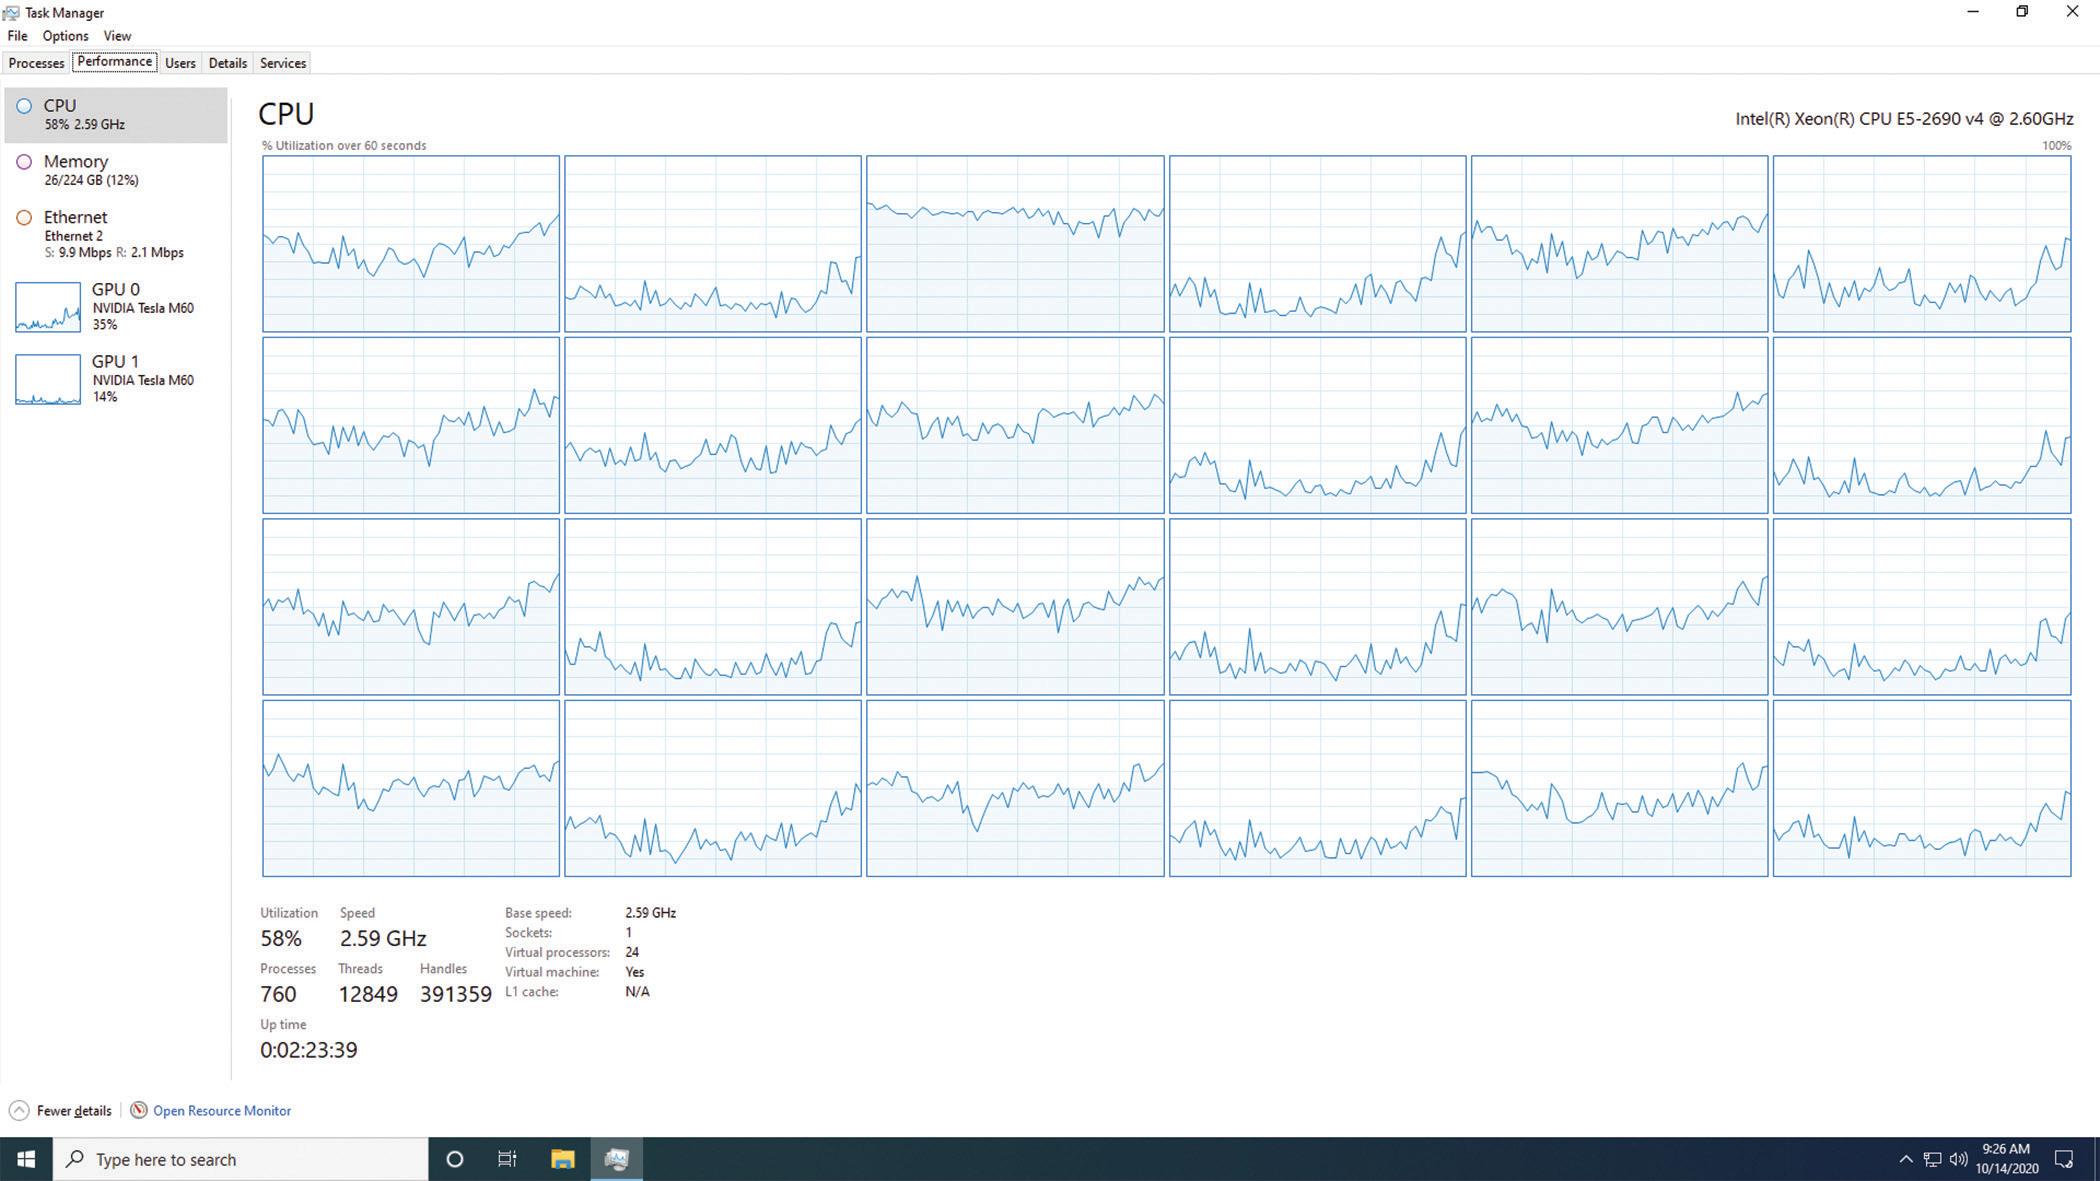
Figure 2
Figure 3
WHAT DO YOU NEED TO CONSIDER ABOUT VIRTUAL DESKTOPS?
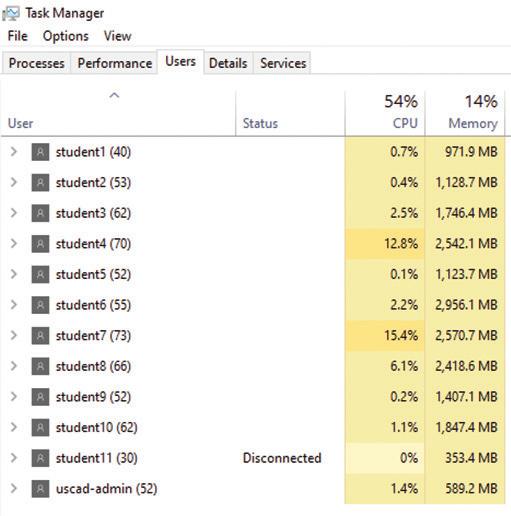
Licenses. If you decide to go with a Windows Virtual Desktop, every user will need a Windows 10 Enterprise account. This is one of the ways WVD stands out. WVD runs on Windows 10 with elements of Windows Server built in that allow multiple concurrent interactive sessions. Every user will have their own Windows Profile. Autodesk also requires Single-User Sign On (figure 3).
Usage. You will need to have a good idea of the number of users, the applications required, and the uptime your organization would need. Uptime being the time your users would need access to the systems. Starting off with more than enough resources to meet demands is important for success, adoption, and getting that baseline cost as accurate and quickly as possible. You can always scale down later.
Training. This is not a big consideration but should be talked about. Users will need to understand which icon/software to open – so many symbols and names are similar. Further, if you do not have device redirect/passthrough as a solution, users will need to know how to get data from a local USB or other drive to the Virtual Desktop. The option to passthrough and connect the physical desktop to the virtual desktop is a real time and sanity saver!
WHAT CHALLENGES EXIST WITH VIRTUAL DESKTOPS?
There are still minimum network and IT infrastructure requirements. Users will need their networks to handle 15/15 Mbps with 150ms latency or less. What is that? The 15/15 is referring to the upload and download speeds of your internet. Mbps is Megabits per second. Most users in urban and suburban areas who have internet at home should be able to get this easily. 150ms is saying 150 milliseconds. And finally, by latency, that is the delay between
the time you click and when something happens. Humans start to notice and get annoyed at a delay of more than 150 milliseconds (which is less than half the time it takes you to blink an eye!).
Traditional VDIs may have additional issues. For example, custom commands on a computer that a user has programmed may not translate to the virtual desktop. WVD has a lot of those hiccups worked out.
FINAL THOUGHTS
Windows Virtual Desktop works with Azure (a cloud storage solution) to make it virtually seamless to transition to a virtual workspace instead of a robust physical one. U.S. CAD uses this solution for our training: USCAD Cloud Workstation. We also have guest accounts set up for testing, demoing, and use for those who might be interested in seeing if a solution like this would work for them.
Local outages are less of a problem. With backups and redundancies handled by an off-site provider, less things go wrong and for a shorter time period, without the need for intervention by your internal IT team.
A technology partner can provide a Turn-Key Implementation service to help get everything set up, including configurations, deployments, and application installations while providing Best Practices and Tips to end-users. They can even help set up timebased scaling of the solution or autoscaling by threshold numbers. Remember, you pay for the uptime! Use these options to keep that cost as low as possible. Brian Smith is a Cloud Solutions Specialist with many years of IT experience. He works with Panzura, BIM 360, Office 365, Azure, AWS, and more. He is skilled at interacting with all levels of personnel within an organization and can address client concerns quickly, accurately, and efficiently. Mr. Smith helps clients with consulting, configuration, and deployment of cloud services to meet their current and future IT needs. Brian brings the knowledge of an IT Manager for Systems Administration, Software Deployment, User Management, and Virtualization together to make sure Cloud Solutions meet the needs of clients. Mr. Smith has assisted U.S. CAD’s clients throughout their cloud solutions product lifecycle, including: introduction, demonstration, proof of concept, deployment, configuration, training, support, upgrades, and expansion.
Andrell Laniewicz has working in the VDC world since 2011. During this time, she has been involved in everything from Model Coordination, 4D, 5D, and Quantification to Proposals, Site Logistics, and more. She has worked for General Contractors and MEP Design to Fabrication firms. She has taught BIM for Construction Management at Universities, presented at Autodesk University and BiLT, and consistently delivers social media content. At U.S. CAD, Andrell works with clients to evaluate their existing workflows, implement solutions and technology, and providing training to get clients to their ultimate end goal. She focuses on Revit, Navisworks, BIM 360, FormIt, and MSuite within Architecture, Construction, and Fabrication. She has her Certificate of Management in Building Information Modeling from AGC of DC.
PRODUCT FOCUS Civil
Drones - Accuracy and Opportunity for Surveyors

➲Drones, drones, drones! Over the past few years this may be the biggest industry trend for land surveyors and civil engineers. And, probably just as important of a shift as GPS data collectors.
I started a surveying firm in 2010 with a focus on ALTA surveys, general boundary and topo projects, mass volume calculations, as well as construction staking. We then got into a little LiDAR scanning. Then, we really jumped into aerial data capture about 5 years ago and have never looked back!
I love data capture, whether from the ground or from the air, and trying to keep up with the daily technology trends and advances can sometimes be overwhelming. I thought I would put together this article on some of the lessons we’ve learned over the past few years when it comes to utilizing a drone in our survey department.

Figure 1

INDUSTRY CHALLENGES
Talent Gap - Some things we face daily in the survey industry is the talent gap that seems to be getting wider and wider every year. Here in the State of Utah, the average age of a licensed land surveyor is 57! The year over year decrease in licensed surveyors throughout the western states has been cut almost in half in the past decade, which is alarming in many ways. Getting kids 13-17, college aged students, and even the non-traditional 30+ crowd interested in a “blue collar” career isn’t easy. However, with the rapidly increasing use of drones for survey, I can see an upward trend of younger men and women getting excited about the world of land surveying.
Schedule - Resolving schedule conflicts to meet client deadlines has always been a juggling act. Just as with everything else in life, people want and demand immediate results. Clients, rightfully so, want their project to be #1 priority, no matter the scope or size. Deploying drones can help speed the data capture up, getting near immediate results and actionable data in a fraction of the time as traditional field gathering.
Safety - Keeping crews safe when working on hard-to-access projects like steep terrain, busy rights-of-way and fenced yards is always a priority. Couple that with the average age of surveyors, and you may struggle, or even pass on projects that have any sort of physical barriers. Gathering data from the air can supplement those hard to survey areas and keep your crews safe from some of these project types. Adding drones to your toolbox helps address each of these challenges.
Important Note: !! Drones are NOT a replacement for your field crews!!
THE EQUIPMENT
For the sake of this article, I will not get into RTK drones or LiDAR drones, but will focus mainly on photogrammetry. I also will not tell you that you HAVE to buy XYZ drone.
Aside from your standard day to day survey equipment, the selection of drones in the marketplace can be pretty overwhelming! It seems like every day I am sent a new article or news story about a new drone hitting the market. I have used several different drones over the past few years. Some that I have used are:
DJI Phantom 4 Pro (v2) – This is a fantastic drone for just getting started, and your accuracies for most project will be more than acceptable. And at the price point you can afford to take the training wheels off and not be afraid to crash! There is also a great entry level RTK option with the P4P. DJI Inspire and/or Matrice 200 – These drones are bigger drones with a few more capabilities such as interchangeable cameras. The Inspire and the M200 can swap payloads out. For our stuff, we use the x4s and x5s camera, as well as an additional camera for thermal needs.
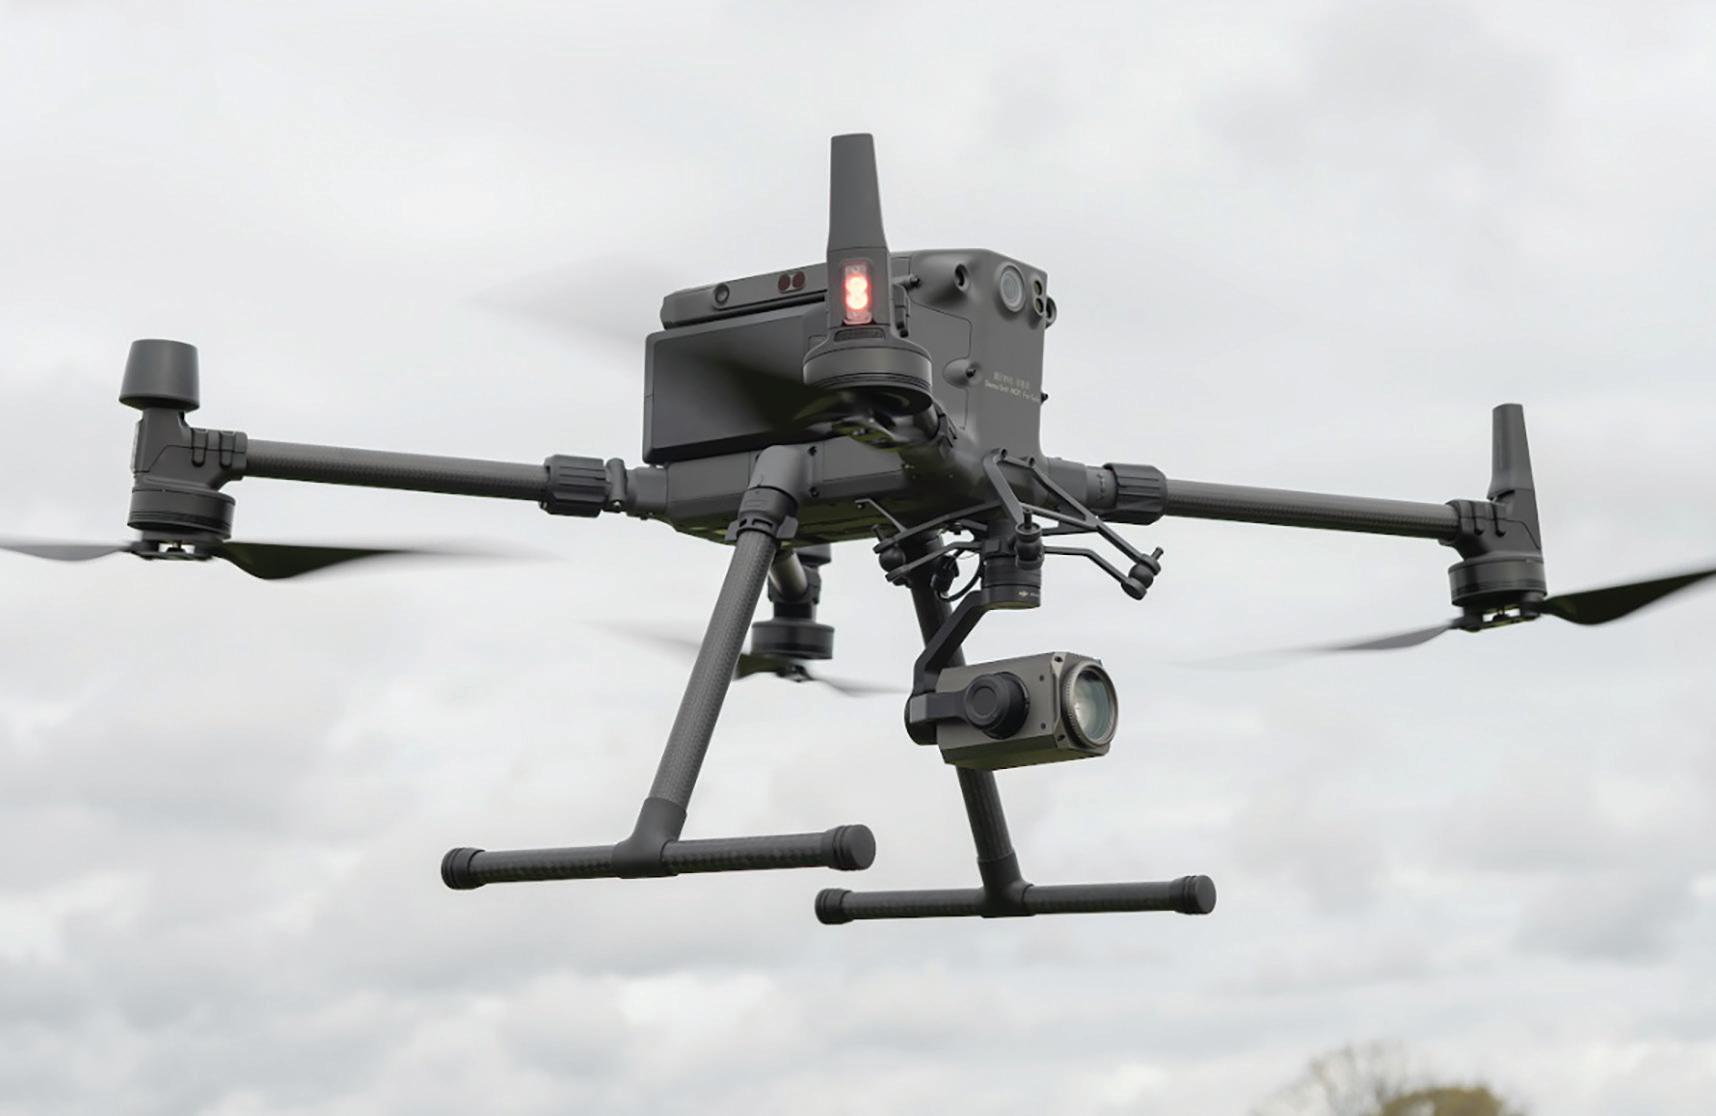
DJI Matrice 300 w/ RTK – I just got one and will let you know soon on what I think! Yuneec H520 – Even in high wind environments, which we face a lot, this drone has held its own when it comes to data quality, battery life and stability. SenseFly eBee and WingtraOne – For fixed wing drone enthusiasts, these seem to be very popular options.
THE ACCURACIES – COMPARING ACCURACIES
Clearly the most important thing in land surveying, in my opinion anyway, is ACCURACY! I believe this to be one of the main reasons surveyors are hesitant to add this tool to the toolbox. There are 2 different accuracies to consider when capturing data.
Absolute accuracy is the amount of error between a model and a known point on planet earth. Absolute accuracy must be measured against a global coordinate system, such as NAD83 or WGS84.
Relative accuracy effectively measures the accuracy between points within a single project. For example, if you need to measure a building footprint, it does not matter if that footprint is in Utah or Arizona as long as the measurement itself correct.
Factors that contribute to accuracy issues:
• Flight Altitude – (Careful!! – Low Flight could lead to GCP issues) • Overlap – 75 frontlap x 75 sidelap is ideal but could be brought down to 70x65 if needed. • Lighting - (Poor or Inconstant – Shadows/Bright Lights) • Type of Terrain - Vegetation v. Hardscape • Geography / Topography - (Steep (without proper GCP /
Flight Planning) • Quantity of Ground Control (Proper Distribution of GCP) • Camera Quality – In my opinion, although important, this is the least important of all factors. If other sources of error are present, then a better camera will NOT improve accuracy at all. A 20mp camera with proper workflow should yield extremely accurate data.
What is GSD? You will hear, or have heard, the term GSD when it comes to drone flights. This is something you will want to be aware of when fully understanding accuracies. The Ground Sample Distance is the distance between center points of each sample taken of the ground. So basically, the GSD is how big each pixel is on the ground. The GSD is determined by the geometry of the camera and its altitude above the ground. Here are a couple of calculators I like to use when calculating GSD. • https://www.propelleraero.com/gsd-calculator/ • https://support.pix4d.com/hc/en-us/articles/202560249-
TOOLS-GSD-calculator

Figure 3 shows a screen shot comparing accuracies via total station, RTK GPS and Photogrammetry.
TIME TO TAKE FLIGHT
There are many softwares out there for flight planning/mapping. We will discuss the processing software in an upcoming section, and many of these same listed companies have both the flight mapping capabilities as well as the final processing capabilities.
I personally use SiteScan from ESRI (formerly 3DRobotics) for my site mapping AND processing. I have been looking more into Drone Deploy and Propellor. Below is a bit more info on each of those. Links to their website can be found in the software section of this article.
SiteScan from ESRI - Increase efficiency by creating and sharing advanced 3D flight plans between your pilots. Overlay 2D and 3D data from ArcGIS Online and ArcGIS Enterprise for enhanced flight safety and data capture quality. Manage your data in the field and upload it to the cloud. DroneDeploy - Capture maps, photos, panoramas, and videos all from one app Propellor - Map and measure your worksite yourself, with browser-based 3D surveys. DJI Ground Station (GS) Pro - Conduct automated flight missions, manage flight data on the cloud, and collaborate across projects to efficiently run your drone program.
THE FIELD PREP
No, you cannot just show up to a site, deploy a drone, and expect to take a nap while the drone magically does your job for you…yet!
There are many things to do prior to flying the drone. Gain FAA approval if needed, set ground control points (GCP), “prepare” the site by calling in Blue Stakes (811, Julie, etc), paint some stuff, plan which flight pattern you will use, etc, etc, etc. And each site has its own challenges that need addressed. There is no “one flight fits all” scenarios for most firms. A bit more explanation on these is below:
FAA Approval – Aside from the requirement of becoming Part 107 Certified for commercial pilots, some projects may require FAA approval to fly within controlled airspace. Plan ahead, as some locations may take time and some locations may be immediate.
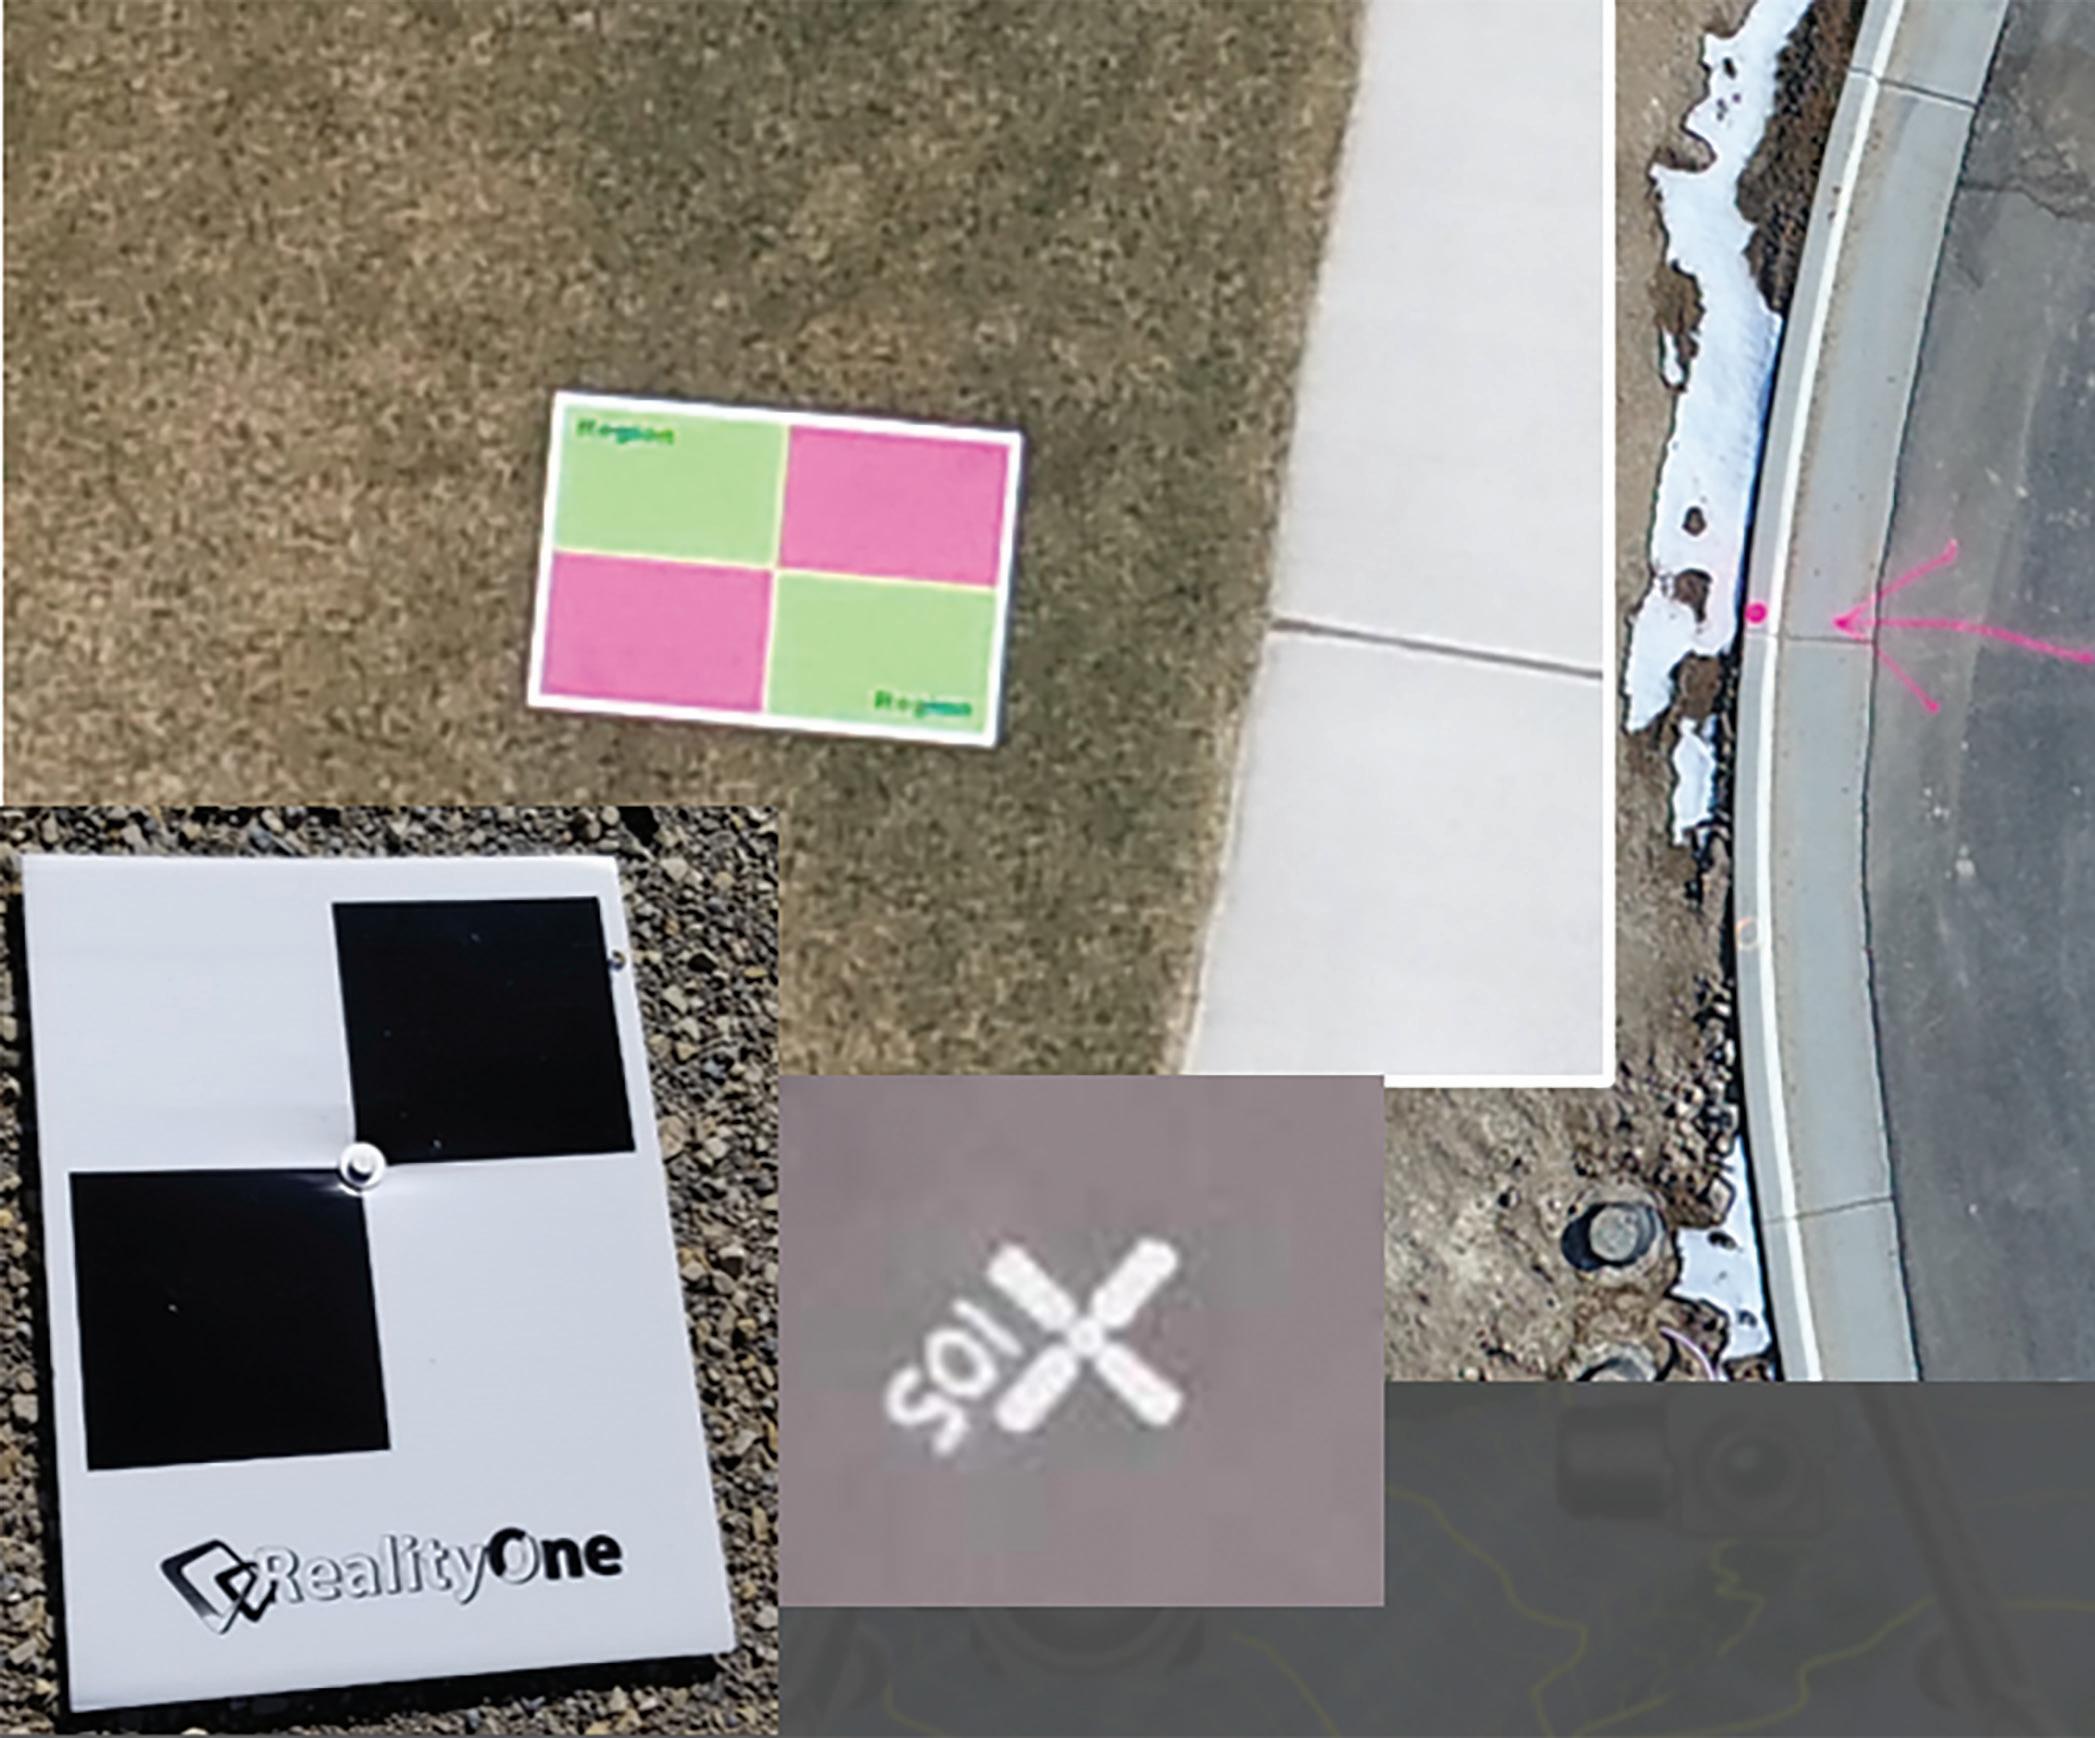
Ground Control Points (GCP) - Ground control is essential in ensuring accuracy of your flight linework/DTM deliverables. GCPs are marked points on the ground that have a known geographic location. GCPs coordinates are used by drone mapping software to accurately position the collected data in relation to the real world. Think of a flight at 400’ compared to a flight at 200’ with identical GCP quantity. GCPs can be as simple as using a can of paint (typically for hard surfaces) or using one of many methods of target creation.
NOTES: Not all GCP targets are created equal! I prefer a brightly colored 24”x24” target that can easily be identified for manually GCP tagging, or even automatic tagging in some software.
GCP placement is very important. Flight altitude is key to proper planning of GCP placement. Low altitude flights typically result in the need for additional GCP’s. Figure 4
Paint some stuff! We try to call in blue stakes to paint underground utilities such as gas, telecom, fiber optics, etc. And in developed areas, I typically send my survey crew out to mark things such as manhole depths, flow direction, etc. Having all this data in your images can really save unnecessary trips out to the site and answer questions immediately as
to not slow down the design process.
Flight Patterns – There are several flight options in most drone mapping software’s, but 2 patterns remain consistent across all platforms. • Area Survey (NADIR) – This pattern typically consists of no oblique images. • Crosshatch – For Example, this flight pattern goes East-West, then flies the same area North-South. This pattern typically has a 35-degree gimbal angle for oblique images.
So, which flight pattern is right for you? 95% of the 500+ flights I have done the past few years have been done using the area survey option. I have tested over and over Figure 5 the need for a cross hatch pattern, but for most projects the data value just isn’t there. You would think that more coverage is better right? Instead, the cross hatch causes an increase in field time, an increase in data processing time, an no
Civil PRODUCT FOCUS
real major measurable benefit in accuracy. However, crosshatch survey is at times needed. For areas with highly repetitive land, like crops and dense vegetation and verticality concerns, a cross hatched pattern may be useful. We do a lot of ALTA surveys of

PRODUCT FOCUS Civil
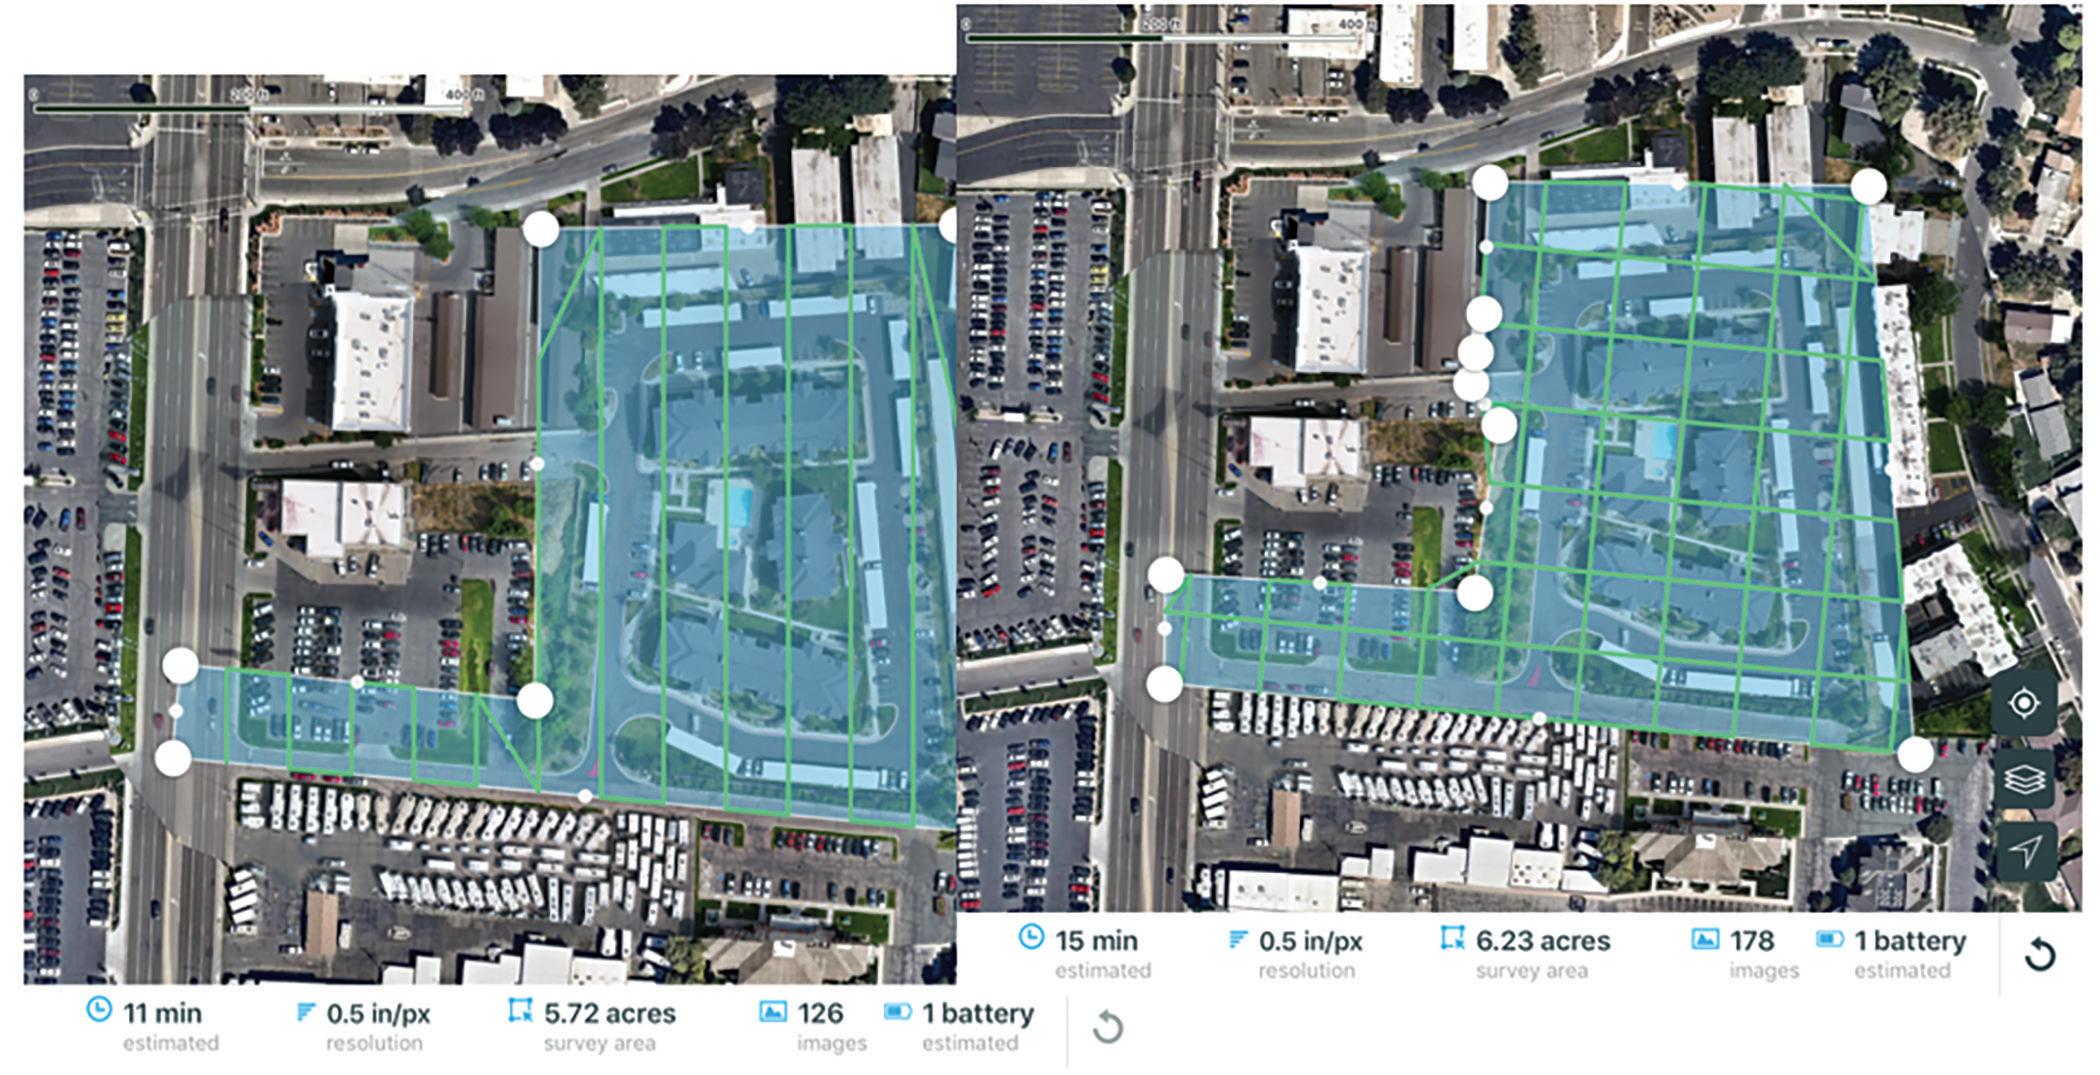
Figure 6 apartment complexes, and with all the buildings and vegetation, we sometimes use the crosshatch pattern.
If you would like to see some data from each type of flight pattern, feel free to email me and I will send one of the projects where we’ve used both options for comparison purposes.
Figure 6 shows the above-mentioned flight types, and the flight data difference between the 2.
THE PROCESSING SOFTWARE
This conversation sometimes gets just as heated as politics or religion! Many people swear that their software is the best and most accurate. As I mentioned, I personally use ESRI SiteScan for everything and have for years. I have tested others, and while some have other bells and whistles, I have really liked working with all aspects of SiteScan. I have a pretty lengthy wish list of items, but with the recent purchase of SiteScan by ESRI I can really see a bright future and some exciting new features coming. I will leave it at that and provide links to some of the most popular photogrammetry on the market.
SiteScan from ESRI - https://www.esri.com/en-us/arcgis/ products/site-scan-for-arcgis/overview
DroneDeploy - www.dronedeploy.com
Propellor - https://www.propelleraero.com/
Autodesk ReCap Photo - https://www.autodesk.com/products/recap would expect to get the following data once processed:
Orthomosaic (.tiff) – A high quality, ortho-rectified image is always available and can be used within almost any design software. DEM (.tiff) – Raw data - unfiltered DTM (.tiff) – Auto filtered to remove manmade objects and vegetation Contours: • Shapefile • DXF (DTM and DEM) Point Cloud • LAS • RCS – Autodesk ReCap format • LAZ
ORTHO IMAGE USE
We are working with larger data than ever before. Drone data and aerial imagery is now at the tip of our fingers anytime we want them. Some raster images can be many GB in size and resolution that some design software’s cannot handle. If you have ever tried to import a GeoTiff (or other image types), and you get the “Invalid Image” warning, then QGIS is exactly what you need!
This is a FREE open source software tool that allows you to reduce the size of large images quickly and easily, and even translate to other coordinate systems if you’d like. Just go to www.qgis.org and download it.
You simply drag and drop your image into the QGIS desktop, right click on your layer (image) and export to a new rendered image!! This can take a 2GB image, reduce it to 200MB and not lose the quality of image you would expect from your flight data.
Civil PRODUCT FOCUS
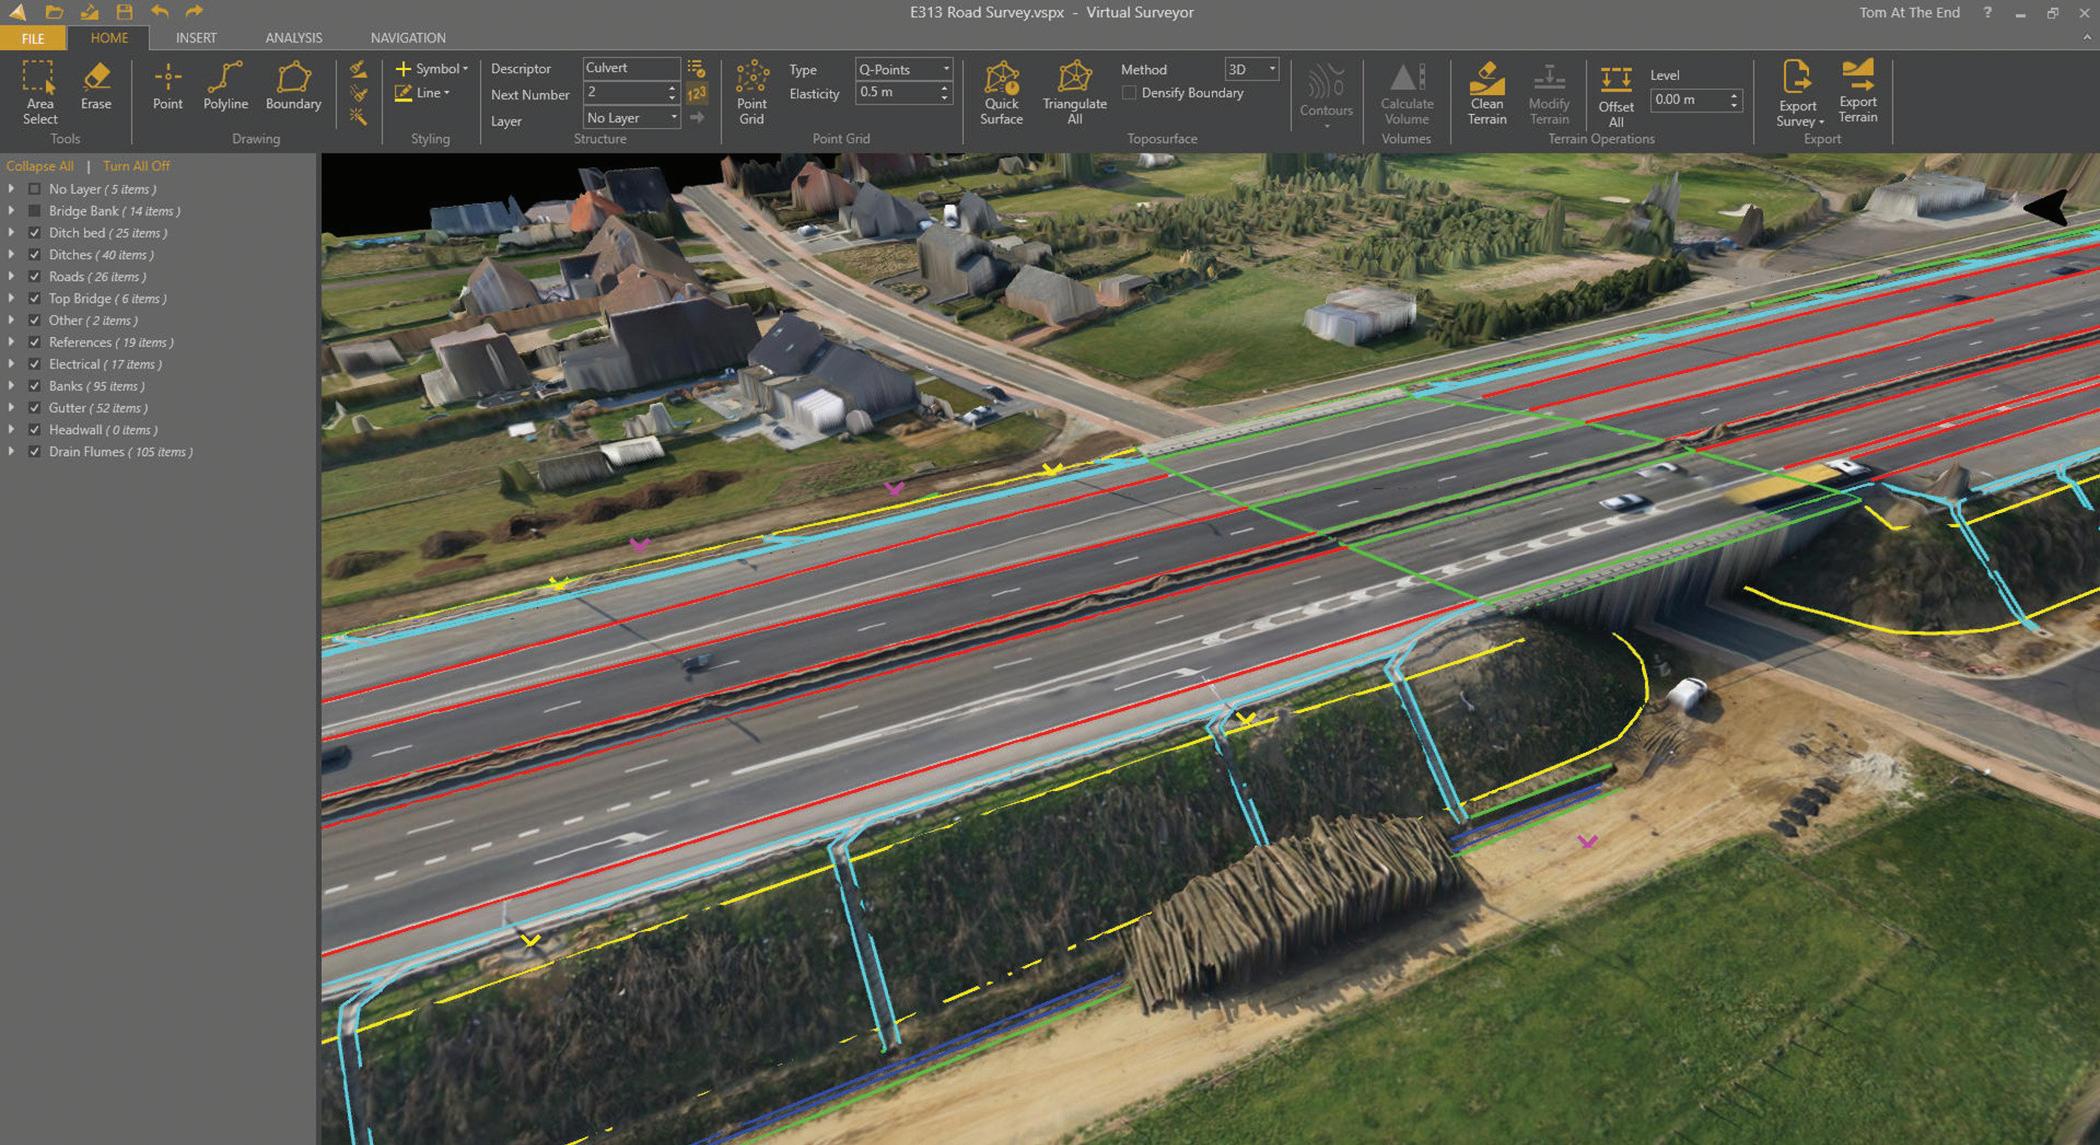
Figure 7
VIRTUAL SURVEYOR
The fact that this simple machine that flies through the air, captures photos and then somehow returns usable, actionable data is just fantastic!! But what do we do in production software such as AutoCAD, Civil 3D and Bentley with the data? We can bring it into ReCap (or LAS) file, then what? Connect some dots, draw some lines, but it all just seems too much of a manual process.
I’ve been in the reality capture industry for years and have really taken to the drone space, but have always struggled in creating a useable existing conditions map from the data within Civil 3D… until now!!
A couple years back I got introduced to Virtual Surveyor (https:// www.virtual-surveyor.com/) and feel that this is one of the best, if not THE best, tools out there to bridge that gap between drone and CAD.
You can easily accelerate your survey workflows with the productivity tools in Virtual Surveyor (VS). The software produces the bulk of the output. You only need to review, remove, and add some points or breaklines to complete the job.
You will see that Virtual Surveyor is a simple, easy to use user interface. There is not a ton of overbearing tools within the software. Along the left side you will find your project data. As you create layers for points, breaklines, topo, etc., they will show up in this dialog box. Simply export the data out to CSV or DXF and bring it into your CAD platform.
CONCLUSION
This could be a 30 page “article” in order to go through all the detail necessary, but AUGI probably wouldn’t like the Herring Takeover of this edition! So hopefully my attempt at condensing the information was found to be helpful in some way. At a minimum, it opens up your mind to some things to think about whether you are a seasoned vet or just thinking about adding a drone to your survey toolbox.
I would love to hear from you regarding your experiences or questions regarding drone use in the survey industry, so feel free to call or email me anytime.
Shawn has been a part of the design engineering community for roughly 16 years in all aspects of design, construction and software implementations. He has implemented and trained companies across the Country on Civil 3D and other infrastructure tools and their best practice workflows. Shawn is coowner of Region Engineering & Surveying in Utah and RealityOne based out of Utah but with offices in several locations. Shawn can be reached for comments or questions at sherring@ regionengineering.com.


