10 minute read
Revit
from AUGIWORLD
by AUGI, Inc.
Revit Project Setup in a Multi-Trade Environment
For who? For a small 10 person firm? For a 10,000 person firm? For C&S Companies? (The 500+/- person company I work at). It does make a difference. What your firm does also makes a difference. So therefore, I’d like to stick to the topic for this article. I want to discuss basic production. No BIM Execution Plans or LOD.
I just want to discuss my checklist and how I start every project regardless of the size.
TEMPLATES
OK, it starts with the templates. I’ll be honest right now and just say that I am lucky to have some pretty talented folks around me. I wish I could say I know everything about anything but I sure don’t. Templates for each trade need to be developed with input from the folks who are doing the design every day. This development doesn’t happen overnight. The way I approach each trades templates is to let the engineers, architects and designers hash out what they feel is most productive for them. Not everyone in the room is a Revit expert (in fact some of the people are proud of the fact they don’t know Revit). I sit in the meetings looking out for the entire company. For example. When an architect starts hating on the Arial font. I say, “Nope choose a different battle. This is what you want a two fire rated wall to look like in plan? Awesome. That’s great, let’s do it. But leave Arial alone”! My company’s drawings look a certain way in terms of
borders, fonts and view titles. I need people to be as flexible as possible, but within the envelope of my company’s brand. This consistency takes the guesswork out of wondering what templates to use and how we must configure them for a specific person or project.
I should mention how much content I like to add to a template. I am personally a minimalist. I see templates with every conceivable family loaded… preloaded borders, typical details, you name it. It’s too much. Have a standards directory available for users to load content that isn’t obvious. Sure 2x4 lighting fixtures, diffusers and receptacles and 120 and 277 volt panels are preloaded into the template, but not every VAV unit from every manufacturer.
BORDERS
I keep saying I’m never touching our borders again but, as I write this article, I’m making edits to my company’s border. All I can say is this. Make them flexible, (Visibility parameters, different view title types things like that) but not to the point where you need a 5 page PDF of instructions that come with it. Use as many default parameters. I know you will probably need a shared parameters file but keep those parameters to a reasonable amount. The less you have to instruct people in the “simple stuff” the tighter your workflow is going to be. Especially if you are working with an outside client.
Just use one border for a project. If people are copying borders in a project stop them. There’s no reason to do this. Make it flexible enough for each trade to use the same border.
PROJECT COORDINATION
OK, I’m going to vent here for a minute. If I get pulled into another project that went sideways, that was setup on the fly by parties unknown, with no project kickoff or coordination… I’m gonna lose it! Well, maybe not lose it but you get my point. Once the templates are tuned in, this part is almost secondary but it takes coordination from this point on. I would much rather have a BIM coordinator on a project that is actually working in the project every day. Someone who is looking out for the health of the data. OK, sorry that was a stupid analogy. Health of the data. I’m sounding like a salesman here. The idea is, we want someone who knows the building, knows the schedule, and at least knows the basic scope of work. I love being the BIM person on projects, some projects are better handled with a person that has a deeper knowledge of the specifics. Like I said, I don’t want to get into BIM implementation, but this is where you would slide that in. Not every project needs it though. If you can sit down and just go over how it is being set up, you are much better off.
PROJECT SETUP
OK, here’s how I like to do it. When it comes time to set up the project, I go to my templates to start new models. I have a separate template for Architecture, Interiors (when needed), Structure and Plumbing. Models I combine are Mechanical and Electrical. I put both trades into that one template. I know that model has more people in it and is a little harder to manage but the benefits (powering mechanical equipment being one) outweigh the extra maintenance. I also have a combined Life Safety template. All of my sprinkler, security and low voltage trades are in there. Not everybody likes doing it this way, but as a company we hashed it out and that’s the standard. I use these templates to start every project regardless of the size or scope of work.
Once the models are created (either on a local server or BIM 360) I of course set up the worksharing. I have no standards for worksets so I use the defaults. If there’s a project that would need

an approach to where we would need worksets I allow it, but it’s not our standard.
When it comes to linking models, the default is Internal Origin to Internal Origin. If it is deemed that we will be coordinating with site, I will ask for the Civil 3D model and acquire the shared coordinates from the site model and place the project on shared coordinates. If the project is on shared coordinates is should be determined before you put these models on BIM 360. You cannot publish coordinates to models that are on BIM 360. You need to either pull the models off BIM 360 or come up with a better strategy.
I link all trades into all models. I copy monitor the architectural levels from the architectural model and I copy monitor the structural grids from the structural model. From there I like to drag a plan view onto a sheet. If the default C&S view template works, I use it. Generally I have to modify it, then reapply it to my views.
PROJECT MAINTENANCE
Stuff gets messy. I don’t like going into models and purging everything. Instead I encourage my team to maintain their models. Most do. If not I do it. Performing audits is never a bad idea. I also like to compact the central models every so often.
The one thing I generally tell people is to just think about if someone was coming into this project with no prior knowledge. Would they know what to do? This is where having good project management pays off!
Eric Wing lives in Syracuse NY where he is the Director of BIM Services for C&S Companies. Eric is a popular speaker at events around the country speaking on many BIM-related topics. He has authored several books including Autodesk’s official training guide for their BIM solution “Revit” called Revit for Architecture No Experience Required. Eric is also an author for LinkedIn Learning where he has authored around 60 full courses on BIM management, Revit, AutoCAD MEP, Navisworks and Virtual Design and Construction (VDC). Eric has truly been a leader in the architecture, engineering and construction industry since the conception of BIM and 3D design, and has specialty skills in BIM coordination, training and development of technical staff along with daily application of these tools on multi scale, multi-disciplinary projects. He is also currently a Professor at Syracuse University teaching BIM and Advanced BIM at the School of Architecture, and at the School of Engineering. Eric has also taught courses at the Rochester Institute of Technology and Clarkson University on the subjects of Analytical tools for Facility Management, BIM, and Integrated Project Delivery.
Autodesk Civil 3D – Simple Management Tips

As we all know, there is a ton of data to manage when it comes to Civil 3D. Not just data, but files, best practices, styles, folder structure, et cetera! At times it can be a bit overwhelming, especially if there has been no management over these items in the past. But for those looking to get a better handle on things, I have outlined several of the topics I would make sure to spend a bit more time getting up to speed on. There are obviously many more things that help in project management, but these are some of the things I see being underutilized.
MANAGING DATA IN PROSPECTOR
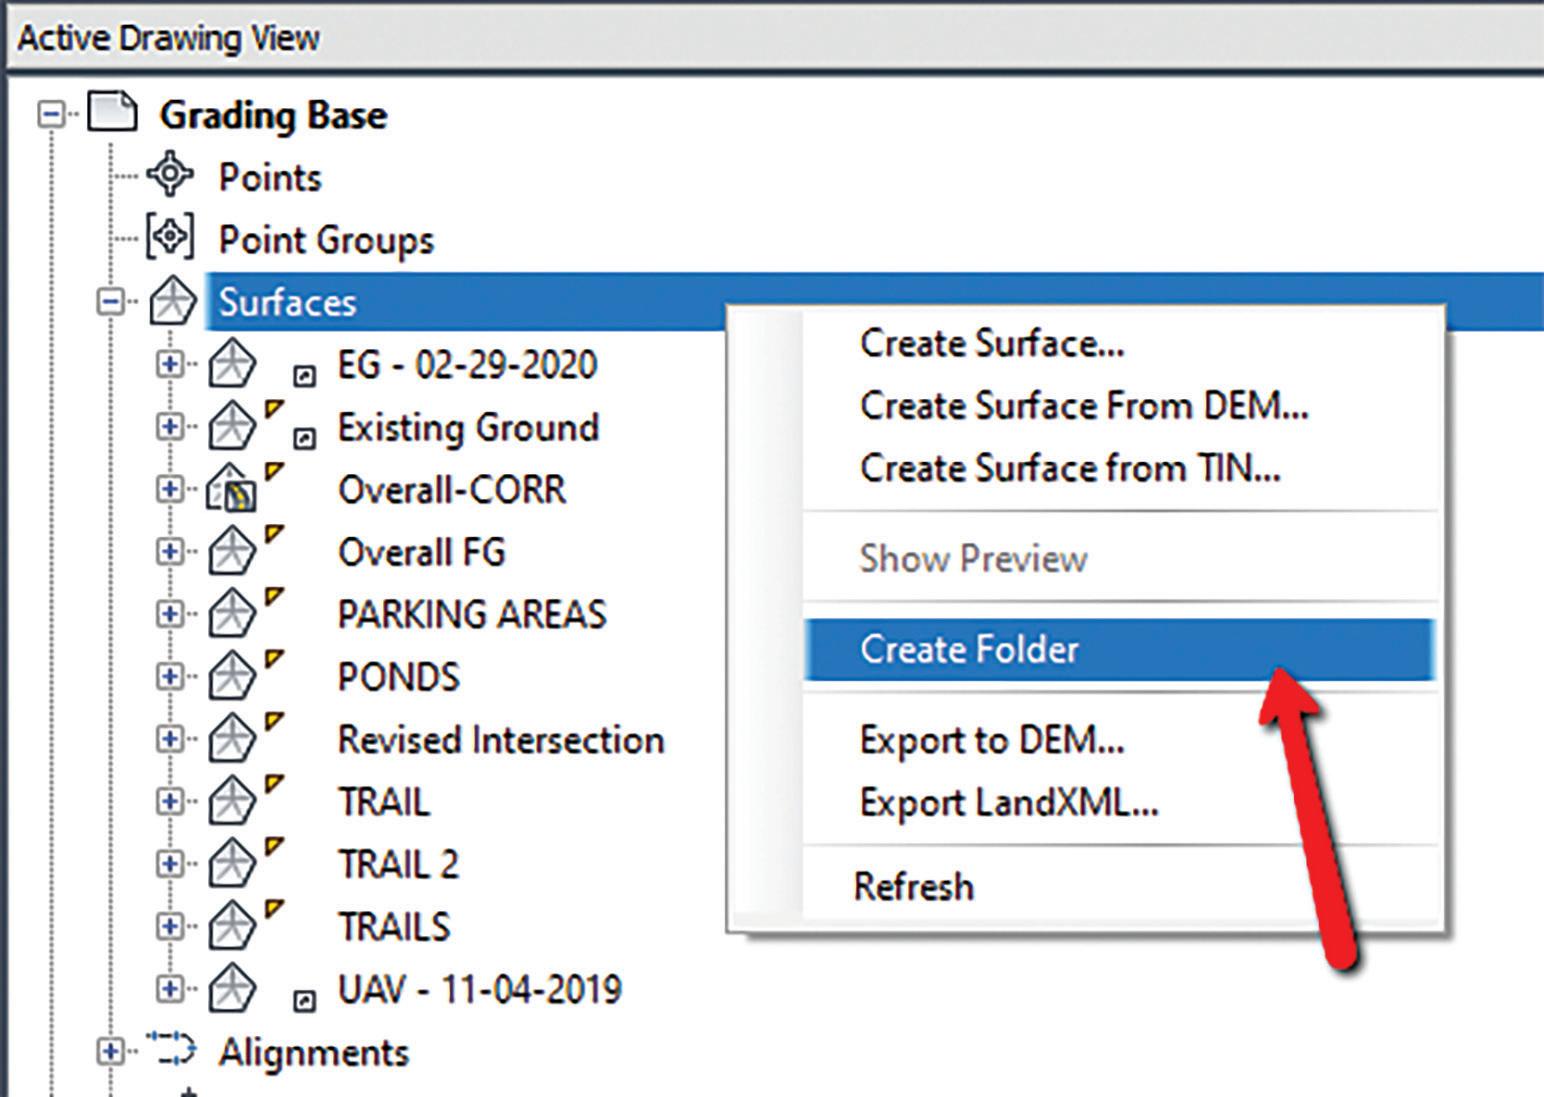
Did you know you can create folders within Prospector for things like alignment, surfaces and pipe networks? This can be extremely helpful when managing large projects.
Take surfaces for example. On large projects you probably end up with several surfaces that represent an overall finished grade surface, or several surfaces to build your existing ground surface.
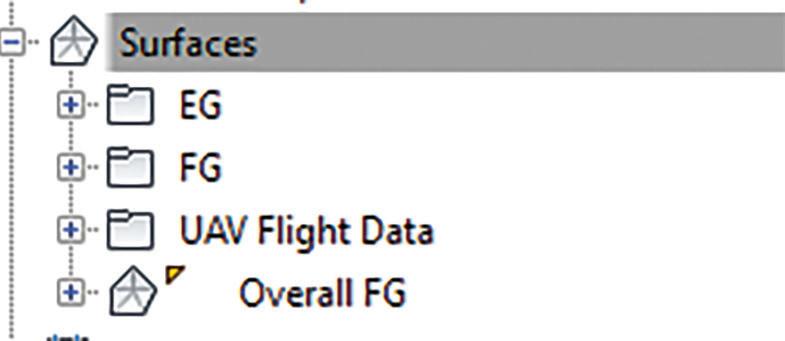
This can get a bit messy and confusing at times, as shown below in a simple example. But right click on Surfaces and simply select NEW FOLDER to make your life easier! I typically leave two surfaces outside of the folders, one for my existing ground and one for my overall finished grade. Once you have created the folders, simply drag and drop your surfaces in the correct folder.

Figure 1

MANAGING DATA SHORTCUTS
Use them! This is a very overlooked, and often misunderstood function of Civil 3D. Even for simple projects, data shortcuts can really help production and speed up time to completion. But what do you do on these larger projects when you literally have hundreds of data shortcuts??!! Well… I think we are all still trying to figure out the best practices, but here are some tips I have found to be helpful.
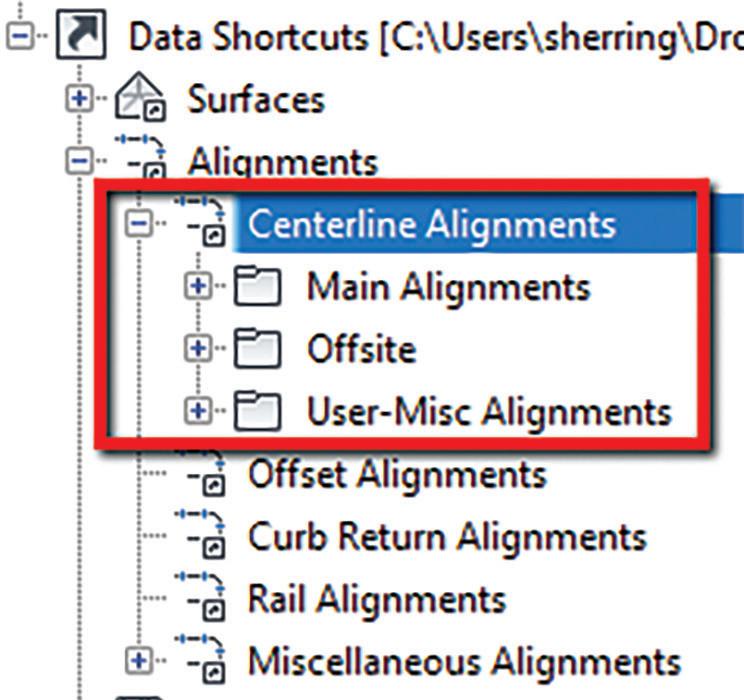
Tip 1: Just as we can create folders in the Prospector, as mentioned. above, you can also do this for data shortcuts! Throughout a typical project, you have main alignments (i.e., road centerlines) but you also end up with misc. alignments (offsite utilities, cross section alignments, et cetera). I would create a couple folders within the folders in data shortcuts, one for “MAIN” alignments and one for “USER” alignments. This will make it easier for users to find exactly what they are looking for much quicker.
Tip 2: Did you know there is a Data Shortcut Manager? You can use this to replace drawing objects with shortcuts or repair broken references. This is helpful in managing multiple shortcuts at once. At times, the need to replace an associated shortcut may arise, this is the simplest way to handle that. multiple shortcuts at once and either right click and “Create Reference” or drag and drop them on your screen to import them at once!!
Tip 4: I may not condone this one, but it is helpful!! I am not one to promote data shortcuts, but if you need to send out a Civil 3D file to someone, you can promote all shortcuts at one time! Talk about a time saver.
Go to the Manage tab of the ribbon, drop down the Data Shortcuts panel, and select Promote All Data Shortcuts.

Figure 3 Figure 4


Figure 5
MANAGING PALETTES (SUBASSEMBLIES)
Let’s be real, how many of us use 5-7 subassemblies for almost ALL subdivision roads!! OK, maybe it is just me? You have lanes, curbs, asphalt, sidewalk and end sections. Simple right? So why do we need 40 tabs on our palette, and constantly go through several to find what we want? Why change a curb &


