5 minute read
BIM
from AUGIWORLD
by AUGI, Inc.
Coordination Views in BIM 360 Simplified
Ireally like it when coordination is easy. So much so that when I see a new feature come out that deals with coordination, I’m all over it. Usually, I find that it is either too convoluted to really implement in my workflow, or it just … “jumps software” too much. (Exporting models from Revit and Civil 3D and needing to configure object enablers for specific versions agitates me). So, when I saw this little icon start showing up in BIM 360 and Revit I had a geek flare up and had to get me some. For those of you who do not know what a geek flare up is, it is a physical reaction to technology that is only cured by spending the weekend in front of your computer and consuming hot pockets.
OK, I’m getting off track again. Here’s how this works. We can now share 3D views with all trades linked together where all you need to have on your computer is an internet browser. That means that all project members can slice and examine a project without having to be a Revit or Navisworks user. Granted there’s no clash detection here but I find that actually looking at a model with all trades incorporated negates the need for agonizing clash detection the day before the thing goes out the door. Below are the steps to share a view in BIM 360.
PUBLISH SETTINGS
By using the existing publish dialog we can set up a view to include all of your links, visibility settings and detail level. Here’s how it works:
1. Open the model you wish to publish.
2. Go to a 3D view and duplicate it (with or without detailing, it doesn’t matter). 3. Rename the view to Publish View (or something that makes sense to you, I don’t really care).
4. Turn on all of the links you want to see. 5. Set the Detail Level to Fine.
6. Go to the Collaborate tab
7. Go to Publish Settings
8. Under Selection Sets, click the New Set button.
9. Call it Publish View (I usually put my initials there just so people know how cool I am).
10. For Show in List, select 3D Views in the Model.
11. Select the 3D View: Publish View
12. Make sure you check the Publish View name in the Selection Sets. See the proceeding screenshot. 13. Save and Close
14. Sync the model and close out.
Here’s what you’ve done. You just set up a view that will be used throughout the project. Now when you want people to see the updated version, all you need to do is publish the model. That’s what we’ll look at next!

PUBLISHING A MODEL IN BIM 360
Now for the easy part. Publishing. You can rest assured that the published view will look exactly the way you want.
1. In Revit, find your project in the BIM 360 category.
2. Go to the folder that contains your model you just set the publish view up in.
3. All the way to the right of the dialog, you will see a settings button. (I think the nerds are calling it the kebab button now…sheesh!) 4. Select Publish Latest.

You will be greeted with a large descriptive dialog. Click Publish.
Depending on the size of the model, the process time will vary.
OK, the model is published. Now it’s time to go find it and share it with your team.
1. Go to the BIM 360 project in your internet browser.
2. Go to Document Management.
3. Go to the folder where the model is. If you see the blue wheel of progress spinning it’s not quite cooked yet. You’ll need to wait. 4. When it’s ready, open the model. Select
Publish View.


5. On the right side of the black header bar, click the settings button.
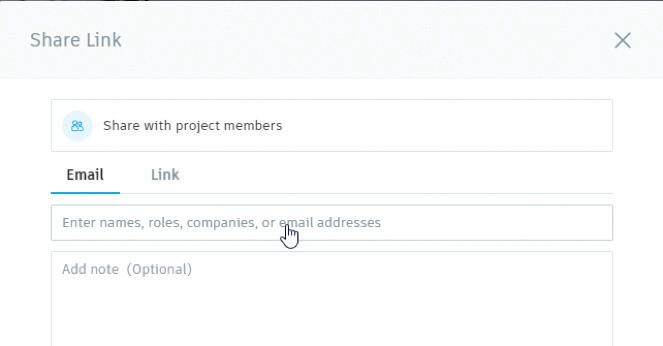
6. Select Share.
7. Chose the project members you would like to send the view to. You can either copy a hyperlink, or send it in an email. If you click on the Enter Names… fields a list of team members will pop up. Select who you want to share with.
So, there we go! I really get a lot of use out of this feature. Granted, if we want full clash detection Navisworks is still the go-to, but I think this is pretty awesome and really darn easy!


Eric Wing lives in Syracuse NY where he is the Director of BIM Services for C&S Companies. Eric is a popular speaker at events around the country speaking on many BIM-related topics.
Eric has authored several books including Autodesk’s official training guide for their BIM solution “Revit” called Revit for Architecture No Experience Required. Eric is also an author for LinkedIn Learning where he has authored around 60 full courses on BIM management, Revit, AutoCAD MEP, Navisworks and Virtual Design and Construction (VDC)
Eric has truly been a leader in the architecture, engineering and construction industry since the conception of BIM and 3D design, and has specialty skills in BIM coordination, training and development of technical staff along with daily application of these tools on multi scale, multi-disciplinary projects.
Eric is also currently a Professor at Syracuse University teaching BIM and Advanced BIM at the School of Architecture, and at the School of Engineering.
Eric has also taught courses at the Rochester Institute of Technology and Clarkson University on the subjects of Analytical tools for Facility Management, BIM, and Integrated Project Delivery.


