Gogue Center Performance Study Guide: Bill Blagg: “The Science of Magic”
PERFORMANCE STUDY GUIDE GRADES 1 — 5
Bill Blagg: The Science of Magic
The Jay and Susie Gogue Performing Arts Center at Auburn University engages audiences across the university, the state of Alabama and beyond with curated arts experiences that inspire, enlighten and unite.
Our annual K–12 School Performance Series provides opportunities for students to enjoy exclusive performances by some of the most talented and accomplished artists from around the world. Prior to each K–12 school performance, teachers receive a study guide containing details about the performance, artist and company, supplemental information about the art form and its history, and grade-appropriate activities designed to spark conversation and exploration in the classroom.
To learn more about education and engagement initiatives at the Gogue Center, visit goguecenter.auburn.edu/education.
produced by Jay and Susie Gogue Performing Arts Center at Auburn University 910 South College Street Auburn, Alabama 36849
k–12 school performance series contact Andrea Jarmon, D.M.A. Education Coordinator telephone: 334.844.7371 email: gpac.education@auburn.edu
PERFORMANCE STUDY GUIDE
GRADES 1 — 5
Bill Blagg
The Jay and Susie Gogue Performing Arts Center at Auburn University
Where will we go?
GOING TO THE GOGUE CENTER
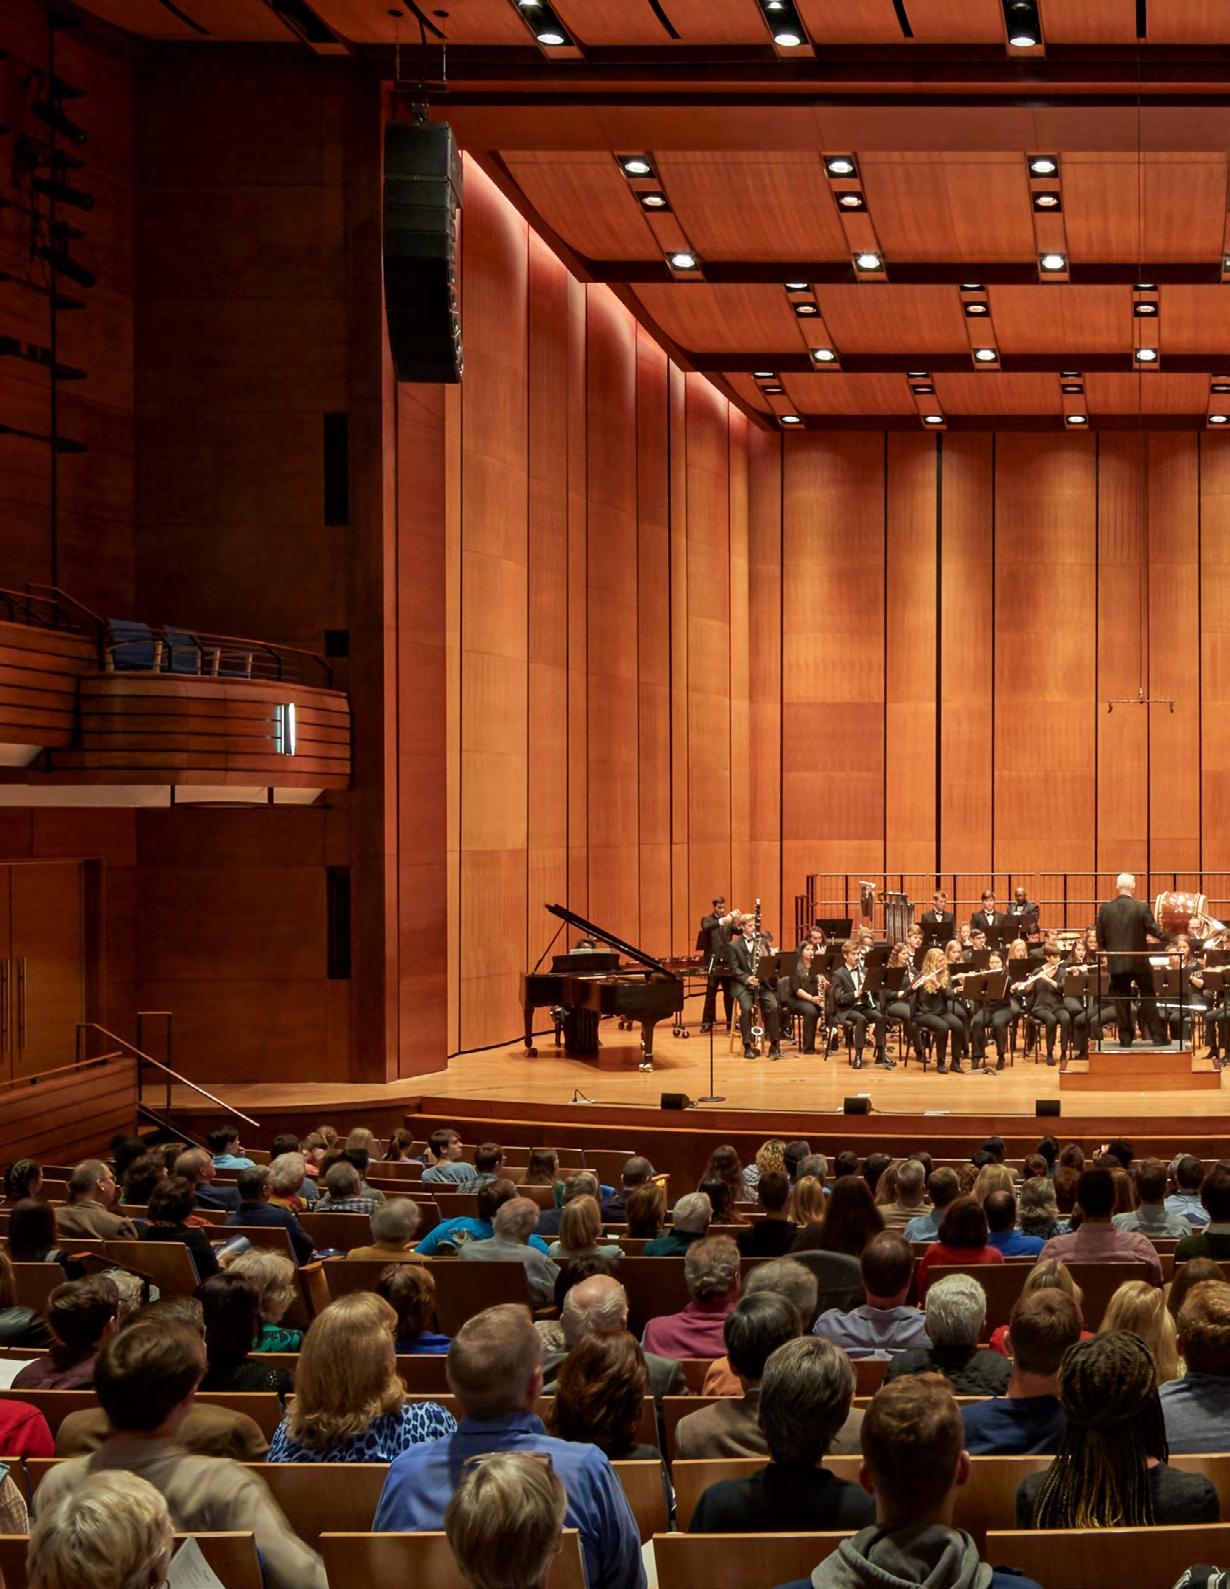
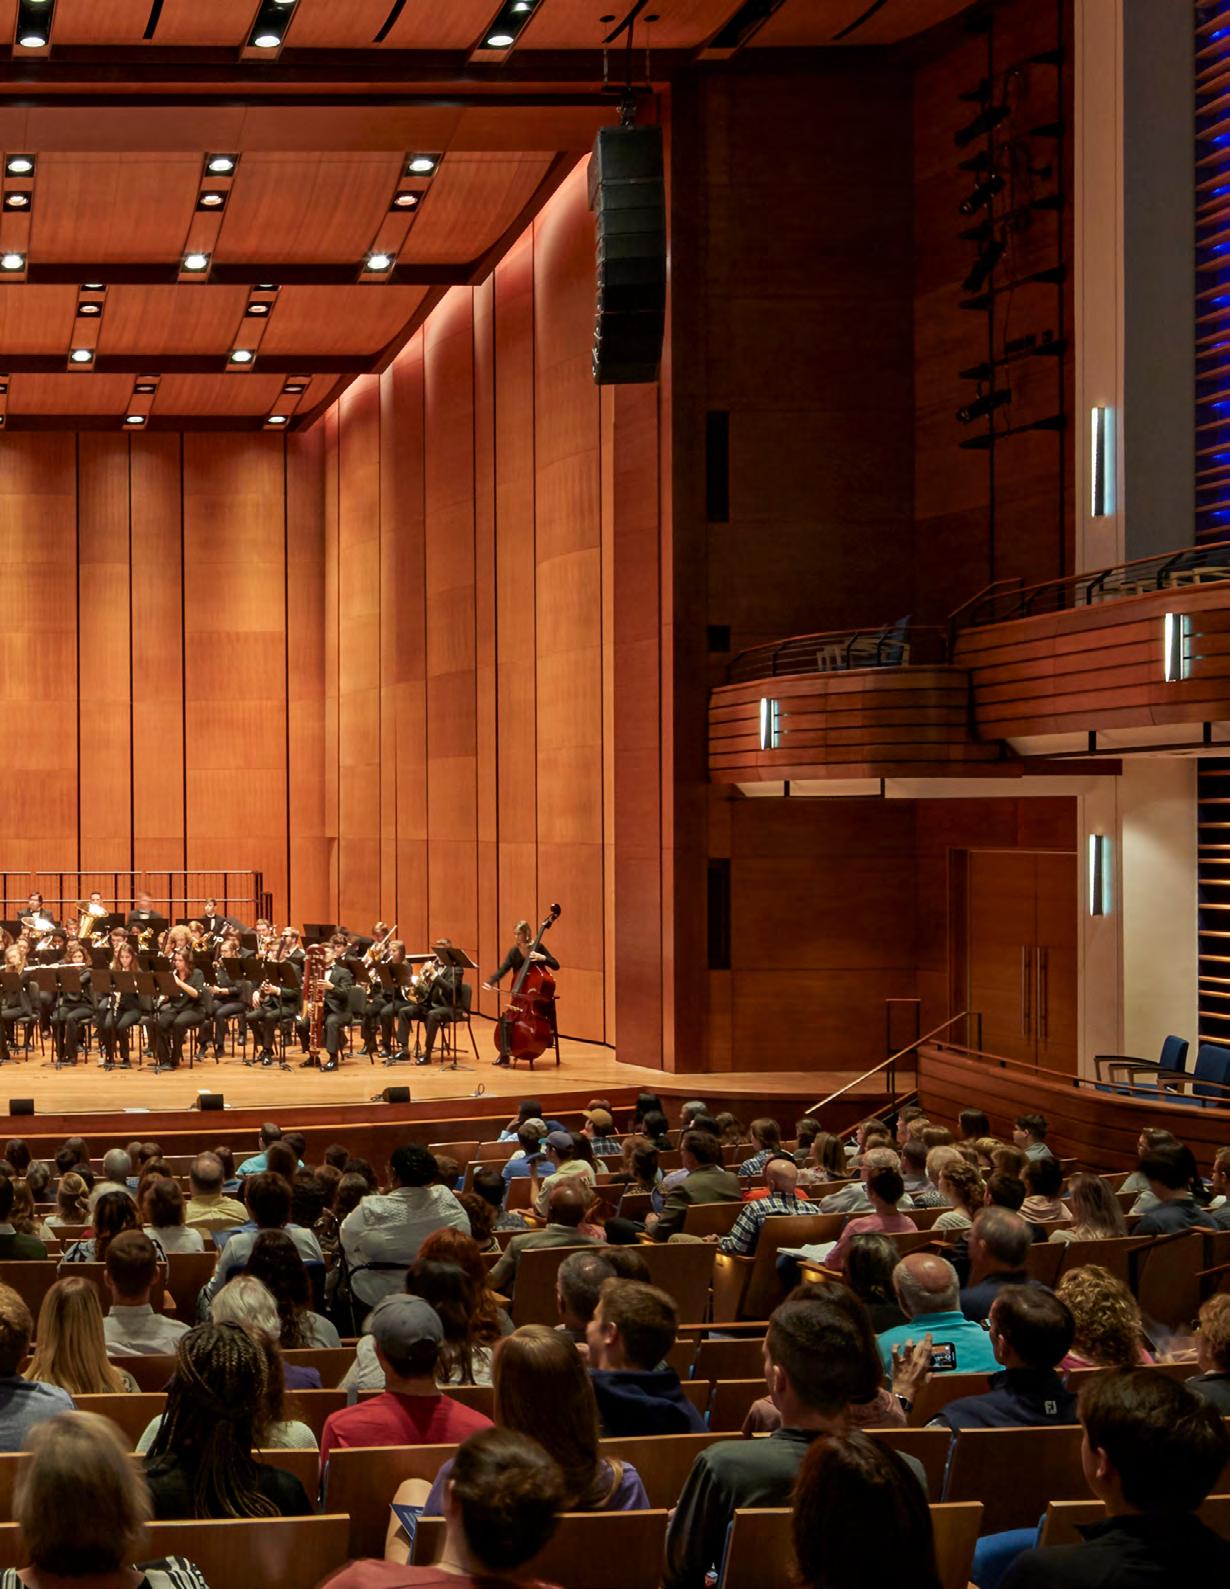
The Jay and Susie Gogue Performing Arts Center, otherwise known as the Gogue Center, is located on the campus of Auburn University in Auburn, Alabama.
The Gogue Center houses the 1,200-seat Woltosz Theatre. The theatre was built with exceptional acoustics so that it is possible to hear well from every seat.
WHO WILL YOU SEE HERE?
Ushers
These are the people who will greet your bus, lead your class into the building and help you find your seat. Be sure to say “hello!”
Stage Crew
These are the people who work backstage, so you won’t see them in the lobby, but you might see them before or after the performance, and sometimes, they even come on stage during the performance to move things.
Lighting & Sound Operators
These are the people who control the lighting and the sound for the performance. You may see them in the middle of the auditorium at the big sound board or in the back of the auditorium in the booth. Sometimes, the spotlight operators are in the back way above your head.
Performers
These are the people on the stage who may be dancers, musicians, singers, actors or acrobats. It is their job to communicate using their bodies, instruments and voices.
Audience Members
This includes you, your classmates, and other students and teachers from around the state of Alabama and maybe even Georgia.
What Does the Audience Do?
Alabama Course of Study
GMu3-5.15
GMu6-8.14
National Standards
MU:Pr6.1.3-8b
The audience is an important part of the performance. Without the audience, who would watch the performers? Who would clap and sing along and appreciate what the artists bring to the stage? When you are a member of an audience at the theatre, there are a few things to know about what to do and what not to do.
Sit in your seat and look around, but please keep your feet toward the ground.
Listen and watch, but do not talk.
Have a camera or phone? Please turn it off.
The performers will take to the stage, and we know they will engage. You can laugh, you can sing, you can get up and dance, but just make sure that you give them all a chance!
BRAVO!
THANK YOU!
When the song is done, or the show comes to an end, make sure that you give the performers a hand! Applause is the way that we can say thank you for all that they did today!
Stanley and Virginia Katharyne Evans
Walter
Woltosz Theatre
Acoustics: The Science of Sound
Alabama Course of Study Standards
SC1.1
National Standards
NS.K-4.1 NS.5-8.2
Acoustics is the study of sound and how that sound reacts in spaces, particularly rooms and buildings. What is sound? Sound is vibration. That vibration travels through the air and into our ears where we hear it.
Vibration begins through movement—for example, strumming a guitar string. That vibration creates a sound wave. In a theater or concert hall, acoustics are important so that everyone can hear the performers.
There are two ways that acoustics are controlled. The first, reverberation, is controlling how sound waves bounce off surfaces, like walls and floors. Hard surfaces cause more reverberation and make spaces louder. The second way, absorption, is the opposite of reverberation. Soft surfaces absorb sound waves and make rooms quieter.
Let’s see if we can figure out which of these materials cause reverberation and which cause absorption of sound:
• Tile
• Carpet
• Marble
• Curtains
• Cushions
• Wood
The controlling of reverberation and absorption of sound waves is how acoustics are controlled in the Woltosz Theatre.
Who to know at the show
THE MAN BEHIND THE MAGIC
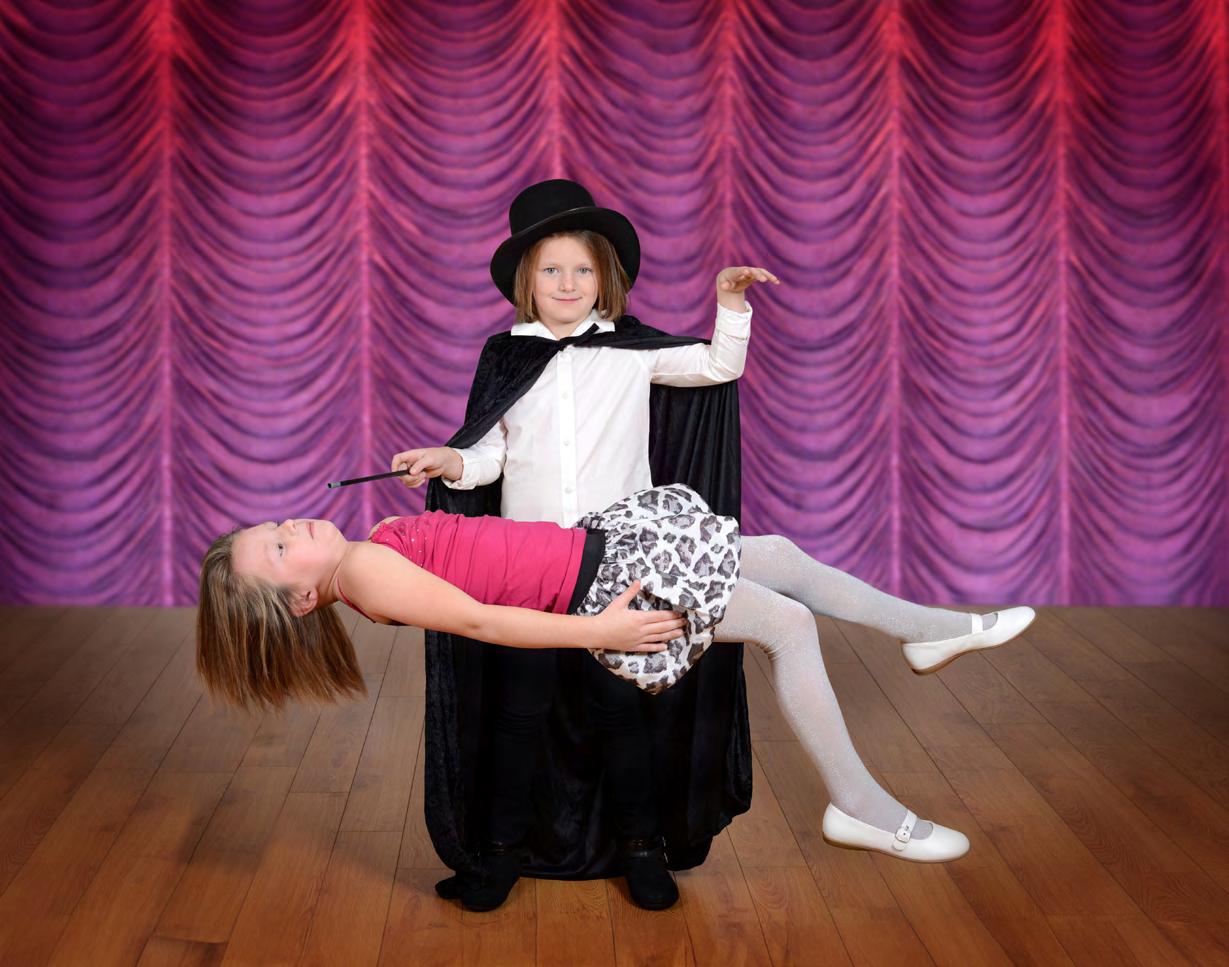
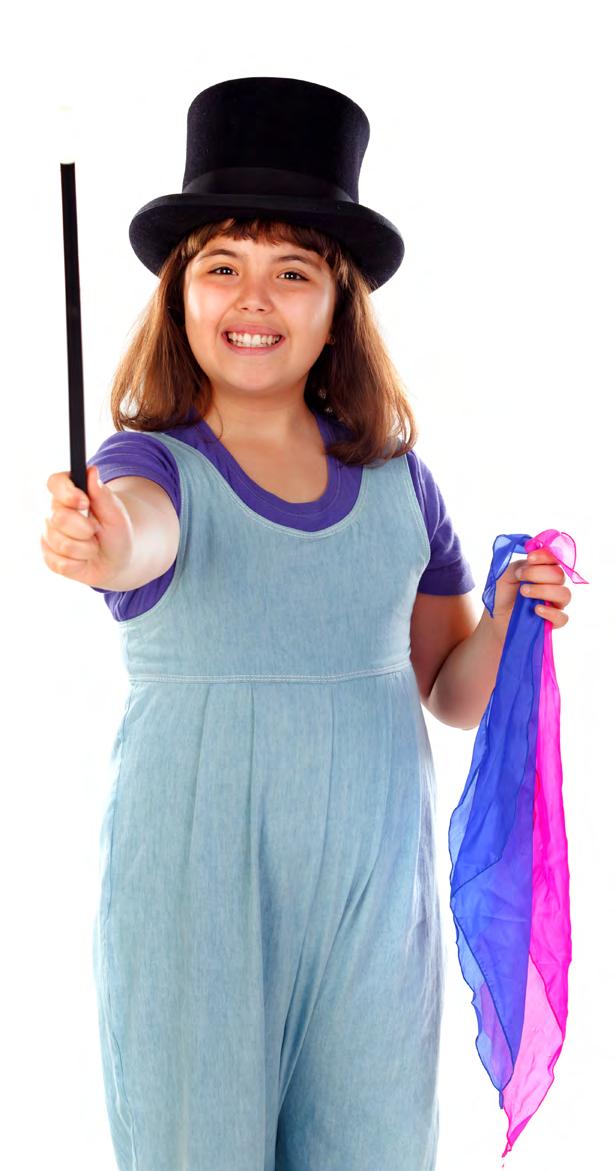
It is no exaggeration to say Bill Blagg has led a magical life. From the moment he received his first magic kit in 1985, his world has never been the same. In 1996, at the age of 16, Blagg launched his professional magic career and, owing to his off-thecuff personality and high-energy performance style, quickly became a standout in the magic community.
After graduating college with honors, Blagg hit the road to perform magic full-time. Today, he has one of the largest theatrical magic and illusion touring shows in the country.
Having a love for science as well as magic, Blagg combined them to create his unique educational show, The Science of Magic. This show takes students on an exciting, never-before-seen journey behind the scenes of the magic world to reveal how magicians use science to create the seemingly impossible. Blagg lives in Milwaukee, Wisconsin, with his wife, Kristin. When he’s not performing, he can be found at his magic workshop, working with his father to create the latest thrilling illusions for his audiences.
“A lot of people have never seen live magic, let alone live illusion. When you’re sitting there watching this happen right in front of your face, it’s the coolest thing in the world. ”
— Bill Blagg
What to know before the show
THE SCIENCE OF MAGIC
For centuries, magicians have used scientific principles to create magic tricks like making people levitate in midair or vanish in the blink of an eye. Illusionist Bill Blagg’s one-of-a-kind educational experience, The Science of Magic, takes students on a rare, exciting journey that shows the science behind the illusions.
Blagg’s comedy-filled, action-packed presentation invites audience participation that makes science interesting and fun. Students will use the scientific method to levitate one of their teachers and learn how the science of reflection can make their homework magically disappear. In addition, Blagg will perform some of his mind-blowing, grand-scale illusions with a scientific twist, even presenting an incredible display of the water cycle by making it snow from his bare hands.
The Science of Magic is designed to educate, intrigue and motivate students to think outside the box about how science and the scientific method are used by magicians to create their fantastic illusions.
THE METHOD BEHIND THE ILLUSION
Sometimes magic tricks and scientific experiments don’t seem much different from each other—both can leave people scratching their heads in wonder. But what is a magic trick? Simple—a magic trick is an illusion. The magician knows the trick’s secret; however, to audiences the trick looks like magic because they don’t understand how it is performed.
In truth, many magic tricks are simple science experiments. The magician may add a few mysterious words or gestures to make the audience think something supernatural is happening. Magicians are highly skilled performers who work very hard to fool audiences through misdirection and manipulation of the senses. In the end, there’s a scientific explanation for how every trick works, one that has nothing to do with magic or magic words.
EXAMINING MAGIC
Before you examine the topic of magic in detail, it is helpful to let students understand the broadness of the topic by brainstorming different types of activities that might fall under the category of “magic.”
For centuries, magicians have used scientific principles to create magic tricks like making people levitate in midair or vanish in the blink of an eye. Illusionist Bill Blagg’s one-of-a-kind educational experience, The Science of Magic, takes students on a rare, exciting journey that shows the science behind the illusions.
Examples of magic can include making objects appear, disappear or change form; defying the “natural” order of the world (e.g., defying gravity, walking through walls); and surprising people with amazing physical feats. You may soon find your list of magic tricks getting quite lengthy. It may be helpful to look at some synonyms for magic, such as illusions, tricks, stunts and deceptions.
Blagg’s comedy-filled, action-packed presentation invites audience participation that makes science interesting and fun. Students will use the scientific method to levitate one of their teachers and learn how the science of reflection can make their homework magically disappear. In addition, Blagg will perform some of his mind-blowing, grand-scale illusions with a scientific twist, even presenting an incredible display of the water cycle by making it snow from his bare hands.
Discuss with students why something might be called a “stunt,” whereas something else would be considered an “illusion.” Decide how broadly you would like to define the category of magic, and work with your students to create your own definition.
FAMOUS MAGICIANS
The Science of Magic is designed to educate, intrigue and motivate students to think outside the box about how science and the scientific method are
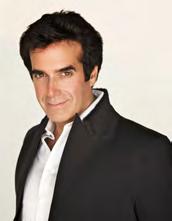
David Kotkin (b. 1956), known professionally as David Copperfield, is the most commercially successful magician of all time. In a career spanning more than four decades, he has won 21 Emmy Awards and holds 11 Guinness World Records. Some of Copperfield’s most well-known illusions include making the Statue of Liberty disappear and reappear, levitating over the Grand Canyon, escaping from Alcatraz, and flying on stage.
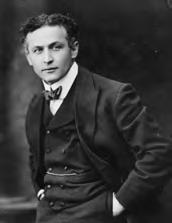
Erik Weisz (1874–1926), known professionally as Harry Houdini, was a Hungarian American escape artist and illusionist. He was famous for daring acts that included escaping from handcuffs, chains, ropes slung from skyscrapers, straightjackets under water, and more. Houdini also starred in several movies and was an accomplished pilot.
Pre-Show Discussion Topics
Use the following questions to start a classroom discussion prior to attending The Science of Magic:
• What is magic?
• Who are some famous magicians?
• Do you or any of your friends or family members know how to do a magic trick?
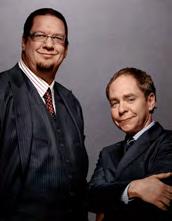
Penn Jillette (b. 1955) and Raymond Teller (b. 1948) are an American magician duo known professionally as Penn & Teller. They are most wellknown for combining comedy with their magic. In their act, Penn is the orator while Teller tends to communicate only non-verbally. Penn & Teller like to explain the magic behind their tricks and have even appeared on Bill Nye the Science Guy.
used by magicians to create their fantastic illusions. Sometimes magic tricks and scientific experiments don’t seem much different from each other—both can leave people scratching their heads in wonder. What is a magic trick? A magic trick is an illusion. The magician knows the trick’s secret; however, to audiences the trick looks like magic because they don’t understand how it is performed.
In truth, many magic tricks are simple science experiments. The magician may add a few
• If you could learn one magic trick, which trick would it be? Why?
• What is your favorite magic trick?
• Do magicians have magical powers, or do they use science to fool us?
• Where do magicians learn how to perform magic?
penn & teller copperfield houdini
WHAT IS SCIENCE?
Science is the process of learning about the world through observation and experimentation. The scientific method is used to investigate; it is the process of objectively establishing facts through testing and experimentation. The process begins with a question. Then research is conducted to gather information. This research leads to the formation of an idea or guess about the answer to the question. This idea is called a hypothesis. Once a hypothesis is formed, an experiment is designed to test the hypothesis to determine if it is correct. Upon completion of the experiment, a conclusion is drawn about the accuracy of the hypothesis.
5 SCIENTIFIC METHOD STEPS
Conduct research.
Form a hypothesis.
Draw a conclusion. 3 4 5
Perform an experiment.
FAMOUS SCIENTISTS
The scientific method has five steps:
1. Ask a question.
2. Conduct research.
3. Form a hypothesis.
4. Perform the experiment.
5. Draw a conclusion.
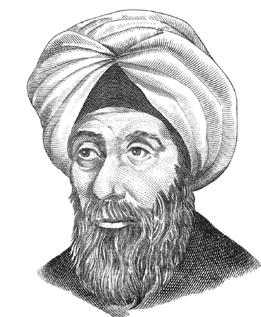
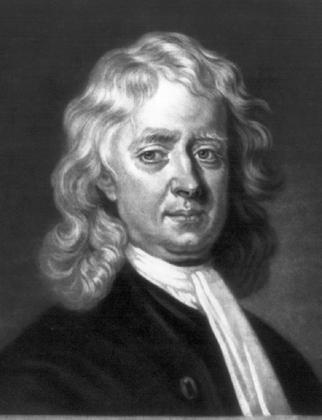
Alhazen (c.965–c.1040) was a mathematician and scientist whose most important work involved optics and visual perception. He explained the behavior of light when reflected off a curved surface, theorized that vision occurred in the brain, and was instrumental in the development of the scientific method. His work contributes to our understanding of why images formed in cameras are upside down.
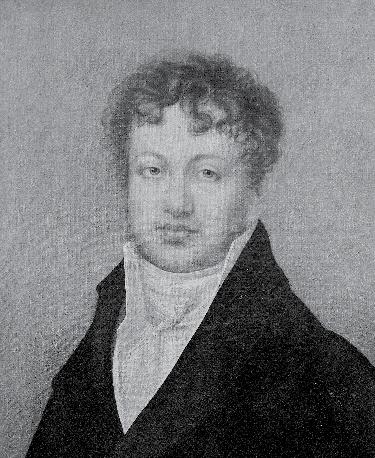
André-Marie Ampère (1775–1836) discovered that a wire carrying an electric current can attract or repel a wire next to it that is also carrying an electric current. Though it is a magnetic attraction, there are no magnets. He was instrumental in the creation of electromagnetic theory, hypothesized the existence of the electron, and created an early version of the periodic table. The ampere, which is the unit of measurement used to measure electrical current, is named for him.
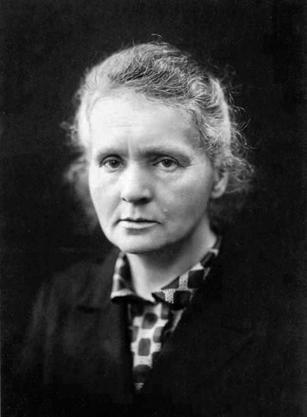
Marie Curie (1867–1934) made significant contributions in the study of radioactivity. She discovered the elements radium and polonium.
Marie Curie
1867–1934
Alhazen
c.965–c.1040
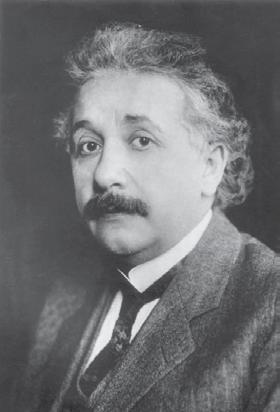
Albert Einstein 1879–1955
André-Marie Ampère
1775–1836
1564–1642
1544–1603
1857–1894
Most importantly, she was the first to research the treatment of cancerous tumors with radiation, a practice still used today. She is the only person to ever win the Nobel Prize in both chemistry and physics.
Albert Einstein (1879–1955) revolutionized the way the behavior of things like light, gravity and time were understood. He is widely considered the most famous scientist of the 20th century.
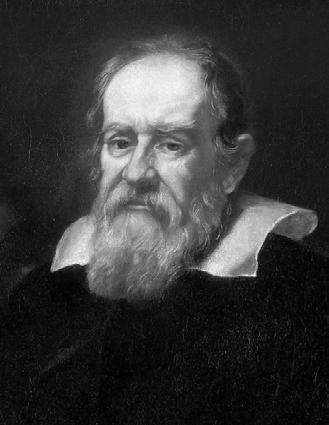
Galileo Galilei (1564–1642) is known as the father of modern science. He was the first person to study the sky with a telescope which led to his discovery that the Milky Way was made of stars. He was also the first to discover moons that orbited planets other than Earth. He discovered the rings of Saturn and that the Sun sits at the center of the solar system. He also did important work with the study of gravity and inertia.
William Gilbert (1544–1603) founded the scientific study of magnetism and is considered one of the founding fathers of experimental science. He discovered that Earth has two magnetic poles and created the world’s first electroscope to detect electric charge.
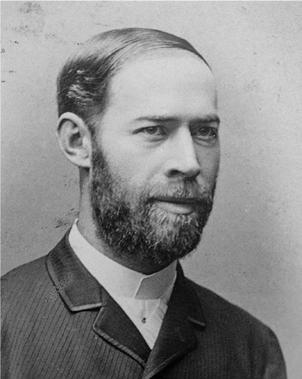
Heinrich Hertz (1857–1894) discovered electromagnetic waves. The frequency of waves is measured in hertz, a unit named for the scientist.
• Markers, crayons, colored pencils, etc., for decorating
PROCEDURE
To complete this activity, follow these steps:
1. Ask students to use books, encyclopedias, the Alabama Virtual Library, the internet and other sources to gather information about their chosen scientist.
2. Distribute copies of the “Famous Scientist Research” worksheet to students and have them fill in the information, including the scientist’s name, birth and death dates, place of birth, field of study, what the scientist is famous for, and key contributions or discoveries. Ask them to add an interesting fact about the scientist and explain why they chose this particular scientist.
3. Distribute copies of the “Trading Card Template” worksheet and ask students to fill in the pertinent information and to either draw a picture of the scientist in the space provided or print and attach a picture.
4. Allow students time to color and decorate their trading card to make it visually appealing.
5. Have students present their trading card to the class or in small groups.
Famous Scientist Research
Name of scientist:
Birth date:
Death date:
Place of birth:
Field of study:
Famous for:
Key contributions/discoveries:
Interesting fact:
Why I chose this scientist:
Trading Card Template
Famous for:
Key contributions/discoveries:
Interesting fact:
Why I chose this scientist:
Name of scientist:
Birth/death date:
Place of birth:
Field of study:
ATTACH PHOTO
Famous for:
Key contributions/discoveries:
Interesting fact:
Why I chose this scientist:
Name of scientist:
Birth/death date:
Place of birth:
Field of study:
ATTACH PHOTO
Atom
V0 C a B U La R y
here are some terms helpful in understanding both magic and science.
A tiny particle that makes up all matter
Attract
To come together
Buoyancy
An object’s ability to float
Center of gravity
The point where the effect of gravity on an object is equal
Density
A term used to compare two substances that occupy the same amount of space but have different amounts of matter
Experiment
A procedure used to test a hypothesis or to make a discovery
Hypothesis
An educated guess about the results of an experiment yet to be performed
Illusion
Something that produces a false impression of reality
Levitate
To float in air
Magnetism
The invisible force that causes items to attract or repel each other
Matter
Anything that has mass and takes up space
Mirror
An object with at least one reflective surface
Mirror image
What is seen reflected in a mirror
Misdirection
Calling attention to one thing to distract from another
Molecule
Formations of atoms bonded or linked together
Perspective
The position from which the eye sees an object
Plane mirror
A mirror with a flat surface, the most common type of mirror
Reflection
The bouncing of light from a surface
Refraction
The change in direction of light as it moves from one transparent substance to another
Repel
To push apart
Scientific method
The process used to prove or disprove a hypothesis using experimentation
Solution
The result of mixing two or more substances together (e.g., salt water)
GAINING VOCABULARY
Alabama Course of Study Standards
OBJECTIVE
By completing this activity, students will:
• Deepen their understanding of key vocabulary to construct meaningful knowledge of content
MATERIALS
For this activity, you will need the following items:
• “Word Concept Map” on page 21
• Pencil
PROCEDURE
To complete this activity, follow these steps:
1. Before the show, have students fill in the “Word Concept Map” with the word “magic” or the word “illusion”— depending on grade and level of knowledge.
2. After the show, revisit the “Word Concept Map” and encourage students to continue to fill in and clarify their responses. Have students add examples of what was observed at the show. Take the opportunity to build and explore words using “magic” or “illusion” as the base word (e.g., magician, magically, magical or illusionist).
Magic and Illusion
Word Concept Map
Word: Description:
Another example: And another example:
An example:
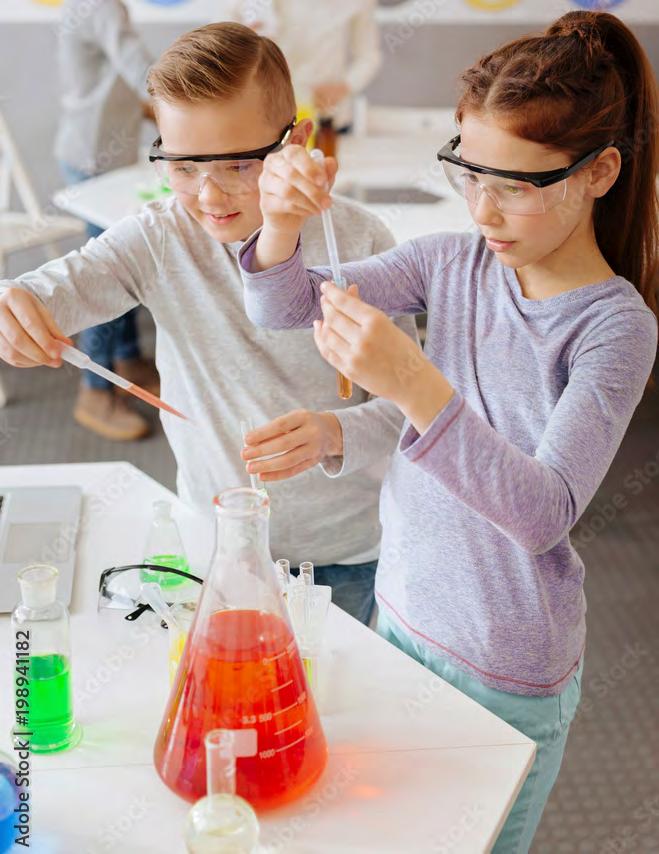
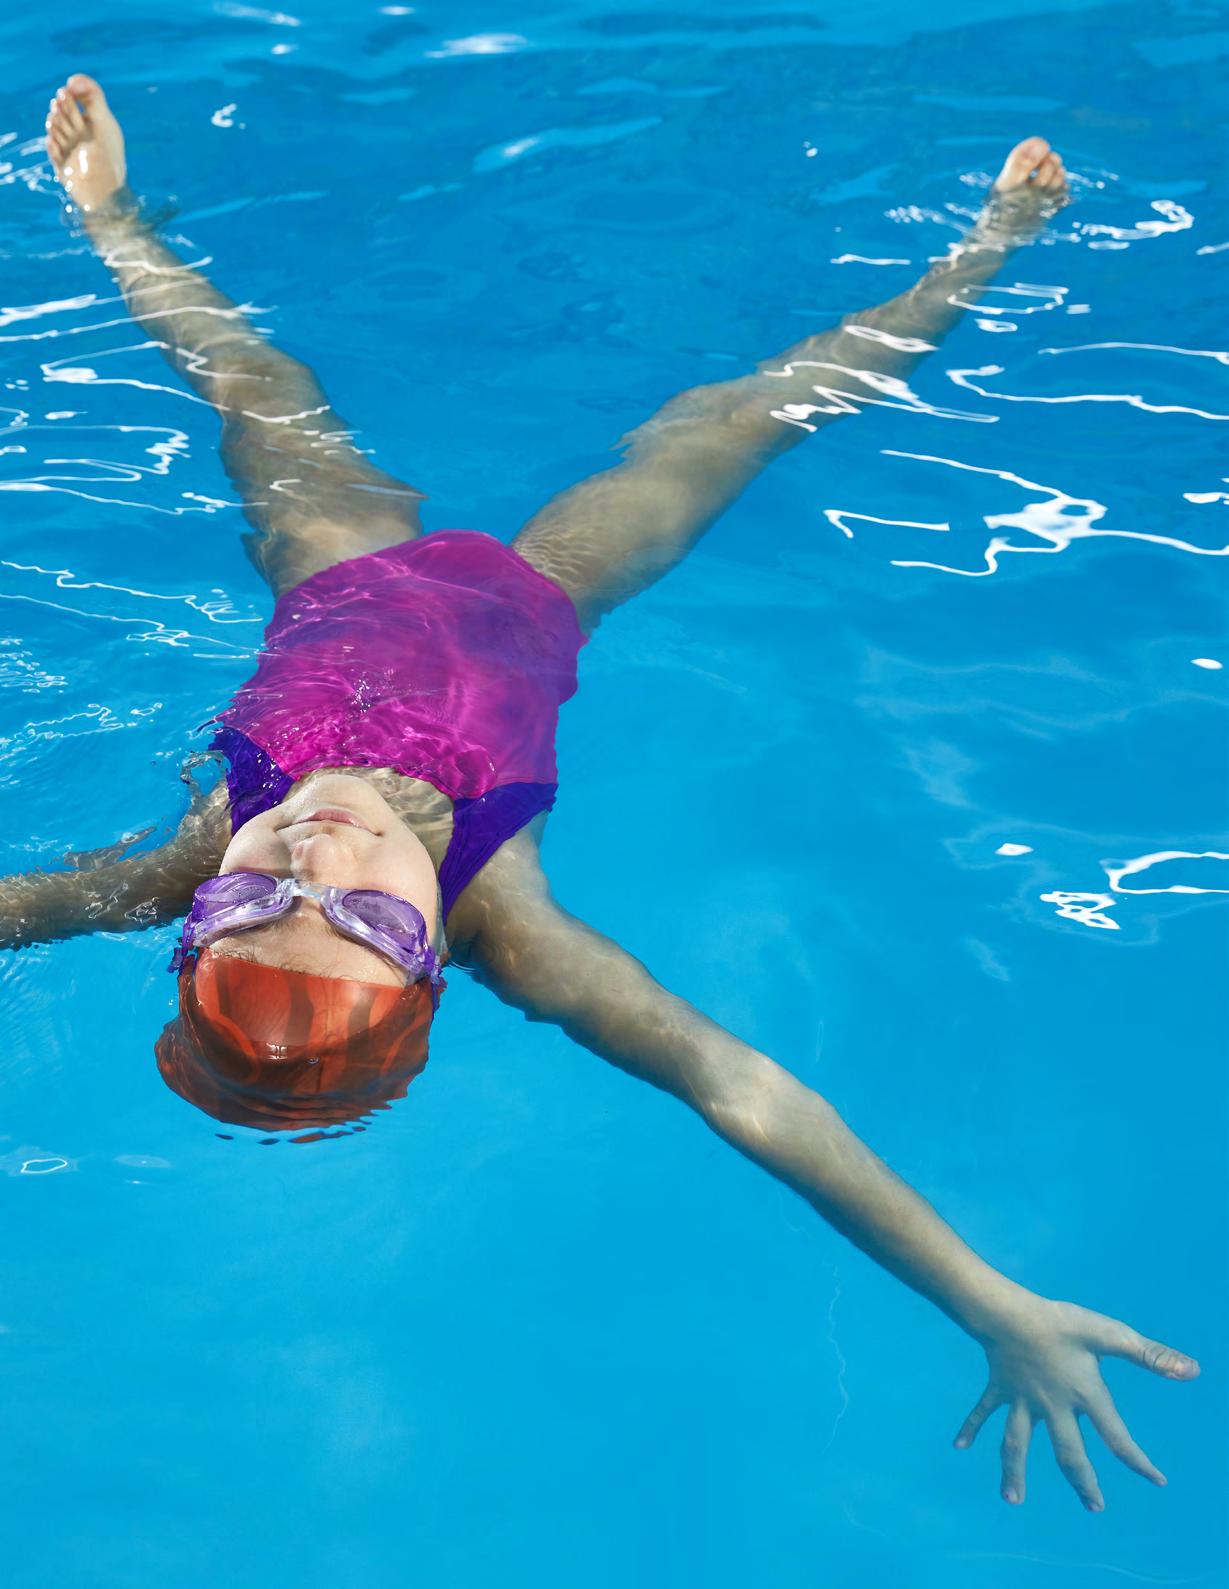
DENSITY & BUOYANCY
An object placed in water will do one of two things: float or sink. But why do some things float on the water’s surface while others sink to the bottom? The answer has to do with science and two important terms: density and buoyancy. Density is a term used to compare two substances that occupy the same amount of space (have the same volume) but have different amounts of matter (their masses). Buoyancy is simply an object’s ability to float. Buoyancy depends greatly on the density of the object. If the object is denser than the water, it will sink. If the object is less dense than the water, it will float. Sometimes, we may think of density as weight. We can look at a heavy stone and a piece of Styrofoam and hypothesize that the stone would sink and the Styrofoam would float based solely on knowing the stone is heavy and the Styrofoam is light. In this case, we would be correct. But what about objects that are very light and still sink, like paperclips, or large ships that float on the water despite weighing tons? This is because density is not merely the weight or size of an object but is related to the amount of matter within the space it occupies.
Density of Solids in Water
CORK WOOD ALUMINUM LEAD
WILL IT SINK OR FLOAT?
Alabama Course of Study Standards
OBJECTIVE
By completing this activity, students will:
• Conduct an investigation to describe and classify various substances according to their physical properties
• Examine matter and determine some of its properties
• Investigate how the density of objects affects their buoyancy
MATERIALS
For this activity, you will need the following items:
• “Will It Sink or Float?” worksheet on page 25
• Large container of water
• Lots of small objects of different weights and materials (plastic, metal, wood, foil, Styrofoam)
• A few larger objects
• Pencil
PROCEDURE
To complete this activity, follow these steps:
1. Have students select seven objects to examine. Ask them to draw or name each object in the boxes in the left column on the worksheet.
2. Ask the students to make a prediction about each object when placed in the container of water. Have them mark their prediction by circling either “sink” or “float” in the middle column.
3. Drop the objects into the water one at a time (or allow students to do this). Watch what happens to each one. Ask students if they predicted correctly. Have them record their observations for each object by circling “sink” or “float” in the right column.
4. After the experiment has concluded, allow students to discuss the results and how they compared to their predictions. Did they guess correctly? Did they predict that some very light objects like a paperclip or button would float when they actually sunk? Did they think a wooden block would sink but then actually floated? Remind the students that buoyancy is not just about the weight and
size of an object but depends on its density and even more specifically its density in comparison to the density of the water. Density has to do with the amount of matter within an object. Another way to think about it is that matter is made up of molecules. Objects with more matter have molecules that are closer together. These objects are more dense. So, objects that sink are denser than the water. Objects that float have less matter, or molecules that are further apart, making them less dense than the water and allowing them to float.
5. Ask students how you might change the density of the water. Have them create predictions about what would happen to the objects if the water became more dense. (Now it’s time for the magic! Proceed to the “Floating an Egg” activity on page 26.)
for younger students
Have a signal that allows for smooth and clear transitions between steps of the lesson.
1. Introduce the concepts of sinking and floating with this video:
X “Sinking and Floating Song” (CBeebies)
2. Make a sink-or-float tank. Ask students to show whether they think an object will sink or float by having them wave their hands overhead to indicate float or moving their hands downward to indicate sink.
3. Throughout the week, add new objects to the tank and have students observe what has been added. Label objects on cards to add to the center for sight word recognition.
Will It Sink or Float?
Draw a picture of each object What do you think will happen? What actually happened?
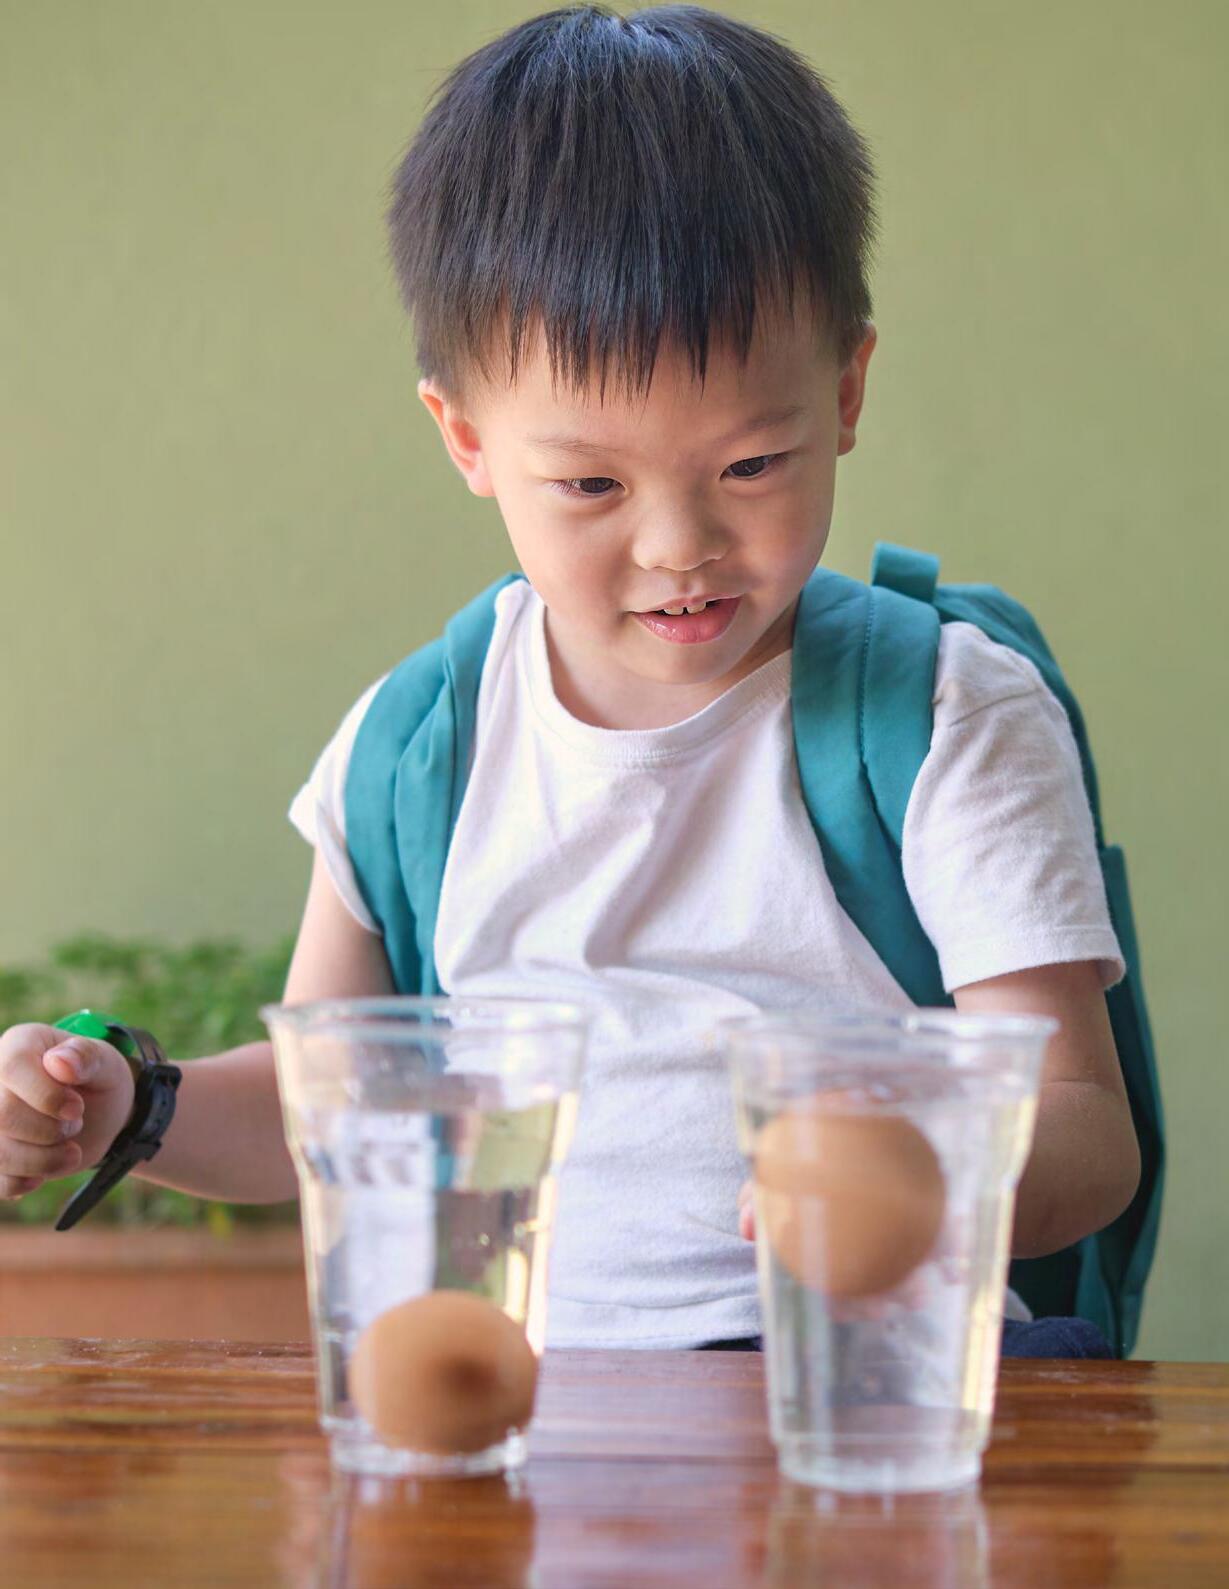
FLOATING AN EGG
Alabama Course of Study Standards
National Standards
OBJECTIVE
By completing this activity, students will:
• Examine matter and determine some of its properties
• Investigate how the density of objects affects their buoyancy
MATERIALS
For this activity, you will need the following items:
• Quart or liter jar
• Tap water
• Scissors
• Rulers
• Masking tape
• 1/2 cup salt
• Felt-tip pen
• Uncooked egg
• Large spoon
PROCEDURE
To complete this activity, follow these steps:
1. The Setup
a. Fill the jar half full with tap water.
b. Cut a three-inch piece of tape and stick it to the outside of the salt container. Use the pen to label the tape “Magic Swimming Powder.”
c. Place the egg and spoon on the table.
2. Magic Science Time!
a. Tell students, “I am going to teach an egg how to swim.”
b. Demonstrate to students that the egg doesn’t know how to swim by placing it in the jar filled with tap water. The egg will sink to the bottom. Use the spoon to remove the egg from the jar.
c. Tell students that, for the egg to swim, “magic swimming powder” needs to be added to the water. Pour the salt in the water and stir with the spoon. If you wish, you can say some magic words.
d. Place the egg in the water—now it will float.
3. Discussion
a. How did the “magic swimming powder” help the egg float?
b. What was created by mixing the powder into the water?
c. Why didn’t the egg float without the powder?
4. Explanation
a. All matter floats or sinks depending on its density. Less dense substances float on more dense substances. The egg floats in salt water because the egg is less dense than the salt water. However, the egg is denser than tap water, so it sinks.
b. Salt water is a solution that contains both salt and water. A solution occurs when a solid is dissolved in a liquid.
TAP WATER SALT WATER
What is an
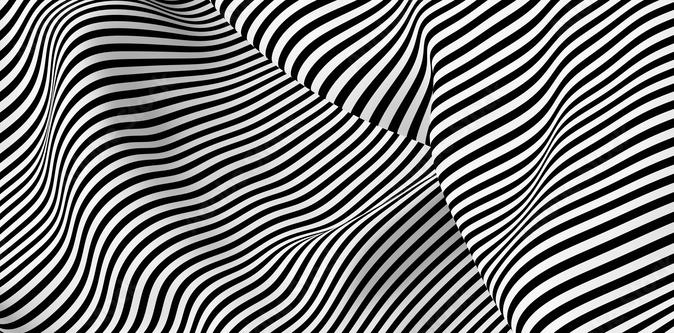
An illusion is something that is not what it seems to be. Illusions trick our senses and make us believe something is real when it is not. Optical illusions trick the eyes, but also trick the brain. They can use light, color and patterns to fool our brains into perceiving things that may not be real.
How many black dots do you see in this image (right)? Would you believe there are actually no black dots? This illusion is called the scintillating grid illusion, and scientists have used it and others like it to explain how the eyes transmit signals to the brain.
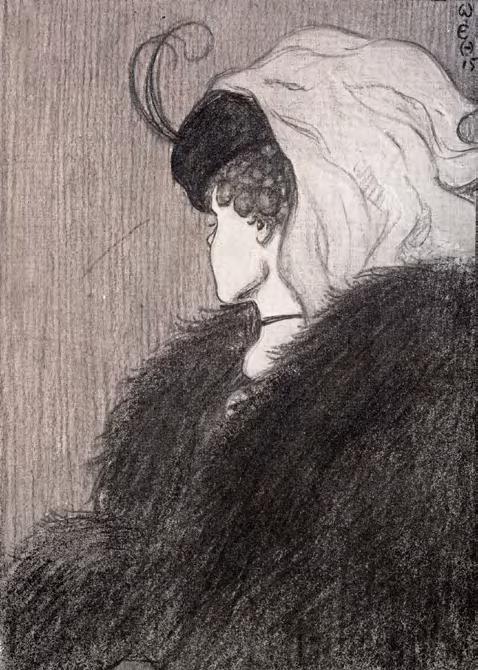
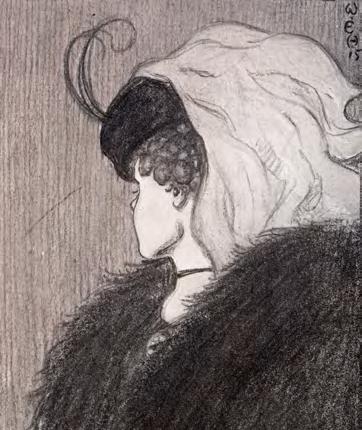
Can you see both women in this image (left)? This drawing is called “My Wife and My Mother-in-Law,” and it is one of the oldest optical illusions, created by William Ely Hill in 1915. Research has shown that younger people tend to see the wife first and older people tend to see the mother-in-law. It is virtually impossible to see them both at the same time. Which do you see first?
hint: The thin horizontal line near the center of the drawing is both a necklace and a mouth.
• Understand how the eyes and brain work together to see
• Be able to define the term “optical illusion”
• Be able to describe different types of optical illusions
MATERIALS
For this activity, you will need the following items:
• “Observation Lab–Optical Illusions” handout on page 30
• “Student Data Sheet—Optical Illusions” worksheet on page 32
• Pencil
PROCEDURE
To complete this activity, follow these steps:
1. Discuss various examples of optical illusions with students.
2. Provide each student with the “Observation Lab” handout.
3. Allow students time to focus on the illusions in each figure. Ask them to jot down notes on what they see, in particular their first impressions.
4. Provide students with the “Student Data Sheet” worksheet and allow each student time to complete it.
5. Conduct a class discussion during which students can share what they experienced and saw in each of the optical illusions.
EXTENSION IDEA
Analysis: Have students write a paragraph discussing what each of the figures on the “Observation Lab” handout has in common and what they have learned from this activity. Have them also include information on which illusions were more difficult to observe and which were easier. Finally, if they have previously observed other optical illusions, have them briefly mention these in the paragraph.
Observation Lab—Optical Illusions
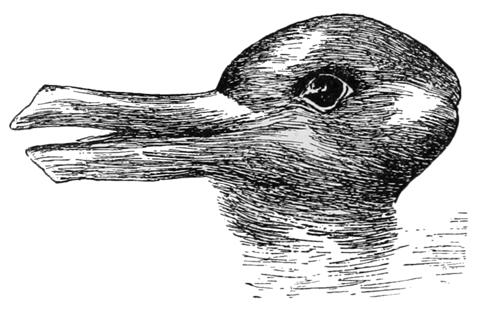
figure 1: Which animal do you see first? Can you see another?
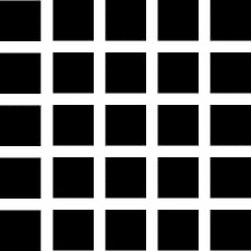
figure 2: What do you see where the white bars cross each other?
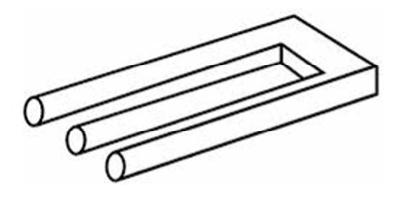
figure 3: What seems wrong about this figure?
figure 4: Which person is tallest? Make a guess and then use your ruler to measure each person.
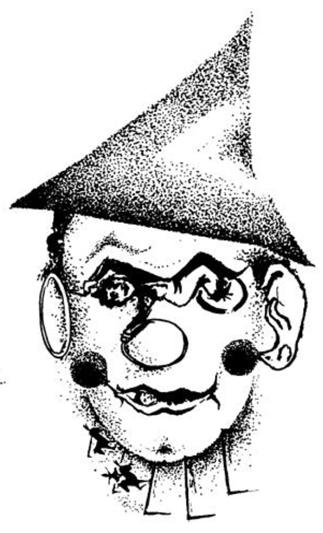
figure 5: Rotate the clown 90 degrees to the right. What happens?
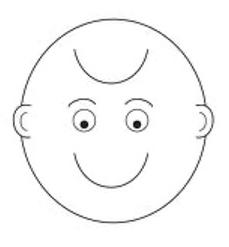
figure 6: Rotate the face 180 degrees. What happens?
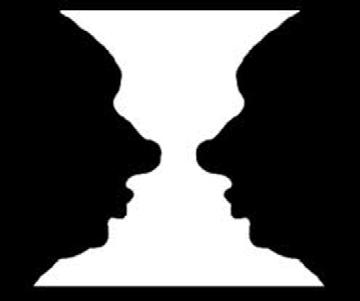
figure 7: What do you see first? Look again— what else do you see?
figure 8: What do you see first? Look again—what else do you see?
figure 9: Which president do you see? Look again—can you see other things? Name as many as you can find.
figure 10: Stare at the space between the bullseye and the arrow. What happens?
Student Data Sheet—Optical Illusions
Figure 1: Which animal(s) do you see?
Figure 2: What do you see where the white bars cross?
Figure 3: What seems wrong about this figure?
Figure 4: Which person is tallest? (observation)
Person on left = cm. Person in middle = cm. Person on right = cm.
Figure 5: What happens when you rotate the clown?
Figure 6: What happens when you rotate the face?
Figure 7: What do you see first?
Look again, what else do you see?
Figure 8: What do you see first?
Look again, what else do you see?
Figure 9: Which president do you see?
What other things do you see?
Figure 10: What happens when you stare at the space between the bullseye and the arrow?
NOTE FOR TEACHERS
The following explanations for the illusions in each figure can be used for your information rather than for students, depending on their grade level. Not all details have to be explained; the illusions can be enjoyed simply as an observation activity.
figure 1: Both a duck and rabbit can be seen. This is a famous example of gestalt psychology—essentially that the whole is greater than the sum of its parts. The principle maintains that the human eye sees an object in its entirety before perceiving its individual parts. Gestalt psychologists stipulate that perception is the product of complex interactions among various stimuli.
figure 2: This is called the Hermann grid. Gray spots are seen at the intersections. One reason is that the white appears to be whiter when it is next to black. The white bars between the black squares appear whiter than at the intersections. An intersection is seen as white meeting white and less than white than next to black. Darker areas are the result. It also has to do with the rods in the retina that are firing inhibiting neighboring receptors from firing, thus producing areas of darkness.
figure 3: It is not attached anywhere, which is called a blivit, or an “impossible” picture that is the result of two sets of information from the same source that cannot exist together. When you look at the separate parts, they appear possible, but when our brain tries to figure out how the whole picture is put together, we run into trouble.
figure 4: The three persons are all the same height (2.7 cm). This illusion is caused by the narrowing of the lines and squares towards the back of the figure; the narrower lines make the person on the right appear tallest. The person on the left has wider lines behind them, making them appear shortest.
figure 5: When the clown is turned 90 degrees to the right, the viewer will see a circus ring with jugglers and animal acts. During the early part of the 20th century, some painters became “surrealists” because their paintings passed beyond the appearance of ordinary reality. One technique was double painting; the clown is an example of this type of art.
figure 6: This drawing is called a “smiley/frowny face.” When the figure is rotated 180 degrees, the face changes from smiling to frowning.
figure 7: One observation of the drawing (its white center) produces the image of a curvy vase; another observation (the black background) produces the image of two mirrored faces in profile.
figure 8: A person viewing this drawing might see a young or older lady. (Hint: The young lady’s chin and ear become the older lady’s nose and eye.) This is called a transformation and is an illusion consisting of two very different drawings. This transformation is often used in study by psychologists.
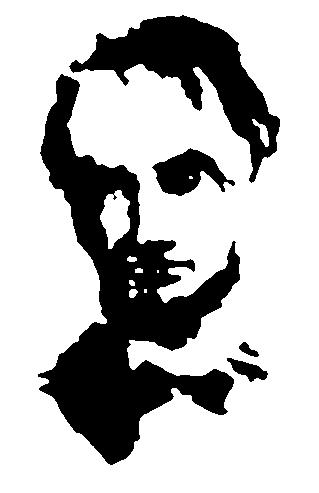
figure 9: Most viewers will immediately recognize the silhouette of Abraham Lincoln, but several other objects can also be identified, including a mouse, camel, snail, clown, goose, the profile of a face, and a dog’s head.
figure 10: It appears the arrow “shoots” right into the center of the bullseye. This occurs because when the page is close to your face, one eye sees only the arrow while the other eye sees only the bullseye. Your brain must put the two pictures together.
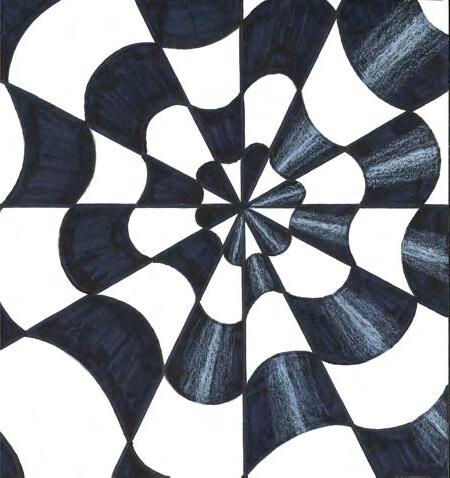
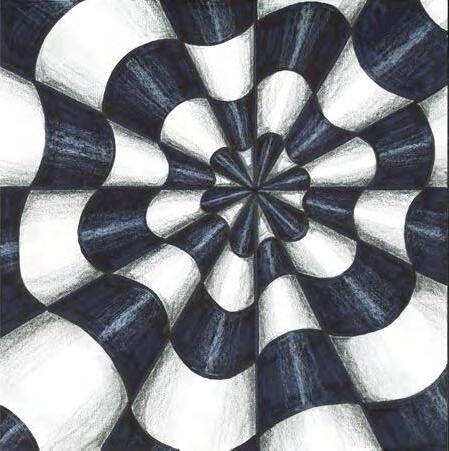
MAKING OPTICAL ILLUSION ART
Alabama Course of Study Standards
AE17.VA.4.3 AE17.VA.4.4 AE17.VA.5.4
National Standards
OBJECTIVE
By completing this activity, students will:
• Use line direction and value to create the illusion of waving paper
MATERIALS
For this activity, you will need the following items:
• Drawing paper 10 x 10 inches in size
• Rulers
• Pencils
• Felt-tipped markers
• White colored pencils
PROCEDURE
To complete this activity, follow these steps:
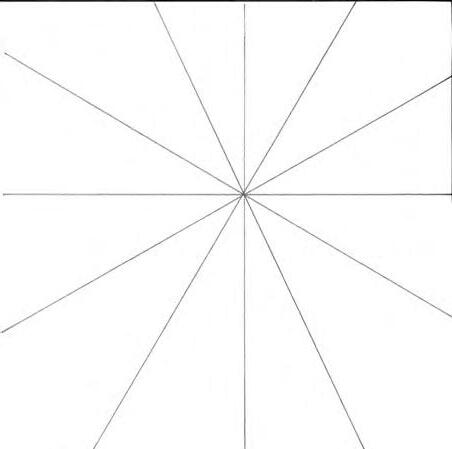
1. Using a ruler, draw six straight lines that intersect at the same point, creating 12 pie slices.
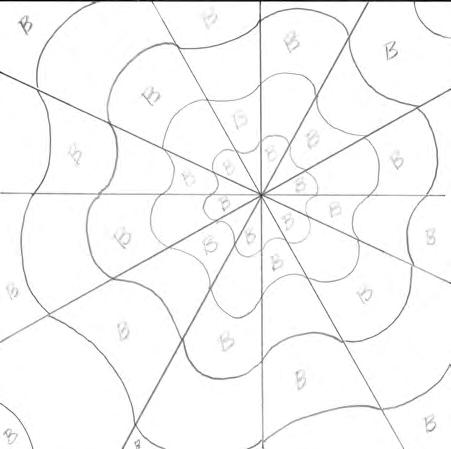
2. Demonstrate how to draw alternating curving lines within each pie slice, starting in the center. Have students follow along on their own papers.
3. Have students label every other section with a “B” within each slice, drawn lightly in pencil.
4. Ask students to trace over the smallest pieces labeled “B” in the center using an extra-fine point felt-tipped marker, then fill it in. As they move outward to the larger pieces, they may wish to switch to a fine point felt-tipped marker.
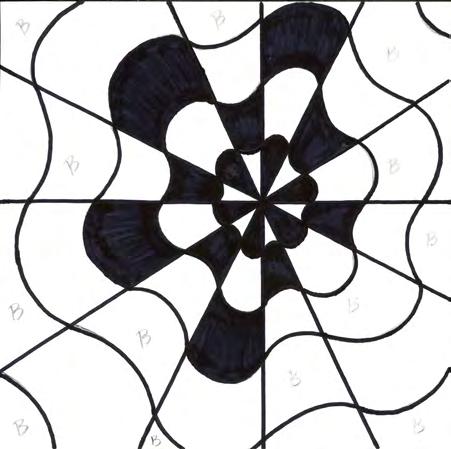
5. Discuss the element of value in art with students and demonstrate how to create subtle value changes within each piece with colored pencils. First use white colored pencil in the black areas to create highlights. Have students press hard with their white pencil down the middle of a section, creating a bright white strip. Then as they move outward to each side, have them press progressively lighter, leaving the sides black.
6. Finally, have students use black colored pencils in the white areas. Have them draw the darkest along the sides and gradually press more lightly as they move towards the center, leaving the center white.
Share your students' colorful creations with us.
We'd love to see the masterpieces your talented students create. Send us photos of their optical illusion art and other projects from this performance study guide. Be sure to include each student's name, age, grade and school with your submission. You can send all submissions to the Gogue Center via email at gpac.education@auburn.edu
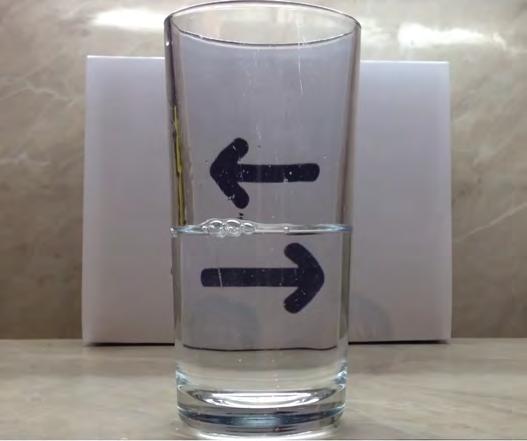
REFLECTION & REFRACTION
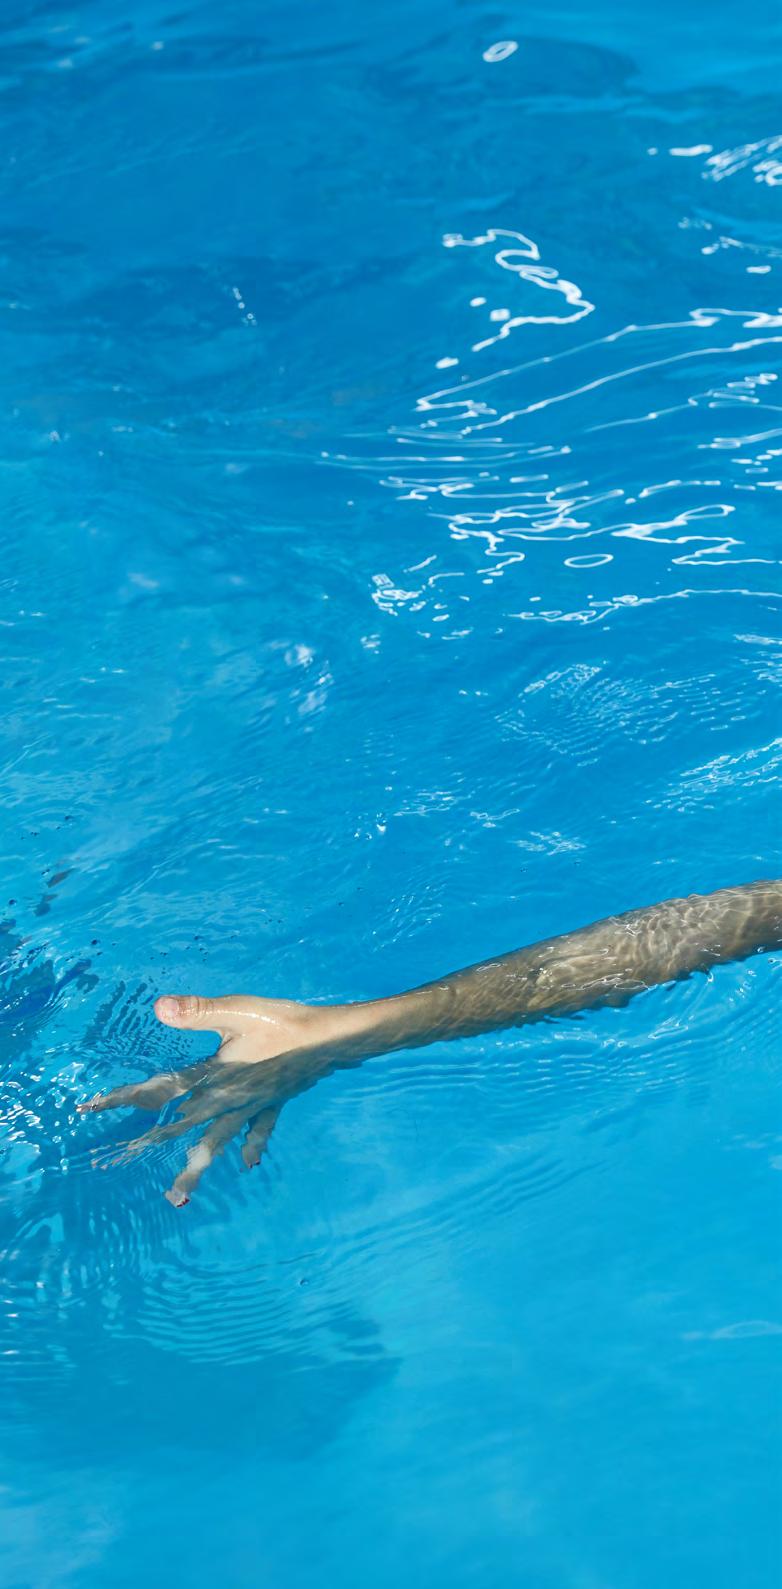
One method for creating optical illusions is through the reflection and refraction of light. Reflection of light occurs when a light wave hits a surface and bounces back. Refraction of light occurs when light rays bend as they pass from one medium to another, thereby changing the path of the rays. It is important to know that light, on its own, moves in a straight line. It is only when light encounters a surface or passes through different mediums that its path is altered. Light is what allows us to see. We see things because they give off their own light or they reflect light from another source; for example, we see the moon because it reflects the light of the sun.
Water can play an interesting role in reflection and refraction, and magicians use both to create their illusions. Water serves as an excellent reflective
surface for light. Think about a bright sunny day at the pool or beach. It’s not just the sun that hurts your eyes, it’s also the light reflecting off the water. However, if you put water in a clear glass and look through it, you can experience its refracting power. The light rays passing through the glass are bent.
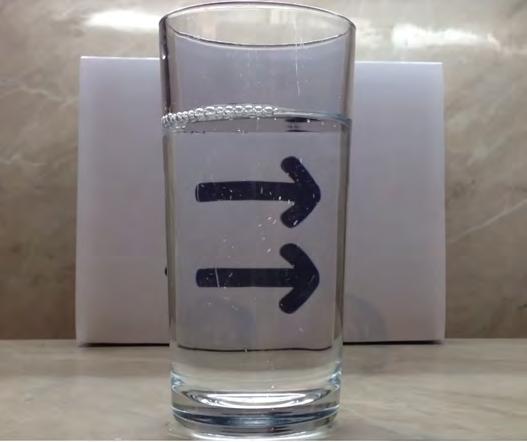
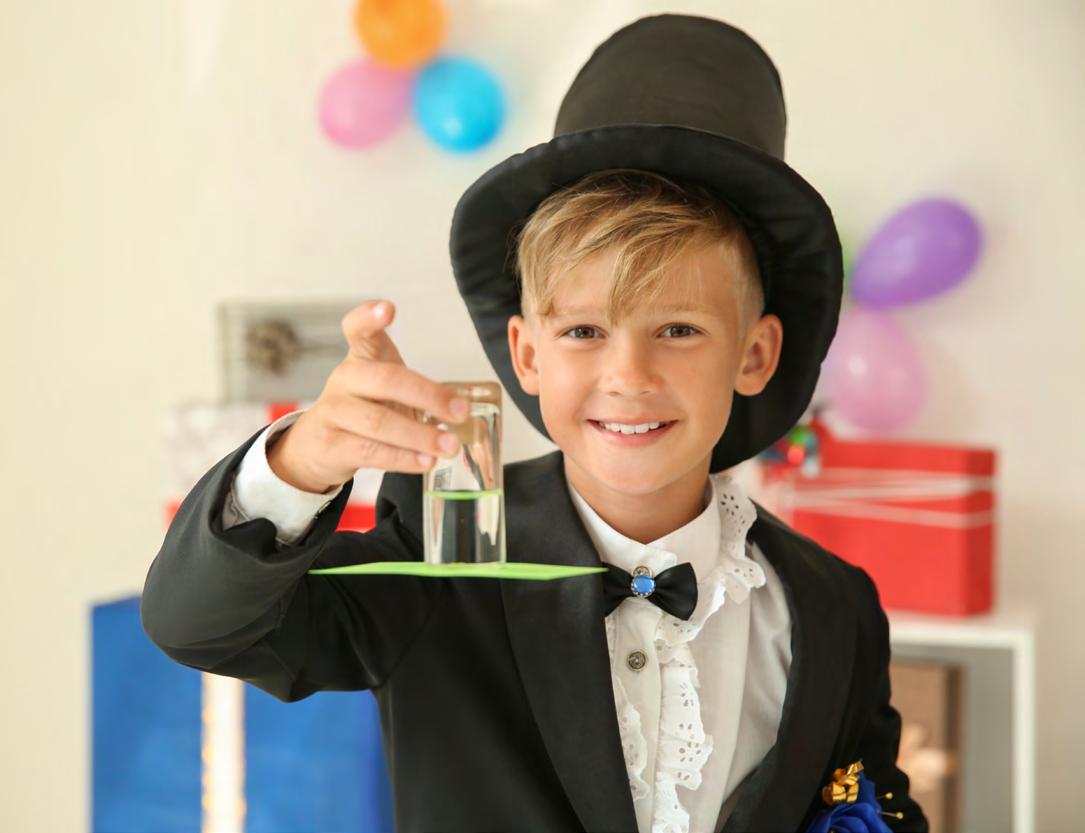
In the images below, do the arrows behind the glass appear to be pointing in the same direction?
It may look like one arrow magically changes direction, but this demonstration showcases the effects of refraction. Both arrows, in fact, are pointing in the same direction. So, light passing from air to water will cause the rays to bend and thus trick our eyes into seeing an illusion.
CREATING ILLUSIONS
Alabama Course of Study Standards
National Standards
OBJECTIVE
By completing this activity, students will:
• Understand through observation that objects can be seen when light illuminates them
• Understand the effects of light refraction on vision
MATERIALS
For this activity, you will need the following items:
• A glass
• Tap water
• Pencil
PROCEDURE
To complete this activity, follow these steps:
1. The Setup
a. Fill the glass about two-thirds full of tap water.
b. Place the glass of water and the pencil on the table.
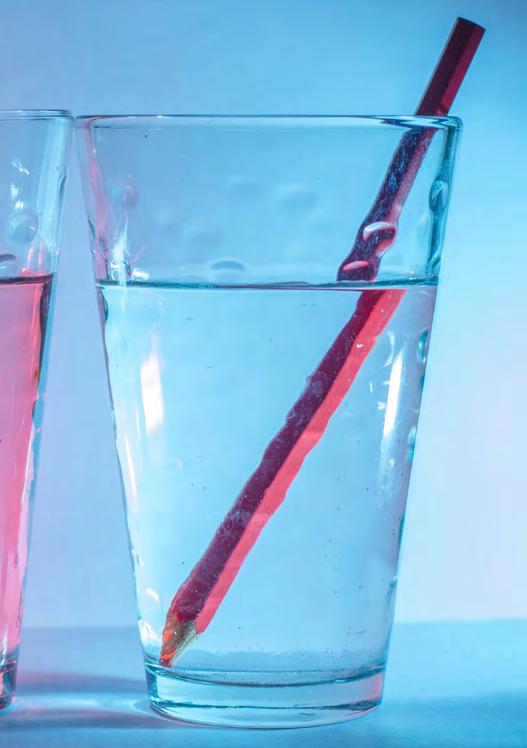
2. Magic Science Time!
a. Hold the pencil in front of you. Tell students, “I am going to break the pencil by simply sticking it in this glass of water.”
b. Hold the pencil upright in the water so that the tip is about halfway between the surface of the water and the bottom of the glass. Make sure the pencil is near the back of the glass, away from students.
c. Move the pencil back and forth in the water, keeping it upright. Ask students what they see. It will appear as though the pencil is broken when in the water.
d. Remove the pencil from the water.
3. Discussion
a. Did the pencil really break when it was placed in the water?
b. If not, then why did it look like the pencil was split in half?
4. Explanation
a. This trick works because of refraction. Light travels in straight lines, but when it travels from one transparent substance to another, the light rays bend. This is refraction. When light travels from a more dense transparent substance, such as water, to a less dense substance, such as air, the light refracts, or bends noticeably. Light travels at different speeds in substances with different densities.
b. Light reflected from the pencil appears to be in one place when it travels through the air, and in another place when it is refracted through water.
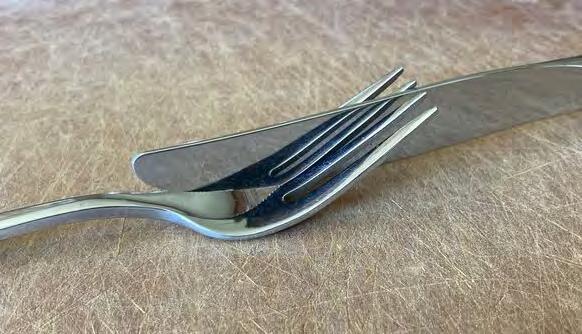
TRANSPARENCY & OPACITY
We know that light waves can be reflected or refracted by objects, but in what ways do different objects affect light waves? Objects that have transparency, such as a piece of clear glass, transmit light. This means that light passes through them completely, making them see-through. In contrast, objects that reflect light are opaque, meaning light does not pass through them but instead bounces off. But, what about objects that let some light pass through or only partly reflect the light?
This is a quality called opacity. Opacity is an object’s level of resistance to light. Objects that are not completely transparent nor completely opaque are translucent. Translucent objects allow some light to pass through them, but the view on the other side of the translucent object is more difficult to see or is altered. Consider a piece of plain paper or colored plastic container as examples.
In this optical illusion, reflection of light is used to make the knife appear to be translucent.
DISAPPEARING PENNY
Alabama Course of Study Standards
OBJECTIVE
By completing this activity, students will:
• Understand from observation that objects can be seen only when light illuminates them
• Investigate the difference between the translucent and reflective properties of water and how that affects vision
MATERIALS
For this activity, you will need the following items:
• Quart or liter jar with lid
• Tap water
• Penny
• Student assistant
PROCEDURE
To complete this activity, follow these steps:
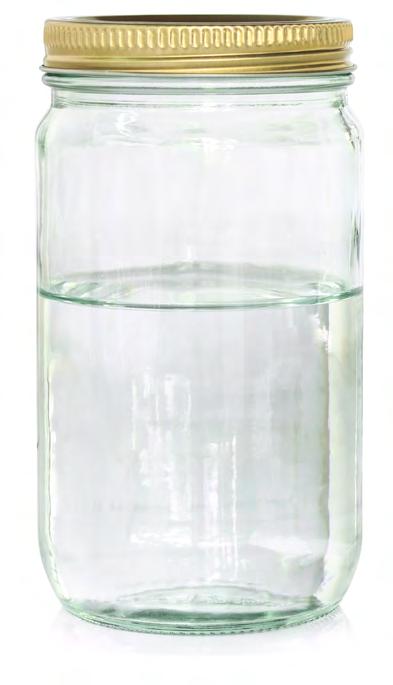
1. The Setup
a. Fill the jar with tap water. Put the lid on the jar.
b. Place the jar and the penny on the table in front of you.
2. Magic Science Time!
a. Ask a student helper to assist you.
b. Have your helper examine the penny and confirm that it is real.
c. Have the helper place the penny on the table. Ask, “Can you see it?”
d. Place the jar filled with water on top of the penny.
e. Say a few magic words and wave your hand over the top of the jar.
f. Ask the helper to examine the water from the side of the jar and see if the penny is still there. What is the answer?
3. Discussion
a. Where did the penny go?
b. Why can’t the helper see the penny through the clear water?
4. Explanation
a. When light travels from air to water, light bends toward the normal, a line perpendicular to the surface. Traveling from water to air, light bends in the opposite direction, away from the normal.
b. At a certain angle, when light travels from a more dense substance (water), to a less dense substance (air), it no longer refracts but will reflect. When the image of the penny comes toward the side surface of the jar at too great an angle, reflection occurs rather than refraction, and the image cannot be seen outside of the jar.
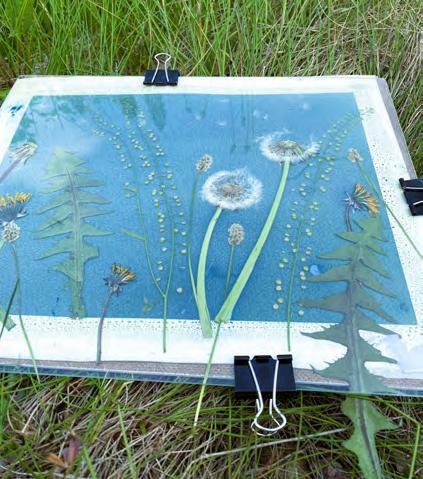
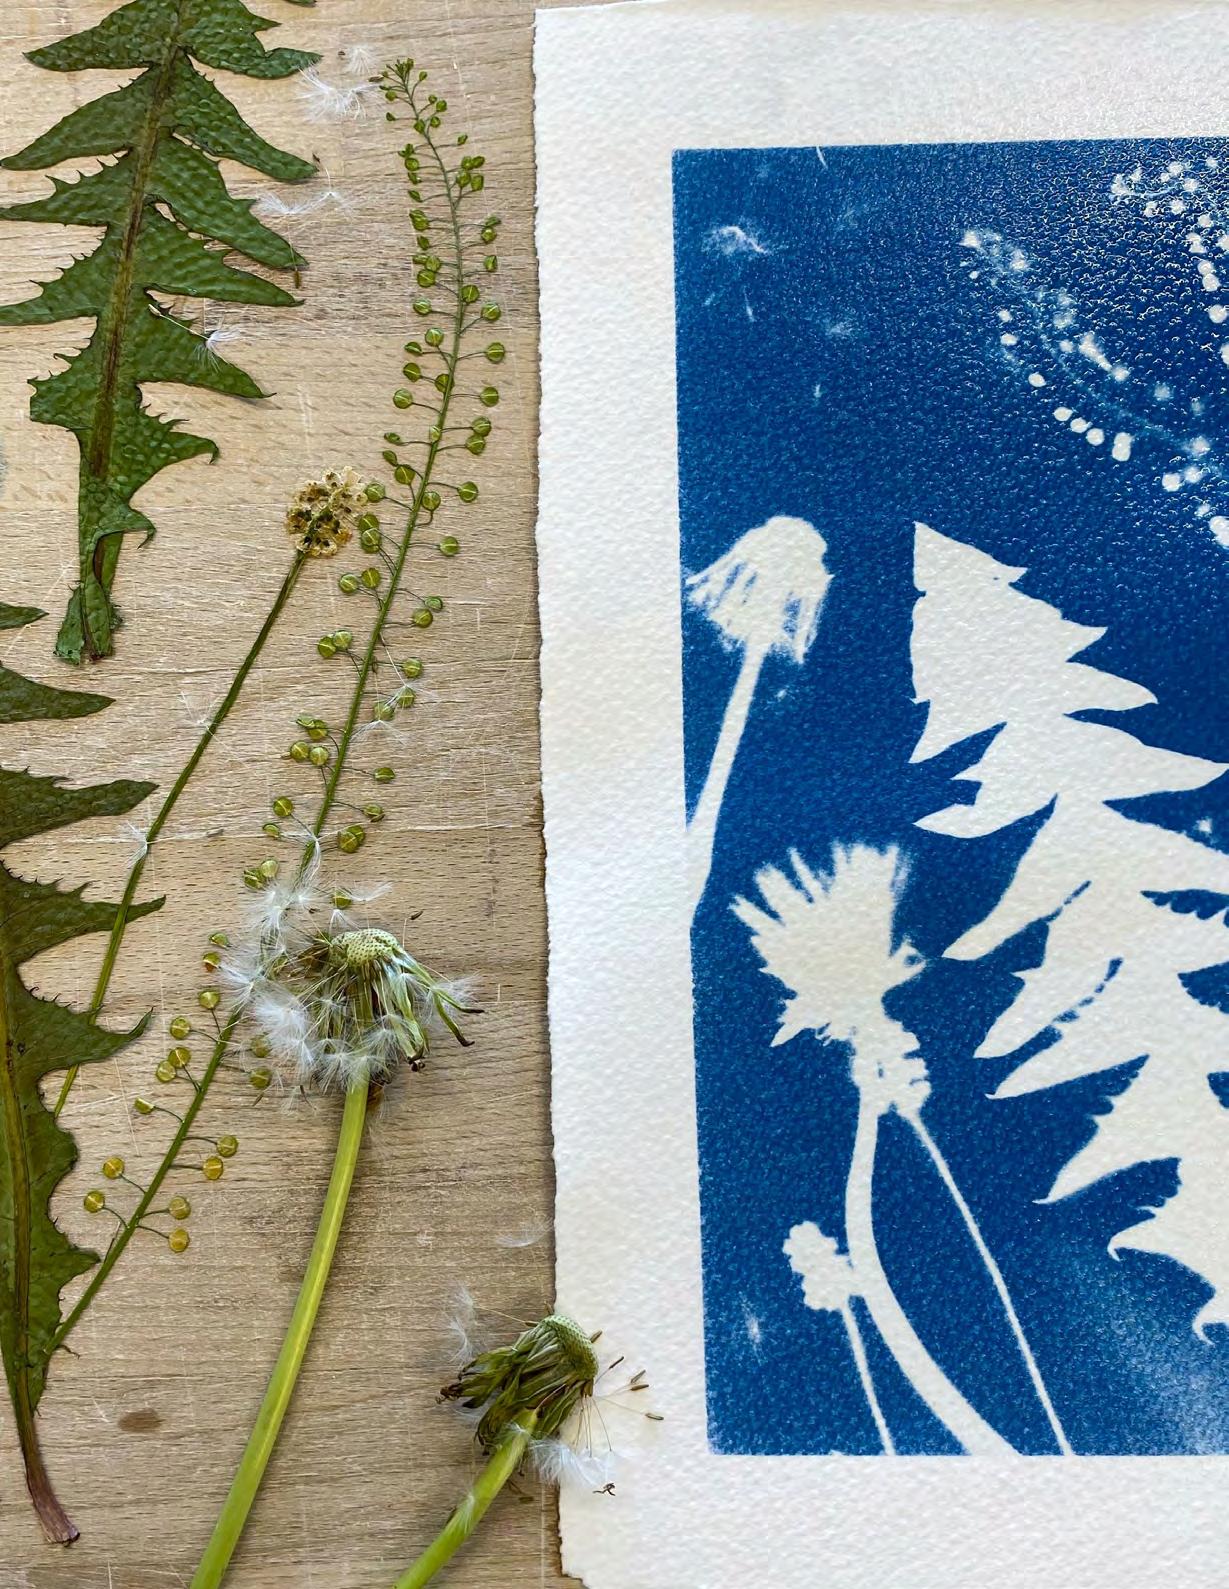
CAPTURING CYANOTYPES
Alabama Course of Study Standards
OBJECTIVE
By completing this activity, students will:
• Engage in hands-on experimentation with the basic principles of photography and light
• Learn about positive and negative space
• Express their creativity while making unique prints
MATERIALS
For this activity, you will need the following items:
• Cyanotype paper (sun printing paper)
– Can be purchased on Amazon
– Can be created by purchasing the correct nontoxic chemicals. Learn how here:
X https://www.alternativephotography.com/ cyanotype-classic-process/
• A variety of found objects for creating negative space images. (For example, leaves and flowers can make beautiful botanical prints, but students can also cut paper into shapes for creating their prints.)
PROCEDURE
To complete this activity, follow these steps:
1. Distribute the light-sensitive paper prior to the activity.
2. Allow students to gather objects that they will use to create their cyanotype prints.
3. Ask students to arrange their objects on their paper to create the image that they would like to capture.
4. Have students lay their papers in a place where they will receive sun exposure. Papers will need an exposure time of at least five minutes on a sunny day or 20 minutes on a cloudy day. The longer they are exposed to light, the more strongly the image will transfer; however, different effects can be achieved with different lengths of time, so experimentation for the sake of artistic expression and scientific investigation is encouraged.
5. After the image has been exposed for the appropriate amount of time, have students wash the solution off their papers with cold running water for a few minutes. While they do this, they will begin to see the reverse image that creates the negative cyanotype. The parts exposed to light will be blue and the parts hidden by the objects will remain white.
6. Have students blot as much water off their papers as possible and then lay them somewhere safe to dry.
7. Things to note:
a. Exposure time can alter the final print.
b. Items with transparency will allow some light through which may affect the final print. Flower petals and feathers can be captured and create ethereal images if given adequate exposure time. Translucent items like clingfilm and candy wrappers can create interesting textural effects.
c. Laying a piece of glass over the items on the paper will allow them to be pressed closer to the surface while still being exposed to the same amount of light. This will produce a cleaner and more detailed cyanotype image.
MATTER & PARTICLES
Matter is anything that has mass and takes up space. Matter can be in the form of a solid, a liquid or a gas—air, water, rocks, animals and people are all examples of matter. All matter is made up of tiny particles called atoms. Atoms bond together to form molecules. In solids, liquids and gases, these particles behave differently based on their attraction to one another. In solids, they are very attracted to each other and are therefore close together— while in motion, they never move past one another. In liquids, the particles are attracted to each other, but not as much as in solids— they are close together but can move past one another easily. In a gas, particles have essentially no attraction to each other and are far apart and in constant motion. If the particles in a gas collide, they bounce off each other and keep moving. Did you know that all these particles are too small to be seen? If they cannot be seen, how do we know that they are there?
Changing States of Matter
OBSERVING THE INVISIBLE
Alabama Course of Study Standards
SC15.5.1
National Standards
NS.5-8.2
OBJECTIVE
By completing this activity, students will:
• Develop a model to describe that matter is made up of tiny particles, too small to be seen
• Use the model to describe the differences in attraction among the particles of a solid, liquid and gas
• Use their models of solids, liquids and gases to explain their observations in the lesson
MATERIALS
For this activity, you will need the following items:
• Hammer
• Nail
• Wood
• Technology for showing digital content
• Flexible plastic soda bottles (18-20 oz.) with caps (enough for each student or for each group)
• Latex balloons (enough for each soda bottle)
• Water
note: Flexible plastic soda bottles work better than disposable water bottles because water bottles are often not very flexible and tend to crush completely when squeezed.
MATERIALS FOR EXTENSION
For this activity, you will need the these additional items:
• Shaving cream
• Small plastic or paper plate
• Sand
• Two clear plastic cups
PROCEDURE
To complete this activity, follow these steps: In this activity, students will observe and examine the properties of three states of matter: solid, liquid and gas. Before getting started, review the “Matter & Particles” lesson on page 42. Remind students that everything they can see and touch is matter. Explain that all matter on Earth exists in the form of a solid, liquid or gas, and that all matter is made of extremely tiny particles called atoms and molecules. Tell students that an atom is the smallest building block of matter and a molecule is two or more atoms connected together. These particles are so small that we can’t see them. Scientists use models to understand the behavior of atoms and molecules and to help explain the properties of matter.
note: Even though atoms and molecules are different, for the purpose of this lesson, they both will be represented in the same way. In later lessons, you can show them using different models.
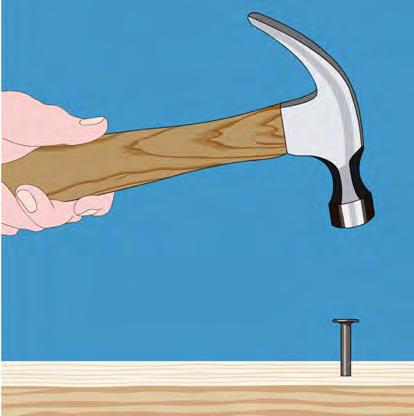
1. Demonstrate the properties of a solid.
Hold up the hammer, nail and piece of wood. Explain to students that these items are examples of solids. Like all other solid matter, the hammer, nail and wood are made of atoms that are highly attracted to each other; their atoms are held together tightly.
Next, use the hammer to tap the nail partially into the wood. Explain to students that even with pressure and force applied (hammer hitting nail; nail entering wood), these solids retain their overall shape. This further illustrates the high level of attraction between the atoms of a solid.
note: If you don’t want to hammer a nail into wood, just tap the hammer lightly on a hard, sturdy, unbreakable surface, like a table or chair.
To further demonstrate, show this animation. Explain the particles in a solid are very attracted to each other and vibrate in place.
2. Demonstrate the properties of a gas.
Have students examine their “empty” plastic bottles. (Ask students to remove their bottle caps. Keep them close by— the caps will be used in the next experiment.)
OBSERVING THE INVISIBLE CONTINUED
Alabama Course of Study Standards
SC15.5.1
National Standards
NS.5-8.2
investigation questions
• If the bottle has no liquid in it, is it completely empty? (Maybe.)
• Is there anything at all in the bottle? (Yes, there is air in the bottle.)
Explain that the bottle has air in it and that air is made up of different gases like oxygen, nitrogen and carbon dioxide that we breathe every day. Explain that a gas, unlike a solid, is made up of extremely tiny particles.
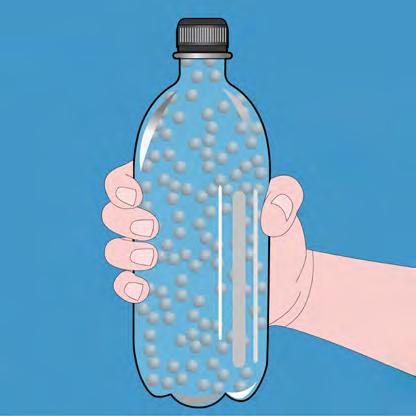
If students still doubt there is anything in the bottle, they can put a balloon on it and see what happens when they squeeze the bottle. Direct students to carefully cover the mouth of the bottle with a standard latex balloon. Once the balloon is on, students should hold the base of the balloon securely in place and squeeze the bottle.
investigation questions
• What happens to the balloon when you squeeze the bottle? (The balloon expands.)
• What do you think happened to the gas molecules when you squeezed the bottle and the balloon expanded? (The gas molecules must have been forced from the bottle into the balloon.)
To further demonstrate, show this animation and discuss how using the balloon shows that there must be something (matter) inside the bottle.
Explain that the spheres in the animation represent particles of gas. Unlike solid particles, gas particles are not very attracted to one another. As they move rapidly, gas particles collide and bounce off each other. Gas particles are also much farther apart than solid particles.
Explain that when the bottle is squeezed, the gas molecules move from the bottle into the balloon, causing the balloon to expand.
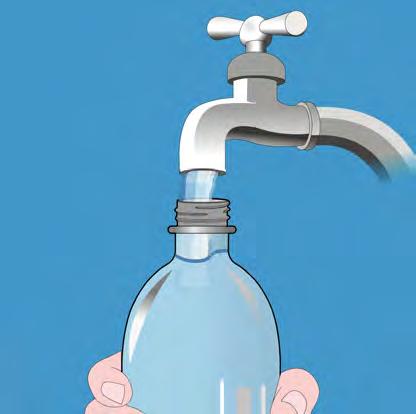
3. Demonstrate the properties of a liquid. Have students fill their bottles with water to the very top and replace the cap securely. Once the bottles are closed, ask students to carefully examine their bottles. When filled with water (and with little to no gas inside) the bottle should be very hard to squeeze.
investigation questions
• Can you force the molecules of a liquid to move closer together?
• Were you able to squeeze the bottle as much as when there was gas in it? (No.)
• Having squeezed the bottle filled with gas and liquid, would you say liquid particles are closer together or farther apart than gas particles? (Closer together.)
To further demonstrate, show this animation and discuss the attraction, motion and arrangement of liquid particles.
Explain that the attraction between liquid particles is stronger than between gas particles but not as strong as between solid particles. While liquid particles are held close together, they can still slip past each other as they move. To further demonstrate the difference in attraction, motion and arrangement of solid, liquid and gas particles, show this animation.
Explain that in a solid, particles are very attracted to each other so they are close together. The particles can move in their fixed positions but cannot slide past one another.
In a liquid, particles are also attracted to each other but not as much as in a solid. The particles are close together, in constant motion and can slide past one another.
In a gas, particles are hardly attracted to each other. They are very far apart, in constant motion, and hit and bounce off each other as they move.
EXTENSION
Now that students have been introduced to the idea that all matter—whether solid, liquid or gas—is made from particles called atoms and molecules, show this animation and discuss their size.
Explain to students that the atoms and molecules shown in the animation are models used to represent their size. In reality, atoms and molecules are incredibly tiny—trillions of times smaller than the dots and spheres used to represent them. In fact, atoms and molecules are so small that millions of them would fit in the space of a single period at the end of a sentence.
Explain that the animation represents the number of water molecules found in a single tablespoon of water, which is about 600,000,000,000,000,000,000,000. (That’s roughly 600 billion trillion, so they are very, very small!)
FURTHER EXTENSION
Tell students that some resources may define states of matter more simply in the following way:
• Solids maintain their shape even without a container
• Liquids take the shape of a container or space
• Gases spread out to fill a container or space
But how do you categorize a substance that doesn’t seem to fit these simple definitions? It can be tricky, even with some of the most common substances. Ask students to consider whether sand and shaving cream are solids, liquids or gases.
To complete this extension activity, follow these steps:
1. Put about 1⁄4 to 1⁄2 cup of sand into a plastic cup.
2. Carefully pour the sand from one cup into another.
investigation questions
• Is sand a liquid?
• Did the sand take the shape of the cup? (Yes.)
• Does that mean that sand is a liquid? (No. Each piece of sand is a solid but the pieces are so small that when you pour them, they take the shape of the container. Sand is a solid but acts sort of like a liquid because its tiny pieces take the shape of the container it fills.)
3. Place a small mound of shaving cream on a paper plate or any other flat surface. (If placing the shaving cream on students’ desks, instruct them not to touch it.) Allow students time to carefully examine the shaving cream. Encourage them to take notes on anything they see, like bubbles or movement. investigation questions
• Is shaving cream a solid?
• If you don’t touch it, does the mound of shaving cream maintain its shape without a container? (Yes.)
• Does that mean shaving cream is a solid? (No. If you look very closely at the shaving cream, it is actually a liquid containing many tiny gas bubbles. So, shaving cream is really a combination of a liquid and a gas that together maintains its shape like a solid until you touch it.)
Alabama Course of Study Standards
SC15.5.1.
National Standards
NS.5-8.2
OBJECTIVE
By completing this activity, students will:
• Understand that matter is made up of particles too small to be seen
MATERIALS
For this activity, you will need the following items:
• Paper towel
• Drinking glass
• Plastic tub or bucket filled with enough tap water to reach the height of the glass
PROCEDURE
To complete this activity, follow these steps:
1. The Setup
a. Place the materials on the table.
2. Magic Science Time!
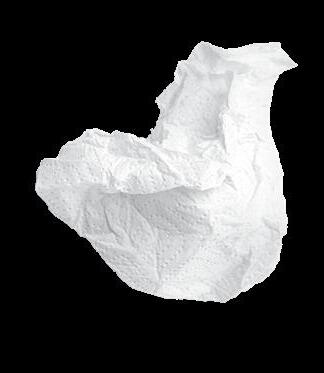
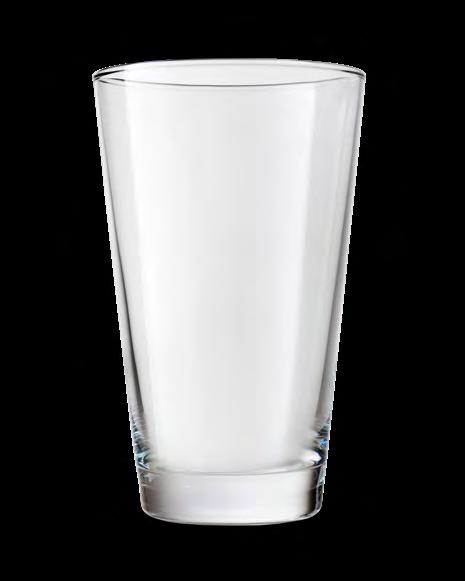
a. Crumple the paper towel and place it in the bottom of the glass.
b. Turn the glass over. Make sure the paper stays in place at the bottom of the glass.
c. Keeping the glass as level as possible, slowly lower the upside-down glass into the tub of water until the entire glass is submerged. (This is a good opportunity to ask students whether the paper towel will get wet.)
d. Take the glass out of the water and let the water drip off the outside of glass.
e. Turn the glass right side up and remove the paper towel. Let the audience feel the paper towel to determine if it is wet or dry.
3. Discussion
a. Will the paper towel in the glass get wet? Why or why not?
b. Why didn’t the paper towel get wet when it was placed in the water?
4. Explanation
a. Air takes up space. The glass is filled with air when it is right side up and when it is upside down. When you turn the glass over and slowly lower it into the water, air remains in the glass.
b. The water cannot enter the glass because of the air inside the glass. The air creates pressure that is greater than the pressure of the water trying to get in. The towel at the top of the glass stays dry. If you were to tilt the glass on its side when submerged, air would exit the glass and form bubbles. Water would then be able to enter the glass and soak the paper towel.
EXTENSIONS
Make Magic!
• Encourage students to develop their own unique magic tricks. Guide them through the steps of the scientific method to help them in their quest to create their own illusion.
• If pressed for time, perform this activity as a single, all-class magic trick. Ask students to share ideas of a magic trick they’d like to create. Select one idea and as a class follow the steps of the scientific method to make the trick a reality!
• Remember that sometimes no matter how many times you try the trick, it won’t work. Be sure to document your experiments and the variables you change each time. Use those notes to start a classroom discussion on why the trick didn’t work. What else could be tried to make it work? Have students suggest their own methods. Do they work?
Magic Show!
• Have students select a magic trick from a book in the library. (If your school library doesn’t have any books on magic tricks, find some magic tricks online to distribute to students using the “Online Resources” section on page 54.)
• Discuss with students the importance of showmanship when performing magic. Encourage them to use magic words, hand gestures, etc., when performing.
• Instruct students to practice the trick at home.
• Plan a day to have students perform their very own magic show.
• Following each trick, explain the science that allows the magic to happen.
Why we go to the show
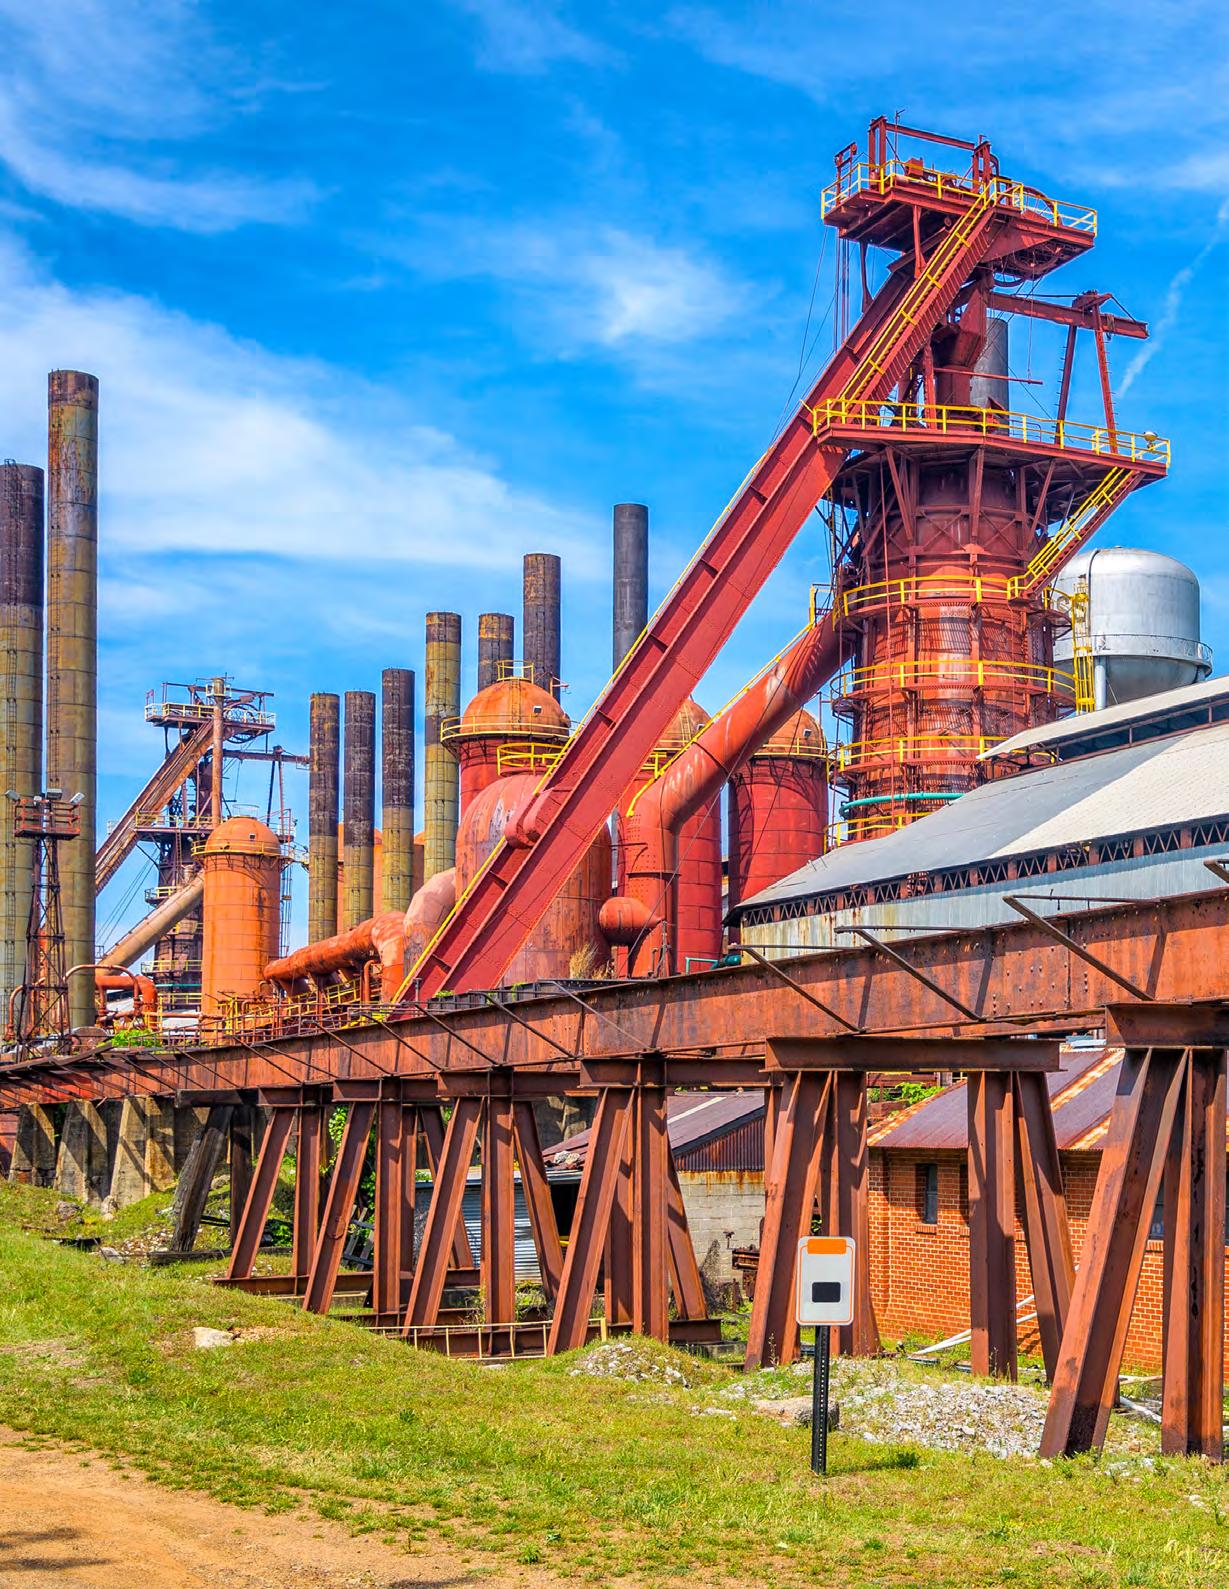
THE MAGIC CITY
Did you know that right here in Alabama we have our very own magic city? Birmingham, located in the north central part of the state, is known as “The Magic City.” Why? The answer actually has a lot to do with science!
After the Civil War, many of the cities in the South had to rebuild. Rather than recreate what had existed before, they decided to embrace the rise of industry. Birmingham did not exist before the Civil War—it was founded in 1871. It was named after Birmingham, England, which was the center of the iron industry in England. The area for the new city was chosen because the soil contained three important materials: iron ore, limestone and coal. These materials can only be found together naturally in a few places in the world, but why are they important? Well, all three are needed to make steel. Iron ore, limestone and processed coal, also known as “coke,” are combined with hot air in a blast furnace to produce pure molten iron.
take a look
Watch this video to see how iron ore, limestone and coal are turned into steel.
The first blast furnace in Birmingham was the Alice Furnace which began operating in 1880. Blast furnaces created pig iron. Pig iron is used by the iron industry in the production of steel. In 1880, the state of Alabama produced 68,919 tons of pig iron. By 1890, production had increased to 816,911 tons. The amount of pig iron produced by the state of Alabama steadily rose until 1950. That is 70 years of growth. With the growth of the industry, the city grew too—like magic.
Founded by Colonel James Withers Sloss in 1881, Birmingham’s Sloss Furnaces is a National Historic Landmark and was one of the largest producers of pig iron in the world. In 1899, the Sloss Furnace Company merged with several other companies and became the Sloss-Sheffield Steel and Iron Company. In the 1920s, Sloss Furnaces rebuilt their furnaces to make them bigger and better, allowing them to produce around 400 tons of pig iron a day. Sloss, and other companies like it, created their own communities where workers and their families could live. These communities had their own doctors, stores, schools and churches. The living conditions were not great, but it made it much easier on the workers, and the companies found it easier to keep the men working.
Somehow, Birmingham’s iron industry survived several recessions in the late 19th century, and, though it was called “the hardest hit city in the country,” it survived the Great Depression. World War II brought business roaring back. After the war, iron production began to slow and by the 1960s the industry was in sharp decline. In 1930, almost 70 percent of the jobs in Birmingham were in the iron and steel industry. Sloss closed in 1971, and by 1979, only 5 percent of Birmingham’s jobs were in iron and steel. In 1983, after a $3 million restoration, Sloss Furnaces opened as a museum of history and industry. Today, this historic site serves as an urban center that houses performing arts, serves as a wedding venue, and is home to the Metal Arts Program.
• Explain the development and changing role of the iron and steel industry in Alabama during the late 19th and early 20th centuries.
• Analyze social and educational changes during the late 19th and early 20th centuries for their impact on Alabama
MATERIALS
For this activity, you will need the following items:
• Technology with internet access and the ability to show videos
• Downloaded “Postcard from the Magic City” handout
PROCEDURE
To complete this activity, follow these steps:
1. Before watching the videos, ask students these questions:
a. How did the growth of cities in the United States affect iron and steel production?
b. Why do you think that iron and steel were important in the growth of Birmingham?
2. Show the following videos:
X “Like it Ain’t Never Passed”
X “What Happens at Sloss Furnaces?”
3. After watching the videos, consider taking students on this virtual tour of Sloss Furnaces.
4. After watching the videos, ask students these questions:
a. How did iron and steel make Birmingham the “Magic City?”
b. Why was Red Mountain important to the development of Birmingham?
c. Why were the working conditions of African Americans at Sloss Furnaces unusual for the time period?
d. How has Sloss Furnaces become a place of creativity for its community?
e. How is Sloss Furnaces an example of community effort?
f. Is there a place in your community that you think should be saved? How do you think you and your community could help? How would this place be used by your community? Does this place tell a story about your community?
5. Print and pass out the “Postcard from the Magic City” handout and allow students the opportunity to read about postcards silently or read aloud as a class. For younger students, you may show them a postcard and explain to them what postcards are and how they have been used.
6. Have the students complete the “Postcard from the Magic City” activity.
7. Find a creative way to display the students’ postcards in the classroom.
What to do after the show
Included in this section are some post-performance activities you can share with your students.
1. After seeing Bill Blagg: The Science of Magic, guide students in a discussion about the performance.
suggested discussion questions
• How do magicians create magic tricks? (They use the steps of the scientific method. They develop a theory, or hypothesis, then test it. If the hypothesis fails, they change one variable in their trick and test it again. They repeat this process until they get their trick to work.)
• Do magic tricks always work? (No. Just as for scientists, magicians must keep experimenting to find ways to make tricks work. Some ideas never work, and others take years to create!)
• How do magicians use mirrors to make magic? (They use mirrors to reflect light to make a person think they are seeing something—a mirror image—that is not really there.)
• What type of mirror did Bill Blagg use to make things disappear in the magic box? (He used a plane mirror.)
• Can a solid pass through a solid? (No. When particles are tightly packed together, they form a solid. In a solid, the particles can’t move or separate to allow another solid to pass through.)
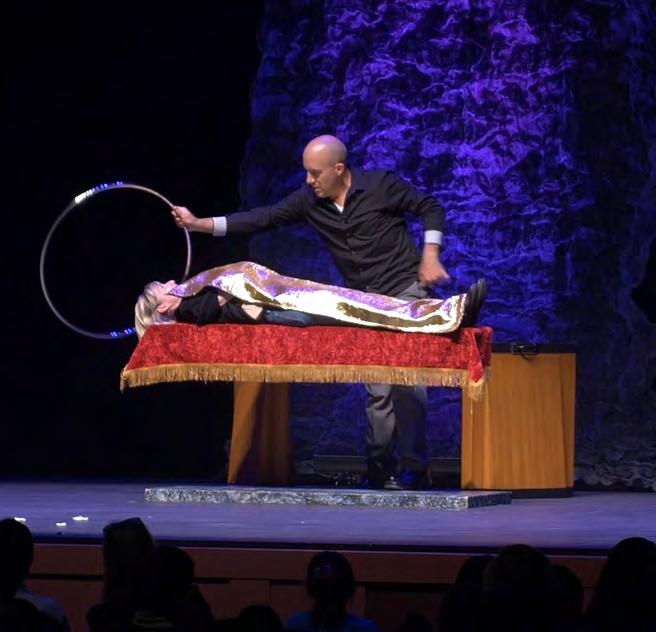
• Since a solid can’t scientifically pass through another solid, how did Bill Blagg pass the metal hoop over the floating teacher? (We can’t tell you the secret but here’s a hint: misdirection and controlled perspective.)
• What can you do with an object when you find its center of gravity? (Make it balance.)
• During the show, do you think the teacher was really floating in midair? (Mention the passing of the metal hoop as proof of no supports. Use this question to start a discussion on the creative methods of how the teacher was floating. For an extra activity, create experiments to test students’ hypotheses on how they think the teacher floated. Were their hypotheses correct? Why or why not?)
2. Copy and distribute the “My Trip to the Gogue Center” worksheet on page 53. Once they have completed the worksheet, have students share their responses.
My Trip to the Gogue Center
Answer these questions about the performance and your visit to the Gogue Center.
List three things you remember hearing or seeing during the performance of Bill Blagg: The Science of Magic.
Name something you learned during the performance.
Name something from the performance you would like to know more about.
If you could ask Bill Blagg a question, what would you ask?
In the space below, draw something special you remember hearing or seeing during the performance.
Alabama Course of Study standards index
that people from different times and places have made art for a variety of reasons.
ENGLISH LANGUAGE ARTS
ELA21.2.16 Describe word relationships and nuances in word meanings, including relating them to their opposites and distinguishing shades of meaning in similar or related words.
ENGLISH LANGUAGE ARTS
reading
and
Gather and use research to answer questions to complete a research product.
ELA21.3.8 Apply knowledge of phoneme-grapheme correspondences, multisyllabic word construction, and syllable division principles to decode and encode (spell) words accurately in isolation and in context.
Utilize new academic, content-specific, grade-level vocabulary to make connections to previously learned words and relate new words to background knowledge.
Analyze meaningful parts (morphemes) of words and phrases in discussions and/or text.
ELA21.3.16 Use knowledge of grade-level academic and domainspecific vocabulary to gain meaning from text.
Demonstrate content knowledge built during independent reading of informational and literary texts by participating in content-specific discussions with peers and/or through writing.
Establish a
comprehension, including identifying background knowledge and generating questions about the topic or characters.
evaluate information about a topic from a variety of sources, including digital sources, and utilize it to create a project, report, or presentation.
and use grade-level vocabulary, clarifying the meaning of unknown and multiple-meaning words and phrases in text, choosing flexibly from a range of strategies.
explain that an object can be seen when light reflected from its surface enters the eyes.
SC15.4.10 Obtain and communicate information explaining that humans have systems that interact with one another for digestion, respiration, circulation, excretion, movement, control, coordination, and protection from disease.
SC15.5.1 Plan and carry out investigations (e.g., adding air to expand a basketball, compressing air in a syringe, dissolving sugar in water, evaporating salt water) to provide evidence that matter is made of particles too small to be seen.
SC15.5.3 Examine matter through observations and measurements to identify materials (e.g., powders, metals, minerals, liquids) based on their properties (e.g., color, hardness, reflectivity, electrical conductivity, thermal conductivity, response to magnetic forces, solubility, density).
SC15.5.4 Investigate whether the mixing of two or more substances results in new substances (e.g., mixing of baking soda and vinegar resulting in the formation of a new substance, gas; mixing of sand and water resulting in no new substance being formed).
SC15.5.5 Construct explanations from observations to determine how the density of an object affects whether the object sinks or floats when placed in a liquid.
SOCIAL STUDIES
SS10.4.4
relationship of the
geographic regions of Alabama to the movement of Alabama settlers during the early nineteenth century.
SS10.4.10 Analyze social and educational changes during the late nineteenth and early twentieth centuries for their impact on Alabama.
Supplemental books
FICTION
Harry Potter and the Sorcerer’s Stone by J.K. Rowling
Harry discovers he is a wizard and begins his education at Hogwarts School of Witchcraft and Wizardry.
Hocus Pocus Practice Focus: The Making of a Magician by Amy Kimlet
When a magician amazes a young girl named Mila at her birthday party, she wants to become a magician too.
Lulu and the Brontosaurus by Judith Viorst
Lulu finds a magical surprise when she goes searching for a brontosaurus for her birthday.
Magic Tree House: Dinosaurs Before Dark by Mary Pope Osborne
Siblings Jack and Annie discover a treehouse filled with books that transport them to different times and places.
The Chronicles of Narnia: The Lion, the Witch and the Wardrobe by C.S. Lewis
Four siblings discover a magical land called Narnia through the back of a wardrobe.
The Girl Who Drank the Moon by Kelly Barnhill
A young girl named Luna is accidentally given magical powers and must learn to control them.
The Magic Finger by Roald Dahl
A young girl with a magical finger turns a family of hunters into birds.
The Magic Hat by Mem Fox
A magical hat transforms the lives of people and animals in surprising ways.
The Magic School Bus at the Waterworks by Joanna Cole
Join Ms. Frizzle and her class on a magical school bus ride through the waterworks.
The Magic Tree House: Merlin Missions series by Mary Pope Osborne
Jack and Annie go on more magical adventures with the help of Merlin the Magician.
The Night Gardener by Jonathan Auxier
Two Irish orphans discover an eerie manor house and a tree with magical properties.
The Princess in Black by Shannon Hale
Princess Magnolia has a secret: she’s also the monster-fighting Princess in Black.
The Tale of Despereaux by Kate DiCamillo
A small mouse with big ears and a love for adventure encounters magic and bravery in his quest to save a princess.
The Wishing Spell (The Land of Stories series) by Chris Colfer
Twins Alex and Conner Bailey fall into a magical world through a book of stories.
Upside-Down Magic by Sarah Mlynowski, Lauren Myracle, and Emily Jenkins
Nory’s magic is all mixed up, but she finds a place where different is celebrated.
Zach’s Lie by Roland Smith
When Zach’s family enters witness protection, a magical diary helps him cope with his new identity.
NON-FICTION
Abracadabra! Magic with Mouse and Mole by Wong Herbert Yee
While technically a fiction book, this story introduces simple magic tricks and includes explanations on how to perform them.
Big Magic for Little Hands: 25 Astounding Illusions for Young Magicians by Joshua Jay
Detailed instructions for performing 25 impressive magic tricks.
Houdini: The Handcuff King by Jason Lutes and Nick Bertozzi
A graphic novel biography of the famous magician Harry Houdini.
Magic: A Beginner’s Guide by Robert R. Hieronimus and Laura Cortner
Introduces young readers to the history of magic and basic tricks they can perform.
Magic Tricks for Kids by Tony Clark
A collection of fun and easy magic tricks that kids can learn and perform.
Magic Tricks from the Tree House by Mary Pope Osborne and Natalie Pope Boyce
A nonfiction companion to the Magic Tree House series, teaching real magic tricks.
Magic Tricks with Coins, Cards, and Everyday Objects by Jake Banfield
Simple tricks that young children can perform with everyday objects.
Now You See It, Now You Don’t: Lessons in Sleight of Hand by Bill Tarr
An illustrated guide to basic sleight of hand techniques, suitable for young readers.
The Kids’ Book of Magic Tricks by Steven P. Cohen
Easy-to-follow instructions for basic magic tricks.
The Magic Book: The Complete Beginners Guide to Anytime, Anywhere, Sleight of Hand Magic by Joshua Jay
A comprehensive guide to starting with magic tricks, perfect for budding magicians.
The Science of Magic: Understanding and Improving Your Magic by Paul R. Harris
Explains the science behind magic tricks and how to use it to improve performances.
Online resources
Here are some additional resources that might be helpful if you or your students would like to more about the subject matter included in this peformance study guide.
PBS Learning Media: Yellowhammer History Hunt – Sloss Furnaces
X https://aptv.pbslearningmedia.org/resource/d504581a14a9-47d5-acf2-d2562dc97544/sloss-furnaces-videoyellowhammer-history-hunt/
Sloss Furnaces Teacher’s Guide
X https://www.slossfurnaces.com/wp-content/ uploads/2020/03/Teachers-Guide-smaller.pdf
How Steel is Made
X https://youtu.be/kmq8MlUDmx0?si=npYIx817gNqm2y2I
Perkins, Kathy. “Observing the Invisible.” Alabama Learning Exchange
X https://alex.alsde.edu/LR/LP1/56300
Cyanotype history
X https://www.alternativephotography.com/cyanotypehistory-john-herschels-invention/
Mixing the chemicals for cyanotypes
X https://www.alternativephotography.com/cyanotypeclassic-process/
How to cyanotype printing
X https://www.gathered.how/arts-crafts/guide-tocyanotype-printing
Purchasing cyanotype paper
X https://www.amazon.com/Cyanotype-SensitiveActivated-Printing-Drawing/dp/B0B1V2FBMH/ref=asc_ df_B0B1V2FBMH/?tag=hyprod-20&linkCode=df0&hva did=693595110124&hvpos=&hvnetw=g&hvrand=9951543 20557739246&hvpone=&hvptwo=&hvqmt=&hvdev=c&h vdvcmdl=&hvlocint=&hvlocphy=1012947&hvtargid=pla1950298923510&mcid=47b241b9b3b13ff29c775b14388a828 f&gad_source=1&th=1
Optical Illusion Art Project
X https://www.artwithmrsfilmore.com/tag/op-art/
Discovering Optical Illusions
X https://www.wilkes.edu/about-wilkes/centers-andinstitutes/science-in-motion/_assets/online-learning/ biology/Optical-Illusions-Observation-Activity.docx
Will It Sink or Float?
X https://learning-center.homesciencetools.com/article/ sink-and-float-science-projects/
Credits
BOOKS
Wiess, Jim (1998). Magic Science: 50 Jaw-dropping, Mindboggling, Head-scratching Activities for Kids. San Francisco: Jossey-Bass
Shalit, Nathan (1981). Science Magic Tricks. New York: Holt, Rinehart and Winston
WEB LINKS
“Observing the Invisible” Lesson plan written by Kathy Perkins, Tuscaloosa City Schools
X https://alex.alsde.edu/LR/LP1/56300
Card Trick Central
This website has hundreds of card tricks. They are sorted by ability level and make it easy to find an appropriate one to try.
X https://web.superb.net/cardtric
Bill Blagg
Official website for Bill Blagg that includes tour dates, biography, videos, pictures and an e-mail group sign up form.
X https://www.billblagg.com
SPECIAL THANKS
Overture Center for the Arts Madison, Wisconsin
Excerpts from the Overture Center’s self-produced OnStage Education Resource Guide (2010) have been referenced in this performance study guide.
Simon Shaw / Shaw Entertainment Group Great Barrington, Massachusetts
CREDITS
All images featured in this performance study guide are wholly owned and copyrighted by their respective copyright holders and are used for educational purposes only. No copyright infringement is intended. The Gogue Performing Arts Center does not claim ownership of any images unless explicitly stated otherwise. If you have concerns about the use of any image included herein, please contact us immediately.
For a list of additional image sources and credits, please contact our Department of Communications and Marketing by telephone at 334.844.7234 or via email at jaosborne@auburn.edu
The Jay and Susie Gogue Performing Arts Center at Auburn University serves students and educators across the state of Alabama and beyond with its annual K–12 School Performance Series.
These high-quality and transformative arts experiences are further enriched with performance study guides that provide meaningful cross-curricular connections.
Developed by our Department of Education and Engagement, in collaboration with the Gogue Center Curriculum Council, each performance study guide contains information about the featured performing artist(s) or company, the art form, and relevant, grade-appropriate lessons and activities designed to help incorporate academic and arts standards into the classroom.
Our sincerest thanks to the members of the 2024–25 Gogue Center Curriculum Council.
2024–25 Gogue Center Curriculum Council
Lacey Basgier
Secondary Art
Lee-Scott Academy
Alabama Independent School Association
Stacey Blakemore
Secondary ELA
Oak Mountain High School
Shelby County Schools
Brooke Braswell
2nd Grade
Cary Woods Elementary School
Auburn City Schools
Euri Carr
Arts Specialist
Alabama State Council on the Arts
State of Alabama
Jennifer Dempsey Media Specialist
Wrights Mill Elementary School
Auburn City Schools
Abbie Gaston
4th Grade
Creekside Elementary School
Auburn City Schools
Cynthia Jackson ELA, Curriculum & Instruction
W.F. Burns Middle School
Chambers County Schools
Martin McKay
Assistant Principal Headland Middle School
Henry County Schools
Amber Pickard Social Studies
Lee-Scott Academy
Alabama Independent School Association
Josh Roberts Head of School
Alabama Christian Academy
Private School, Montgomery
Ruth Marie Romero
Pre–K
Peter Crump Elementary School
Montgomery Public Schools
Charlotte Ellison Williams Retired Educator/Administrator