13 minute read
HALLOWEEN


family
happy halloween
Throw a spooky party on 31 October for your little monsters using our creepy-cute recipe ideas – they’re sure to scare up some fun
recipes CASSIE BEST photographs MIKE ENGLISH
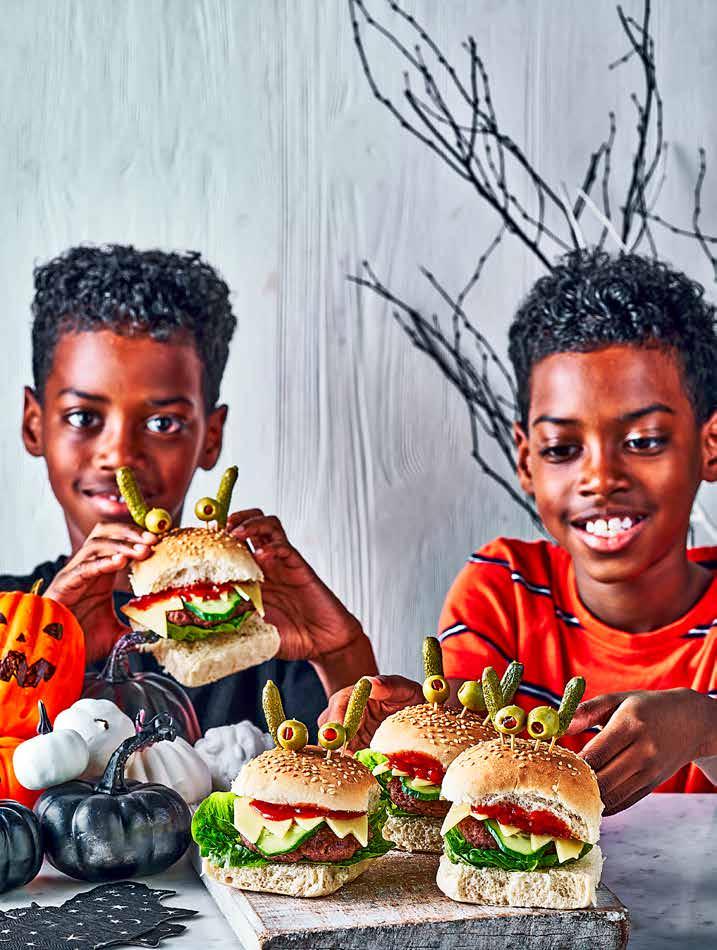
Mini monster burgers
Spooky Halloween marshmallow cheesecake

SERVES 12 PREP 30 mins plus at least 2 hrs chilling COOK 1 hr 30 mins MORE EFFORT V

300g crème-filled chocolate sandwich biscuits 75g butter, melted 180g white mini marshmallows (ensure vegetarian, if needed) 50ml milk 500g full-fat soft cheese 200ml double cream 1 tsp vanilla extract For the meringue ghosts 2 egg whites 200g caster sugar black writing icing or edible ink pen 1 Tip the biscuits into a food processor and blitz to fine crumbs. Pour in the melted butter and blitz again to combine. Line the side of a deep 20cm springform or loose-bottomed cake tin with baking parchment. Tip in the crumb mixture and press it into the base and up the side of the tin using the back of a spoon. You should be able to press the mixture about halfway up the side, but don’t worry if the edge is slightly uneven – this will add a spookily craggy effect to the cheesecake. Chill in the fridge while you make the filling. 2 Tip the marshmallows and milk into a saucepan set over a lowmedium heat and stir until the marshmallows have melted. Leave to cool for a few minutes. 3 Tip the soft cheese, cream and vanilla extract into a large bowl and beat together using an electric whisk. Pour in the still-warm marshmallow mixture and mix again until smooth. Remove the chilled biscuit base from the fridge and scrape in the marshmallow cheesecake filling. Smooth the top and chill for at least 2 hrs. Will keep chilled for up to a day. 4 Heat the oven to 120C/100C fan/ gas 1 and line a baking tray with baking parchment. Put the egg whites in a large, clean bowl with a pinch of salt and beat with an electric whisk until foamy – they should hold soft peaks when you lift out the beaters. Beat in the sugar 1 tbsp at a time until fully incorporated and the meringue is thick, shiny and holding stiff peaks. 5 Spoon the meringue into a piping bag fitted with a large round nozzle. Holding the nozzle directly above the lined tray, pipe little blobs to make the meringue ghosts. Bake for 1 hr 30 mins, then leave to cool. 6 When the meringues are cool, use an icing pen to draw faces on them. Carefully remove the cheesecake from the tin and put on a plate or cake stand. Arrange the ghosts on top just before serving. Will keep in the fridge for up to two days.

PER SERVING 479 kcals • fat 30g • saturates 17g • carbs 48g • sugars 37g • fibre 1g • protein 5g • salt 0.6g
Mini monster burgers
SERVES 8 PREP 15 mins COOK 15 mins EASY
vegetable oil, for the baking tray 8 beef meatballs 8 small seeded rolls, split 1 Little Gem lettuce 2 slices cheddar ¼ small cucumber (about 4cm long) 16 cornichons 16 pimento-stuffed green olives ketchup, to serve
1 Heat the oven to 200C/180C fan/ gas 6. Line a baking tray with foil and drizzle with a little oil. Arrange the meatballs over the tray, spaced apart, and squash into flat patties using the palm of your hand. Turn the patties over and rub in the oil, then bake for 15 mins. 2 Meanwhile, top the base of each roll with a small lettuce leaf. Halve the cheese slices lengthways in a zig-zag to make ‘teeth’, then cut in half again crosswise so you have eight rows. Cut the cucumber into thin slices on the diagonal to make tongues. Push a cocktail stick into each of the cornichons, lengthways, to make the horns and halfway through the olives to create the effect of eyeballs on stalks. 3 Add a burger patty to each of the lettuce-lined buns, followed by a cucumber tongue, cheese teeth and drizzle of ketchup, then sandwich with the tops of the buns. Stick the olive eyes and cornichon horns into the tops of the buns.
PER SERVING 205 kcals • fat 8g • saturates 2g • carbs 20g • sugars 3g • fibre 4g • protein 12g • salt 1g


Mini pumpkin & feta pies
MAKES 6 PREP 40 mins COOK 1 hr 10 mins MORE EFFORT V
450g butternut squash or pumpkin peeled and cut into 2cm chunks (prepared weight) 2 garlic cloves 2 tbsp olive oil 1 small onion, finely chopped 250g plain flour, plus extra for dusting ½ tsp ground turmeric 125g cold butter, cut into small pieces, plus extra for the tin 2 egg yolks, plus 1 whole egg, beaten (use the leftover whites to make the meringues) grating of nutmeg ½ tsp chilli flakes (optional) 200g feta, crumbled

1 Heat the oven to 200C/180C fan/ gas 6. Tip the squash and unpeeled garlic into a roasting tin, drizzle with 1 tbsp oil, season and toss to coat. Roast for 30 mins, stirring halfway through, until soft. Remove from the oven and leave to cool. 2 Meanwhile, cook the onion in a frying pan over a medium heat with the remaining 1 tbsp oil for 8-10 mins until tender and slightly golden. Leave to cool. 3 Tip the flour, turmeric and a pinch of salt into a food processor. Add the butter and whizz until the mixture resembles fine crumbs. Add the egg yolks and 2 tsp cold water, and blitz again until the mixture starts to clump together. Squeeze it between your fingers – if it sticks together, tip the mixture onto a work surface. If it’s too dry, add more water, 1 tsp at a time. Knead the pastry a few times just to bring it together, but don’t overwork it. Shape into two circles, one slightly smaller than the other, then wrap in baking parchment and chill in the fridge for at least 20 mins. 4 Squeeze the garlic from its skins into the roasted squash and mash together. Add the fried onion, grate over some nutmeg, tip in the chilli flakes, if using, and feta, and mix. 5 Butter six holes of a muffin tin and line each with a strip of baking parchment that overhangs the top. Roll the larger circle of pastry out on a lightly floured surface to the thickness of 2.8mm. Use a 10cm cutter to stamp out six circles (you may need to re-roll the pastry to get all six). Press the pastry circles into the prepared muffin tin, patching any cracks with the pastry offcuts. Spoon in the squash filling. 6 Roll the remaining pastry circle out as you did the large one, but use an 8cm cutter to cut out six lids. Cut spooky pumpkin faces into the lids using a small, sharp knife. Press the lids over the pies in the tin and brush with the beaten egg. Bake for 40 mins until golden brown, then leave to cool for 10 mins in the tin before lifting out. Eat hot or leave to cool completely. Will keep in an airtight container in the fridge for up to two days or the freezer for up to two months. Reheat in a low oven for 10 mins, if you like.
GOOD TO KNOW calcium • 1 of 5-a-day PER SERVING 493 kcals • fat 31g • saturates 17g • carbs 40g • sugars 5g • fibre 4g • protein 12g • salt 1.3g
Freaky fruit platter
SERVES 12 PREP 30 mins plus chilling NO COOK EASY V

For the mummy bananas 70g white chocolate, plus extra for sticking on the eyeballs 3 small bananas, peeled and cut in half crosswise eyeball cake decorations or black writing icing or edible ink pen For the tangerine pumpkins small piece of celery 6 small tangerines, peeled For the apple fangs 1 red apple, cored and cut into 6 wedges 2 tbsp nut butter (we used almond) 25g yogurt-coated raisins For the lychee eyeballs 425g can lychees in juice, drained 150g blueberries eyeball cake decorations or skewers For the grape snakes 250g black and green grapes short wooden skewers black writing icing or edible ink pen, or eyeball cake decorations
1 For the mummy bananas, melt the chocolate in a heatproof bowl set over a small pan of simmering water or in the microwave in 20-second bursts. Cool to room temperature. Put the bananas on a tray lined with baking parchment and drizzle over the chocolate in a criss-cross pattern to make ‘bandages’ . Stick on the eyeball decorations or use black icing or an edible ink pen to draw the eyes on the bananas, then chill until set, about 30 mins (they will start to discolour after about 2 hrs). 2 For the tangerine pumpkins, cut tiny ‘stalks’ from the celery piece and push these into the tops of the tangerines where the segments come together. 3 For the apple fangs, cut a small wedge from the peel side of the apple wedges to make lips, then fill the ‘mouth’ with the nut butter. Push the raisins into the mouth to look like wonky teeth. 4 For the lychee eyeballs, stuff each lychee with a blueberry. Stick the eyeball decorations onto the blueberry using some of the melted white chocolate from step 1, or skewer the fruit together. If you like, drop these into a punch bowl. 5 For the grape snakes, thread alternating green and red grapes onto skewers, then stick on eyeball decorations with white chocolate as in step four. 6 Arrange the freaky fruits on a large serving platter. Fill gaps with any leftover blueberries and decorate with spooky Halloween figures and decorations, if you like.
GOOD TO KNOW vit c • 1 of 5-a-day • gluten free PER SERVING 131 kcals • fat 4g • saturates 2g • carbs 21g • sugars 20g • fibre 2g • protein 2g • salt 0.03g
Gory guts pizza tear ‘n’ share bread
SERVES 8-10 PREP 30 mins plus at least 2 hrs 30 mins proving COOK 1 hr 15 mins MORE EFFORT V tomato sauce only
500g strong white bread flour, plus extra for dusting 7g sachet fast-action dried yeast 2 tbsp olive oil 2 garlic cloves, crushed 2 x 400g cans chopped tomatoes ½ tsp dried oregano 250g grated mozzarella or cheddar, or use a mixture pizza fillings of your choice (we used olives and ham) 2 tbsp herby garlic butter

1 Tip the flour into a large bowl. Add the yeast to one side of the bowl and 2 tsp salt to the other. Pour in 300ml warm water and mix with a wooden spoon or in a stand mixer fitted with a dough hook until you have a soft dough (you may need to add up to 25ml more water if the dough seems dry). Knead on a lightly floured work surface for 10 mins or in the mixer for 5 mins until you have a soft, stretchy dough. Rub a little of the oil over the ball of dough, then put it in a clean bowl and cover with a tea towel. Leave to prove in a warm place for 2 hrs, or chill overnight (or for up to 24 hrs). 2 Heat the remaining oil in a pan over a medium heat and sizzle the garlic for 30 seconds – don’t let it brown. Add the tomatoes, oregano and 2 tsp sugar. Season well. Reduce the heat to low-medium and bubble for 20-30 mins until the sauce is thick and rich. Use a potato masher to squash any remaining lumps of tomato into the sauce. Leave to cool until ready to use. Once completely cool, will keep in the fridge in an airtight container for up to three days or the freezer for six months. 3 When you’re ready to assemble, spread the sauce over the base of a large roasting tin or baking dish (ours was 40 x 30cm). Roll the dough out on a floured surface into a 60 x 30cm rectangle. Cut the rectangle in half lengthways so you have two smaller rectangles measuring 15 x 30cm. Pile the cheese along the centre of each rectangle and add any pizza between for the bread to expand as it bakes. Cover and leave to prove at room temp for 30 mins or chill for up to 8 hrs. Heat the oven to 200C/180C/gas 6. 4 Bake for 45 mins until the bread is golden brown. Brush with the herby garlic butter, then leave to cool for at least 10 mins before serving.
toppings you like. Pinch the long sides of the rectangles together to enclose the fillings – do this carefully so you don’t break the dough. Squeeze along the length of each long sausage to make sure they are well-sealed, and gently stretch them out to make them slightly longer. Arrange the dough sausages over the sauce seam-side down, wiggling them into the shape of intestines but leaving a little space
GOOD TO KNOW 1 of 5-a-day PER SERVING (10) 327 kcals • fat 11g • saturates 6g • carbs 42g • sugars 4g • fibre 3g • protein 14g • salt 1.6g
SKILLS FOR LIFE K DS K TCHEN ’In this series, we’ll guide you and your children through six essential cooking skills so they can build their knowledge. This month, weighing and measuring recipes CASSIE BEST photographs WILL HEAP
HOW TO USE OUR GUIDE
These recipes are suitable for children aged seven to 11, but younger children will need extra support from an adult. Older children and teenagers can still enjoy making them, though, and may want to adapt or further develop the recipes, swapping in their favourite ingredients or adding extra spices to make them their own.
The step-by-step recipes come with clear lists of ingredients and equipment so they’re easy to follow, and there are three to support each new skill: a basic one, one that’s more of a challenge and another for advanced mini chefs. Talk through and practice the cooking skill with your child before making the dishes.
Follow this collection of monthly recipes as you would a cookery course, making each recipe with your child to help develop their skills and confidence.

Part 2

Weighing and measuring ingredients are fundamental skills in cooking, and a great way for children to practice their maths skills. Once they’re feeling confident in the kitchen, they can use estimation for certain recipes, such as stir-fries, pasta sauces or stews. But, if you want to get a recipe just right, you need to weigh and measure carefully. This is especially important when baking cakes, biscuits and bread. There are many ways to weigh and measure ingredients and different pieces of equipment you can use to help you. Teach your kids how to use these various bits of kitchen kit and they’ll be able to make almost anything.
BEFORE YOU START Make sure you have everything you need for the recipe – there’s nothing worse than getting halfway through and discovering you’re missing a vital ingredient or piece of equipment. Weighing and measuring your ingredients out before you start will help you feel more organised.


