22 minute read
PRODUCT REVIEWS


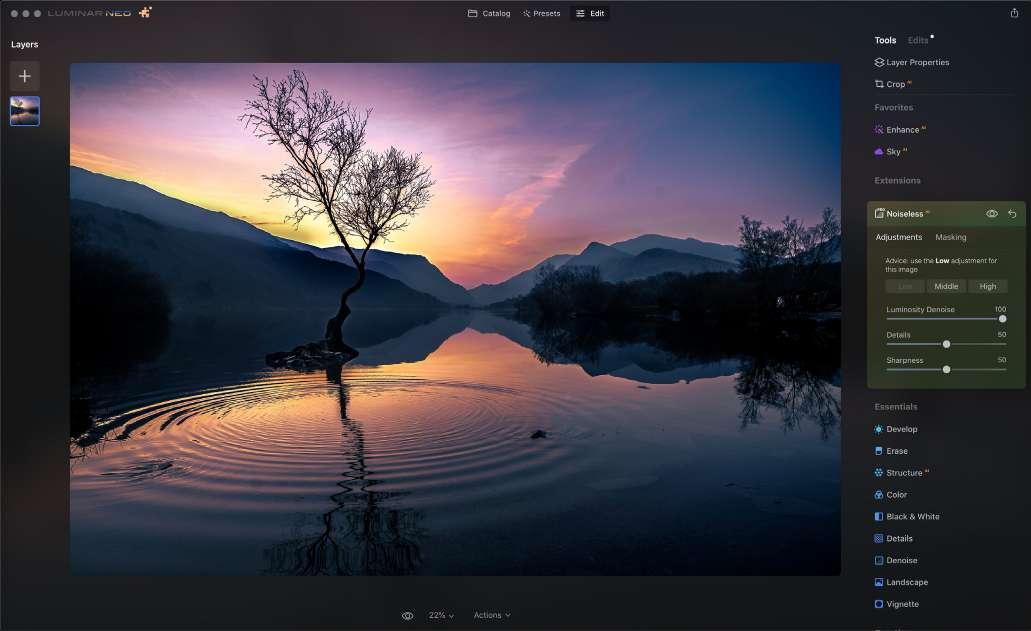
Luminar Noiseless
Noise Reduction Powered by AI | Dave Williams
Advertisement
Noiseless AI is the latest Extension to Luminar Neo by Skylum. It’s comparable to several other pieces of software that serve to reduce noise using machine learning (ML), artificial intelligence (AI) technology; but the power and the user interface are just so much more sleek and powerful with the Noiseless AI extension. [For more on Luminar Neo and how its Extensions work, check out “Maximum Workflow” in the September 2022 issue of Photoshop User.—Ed.]
The level of noise reduction is controlled primarily by three options: Low, Middle, and High. Luminar Noiseless AI will recommend the preset option that will work best with your image. Secondarily to this, there are sliders controlling Luminosity, Denoise, Details, and Sharpness. To control affected areas of the image, there are also Masking options, including a Brush, Linear Gradient, Radial Gradient, and an additional feature called Mask AI, which uses AI to determine where the mask should be applied.
I ran several images through Noiseless AI to test its capabilities and haven’t been disappointed, even with severely noisy images taken at night with a moonless night sky and the aurora over dark landscapes. There’s not much more to say,
Company: Skylum
Price: Luminar Neo + Extensions: $14.95/month; $109/annually; $448/lifetime 2022 Extensions Pack: $299 (7 Extensions to be released by end of year)
Hot: Powerful noise reduction; effective UX and UI
Not:
Before

After

though, when a piece of software simply does exactly what it’s supposed to.
Noiseless AI sits within the Luminar Neo ecosystem and is also available as a plugin for Adobe Photoshop and Lightroom Classic. All of the methods of using Noiseless AI perform equally effectively.
Skylum takes care to invest carefully in their technology and education, and that’s reflected in Noiseless AI and Luminar Neo as a whole. When making a purchase, it’s worth considering that Luminar Neo, along with all its Extensions, is comparable to the competitors, such as ON1 and Topaz Lab.
Overall, I’m very impressed with Luminar Neo Noiseless AI and its simplicity in creating complex adjustments to noisy photos, therefore it’s a 5-star rating from me. n

Canon RF 15–30mm F4.5–6.3 IS STM
New RF Mount, Budget-Friendly, Wide-Angle Zoom Lens | Review by Fernando Santos
If you’re on a budget (and who isn’t nowadays), and you’re looking for a wide-angle zoom lens for your RF camera, the new Canon RF 15–30mm F4.5–6.3 IS STM may be a good solution for you, at just $549.99.
As you can guess from its name, the new model has a variable aperture of F4.5 at 15mm to F6.3 at 30mm (according to my tests: F5.0 at 16mm, F5.6 at 22mm, and F6.3 at 27mm and beyond). The lens is 3.7" (88mm) long and weighs just 0.86 lbs. (390 g). The filter size is 67mm. This lens has up to 5.5 stops of optical image stabilization and, according to Canon, it can go up to 7 stops if your RF camera has IBIS (in-body image stabilization).
Just like other non-L series RF lenses, the featured control ring also doubles as the manual focus ring, which means you’ll have to toggle between each function. Thanks to the STM motor, the autofocus is smooth, and silent enough to make this a good lens for video, and vloggers may enjoy the focal range, which also
Company: Canon U.S.A. Inc.
Price: $549.99
Hot: Small size; lightweight; budget-friendly
Not: Optional lens hood; slow apertures for interior and night shots
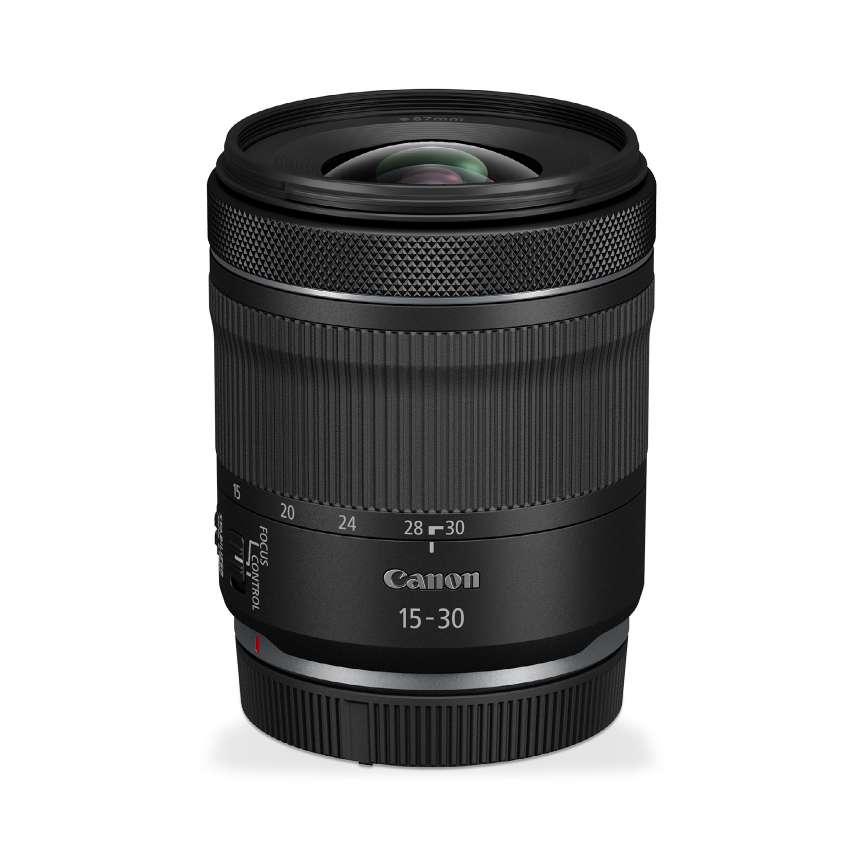
works great if you’re on an ASP-C body. For example, with the Canon R7 or R10, this lens will be equivalent to a 24–48mm zoom.
If you use Lightroom or Adobe Camera Raw, you’ll be happy to know that both already include the corresponding lens profile. As usual, with Canon entry level lenses, there’s no lens pouch or lens hood included in the box.
Lens quality is on a par with what we have come to expect from Canon RF lenses. In my opinion, the Canon RF 15–30mm F4.5–6.3 IS STM is a good lens for those who don’t want to break the bank, but still want to have a wide-angle zoom lens in their camera bag. n
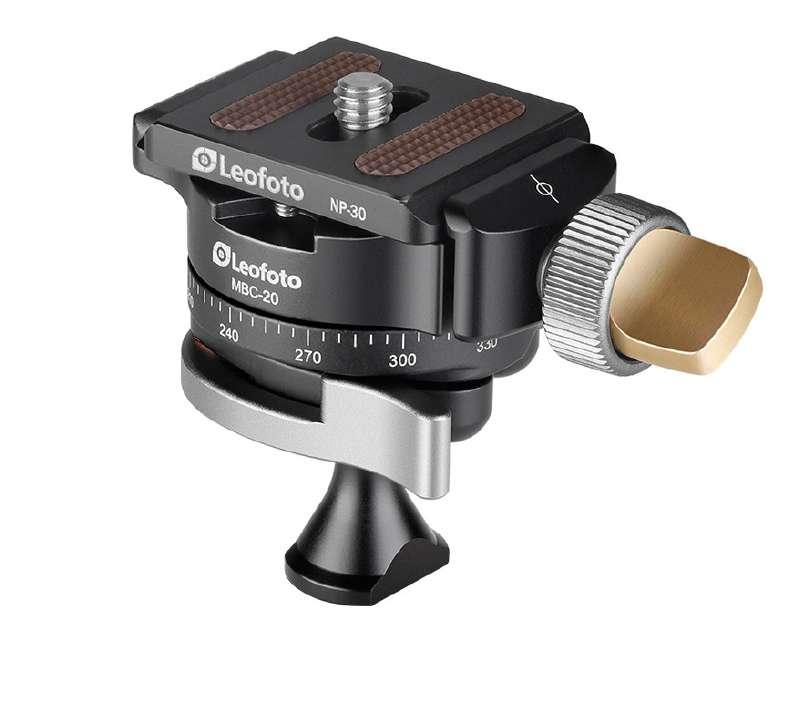
Leofoto MBC-20 Mini Ball Head
Tiny, Panning Ball Head | Review by Fernando Santos
What if I tell you that a panning ball head can fit inside your closed fist? Surprised? So was I. Here’s what I found (in about 300 words):
Although the Leofoto MBC-20 mini ball head was probably designed to be used with small tabletop tripods or clamps to support some accessories, a mobile phone, etc., its small size also makes it interesting to use with the Platypod Ultra or even a small travel tripod. And it takes up no additional space in your camera bag. You will, however, need an inexpensive female 3/8" to male 1/4" adapter, so that you can attach the MBC-20 to a typical 3/8" tripod mount. I recommend the Manfrotto 015, but any similar one will do the job.
The ball head locks/unlocks with a lever release that works well, and the construction even allows it to be tilted up to 90°. The panning plate is on top of the 16mm ball head. There’s no spirit level; but your camera or your phone can help you to ensure that it’s level, so I did not find that a problem.
The arca clamp has a dual-function knob: the interior side opens/closes the clamp, and the exterior knob locks/unlocks the panning. Both are pleasing to the touch.
The ball head weighs just 3.7 oz/105g and is said to handle a load of up to 17.6 lbs./8Kg. In my tests, it didn’t go that far; but it could still handle my Canon R6 with the RF 24–240mm without any problem.
I wish the mount was 3/8" instead of 1/4", and a small hole for an Allen wrench to be inserted to tighten it to a tripod would be nice, too. Look carefully, and you may find similar models from other brands without these issues, at a less expensive price. n
Company: Leofoto
Price: $69
Hot: Very small size; lightweight; panning capabilities; well built
Not: 1/4" mount; difficult to lock to the tripod
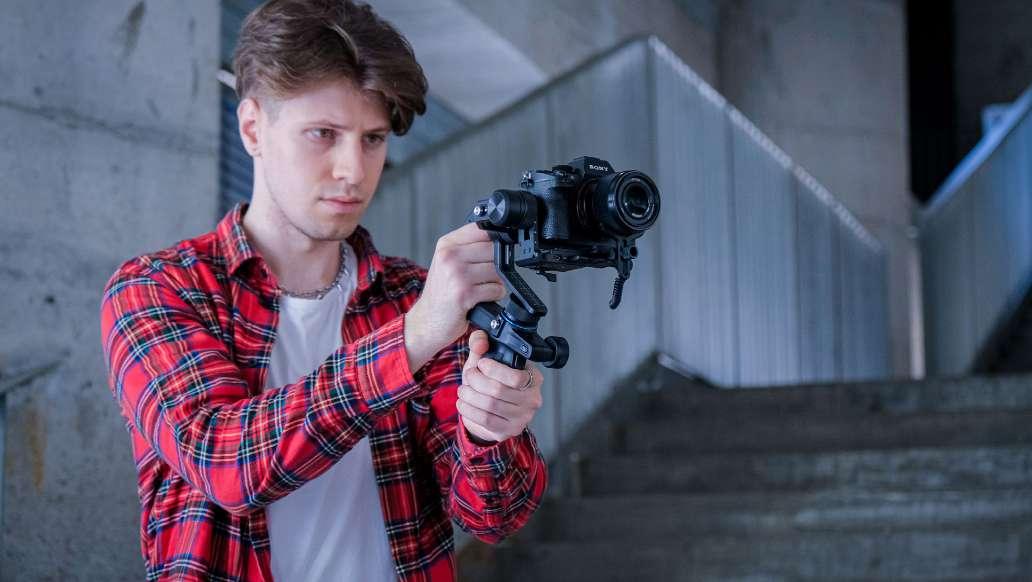
FeiyuTech SCORP Mini
Three-Axis, Lightweight, Handheld Gimbal | Review by Dave Williams
The SCORP Mini by FeiyuTech seeks to fill a gap and solve issues inherent to small gimbals: weight and ergonomics. The problem that they aimed to solve is one of ergonomics, and they’ve achieved the solution. The dual handles behind and beneath this gimbal are designed for comfort while operating your gear. Constant switching from one handle to the other to achieve the optimum camera angle is an issue that comes with gimbal operation but, as far as friendly, easy operation goes, this gimbal has it nailed.
Setup isn’t quite so friendly. Balancing a gimbal is generally a fairly tedious task, and unfortunately, it remains that way with the SCORP Mini. The balancing instructions are almost nonexistent and in broken English that effectively just says “balance the camera.” While this gimbal boasts support for four different camera types (mirrorless, compact, action, mobile), the attachments and plates to support each camera type require some instruction that isn’t present. I like a puzzle, but I’d rather have the solution available.
The unit itself is constructed of aircraft-grade aluminum and synthetic macromolecular resin, making it strong and lightweight at 787g. It’s comfortable and easy to hold for long periods, and all the controls are at your fingertips, giving you full control with finger-and-thumb actions. The controls are extended into the Feiyu SCORP app and there’s another app, Feiyu ON, for creative shooting modes on your smartphone.
The SCORP Mini, pitched as the world’s first four-in-one gimbal, is a great piece of gear for amateur photographers. The batteries cannot be removed, however, so continuous shooting isn’t achievable with a battery change. It’s super-lightweight and feels tough and durable and, in terms of its price point, the $299 retail price (after the $199 KickStarter super early-bird price) is fair. Overall, this SCORP mini is a great gimbal for non-professional use. n
Company: FeiyuTech
Price: $299
Hot: Supports multiple camera types; ergonomically designed
Not: Lack of instructions

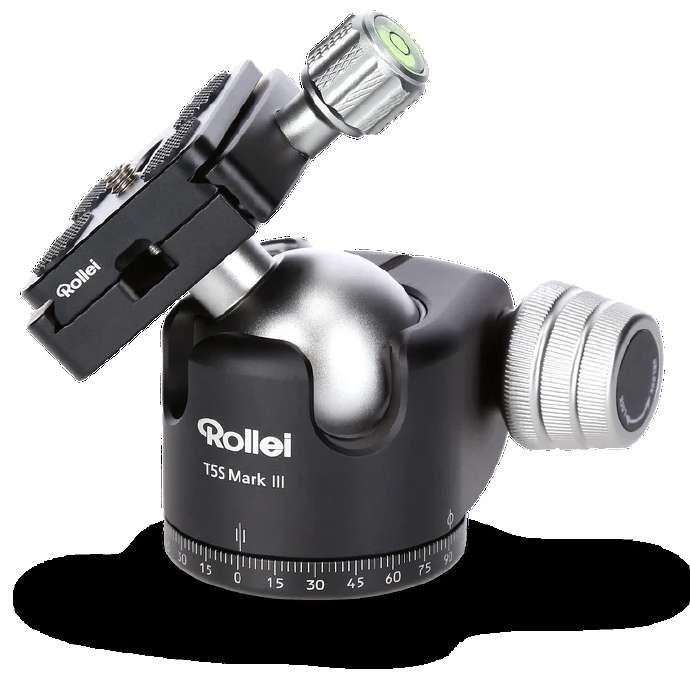
Rollei Ball Head T5S Mark III
Surprisingly Great Ball Head From Germany | Review by Fernando Santos
This new little ball head from German-based company, Rollei, deserves your attention. If you know the iconic and outstanding BH-55 by Really Right Stuff, you probably have seen many similar products from other companies. I tested a few and none compared to the BH-55; but this Rollei Ball Head T5S Mark III does look and feel like a BH-55, with a smaller size, less weight, and at a much lower price. Interestingly, it proved to be very solid, with great performance. Let me tell you about it.
The T5S Mark III is an arca-style panoramic ball head with three control knobs: a large one that controls the locking on the 40mm diameter ball head; a smaller one that controls the tension; and a third knob that controls the panoramic movement. The arca clamp is 50mm long and uses a screw knob. (Personally, I prefer the lever-release type.) It also includes a good-looking 50mm arca plate, but you probably already have enough arca plates, don’t you? I do. The ball head attaches to your tripod with the standard 3/8" mount.
While the BH-55 is incredibly good, many times when I’m traveling, I reach for a smaller ball head mainly because of weight and size restrictions. The T5S Mark III, weighing just 0.9 lbs/409g, seems to be a great compromise between size, weight, and performance, and it supports up to 48.5 lbs/22Kg. The ball head base diameter is 50mm (roughly 2"). Even when you use a Platypod Ultra, it doesn’t obstruct any of the threaded holes or the strap slots. Same applies to the larger Platypod Max and the new Platypod Extreme. Its size is also helpful if you need to mount the ball head on the popular Manfrotto 131 Arms.
Company: Rollei
Price: $89.99
Hot: Great performance; size; weight; very affordable price
Not: Screw knob clamp with no lever-release option
Apart from its good looks, small size, and light weight, how does the Rollei T5S Mark III perform with camera gear attached? Here’s how:
I grabbed my Canon EOS R6, the corresponding battery grip with two batteries inserted, the L-bracket sized for the grip configuration, my always-attached Peak Design Clutch, and then I added the Canon RF 2X Extender and one of my heaviest RF lenses, the RF 100–500mm f/4.5–7.1 L IS USM with a dedicated arca type lens foot. That totaled, in all, around 7.7 lbs/3.5Kg. If you exclude the RF high-end, super telephoto lens and gimbal heads, it’s difficult to load more on a ball head, considering the equipment most people use on a regular basis. Initially, I attached this whole setup to the lens foot, for proper weight distribution. The Rollei T5S Mark III handled the whole load without any problems, even with the lens extended to 500mm and the lens hood attached! So, I decided to take it up a notch: I mounted the whole setup using the camera L-bracket, which changed the gravity center way outside the ball head. To my surprise, the T5S Mark III was still able to handle the load, and did not move at all. Even though the specifications say it could handle up to 48.5 lbs./22Kg, I really wasn’t expecting that it could handle such a load.
So, I tried another heavy setup, where I replaced the RF 100–500mm with the RF 800mm F11, while keeping all the rest about the same, except for the lens foot, which, of course, was different. The new setup weighed about 7.3 lbs/3.3Kg and, again, it was no problem whatsoever for the Rollei T5S Mark III. Unfortunately, I don’t have any heavier lenses that I could try, but I suspect this ball head would still be able to handle them; at least if properly mounted on the lens foot.
The Rollei Ball Head T5S Mark III is a very impressive ball head. I will have no fear taking it with me on assignment, because I know it will be able to handle my gear without any issues. The only problem for readers in the U.S. may be finding one locally, while readers in Europe will have no problem. The easiest way to get one in the U.S. seems to be via online ordering at Amazon Germany. Hopefully, that will change soon. n
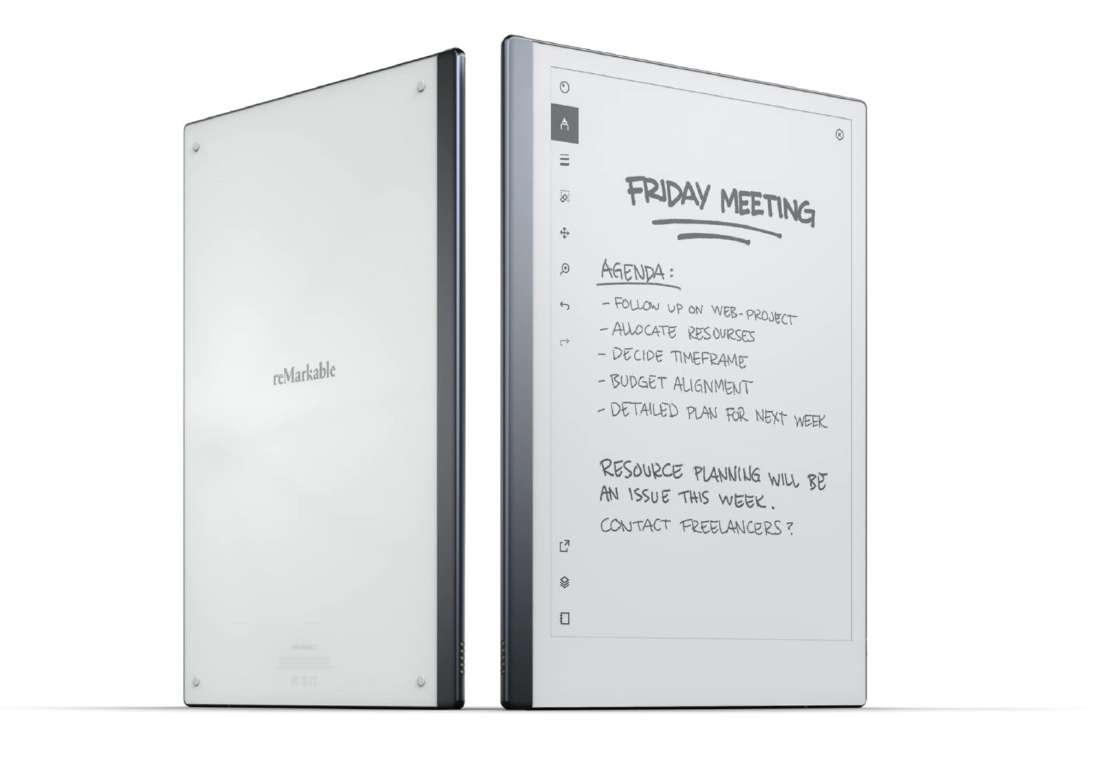
reMarkable 2
Writing, Drawing, & Reading with the Tactile Experience of Paper | Review by Erik Vlietinck
The reMarkable 2 digital tablet is a very thin, low-latency tablet that re-creates the pen-on-paper experience with a rough glass surface. It’s a tablet that helps users focus, as it can only be used as an e-reader and note-taking annex drawing tablet. According to the latest research, with reMarkable 2, it’s better to assimilate and understand content than with traditional tablets, because it comes very close to a pen-paper experience.
For this review, reMarkable sent me the reMarkable 2 tablet as well as the following options: the Marker Plus pen with an incorporated eraser ($129); the standard Folio ($79) to carry the tablet and marker; and the Book Folio in brown leather ($169). They also included a free subscription to the Connect service that adds unlimited cloud storage, writing-to-text conversion, and more.
Made from stylish, dark aluminum, the reMarkable is only 4.7mm thick and has a writing surface of 15.5x20.5 cm. It has a 21-milliseconds refresh rate, which lets you write and draw very quickly with no discernible lag, and there isn’t a visible gap between ink and marker. The writing surface is quite dark (for more contrast, I’d rather it was a lighter shade of gray). The plastic marker pen has a structured surface and attaches to the tablet with a strong magnet. You can also purchase additional marker tips, starting at $14 for a pack of 9 tips.
A large number of templates allow you to use reMarkable 2 for storyboarding,
Company: reMarkable
Price: $299
Hot: Beautiful design; lightweight; robust; paper surface feels like a smooth index card
Not: Connect doesn’t support privacy-minded cloud servers; text conversion is still in its infancy for cursive writing (or plain writing like mine)
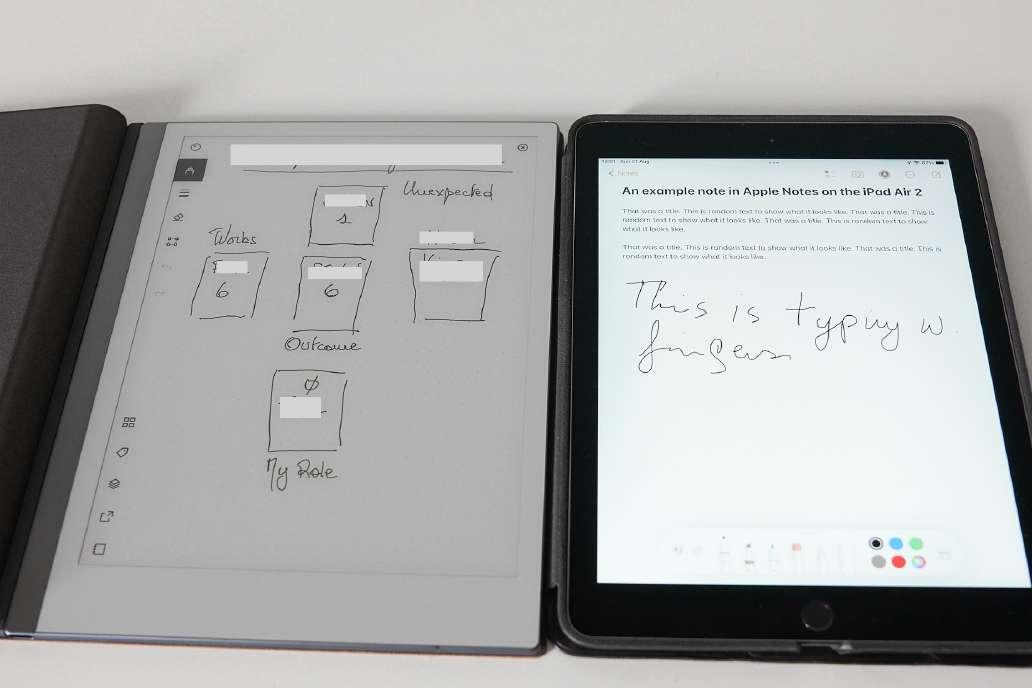
perspective drawing, notes, and more. PDFs can be redacted on the page, which is the most efficient way to do it. Because you can turn layers on/off individually, reMarkable is very useful for sketching, situation roughs, drawing setups for studio lighting, etc.
Although the tablet will only render marker strokes in B&W, you can select your marker to export to blue and red for the pens, markers, pencil, and paintbrush; and gray, pink, yellow and green for the highlighter.
An app comes with the tablet that lets you quickly synchronize your content with reMarkable’s servers. After the 1-year free trial period, if you don’t subscribe to the optional Connect service ($2.99/month), you’ll need to open or edit documents that are older than 49 days, before they’re removed from the server.
The free reMarkable app enables you to upload PDFs and ePub files and a free web extension for Chrome browsers to read websites on the tablet. From within the app, you can offload the tablet to PDF, PNG, and SVG; however, tags on the tablet won’t be exported. With the Connect service, you also gain the ability to offload OCR writings with Send by Email.
In addition to storing your notes on the tablet, Connect offers: unlimited cloud storage on reMarkable’s servers, Google Drive, Dropbox, and OneDrive integration; handwriting conversion (MyScript based); Screen Share to put your notes on a big screen via the reMarkable app; and Send by Email. Connect also comes with a 36-month extended warranty.
Text conversion isn’t bad; but it’s far from perfect. It recognized my handwriting correctly for about 95% of the time, and it can’t handle tables and lists.
The cloud services integration allows you to share notes directly from your reMarkable 2 tablet to, for example, a Dropbox folder with just a working Wi-Fi connection. It would be nice, though, if the integration would also support Sync or Box. n

The Eiffel Tower Effect
Dave Williams | Review by Peter Bauer
“How to find your unique photographic perspective and defeat the influencers”
is how the author describes this book. He discusses at length how to take
photos of familiar structures, landmarks, and scenes that differ from the huge
number of near-identical photos of the subject flooding social media. He also
devotes a large portion of the book to making your images (and yourself) more
popular (and, therefore, more influential) on social media. One example: He notes
that you can create engagement by including an “intentional mistake” in the
text of a social media post. (Does that explain the several typos in the book?
No, I refuse to engage on that subject!) He makes an excellent point for profes-
sional photographers, both wedding and commercial: The images you post to
promote yourself should be readily reproducible rather than one-off, exceptional
shots you happened to capture. Example photos illustrate his points effectively.
Publisher: idavewilliams.com
Pages: 170
Price: $23.50 (paperback); $8.99 (Kindle)

David Yarrow: How I Make Photographs (Masters of Photography)
David Yarrow | Review by Peter Bauer
The “Masters of Photography” series is a collection of books, each featuring one
photographer who discusses his (or perhaps someday “her”) approach to his craft.
David Yarrow may be the gold standard in wild animal photography. He’s very frank
in his discussion of how he makes images. For example, he emphasizes doing as
much research as possible before leaving for (or even planning) a specific shoot.
Although he also explains that sometimes, despite your research, conditions don’t
match your plans, and you’ll need to both improvise and compromise. In addition
to animals, his photography includes the environments in which they live and,
in some cases, the people with whom the animals interact. This is a small book
(roughly 5.5x8") and some of the images are tiny (as small as 2.5x1.5"). It may
inspire you to seek out his coffee-table books. But it will inspire you. n
Publisher: Laurence King Publishing
Pages: 128
Price: $19.99 (paperback)
Q. With the Spot Healing Brush tool selected, what are the differences between the Proximity Match and Content-Aware modes in the Options Bar?
A. Great question! The difference is that Proximity
Match analyzes the pixels around the area you’re trying to repair and then samples those pixels and tries to blend them into the damaged area. The
Content-Aware mode uses AI to fill the damaged area with the best possible match.
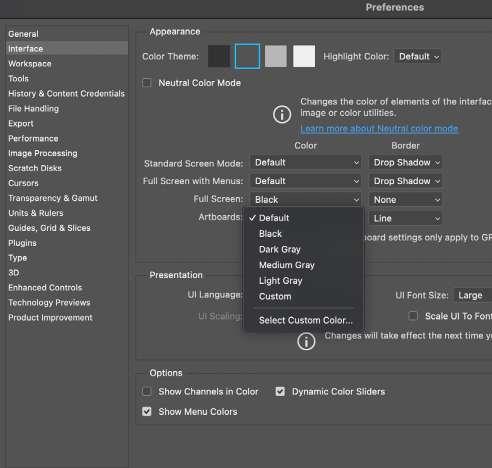
Q. How can I customize artboard preferences?
A. There are a couple of artboard preferences that you can customize in the way that works best for you.
Go to Photoshop (PC: Edit)>Preferences>Interface.
First, we’ll change the color of the canvas area around the artboards. In the Appearance section, click on the Artboard drop-down menu, and now you can choose any color from the available default presets.
If you have a specific color in mind, choose Select
Custom Color, select your color in the Color Picker, and click OK. That color will now be the backdrop for all your artboards. The next drop-down menu to the right lets you specify if you want to have a line around the border of the artboard, because by default, artboards have a line around them.
If you have a Photoshop question that you’d like Victoria Pavlov to answer in the pages of Photoshop User magazine, send it to letters@photoshopuser.com. Q. I can’t figure out how to use the Magic
Eraser tool. What does it do?
A. The Magic Eraser tool (nested below the Eraser tool [E] in the Toolbar) is similar to the Magic Wand tool; but, instead of selecting pixels in a single click, it erases them based on how similar the colors are.
For example, if you have an image with a solid color background, you can remove this background with only one click using the Magic Eraser tool. There are also some settings available for this tool in the Options Bar to help you control how much it erases. Tolerance is responsible for the range of similar pixels that will be erased and the value can be set between 0–255. The larger the Tolerance value, the more pixels it will consider similar, so it will erase a larger area. The Anti-alias option will help smooth the areas around the deleted pixels. If the Contiguous option is selected, when you click with the Magic
Eraser, it will only delete similar pixels that are next to each other, based on the Tolerance range you specified. If you turn off Contiguous, it will erase all similar pixels in the image (whether they’re touching or not). If the Sample All Layers box is checked, the
Magic Eraser tool will calculate the data using all visible layers. And finally, the Opacity is responsible for the strength of the erasure.
Q. I see a lot of tutorials that use the
Lasso tool for making selections.
I started using Photoshop recently, and I’ve tried the tool many times, but it seems very difficult to use.
Could you please explain why and how the Lasso tool can be used?
A. In Photoshop, we have many different selection tools, and the Lasso tool (L) is only one of them. Personally,
I often use various selection methods depending on the image with which I’m working, and sometimes
I’ll use a lot of the available selection tools when working on a complex selection. The Lasso tool is a freeform selection tool which follows your hand/pen movement with precision as long as you hold down the mouse button, or apply pen pressure. Once you release the button, Photoshop will automatically draw a straight line from that point to the starting point of the selection to close it. Once you make a selection using the Lasso tool, you can hold the Shift key and click-and-drag to add to the selection, or the Option (PC: Alt) key to subtract from the selection. When the Anti-alias option is selected in the Options Bar, the selection will have smooth edges. The Feather option creates
smoother transitions between the selection and surrounding pixels.
While drawing a selection, if you want to switch from drawing freeform to drawing a straight selection segment, hold down the Option (PC: Alt) key and release the mouse button to temporarily switch to the Polygonal Lasso tool. Click-and-hold where you want the endpoint of the straight segment, release the Option (PC: Alt) key, and you’ll be back to the regular Lasso tool.
Tip: If you need to adjust the selection, in the Options Bar, click the Select and Mask button. Photoshop will redirect you to the Select and Mask workspace where you can adjust or improve the selection.
Q. A few years ago, I saw a digital painting done in Photoshop using the Art
History Brush. Since then, I’ve been trying to paint using the Art History
Brush tool with little success. Victoria,
I know that you do digital painting in
Photoshop, so could you please show me the best way of using this tool?
A. Thank you so much for this question. The Art History Brush tool (nested with the History Brush [Y] in the Toolbar) is easy and fun to use. This tool is especially helpful for Photoshop users without any painting experience. Using a photo layer as a base/reference layer, you can create a unique simulation of painting in many different styles. For a nondestructive workflow, create an empty layer above the reference/original layer, and use this empty layer as a “painting” canvas.
Let’s look at the various settings in the Options Bar for the Art History Brush. Click on the brush preview in the Options Bar to open the Brush Preset Picker and, from the General Brushes folder, choose any brush. Click the folder icon next to the brush preview to open the Brush Settings panel, and make any desired adjustments to the brush.
Back in the Options Bar, you can change the Mode to Lighten, Darken, Hue, Saturation, Color, or Luminosity at any time. The Opacity value is responsible for the strength of the painting effect applied to the reference layer.
Photoshop offers many different brushstrokes styles from which you can choose in the Style drop-down menu. Keep in mind that you can switch between different styles as often as you wish. The Area specifies the diameter of the area which will be covered by each brushstroke, and it can be set anywhere between 0–500. Using the Tolerance option, you can limit the region where the brushstroke can be applied. Changing the brush Angle option will rotate the brush.
The best thing to do now is just start playing. Try different settings and brushes to see how they’re applied to the reference image.
Q. What is the fastest way of converting a photo to black-and-white using Photoshop on iPad?
A. The quickest way is to open the image on which you’d like to work in Photoshop on iPad, and then on the left side of the screen, tap on the Layer Properties icon and select Add Clipped Adjustments followed by Black and White. n
ALL IMAGES BY VICTORIA PAVLOV