


Introduction
What is in This Guide
Why Put a Heat Pump on a Water Tank?
How Does it Work?
Additional Information
Modes Overview
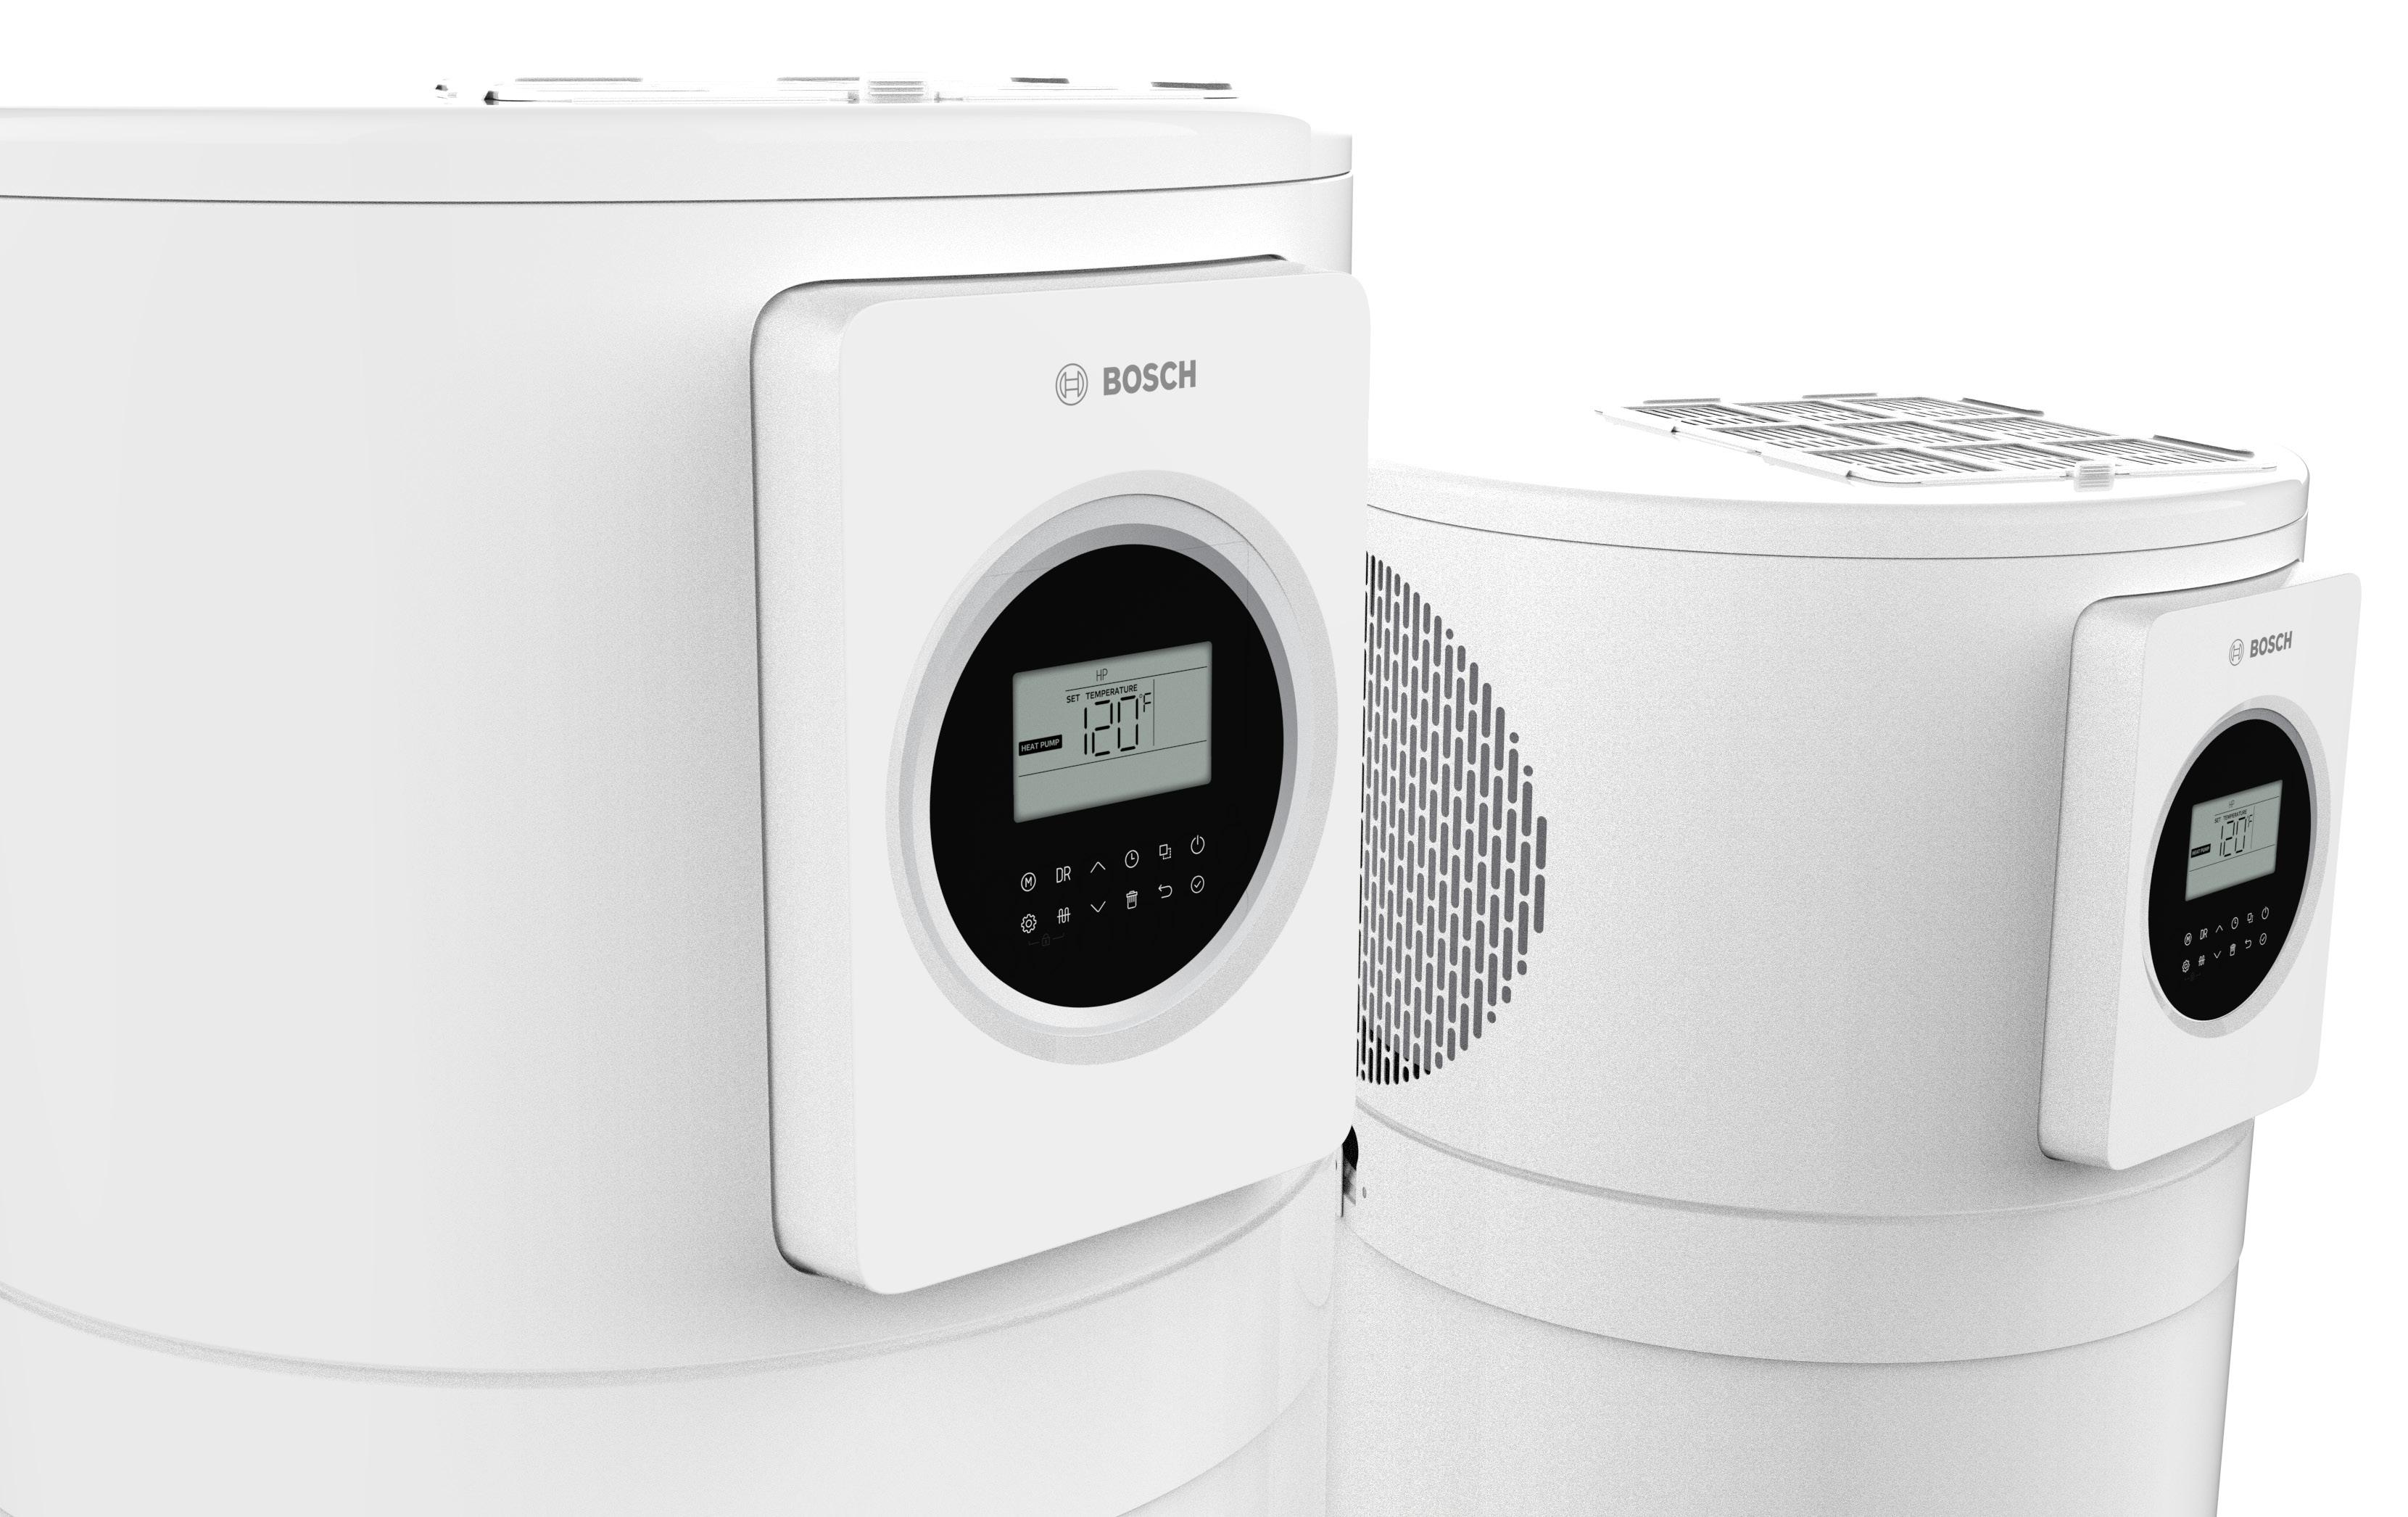
HMI Guide
HMI Overview Buttons
HMI Overview Display
Setting a Schedule
Set the Date and Time
Weekly and Daily Schedule
Vacation Mode
Legionella
Demand Response
Operating Parameters
Advanced Settings
Maintenance
Maintenance Schedule
Specific Information
Setting Maintenance Schedule
Accessory Parts
Anode Rods
Ducting Kit
Leak Detection Kit
▶ Bosch GreenTronic 7000 T Overview
▶ Basic operator/interaction instructions
▶ Maintenance guide
▶ Accessory parts
Increase savings and conserve energy by switching to a hybrid electric water heater. The Bosch GreenTronic 7000 T takes advantage of heat pump technology to boost performance, making it 3-4 times more efficient than a standard electric storage unit. Meaning, using a heat pump, you can have hotter water for the same amount of electricity.
However, using a heat pump to supply hot water can take longer than traditional heating elements.
To get the best of both worlds, The Bosch GreenTronic 7000 T comes with backup electric heating elements for when hot water is needed faster. The Bosch GreenTronic 7000 T has five different operating modes to offer different balances between efficiency and comfort.
The Bosch GreenTronic 7000 T is up-to 3-4 times more efficient than a traditional electric water heater without sacrificing comfort.
Back-up heating elements for faster heat-up times.
Choose from five operation modes for the perfect balance of efficiency and comfort.
Operates at 49 dB(A), comparable to a quiet refrigerator.
Optional duct adapters give flexibility of air flow and installation space.
10-year limited warranty on tank and parts including 1-year labor.(1)

Auto shutoff leak protection kit (sold separately). It detects leaks and will shut off the supply of water to your water heater.
Heat pumps work by “moving” heat from one location to another. In this case, heat in the air inside your home, garage, etc. gets moved to your soon to be hot water. For this movement of heat to happen, there needs to be a temperature difference between the air and the refrigerant, specifically the air needs to be hotter than the refrigerant.
It starts when the heat in the air gets transferred to the refrigerant since it is colder than the air, this causes the refrigerant to boil, increasing its temperature and pressure.
After the refrigerant boils, it is moved along from the evaporator coil to the compressor. Here, the pressure of the refrigerant is greatly increased, and due to basic laws of physics, so does its temperature.
Now, the refrigerant is much hotter than the water that is inside the tank. This means that the heat from the refrigerant gets moved to the water as it flows through the tubing that surround the outside of the tank.
Once the refrigerant has given up its heat to the water, it is cooler than it was before but is still too hot to take heat from the surrounding air. To drop the temperature so that it can absorb heat from the air again, the refrigerant goes through an expansion valve which lowers the pressure and like the compressor in reverse, drops the pressure and the temperature. Now the refrigerant is cooler than the surrounding air and the process can start over again.
Please follow the QR to find information on tax credits and rebates near you and to the GreenTronic 7000T FAQ page.

For Information Regarding Tax Credits and Rebates

GreenTronic 7000T Product FAQs

GreenTronic 7000T Home Page

DOE website to find out more about water heater sizing
E-HEATER Very Low Very High
Vacation mode will put the water heater to target set temperature of 59 F to protect the water heater while not use for the length of the selected days (1 – 360 days). Further details in chapter 6.2.5.
Hybrid mode utilizes the heat pump and the electric heating elements to heat up the water. Efficiency is lower and the water heats up faster compared to economy mode. Only active for 72 hours.
E-Heater only utilizes the electric heating elements to heat up the water. It is the least economic mode but is the fastest way to heat up the water in the water heater tank. Only active for 72 hours. ECONOMY
Economy mode utilizes the heat pump and the electric heating elements to heat up the water. It’s the default mode. Efficiency is high while it takes longer to heat up the water.
HEAT PUMP Very High Very Low
Heat pump mode only utilizes the heat pump to heat up the water. It is the most efficient way to heat up the water but also takes the longest.

Button Name Description
Mode Cycle through modes. Tank mode is set once “Mode” appears on screen.
Settings
Press once to open operating parameters menu. Hold for 3-5 seconds while on the home screen opens advanced settings menu.
Demand Response Toggle the demand response control on and off.
Electric Element
When pressed, automatically turns on one of the electric elements until the set point temperature is reached.
Clock Set the date, time, and select schedule (weekly or daily).
Delete Clear settings in the schedule.
Copy Copy and paste settings in the schedule.
Back Returns to previous screen.
On/Off Turns the tank on or off. Display stays on.
Confirm Saves any changes the user has made or proceeds through menus
Child Lock
Up/Down
Press the setting and electric element buttons at the same time to turns on child lock. Chanes cannot be made on the display.
Navigate different menus and set the temperature when on the home display screen.
1

Main Display: This icon will be illuminated if the screen is unlocked. It shows the following values:
▶ The measured water temperature in the tank
▶ The setpoint temperature
▶ Remaining days of vacation in vacation mode
▶ Error code if fault is detected, see troubleshooting section for more details
2
3
4
5
Time and Clock Setting: This icon shows the current time. This value must be set upon installation. It also shows the time when using the scheduling function.
Scheduling: This icon is used to show the scheduling programmed by the user. If no scheduling is used, the icon will not be present. For the scheduling function:
▶ The day that has been scheduled will be displayed
▶ The dots and dashes represent different scheduled on/off cycles on a given day
▶ The day and time that is being scheduled will flash on and off when being set
Maintenance Reminder: This icon will flash to remind the user to conduct maintenance on the product. The time interval is default to 365 days and can be set in the engineering settings.
Child Lock: This icon will be displayed when the child lock is activated. This will prevent all operational buttons from being pressed. 6
Hybrid Mode: This icon will be displayed when hybrid mode is selected. This mode will minimize recovery time while still utilizing the heat pump and allows the heating element and heat pump to run simultaneously under certain operating conditions.
7
Electric Resistance Heating Element: This icon is displayed when the heating element is being used to heat the water. The electric resistance element button can also be used to manually activate the heating elements if the operation mode and conditions allow.
Scald Risk Alert: This icon is displayed when the temperature is higher than 122°F (50°C) to notify the user of high water temperatures.
Error Alert: This icon is displayed when there is an error and/or lockout. Contact a qualified technician if activated.
Vacation Mode: This icon is displayed when vacation mode is selected. In this mode, the tank will maintain the temperature at 59°F (15°C) to save energy.
E-Heater Mode: This icon is displayed when E-Heater mode is selected. This mode will only utilize the electric resistance heating elements to heat up the water.
Economy Mode: This icon is displayed when economy mode is selected. This is the default mode and will heat the water as high as possible before using electric resistance heating elements.
Heat Pump Mode: This icon is displayed when heat pump mode is selected. This mode will allow only the heat pump to function unless the unit is under certain extreme operating conditions.
Demand Response (DR): This icon is displayed when the user presses the "DR" button to turn on demand response functionality. If a UCM is connected to the unit and the water heater receives a power limit request, basic or advanced load request, or emergency curtailment request, it will flash slowly. If there is an emergency shutdown request, the icon will flash quickly.
This water heater has two different types of schedules you can set, daily and weekly. In order to set a schedule, you will need to first set the date and time.
Hold the clock button down for 3-5 seconds. Weekdays will flash first--use the arrows to select the day and confirm with the check button. The time will flash next. Use the arrows to set the time (24-hour time) and confirm with the check button.
To set the weekly schedule
press the clock button until WEEK appears on the display next to the schedule and press the confirm button.
▶ Use arrows to select a day, press confirm button, then select a slot using the arrows and press confirm
▶ Follow the prompts on the display to set the start and end time, mode, and temperature
• Settings are saved in a specific slot after you set the temperature
• There are 6 different slots per day, each slot can be set for a specific time, mode, and temperature.
• If times overlap to a previous slot, it overwrites the previous slot(s) and deletes the information that was set.
• The settings are automatically saved in whichever slot you were editing after you press the confirm button to set the temperature.
• To delete settings in a slot, scroll to the slot and while flashing, press check, then the delete button on the first option (start time), this clears the slot.
To delete a day from the schedule
Press the delete button while in the day selection prompt (day of the week selected is flashing), press delete again adds it back to the schedule.
▶ If you delete a day that has a schedule set, it does not delete the information that was set for that day and is saved for when you add it back to the schedule.
To copy settings from one day to another
▶ Start in the day selection menu and scroll to the day you would like to copy the settings from (day of the week should be flashing)
▶ Press the copy button, then use the arrows to select which day of the week you want to copy the settings to
▶ To paste, press the copy button again so that the day is rapidly flashing, the settings are saved automatically when you press the copy button, use the arrows to continue to select other days you wish to copy to and press the copy button to save
▶ Press the confirm button when you have finished pasting information to the desired days.
Daily schedule is set the same way, but you are limited to 6 different slots for an entire day.

Using the mode button to select VACATION, the display will automatically prompt you to set the days using the up/down arrows. The temperature the tank holds while in vacation mode can be set in the Advanced Settings under F11.
Below 113°F, Legionella can grow freely and be dangerous to humans. If the tank temperature is set below 113°F [50C] or you would like additional protection, you can turn on Legionella Protection and edit the time and temperature in the advanced settings. (F07, F09, F17, and F26). The system will then disinfect the tank of legionella by increasing the water temperature and holding it for 30 minutes, regardless of the temperature the tank is set to. Legionella Protection does not heat the tank efficiently and takes advantage of mainly the heating elements to ensure the entire tank reaches temperatures high enough to kill any bacteria.
This tank is equipped with a UCM (Universal Communication Module) port. If enrolled, this is where the module will be installed. The module gives your utility an access point to control the tank during periods of high demand and in return, you may receive some benefits like discounts on your power bill. You still have full control over your tank and can overwrite the demand response if you wish. (When activated by your utility, the demand response can be seen on the display when the DR icon is flashing. Please refer to your Installation Manual for more information about your GreenTronic 7000 T and demand response feature.
To access, press the setting button once and use the up/down arrows to navigate. This menu displays current tank sensor readings, setting values, software versions, error code history, and other relevant tank information. Refer to the manual that came with your water heater for specifics.
While in the home menu, hold the setting button for 3-5 seconds until the menu is displayed on the screen. This menu allows you to change specific settings or preferences on your tank such as maintenance schedules, set up Legionella protection, vacation mode temperature, and more. Use the up/down arrows to select a specific setting, press the confirm button, use the up down arrow to change the value, and press the confirm button again when you have selected the desired value.
F01 Unit conversion for temperature display
F02 Maintenance reminder
F03 Time for maintenance reminder
F04 Reset maintenance time
F07 Legionella protection
F09 Legionella protection cycle time (hour)
F11 Set vacation mode temperature
F14 Time until electric heating element activates when heat pump is not able to increase tank temperature
F17 Legionella protection temperature
F18 Maximum temperature setpoint
F26 Legionella protection cycle time (minutes)
F27 Activation of electric heating element when heat pump is not able to increase tank temperature
F30 Backlight behavior
F34 Mute sound
F35 Automatic child lock
F38 Auto shutoff valve leak protection
F39 Manual activation of legionella protection
F40 Duct settings
0 – Celsius 1 – Fahrenheit
0 – No maintenance reminder 1 – Maintenance reminder (default)
Select 30 – 365 days (default: 365)
Select 1 and confirm to reset day count of maintenance reminder
0 – off (default) 1 – on (SCALD RISK, refer to chapter 4.2.6)
Select hour of day: 0 - 23 (default: 23)
Select 10 - 20°C (equals 50 - 68°F)
Select 1 - 150; Unit: 10 minutes (default: 84 equals 840 minutes/14 hours)
Select 60 - 70°C (equals 140 - 158°F)
Select 65 - 70°C (equals 149 - 158°F)
0 Select minutes of the hour: 0 - 59 (default: 0)
0 – off 1– on (default)
0 – Backlight always on 1 – Backlight turns off after 3 seconds
0 – sound is on (default) 1 – sound is off
0 – off (default) 1 – on
0 – off (default) 1 – on
0 – off (default) 1 – on
0 – no duct
0 or 2 – select if duct is installed
To ensure that the water heater continues to operate in an efficient, effective, and safe manner, it is important to conduct the required maintenance steps in a timely manner. Failure to do so could negatively impact the performance and the life span of the product, and lead to failures that would not be covered under warranty. A qualified service person should be contacted to perform a majority of the maintenance needed. Maintenance Schedule Maintenance
(Once drained after the first 6 months)
Please follow the QR code to Bosch’s Electric Water Heater Maintenance Information website for specific information about when and who should be maintaining your GreenTronic 7000T.

A reminder can be set in the advanced settings (holding setting button for 3-5 seconds) under F03, it is by default set to 365 days and can be set to a minimum of 30 days. After that set amount of time the maintenance reminder icon will appear on the display to the right of the temperature.
Anode rods need to be replaced when the rod has been depleted. Please refer to the table to get the correct anode rod for your tank size. For further information, please refer to the manual that was supplied with your water heater.
Ducting kits are available for customers who have limited space and airflow in the installation location or would like the ability to direct the cold air from the exhaust to a specific location or room. For further information, please refer to the manual that was supplied with your water heater and Duct Adapter Kit Installation Instructions for more information.
For maximum protection, an optional leak detection kit is recommended. When installed correctly, the kit will shut off the supply water to the tank if a leak is detected. This limits the amount of water that will leak to the volume of water that is inside the tank. For further information, please refer to the manual that was supplied with your water heater and Leak Detection Kit Installation Instructions for more information.
Note:
Bosch Home Comfort Group is a leading source of high quality water heating and comfort systems. The company offers gas tankless, electric whole house and point-of-use water heaters, Bosch and Buderus floor-standing and wall mounted boilers, Bosch and FHP geothermal, water-source and air-source systems as well as controls and accessories for all product lines. Bosch Home Comfort is committed to being Simply Smart by offering products that work together as integrated systems that enhance quality of life in an ultra-efficient and environmentally friendly manner. For more information, visit bosch-homecomfort.us
The Bosch Group is a leading global supplier of technology and services in the areas of Automotive, Industrial Technology, Consumer Goods and Building Technology. The company was founded in Stuttgart, Germany, in 1886 and presently has more than 440 subsidiaries and is represented in over 150 countries.
In the U.S., Canada and Mexico, the Bosch Group manufactures and markets automotive original equipment and aftermarket solutions, industrial drives and control technology, power tools, security and communication systems, packaging technology, home comfort solutions, household appliances and software solutions. The Bosch Group’s products and services are designed to improving quality of life by providing innovative and beneficial solutions. In this way, the company offers technology worldwide that is Invented for life. Additional information is available online at www.bosch.com
Watertown, MA | Londonderry, NH | Ft. Lauderdale, FL
General Inquiries: 1-866-642-3198
Copyright © 2025 Bosch Home Comfort Group All rights reserved. Subject to change without notice.
76HTT1007A 1-25
www.bosch-homecomfort.us