Repairs Handy Hints Booklet


Page 4 - 5: Baths, Showers, Sinks & Basins
Page 6 - 7: Drains & Wastes (External)
Page 8 - 9: Pipes & Taps
Page 10 - 11: Toilets
Page 12 - 13: Clearing a blockage
Page 14 - 15: Kitchen fittings
Page 16 - 17: Doors & Locks
Page 18 - 19: Windows
Page 20 - 21: Walls & Ceilings
Page 22 - 23: Condensation
Page 24 - 25: Floors & Stairs
Page 26 - 27: Roof & Chimneys
Page 28 - 29: Gutters
Page 30 - 31: Gardens & Garages
Page 32 - 39: Heating & Heating maintenance
Page 34: Resetting a Worcester 25i & 30i boiler
Page 34: Resetting a Worcester 24i & 28i boiler
Page 35: Resetting a Worcester 4000 boiler
Page 36: Resetting a Intergas 28/24 HRE boiler
Page 37 - 38: Changing thermostat batteries
Page 39: Thaw a condense pipe
Page 40 - 41: Cold weather
Page 42 - 43: Bleeding radiators
Page 44 - 45: Electrics
Page 46 - 47: Smoke & Carbon Monoxide Alarms
Page 48 - 49: Resetting a Trip switch
Page 50: Trip switches - RCD
Page 51: Trip switches - MCB / RCBO
Page 52 - 53: Isolating power
Page 54: Appliance safety in your home
Page 55 - 56: Electric showers, shower heads & pumps
Page 57 - 60: Electric heating
Page 60: TV Aerials
Page 61: Electrical safety maintenance checks
If you need this information in another language or format, please contact us to discuss how we can best meet your needs, on equalities@bromsgroveandredditch.gov.uk or 01527 548284.
This booklet gives straightforward guidance and information on some of the basic repair tasks that you can do around your home before you call our repairs and maintenance telephone line. By doing this, some repairs can be done in a timely fashion and may cause less damage to your home. Carrying out these tasks can save both you and the Council money and also the hassle of having to arrange appointments and waiting in for a contractor to arrive. To do some of these simple tasks you may need:
• Some tools and parts
• Follow the instructions and advice
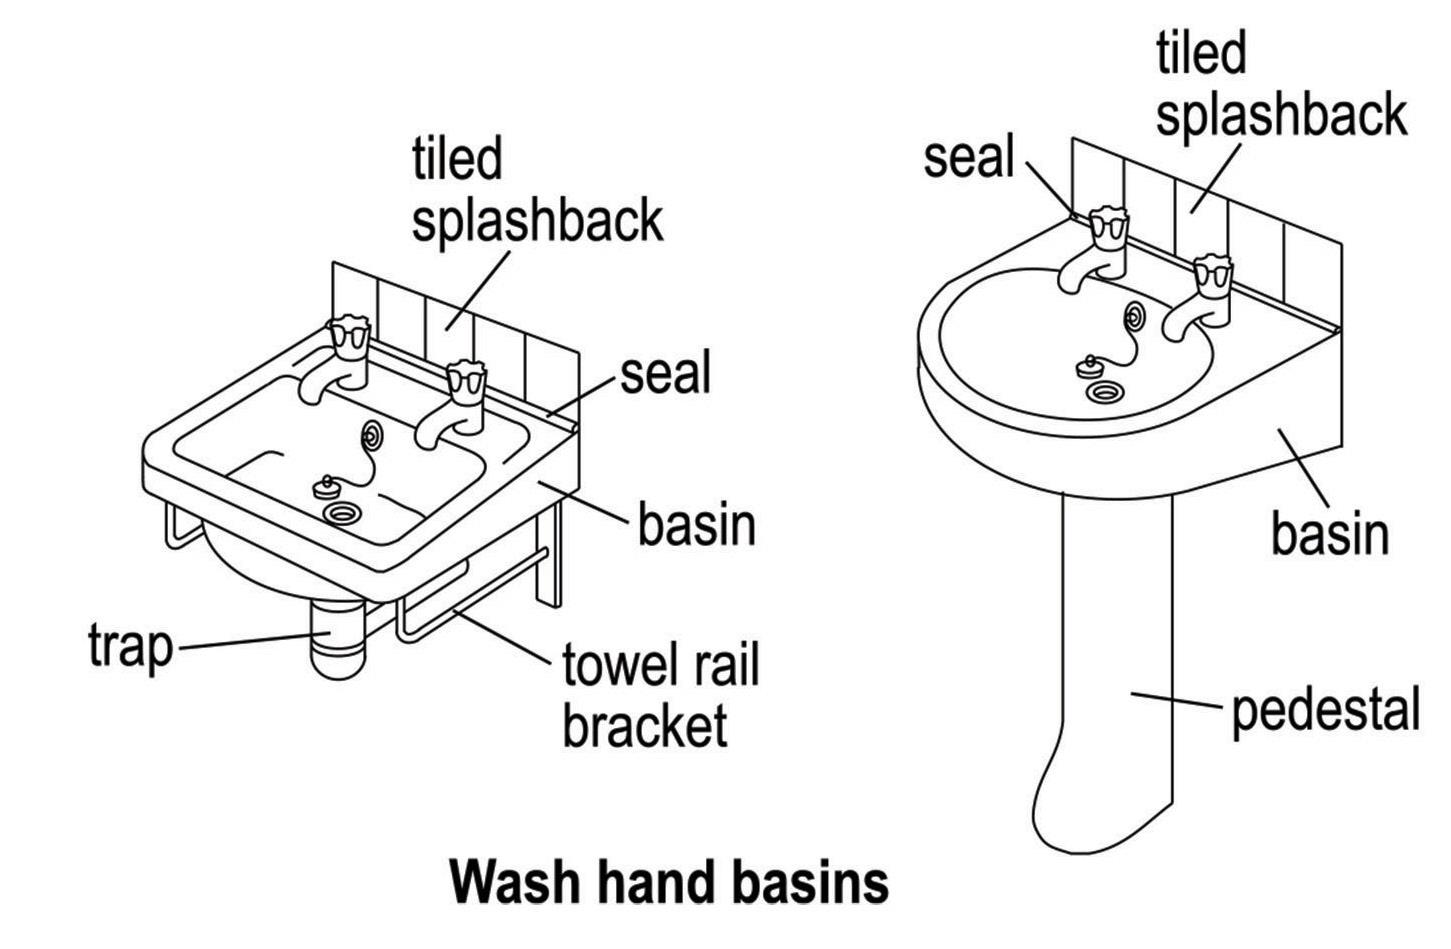
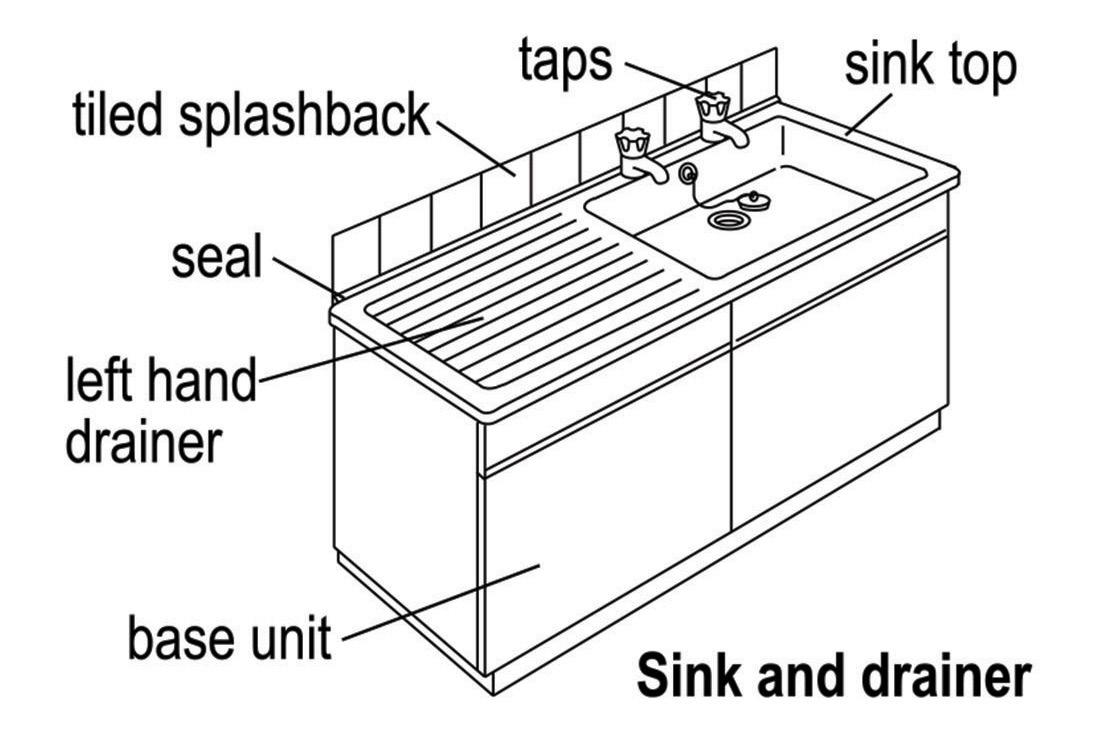
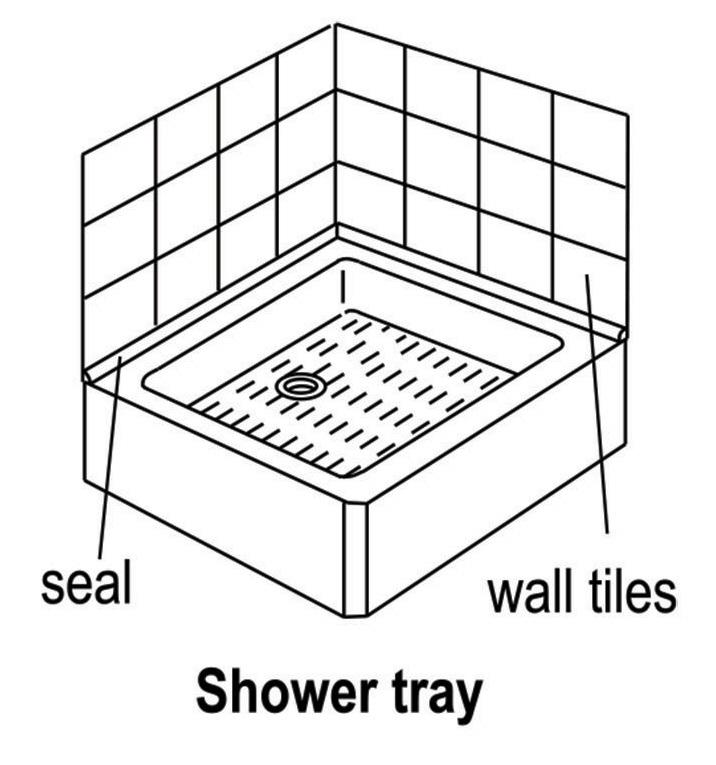
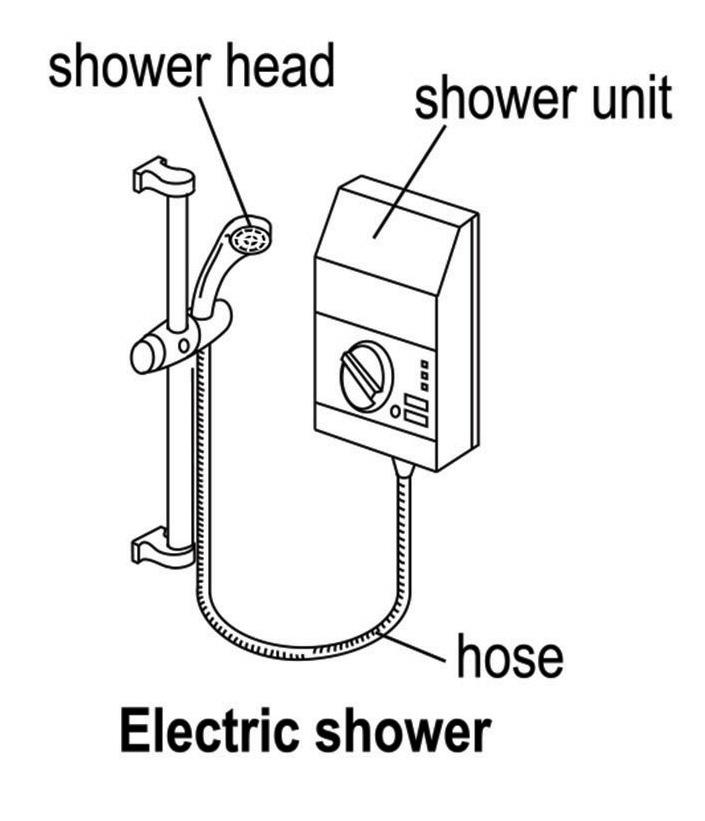
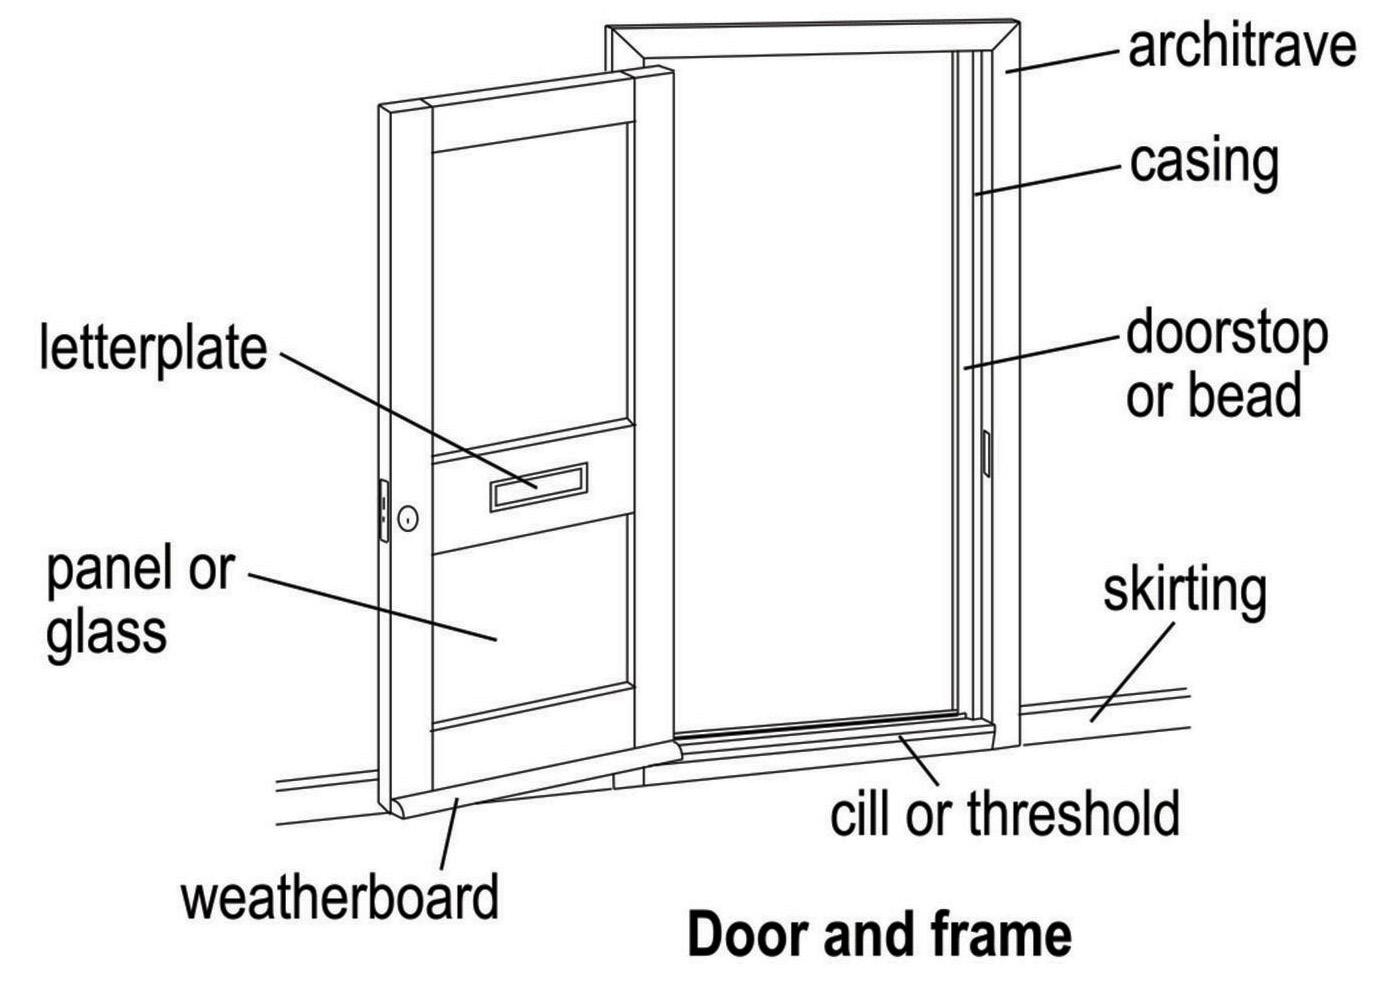
• Use the diagrams to identify the area of repair
• Check you will not be disturbing any materials that contain asbestos
Asbestos: Some of our properties contain asbestos.
Asbestos materials are not dangerous if they are sealed, in good condition and left undisturbed. However, you are at risk if you disturb it by drilling, cutting or breaking it.
If you carry out DIY, such as drilling boards to fix shelves, removing ducts or bath panels or lifting floor tiles, and you are unsure about whether it contains asbestos, you must contact us. You will be advised on whether a particular area where the repair is reported contains asbestos or not.
If you are unable to sort the problem, you will need to contact the Repairs and Maintenance Team. Have this booklet ready, the team will also have a copy of this booklet and they will be able to:
• Let you know if the repair is your responsibility
• Assist you in identifying the problem
• Ensure that you have taken all the advice from the booklet
In some areas, repair issues will be too extensive to be put in this booklet. With this in mind, we will have further information available on our website www.redditchbc.gov.uk


Your responsibilities
• Clearing blocked baths, basins and sinks
• Replacing plugs and chains to bath, basins and sinks
• Repairing any items you have installed yourself e.g. shower, extra tiles etc.
• Repairing any damage caused by you, a member of your household or a visitor to the property
Advice
• For water leaks, blockages or tap problems, see ‘Drains & Wastes’ section 2 and ‘Pipes & Taps’ section 3
• Blocked waste is NOT an emergency. You are expected to try and clear any blocked baths, basins and sinks yourself
• We will charge you for the cost of clearing blockages caused by items such as toys, hair, wipes etc.
• If you caused the damage, we expect you to get it repaired yourself or any repairs completed by us will be fully recharged
• Do not use the bath or sink if the wastepipe is blocked; wait until it has been cleared
• If we need to replace bathroom fittings which are parts of a suite we will try to find a colour match, but if this is not possible we will provide it in white
We need to know
• What is the problem, e.g.: bathroom fittings loose or broken; wastepipe leaking or blocked?
?
• If a panel, is it the side or the end? Is it made or plastic or hardboard? What colour is it?
• If a bath, what is it made of, plastic or metal? What colour is it?
• If tiles, what shape, size and colour are they?
• Has your bathroom been refitted by us in the last 12 months?


Advice
• Thawing condensing pipe
• Ensuring that pipes are kept clear of blockages
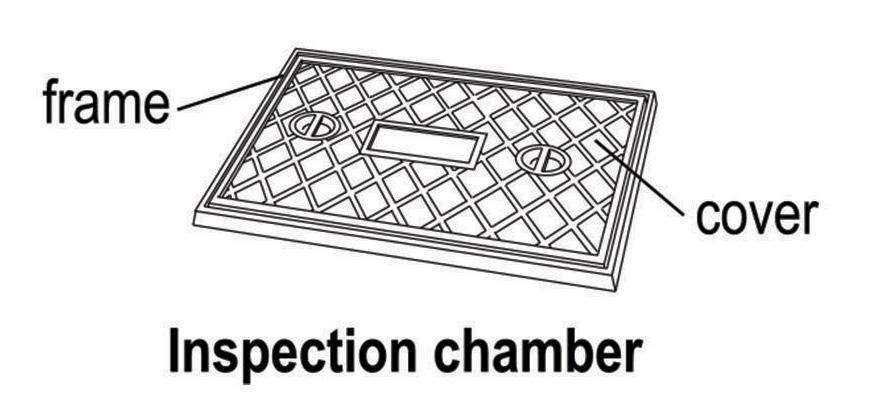
• Keeping gully grids clear of leaves, debris and rubbish
• A blocked waste is NOT an emergency. You are expected to try and clear it yourself
• A blocked toilet is NOT an emergency unless you have no other toilet you can use
• If a blockage is caused by items such as nappies, wipes, air fresheners, toilet rolls, tampons etc., we will charge you the full costs for clearing it. You should always try to clear it yourself before getting in touch with us
• Do not use the bath, basin, sink, shower or toilet if the wastepipe is blocked; wait until it has been cleared
• If you caused any damage, we expect you to get it repaired yourself or any repairs completed by us will be fully recharged
We need to know
• What is the problem, e.g.: wastepipe blocked or leaking; drain smelling or blocked; gully blockage or grid missing?
• If a wastepipe, which is it: bath, basin, sink, shower or toilet?
• If a wastepipe is blocked: is more than one fitting blocked, or are any other properties in your block or flats or rows of houses affected?
• If the drain is blocked: is it overflowing?



• Taking steps to prevent pipes from bursting, particularly if you are away on holiday, in hospital, or for any other reason during the cold weather months
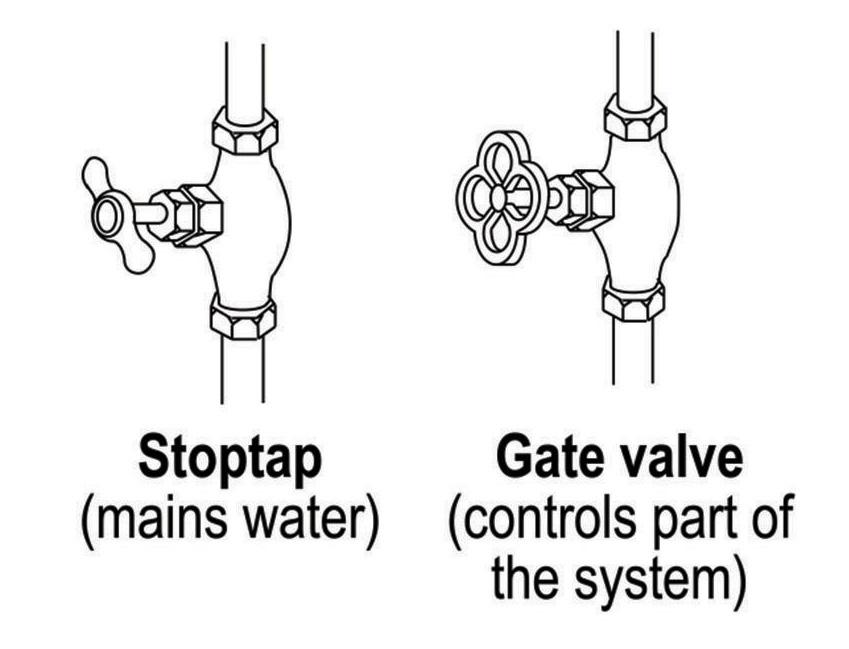
• Turning off your water supply at the stop tap if a water pipe has burst, and then turning on all the taps to allow the remaining water to flow out.
• Isolating water by using isolator valves - the main reasons are when you need to turn off your water supply or if you are having plumbing work done in your property
• Fitting and repairing pipework for washing machines and dishwashers
• Repairing any damage caused by you, a member of your household or visitor to the property
Advice
• You SHOULD know where the stop tap is in order to turn the water off in an emergency. It is normally under the kitchen sink. WE recommend that you keep the stop tap location to hand for you, members of your household and visitors to access easily i.e. on the front of the fridge
• You should use the relevant isolator valves to prevent damage
• If water is leaking onto an electrical fitting, do not touch them and isolate the circuit at the consumer unit
• If damage is caused by water leaking, you may be able to make an insurance claim on your own contents insurance
• If you caused any damage, we expect you to get it repaired yourself or any repairs completed by us will be fully recharged
• What is the problem, e.g.: no water, pipe leaking or burst; overflow running or broken; tap dripping or faulty?
• If water is leaking into your property: can you locate where the leak is coming from e.g.: flat above, guttering, ceiling etc., if from connected property, what is the address and is anyone there? How fast is it leaking; dripping, running or gushing? Can you contain the leak?
• Are there any other connected problems?
• If a tap, what type is it?
• Are other homes in the areas affected? If so, contact the local water company i.e. Severn Trent Water
• Have you isolated the leak i.e. using the stop tap or isolator valves?

Your responsibilities
• Clean toilet pans
• Trying to clear blockages
• Replacing toilet seats and lids
• Repairing any damage caused by you, a member of the household or visitors to the property
Advice
• A blocked toilet is NOT an emergency, unless you have no other toilet you can use
• You should always try to clear any blockages
• If a blockage is caused by items such as nappies, wipes, air fresheners, toilet rolls, tampons etc., we will charge you the FULL cost for clearing it
• If you caused the damage, we expect you to get it repaired yourself or any repairs completed by us will be fully recharged
• If we need to replace the toilet which is part of an existing suite, we will replace it with a toilet which is fit for purpose and in white only
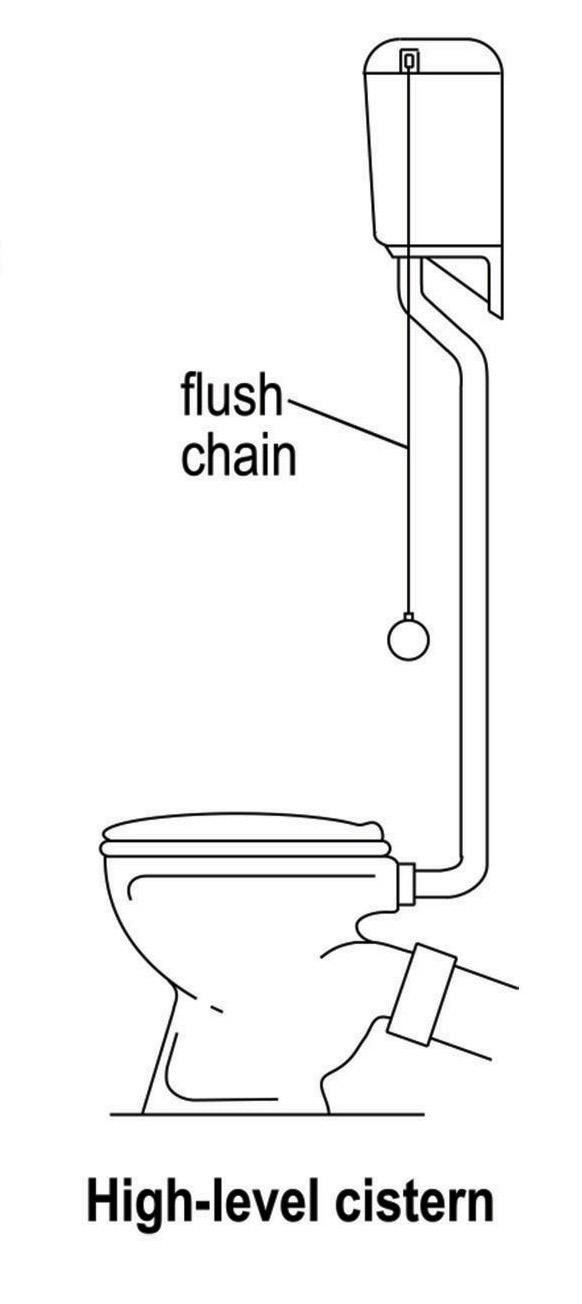
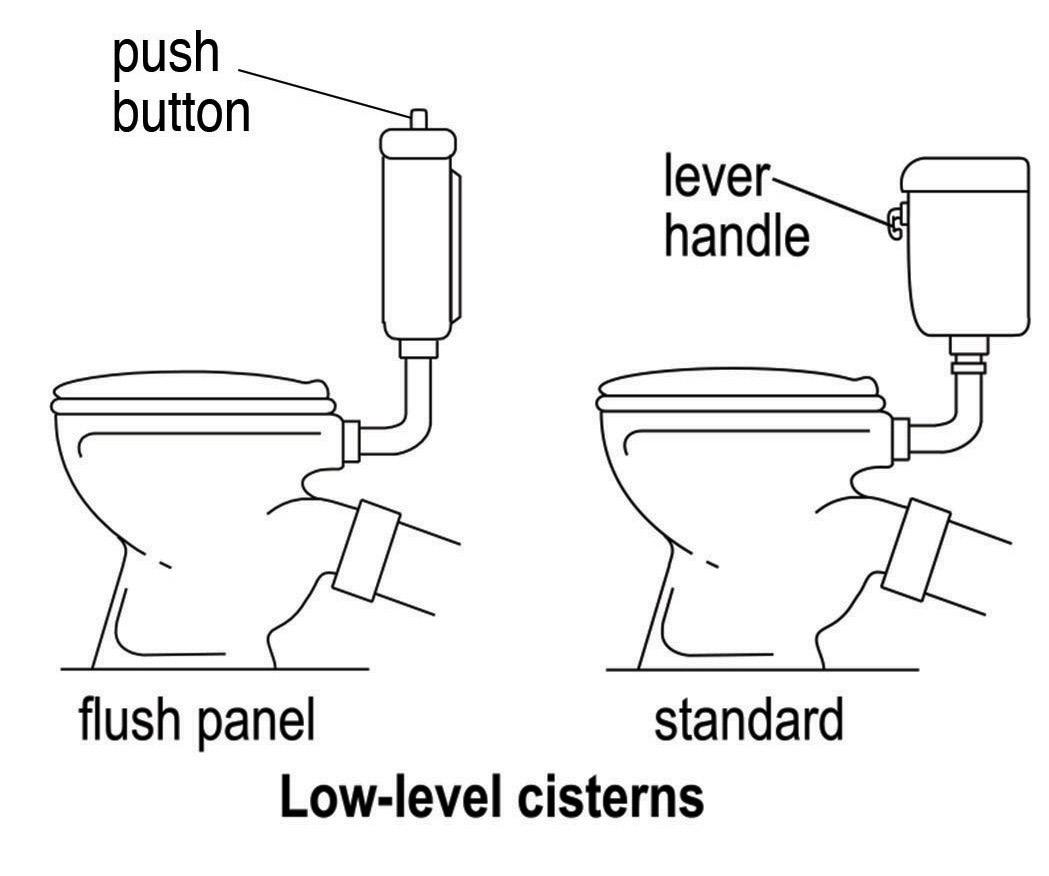
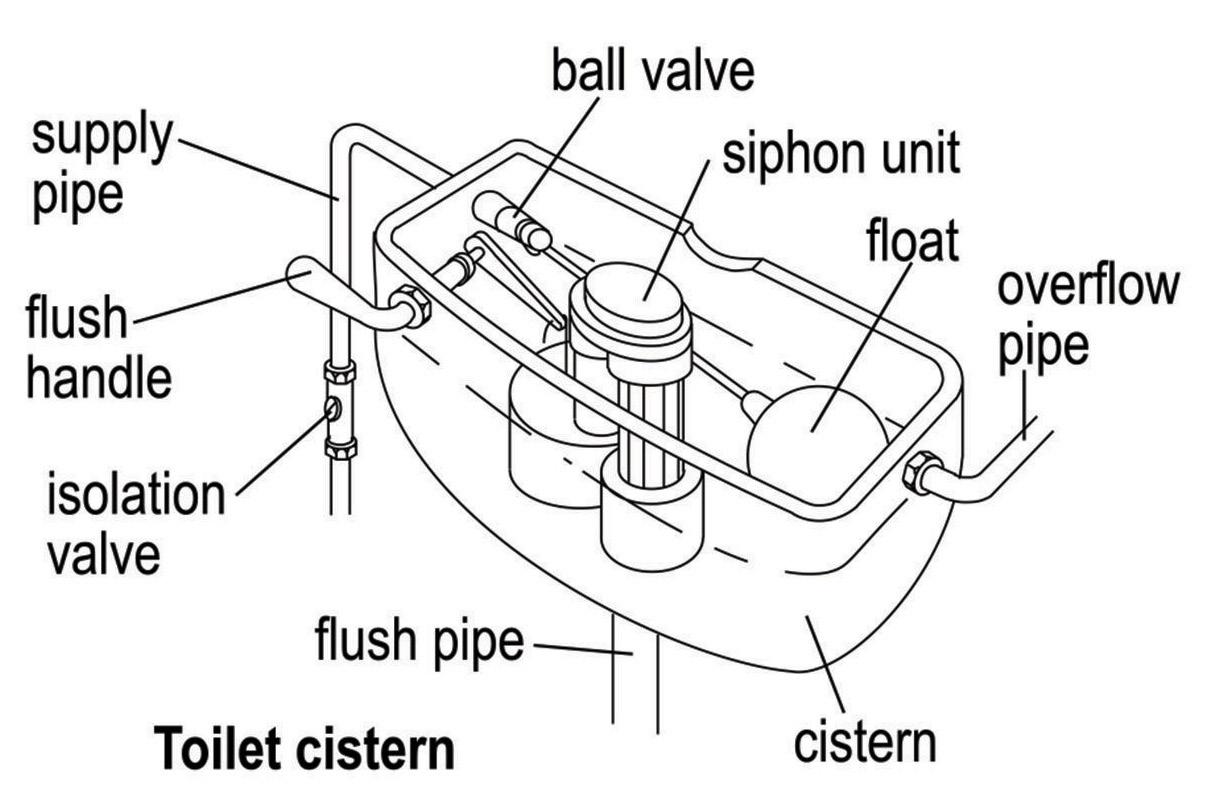
• What is the problem, e.g.: toilet blocked; overflow running; cistern leaking; pan cracked or leaking; flush handle or chain broken?
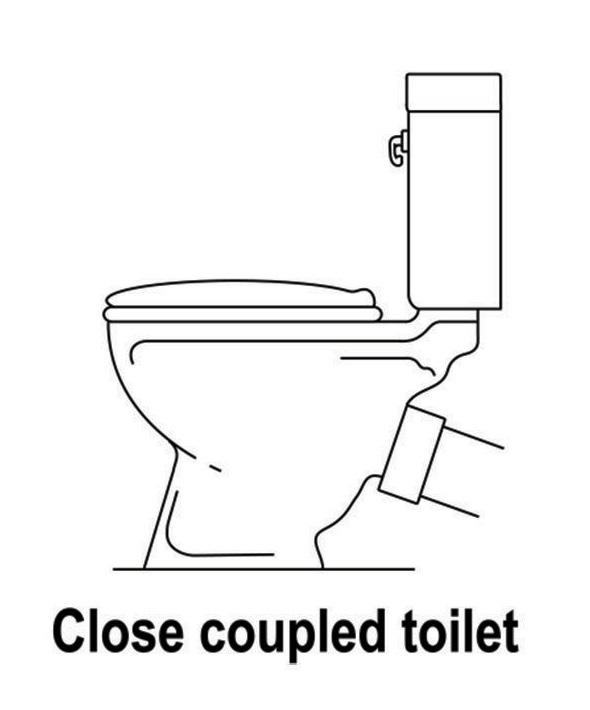
• What type of cistern is it: close coupled, slimline or standard? Is it boxed in?
• What is the cistern made of: plastic or ceramic?
• What type of handle is it: level handle or push down button?
• What colour is the suite?
• If the toilet is blocked in a block of flats, are any other flats affected too?
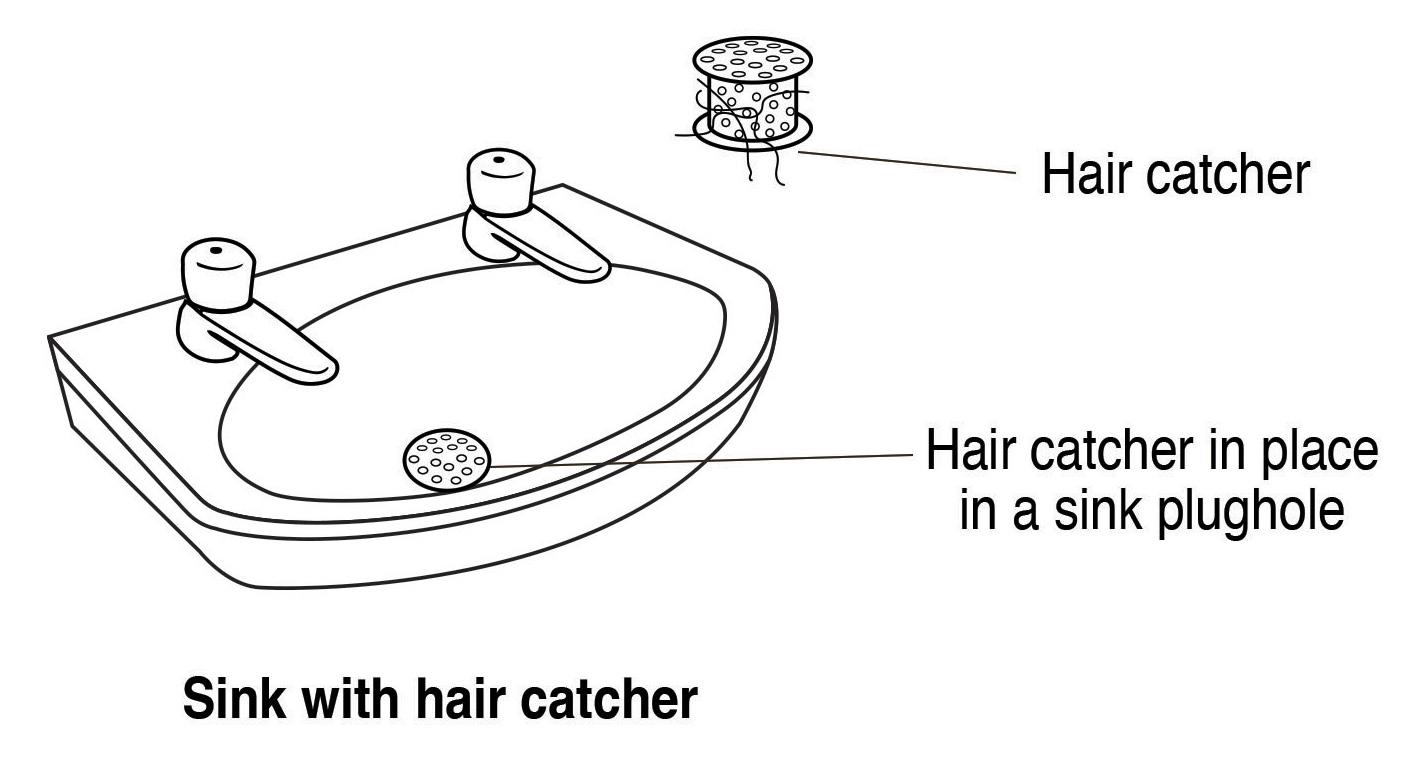
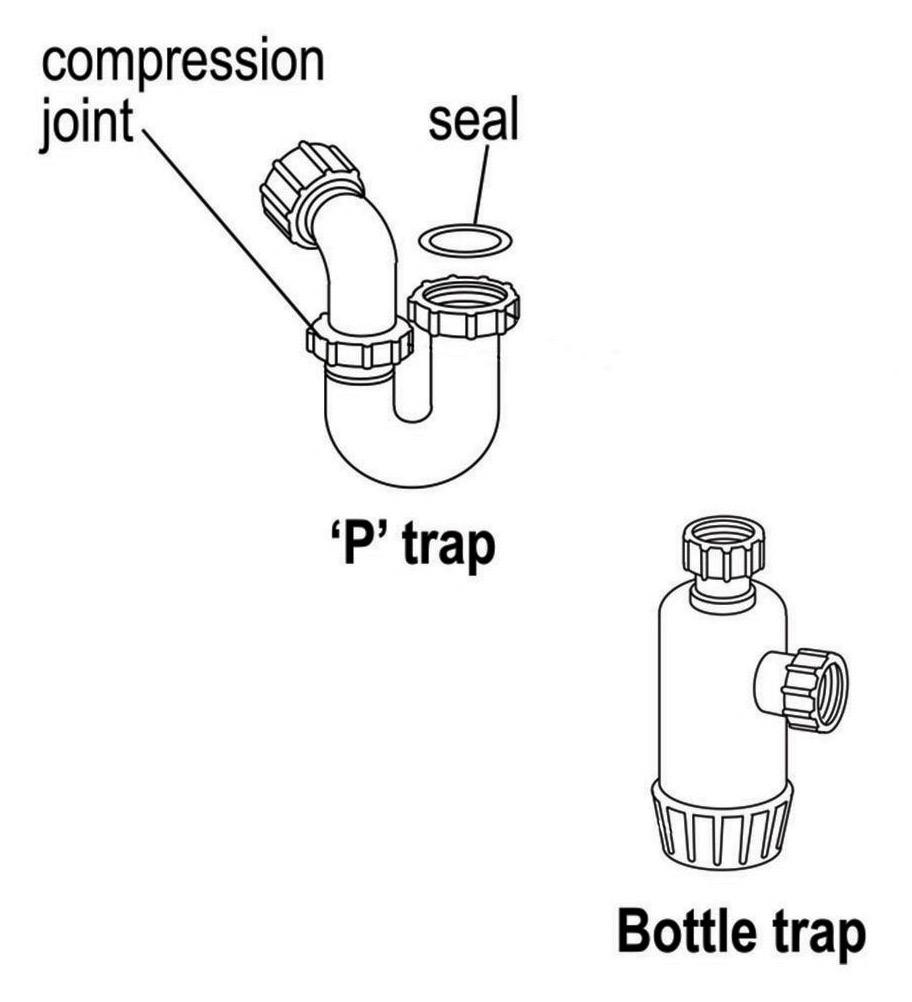
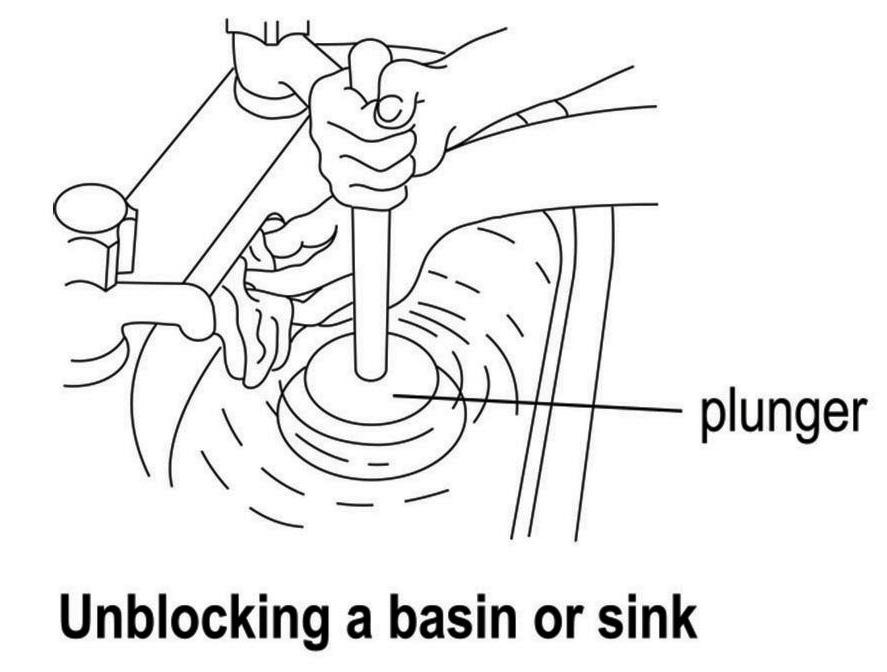
• Blockages are usually caused by the build-up of waste in the trap: fat, wipes, hair etc. It is advisable to clear waste pipes and traps at least once a month, using suitable domestic products. DO NOT use industrial products i.e. caustic soda
• The trap is located under the fitting (bath, basin or sink)
What to do and you will need:
• Bowl
• Jug or cup
• Wet rag or dish cloth
• Plunger (can be purchased cheaply in a range of local stores)
• Rubber gloves (can be purchased cheaply in a range of local stores)
• The trap always holds some water which stops air or foul smells coming up the drain. However, waste can build up and become stuck in it
• If more than one fitting bath, basin or sink) is blocked, the blockage may be in the soil stack or main drain. This will need to be cleared by us, please contact us as soon as possible
To unblock a bath, basin or sink:
• Bale out most of the water
• Hold the rag tightly over the overflow opening
• Place the plunger over the plug hole and pump up and down rapidly
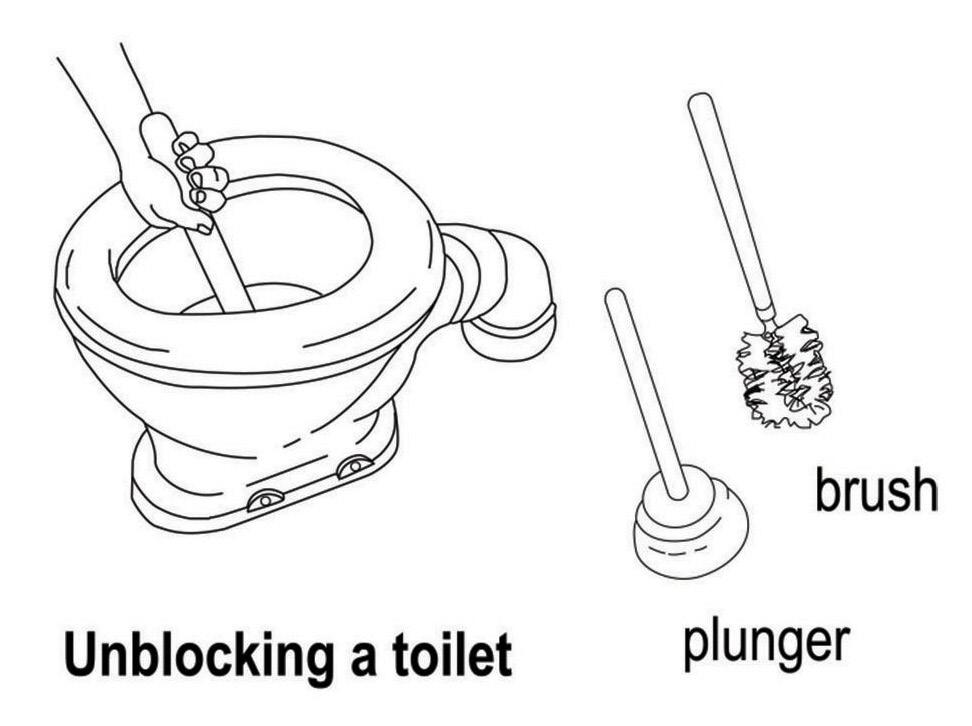
To unblock a toilet:
• If the pan is already full, remove some of the water into a bucket using some form of scoop, e.g.: a jug or bowl
• Push the brush or plunger to the bottom of the pan
• Pump it up and down vigorously about 10 times. This creates a vacuum and pressure, which may shift the blockage
• Flush the toilet to see whether the blockage has gone
• You may need to repeat this process several times before the toilet flushes normally. If there is no improvement after your attempts to remove the blockage, you should contact us
Your responsibilities
• Installing and repairing washing machines, dishwashers or tumble dryers including the wastes, supply pipes and vents
• Clearing any blockages in sinks, washing machines or dishwashers
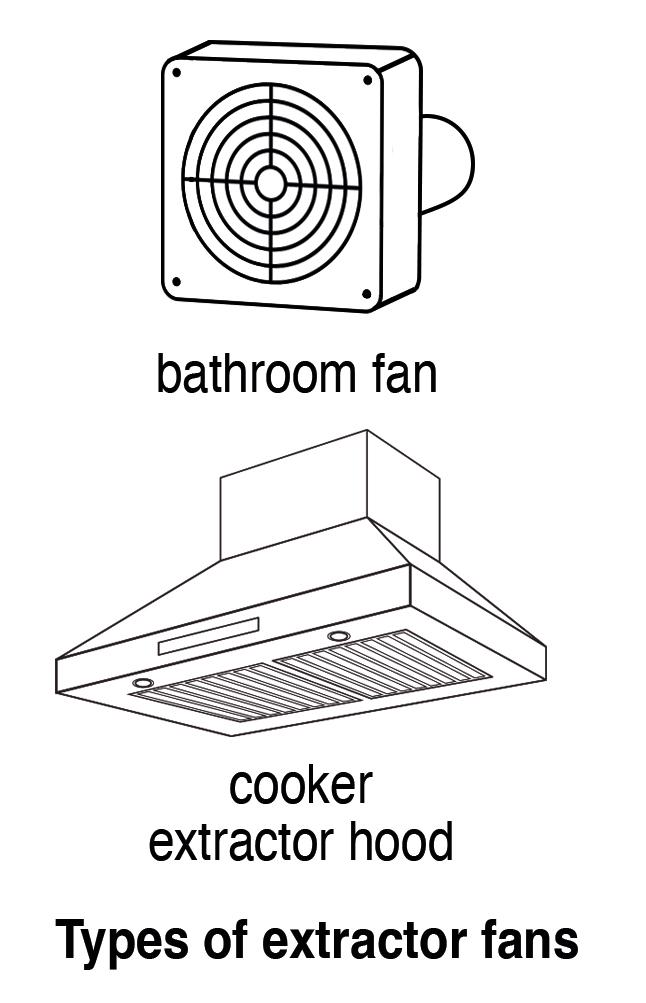
• Clearing extractor fan vents and using them when cooking
• Repairing any extra units you have installed
• Repairing damage caused by you, a member of the household or a visitor to the property
Advice
• If you caused the damage, we expect you to get it repaired yourself or any repairs completed by us will be fully recharged
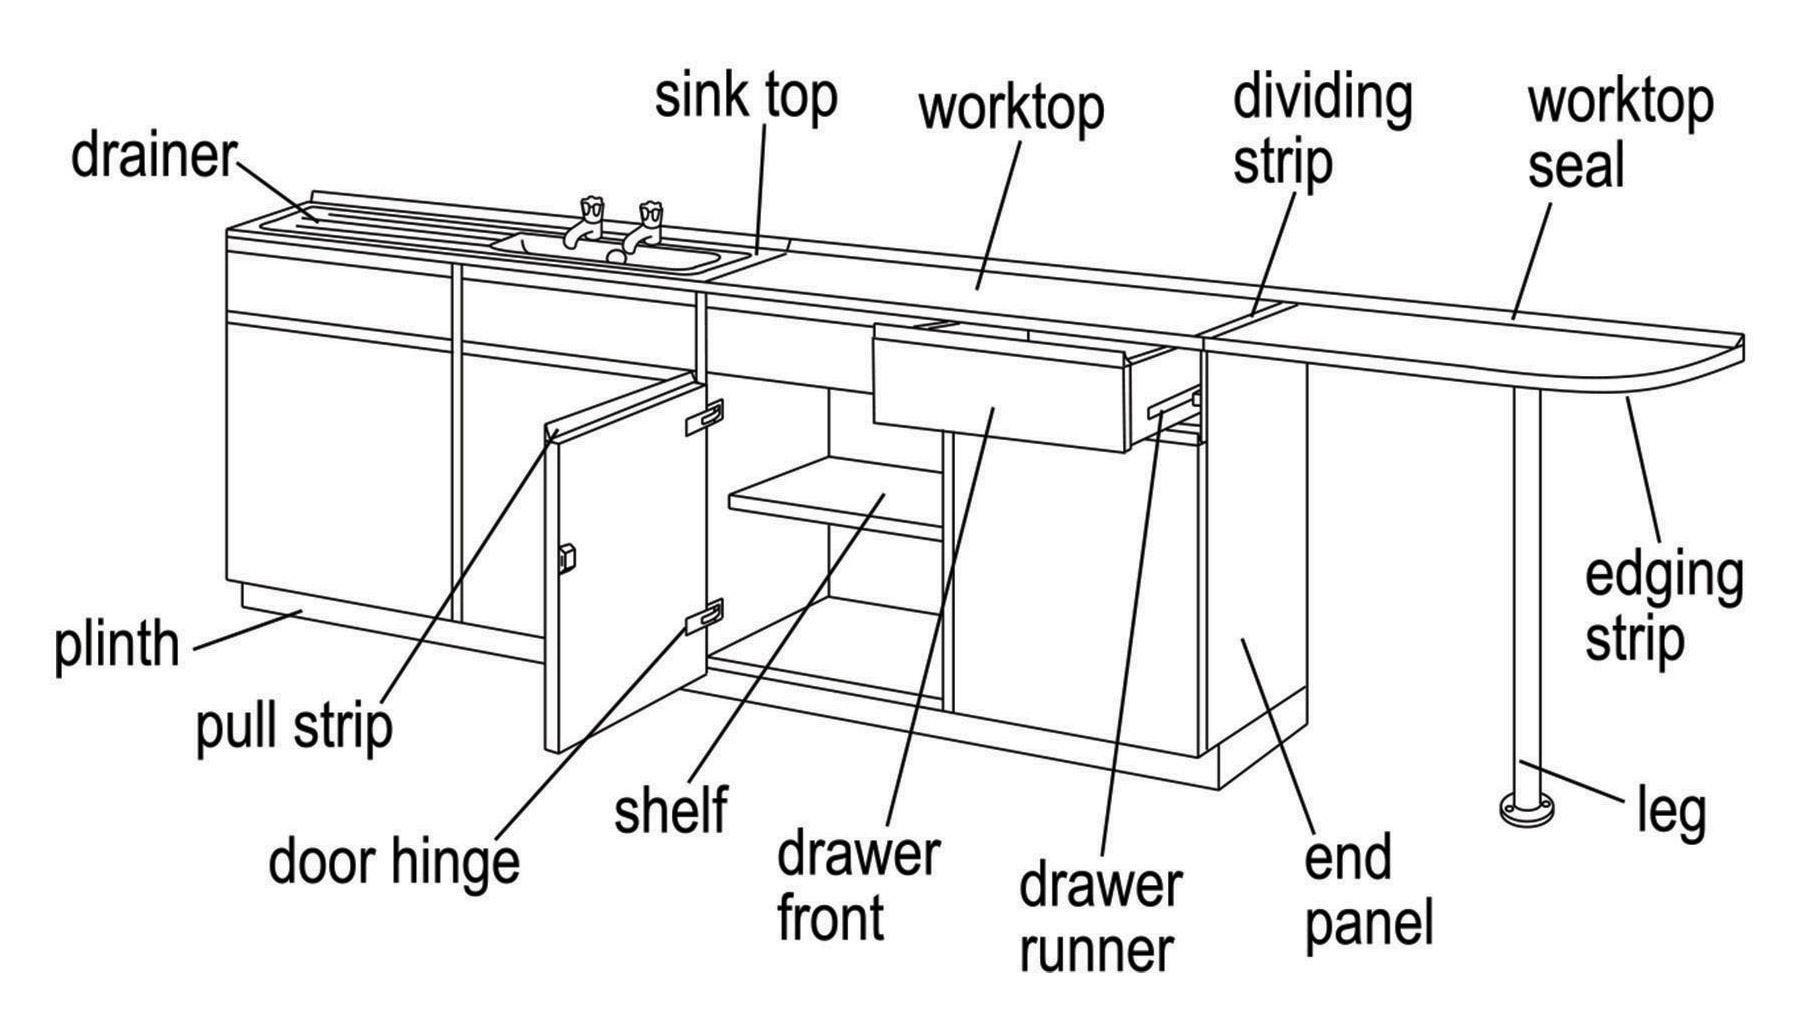
• If we have replaced kitchen units or parts of the unit, such as the worktop, drawer or door, we will try to match the colour and style, but this is often not always possible
• If you installed a washing machine, dishwasher or tumble dryer, you are responsible for clearing blockages, and for repairing any water supply, waste or vent connections that were not already provided by us
We need to know
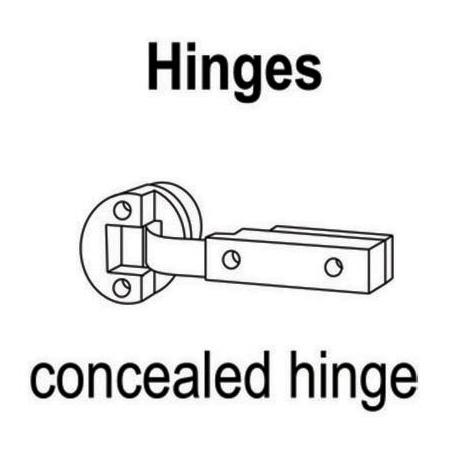
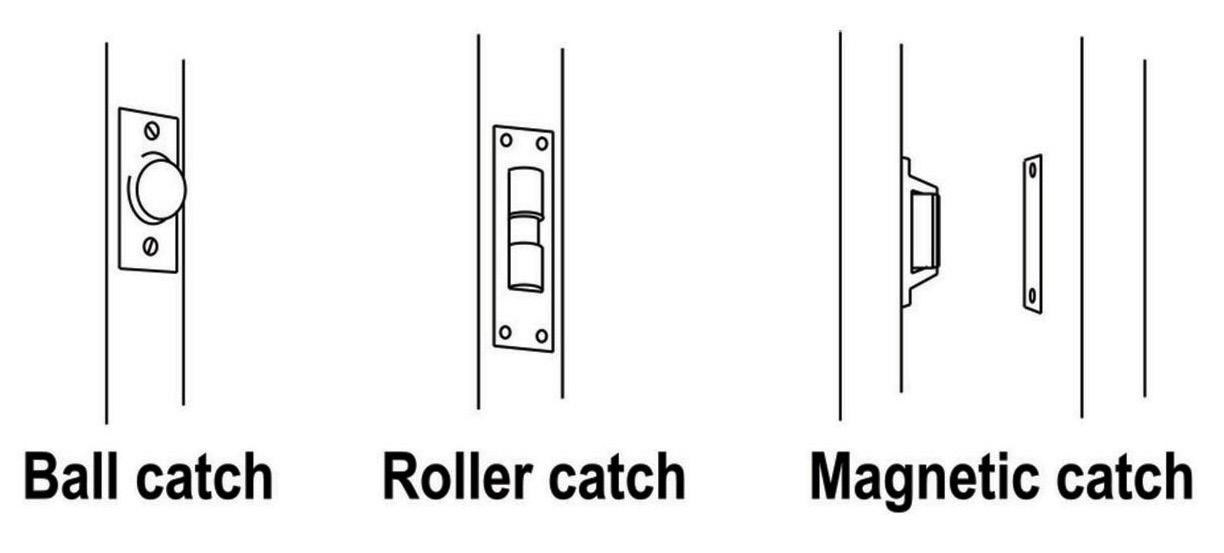
• What is the problem, e.g.: wall or floor unit loose or damaged; worktop loose or broken; cupboard door or drawer damaged; cupboard hinge or catch broken?
• What type of unit is it: wall or floor? Is it a tall or corner unit? Is it a single or double unit?
• Are there any other connected issues?
• How recently were the units fitted? Do you know which company fitted them?
Your responsibilities
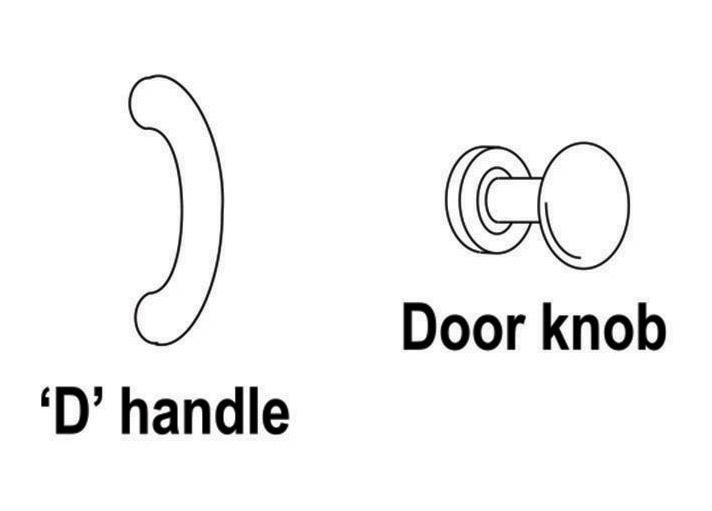
• Replacing keys or locks when keys are lost or when you get locked out
• Fitting any additional locks
• Replacing handles, knockers, bells or security chains on external doors
• Replacing broken glass in any internal or external door, unless you can supply us with a Police Crime Number, see ‘advice below’. (If it is double glazing, we will charge you for doing the repair)
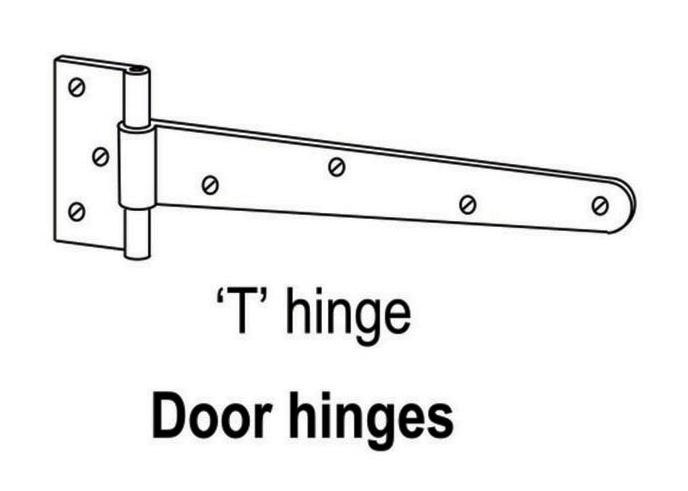
• Replacing handles, hinges and latches on all internal doors
• Adjusting internal doors, particularly when you have fitted new carpets
• Repairing damage caused by you, a member of the household or a visitor to the property
Advice
• If you get locked out, we can arrange a forced entry, but it is usually cheaper for you to get this done yourself
• If you caused the damage, we expect you to get it repaired yourself or any repairs completed by us will be fully recharged
• Emergency repairs will only be done to make the property safe and secure, e.g. you can’t lock or bolt an external door. A full repair will be done at a later date
• If a problem is caused due to vandalism or a break-in, report it to the Police and get a Crime Number (not an incident number given over the phone), otherwise we will charge you in full to complete the repair
• What is the problem, e.g.: lock stiff or not fitting properly in the keep; lock or handle broken; door sticking, ill fitted or damaged? Is the property still secure?
?
• What door is it: front, back or side, or a sliding patio door or balcony door? What type or lock or latch has it got?
• What is the door made of: wood, plastic or metal? Was it fitted recently?
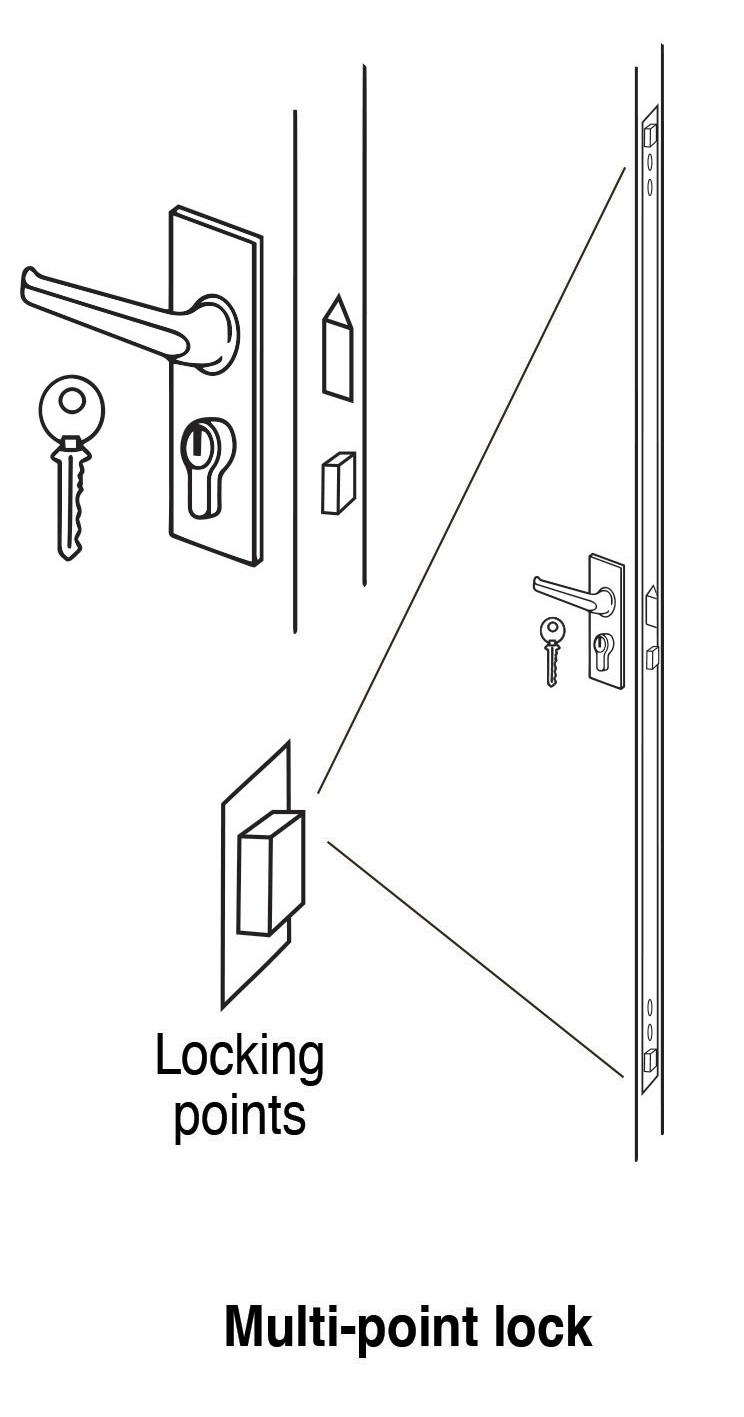
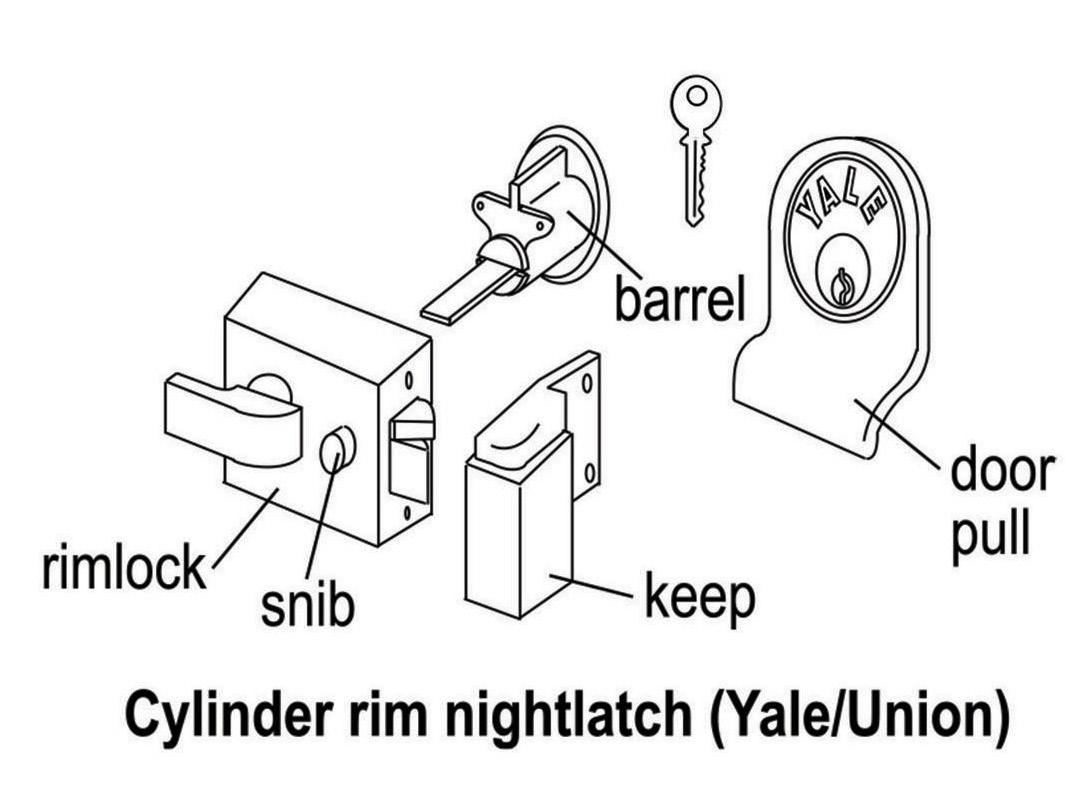
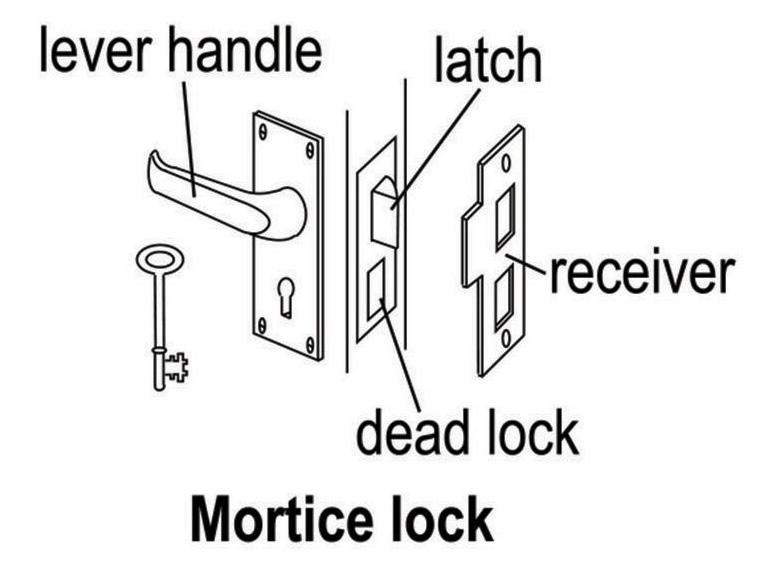
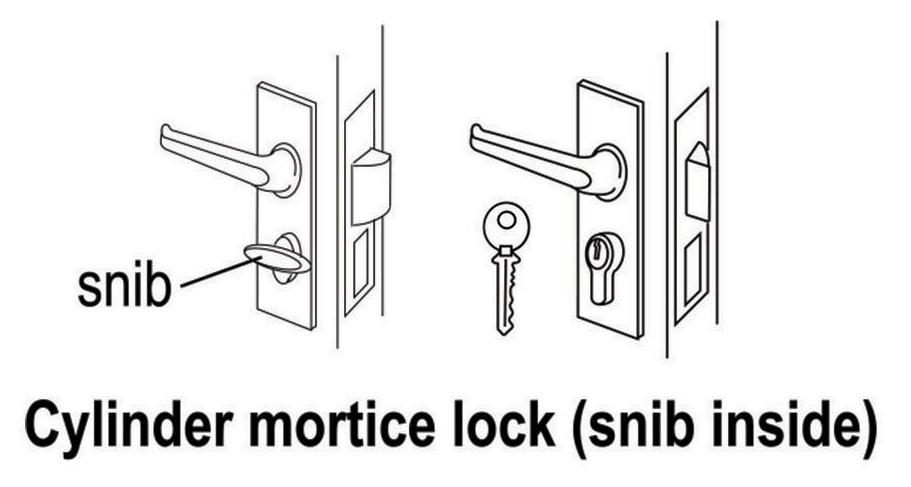
• What type of lock is it: cylinder mortice, cylinder rim night latch, mortice or multipoint?

• Replacing broken or cracked glass where there is no Police Crime Number (not an Incident Number given over the phone) and if it is double glazing, we will charge you
• Fitting additional security locks to windows
• Cleaning window vents or extractor fan vents, and making sure you use them when necessary, see advice below
• Repairing any damage caused by you, a member of your household or visitor to the property
Advice
• If a problem is caused by vandalism or a break-in, you should report it to the Police and get a Police Crime Number (not an Incident Number given over the phone), otherwise we will charge you the FULL costs of the repair
• To clean the extractor fan vents, use a dry cloth or vacuum cleaner with the brush or nozzle attachment
• Lock handles with keys are provided for ground floor windows ONLY
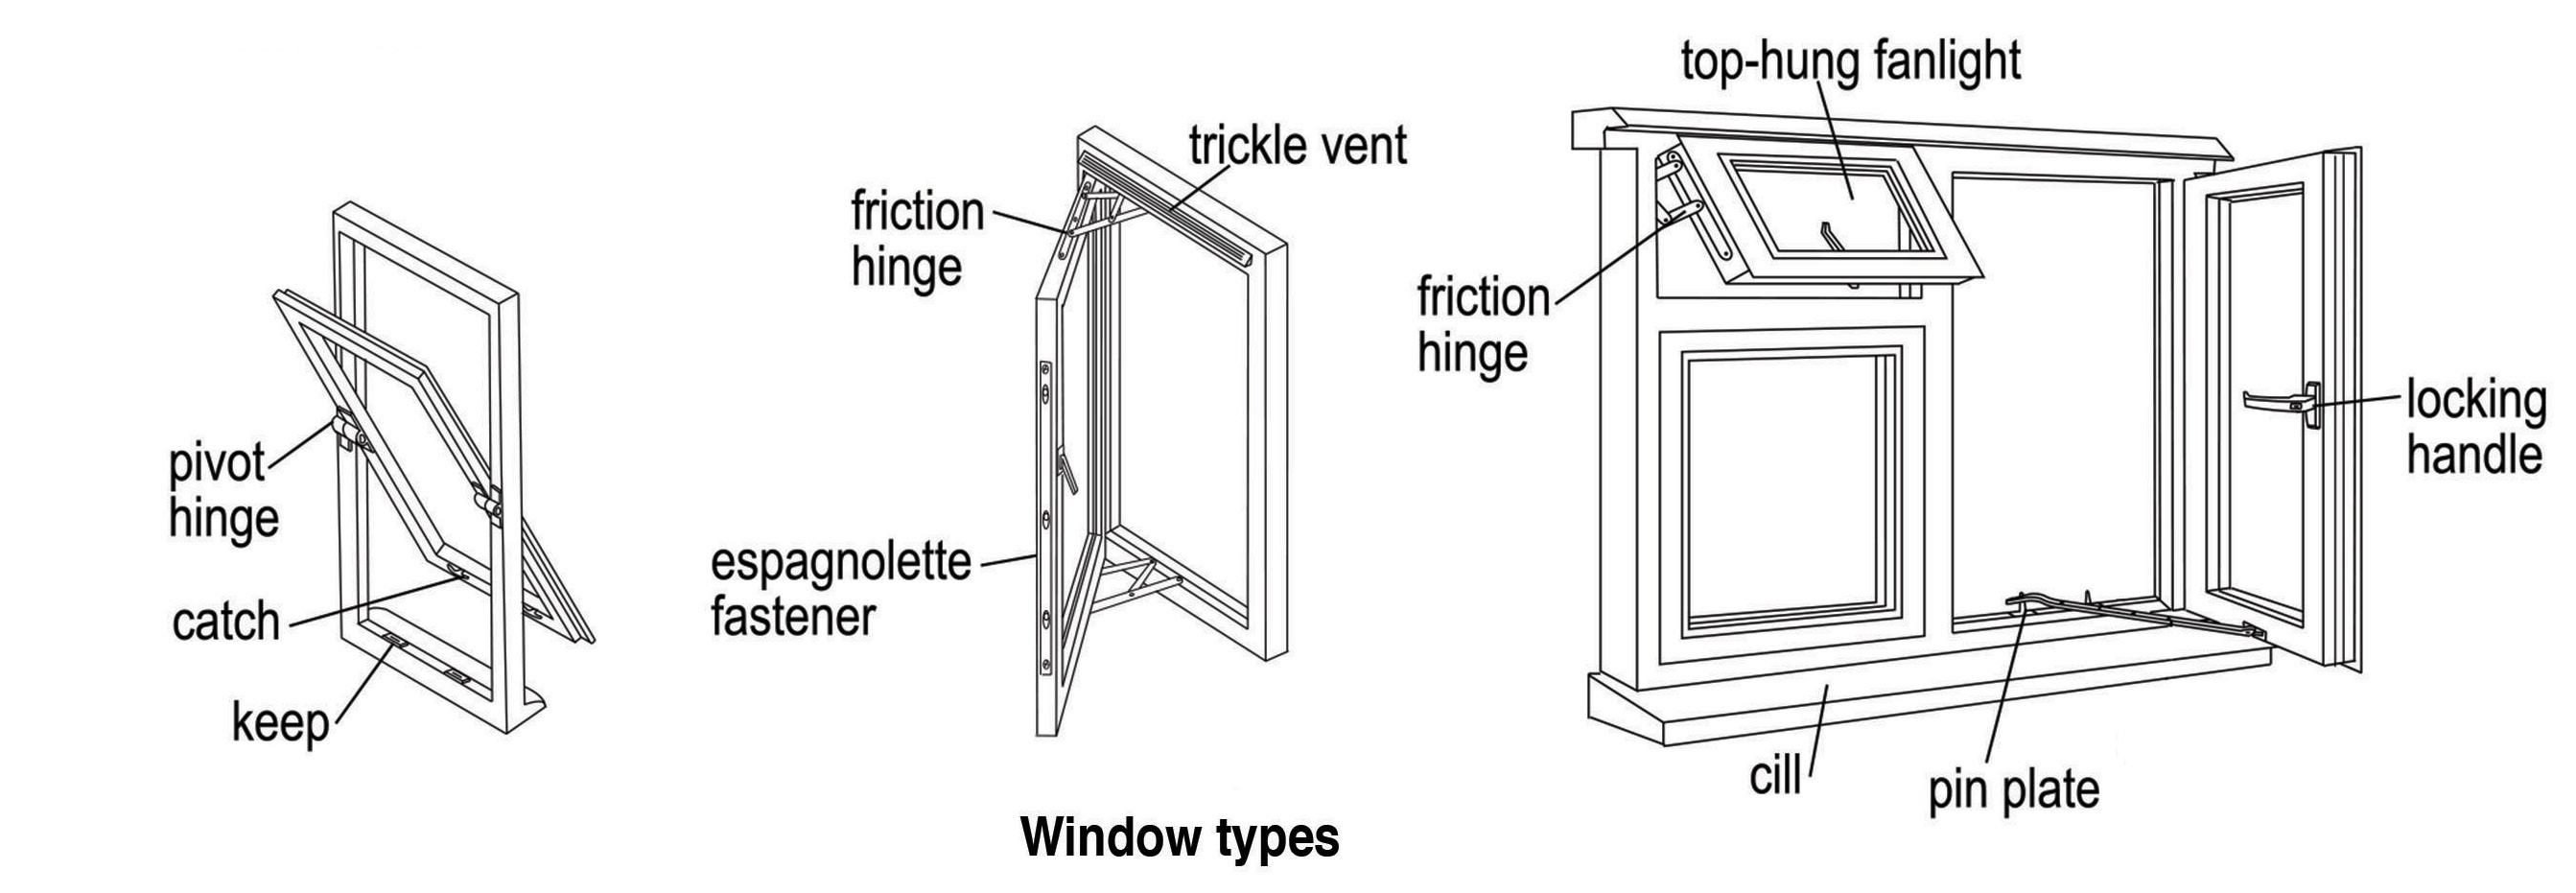
• What is the problem, e.g.: glass cracked or broken; double glazing missing; frame loose or jammed; stay or fastener broken?
?
• What type of frame is it: wooden, plastic (UPVC), or metal?
• What style of window is it: casement, pivot, sliding sash, tilt & turn or fully reversible?
• What type of glass is it e.g.: plain, frosted or wired? Is it double glazed?
• Are they any other connected problems?
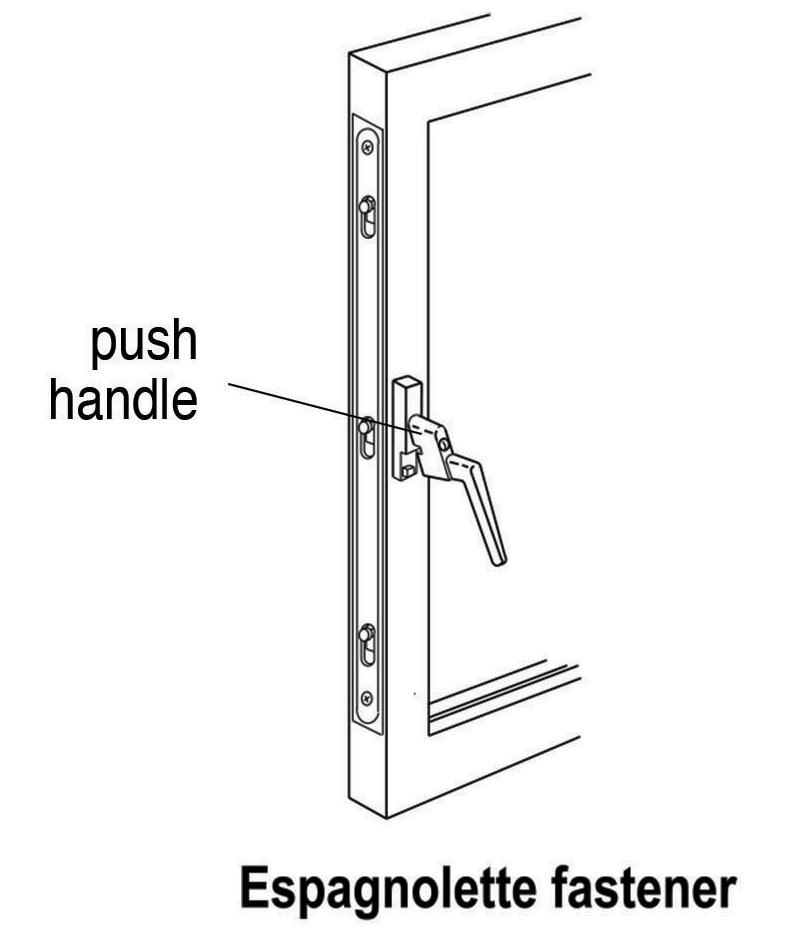
• If a fastener, what type is it?
• Do you know how long ago the window was fitted?

Your responsibilities
• Internal walls and ceilings only
• Decorating walls and ceilings inside the property including filing minor cracks and holes
• Keeping air vents clear
• Putting up and repairing shelves, show and curtain rails, and hat and coat hooks
• Repairing any damage caused by you, a member of the household or visitor to the property
Advice
• Try to keep condensation to a minimum to prevent damp and mould on the walls or ceilings
• If you caused the damage, we expect you to get it repaired yourself. If damage is caused by water leaking, you may be able to claim on your own contents insurance
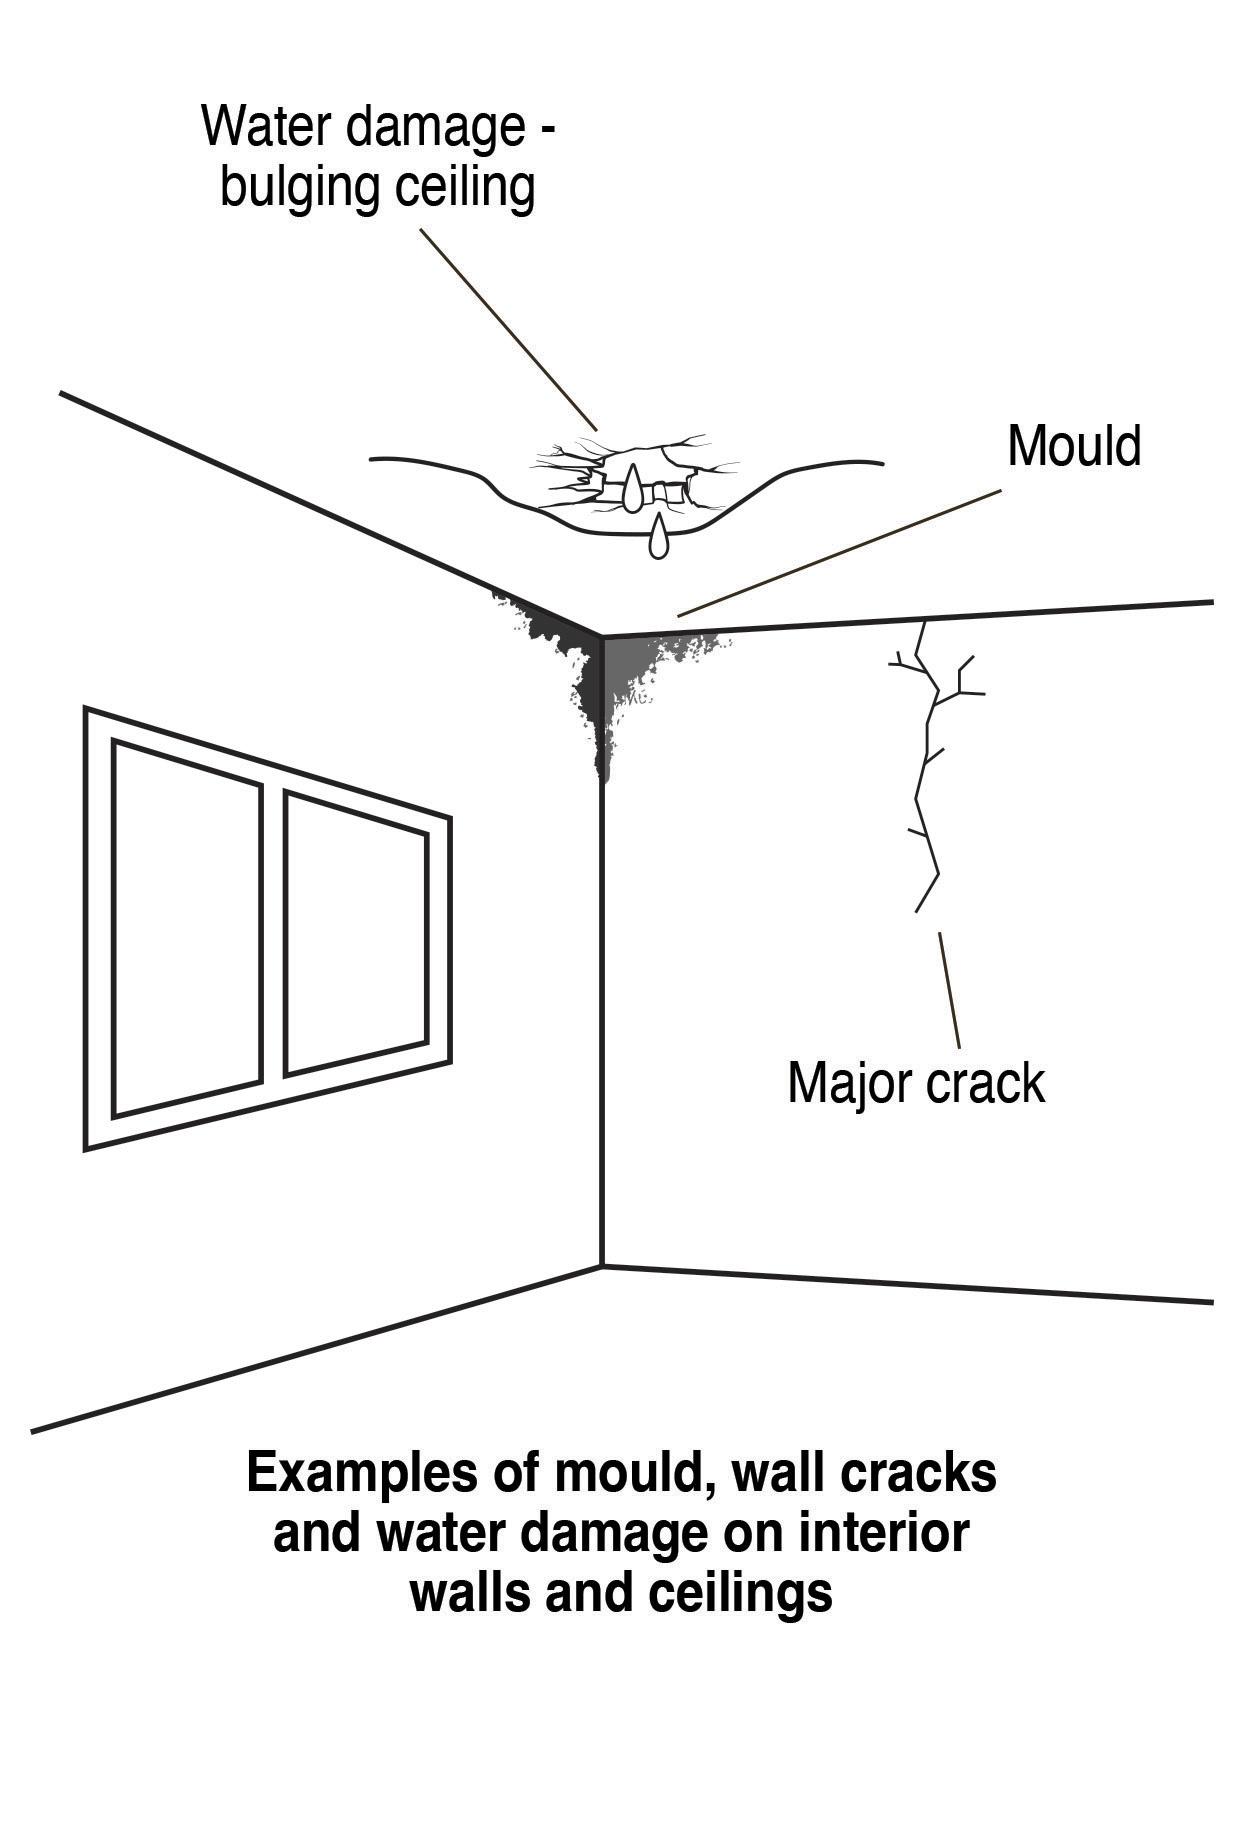
• What is the problem, e.g.: wall plaster loose or crumbling; ceiling plaster bulging; condensation or mould on walls or ceiling?
?
• Is there any damage caused by water leaking from a pipe or radiator, or through the roof?
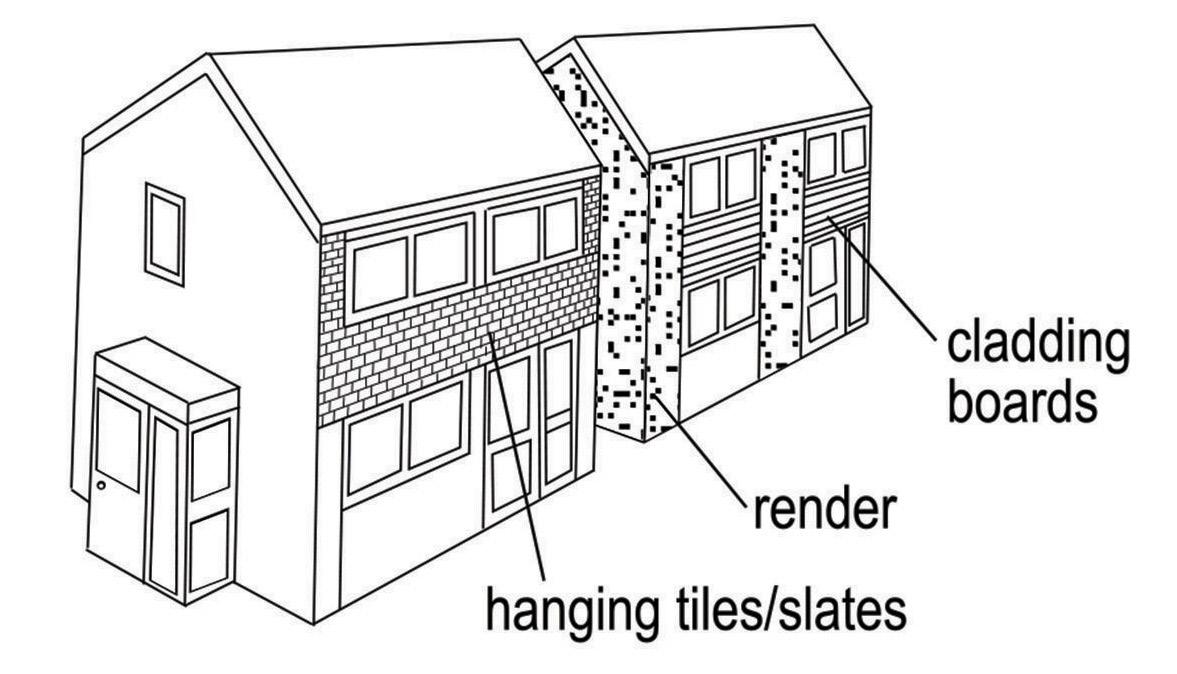
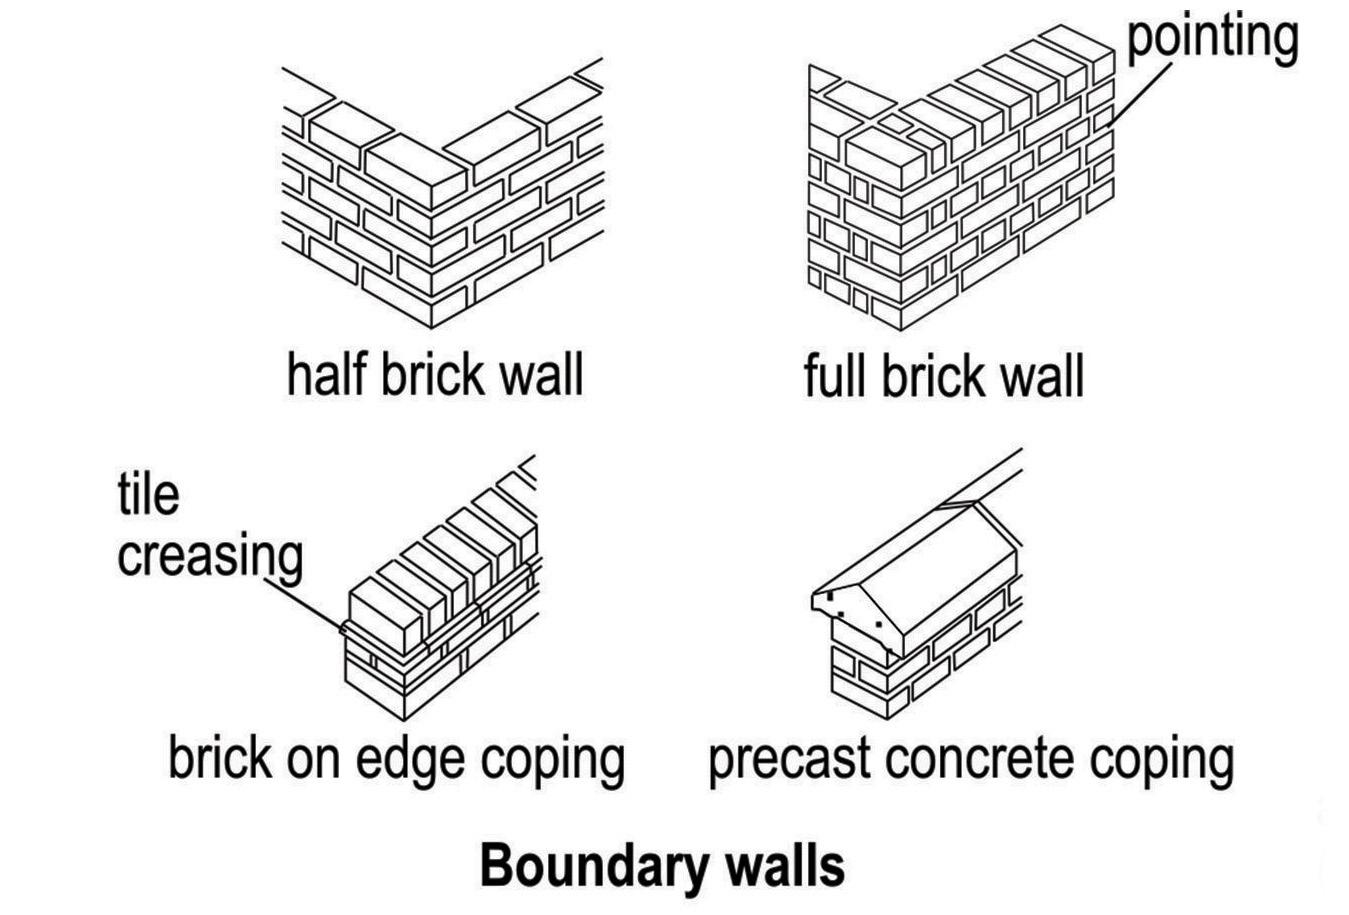
• If outside, what type of wall surface is it; render (pebbledash or smooth), upvc boards, timber boards or hanging tiles or slates? How many boards or tiles are affected or what area?
• If outside wall tiles, what shape and colour are they?
• Are they any other connected problems?
• If cladding boards or fascia, what are they made of: wooden or plastic (UPVC)?
• If a wall, what is it made of e.g.: brick or concrete blocks?
• If it is outside and at the back of the property, how can we get access?
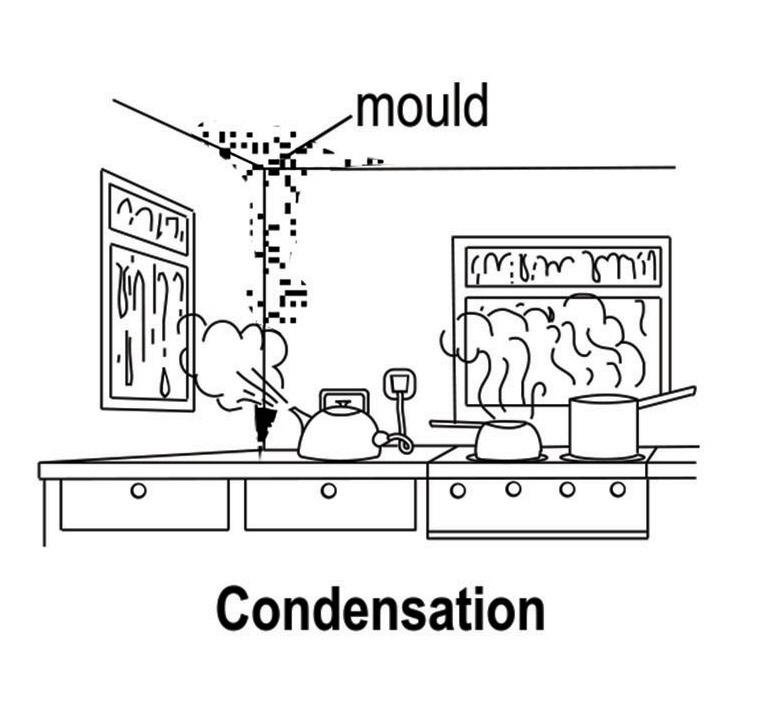
What is condensation?
• It starts as moisture that is produced by cooking, washing or drying clothes indoors on radiators
?
• This moist air condenses on cool surfaces such as walls, mirrors, wall tiles and windows, and even some clothes
• When moist air is warm it rises and often ends up on ceilings and in upstairs rooms, and then forms mould
If mould forms:
• Wipe the mould off immediately with water. DO NOT use washing up liquid or chemical wipes
• Apply bleach solution to the wall or use recommended products available from a wide range of local stores. Bleach solution should be diluted (1:10) there should be 10 times more water than bleach
• Wear protective gloves and wash your hands thoroughly when you have finished
Preventing condensation Condensation can occur in any property and you can take steps to prevent it from happening
Control excess moisture:
• Close kitchen and bathroom doors to prevent steam going into other cooler rooms
• Keep window trickle vents open
• Open kitchen and bathroom windows when cooking or washing so that steam can escape or use an extractor fan if you have one fitted. They use up very little electricity
• Open some windows in other rooms for a while each day to allow a change in air
• Do not use bottle gas heaters – the gas produces a lot of moisture
• Wipe down surfaces where moisture settles to prevent mould forming
• DO NOT block air vents
More information can be found within our condensation factsheet
Produce less moisture:
• Dry clothes outdoors whenever possible, otherwise use well ventilated rooms
• Manage and reduce steam produced in the home
• Vent any tumble dryers to the outside of the property
Keep your property warm:
• Take steps to prevent heat loss and maintain low background heat

Your responsibilities
• Repairing any floor coverings, vinyl tiles, sheeting, carpets or laminate you have put in
• Repairing any damage caused by you, a member of the household or a visitor to the property
Advice
• We will not accept responsibility for damage to your carpets or other flooring coverings unless it is caused by neglect by our staff or contractors. If we tell you it is necessary, you should lift any floor covering (including laminate flooring) before we arrive at the property to complete the repair work. If you cannot do this or cannot arrange for someone to do this for you, you should let us know beforehand
• If we need to replace existing floor tiles it is often not possible to achieve a true match. We will get the nearest colour match possible
• If you cause the damage, we expect you to get it repaired yourself or any repairs completed by us will be fully recharged
We need to know
?
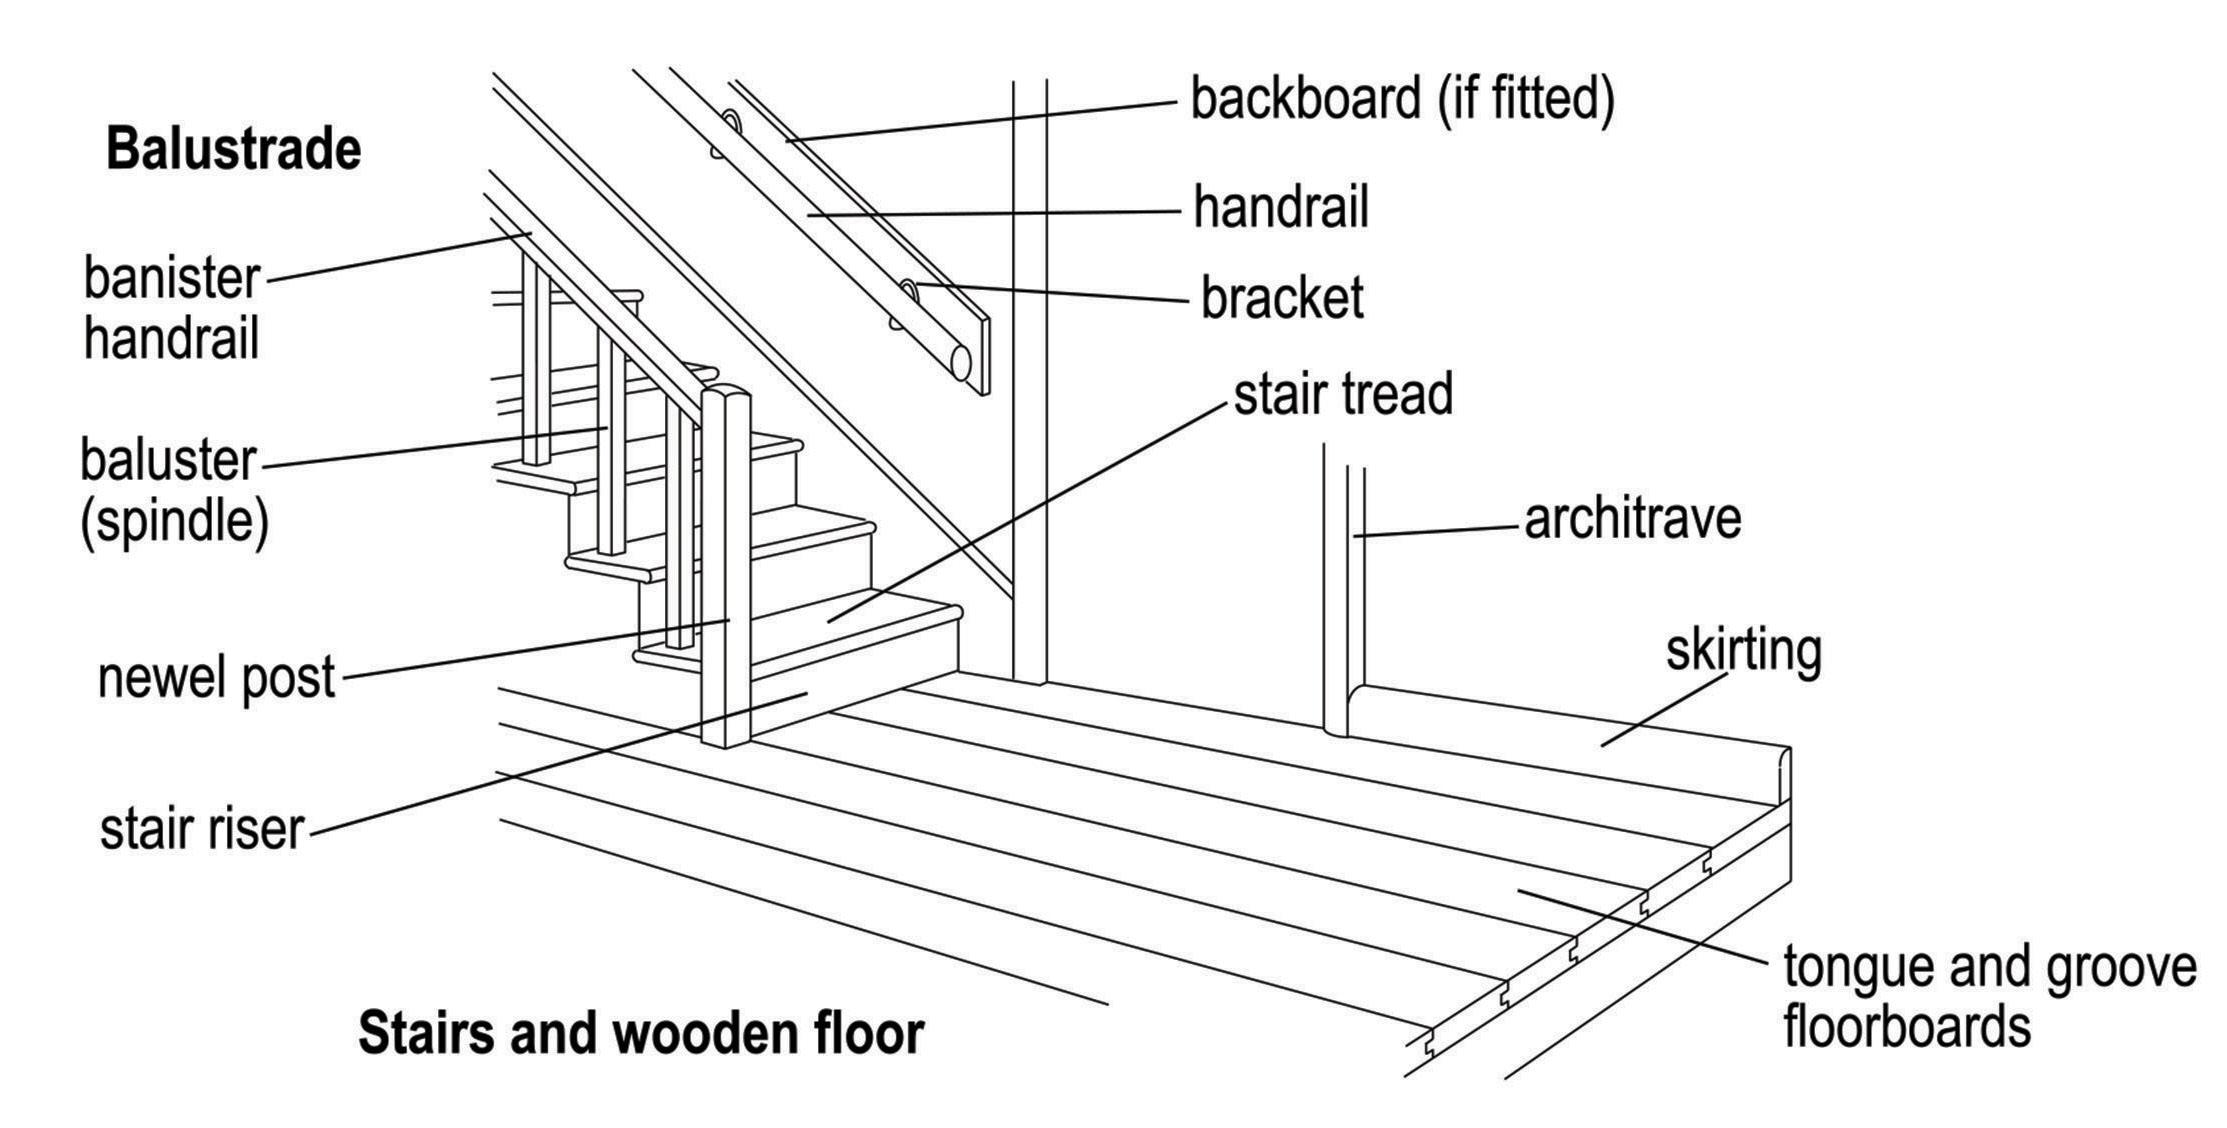
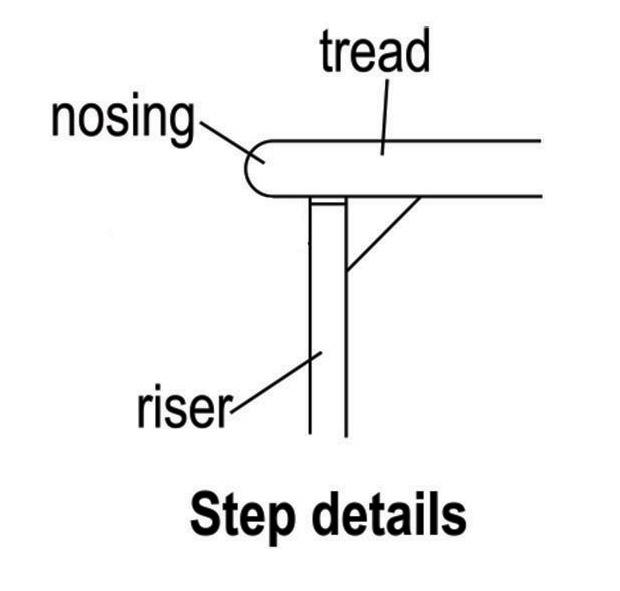
• What is the problem, e.g.: floorboard or skirting loose; rotten or damaged; tread or riser broken; nosing loose; handrail loose or broken; floor covering lifting or damaged?
• What is the floor made of: floorboards, chipboard, plywood or concrete?
• What type of floor covering is it, e.g.: quarry tiles, vinyl tiles or sheeting; or non-slip flooring?
• Is it in a communal area?
• How many boards, panels or tiles are affected, or what area of the property?
• If floor tiles, what colour are they?
• If nosing, is it on communal stairs? If so, is it metal or plastic?
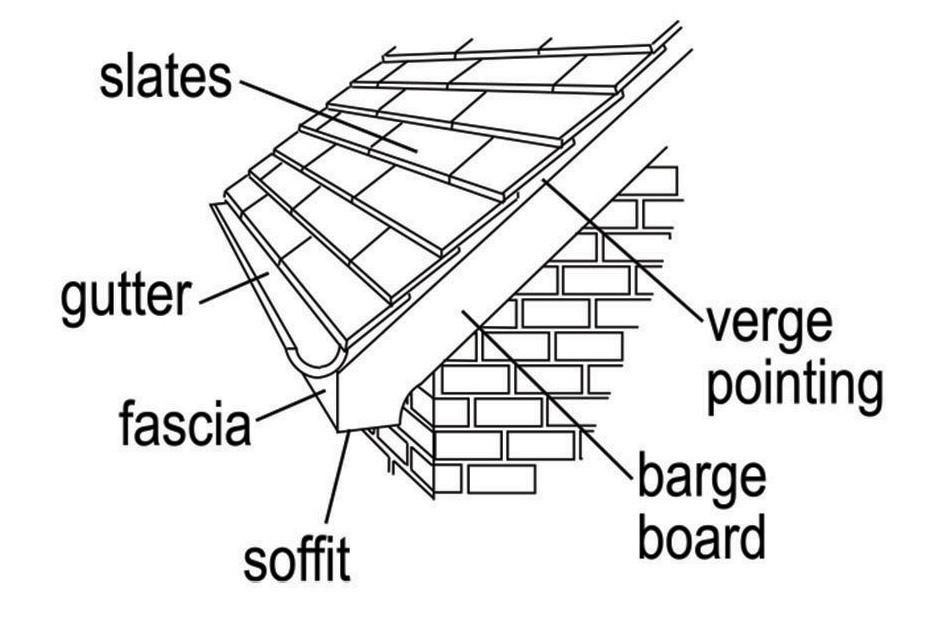
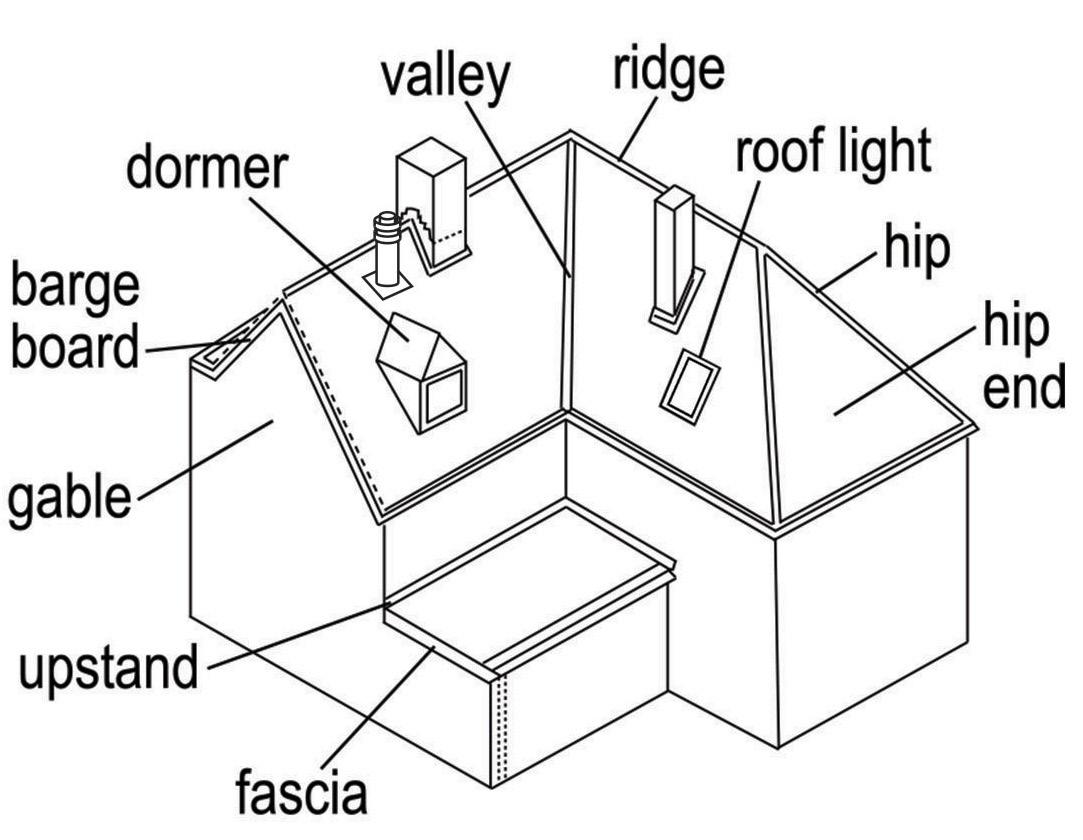
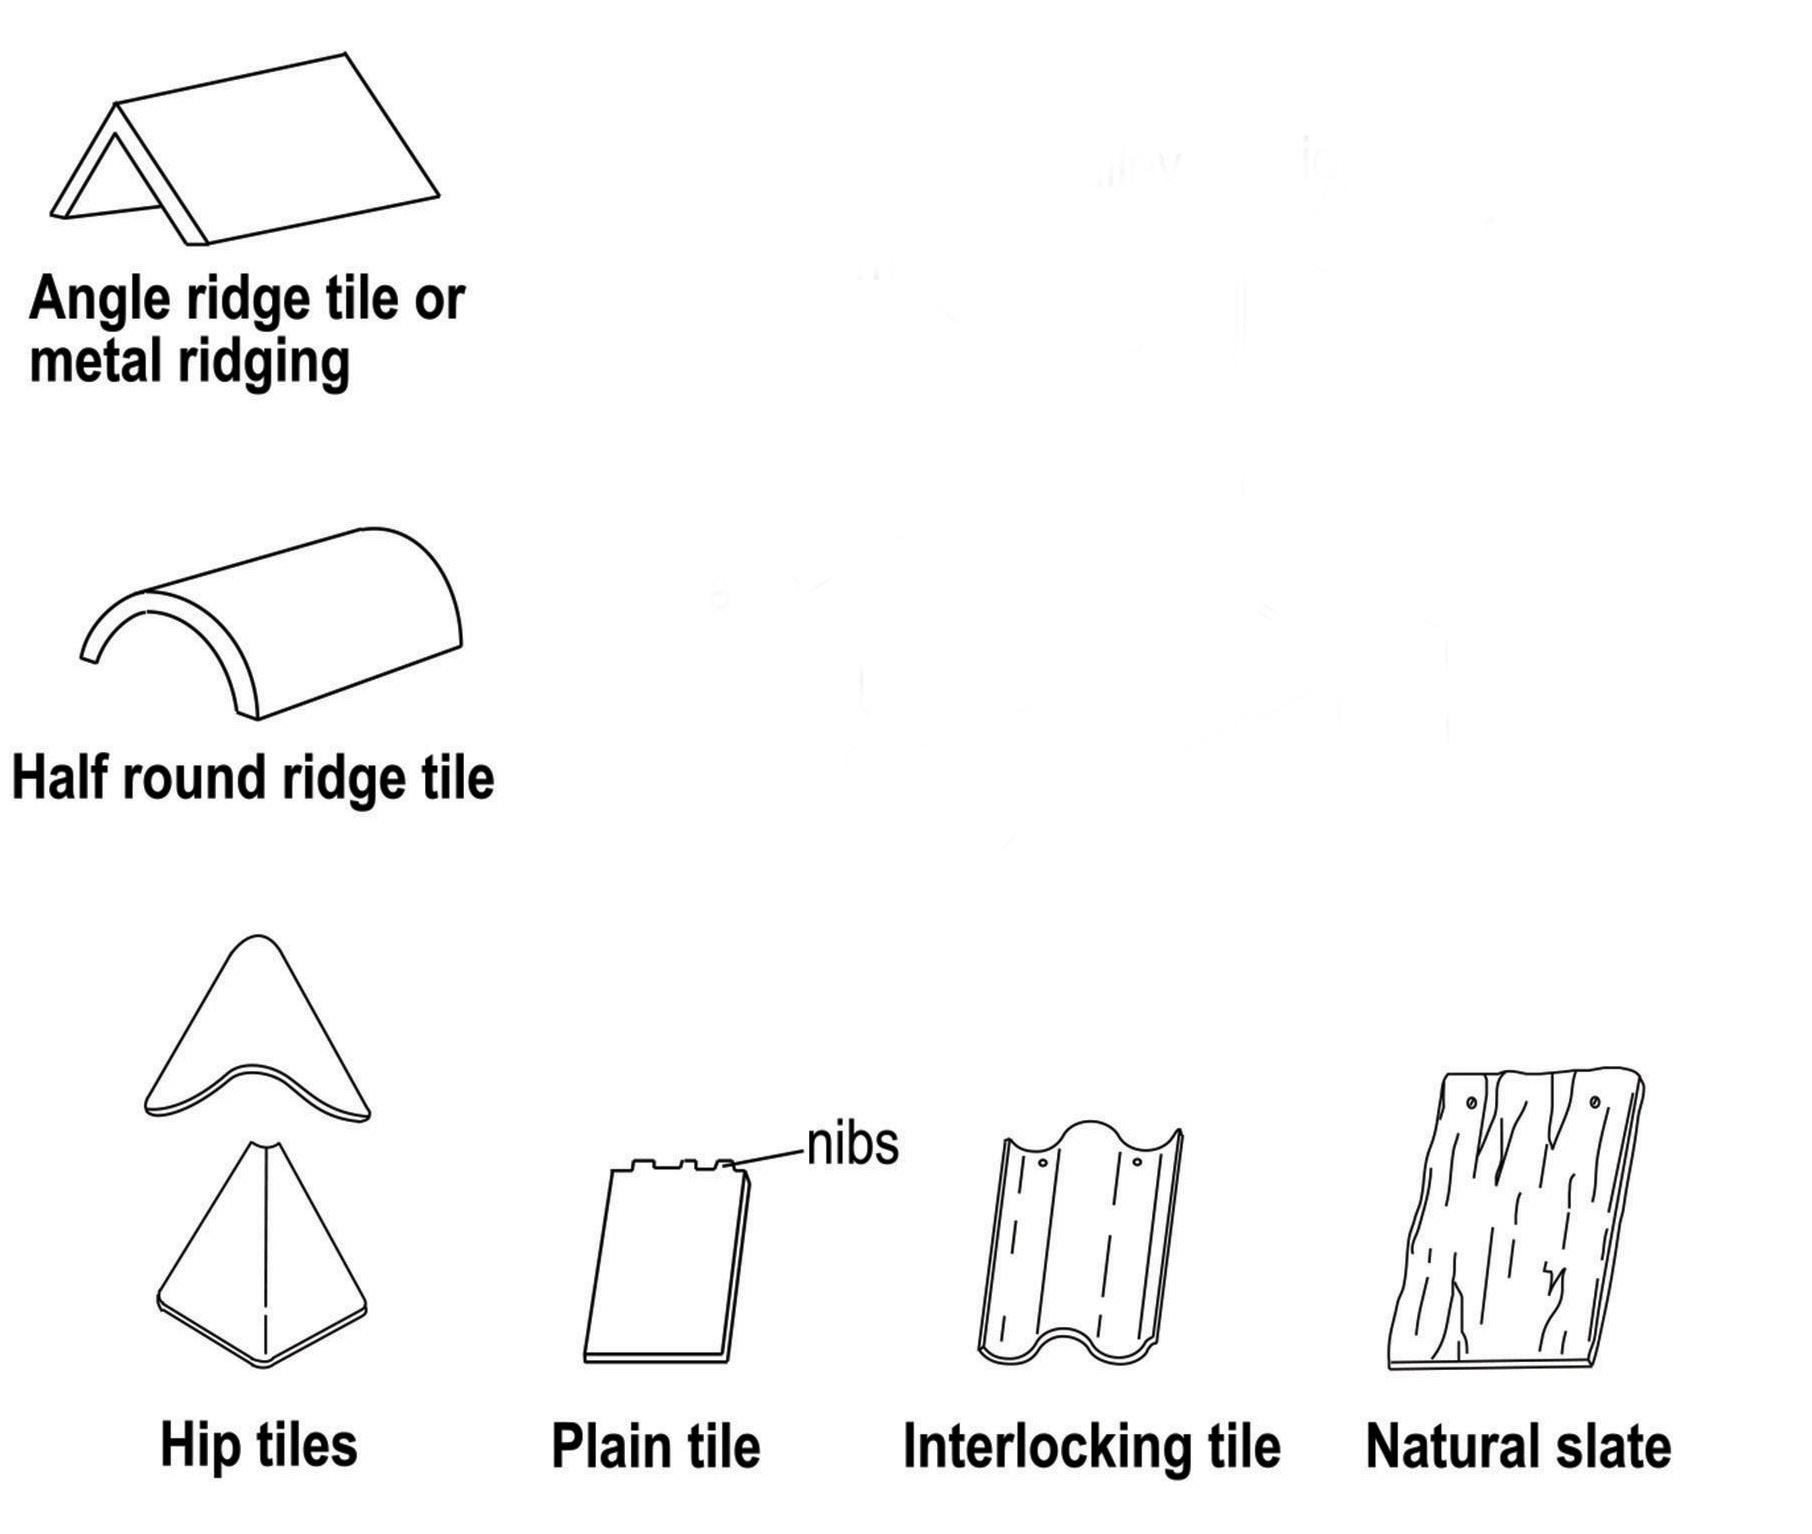
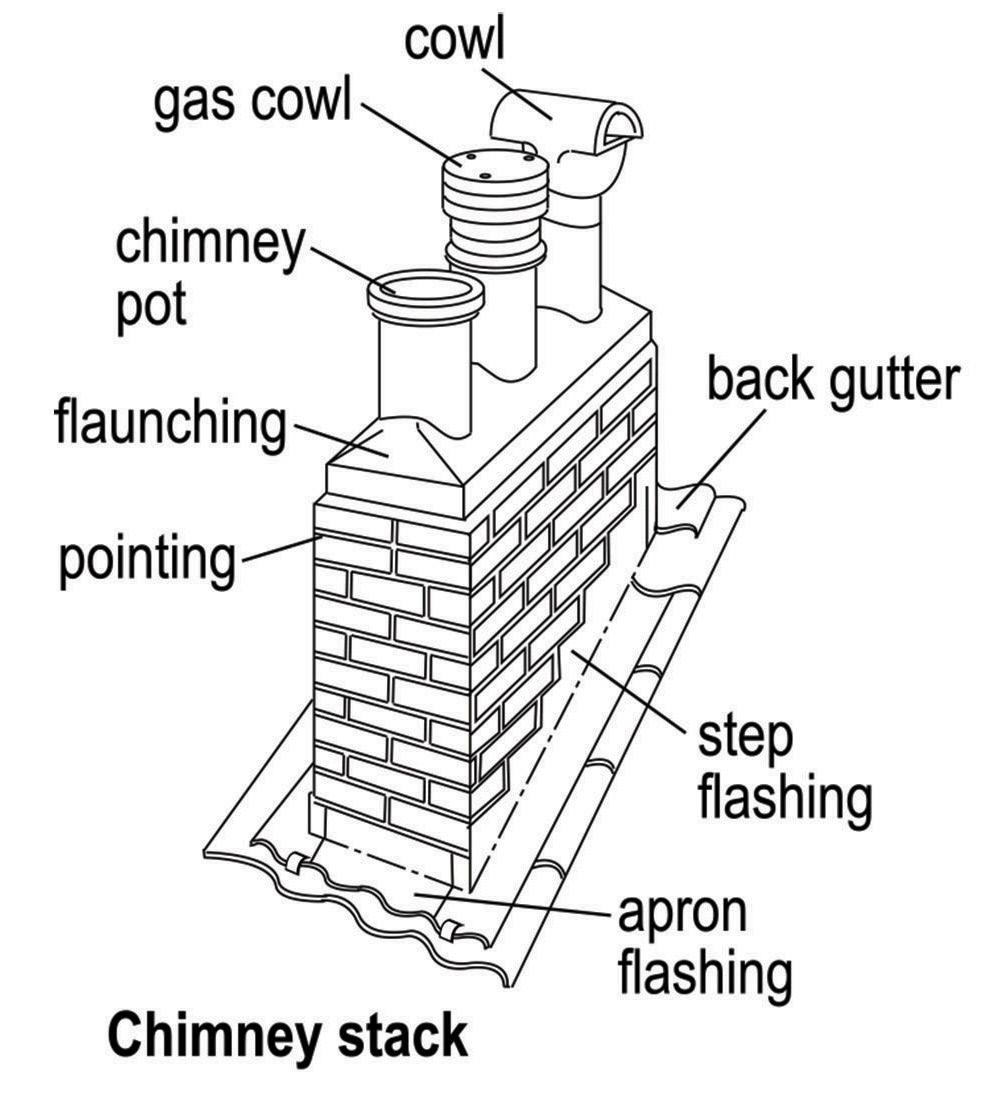
Your responsibilities
• Repairing any damage caused by you, a member of your household or visitor to the property
• Putting up TV aerials and satellite dishes - permission is required
• Getting chimneys swept at least once a year (if used for wood or coal fires)
Advice
• We may need to put up scaffolding to carry out a roofing repair
• For your own and our staff safety, we will always make things safe in the event of the repair not being able to be carried out in full i.e. due to bad weather conditions (severe frost, heavy rain or gale force winds)
• Do not use electrical fittings if the roof is leaking and they are getting wet. This is for your own and our staff safety
• If you want to put up a satellite dish you must get permission first by contacting us
• If you caused the damage, we expect you to get it repaired yourself or any repairs completed by us will be fully recharged
We need to know
• What is the problem, e.g.: roof leaking; titles or slate loose or broken; chimney pot or cowl fallen or loose; chimney stack crumbling?
?
• What type of roof it is, e.g.: flat, pitched or mansard?
• What type of roof covering is it, e.g.: slates, tiles, corrugated sheeting, flat felt or asphalt?
• If tiles, what type are they, e.g.: flat, ridge, interlocking, hip?
• Is the roof leaking?
• Is the chimney shared with another property? What is the address?
• If it is at the back of the building, how can we get access?
Your responsibilities
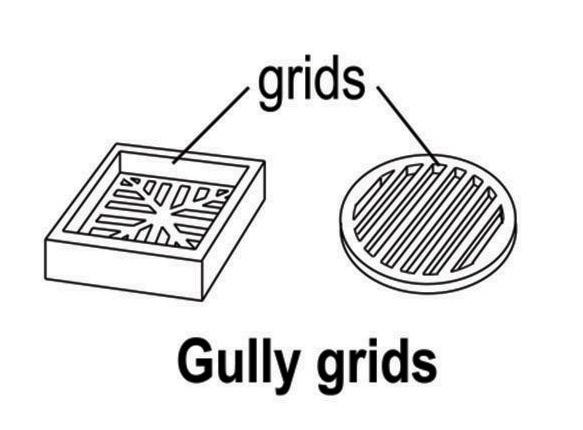
• Keeping gully grids clear of leaves, debris and rubbish etc.
• Repairing any damage caused by you, a member of the household or visitor to the property
Advice
• We may need to put up scaffolding to carry out repairs to the guttering
• In bad weather conditions, for the safety of our staff, contractors and you we might be unable to complete the repair work which will be rescheduled
We need to know
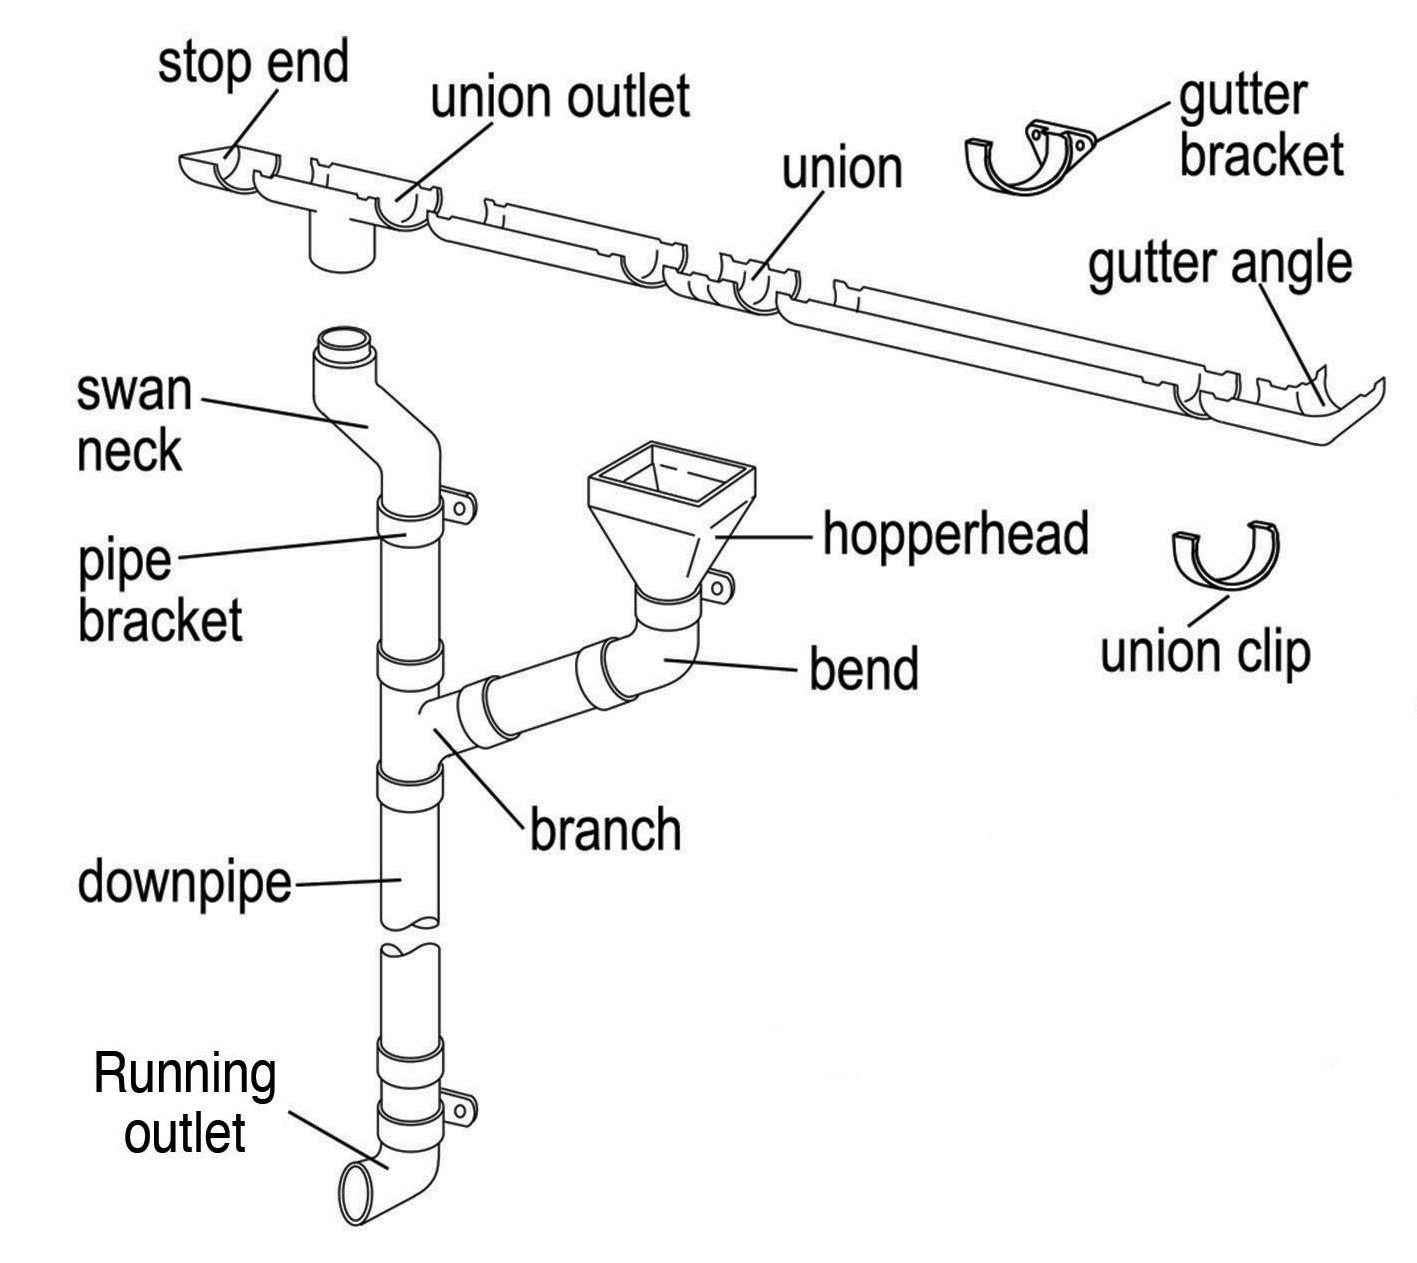
• What is the problem, e.g.: gutter or downpipe loose; leaking or blocked, bracket, joint or shoe loose or broken?
?
• Which gutter or downpipe is it: front, back or side?
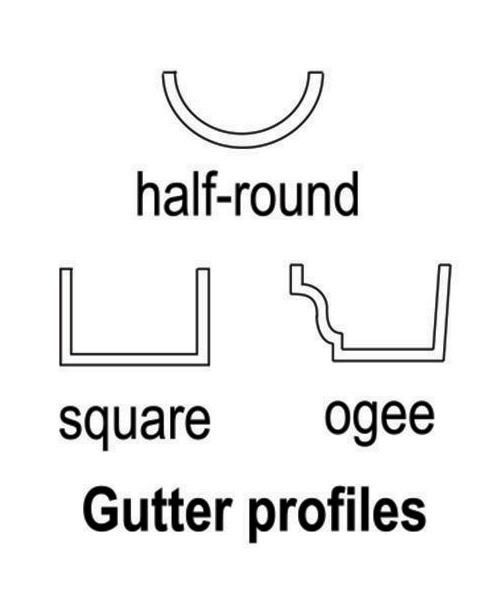
• What shape it is: half-rounded, square or ogee?
• How many storeys high is the property/building?
• Are there any other connected problems?
• What are the gutter or downpipes made of: metal, plastic or cement?
• If it is at the back of the property, how can we gain access to it?

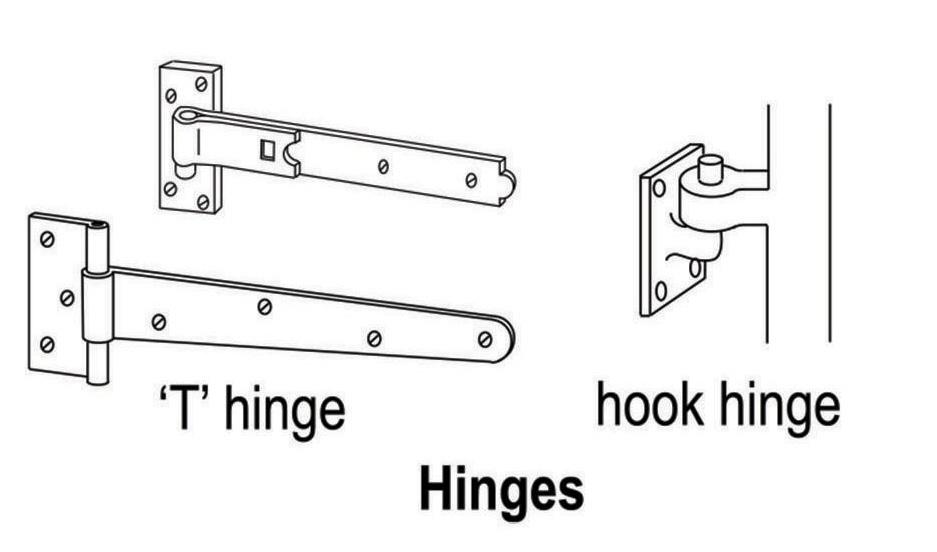
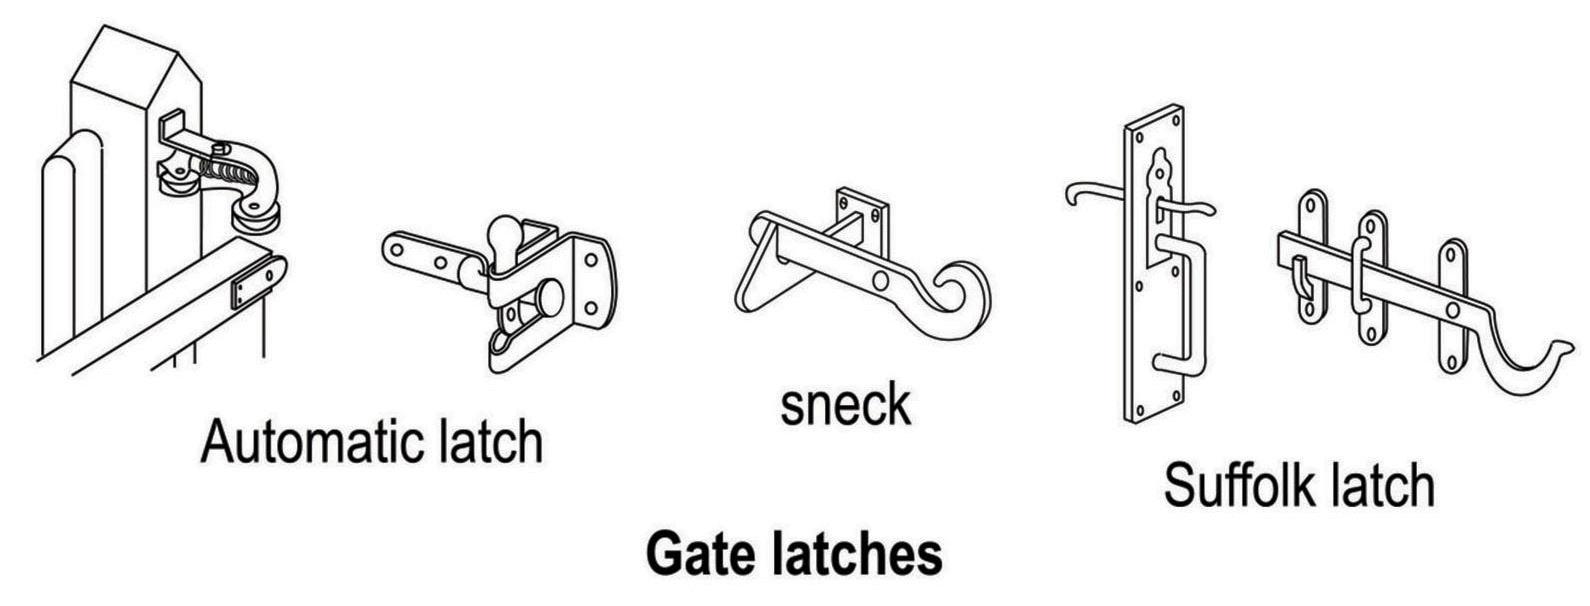

• Repairing any fencing, panels, sheds, patios, steps, ornamental walls or garden features not originally provided by us. We will only secure and repair boundary fencing
• Maintaining garden steps and paths (except the one giving access to the main entrance to the property)
• Putting up or replacing washing lines and posts, unless it is in a communal area
• Replacing keys or locks to garage or shed doors when keys are lost
• Repairing any damage caused by you, a member of the household or a visitor to your property
• If a problem is caused by vandalism or a break-in, you should report it to the police and get a Police Crime Number (not an Incident Number over the phone), otherwise we will charge you the full cost of the repair
• If you cause damage, we except you to get it repaired yourself or any repairs completed by us will be fully recharged
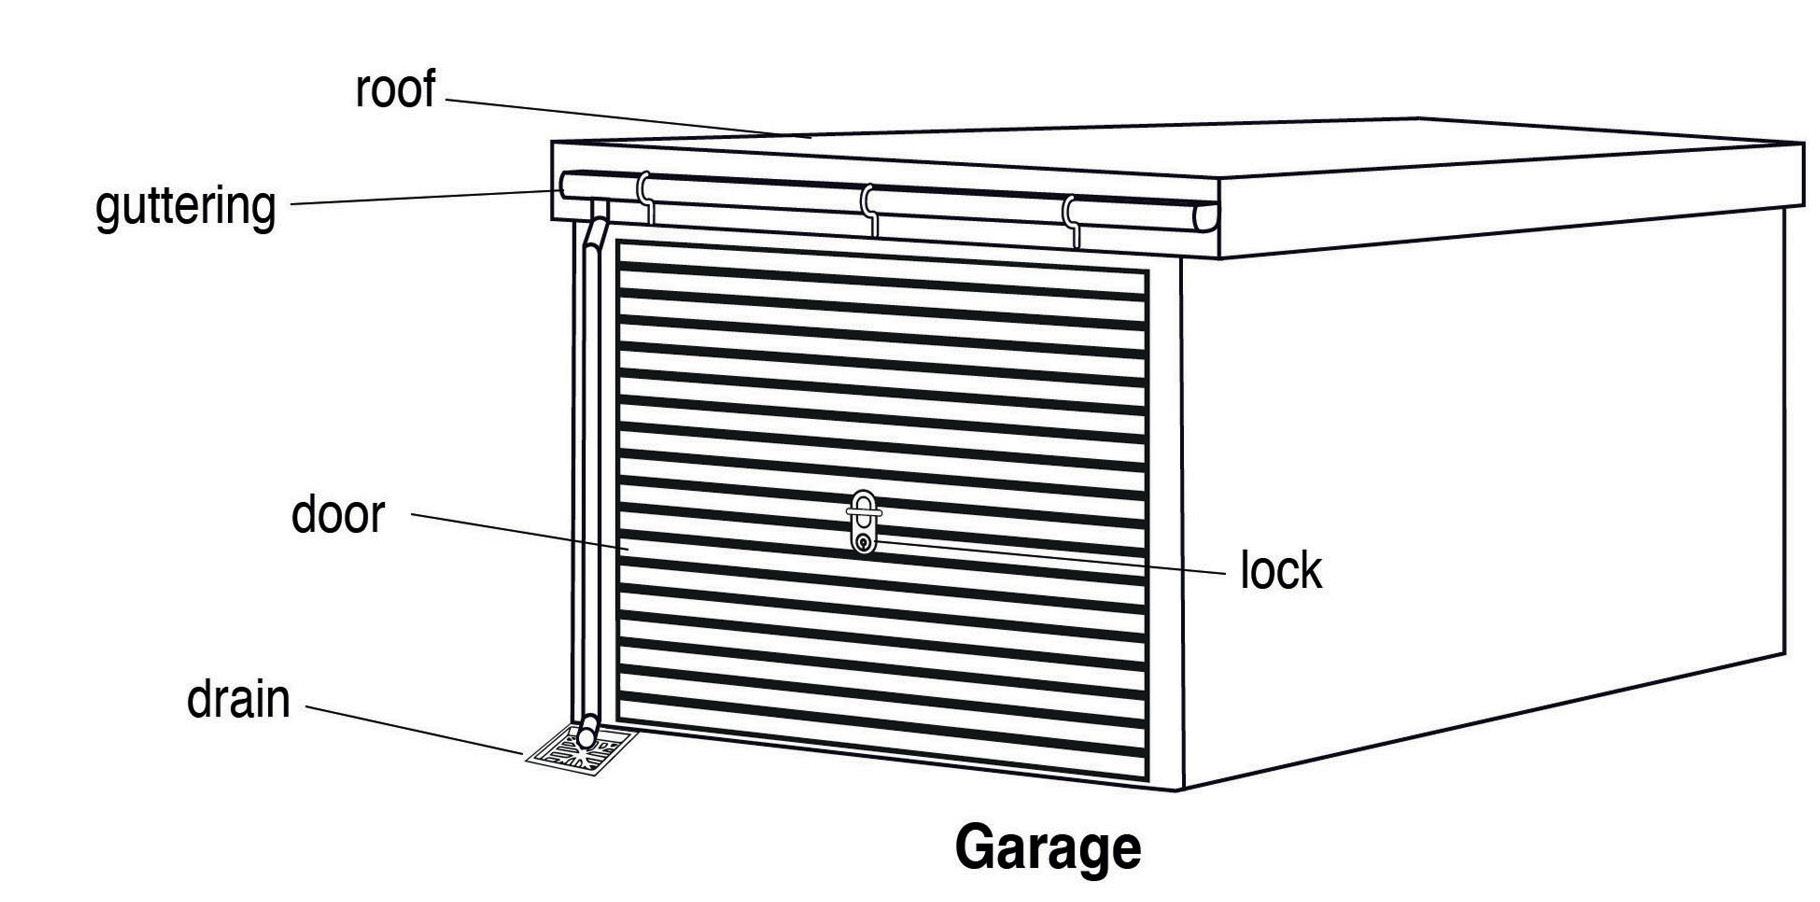
• If your garage is separate from your home, you need to give us your home address and garage number, and explain how we can find it and how we can get access to it
• If a garage cannot be closed or locked, you are responsible for the security of anything you have left inside it
• Please note, garages are for storing vehicle/car ONLY. (As per agreement) we are not liable for any other items i.e. household items
• What is the problem, e.g.: fence loose or broken, gate sticking; gate catch missing; path uneven or damaged; garage door jammed; keys lost or stolen; frame damaged; roof damaged?
?
• If a garage, is the car stuck inside?
• If a garage roof, what type is it, e.g.: corrugated or flat?
• If a fence, what type is it? Refer to drawings and how much of it is affected?
• If a gate or post, what type is it, e.g.: wooden, metal or concrete (posts only)?
• If a path, what is it made of, e.g.: slabs, concrete, tarmac, brick paving?
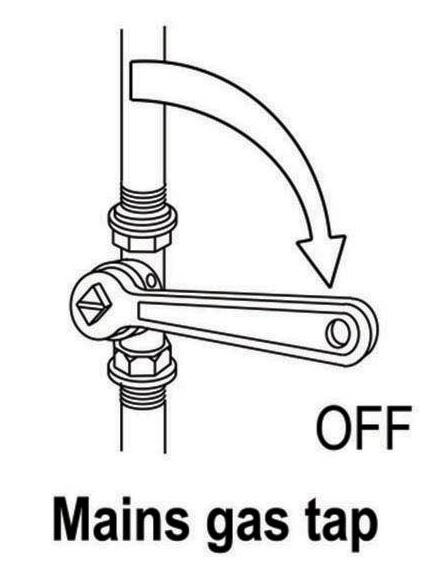



• If there is a gas leak, you MUST IMMEDIATELY CALL 0800 111 999
• Checking that your heating controls (room thermostat, timer or programmer) are set correctly
• Keeping your property properly heated and ventilated to prevent condensation
• Keeping your property properly heated to prevent pipes from bursting during cold weather, particularly if you are away on holiday, in hospital or for any other reason
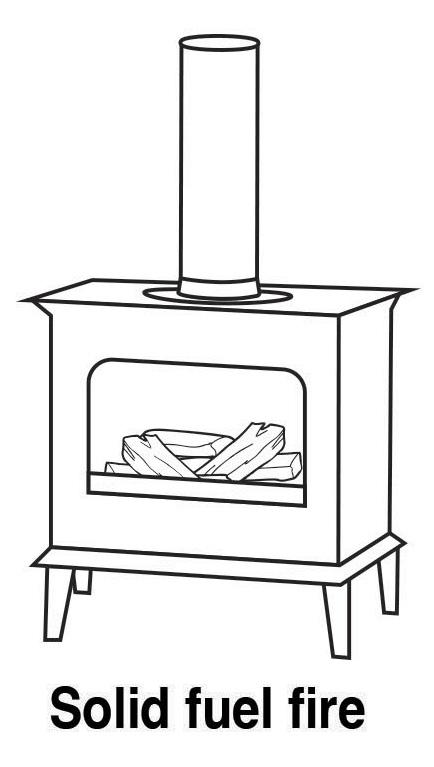
• Getting chimneys swept at least once a year (if used for wood or coal fires)
• Your gas meter box must be kept unlocked as access is required at all times
• If you suspect a gas leak, you MUST IMMEDIATELY CALL 0800 111 999. DO NOT use a phone, mobile phone or intercom system within your property, as it could spark an explosion. Only call from OUTSIDE your property
• If you smell gas turn off the gas at the meter and open all windows and doors to get rid of the gas. DO NOT smoke, use a naked flame or switch anything electrical on or off (including lights and phones) until the problem is fixed. Check to see if the gas has been left on or if the pilot light has gone out, if safe to do so
• You should make sure that your gas supply has not been disconnected because you have failed to pay your bill
• What is the problem, e.g.: central heating not working; radiator leaking or not getting warm?
?
• What type of heating is it: gas, electric or solid fuel (wood or coal)?
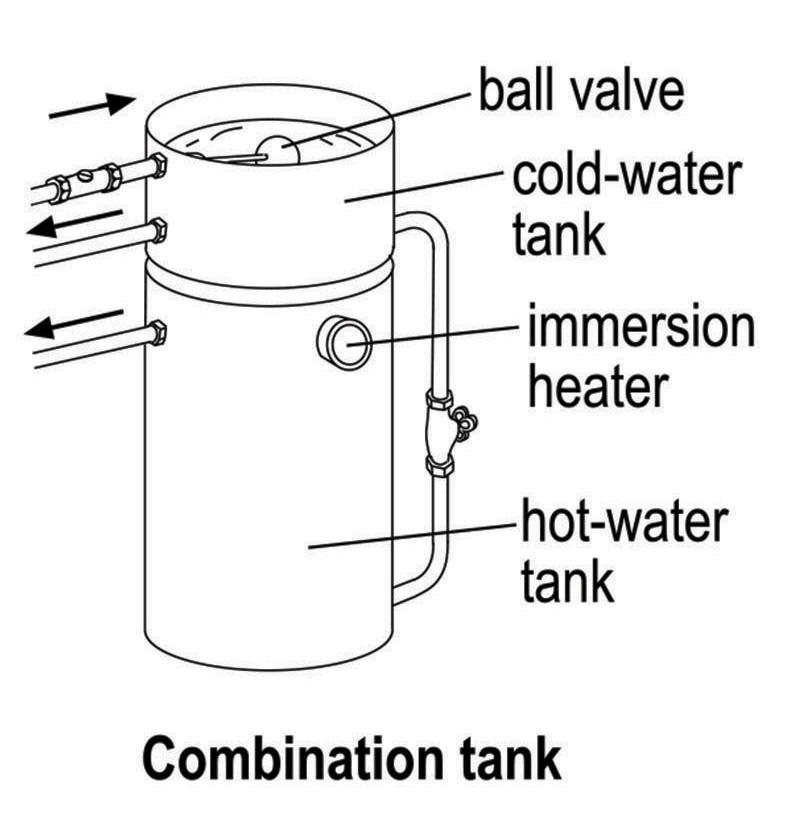
• Have you any other form of heating or hot water heating, e.g.: an electric immersion heater?
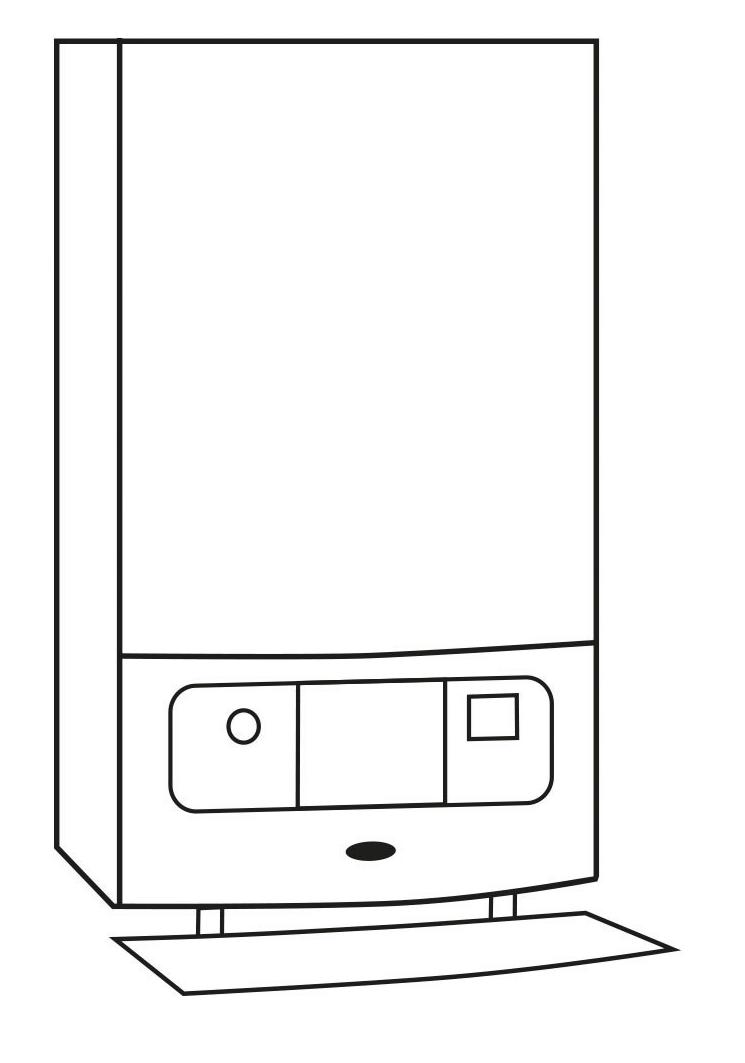
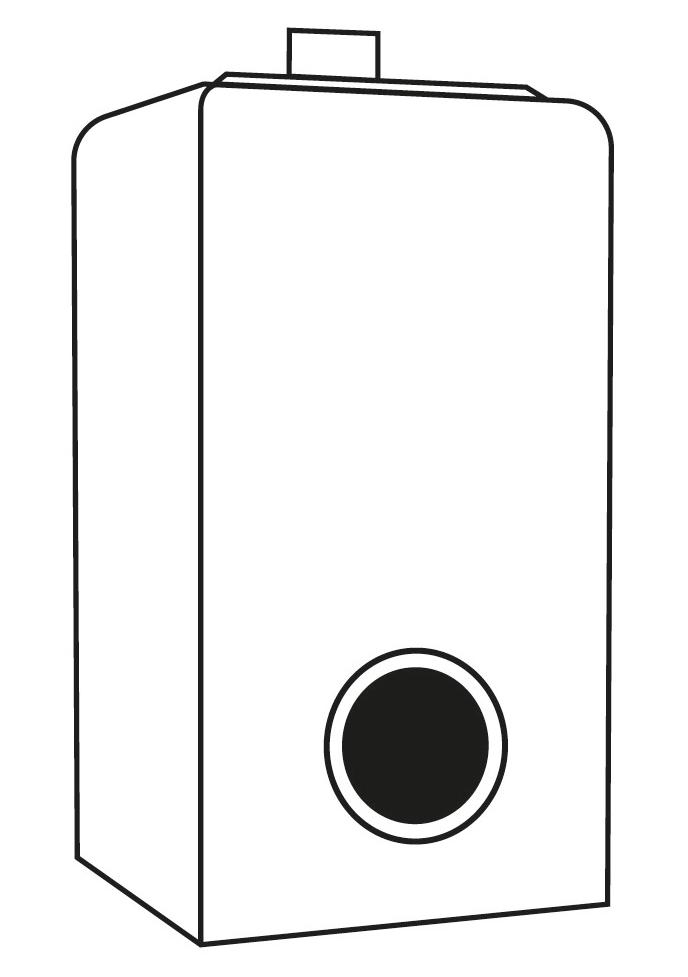
1. Drop the front of the boiler panel
2. The power button which should show blue when on
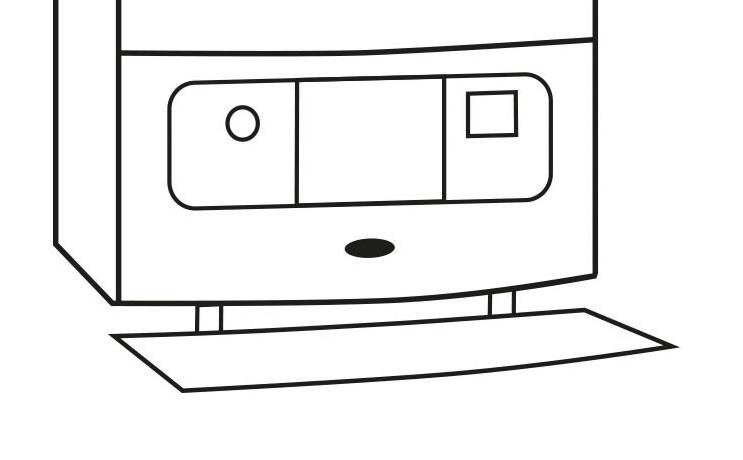
3. Reset button – hold for 2 – 3 seconds then let go
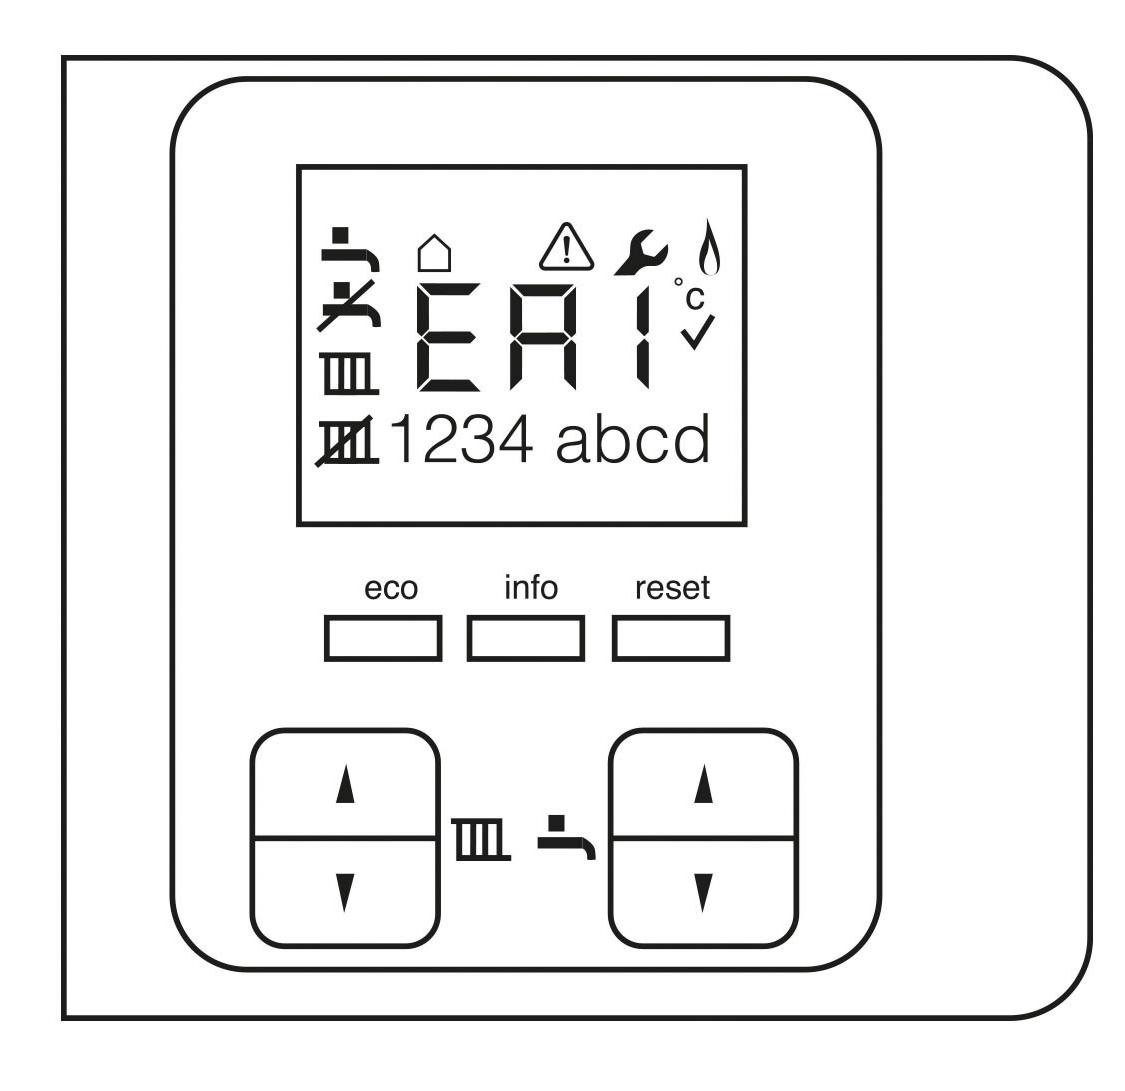
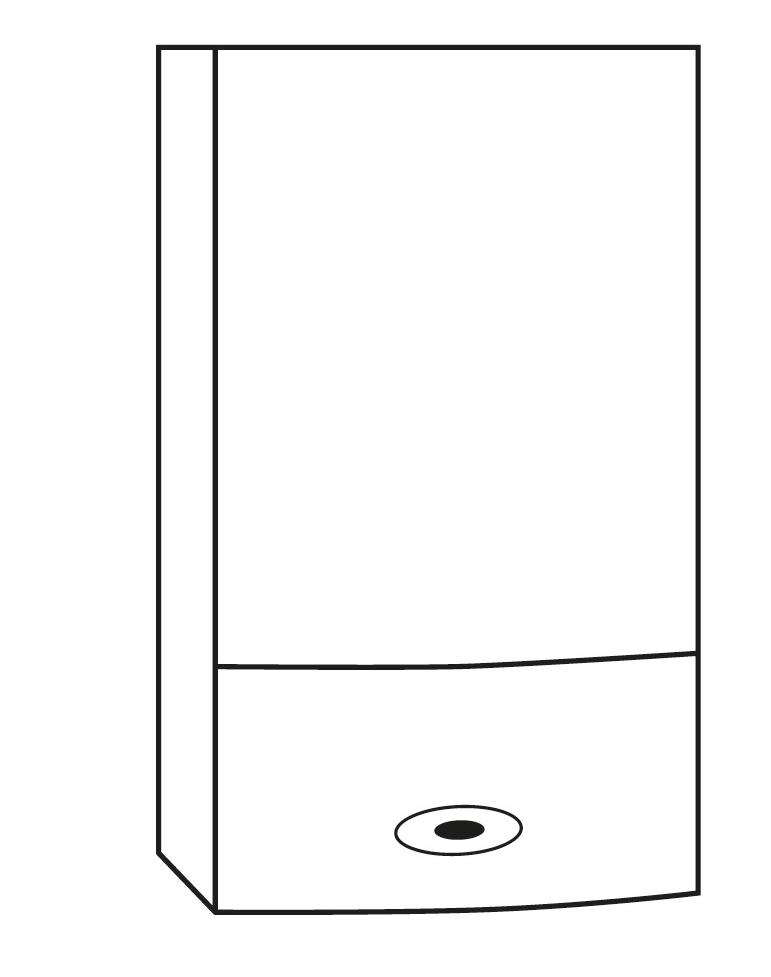
The appliance can be reset by pressing the fault indicator button and holding in for 5 seconds when the appliance has cooled.
The appliance can be reset by pressing the up and down buttons (no. 3) together for 3 seconds when the appliance has cooled.
1. Burner display Illuminates when the burner is alight
2. Display Screen
3. Up and Down buttons - increase or decrease settings
4. Return back
5. OK - Selection/save setting
6. Menu button
7. Hot water button – hot water mode on/off adjusting the
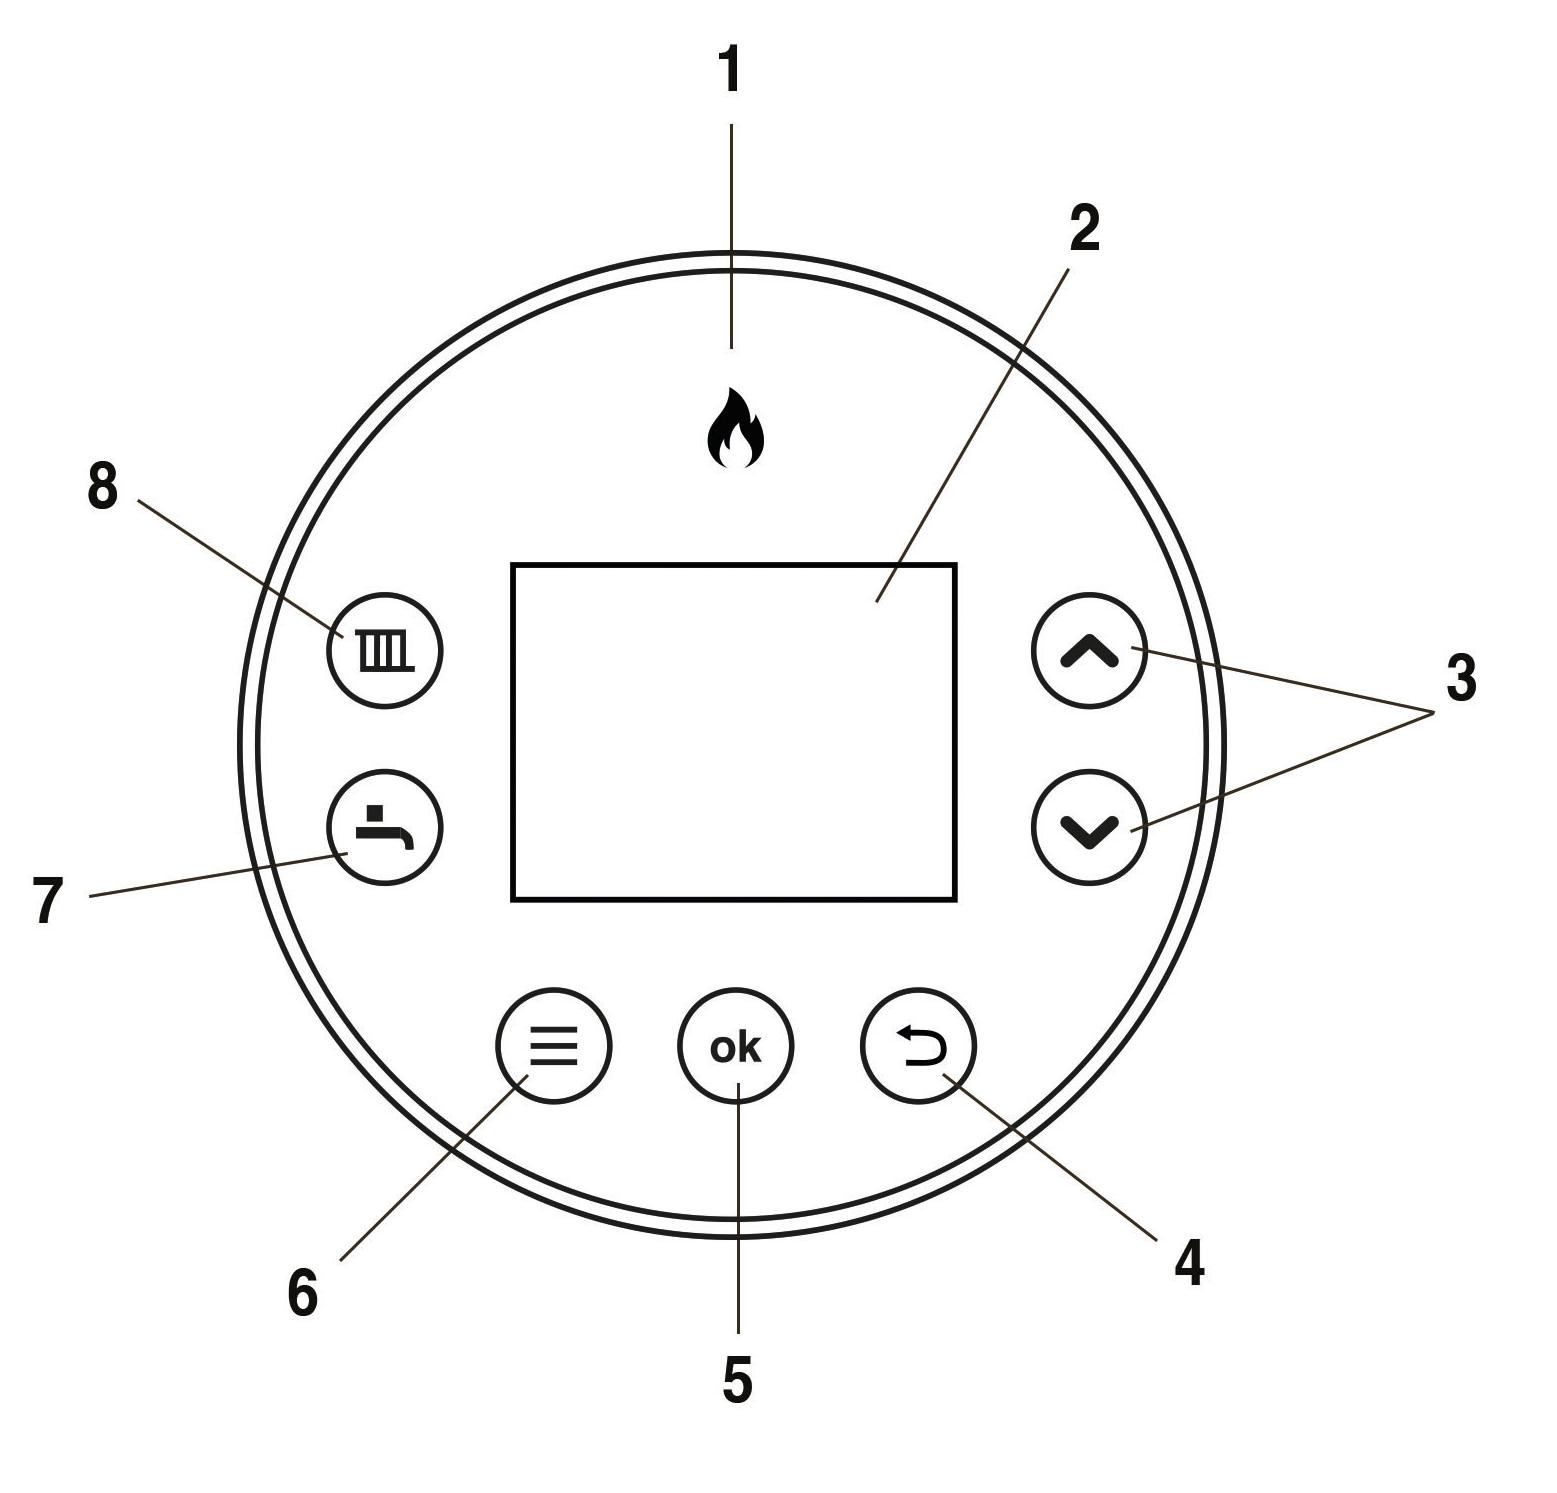
8. Hot water temp
9. Central Heating – heating on/off
1. Drop the front down
Read-out
1. On/off
2. CH operation or setting maximum CH temperature

3. DHW operation or setting DHW temperature
4. Desired temperature of CH or DHW in °C / CH
water pressure (bar) / Fault code/ Time
5. Clock “on” CH enabled
6. Clock “off” CH disabled
7. DHW comfort function eco
8. DHW comfort function on (continuous)
9. Operating code - this is where the fault code will be displayed
10. Flashes to indicate fault
Operation
A. On / Off button
B. DHW / CH button, for setting desired temperature
C. - button
D. + button
E. Clock function setting
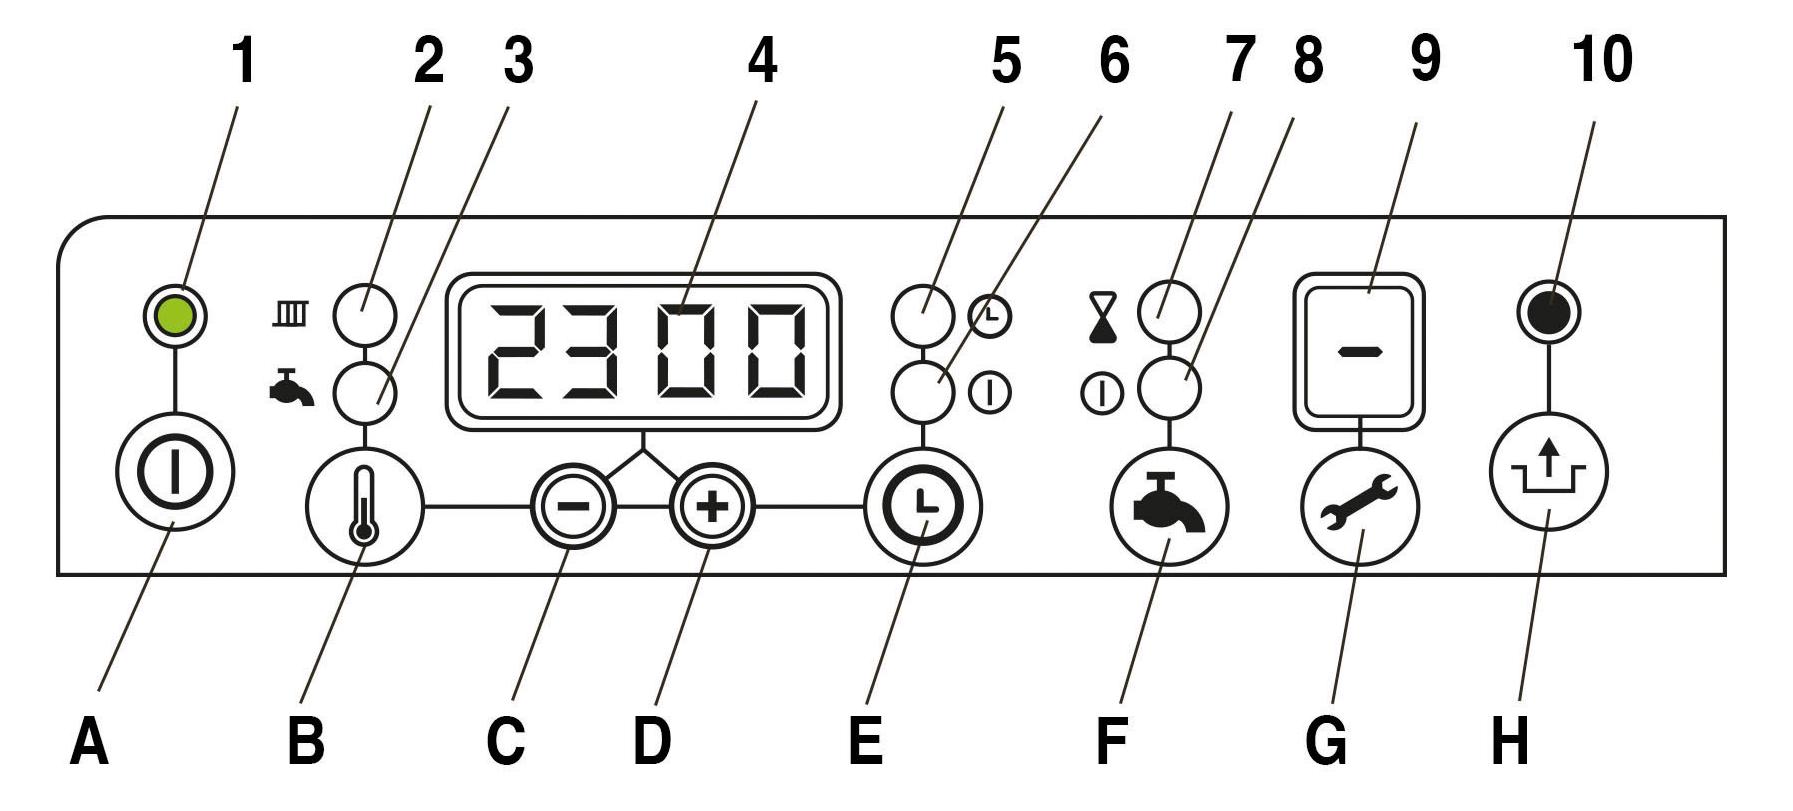
F. DHW comfort function off / eco / on
G. Service button
H. Reset button - press this button to reset boiler
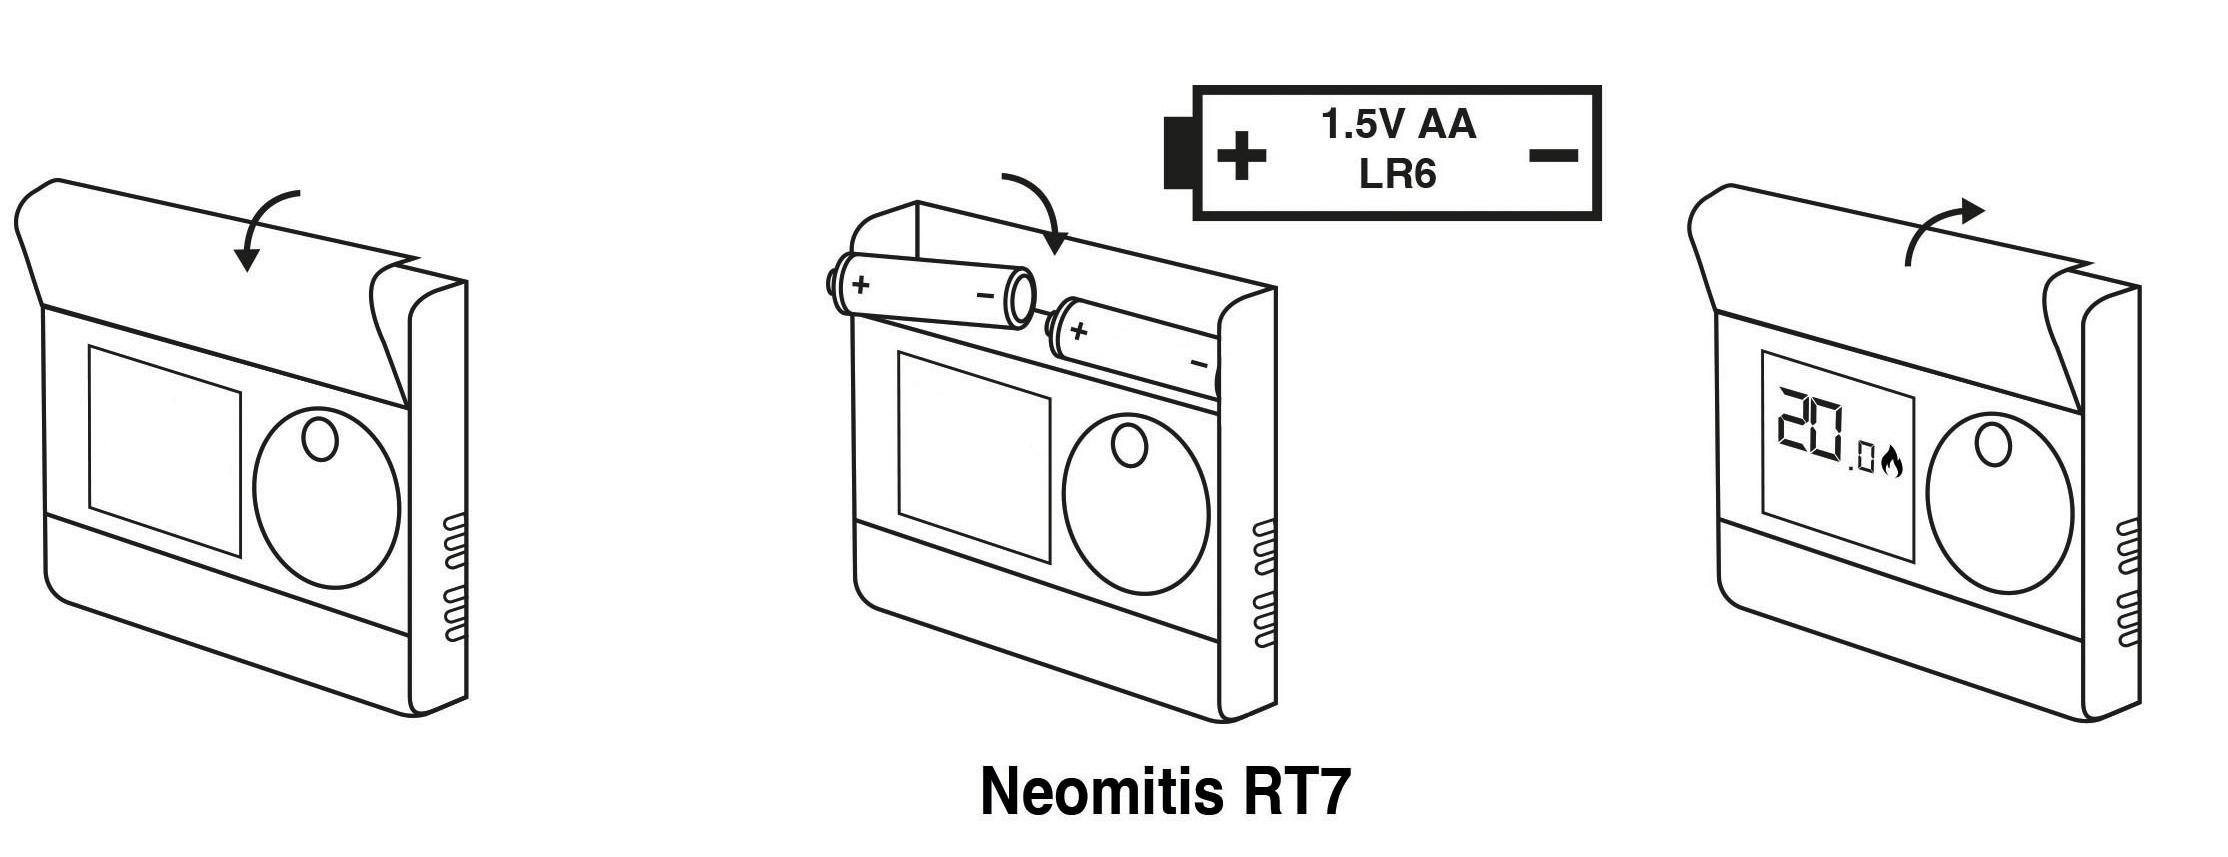
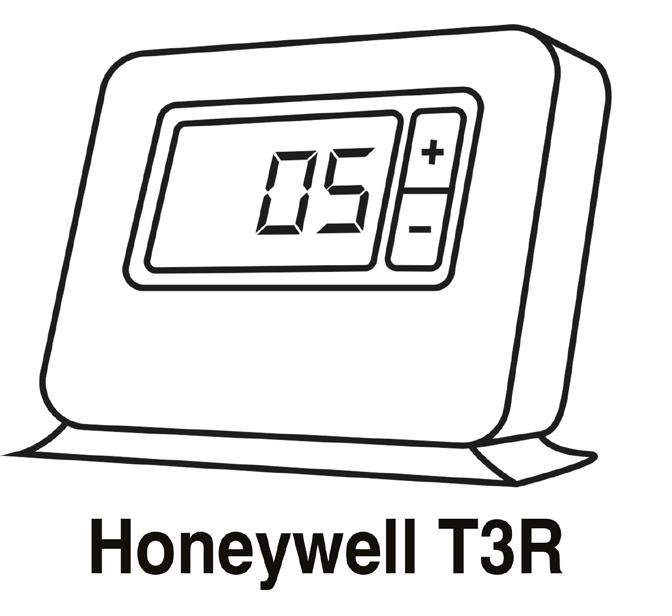
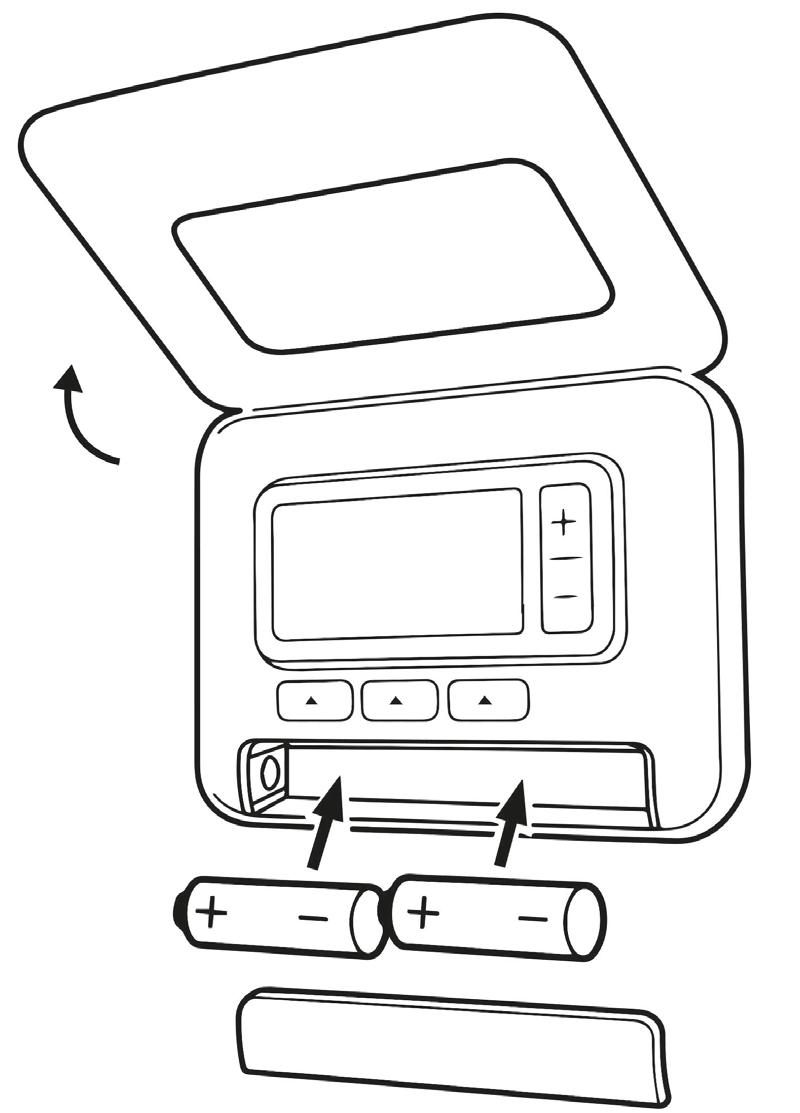
Figure 9 shows low battery
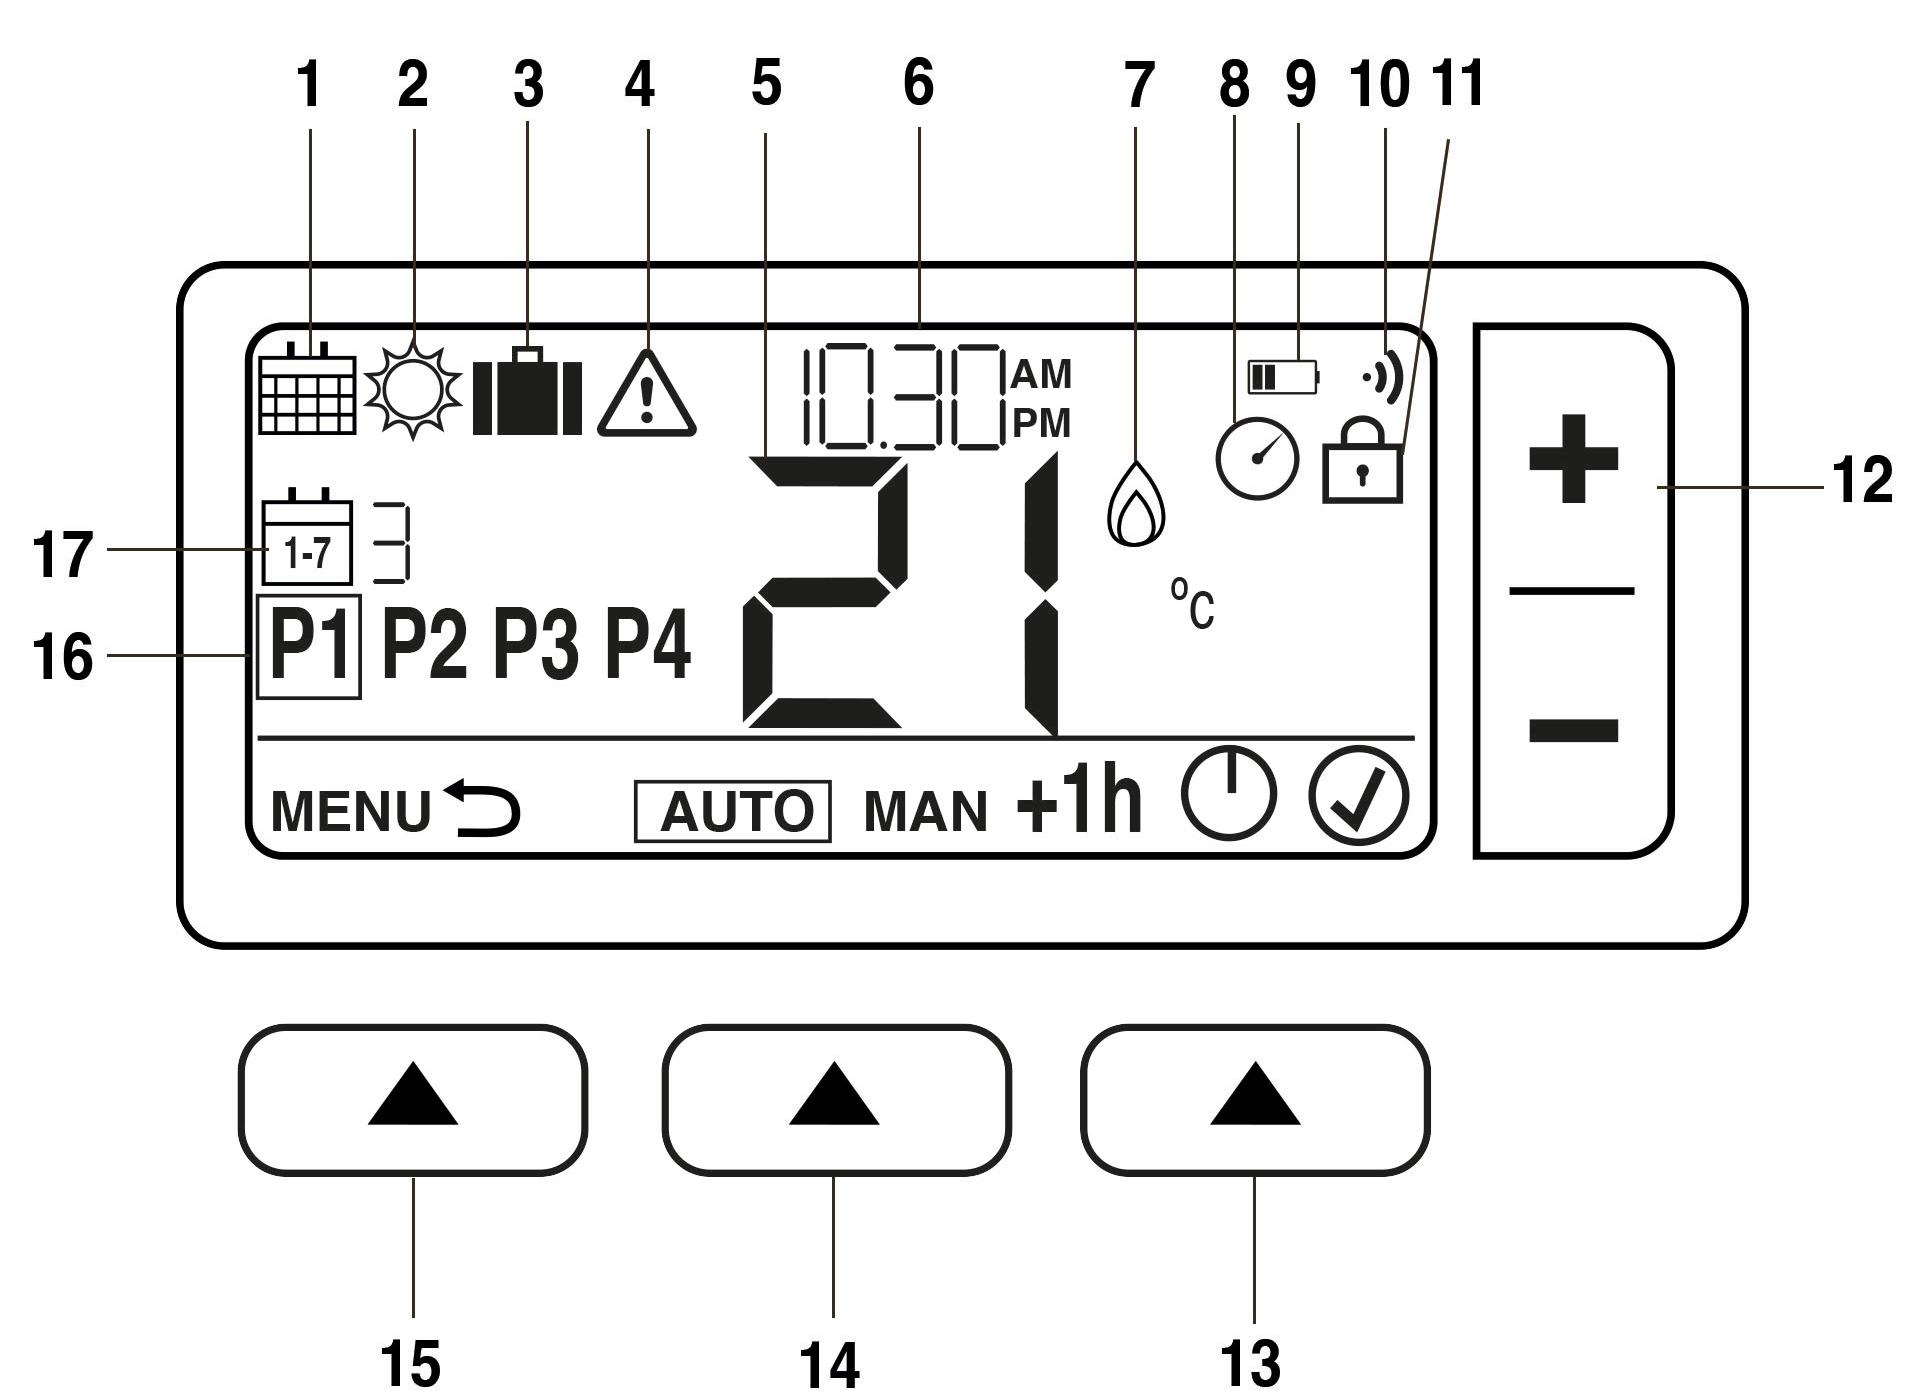
approx. 10% of battery – you should be prepared to change it
will flash when battery power is critically low –battery change immediately
The only time you will see the battery icon is when they get low on power. Once you remove the batteries you have 5 minutes to input the new. The programme holds for 72 hrs.
10. Wireless Signal
11. Keypad Lock
12.
13. Right button
15.

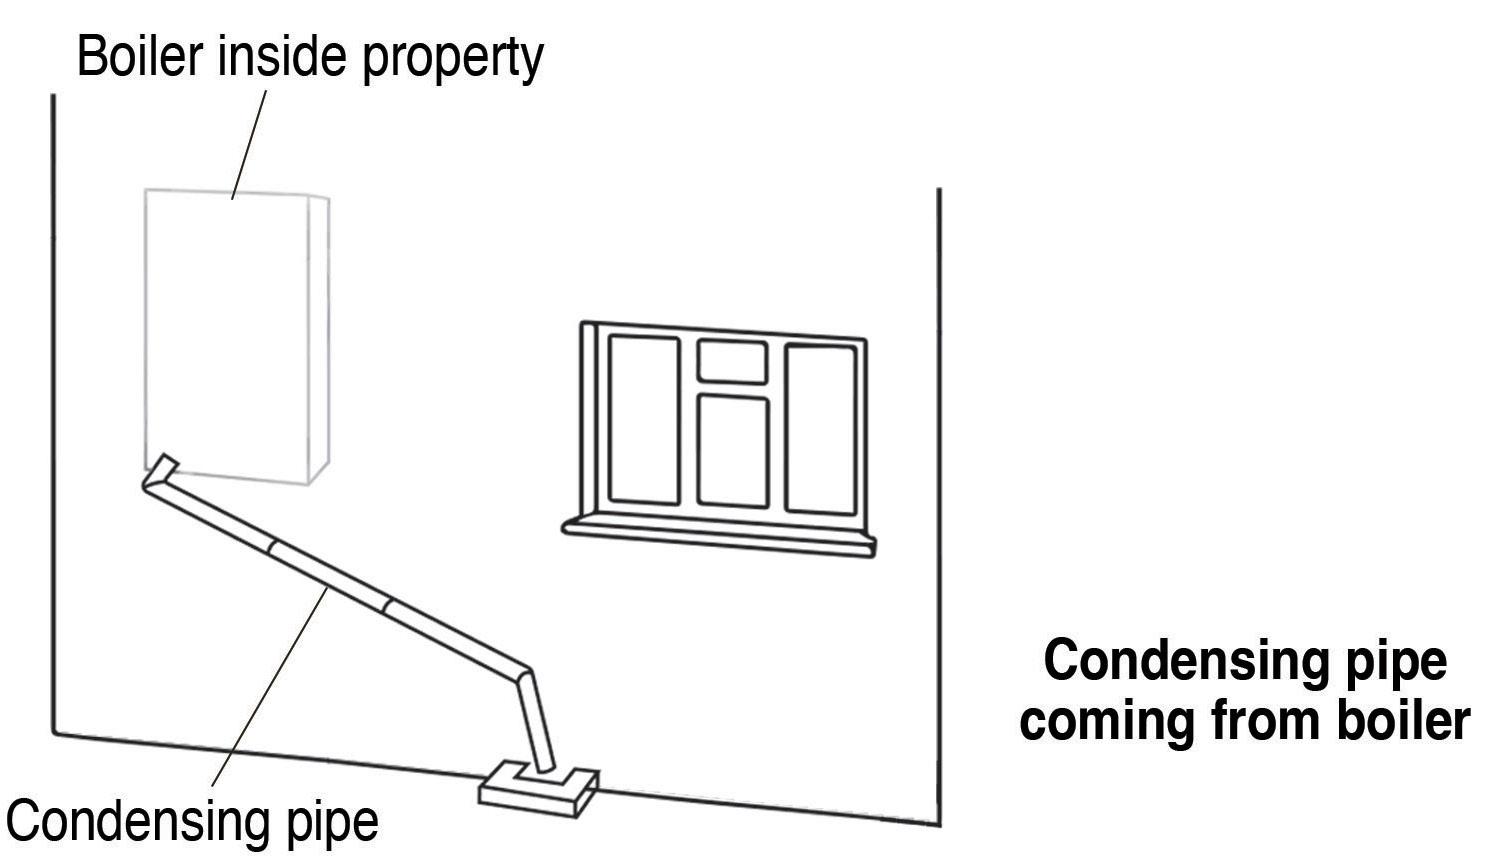
A condense pipe carries condensation from your boiler to your outside drain. It’s usually a white or black plastic pipe that travels through the wall directly outside where your boiler is located. During cold weather, the condensation in this pipe may freeze and cause a blockage causing the condensation to back up into the boiler and cause a shut down.
1. Boil a kettle and allow to cool down for 15 minutes
2. Pour the hot water along the length of the pipe, repeating until the pipe has thawed. DO

Alternatively, you can use a hot water bottle or a heat pack to slowly defrost the pipe
3. Restart your boiler. Check your boiler manual for instructions on how to reset the boiler correctly. Your boiler should now restart. It may take several attempts before the boiler restarts.

• Check that all lofts, water pipes and tanks are insulated. If not, you will need to contact us. We will arrange for insulation to be done for all tenanted properties and any common pipes or roof spaces
• Never insulate under a water tank in the loft. It needs the heating coming from the property
• In very cold weather you should take action to prevent a freeze up. If you can, it is a good idea to always leave the heating on a very low background temperature. You may want to open the loft hatch to allow heat into the loft too
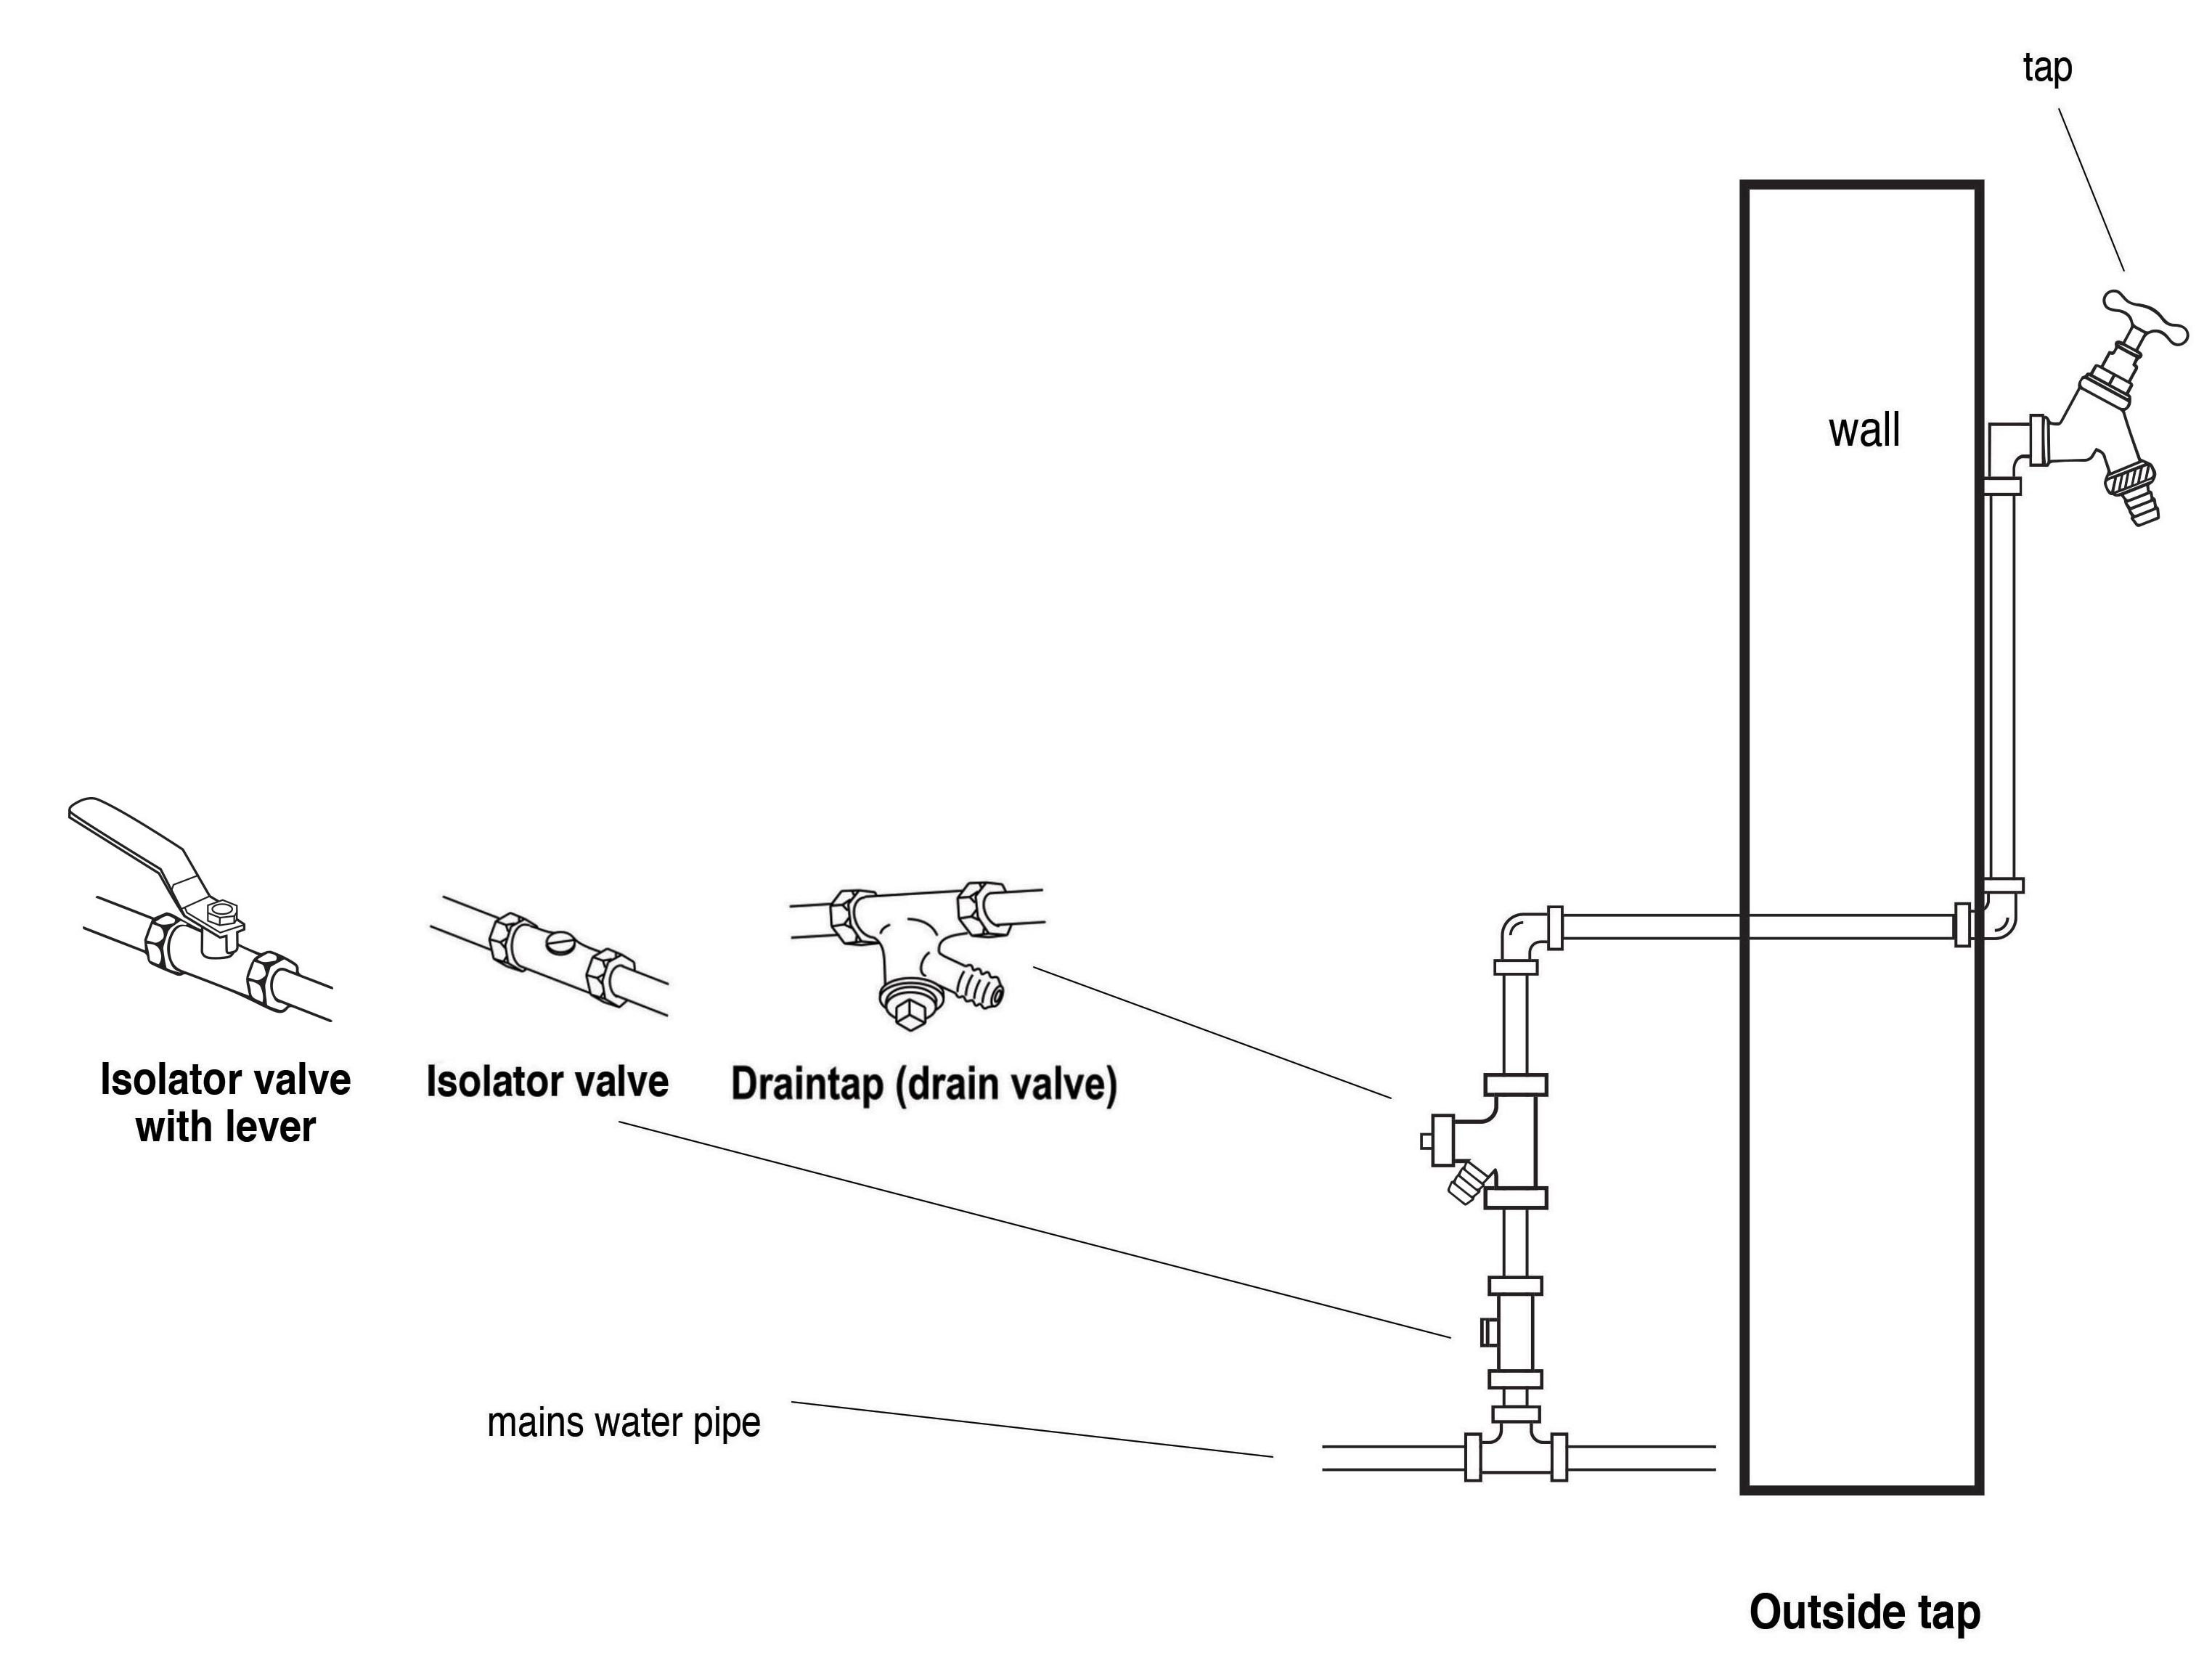
• Know where your stop top is. It is where the water pipe enters the property, usually under the kitchen sink or near the front door
• Make sure you can easily turn all the taps and valves
• You must draw water from the system and use isolator values to prevent further water damage
• We do not install outside taps, if we attend then we will only remove and not replace damaged outside tap
• Pipe lagging must be water resistant, foam lagging should only be used as a temporary measure
Frozen pipes:
• Contact us immediately
• Turn off the water at the main stop tap and isolate
• It is probably best to leave the pipes frozen, but you may try to thaw them using hot water bottles (not hot water)
• If the hot water system is frozen, turn off any water heaters and contact the gas company in your area
Burst pipes:
• Contact us immediately
• Turn off the water at the main stop tap and isolate
• Turn off any water heaters
• Turn on all taps to drain water from the system. This may take about 15 minutes
• When the water stops running, turn all taps off
• If electrics are getting wet, DO NOT TOUCH. Turn off the electricity at the consumer unit/ fuse box

Your responsibilities
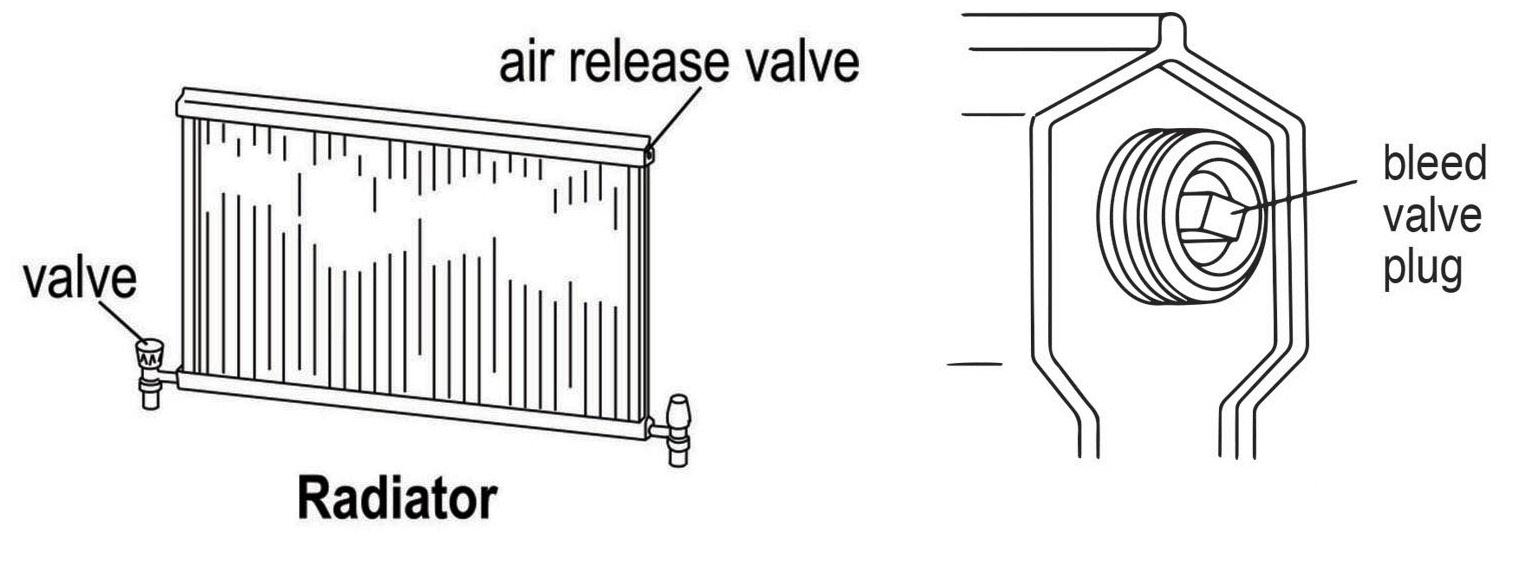
• Bleeding the radiators, by removing the trapped air bubbles Releasing the air allows the water to flow throughout the entire radiator
• Keeping your property properly heated and ventilated to prevent condensation
• Look at for signs that radiators need bleeding i.e. taking too long to heat up and/or being colder at the top
What to do and you will need:
• Radiator key • Cloth or Towel
To bleed your radiator:
• Identify the radiators by putting on your heating system and assessing them by checking for heating at the top and bottom
• Once you have identified the radiators, turn your heating system off and allow to cool down (not doing this could result in a loss of water)
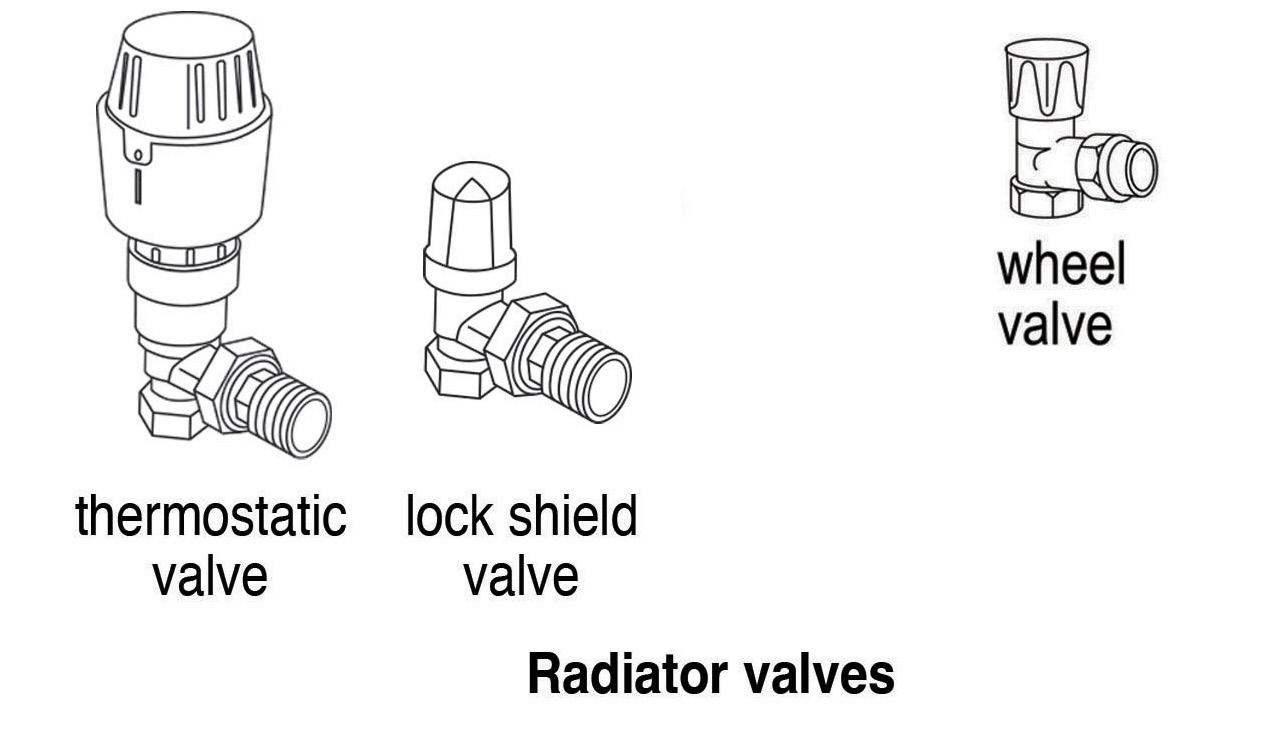
• Release the air, by using your radiator key on the radiator value (at the top of radiator), use the cloth or towel to catch any drips and twist the radiator key slowly anti-clockwise to release the air
• You should hear the air releasing, once this stops it indicates that water is on its way. Quickly shut the value by turning the radiator key on the radiator value clockwise and ensure it is tightened back to original position (not too tight)
• Once completed, put your heating system back on and check the pressure gauge. If it is too low, then you will need to top it up
Advice
• DO NOT TOUCH bare wires and DO NOT TOUCH sockets or switches with wet hands
• ALWAYS switch off electricity at the consumer unit (mains) before examining fittings
• MAKE SURE that you
Your responsibilities
• Resetting trip switches and, if necessary, turning off the mains supply
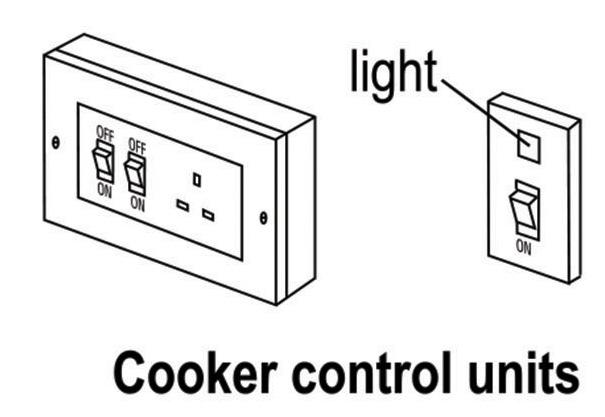
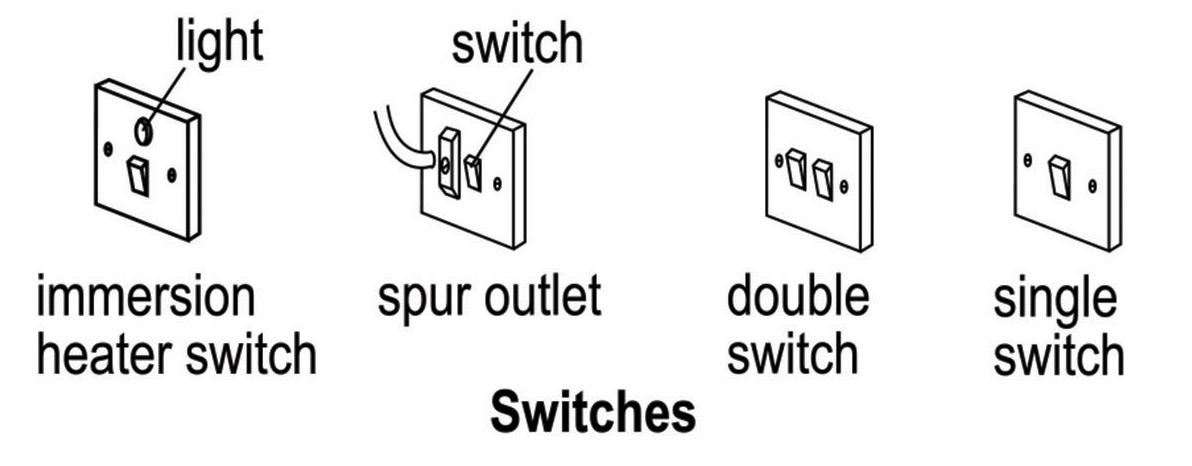
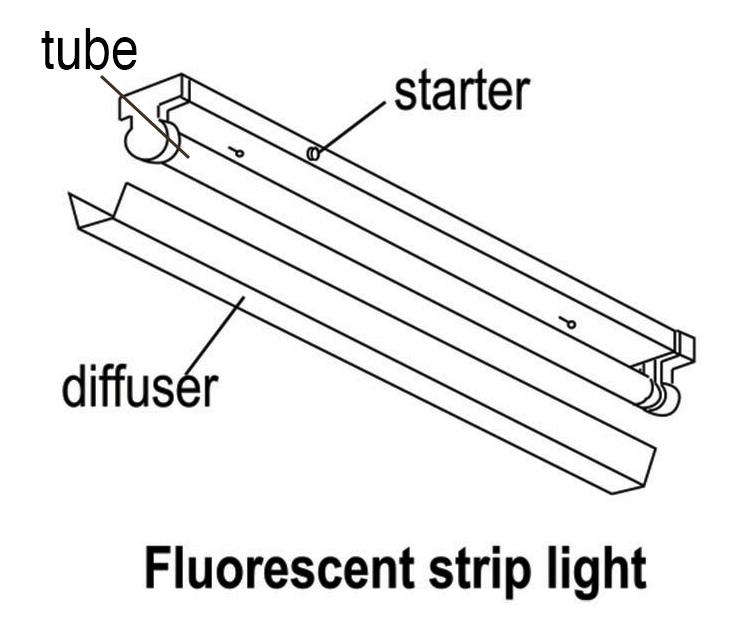
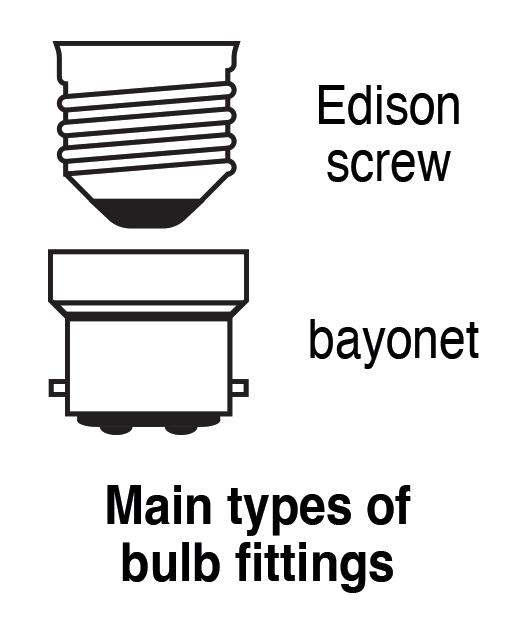
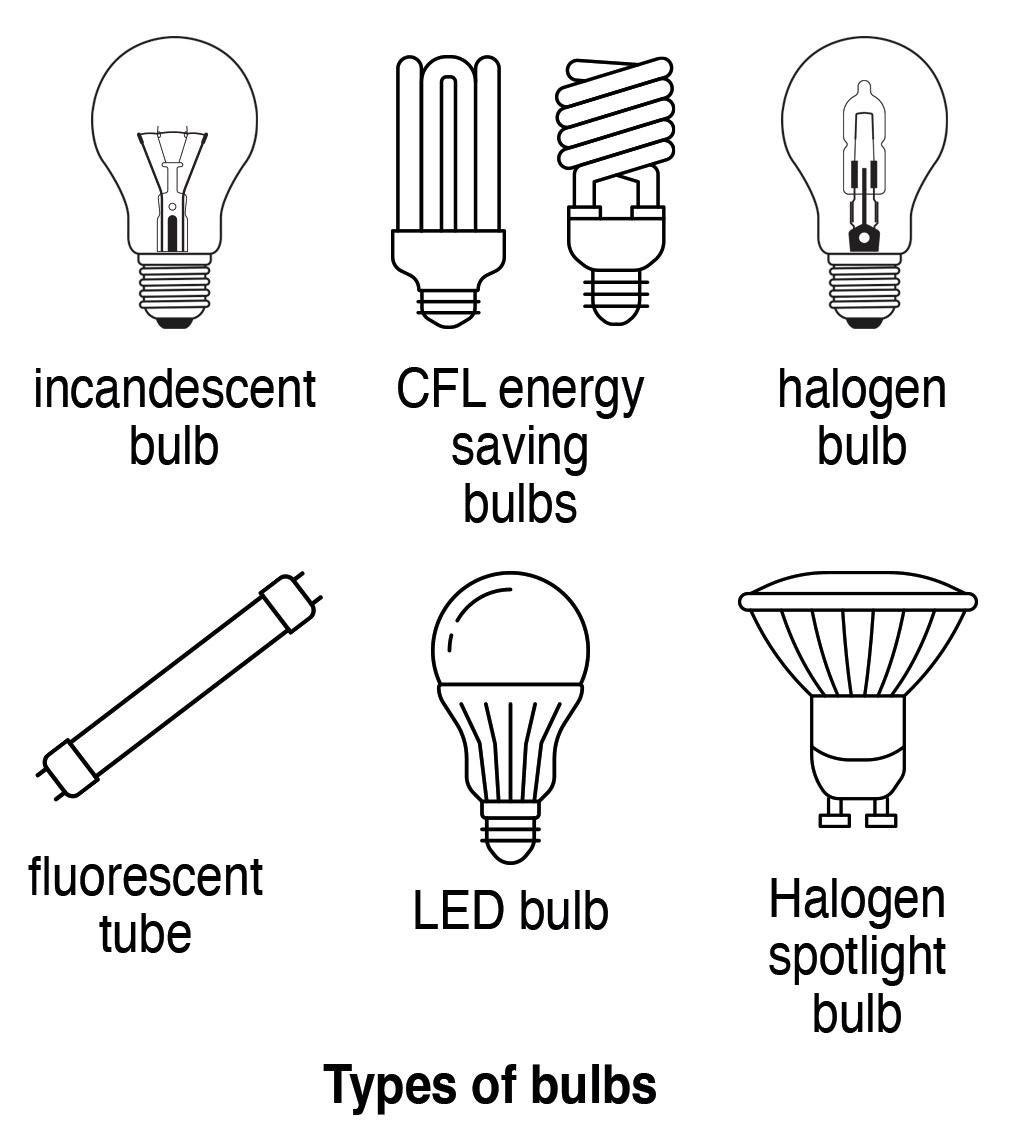
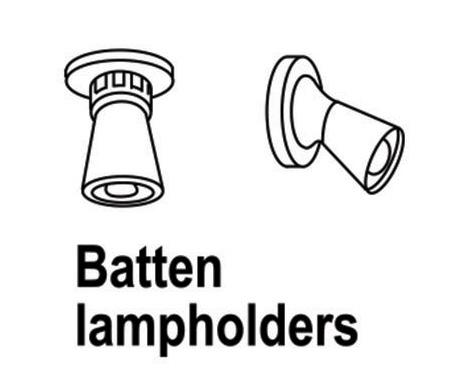
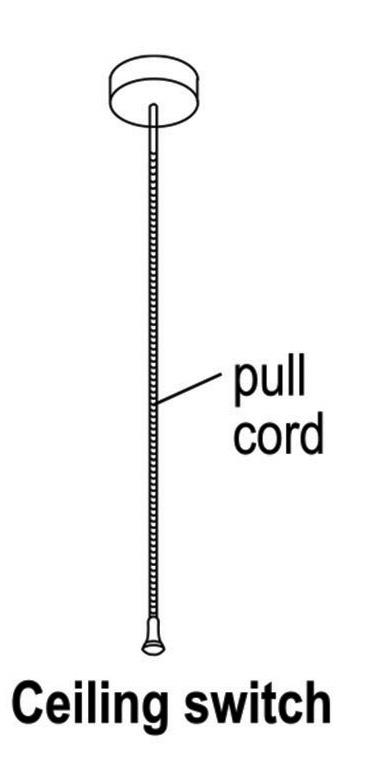
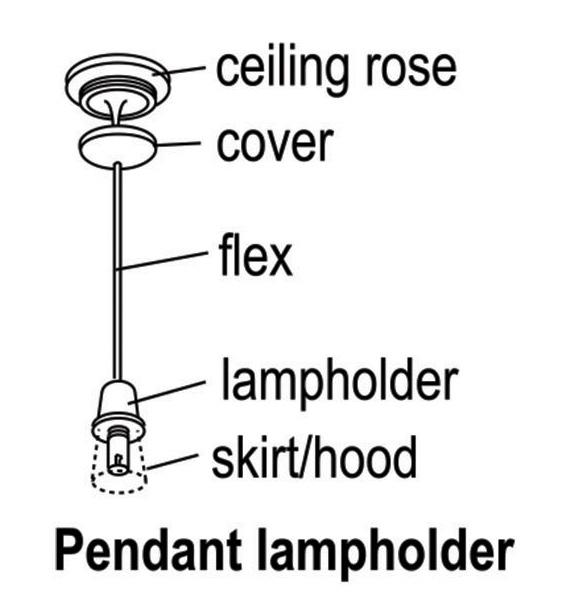
• Replacing light bulbs, fluorescent tubes and starters
• Fitting your own TV aerials and telephone points
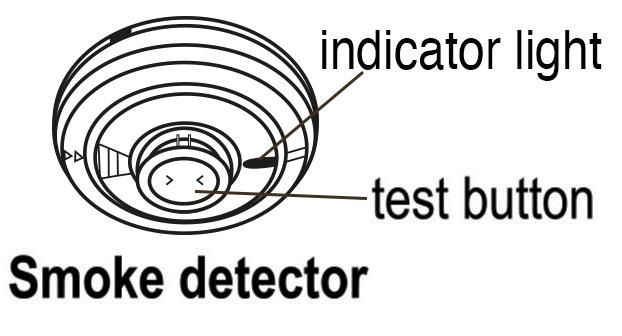
• Testing and cleaning your smoke detectors, and replacing the battery if it is a battery-operated (not if it is mains-wired)
know where the trip switches are located in the property and understand how to reset them
• Before you contact us about no power or lights please check that the power supply is on
• If water is leaking onto electrical fitting or a fitting is dangerous, DO NOT USE any switches connected to it, turn off the power and contact us IMMEDIATELY
• If any switch or socket is dangerous, turn off the supply to that circuit at the consumer unit (mains) and contact us
• DO NOT overload electrical sockets i.e. plugging too many devices into one socket or overloading an extension lead
• REPORT repairs immediately
• DO NOT install shower restrictive (water saving type) shower heads or devices onto electric showers
• Shower head replacement
• Checking power supply to your property i.e. prepayment meters are in credit, local power cuts
• Ensuring electrical appliances are safe to use and meet relevant safety standards
• Seek permission for alterations to the wiring and ensure it is completed by an approved company who proved certification
• Letting us in to conduct regular electrical safety maintenance checks. See page 61
We need to know
• What is the problem, e.g.: no lights or power in part of, or throughout the property; light or light switch not working; socket loose or broken?
?
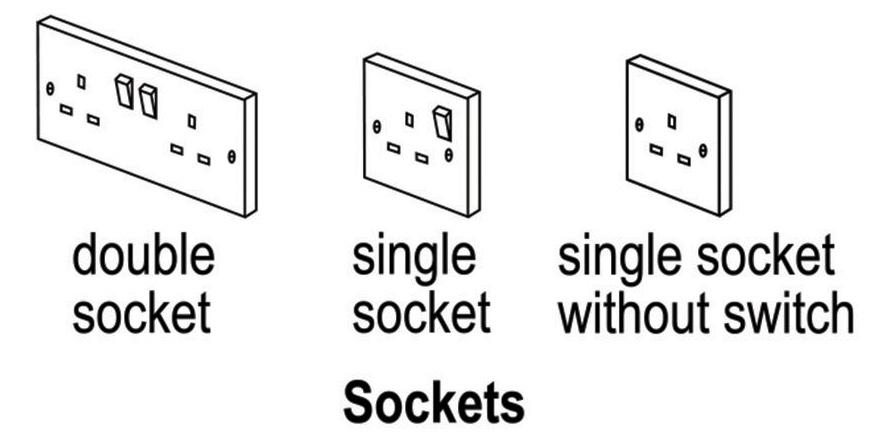
• What type of fitting or socket is it?
• If a TV aerial, is it a communal aerial shared with others in a block of flats?
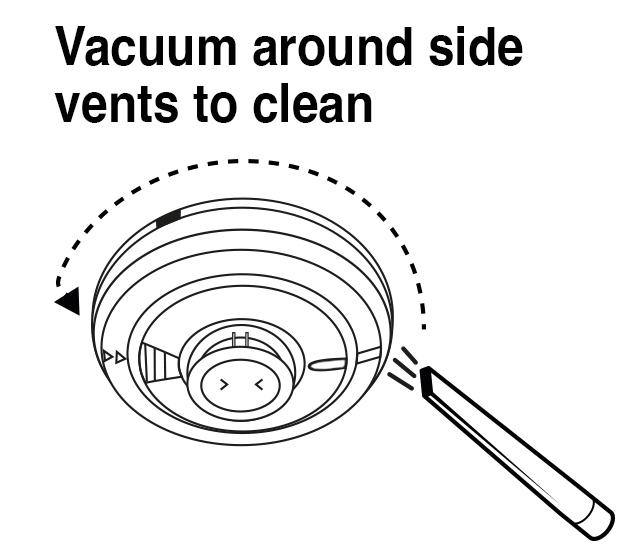
Alarms should be tested at least every month. In the case of smoke alarms, heat alarms and carbon monoxide alarms, these tests may be carried out by use of a test button on each of the smoke alarms, heat alarms, carbon monoxide alarms and multi-sensor alarms installed in the premises. See https://firekills.campaign.gov.uk
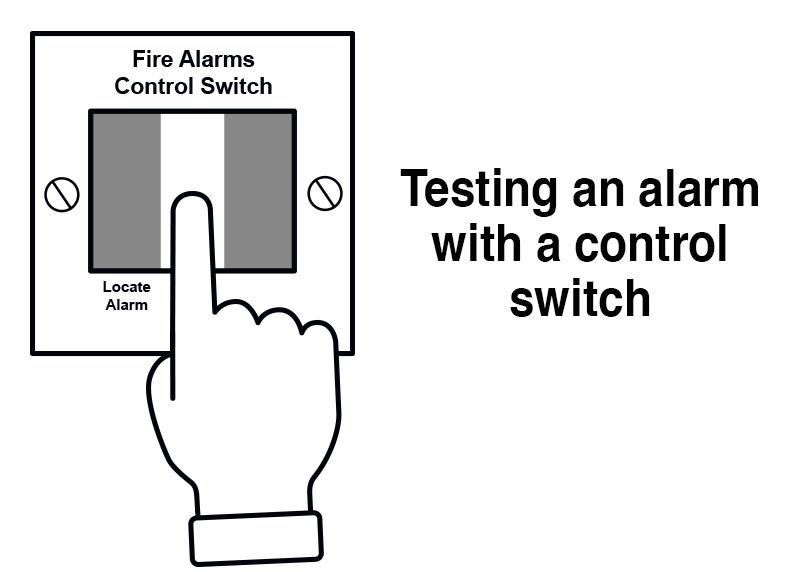
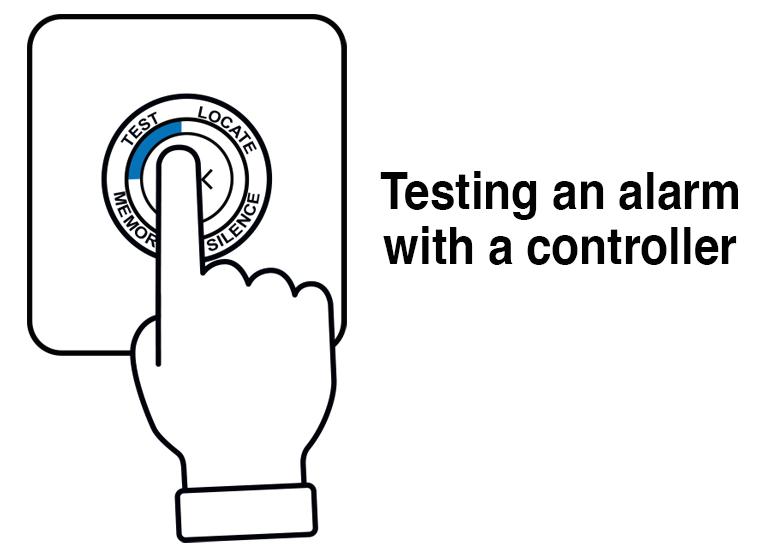
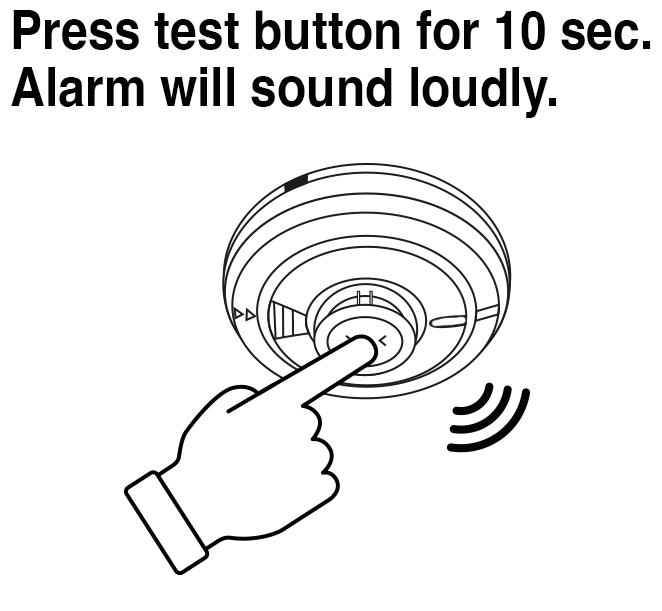
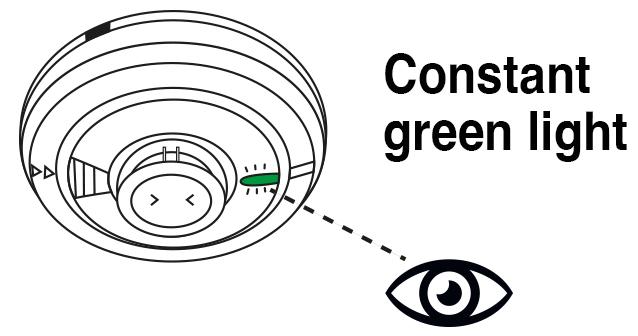
Alarms should be tested at least every month. In the case of smoke alarms, heat alarms and carbon monoxide alarms, these tests may be carried out by use of a test button on each of the smoke alarms, heat alarms, carbon monoxide alarms and multi-sensor alarms installed in the premises. See https://firekills.campaign.gov.uk
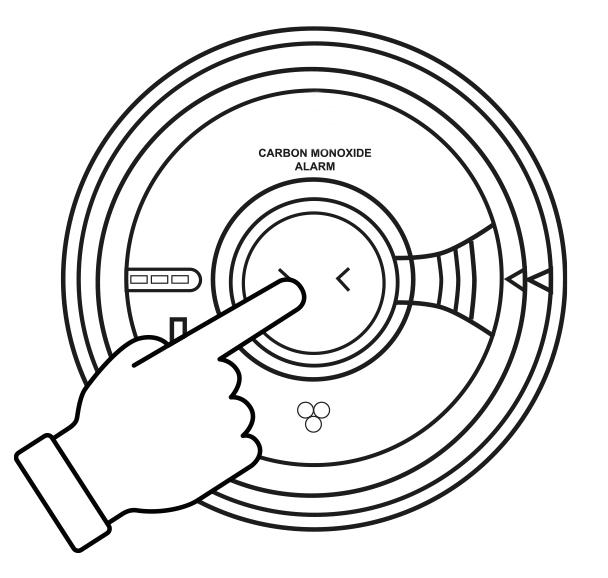
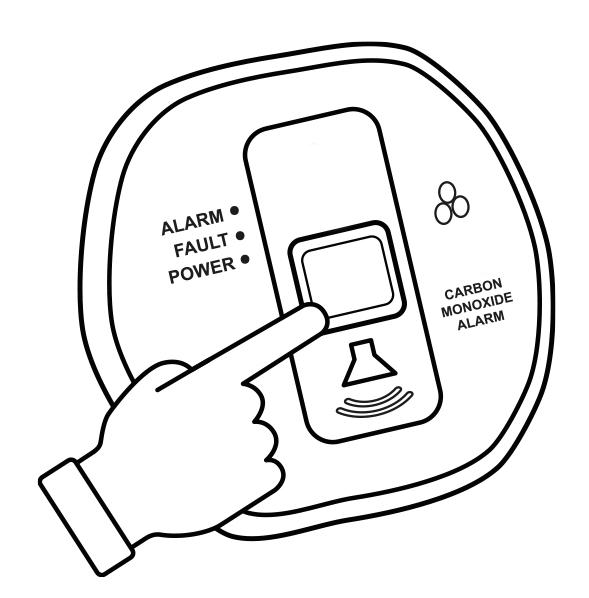
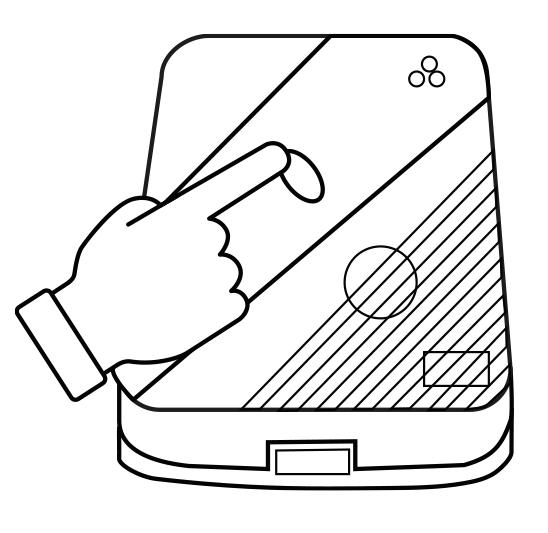
Before you contact us about no power or lights you should check whether you have credit on meters, bills/payments are up to date and if you have been affected by a power cut, details and advice on power cuts can be found on the National grid website www.nationalgrid.com/uk/electricitytransmission or by phone on 105. Remember to keep a torch handy in the event of a powercut.
General
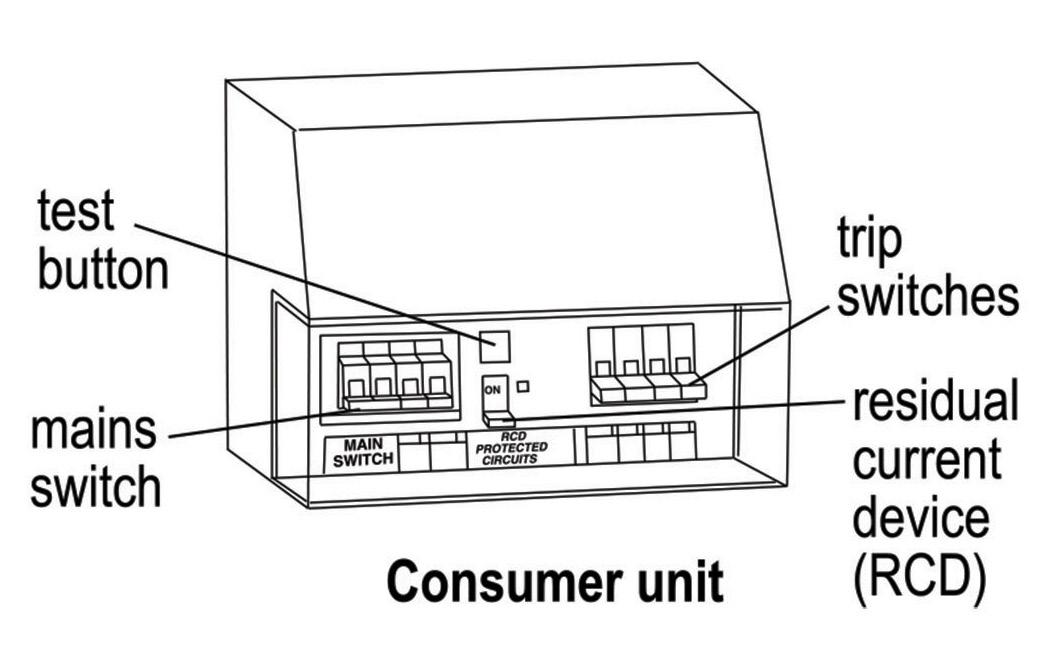
• Modern electric circuits are fitted with circuit breakers called ‘trip switches’. If a fault develops, a switch is tripped, and the circuit is broken
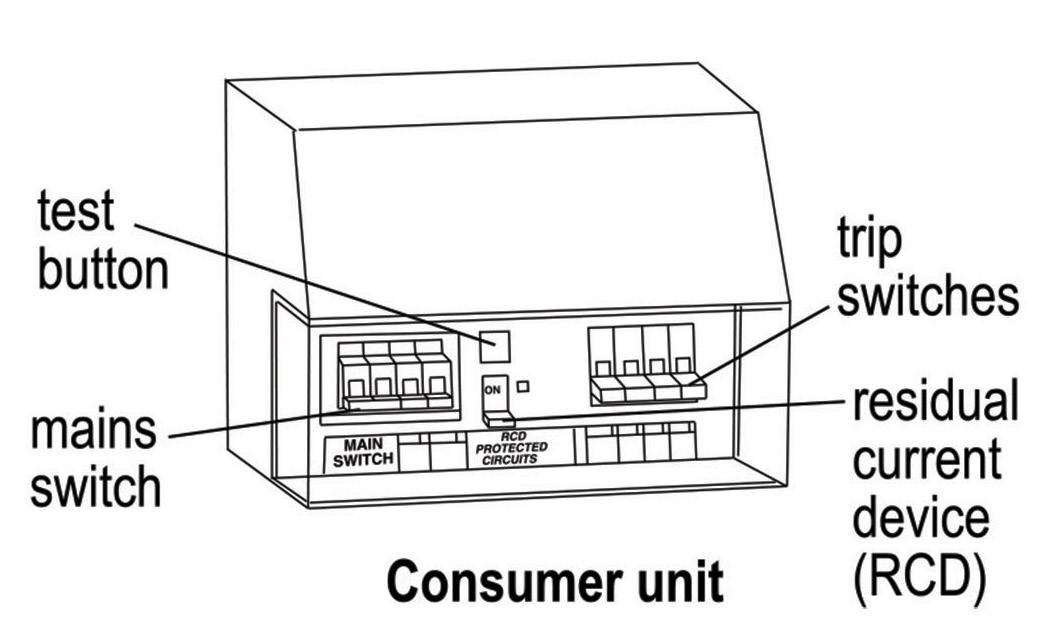
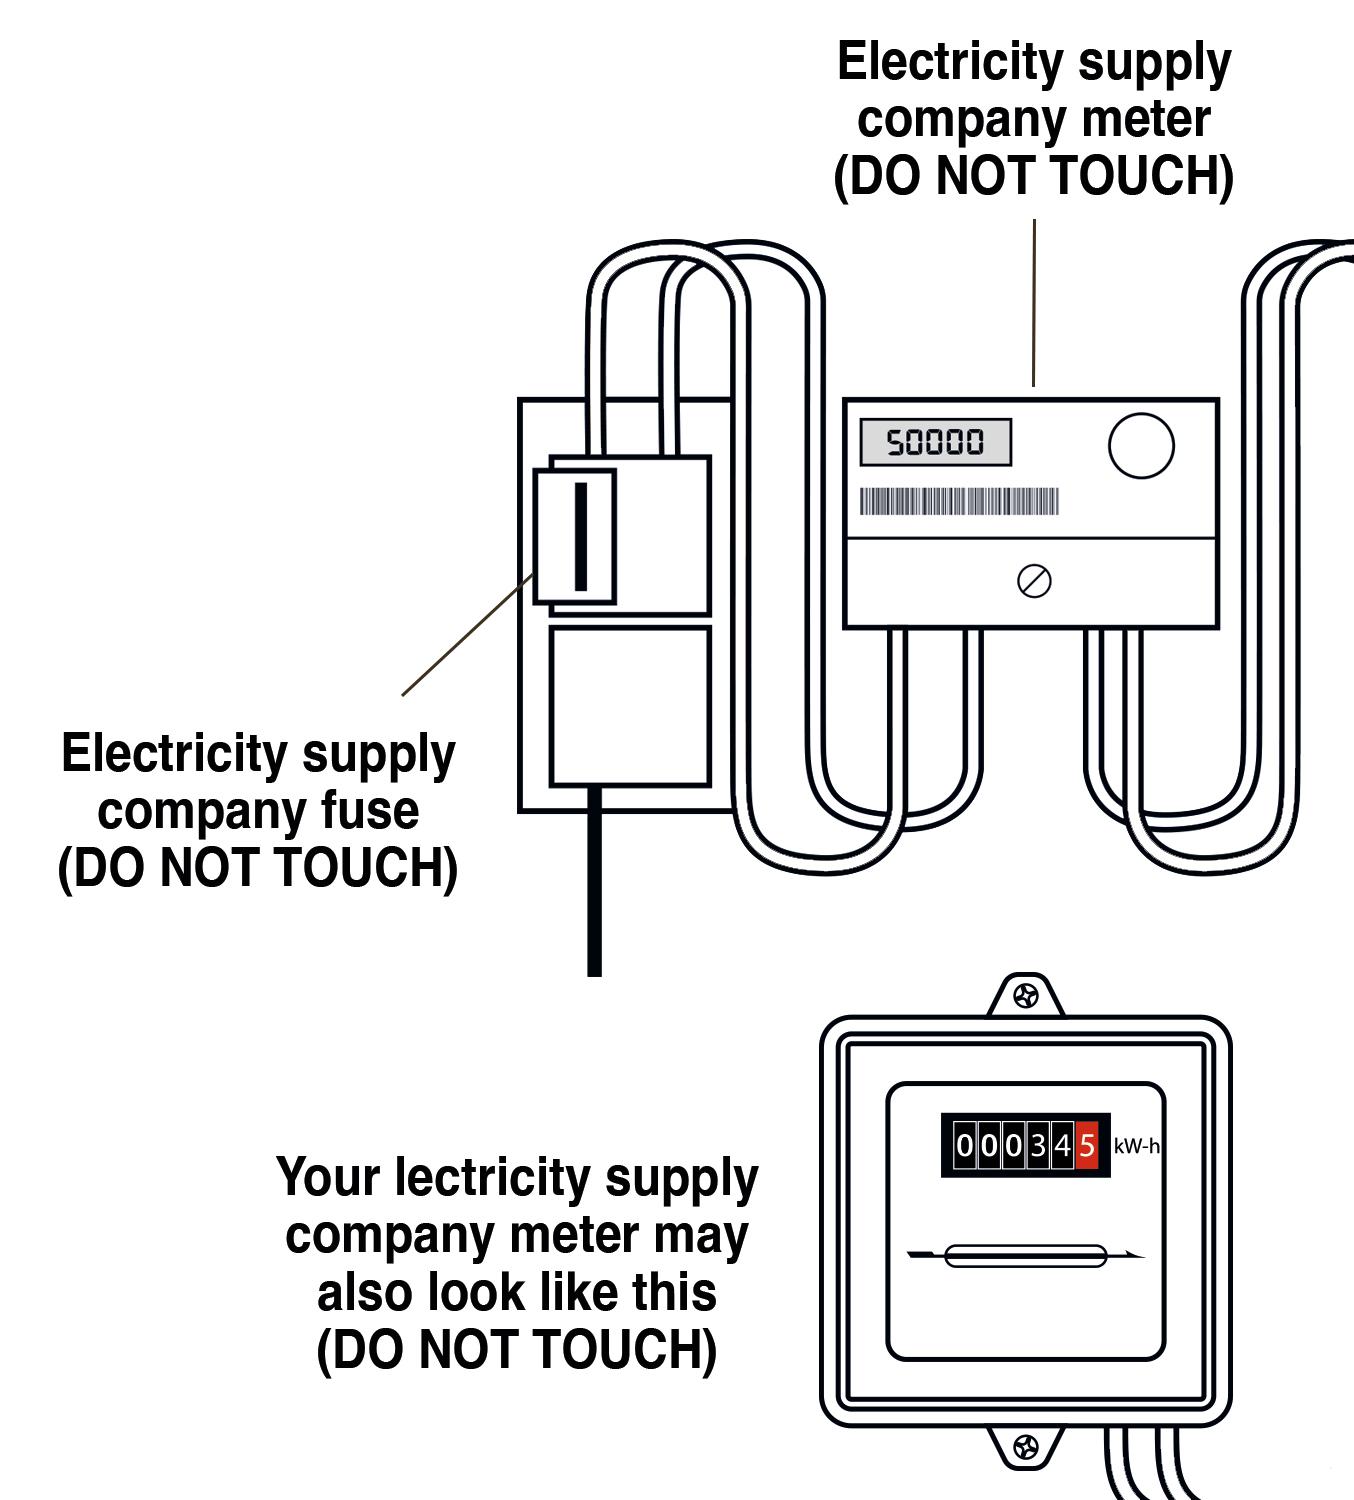
• All the trip switches are located in the consumer unit. Some consumer units have buttons rather than switches. The consumer unit may be next to the electricity meter or near your front or back door (unless the meter is an outside cupboard)
A trip switch or button usually operates because:
• There are too many fittings or appliances on a circuit, and it has been overloaded
• An appliance is faulty or has been misused
• A lead to an appliance, such as a TV or hair dryer, is loose or badly connected
• Water has leaked into a circuit or spilt onto a plug
• A light bulb has blown
• An immersion heater is faulty
• If an appliance is faulty, leave it unplugged and get your own electrician or service engineer to check it
• Make sure your hands are dry when you touch electrical fittings
• Never touch the electrical company’s fuse or seals
This advice only applies to modern consumer units. If you have an older ‘fuse box’ type system you should not touch it but contact us to report that you have a problem.
• Open the cover on the consumer unit to expose the trip switches/buttons
• Follow the advice for the type of trip switch that you have on the next page
In the event of a Residual Current Device (RCD) switching off or tripping due to a fault, the following action should be taken:
1. Switch the RCD on
2. If the RCD trips again, switch off all MCBs protected by the RCD
3. Switch the RCD on
4. Switch on each MCB in turn
5. When the MCB with the faulty circuit is switched on the RCD will trip
6. To identify which appliance causes the RCD to trip:-
7. Switch off/unplug all appliances on the faulty circuit
8. Switch the RCD on
9. Switch on/plug in each appliance in turn until the RCD trips again
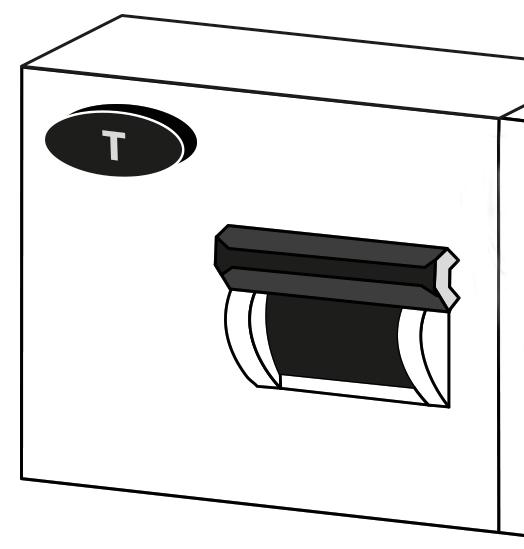
10. Switch off/unplug the faulty appliance and DO NOT attempt to use again before seeking qualified advice
11. Switch the RCD back on
12. If no fault can be identified and the RCD cannot be switched back on, please contact us
The RCD should be tested every 6 months by the tenant by pressing the button marked ‘T’ or ‘TEST’. The device should switch off the supply and should then be switched on to restore the supply. If the device does not switch off when the button is pressed, please contact us.
If an MCB trips:
1. Switch the MCB on
2. If the MCB trips again, switch off/unplug all equipment on this circuit
3. Switch the MCB on
4. To identify which appliance causes the MCB to trip:-
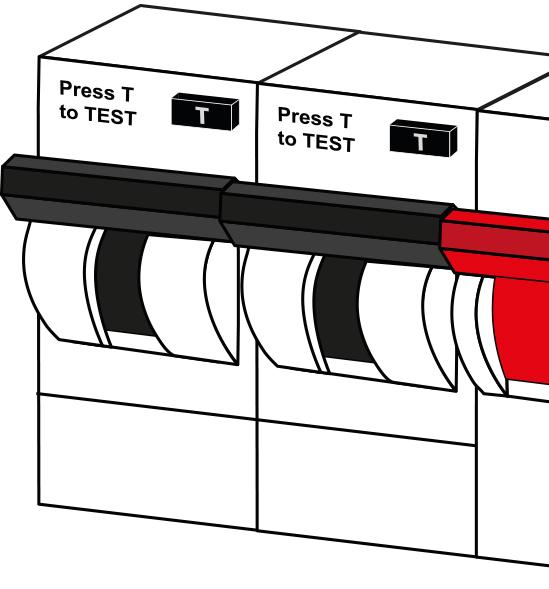
5. Switch on/plug in each appliance until the MCB trips again
6. Switch off/unplug the faulty appliance and DO NOT attempt to use again before seeking qualified advice
7. If no fault can be identified and the MCB cannot be switched back on, please contact us
In an RCBO trips:
1. Switch the RCBO on
2. If the RCBO trips again, switch off/unplug all equipment on this circuit
3. Switch the RCBO on
4. To identify which appliances causes the RCBO to trip:-
5. Switch on/plug in each appliance in turn until the RCBO trips again
6. Switch off/unplug the faulty appliance and DO NOT attempt to use again before seeking qualified advice
7. Switch the RCBO on
8. If no fault can be identified and the RCBO cannot be switched back on, please contact us
The RCBO should be tested every 6 months by the tenant pressing the button marked ‘T’ or ‘TEST’.
The device should switch off the supply and should then be switched on to restore the supply. If the device does not switch off when the button is pressed, please contact us.
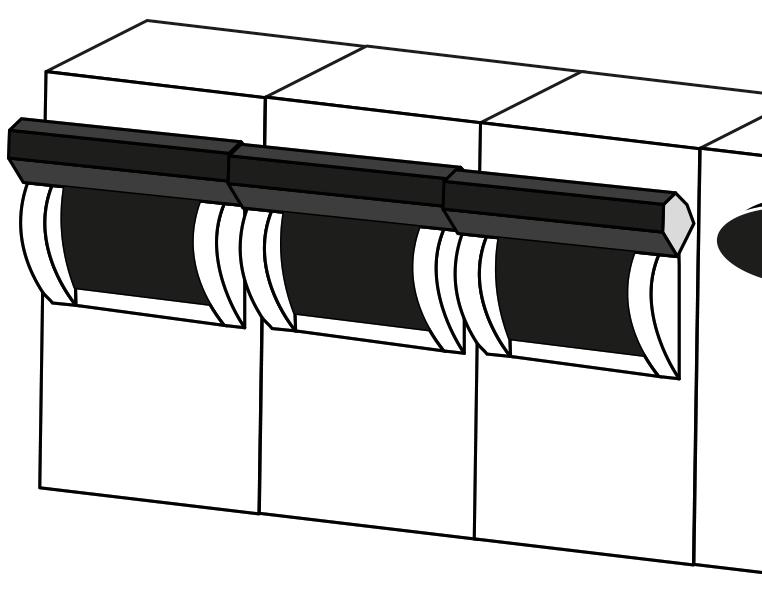
There may be times that you need to turn of the power to all or part of your property; for example if there is a leak through the ceiling or a faulty light or appliance.
WARNING- the advice on this page is not intended for isolation to safely undertake electrical work.
WARNING - only attempt to turn off switches if it is safe to do so, if you are isolating because of a water leak into the electrics then do not use any electrical accessories or appliances that are possibly wet.
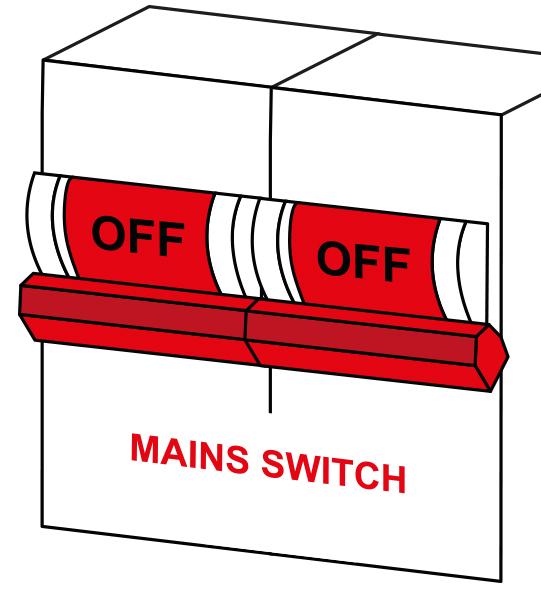
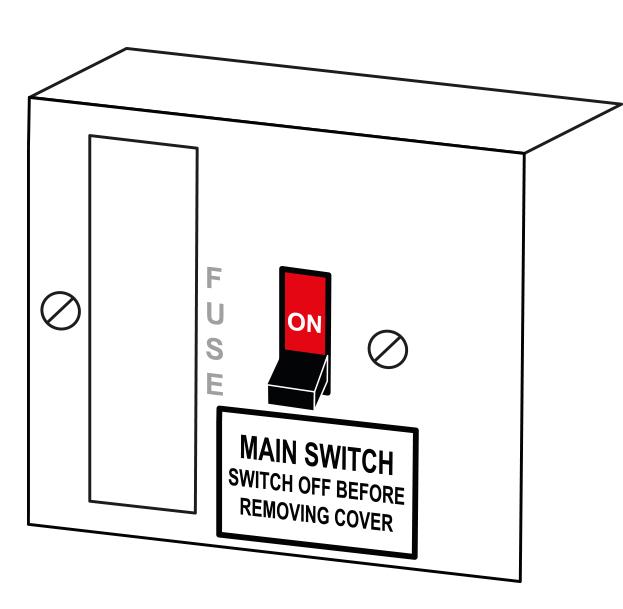
Can be used to turn of the supply to your entire property, there will be one located in your consumer unit (fuse board).
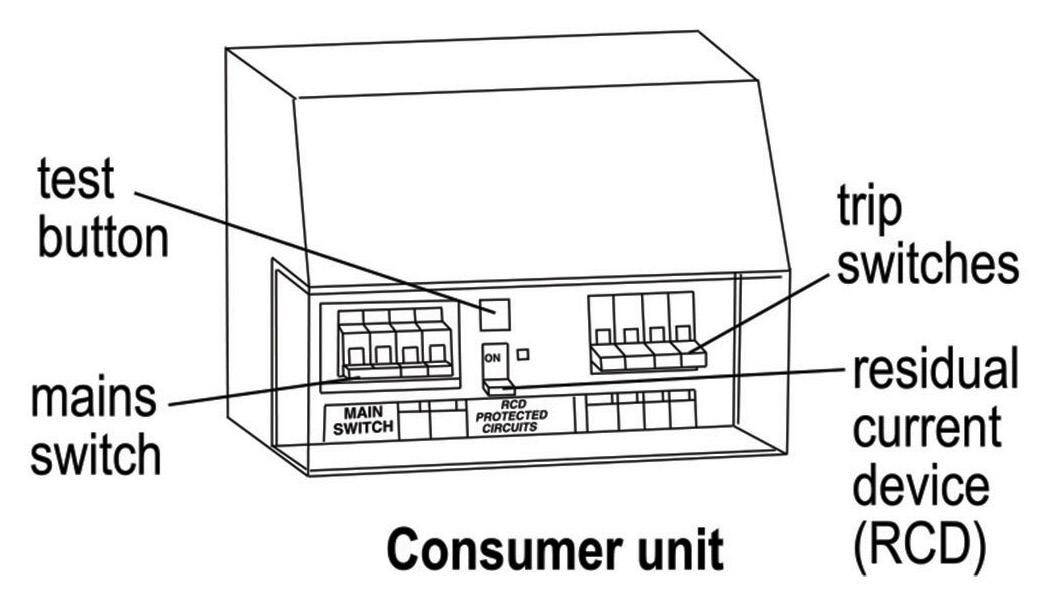
Or there may be main switches closer to your electricity meter.
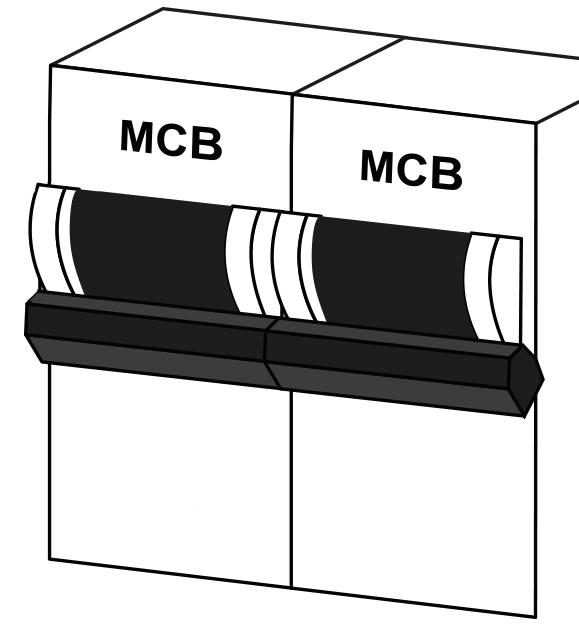
Can be used to turn off the power to individual circuits, Lights, sockets etc. Your trip switches will be in consumer unit (fuse board). In the board there will be a line of trip switches of different sizes and types.
These should be labelled with the circuits that they supply and can be used to turn off the power.
The switches located by your appliances can be used to turn off the power.
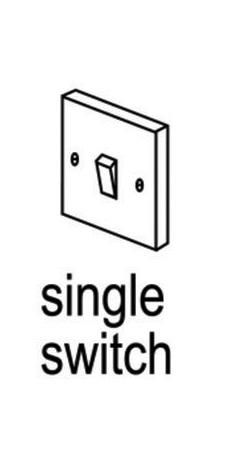
WARNING - Most light switches will not turn the power off fully, light fittings can remain live. Lights will need to be turned off by another method such as at the trip switch/ main switch.
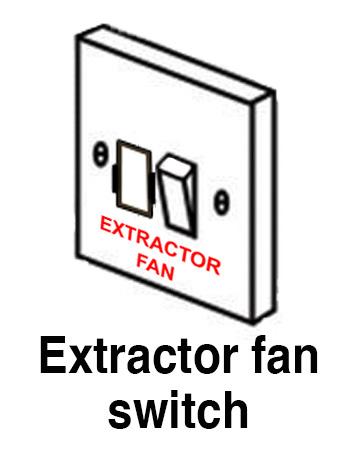
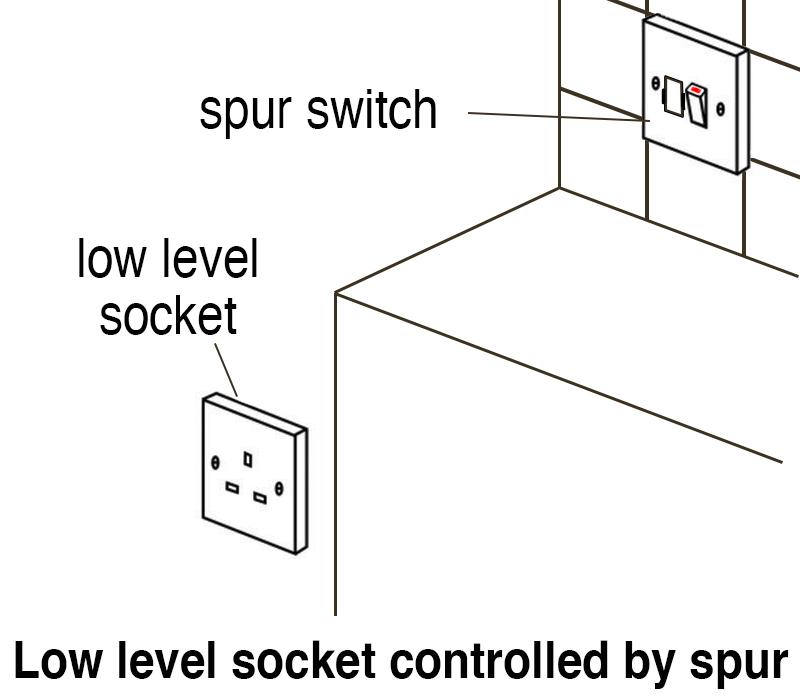
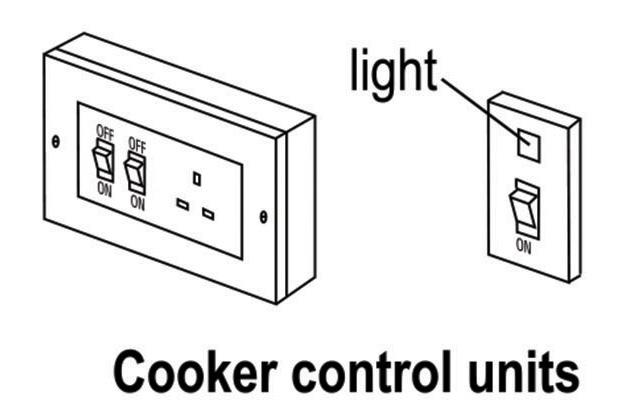
Some sockets have switches that are remote, such as those above a worktop controlling a socket or fan switches in the hall/landings.

Tenants are responsible for any appliances within their home and must ensure that they are suitably maintained and kept in a safe condition.
If at any point you smell burning or see discolouration on an electrical fitting report this immediately to us.
Plugging too many devices into one socket and overusing extension leads can lead to overheating and fires.
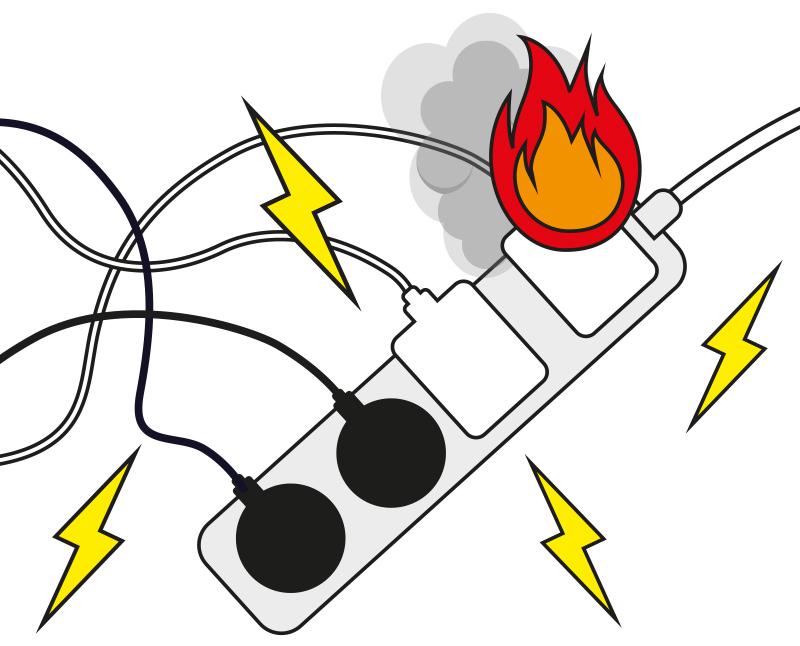
Cheaper ‘unofficial’ electrical products such as phone chargers may not meet safety regulations, increasing the risk of fire.
You may need to be extra vigilant while using online suppliers.
For extra advice visit the ‘guidance’ pages on the Electrical Safety First website
www.electricalsafetyfirst.org.uk
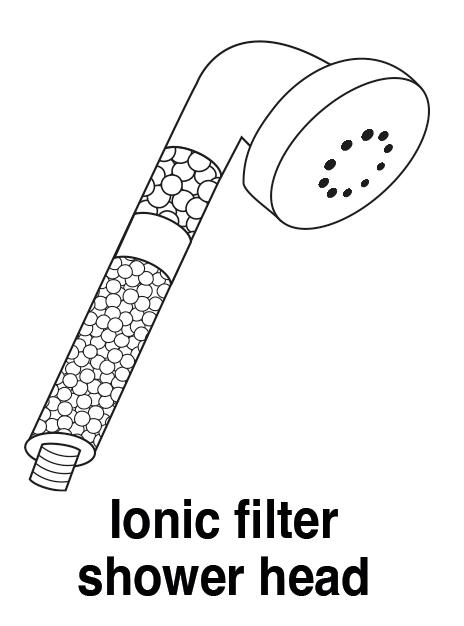
Some properties have electric showers fitted. It is the tenant`s responsibility to ensure shower heads are kept clean and free from limescale. Certain after-market shower heads and water saving devices are not suitable for fitting onto electric showers. Always check the guidance of the manufacture before installing any device. The fitting of such devices can lead to malfunction or even damages showers, damage caused by a such a device could result in a chargeable repair.
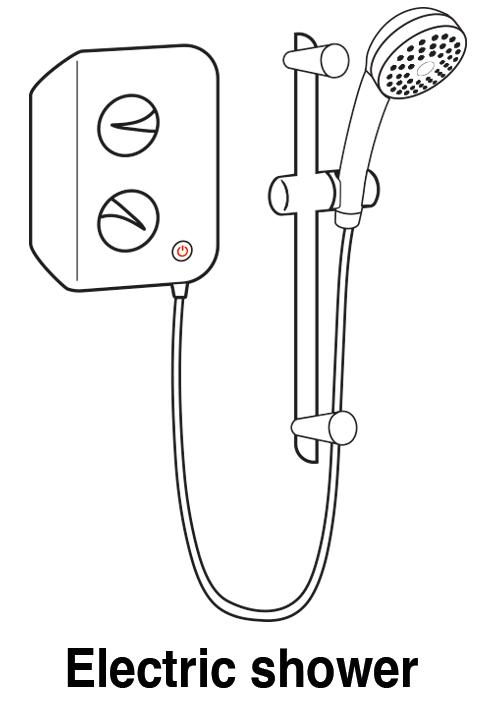
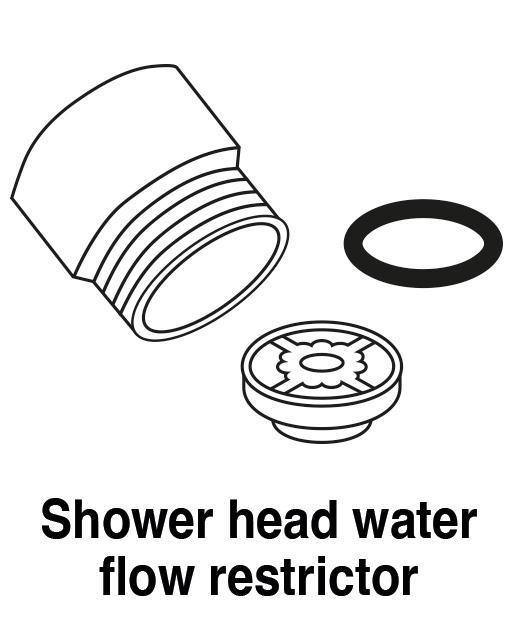
Examples of after-market restrictive devices:
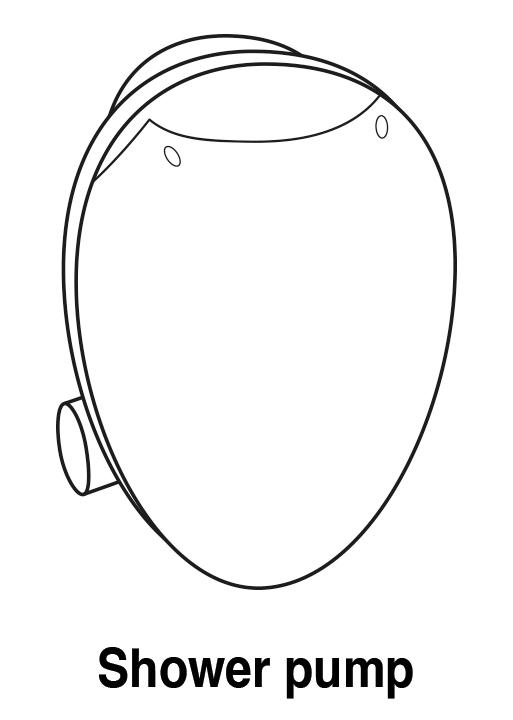
Some showers, usually in adapted properties have pumped wastes. Some of these will make a pumping noise while in use, this is perfectly normal. If this pump fails, there may be a switch supplying power outside the shower room, this will usually be located by the pump. Make sure this is in the on position, if the pump still does not operate, report this to us.
DO NOT use harsh chemical cleaners such as drain unblockers or bleach if you have a pumped waste as doing so can damage the pump internals.
DO NOT use strong or concentrated acidic or alkaline cleaning materials as these may discolour or otherwise damage the product. DO NOT use an abrasive cloth.
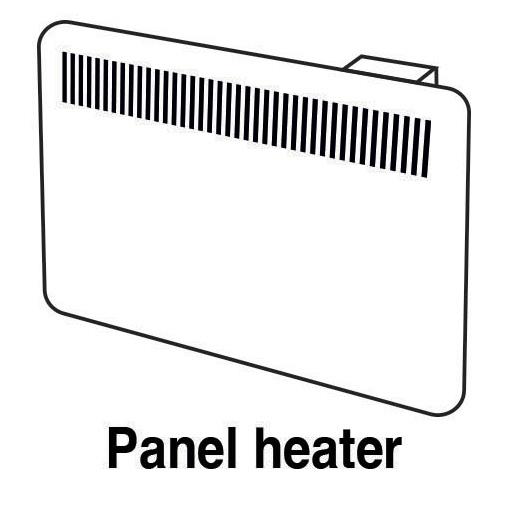
The heating fitted in Redditch Borough Council stock is varied, below are examples of common types. If the ones fitted within your property are different, please refer to the manufacturer’s website for more details. We can provide user guides for heaters upon request.
Storage heaters charge up overnight and store heat in thermally retentive bricks so that warmth can be gradually released during the day.
1. Both the input and output dials will display the numbers 1 - 5 or 1 - 6 depending on the brand of the heater in question
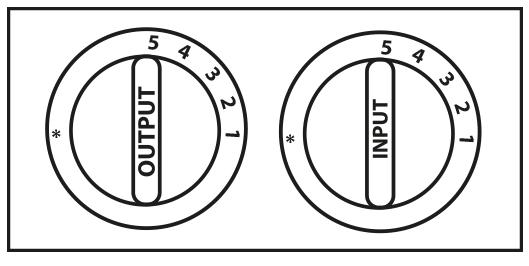
2. Start by setting your input to midway and see how you fare for heat the next day. If you run out, turn it up; if you’ve got plenty left over, turn it down to the next setting. By experimenting with your heaters, you’ll eventually find the ‘sweet spot’ for the settings and won’t need to adjust them quite so frequently
3. Set your output to its lowest setting before you go to bed to prevent heat loss and wasted energy overnight.
4. Keep the seasons in mind – turn input down during the warmer months and up during the colder months. If it’s very warm, save money by switching your storage heater off at the wall
5. Once your room is a comfortable temperature, turn output down again to prevent overheating the space and to retain as much heat as possible for the evening
You need to make sure the day and time are set for these heaters to operate properly.
Elnur heaters have a factory set default program that will suit most needs, if however you feel this does not, guidance is available on the manufacturer’s website or can be requested in other forms from us.
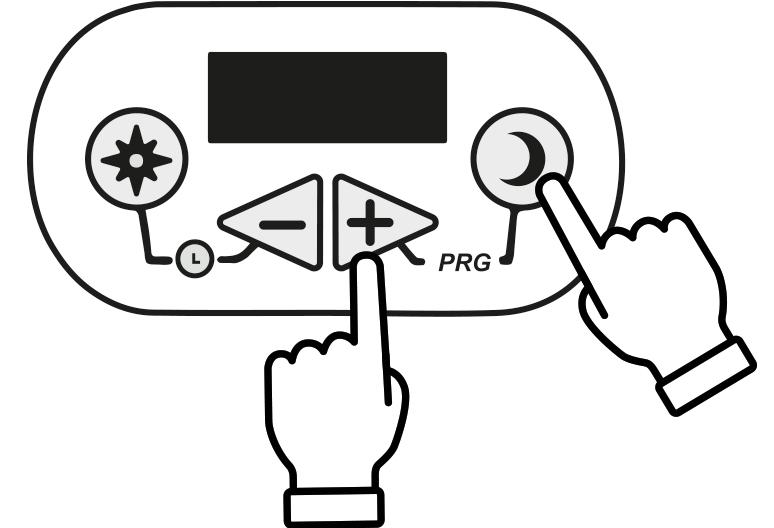
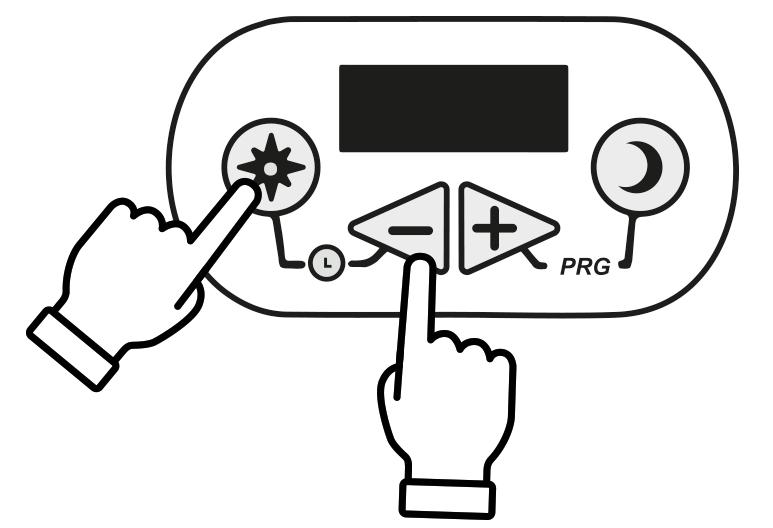
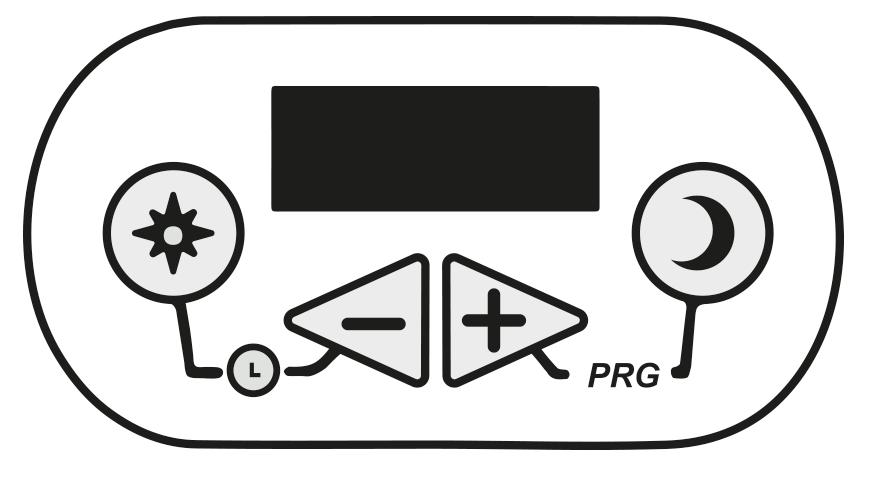
You will find the keypad on the top right hand side on the heater. This easy to use keypad only has four buttons, however these four buttons can be used in different ways to give you many functions and will be explained in more detail later.
This button is used to set the ‘Comfort’ temperature. Default is 21°C.

This button is used to set the ‘Economy’ temperature. Default is 18°C.
This button is used to decrease values.
This button is used to increase values.
Pressing these buttons together will allow you to set the Day and Time.
Pressing these buttons together will allow you to set the weekly programme.
The ECOHHR storage heater has been preset with the Day and Time however you will need to adjust this with summer and winter times (when the clocks go forward and back).
To check the Day and Time on your ECOHHR storage heater follow these steps.
Press & release the sun button & the minus button together & the display will first show the day and then the current time.
If the Day or Time are incorrect and you want to change then follow these steps.
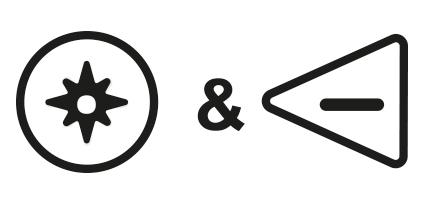
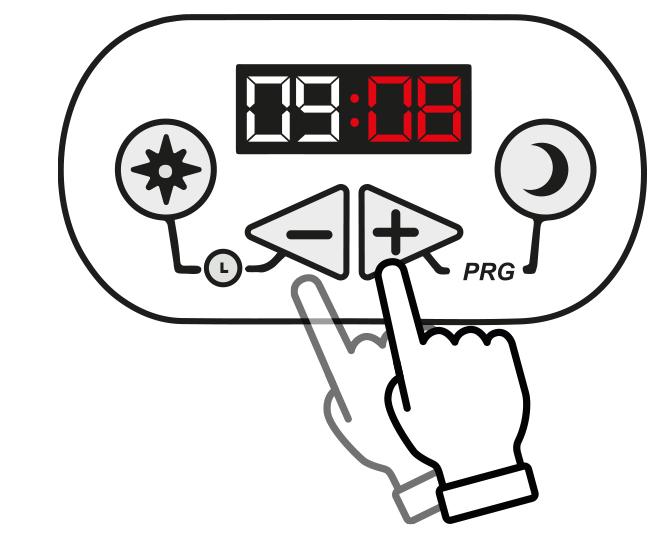
Press & hold the sun button & the minus button together until the day is displayed & starts to flash. Use the plus or minus buttons to adjust the current day.
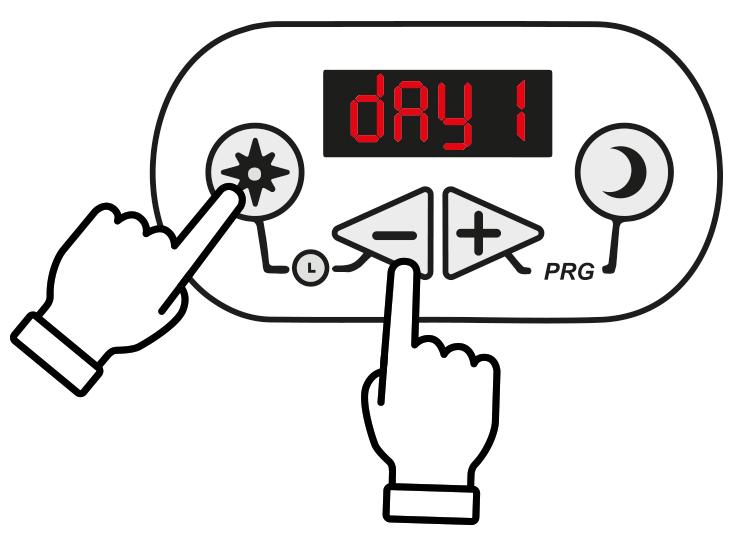
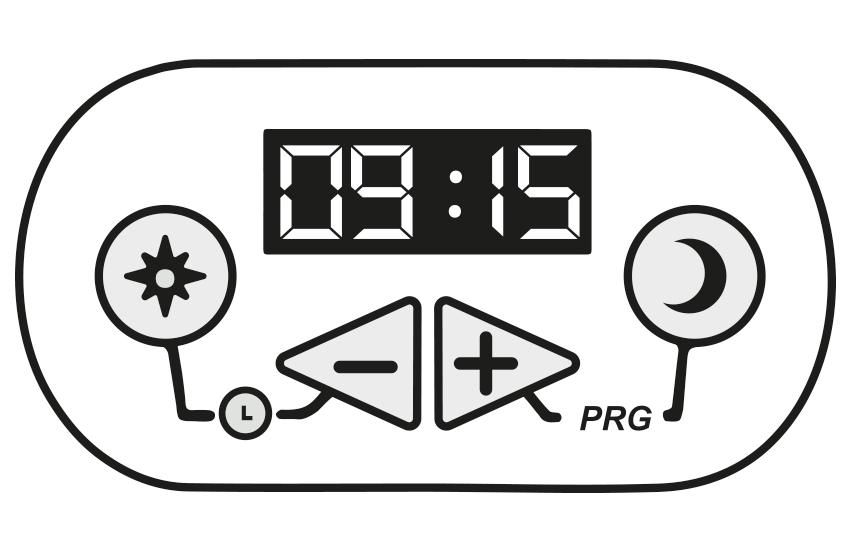

Press & release the sun button & the minus button together to set the day & move onto the time. The hour will now start to flash. Use the plus or minus buttons to adjust to the current hour time.


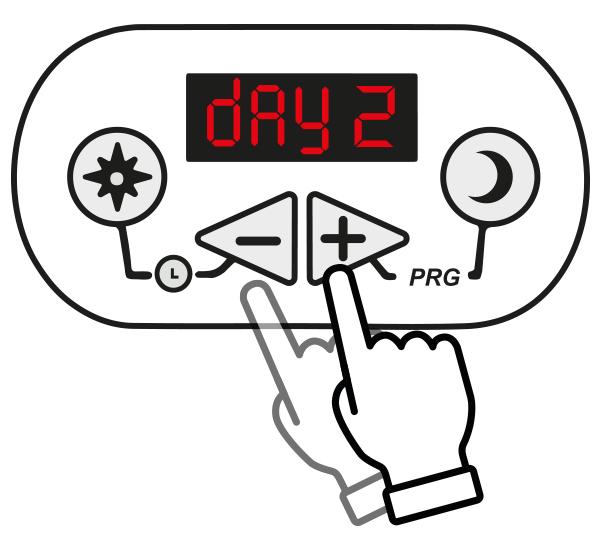

Continued on next page

Press & release the sun button & the minus button together to set the hour & move onto the minutes. The minutes will now start to flash. Use the plus or minus button to adjust to the current minutes time.


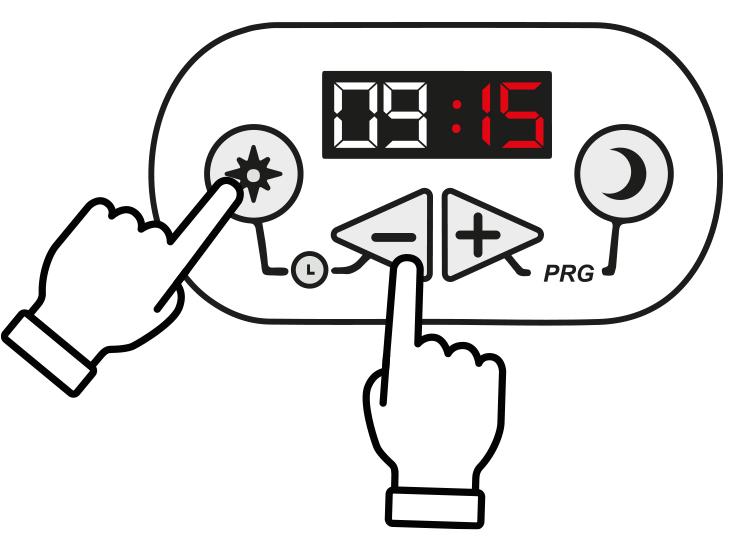
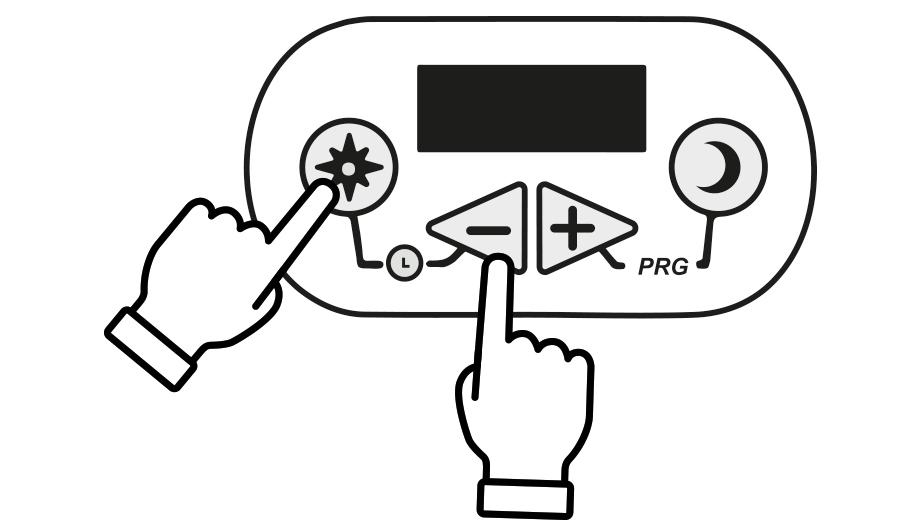
Press & release the sun button & the minus button together to set the minutes & to finish.
Most aerials are the responsibility of the tenant, but we provide aerial supplies in some properties such as multi story flats and assisted living schemes. If your aerial is faulty and you pay a service charge, please contact us.
We are duty bound to conduct regular electrical maintenance checks to make sure your property is safe.
12% 26% of all properties in social housing do not have the Government’s recommended five electrical safety features installed.
Source: MHCLG English Housing Survey 2018-2019
Fires started by faulty electrical distribution led to 317fatalities or injuries in 2018/19
Source: Home Office fire statistics 2018/19
We must ensure that the electrical installation and electrical equipment we own in your property is safe
We must ensure your property is free of any serious electrical hazards, including:
Exposed wiring
Overloaded sockets
Poorly installed electrical systems
We must ensure that any threats from accidental fires are minimised, through:
9%
of social housing properties failed the Government’s Decent Homes criteria in 2018.
Source: MHCLG English Housing Survey 2018-2019
688
people visited A&E during 2018-19 as a result of electric shocks
Source: NHS Hospital Accident and Emergency Activity 2018-19
1 Muscles tighten up, making it almost impossible to let go of the equipment Lungs constrict, making it hard to breathe.
3

Heart constricts and blood vessels tighten.
Burns occur where electricity enters and exits the body.
DON’T DO IT YOURSELF!
DIY wiring can lead to electrical parts overheating, causing fires, shocks and death.
DON’T OVERLOAD SOCKETS
Plugging too many devices into one socket, and over-using extension leads, can lead to overheating and fires.
DO BUY REPUTABLE ELECTRICAL GOODS
of all fires are caused by problems with electrical distribution (wiring, cabling or plugs)
Source: Home Office fire statistics, 2018/19
Ensuring Residual Current Devices (RCDs) are fitted.
Ensuring the distribution board and wiring are regularly checked and maintained.
We must make sure any electrical work complies with the Building Regulations, in particular Part P. Some work (including new circuits, alterations to existing circuits in bathrooms, and replacement consumer units) is notifiable. This must be verified by the issuing of a Building Regulations compliance certificate.
It is recommended best practice that we arrange for an Electrical Installation Condition Report (EICR) to be carried out at least every five years. EICRs are important to verify the electrical safety of properties and spot hazards.
When we visit to check the electrics in your property we may:
Conduct a visual inspection of the electrics, checking:
The electrical intake (where the electricity enters the property, near to the consumer unit/ fuse box)
The consumer unit
The main protective bonding (which connects pipework with the electrics in a property)
Any fixtures and fittings (such as light fittings and sockets)
The state of wires and cables
Send a qualified, competent electrician, who may undertake a Periodic Inspection which will result in the creation of an EICR.
Carry out any necessary repairs or remedial work.
Please allow up to 4 hours for checks to be completed adequately.
If you are concerned about the electrical installation in your property, complete the visual electrical checklist at www.homesafetyguidance.co.uk and if you still have concerns after this, contact your housing provider
Cheaper, ‘unofficial’ electrical products such as phone chargers may not meet safety regulations, increasing the risk of fire.
DO ALLOW ELECTRICAL INSPECTIONS TO TAKE PLACE
Regular checks are the best way to be sure that electrical installations are safe, and to spot potential problems before it is too late.