16 minute read
Industry and Research News
from Oct-Dec 2021
Testing 1-2: New Laser-Based Microphone Calibration Measures Up
NIST News, September 02, 2021 — Researchers at the National Institute of Standards and Technology (NIST) have conducted the first demonstration of a faster and more accurate way to calibrate certain kinds of microphones.
Advertisement
The technique, which uses lasers to measure the velocity at which a microphone’s diaphragm vibrates, performs well enough to overtake one of the main calibration methods used at NIST and throughout industry. Someday, a laser-based method could be commercialized to become a completely new way to do extremely sensitive, lowuncertainty calibrations of microphones in the field, in places such as factories and power plants. Potential users of such a commercial system could include organizations that monitor workplace or community noise levels or the condition of machinery via sound.
“There’s nothing like this on the market now, not that I’m aware of,” said NIST scientist Randall Wagner. “It would be far in the future — a pie-in-the-sky kind of thing — but I see this work as opening the door to commercial applications.”
Their work was published online this week* in JASA Express Letters.
Traditional “comparison calibrations” involve comparing a customer’s microphone to a laboratory standard microphone that has already been calibrated by other means. The new laser method demonstrated by NIST has lower uncertainties and is roughly 30% faster than the traditional comparison method currently used at NIST to calibrate customers’ microphones.
“People have been looking for a highly accurate calibration method that uses lasers, and they haven’t found an approach that is competitive with the most accurate existing method,” said NIST scientist Richard Allen. “But now we’ve found a comparison calibration that is better than the ones used in common practice.”
The ‘Standard’ Standard
Sound is pressure waves traveling through a medium such as air. A microphone is a device that takes those pressure waves and turns them into an electrical signal.
To calibrate a microphone, researchers need to measure how sensitive it is to pressure waves. They start by calibrating a set of laboratory standard microphones using a technique called the “reciprocity method” — the gold standard for microphone calibrations.
In a reciprocity calibration, two microphones are connected to each other via a small hollow cylinder called an acoustic coupler. One microphone produces a sound that the other microphone picks up. After a measurement has been taken, the microphones’ functional positions can be swapped, with the transmitter acting as receiver and vice versa. (And yes, the microphones are sometimes used to produce sounds rather than just receive them. Unlike the microphones you might use for a conference call or karaoke night, laboratory standard microphones are able to perform as either a receiver or as a transmitter — essentially a loudspeaker.)
This process is repeated several times using a total of three laboratory standard microphones. By exchanging the microphones’ roles between measurements, researchers can be sure of the sensitivity of each of the three microphones without the need for a previously calibrated microphone.
Once this master set of microphones has been calibrated, it can be used to directly calibrate customers’ microphones. Different laboratories use different methods to accomplish this goal, but at NIST the technique commonly used for high-accuracy calibration of customers’ microphones is a reciprocity-based “comparison” calibration. It’s called
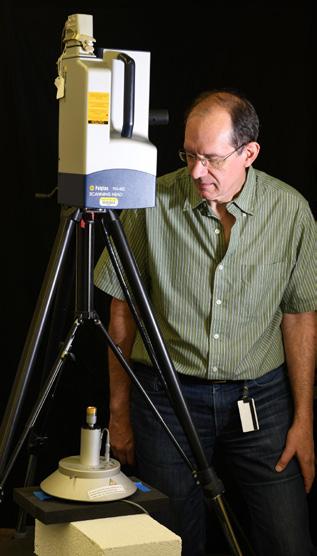
NIST’s Richard Allen with the laser-based microphone calibration setup. The laser system points down at the microphone being measured. Credit: NIST
“reciprocity-based” because it uses the same setup as the reciprocity method, except that the newly calibrated microphone acts exclusively as the transmitter and the microphone being calibrated acts exclusively as the receiver.
It is this second type of calibration, the “comparison” calibration, that NIST scientists set out to test against the new laser-based method.
New Method: Less Is More
Traditional microphone calibration methods are acoustical — they rely on transmission of sound through a medium. In contrast, the new laser-based calibration method measures the physical vibrations of the diaphragm itself.
For their recent experiment, NIST researchers used a laser Doppler vibrometer, a commercial instrument that shines a laser beam onto the surface of a microphone whose diaphragm is vibrating at a set frequency. (See animation.)
The beam bounces off the surface of the diaphragm and is recombined with a reference laser beam. In this way, subtle shifts in frequency are measured. (These shifts in frequency work along the same principle as the Doppler effect, which causes that ambulance outside your window to sound higher-pitched as it approaches and lower-pitched as it moves away.) Researchers convert the signal from the vibrometer into a velocity, which tells them how fast the diaphragm was vibrating at that point on its surface.
To conduct the new test, NIST scientists used nine nominally identical laboratory standard microphones, each with an 18.6 millimeter diameter diaphragm, about the width of a postage stamp. All were tested at two frequencies, 250 hertz (for piano players, roughly the B note below middle C) and 1,000 hertz (two octaves higher than 250 hertz).
They began by measuring over the whole surface area of the diaphragms. They found that the velocity in the center of the diaphragms was significantly higher than near the edges, where there was practically no motion.
Ultimately, they discovered that the best approach was to use data from just a small section at the center of the diaphragms taking up only 3% of the total surface area. The idea of using just the central section came from a recent paper [https://tohoku.pure.elsevier.com/en/publications/ sensitivity-measurement-of-a-laboratory-standardmicrophone-by-me] by a team of researchers from the Republic of Korea and Japan.
“The key to making the velocity measurements nice and repeatable is measuring in the center of the diaphragm,” Wagner said. “As you go further and further toward the edges, our measurements just weren’t very repeatable.”
As a final step, Wagner and Allen compared the microphone sensitivities they measured with the laserbased calibrations to measurements they had previously taken using the gold-standard reciprocity calibrations with the same set of microphones. The verdict?
“The numbers agreed very well,” Wagner said. “They were statistically indistinguishable from each other.”
Moreover, the uncertainties for the new laser method were impressive. For comparison: While the goldstandard reciprocity method has the lowest uncertainty at 0.03 decibels (dB), and the traditional reciprocity-based comparison method has an uncertainty of 0.08 dB, the laserbased comparison method has an uncertainty of just 0.05 dB.
Wagner and Allen say that the laser comparison method saves “significant time” primarily because it is performed in open air. In contrast, the traditional NIST way of doing a comparison at higher frequencies requires connecting two microphones with an acoustic coupler and then filling the coupler with hydrogen, which takes up to 20 minutes per test.
Next Steps
Wagner hopes that scientists will find a way to develop the laser-based system into a highly accurate primary calibration method that rivals or even outperforms the gold-standard reciprocity method. If successful, a primary laser-based method would be significantly faster, since the reciprocity method requires researchers to repeat the measurements multiple times with different combinations of microphones and acoustic couplers.
Meanwhile, Wagner thinks the laser method could someday be standardized by a standards organization.
“That would be a consensus stamp of acceptance,” Wagner said. Until then, he continued, “we have a lot of work left to do.”
In the coming months, he and Allen will be upgrading to a more sensitive laser Doppler vibrometer system and will begin expanding the types of microphones calibrated as well as the range of frequencies. They have applied for a provisional patent, and they will also try to turn the method into a suitable primary calibration technique.
“This first attempt was sort of an example of walking past the trees and seeing the really low-hanging fruit, and grabbing it,” Allen said.
Wagner says that this experiment is unusual in his experience. Vibrations are usually considered “problematic” when making acoustic measurements since they can lead to increased noise levels. But in this experiment, the vibration and acoustic measurements are connected by design.
“I’ve been at NIST 30 years, and I don’t recall a project that brought vibration and acoustics so closely together,” Wagner said. — Reported and written by Jennifer Lauren Lee * R.P. Wagner, R.A. Allen and Q. Dong. Laser-based comparison calibration of laboratory standard microphones. JASA Express Letters. Published online Aug. 30, 2021. DOI: https://asa.scitation.org/doi/10.1121/10.0005919
Source: https://www.nist.gov/news-events/news/2021/09/ testing-1-2-new-laser-based-microphone-calibration-measures
Diode Lasers for Optical Metrology
PTBnews 3.2021—In collaboration with an industrial partner, PTB has developed and assessed a very compact wavelength standard. This standard is based on a diode laser whose frequency is stabilized to transitions of the iodine molecule. In the future, this type of lasers could replace power-intensive and bulky helium-neon lasers as a wavelength standard for interferometric length measurement.
Helium-neon lasers with a wavelength of 633 nm have been used for a long time as wavelength references for industrial interferometric length measurements. With comparatively little effort, they can achieve a relative accuracy of 10–8, which corresponds to an uncertainty of 10 nm per meter and is absolutely sufficient for most applications. This technology is, however, obsolete, and the number of manufacturers has been constantly decreasing. Moreover, compared to modern diode lasers, these gas lasers are bulky, they need high voltage, and they exhibit rather poor efficiency as well as a low output power.
Alternative solutions must keep the wavelength of 633 nm to make it possible to continue using the large number of existing interferometers for length measurement seamlessly. For this reason, diode lasers are a suitable solution, although their inherent wavelength accuracy is not sufficient. This is where stabilization with iodine comes into play: Iodine molecules have numerous absorption lines in the relevant wavelength range. These absorption lines can serve as a wavelength reference.
A special laser diode chip (with internal optical wavelength selection at 633 nm) has been combined with an iodine cell of only 3.3 cm in length in a housing of 27 cm × 15 cm. This has been undertaken by Toptica Photonics AG, a laser manufacturer, within the scope of a project funded by the German Federal Ministry of Education and Research. The laser frequency is automatically stabilized at a defined Doppler-broadened iodine absorption line. A comparatively high power of approx. 5 mW is available at the output of an optical fiber. The device was evaluated with an optical frequency comb against atomic clocks of PTB. This evaluation yielded a relative instability of less than 10–10 for averaging times of more than 10 s. This is considerably less than the values provided by commercially available helium-neon lasers with simple stabilization. The absolute frequency obtained was in agreement with expected values. The line shape and the stabilization were modelled to be able to easily predict the absolute frequency and stability when other iodine lines are selected.
Integrated with micro-optical elements into a small housing (only a few centimeters in size), the prototype has the potential to enable very compact and accurate interferometers in the future.
Contact
Uwe Sterr,Department 4.3, Quantum Optics and Unit of Length, Phone: +49 531 592-4310, uwe.sterr(at)ptb.de.
Scientific publication
F. Krause, E. Benkler, C. Nölleke, P. Leisching, U. Sterr: Simple and compact diode laser system stabilized to Dopplerbroadened iodine lines at 633 nm. Appl. Opt. 59, 10808–10812 (2020)
Source: https://www.ptb.de/cms/en/presseaktuelles/journalsmagazines/ptb-news.html
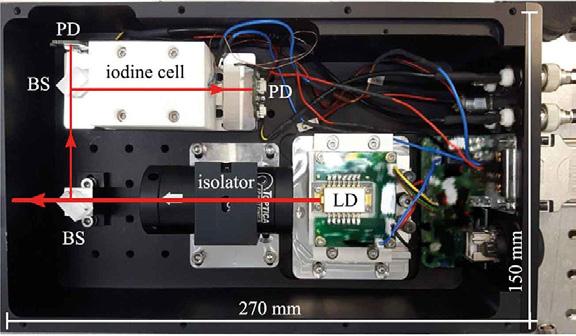
Top view of the prototype – the optical path is indicated by the red arrows with the laser diode (LD), the beam splitter (BS) and the photodetectors (PD). Credit: PTB
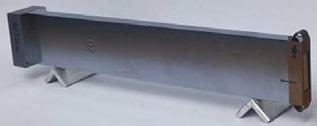
Gauge block made of single-crystal silicon. Dimensions: 197 mm × 35 mm × 9 mm. Credit: PTB
On the Path to a “Nanometer Standard”
PTBnews 3.2021 — At PTB, absolute length measurements on a single-crystal silicon gauge block have been performed using imaging interferometry. These measurements have a smaller measurement uncertainty than all previous measurements. They provide more accurate values for the CODATA reference data and are valuable for a new secondary realization of the meter.
Since it was necessary to have a reference material for high-accuracy measurements of thermal expansion, a large number of measurements used to be performed on silicon over a wide temperature range. Due to its diamond-like crystalline structure, single-crystal silicon expands uniformly in all spatial directions, meaning that it is isotropic with regard to thermal expansion. In addition, high-grade silicon is readily available at an industrial scale.
As early as six years ago, PTB had already presented results of thermal expansion measurements between 7 K and 293 K obtained by means of imaging interferometry. A systematic deviation from the CODATA reference values was, however, noticed in this temperature range. In contrast to dilatometric measurements obtained by others, PTB’s results were derived from absolute length measurements. The present thermal expansion study is based on this work. In this study, the temperature range has been extended to 320 K and the measurement uncertainty reduced. In addition, the study includes the simultaneous determination of the compressibility of silicon.
The measured data were analyzed by means of a new method that provides for the fact that the thermal expansion coefficient (calculated by derivation) is a quantity that is sensitive to the data evaluation model chosen. The approach is based on Bayesian model averaging (BMA) and allows different models to be dealt with at the same time and also to be taken into account when calculating model probabilities.
The results have shown that in the temperature and pressure ranges covered, the thermal expansion coefficient hardly depends on the ambient pressure. The new measurements provide more accurate values than the previous reference values. Furthermore, the measurement uncertainty is smaller than that of previously obtained results by up to one order of magnitude.
Since the latest revision of the mise en pratique for the definition of the meter in the SI refers to the lattice spacing of silicon as a basis for nanoscale secondary realization methods for the meter, these findings can also be used in this context.
Contact
Guido Bartl, Department 5.4,Interferometry on Material Measures, Phone: +49 531 592-5430 guido.bartl(at)ptb.de
Scientific publications
G. Bartl, C. Elster, J. Martin, R. Schödel, M. Voigt, A. Walkov: Thermal expansion and compressibility of single-crystal silicon between 285 K and 320 K. Meas. Sci. Technol. 31, 065013 (2020) DOI: 10.1088/1361-6501/ab7359
J. Martin, G. Bartl, C. Elster: Application of Bayesian model averaging to the determination of thermal expansion of single-crystal silicon. Meas. Sci. Technol. 30, 045012 (2019) DOI: 10.1088/1361-6501/ab094b
Source: https://www.ptb.de/cms/en/presseaktuelles/journalsmagazines/ptb-news.html
Mitigate Global Power Issues for Test
New KCC Scientific Mercury 1000-Watt Converters
Cleans, Regulates, and Converts Power
Mobile precision power across the globe—up to 1000 watts.
Selectable Frequency 50.0000Hz or 60.0000Hz. Selectable 115-230V AC Voltage 1%
Regulated Size: 17.5 × 12.75 × 3.50 in.
Weight: 25/30 lbs.
Everything you need for worldwide metrology included.
More at https://www.kccscientific.com/
New Purdue Research Building Will Offer a World’s First in Hypersonic Testing, Materials Development
July 27, 2021, WEST LAFAYETTE, Ind. — Imagine an aircraft flying 2,800 miles across the United States in only 15 minutes. A state-of the-art building ready for construction at Purdue University will provide the facilities to explore that idea through advanced hypersonic research.
The planned 65,000-square-foot Hypersonics and Applied Research Facility (HARF) will house two cutting-edge wind tunnels, enhancing Purdue’s world-leading capabilities in hypersonics evaluation and testing. The $41 million facility will house the only Mach 8 quiet wind tunnel in the world as well as a hypersonic pulse (HYPULSE) shock tunnel. The tunnels recreate different scenarios such as spacecraft re-entry or missile flight through the atmosphere as well as replicating unique engine conditions for extremely highspeed propulsion.
“Purdue’s rich hypersonics program includes both a broad bench of more than 40 experts and unique capabilities that allow the university to play an important role in the security of our nation,” said Theresa Mayer, Purdue’s executive vice president for research and partnerships. “This first-ofits-kind facility will further Purdue’s capacity to conduct research including tests and evaluations under real-world conditions for faculty, industry partners, federal agencies and other stakeholders.”
The Mach 8 quiet wind tunnel and the HYPULSE tunnel offer controlled environments to research several facets of high-speed flight. The new Mach 8 quiet wind tunnel more closely simulates flight and provides more accurate data than conventional hypersonic wind tunnels.
The HYPULSE tunnel uses a shock wave of hightemperature air to recreate specific hypersonic flight conditions. It will allow flight simulations at speeds ranging from Mach 5 to as high as Mach 40. Purdue will be only the second university in the U.S. to offer HYPULSE test capabilities. The university currently offers one of only two working Mach 6 quiet tunnels in the country.
Supporting a national defense strategy
National pursuit of hypersonics systems by government and industry has intensified during the last few years. Hypersonic vehicles can travel more than five times the speed of sound and fly in the upper reaches of the atmosphere, significantly challenging an adversary’s ability to detect, track, target and engage. These systems are a top Department of Defense priority to ensure U.S. battlefield dominance, as competitors continue to advance similar programs. Hypersonics-related research is included in the FY22 President’s budget request at $3.8 billion, up by 20% from a $3.2 billion request in FY21.
This potential increase in funding would build on previous investments by federal agencies and industry to help better integrate hypersonic systems with the U.S national security strategy. The new HYPULSE tunnel is a donation from Northrop Grumman Corp. In 2019, Purdue received a contract from the Air Force Research Laboratory to support the development of the first quiet Mach 8 tunnel in the world, the first facility of its kind capable of collecting data at speeds greater than Mach 6. Collecting data at higher Mach numbers is critical to extending the understanding of flow physics, especially heat transfer and flight control effectiveness, as Department of Defense programs continue working to fly faster and farther.
Purdue’s own recent investments in hypersonics help to position the university as a compelling partner for national defense projects from industry and government. Hypersonics is a critical topic under two of Purdue’s Next Moves, recently announced strategic initiatives that will advance the university’s competitive advantage. Hypersonics research is a key component of Purdue’s National Security and Technology initiative. The Purdue Applied Research Institute, the new nonprofit applied research arm of the university, will leverage the university’s unique hypersonics capabilities to deliver innovative defense solutions for industry and government partners.
“This investment by Purdue University demonstrates our commitment to advancing national security technology, one of the pillars of Purdue’s Next Moves,” said Mung Chiang, Purdue’s executive vice president for strategic initiatives and the John A. Edwardson Dean of the College of Engineering. “Building the world’s fastest quiet wind tunnel and innovating manufacturing represent two more steps in creating America’s hypersonic engineering epicenter here at Purdue Aerospace District.”
Construction on the hypersonic building is scheduled to begin in September. The building is located in Purdue’s Aerospace District, a university-affiliated aerospace business hub for public and private research collaborations on research and commerce. Tenants in the district already include Rolls-Royce, Saab Defense and Security and SEL Purdue (Schweitzer Engineering Labs).
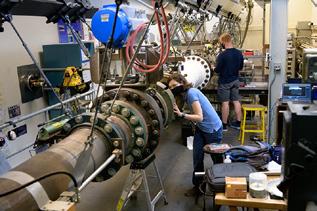
Students work during the summer with Purdue’s Mach 6 quiet wind tunnel. A more advanced Mach 8 quiet wind tunnel will be part of the new hypersonics research building to be constructed at Purdue. Credit: Purdue University/John Underwood


