7 minute read
11 Vehicle Controls


11 VEHICLE CONTROLS
11.1 Primary Controls
All operators should familiarize themselves with all of the controls on the Mahindra ROXOR Offroad Side x Side, in a controlled environment, before going off-road. Find a flat area free of obstacles to practice and perform the exercises listed in section 10 Learning Your Vehicle. Emphasis should be placed on the development of smooth and coordinated use of these controls, knowing their locations and understanding their function.
11.2 Keys
The ROXOR is delivered with four keys. Two rubber booted ignition keys and two storage compartment keys. There is a lockable storage compartment located under each front seat. Neither of these two lockable storage compartments is waterproof. All electronics or other valuables stored in these compartments should be adequately protected by other means.
11.3 Ignition Switch
The ignition switch is located on the dash panel to the right of the steering wheel. l ACC position – in this position all lights, horn, radio, 12V outlet and optional accessories are turned on, but not the instrument cluster and engine controls. Leaving the ignition key in the ACC position could eventually result in a dead battery. l OFF position – in this position the electrical system is disabled and the engine will shut off. You should only be able to insert and remove the ignition key when the ignition switch is in the OFF position. If this statement is not true, contact and return your ROXOR to an authorized dealer.
l IGN & ACC position – in this position all Accessory functions are activated as well as the instrument cluster and engine controls.
When starting in cold climates, the ignition key should remain in this position for several seconds to allow time for the engine intake heater to aid starting. The ignition key should automatically return to this position when released from the start position. If this statement is not true, contact and return your ROXOR to an authorized dealer.
l START position – in this position the starter is engaged. You should only hold the ignition key in this position until the engine starts, then release the ignition key. Do not hold the ignition key in the START position for more than 10 seconds at a time, this can overheat the starter and damage it. You should allow 10-15 seconds between attempts to preserve the starter and battery.
If the engine does not start after repeated attempts, refer to section 27 Troubleshooting.
11.4 Headlamp Switch
A three position switch is used to control the head lights on the ROXOR. l Up position – High Beam Headlights l Middle position – Headlights Off l Down position – Low Beam Headlights
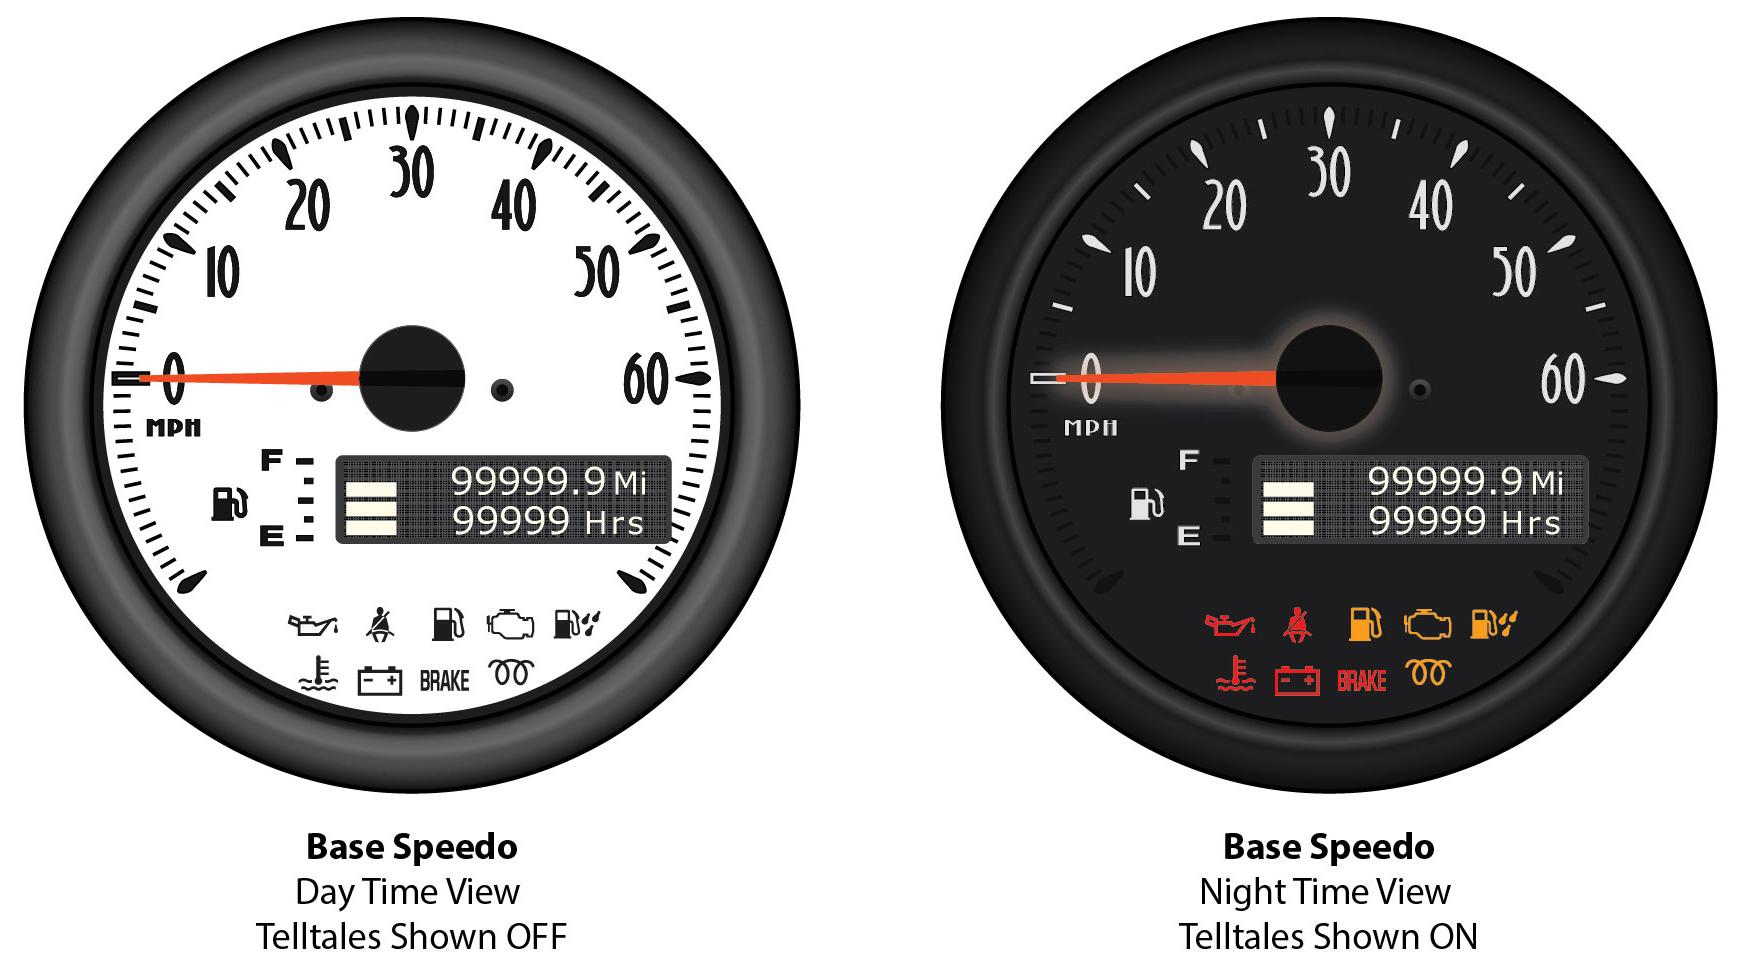
11.5 Multifunction Gauge
The speedometer and odometer (see Figure 1) are preset at the factory to indicate in miles. l Speedometer – indicates vehicle speed in miles per hour. l Odometer – records the total distance traveled in miles.
11 Vehicle Controls
l Hours Meter – the total hours on your vehicle will display below the miles when the ignition key is in the ON & ACC position. l Indicator Lights: o Oil Indicator – red light on steady when the oil pressure is below a safe level. o Seat Belt Indicator – red light on steady when the driver’s seat belt is unbuckled, the throttle will also be limited. o Low Fuel Indicator – yellow light on steady when fuel level is at two gallons or less. Light flashes when fuel level sensor has failed to provide a signal. o Check Engine Indicator – yellow light on steady when an emissions related trouble code has been set, return vehicle to an authorized Mahindra dealer for service. o Water In Fuel Indicator – yellow light on steady when water reached sensor contacts in the fuel filter canister, drain water from fuel separator. o Engine Coolant Temperature Indicator – red light flashes when engine coolant temperature reaches 230°F (110°C) and stays on steady at 248°F (120°C) or above. Light will go off when engine coolant temperature drops below 221°F (105°C). o Charging System Indicator – red light on steady when there is a charging system failure, check alternator and/or battery.
This light will be on when the ignition key is in the IGN & ACC position but the engine is not running.
11 Vehicle Controls
o Brake System Indicator – red light on steady when the brake fluid level is below the minimum level or the parking brake is set. o Wait To Start Indicator – when the key is in IGN & ACC position the yellow light is on steady and then flashes. Wait till flashing stops to attempt starting in cold temperatures.
Engine intake air heater is on due to engine temperature, wait for light to go out before cranking. l Fuel Gauge: o 4 bars – 87% or more fuel in tank o 3 bars – 62% or more fuel in tank o 2 bars – 38% or more fuel in tank o 1 bar – 13% or more fuel in tank o Bottom Bar Outlined Only – 12% or less fuel in tank Figure 1. Multifunction gauge
11.6 Steering Wheel
The steering wheel is located on the driver's side of the vehicle, in front of the driver's seat. Use the steering wheel to control your direction when moving forward and backward. Grip the steering wheel with both hands, and never wrap your thumbs around the steering wheel.
Under rough trail conditions or when crossing an obstacle, the steering wheel could suddenly jerk in one direction or the other. Grip the steering wheel with both hands, without having thumbs wrapped around the steering wheel. Hand and/or wrist injuries may occur if the thumbs are wrapped around the steering wheel.
11.7 Accelerator Pedal
Of the three pedals located on the driver's side floor area, the accelerator pedal is on the far right. The accelerator pedal controls the engine speed and should be operated smoothly and reasonably. The accelerator pedal is spring loaded and should return to its rest position (idle) when not pressed. Take your ROXOR to an authorized dealer if you are experiencing problems. The throttle input will be limited if the driver’s seat belt is not fastened.
11 Vehicle Controls
11.8 Brake Pedal
Located in the driver's foot well area, the brake pedal is the middle pedal on a Manual Transmission model. It is the left pedal on an Automatic Transmission. Use the brake pedal to slow down or stop the ROXOR. When driving a manual transmission it is preferred to use your right foot to operate this pedal. It is spring loaded and should return to its rest position (little to no rolling resistance) when not pressed.
If the ROXOR will not move with your foot off of the brake pedal, first check and release the parking brake. Next make sure the transmission is in gear. If neither of these work, take your ROXOR to an authorized dealer.
11.9 Clutch Pedal
Of the three pedals located on the driver's floor area on a Manual Transmission model, the clutch pedal is on the far left. To disengage the clutch, fully depress the clutch pedal when shifting gears. Don't grind the gears during shifting, this may result in damage to the gears. Do not allow your foot to rest on the pedal when not using the clutch. This can overheat the clutch plates and result in premature clutch failure. You should avoid these habits as they may result in having a limited warranty claim denied due to improper use.
11 Vehicle Controls
Never try to start the ROXOR without being seated in the driver’s seat with the clutch pedal fully depressed and the parking brake set to help prevent a runaway situation in the event the throttle is stuck.
11.10 Gear Shift Lever
The shift pattern for a Manual Transmission is located on top of the gear shift lever knob. Use the gear shift lever to shift between forward gears and access reverse. When shifting gears, always depress the clutch fully and let up on the accelerator pedal before moving the gear shift lever to the next gear. Bring the ROXOR to a complete stop with engine running before shifting into reverse to prevent gear damage and ease engagement.
11.11 PRNDL
The shift pattern for an Automatic Transmission is located to the left of the gear shift lever. Use the gear shift lever to shift between park, reverse, neutral and drive. Bring the ROXOR to a complete stop with engine running, before moving the gear shift lever, to prevent gear damage.
11.12 Transfer Case Lever
The transfer case shift pattern is located on top of the transfer case lever knob. Use the transfer case lever to switch between 2WD and 4WD operation. 4WD has a Low range and High range. 4WD Low range allows the vehicle to drive at much slower speeds while still operating within the usable power band / RPM range of the engine. This also increases the torque available at the axles. Low range gears should be used during slow speed or extreme off-road conditions.
Bring the ROXOR to a complete stop with engine running before shifting the transfer case into 4WD Low Range to prevent gear damage and ease engagement. The ROXOR can be shifted between 2WD and 4WD High ranges at any speed.

