5 minute read
Critical soil sampling
SOIL SAMPLING - A CRITICAL ACTIVITY FOR NUTRIENT MANAGEMENT
By Danielle Skocaj (SRA), Bernard Schroeder (USQ), John Panitz (Morrisey Ag) and Barry Salter (SRA)
Advertisement
Soil sampling assists in determining suitable management strategies to optimise crop performance. Different assays are available to assess a range of important soil chemical, physical and biological properties. This article focuses on soil sampling to determine crop nutritional requirements and better manage nutrient inputs.
Why soil sample?
• Diagnose nutritional problems and soil chemical constraints (such as acidity, sodicity, salinity)
• Determine crop nutrition requirements
• Reduce the risk of under-fertilising and cost of over-fertilising
• Monitor the effectiveness of nutrition and amelioration programs
• Optimise other crop management practices by understanding soil properties
When to soil sample?
To assess nutritional and soil ameliorant requirements for sugarcane, soil sampling should be completed straight after harvesting the last ratoon crop and prior to cultivation.
If conducting significant earthworks, including laser levelling, soil sampling is best delayed until afterwards.
If break crops (for example soybeans, mungbeans, vegetables or cucurbits) are grown between cane crops, seek advice on the best soil sampling strategy to identify the nutritional requirements for all crops.
How to soil sample?
There are five important steps in the soil sampling process:
Step 1: Planning Review available information to develop a ‘fit for purpose’ soil sampling strategy.
Identify which blocks need to be sampled and consider soil variability, position in the landscape, topography, crop performance and management history.
Sampling each block individually will provide a more accurate assessment but it may be possible to rationalise the number of samples due to common soil types and management history. Following this assessment, the most suitable soil sampling pattern can be identified for each block.
Try to collect samples at the same time each year, avoid sampling immediately after high rainfall or irrigation and delay sampling for at least two months after applying any ameliorants or fertiliser.
Step 2: Collection Clean hands and equipment – to avoid sample contamination wash hands prior to sampling.
Ensure equipment is clean (to manage farm hygiene sanitise with 70% methylated spirits) and hasn’t been in contact with fertiliser.
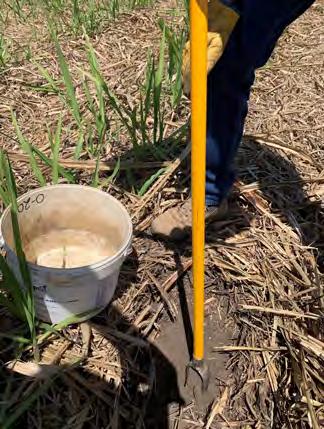
Use the right equipment – soil sampling plan, soil auger or probe, plastic handled bucket, clean plastic bag/s and permanent marker.
Avoid using or touching galvanised surfaces (like bucket handles and vehicle trays) during sample collection to prevent contamination. Collect samples from the correct position on the row – this will be influenced by fertiliser placement in the previous crop.
Generally, soil samples are collected from the shoulder of the cane row (about halfway between the centre of the cane row and centre of the inter-row).
If fertiliser was applied using a side-dress applicator, cores should not be collected from the fertilised zone of the shoulder.
For reliable results, avoid collecting samples from non-cropped areas, poorly drained sections and areas where fertiliser or soil ameliorants including mill by-products have been stored.
Also avoid including crop residue or organic matter from the soil surface in the sample. Collect samples from the correct soil sampling depth – to determine crop nutritional requirements sample the topsoil (0-20cm). Other soil depths may be sampled to support the identification of subsoil constraints.
To ensure a representative sample, collect an appropriate number of soil cores from the sampling zone. This may be a whole block, portion of a block or pre-determined zones within a block.
Generally, the more soil cores taken, the more reliable the soil test result. As a rule of thumb collect about 20 soil cores from each sampling zone. This can be varied depending on the area of the sampling zone.
A common mistake is to collect too few cores to adequately represent the zones being tested, particularly in very large blocks. In some cases, it is sensible to divide larger areas into smaller sampling zones.
Thoroughly mix soil cores, taking care to break-up large soil clods as you blend the sample by hand.
Collect a subsample (500g) from the blended soil sample for laboratory analysis. More soil will be required for a subsample if requesting additional soil assays.

Place the subsample into a clean plastic bag, such as those supplied by soil testing laboratories or a ziplock sandwich bag. Clearly label each subsample – include name, farm number, block number or sampling zone (if taking more than one soil sample per block) and date.
Record soil sampling event details – including dominant soil type/s and geolocation of soil sampling sites. This will allow variations in soil properties to be better understood and the same sampling locations to be revisited over time. This is valuable for monitoring changes in soil fertility and checking on the adequacy of nutrient inputs.
Step 3: Sample handling Soil samples should be dispatched to the laboratory as soon as possible after collection.
For short term storage, soil samples should be placed in an esky or refrigerator. Do not leave samples inside a vehicle in the sun.
Step 4: Laboratory analysis Samples should be submitted to a reputable laboratory for analysis through agribusiness agents, productivity services organisations (in some districts) or private agronomic consultants.
The laboratory must conduct tests and report results that are compatible with the SIX EASY STEPS guidelines.
Ensure that the laboratory used has a Certificate of Proficiency issued by the Australasian Soil and Plant Analysis Council (ASPAC).
Refer to the Analyses required to interpret a soil test using the SIX EASY STEPS information sheet available on the Nutrient Management page of the SRA website.
Step 5: Interpretation of results Soil test reports should be interpreted using the SIX EASY STEPS nutrient management guidelines relevant to your region.
This is best done in conjunction with your trusted advisor. Information pertaining to fallow management and application of mill byproducts is important for interpretating soil test results and providing sound nutrient management advice.
Participating in a SIX EASY STEPS workshop will equip you with the knowledge to develop block specific soil sampling strategies, confidently collect soil samples, interpret soil test reports, identify suitable fertiliser products and develop a basic nutrient management plan for your farm.
If interested in SIX EASY STEPS training contact your SRA District Manager.


