1 minute read
Creating accessible documents and information
This is the eighth item in the series providing tips on creating accessible information and documents. For previous tips refer to Tips and tools.
The items in pānui over the previous seven weeks have covered how to produce accessible Information. It is now time to give tips on how to check your created information for accessibility.
Advertisement
MS Office has an ‘Accessibility Checker’. This is built in to later versions of Word, Excel, Outlook, PowerPoint, etc. It allows creators of information to check their work for accessibility.
Before sending your Outlook email message or sharing your Word document, Excel spreadsheet, or PowerPoint presentation, run the Accessibility Checker to make sure your Microsoft 365 content is easy for people with disabilities to read and edit. To find out which apps have the Accessibility Checker, go to Make your content accessible to everyone with the Accessibility Checker

Use the Accessibility Checker
1. On the ribbon of the Microsoft 365 app, select the Review tab. If you're using Outlook, you'll only see the Review tab when writing or replying to messages.
2. Select the upper part of the Check Accessibility split button. The Accessibility pane opens to the right of the screen. The Accessibility ribbon activates at the top of the screen. Tip: To see more options, select the lower part of the Check Accessibility button.
recommendations for each. To quickly fix the issues, apply one of the recommended actions. For more information on how the findings are categorised, , go to Rules for the Accessibility Checker
1. In the Accessibility pane, select an issue under Warnings or Errors. The list expands and shows the items and objects affected by the issue. Tip: To view the exact location of the affected item or object, select the item or object.
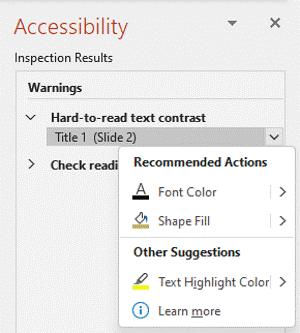
2. To address the issue, select the down arrow button next to it. The Recommended Actions list opens.
3. In the Accessibility pane, review and address the findings as instructed in Apply recommended actions.
Apply recommended actions
In the Accessibility pane, you'll see a list of errors, warnings, and tips with how-to-fix
3. To apply a one-click fix, select an action from the Recommended Actions list. To view more options, select the right arrow button next to an action (if available).
4. Go through and resolve each issue under Warnings and Errors.
To learn more about creating accessible documents, look out for further items in future pānui. They will cover alt text, customising hyperlinks, videos and signage.. For any queries, please contact the Communications team on Communications@cdhb.health.nz.


