12 minute read
Donning Tosei Gusoku
by Charlie San
0 First, the kimono worn underneath the armor is put on, and then the kyahan.
Tosei Gusoku Details
3/4 View
8 The cuisse ("haidate") is slipped on, followed by greave-like armor kyahan. e The chain mail is donned and lhen the brlgandlne. Anally, the helmet is added to complete the armor.
Helmet Details
Rear 3/4 View
On some tosei gusoku, a flag bearing the crest of the troop is inserted at the warrior's back. Often, helmets were formed into intricate shapes.
Armor Structure
The armor plates contain tiny holes at regular intervals. Cord is passed through the holes to sew the pieces together. The junctures at which one plate meets another all move along with the figure's joints, making the armor fit closely to the body.
0 First, establish the shape, making the helmet deep-set. Add outlines of any attached forms. Draw a circle for the base of the headpiece and then add other forms, adhering to the circle. Add a narrow brim to the front.
8 Draw the helmet's decorative horns. Completed Toseigusoku Helmet
0 First, draw a semicircle for the helmet and then add the brim followed by outlines of any attached forms. Maintain an awareness of the basic form (i.e. circle) when adding the protective sidepieces. • Draw the adornments. Determine the helmet's center and add decorations, keeping the right and left sides symmetrical. 8 A gold decorative piece rests atop the head. Add vertical gold ornamentation radiating away from this point. Draw seams at even intervals.

Appearance of Bushi with and without a Helmet Unlike the Edo Period samurai's hairstyle, the Warring States Period bushls hair has a string woven around the base.
Chapter 4 Samurai in Motion

( Walking Samurai ) Samurai walks swinging the hand on the same side as the foot with which he is stepping forward , rather than alternating sides. This helps retain the kimono's form.
The samurai's right hand and foot (viewer's left) move toward the picture plane, while his left hand and foot (viewer's right) are swung back. The samurai leans forward just a hair, giving the appearance of walking briskly.

lWalking Bushi )
When the samurai's left hand and foot move forward , the figure torques slightly to the right and back, bringing it to an oblique angle with respect to the viewer. Adding hatching to shade the hem of the far foot evokes a sense of depth.
Draw the bush/with his chest puffed out, walking in a dignified manner. The arms are held somewhat away frorn the body and without much backward and forward swinging of the arms. Unlike with the samurai, hardly any torsion is present in the body. The bushfs sleeves are longer than that of the samurai.
( Walking Ronin )
The ronin walks with a swagger, throwing back his head, shifting his center of gravity moderately rearward. The face turns slightly upward.
( Walking Toseinin )

In contrast with the ronin, the toseinin leans forward, shuffling along as if kicking the ground with his toes. The toseinin is keen to hide his identity, so he conceals his face with a straw hat.
The motions of the hands and feet on each side are uniform. The samurai holds the scabbard with one hand, while lightly reaching for the hilt with the other hand. The figure moderately leans forward. The head faces directly forward. The hakama's pleats change in appearance according to the directions of the right and left feet.
( Increasing Speed )

The figure leans even more deeply forward. The head faces down.
(Breaking into a Run )
The stride is short, and the arms are still held low. The front hand lightly touches the sword. Adding gestures that give hits to what the samurai's next actions might be allows you to portray the initial stages of a given action.
( Running Samurai, Front View A )
The figure's right foot is forward, causing the body to torque to the left. Showing the back foot covered in the hakama's shadow generates a sense of depth. Give inspiring, gallant characters like this slim builds.
( Running Samurai, Front View B )

The movement is similar to that of figure A, but one arm is held far from the body, and the toes are turned in moderately, eliminating the air of gracefulness.
When drawing a figure running not in the manner of the samurai, but using more modern motions, show the hand on the opposite side as the forward foot swung to the front and vice versa. While this is not an "authentic" samurai running style, it is one technique for making the figure's movement clear to the viewer.

( Samurai after Battle)
Show the samurai holding his sword in an upright position with his back slightly rounded and one leg firmly planted on the ground from the hip to the knee. This projects the impression of a samurai weary from battle. Leave the mouth half opened to create a look of exhaustion. Use short, hatched strokes to add soiling to the sleeves, elbows, knees, soles of the feet, stomach, and back.
Here, a samurai kneels in defeat. He uses the sword for support. He looks down, wearing a dejected expression on his face. The sword sits near the knee resting on the ground, the figure. Note that the knee resting on the ground is pulled further back than the left foot with the upright knee. This figure shows a rcmiriiHaninu h<u:k in surprise. The figure's center of gravity shifts to the rear. Show one knee touching the ground. Note that showing both knees raised off the ground would suggest that the figure is about to turn a backward summersault.

Here. a samurai adopts a subservient pose to escape his commanding bushls ire. He glances upward slightly. The hips are not lowered, so the upper body leans dramatically forward. Using positioning the head and shoulders as if all three were lying along a semicircle produces the feeling of a bowing figure. This is a submissive pose with both knees and hands resting on the ground. The head faces downward and does not turn up. The figure is leaning forward with both knees on the ground, causing the toes to bend and the heels to rise while the zori remain on the ground. The fingers are angled inward (i.e. toward each other).

This is the pose of a loyal samurai. He is a retainer, known as a "kerai." His posture is straight, and he sits in the formal seiza pose with his legs tucked neatly underneath. Both hands are positioned side by side directly in front of the figure.
( Basic Stance )
The elbows are knees are kept loose and are bent slightly. The body is relaxed. Ensure that you achieve visual balance between the sword's length and the hilt. If the sword is too long or too short, it will not have the look of a convincing samurai sword. Draw the hilt's length at a ratio of 1 :3 with respect to the blade.

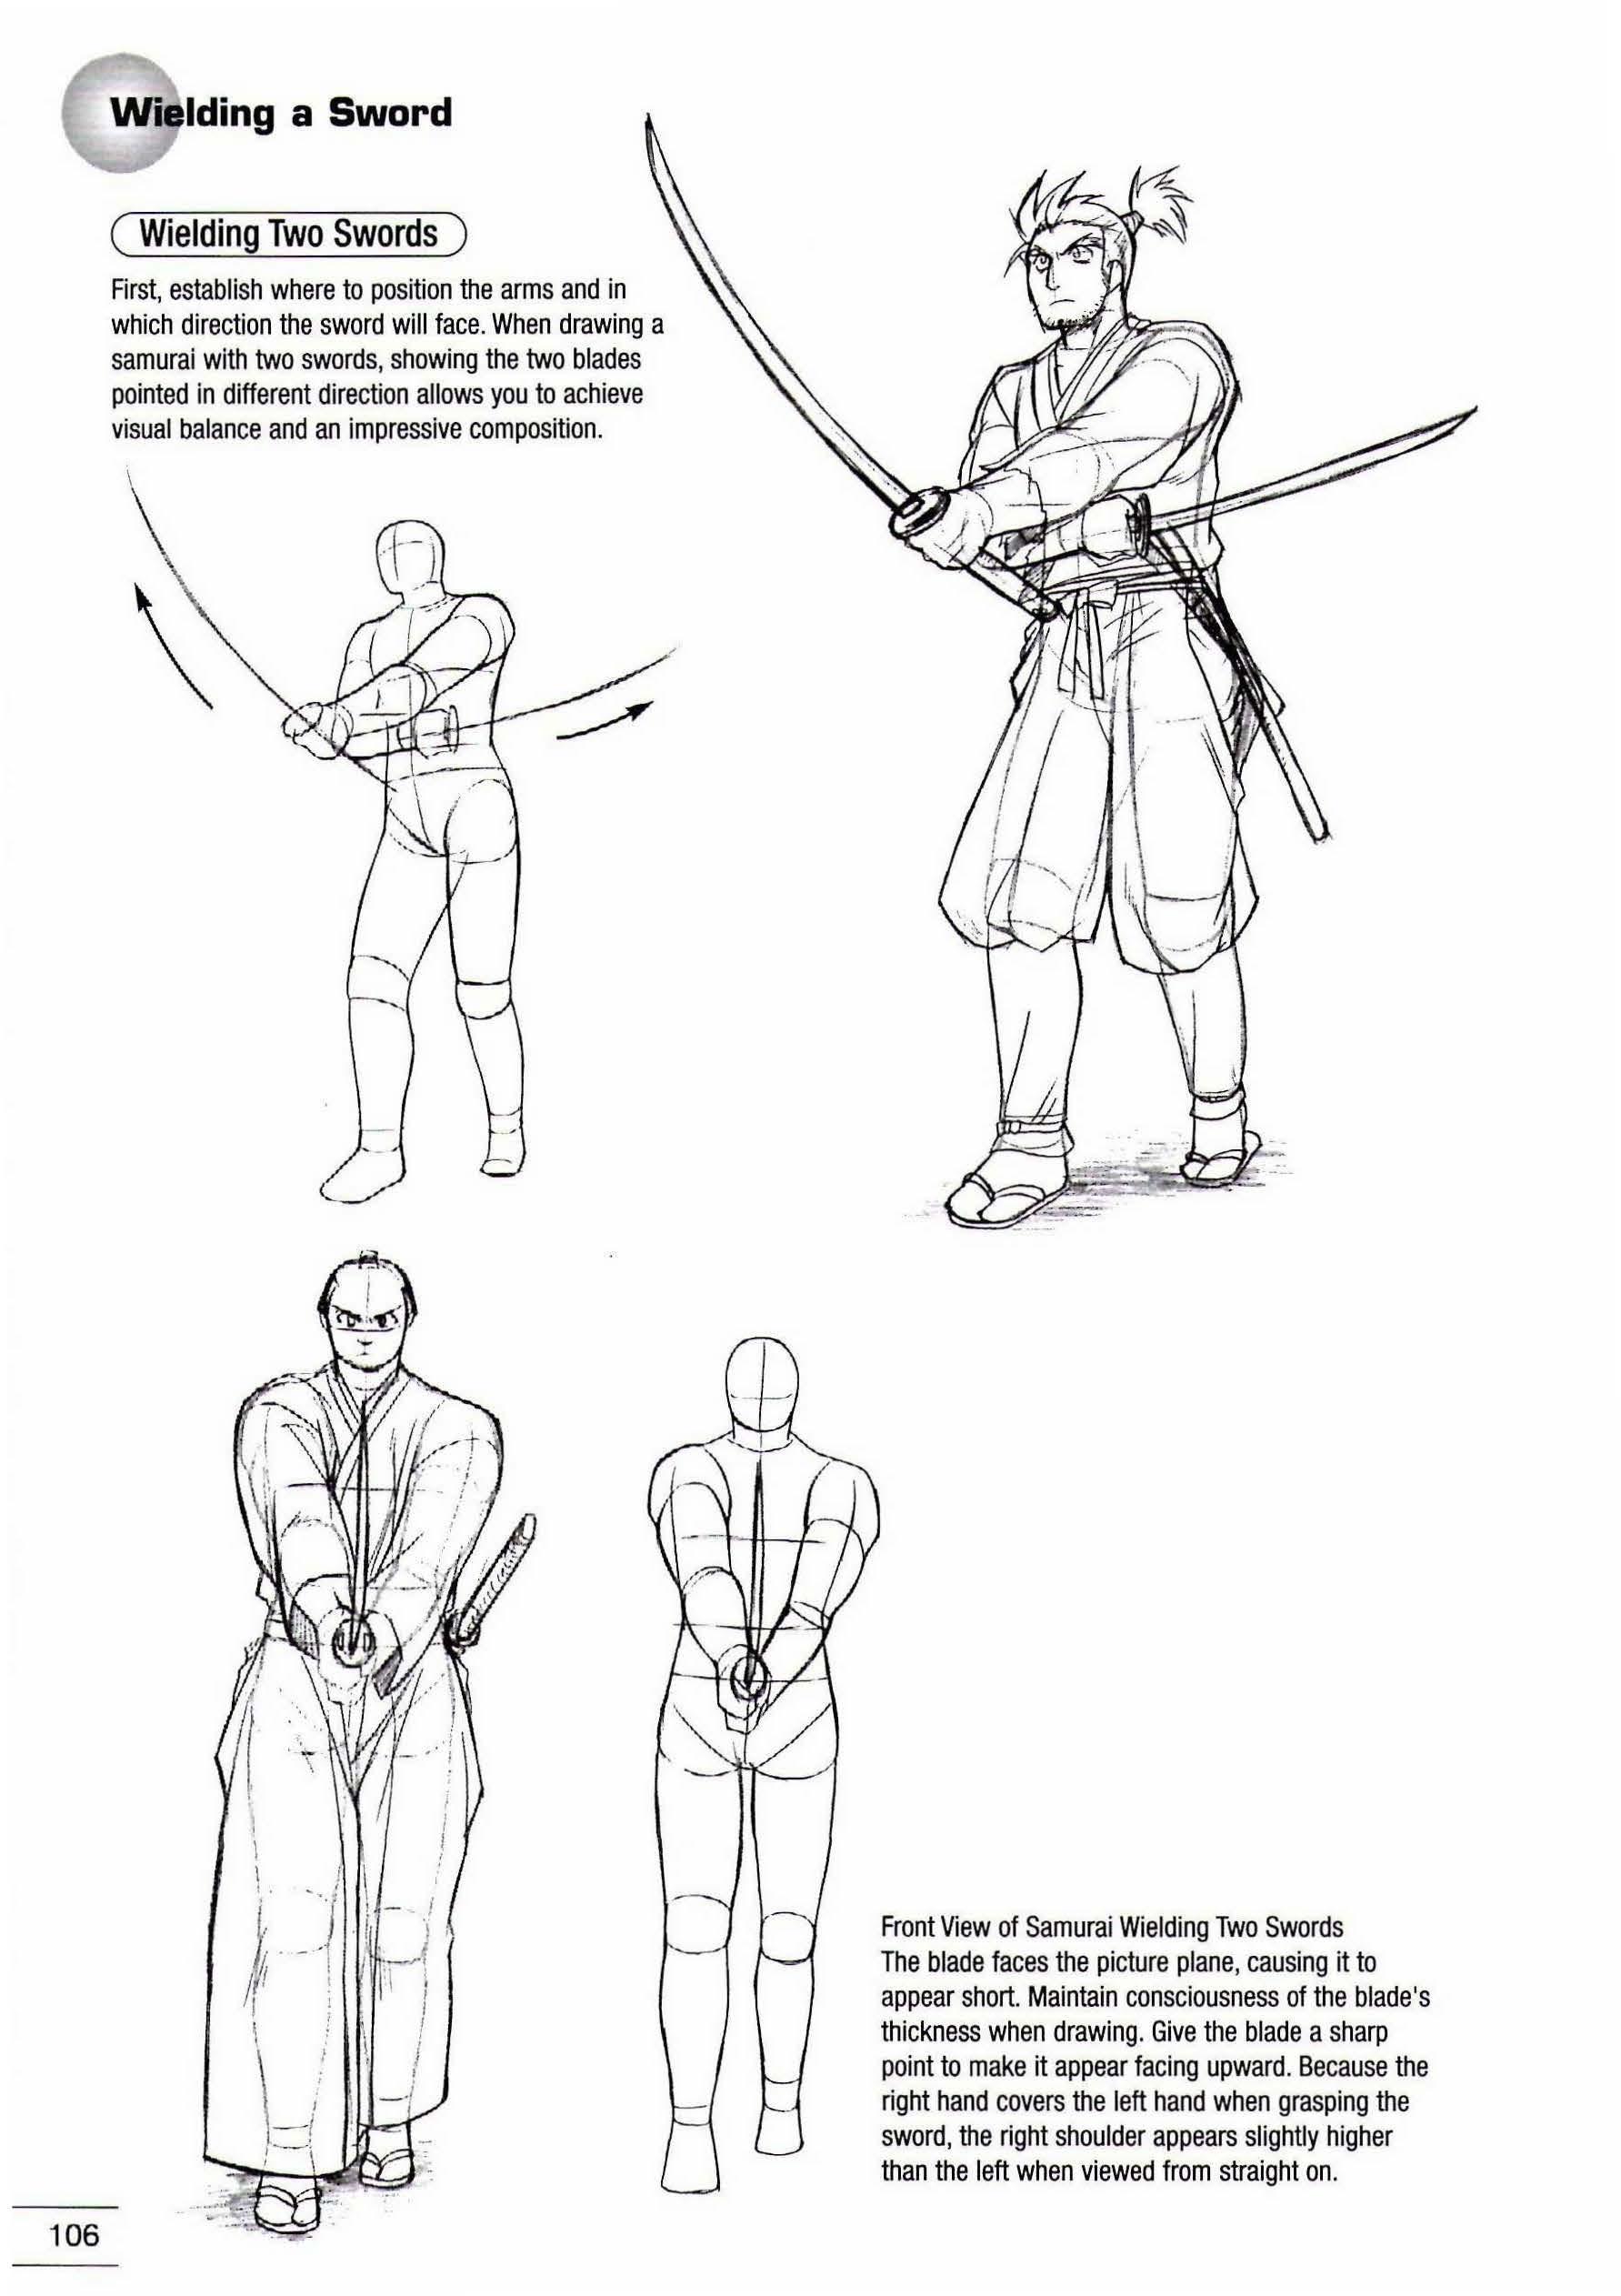
( Wielding Two Swords )
First, establish where to position the arms and in which direction the sword will face. When drawing a samurai with two swords, showing the two blades pointed in different direction allows you to achieve visual balance and an impressive composition.

l \
__ .fi\. - )'
tj/ I I :-1 I /J I : , I ! \ _) !
Front View of Samurai Wielding Two Swords The blade faces the picture plane, causing it to appear short. Maintain consciousness of the blade's thickness when drawing. Give the blade a sharp point to make it appear facing upward. Because the right hand covers the left hand when grasping the sword, the right shoulder appears slightly higher than the left when viewed from straight on.
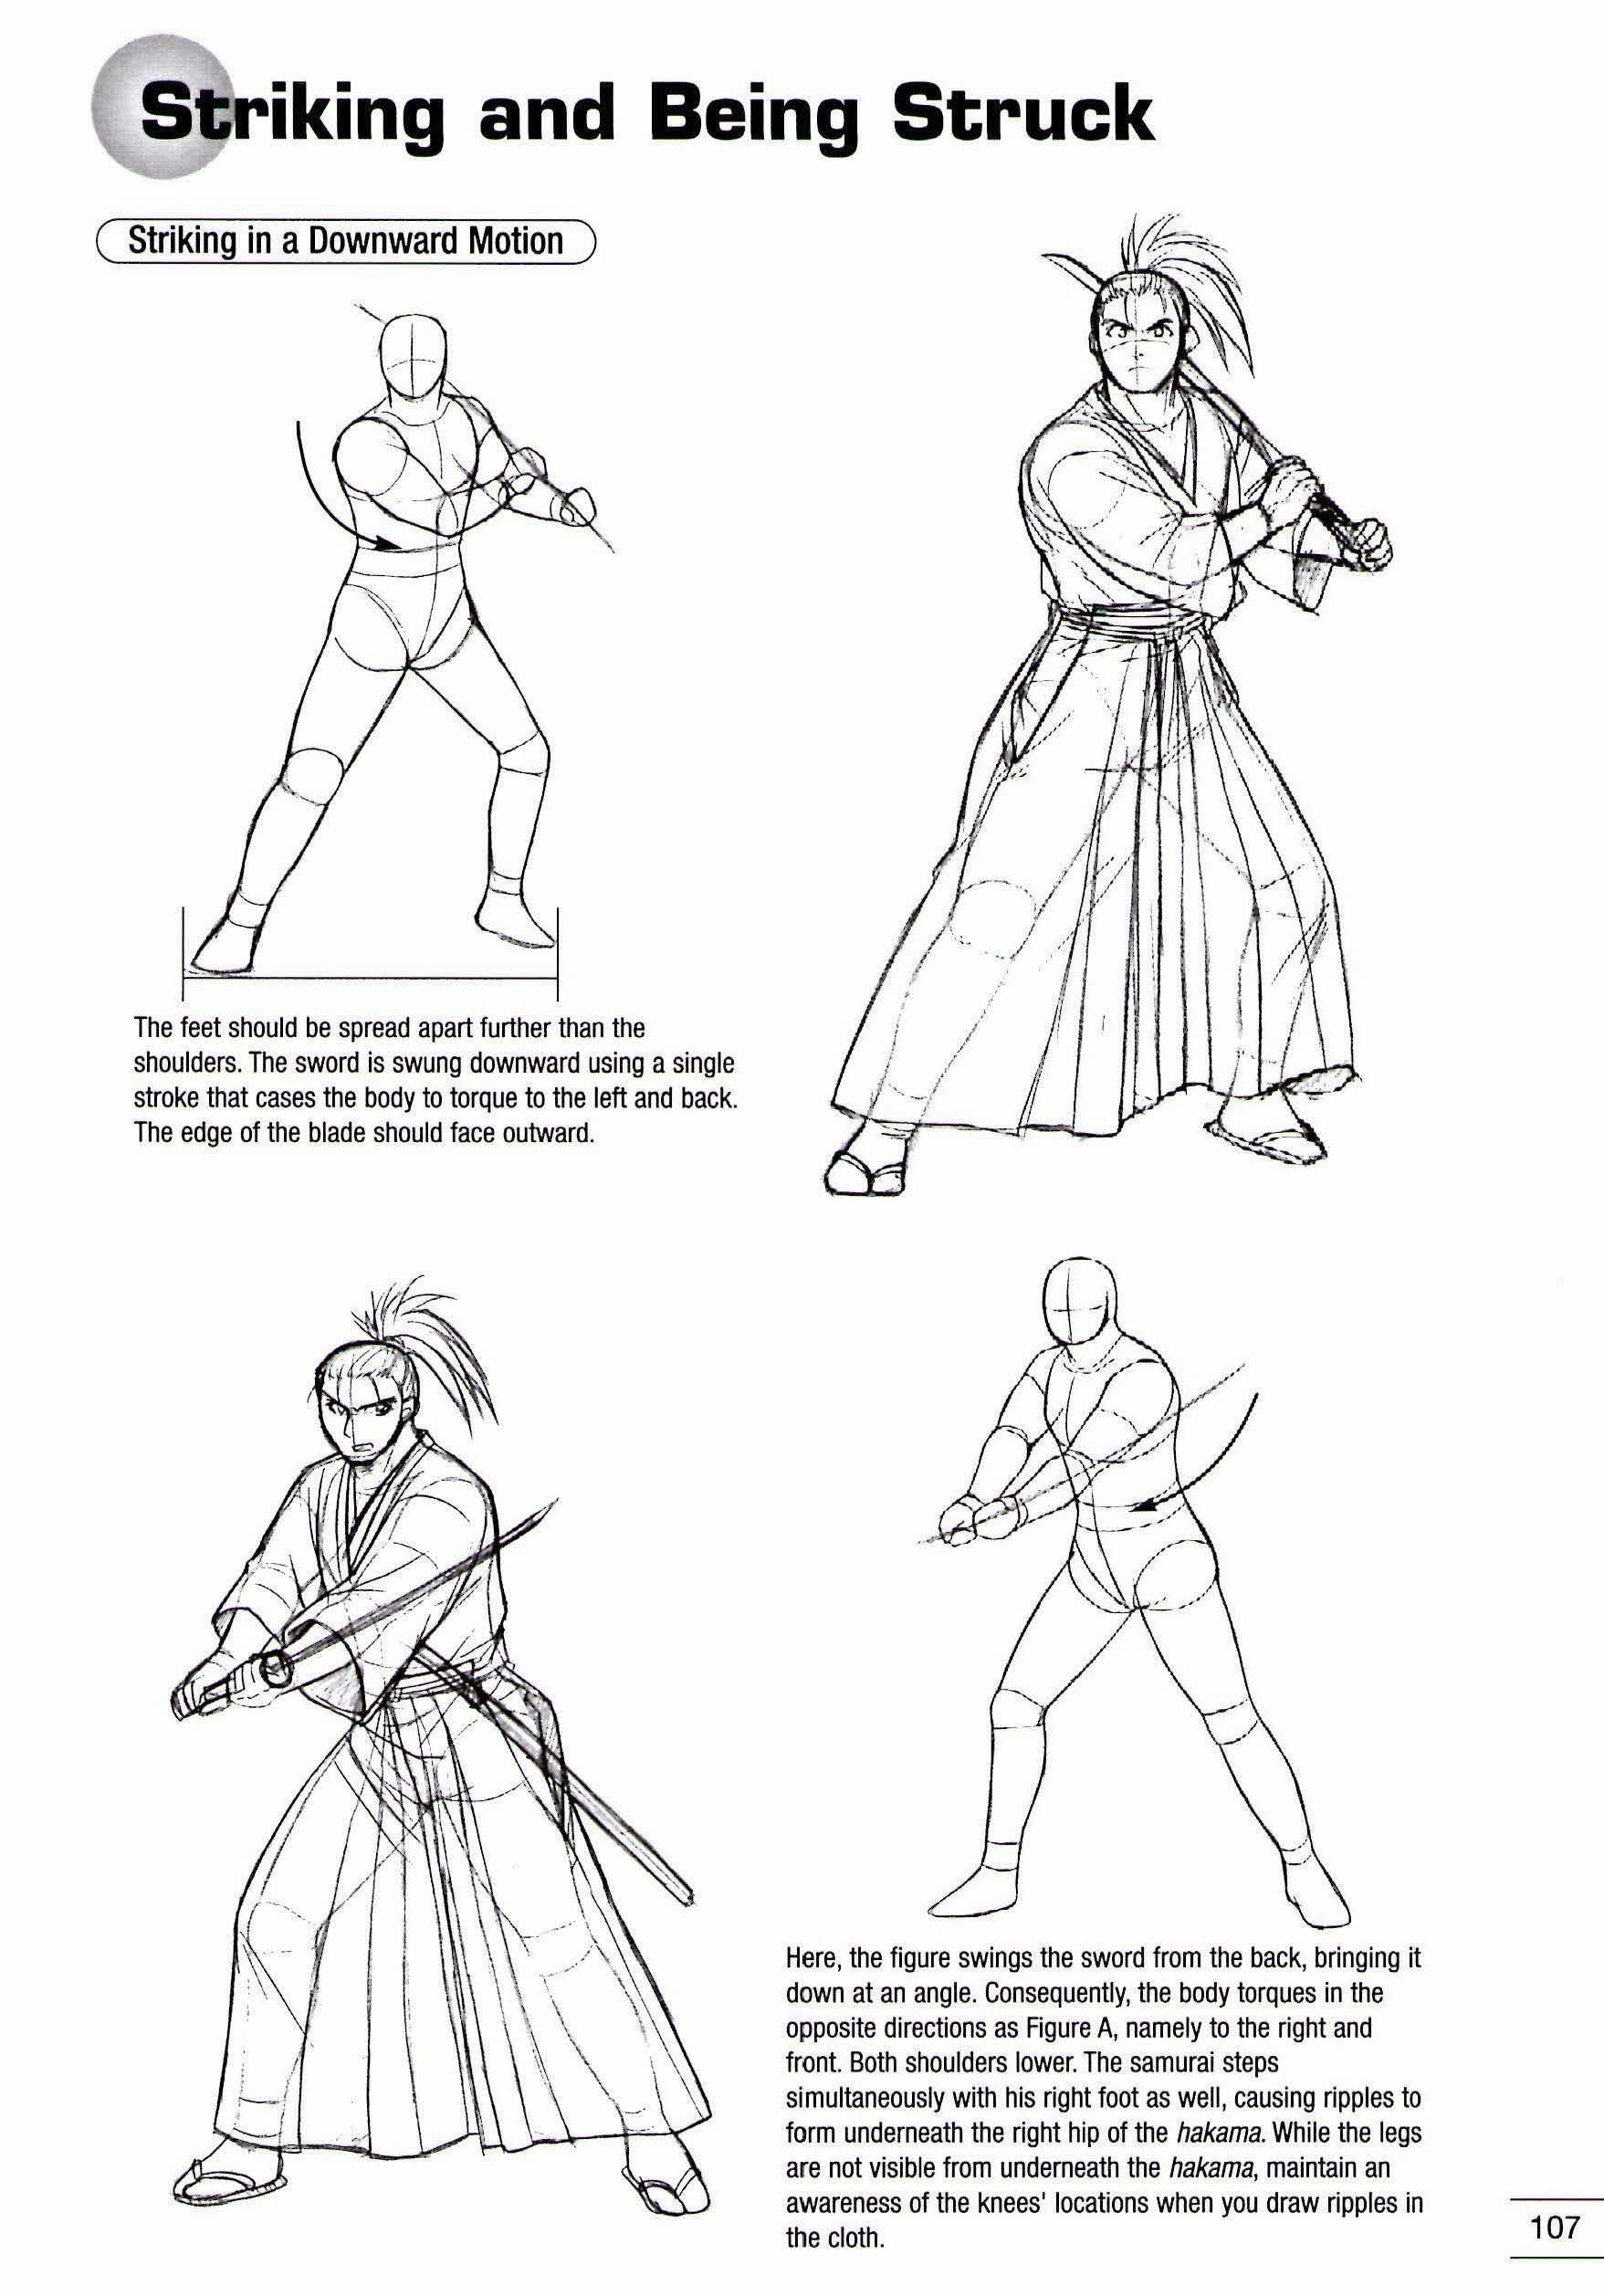
( Striking in a Downward Motion )
The feet should be spread apart further than the shoulders. The sword is swung downward using a single stroke that cases the body to torque to the left and back. The edge of the blade should face outward.
Here, the figure swings the sword from the back, bringing it down at an angle. Consequently, the body torques in the opposite directions as Figure A, namely to the right and front. Both shoulders lower. The samurai steps simultaneously with his right foot as well, causing ripples to form underneath the right hip of the hakama. While the legs are not visible from underneath the hakama, maintain an awareness of the knees' locations when you draw ripples in

In this figure, the samurai lowers his sword. · The tip of the sword and the edge of the blade both face down.

Edge of the blade
2. Here we see a samurai collapsing.
Tension leaves the body, and the sword falls from the hand. The figure completely loses stability and crumples to the side.
The key point here is the facial expression, which should display a combination of agony, shock, and confusion. 1. This figure shows a samurai who has been struck by the enemy. He is offbalance. The shock of having received the blow shows in the figure's motions. The head and back arc backward, while the knees buckle forward. The l1akama's interior is visible. Drawing the eyes and mouth wide open suggests a stunned reaction.

3. Now the samurai collapses on the ground. The body is limp. Drawing the body as if forming a "V" with respect to the ground, positioning the bottom of the
V at the figure's center facilitates creating the illusion of a collapsed figure.
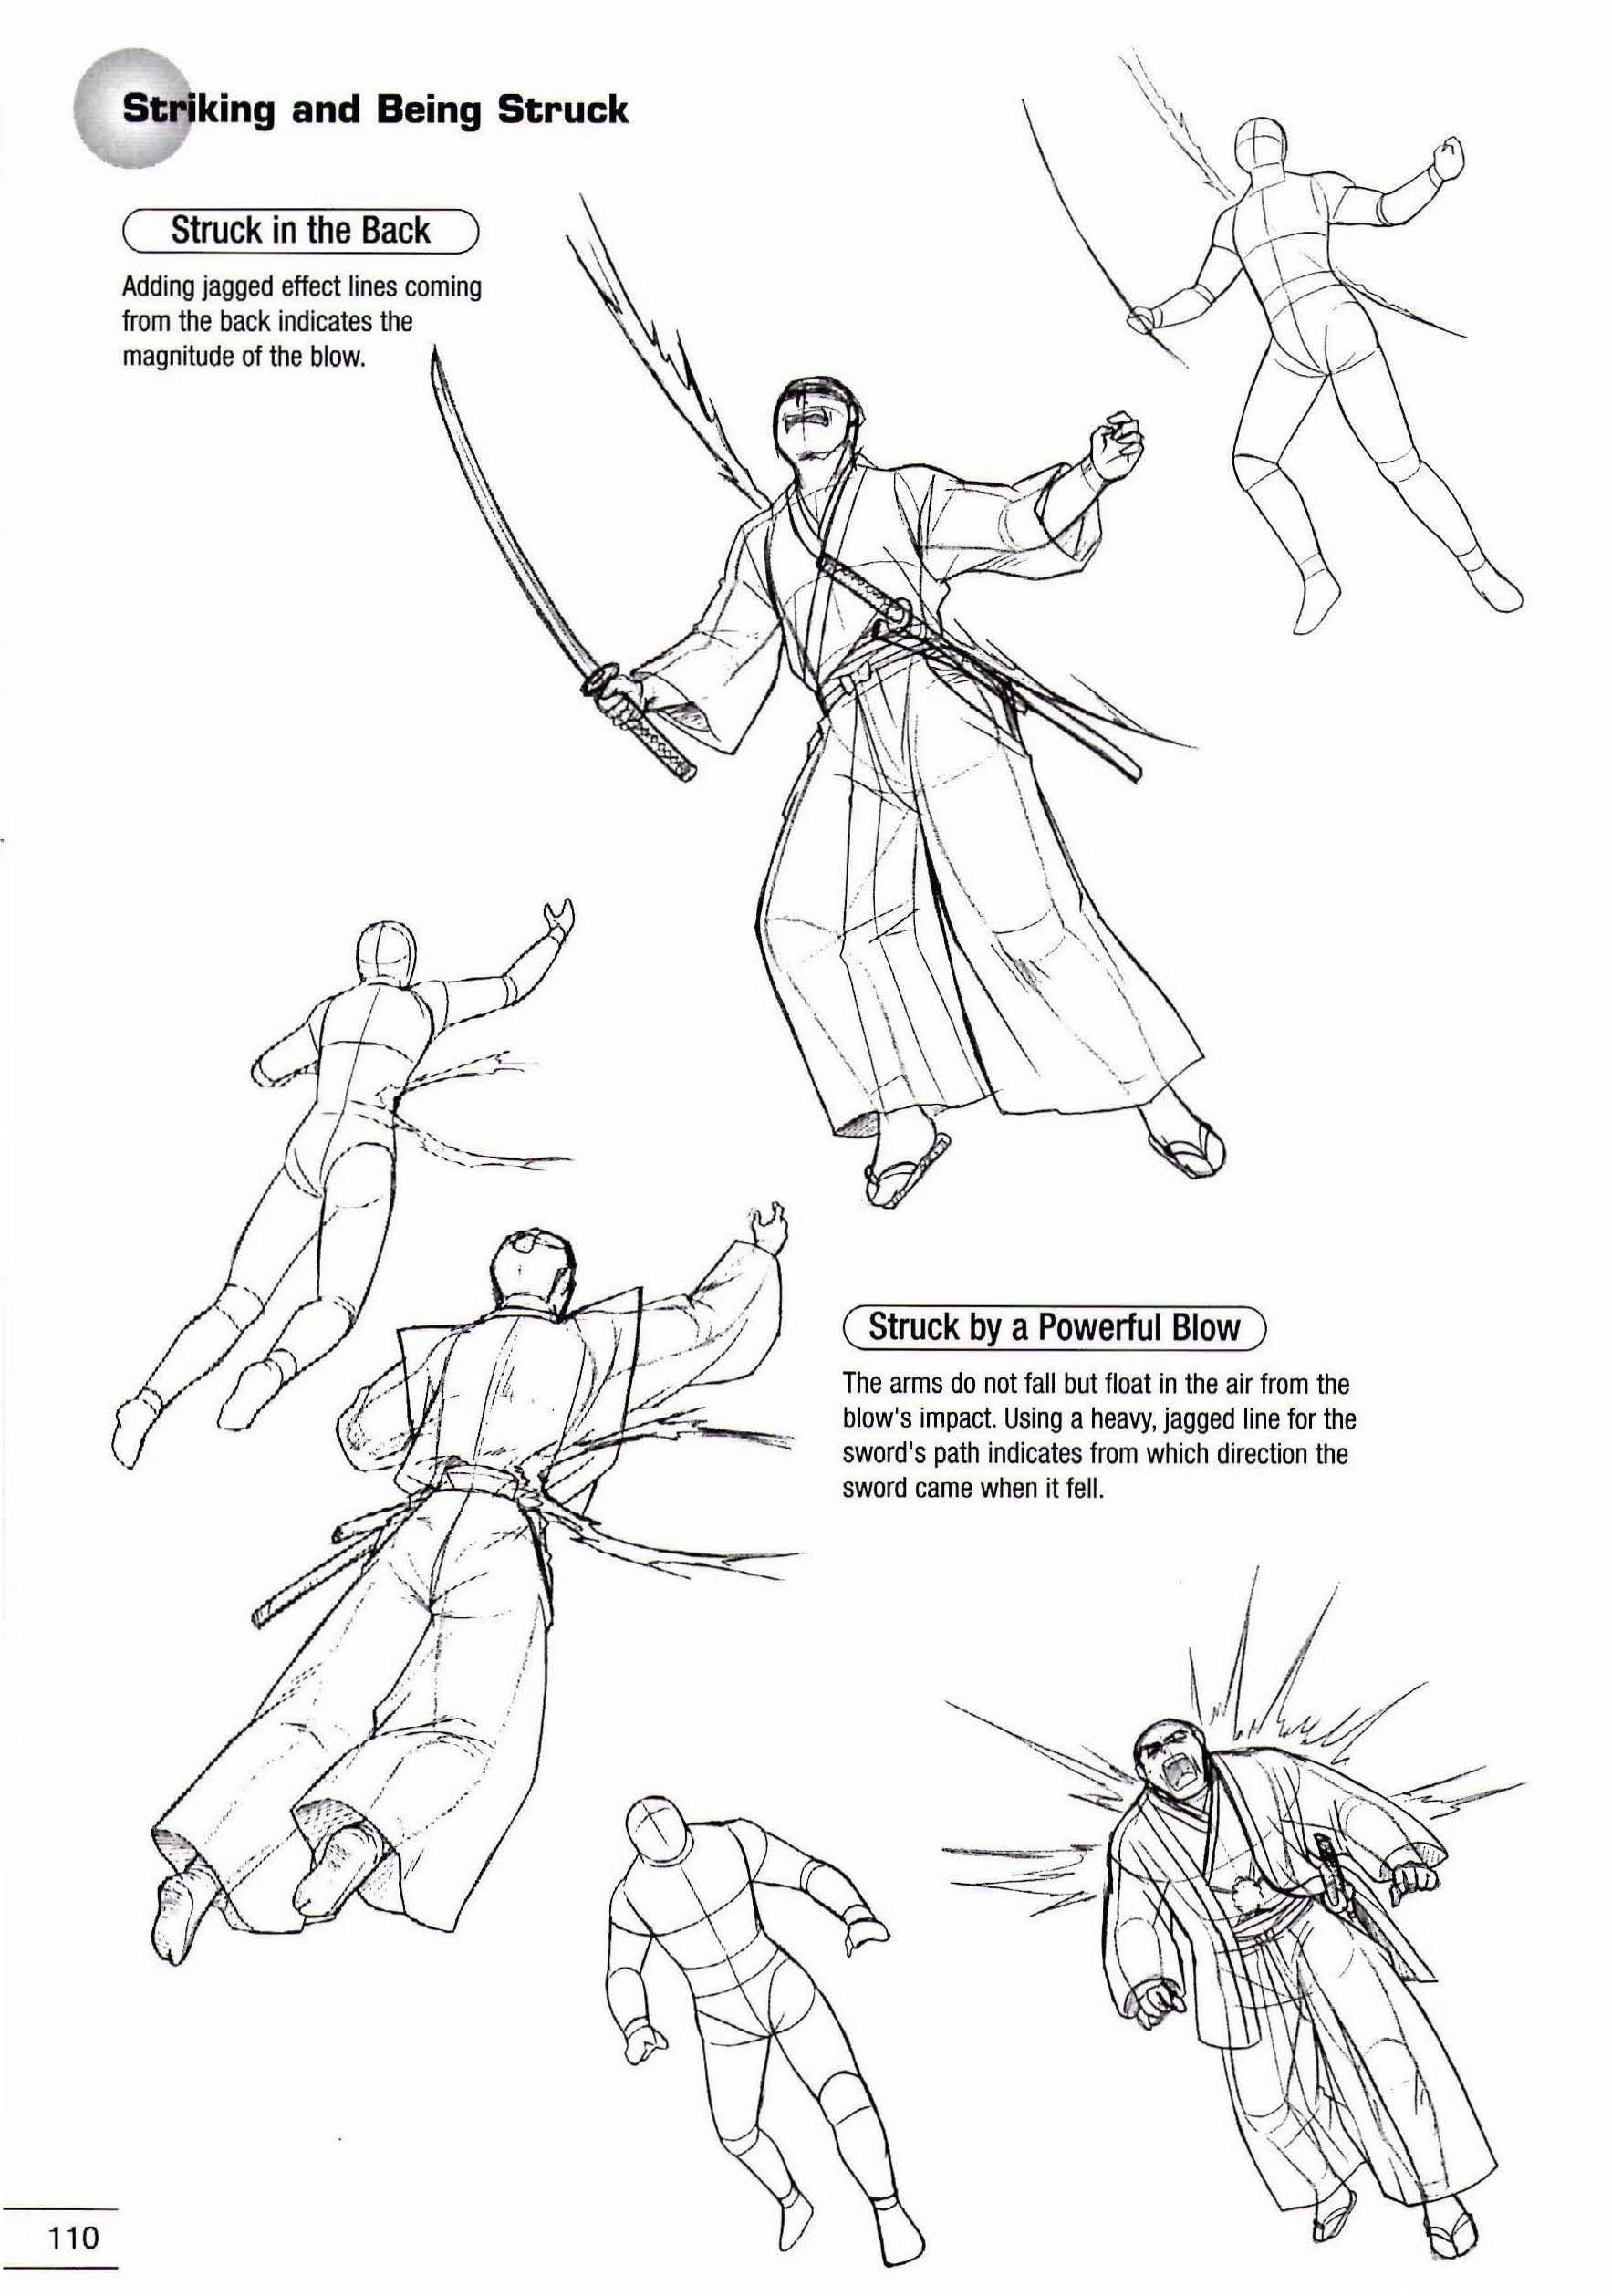
( Struck in the Back )
Adding jagged effect lines coming from the back indicates the magnitude of the blow.

( Struck by a Powerful Blow )
The arms do not fall but float in the air from the blow's impact. Using a heavy, jagged line for the sword's path indicates from which direction the sword came when it fell.
The Hilt: A leather cord wraps around the part the hand grips. When drawing a close-up of a sword, including the hilt creates visually impressive results. Scabbard: This functions as the sword's sheath. Longer and wider than the sword itself, the scabbard is worn tucked into the sash.
Sword Guard: This serves to prevent the opponent's blade from slipping down and striking the hand. Tying this cord to the sash holds the scabbard In place on the sash.
Blade: The blade tapers toward its tip. Draw both the scabbard and the blade to form an elegant arc.
( The Basics in Grasping the Sword ) /
The leather cord wrapped around the hilt ties at the base.

When showing the sword swung in a downward motion, use speed lines to render the entirety of the sword as an afterimage. Draw the lines in the direction of the stroke to evoke a sense of speed. Use speed lines to connect the moment that the sword is completely unsheathed to before the samurai begins to swing the sword. When showing the sword swung in an upward motion, draw an afterimage of sword in a raised position near the picture plane. 111
( Unsheathing the Sword )
The samurai holds the hilt using the same hand with which he writes. The scabbard is tucked into the sash to prevent it from shifting. Samurai with knees bent and sword held low, ready to strike
Samurai with sword held over head, ready to strike

The hand is relaxed. The trick to drawing a relaxed hand is to show some of the fingers not touching the hilt and the thumb directed outward. The thumb would be angled inward if the hand were tensed.
( Mid-Battle )
Tensions grow in fighting scenes, so the samurai grips the hilt tighter, causing the thumb no longer to face outward.
i
The samurai holds his empty left hand so that he can swiftly move it in the next motion to grip the hilt.

Cautiously Approaching the Opponent The samurai does not pell-mell at the opponent, striking wildly. He hunts his enemy, reading his enemy's movements, and reacting. Show the left hand also holding the sword.
When drawing feet, maintain awareness of undulations caused by muscles and bone. Use hatching to shade.
Feet

First, draw the general exterior angles and then add contour layouts for the toes, the heels, and the ankles. Use circles to establish where the big toe's knuckle Is positioned. The foot's arch broadens toward the inside of the foot.
Foot in Profile
FoQt Seen from the Exterior: The small toe is the most shallow. Position the ankle on the outside of the foot just a bit lower than the ankle on the inside, about the same level as the top of the little toe. The foot's arch Is scarcely visible.
'j
Sole of the Foot
Be aware that there are two locations where the flesh rises into a mound on the foot's sole: underneath the knuckle of the big toe and the heel.
.I
The knuckle of the big toe rises into a bump.
Foot Seen from Interior: The big toe is the highest. The foot's arch is visible. The big toe's knuckle bulges. The interior ankle is slightly higher than the exterior.
The toes should hang slightly over the zorts front.
Waraji ZoriSole Tabisocks
The waraji are attached to the leg with cords that allow for size adjustment as well as preventing the waraji from slipping off even in the case of vigorous movement. The heel rises when walking.

Waraji with a Loose Fit Waraji Fastened with a Cord and Tied from Behind 3/4 View


