17 minute read
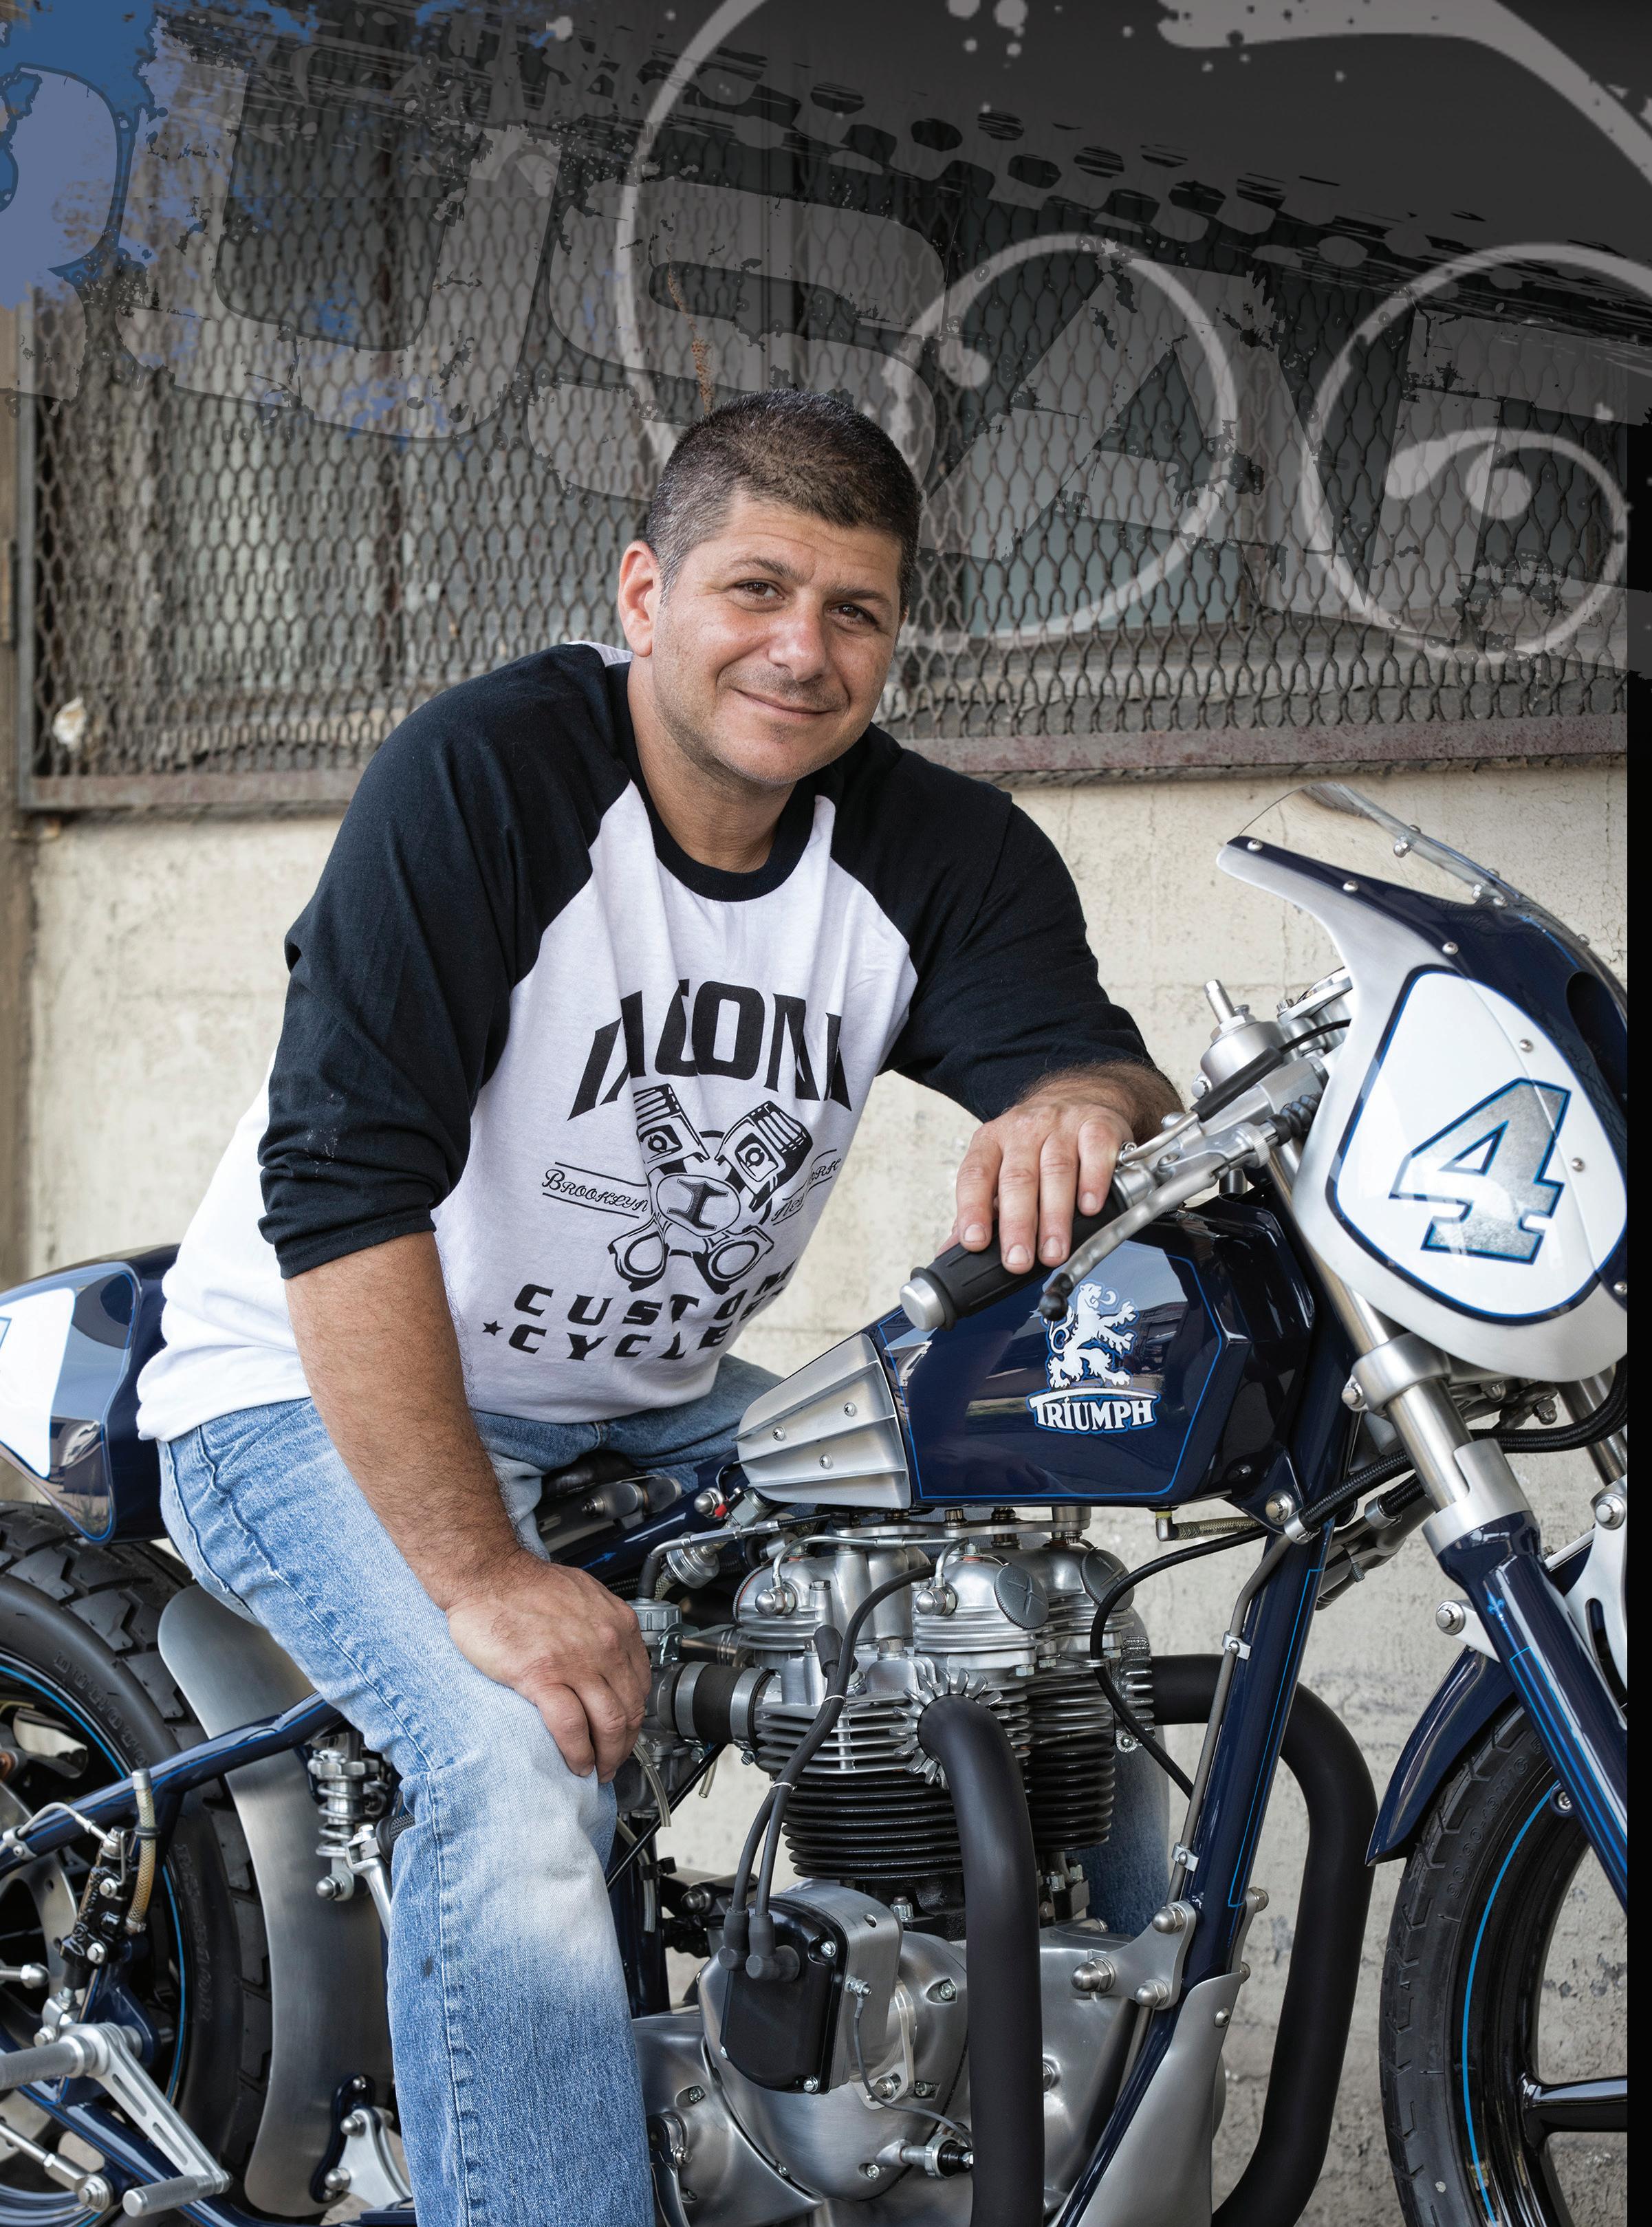
Iacona Custom Cycles Triumph Racer


just when I thought he could surprise me no more my longtime friend Steve Iacona of Iacona Customs Cycles has done it once again! Stepping out of his comfort zone, his latest build is a Bonneville racer with a touch of
Sportster done in only a way that
Advertisement
Steve could do it.
This was a build that had been sitting off to the side for a bit. It was like so many builds we do because there are others that must always come before it and for just reason, like the rent has to get paid. Finally, one day the owner and Steve’s good friend Frank Mattera said: “Let’s do something with this baby.” The first
Article And Photos By: Mark Velazquez
and only design idea that came to mind was that of a Bonneville racer that would be street and show worthy. With vision in mind, Steve got right to work.
Despite building bikes since 2002 this would be the first true Triumph ground up build for Steve, but for him, new is just where the fun begins. The 1972 Triumph T120 would now become the next Iacona creation.
Like all Iacona builds that have come before, the teardown would be the beginning, and everything would go! It is very rare to find the remains of stock parts on an Iacona build and to list every piece made would take an entire issue. This is the reasons for tech sheets, so I suggest you take a look because this feature does actually come with one…long story but Nuff said.
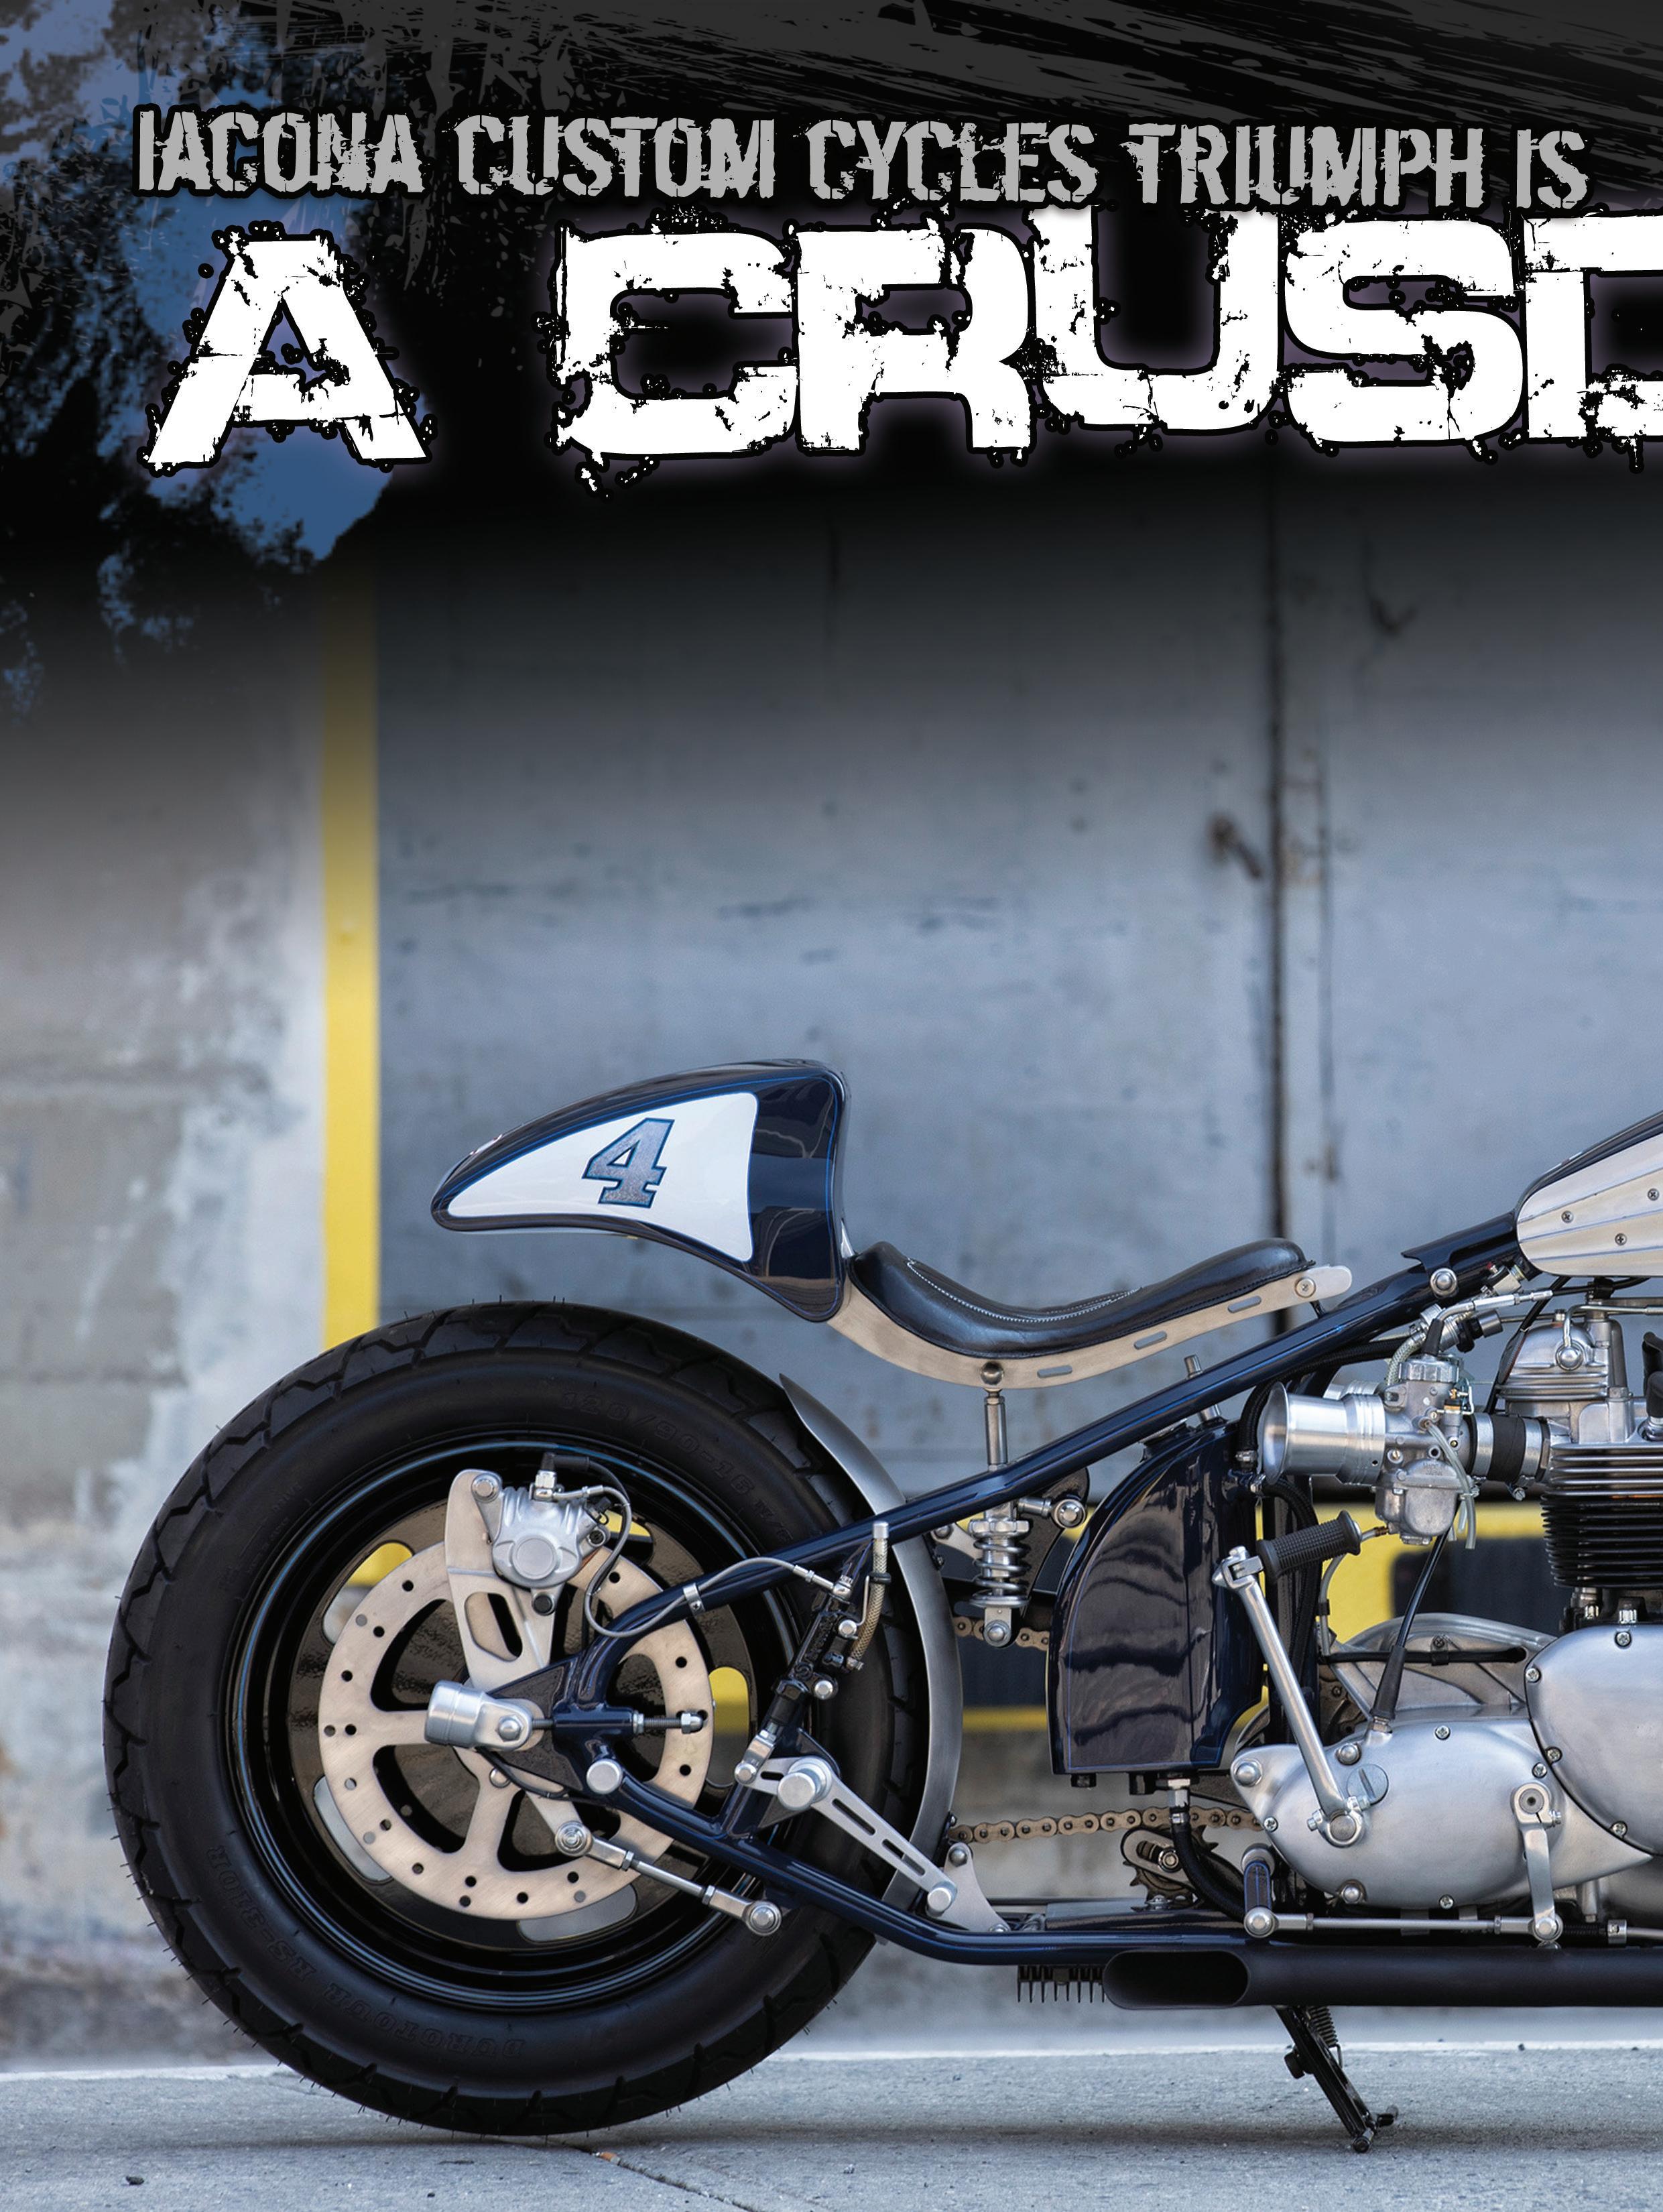
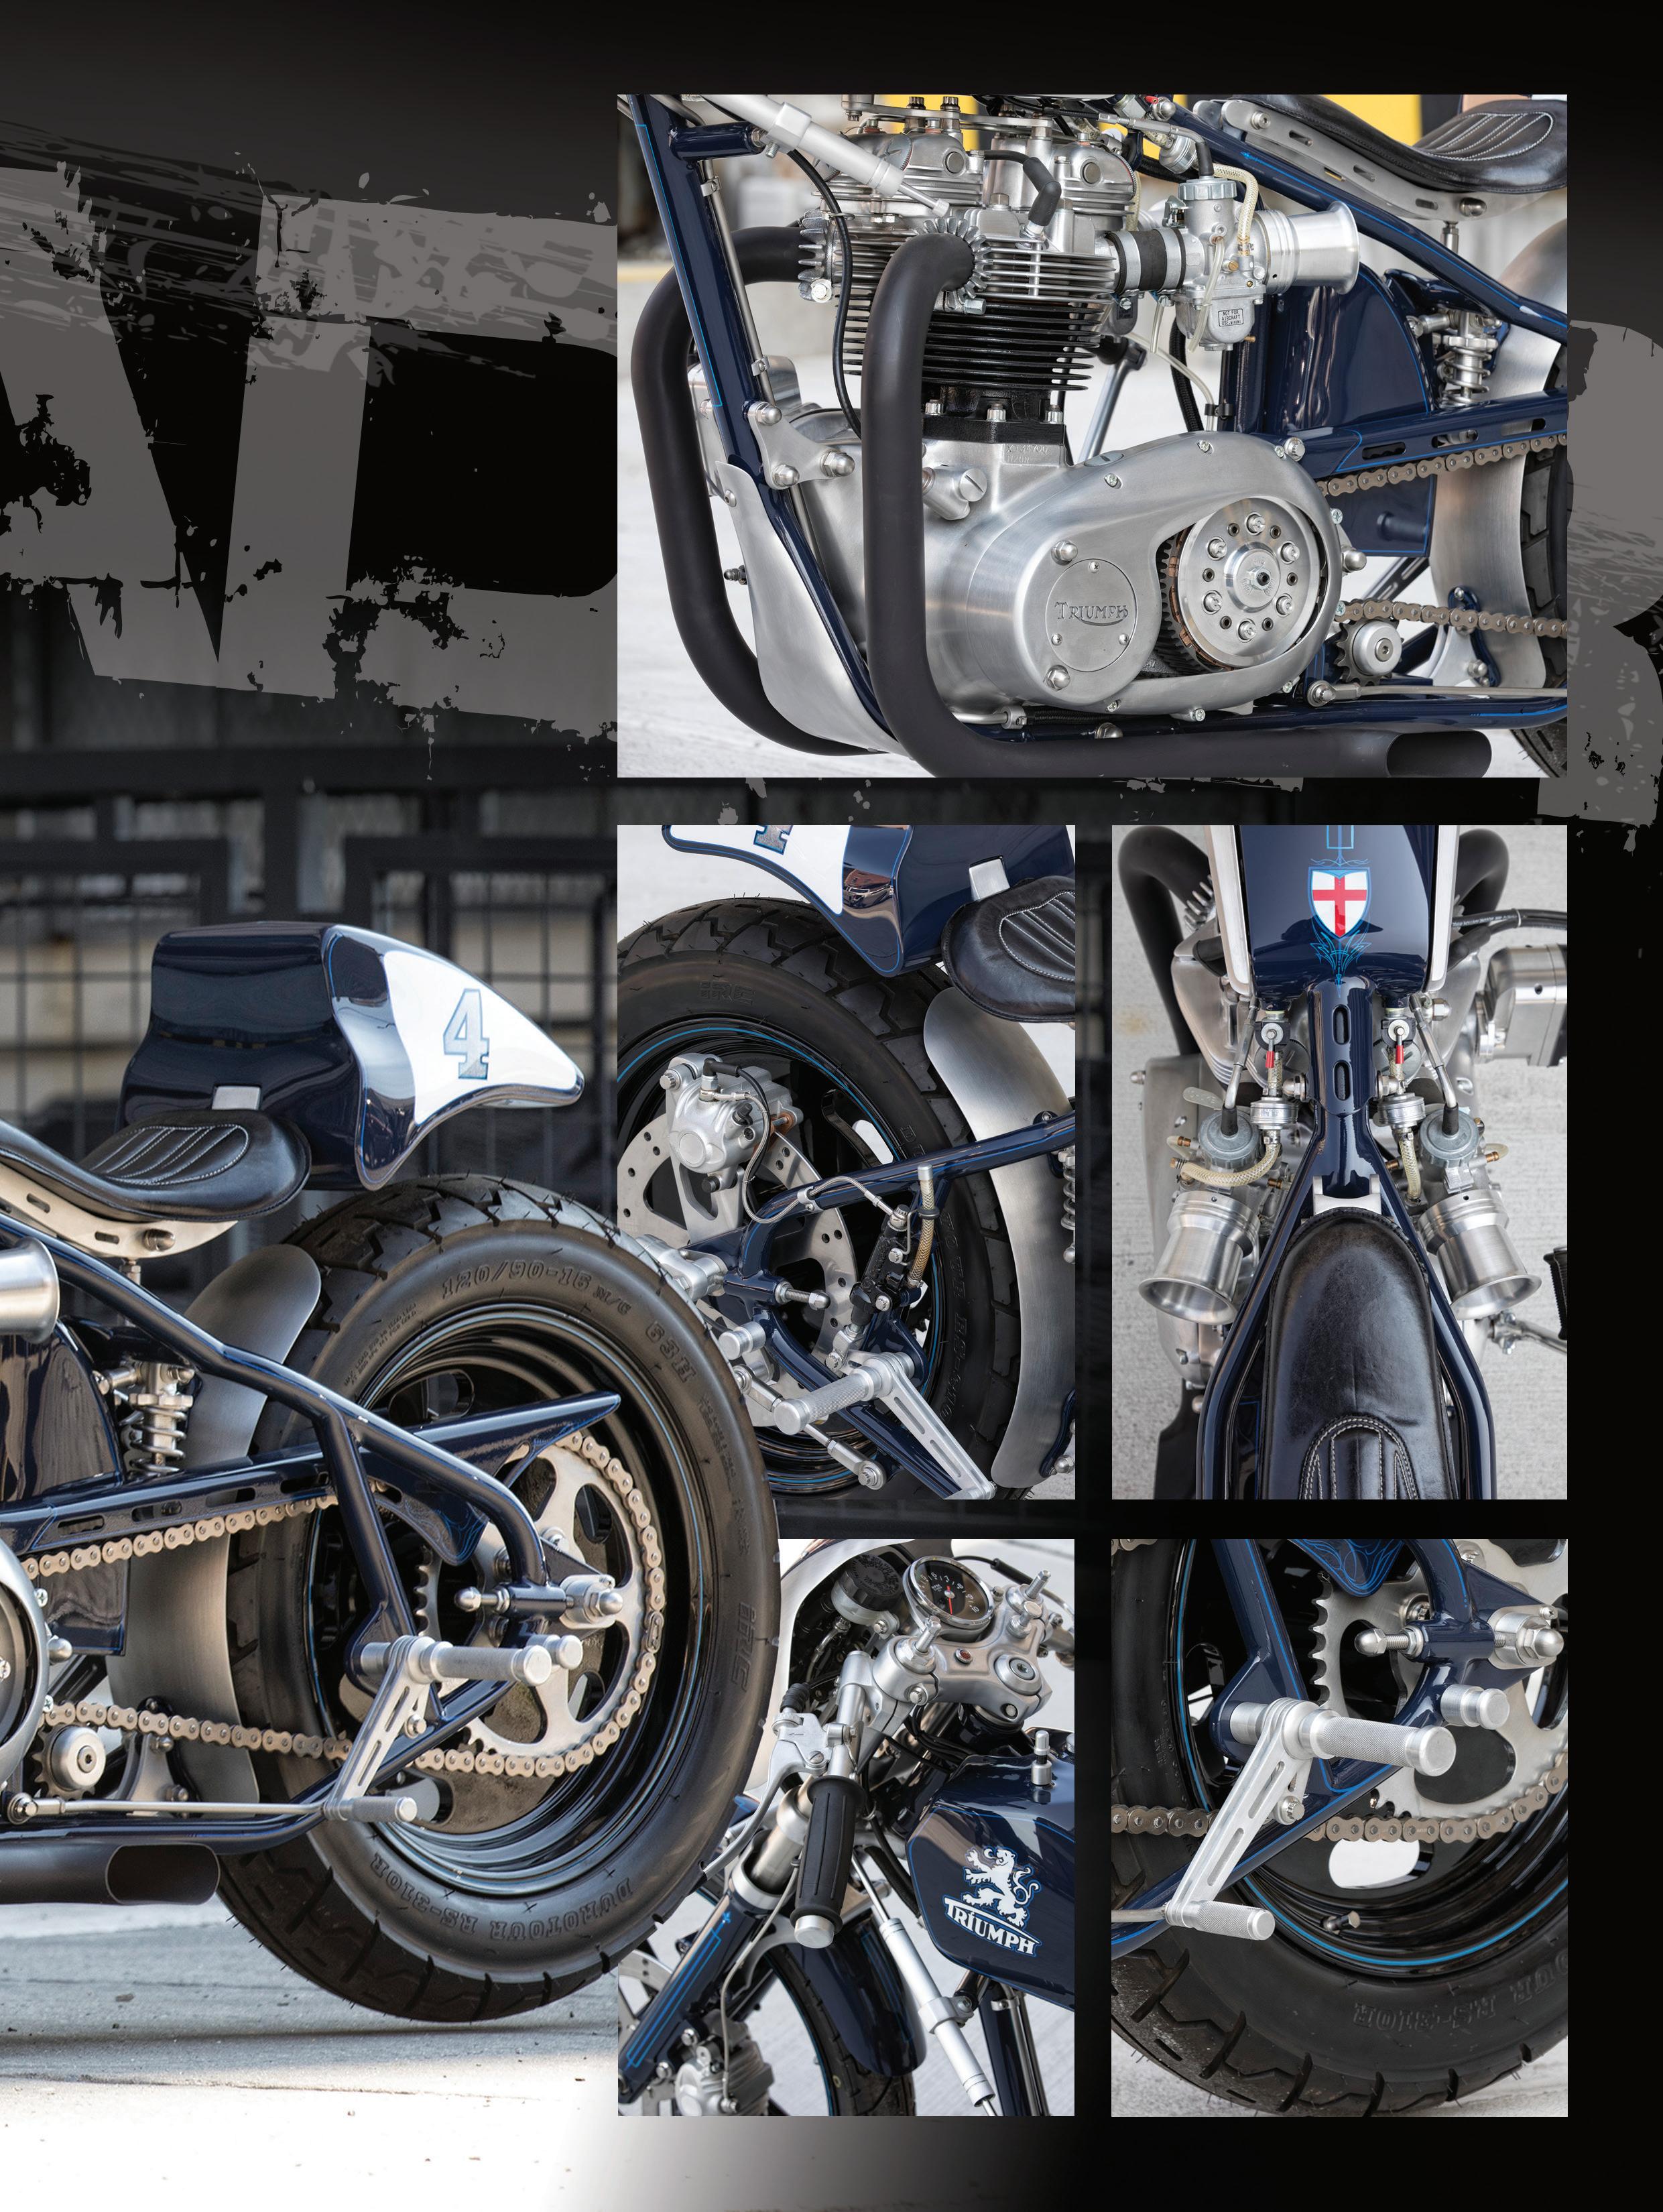
Now in pieces, the first mission would be to stretch a David Bird frame 4 inches and to add additional modifications to accommodate the seat section. If you take a look, the seat rides independent from the frame and sits on shocks with the tail section attached. Pretty damn cool, if you ask me. Also, this frame can and does accommodate a 130 hub in the rear! Old engine mounts were removed, and new custom tabs were installed to clean up the
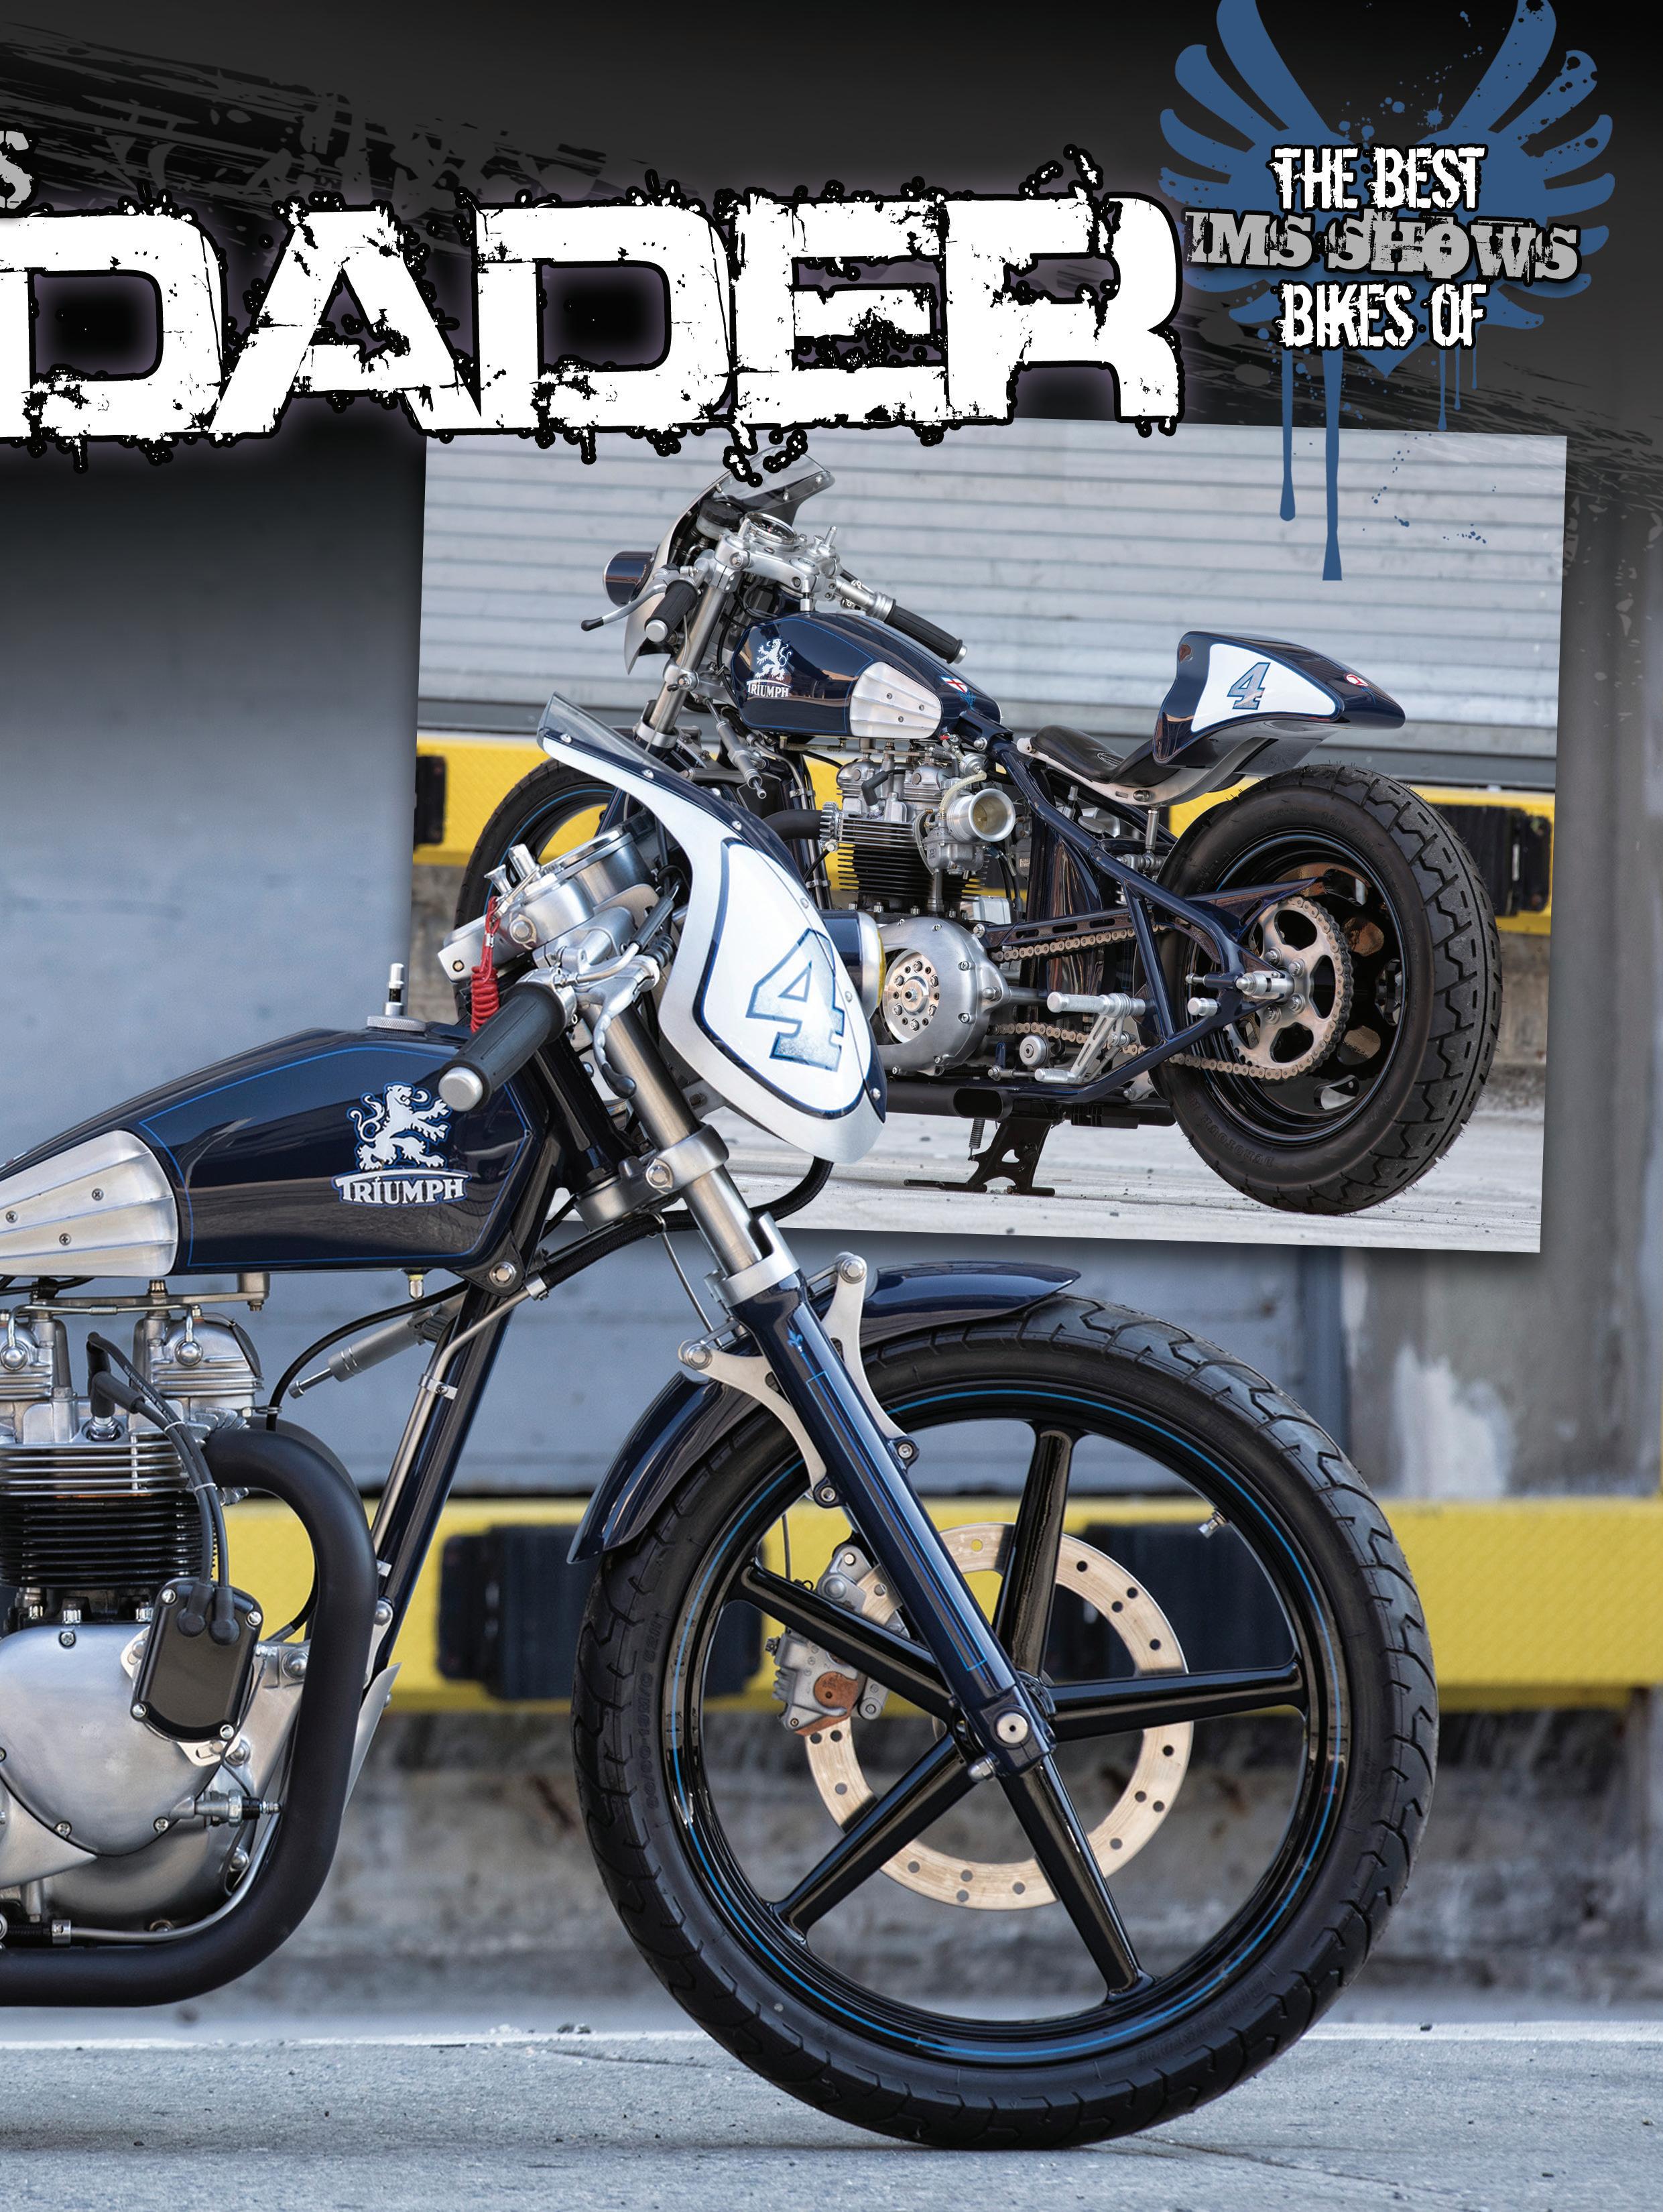
clutter. The front end, well that’s a 39 mm narrow glide 2 inches under with HD Sportster triple trees.
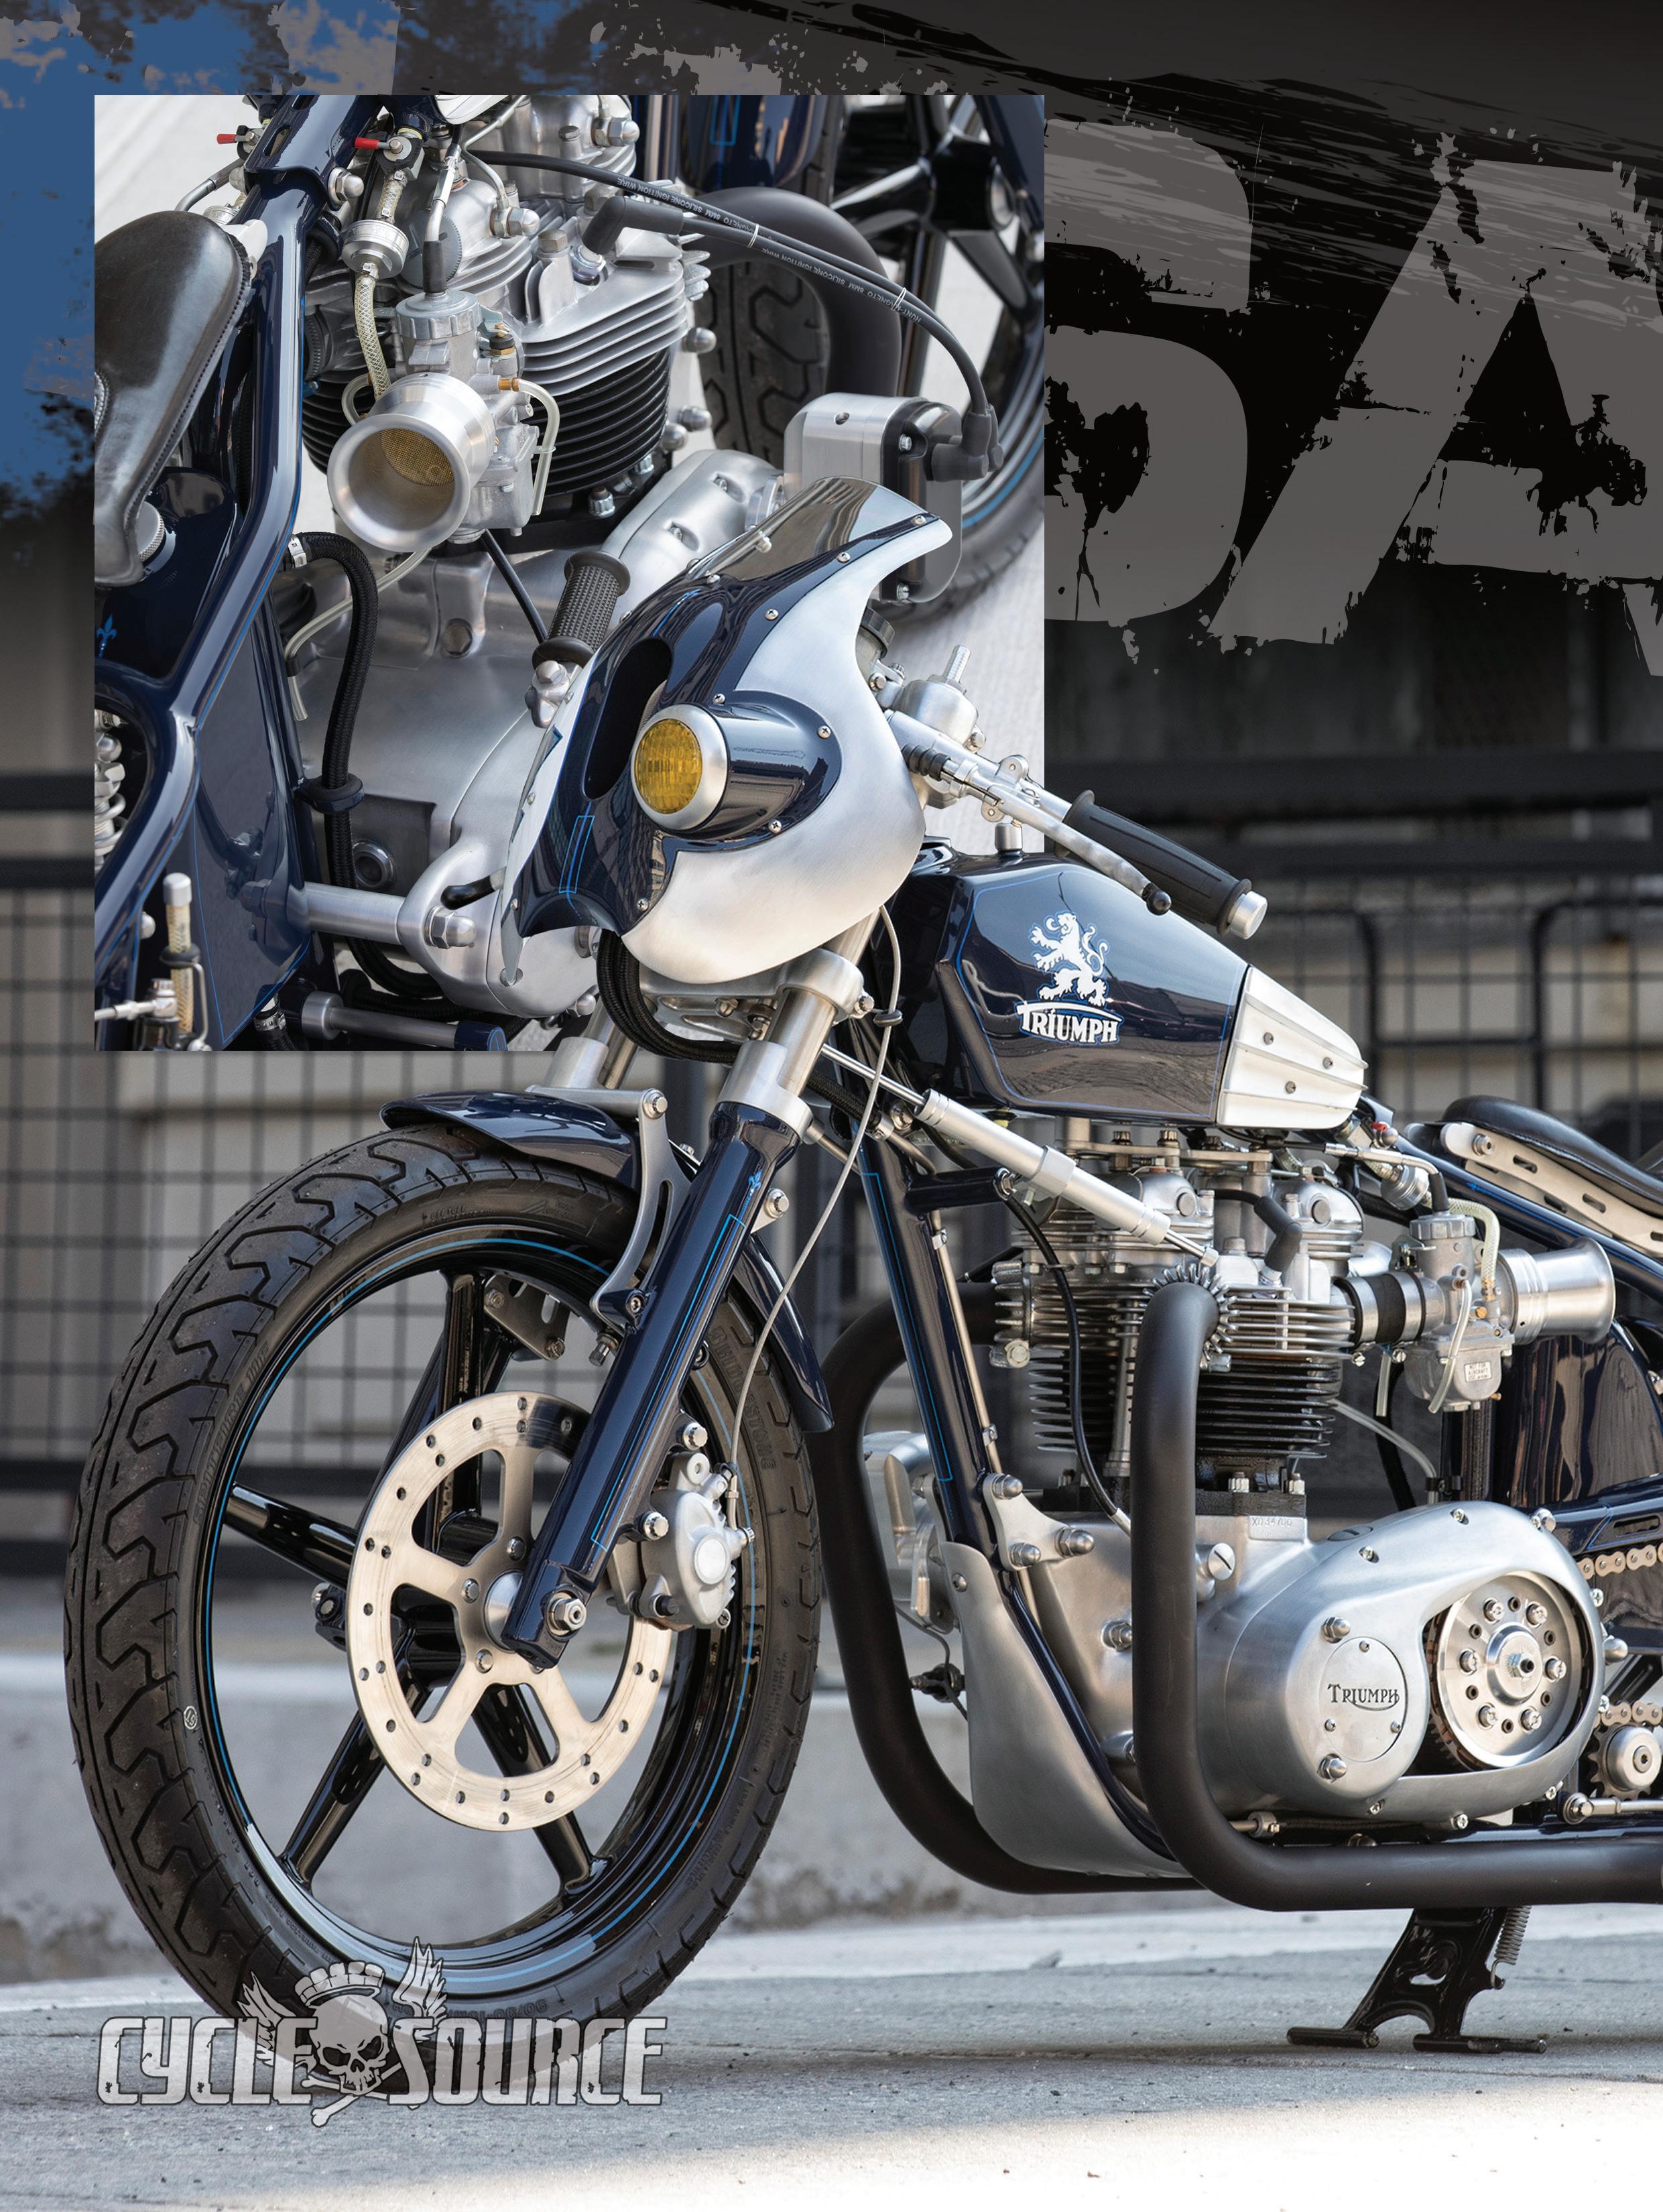
Getting to the engine - the upgrade was made from 650cc to 750cc. Modified cases, Hunt magneto, 30mm dual Mikuni carbs are just some of the standouts. A dry clutch with an open cut primary cover were added to the mix. And to wrap it all up, braking and shifting was tackled with heavily modified brackets and brakes from a 2005 Sportster and installed made to sit American.
With Iacona builds the visual is just as important as how she runs. The handmade signature tank, as well as the custom handmade tail section, is always an eye catcher. This is a design we first saw from Steve based on his famous bike, the Challenger. You will also see for the first time, a handmade fairing set
just off to the left headlight that is done only by Steve, but it will soon be a production part. There are many reasons this cool new fairing sits as she does and here are a few: The master cylinder is tucked away behind the fairing and is cable to hydraulic, to keep that clean look. If you look close, there is an oiler cooler with an air intake in the front which is why there is a screen. Rounding it all up is the very regal royal blue paint done by Shane Salsbury over at Wetcoat Inc. This paint job truly represents the royals for sure and does Triumph proud.
So, there you have it! Another Iacona classic. This, like all of Steve’s builds, is world class. The Crusader was a 2016 IMS 1st place winner in Chicago, National Champion in the Retro Modified class, invited to the 2016 Hand
Owner: Frank Mattera City: Brooklyn, NY Fabrication By: Iacona Custom Cycles Year: 1972 Model: T120 Value: Way Too Much For A Triumph Time: 6 Months
ENGINE
Year: 1972 Model: Triumph T120 Builder: Iacona Custom Cycles Ignition: Hunt Magneto Displacement: 750cc Pistons: Brittish Standard Heads: Stock Cam(s): Stock Carb: Dual 30mm Mikuni Air Cleaner: Dime City Cycles Stacks Exhaust: Iacona Custom Cycles Primary: Classic Cycleworks Transmission
Year: 1972 Make: Triumpj Shifting: Iacona Modified Left Side
FRAME
Year: 2012 Model: David Bird, Mods By Iacona Rake: Stock Stretch: Front end Type: H-D 39mm Narrow Glide Builder: Iacona Custom Cycles Extension: 2” Under Triple Trees: H-D Sportster WHEELS
Front Wheel: H-D Rocker Size: 19” Front Tire: Bridgestone Front brake: 2005 Sportster Rear Wheel: Solid Dish Size: 16” Rear Tire: IRC Rear Brake: 2005 Sportster W/ Modified Bracket PAINT Painter:Wetcoats, Inc. Color:Dark Blue Type: Porsche Graphics:Wetcoats, Inc. Molding:Wetcoats, Inc. ACCESSORIES bars: Clip Ons, Iacona risers: None hand Controls: Lowbrow Customs foot Controls: Iacona Custom Cycles Fuel tank: Iacona Custom Cycles oil tank: Iacona Custom Cycles Front fender: Iacona Custom Cycles rear fender: Iacona Custom Cycles Seat: Wetcoats, Inc. Headlight: Speed Dealer Customs Taillight: Iacona Custom Cycles Speedo: None
Built Show, and took 3rd in the Artistry and Iron competition where it competed with some of the best. I would have to say well done indeed! But if you think that this was the end of the journey for this bike you are very wrong. As we speak, the Triumph is being prepped and redesigned to hit the Bonneville Salt Flats this year! Both Steve and owner Frank are putting beauty aside and running her on the flats just like she was intended to do. Stay tuned for the next chapter in this bike’s life.
We talked a good bit about this beautiful scoot now it’s time for a little about its creator. Steve is a kind soul, good family man, and a kick-ass builder! He always carries a smile under his nose and welcomes a hello anytime. He is a true man of his craft straight out of Brooklyn. Iacona is currently working on a full line of parts for the consumer and I can’t wait to see what he brings to the table in 2018!

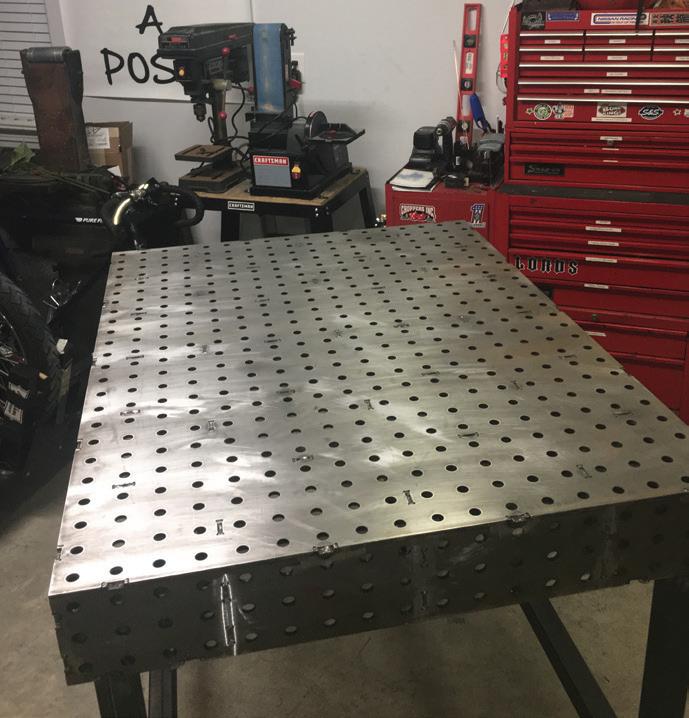
Hola Amigos!!!!! Hoping this finds all of ya’ll well and looking forward to another riding season. I’m not sure which is worse being on the East Coast and knowing that it’s going to be awhile or living in central Texas and being teased with one day of 65° weather and then rain and cold for the next few weeks. I guess, either way; it just allows more time to tinker on things... Speaking of tinkering on things,
I was in Dallas this past weekend at my first IMS (Progressive
International Motorcycle Show).
Man, what an experience. An entire pavilion set up with everything motorcycle related that you could think of. All the major manufacturers were present from import to American. Hell, they even had a Freestyle stunt team that performed inside, yeah it was a big place. One of the features they offered this year, and the main reason for my attendance was Grease & Gears Garage on the main stage. I was honored once again to be invited to do a live demonstration. I had done this once before in Sturgis last year when I installed a Baker tranny into Patience, and that was an absolute blast. I hadn’t realized how much I enjoyed passing on knowledge. The set up for this tour of Grease & Gears Garage was even better than the last; it boasted a huge stage, they had expanding
their tool/equipment inventory and the best part, was the bunch of characters I shared the stage with.
I did a demo along with South Dakota Joe Mielke (IG sodakbigjoe) on the many uses of Certi Flat weld tables (WeldTable.com) and was thrilled Big Joe was on hand, if there’s one other person than Dave Lago the owner of Certi Flat who knows the ins and outs of this table it’s Joe. Together, along with Chris, Mark, and emcee Pat Jensen we talked about the uses and various options that the Certi Flat offers as well as the price ranges and levels they’re designed for. Now, having just assembled mine a week earlier I was excited to see what this thing could do. Man, I wasn’t disappointed in the least, as a matter of fact, I couldn’t wait to get home to start tinkering with mine. There’s some magic that happens when you mic up a bunch of grease monkeys, and you put them on a stage with tools and a live audience, not to mention the tens of thousands that watch the feed live on Facebook. Anything can happen and usually does. It’s always a humbling experience to be working side by side with some of the best in this industry. I can honestly say that every time I get the opportunity to do something like that I always walk away with more knowledge than I started with. Hopefully, it’s the same with the audience but this I know to be true, the laughter that I heard when we were doing our thing tells me that not only were I and

my colleagues having a blast but so was the people watching. I mean, where else can you go to see live demonstration that maybe otherwise we would never be exposed to unless we paid to attend a school or specialty class. Professionals who have labored for years on perfecting their abilities who show you how it’s done for free, I’d say that’s a hell of Bargain!!!
Once again, I was amazed at the comradery that everyone showed the entire weekend, no egos or attitudes, just a bunch of different people who love motorcycles and the culture that surrounds them. I’d like to think that were all part of a community that helps instead of hinders this culture that is so important to us. If you didn’t get a chance to attend the show when it was near you this time, don’t fret it will be back and I highly suggest you check it out. I guarantee you won’t be disappointed.
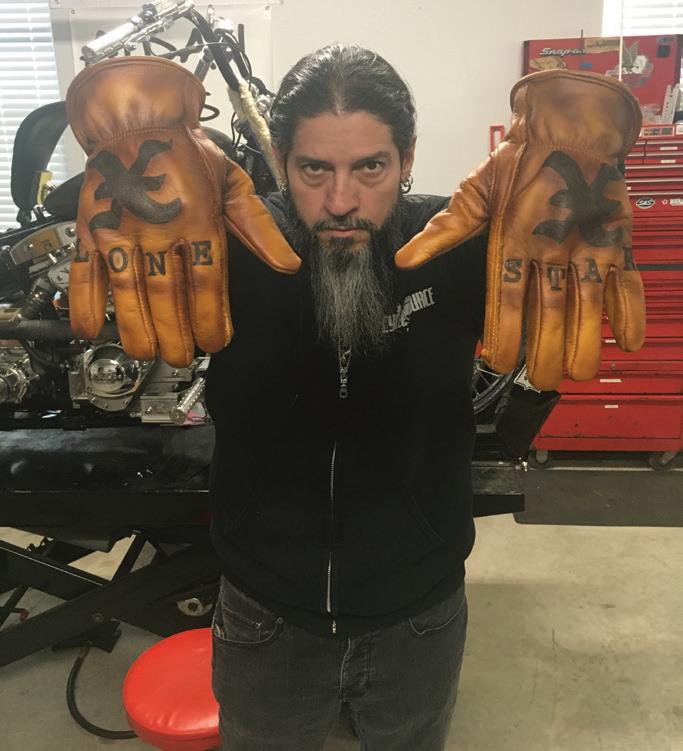
Myself and the guys that share the stage with me would like to give a huge thank you to Dave at Certi Flat Weld Tables for taking such great care of the Grease & Gears Garage stage. Get ready for a little shameless promo on one of my buddies…thank you to Josh Mc Elhannon at Greezmunky (IG greezmunky) for hooking me up with a pair of custom riding gloves for this season, they’re bitchin’, so be sure to check him out to get yours! Until next time my Amigos, be kind to one another and ride safe. God Bless. X.


Article And Photos By: Will Ramsey www.faithforgotten.com

In last month’s tech article, I asked if anyone would be interested in a deeper look at the threading process on a manual lathe. Since
I had an excellent response from many Cycle Source readers, I decided to proceed with this tech article.
Point threading is one of the more challenging and exciting operations performed on a manual lathe. It is an unforgiving process as one mistake can quickly ruin the entire part. So, it is important that every aspect of the operation is understood before diving in. The following tech is meant to be a starting point for those wishing to try their hand at point threading.
Illustrated here are the steps used at
Faith Forgotten Choppers to make an oil cap for one of our oil tanks.
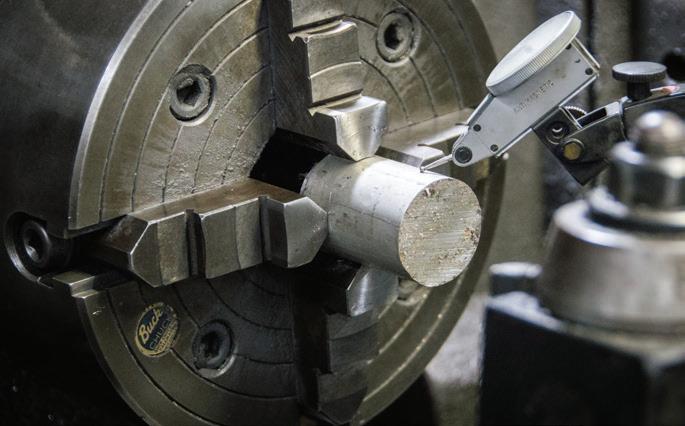
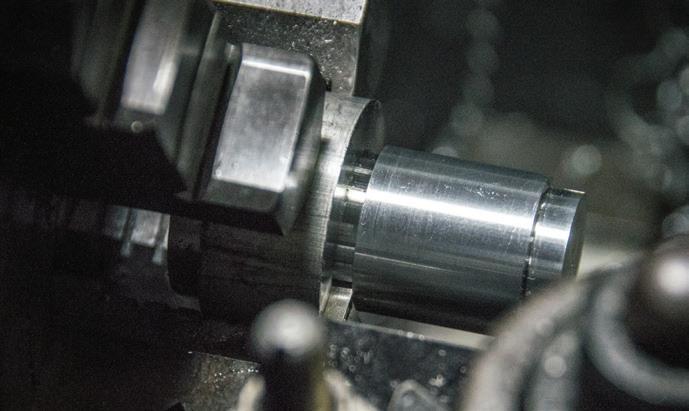
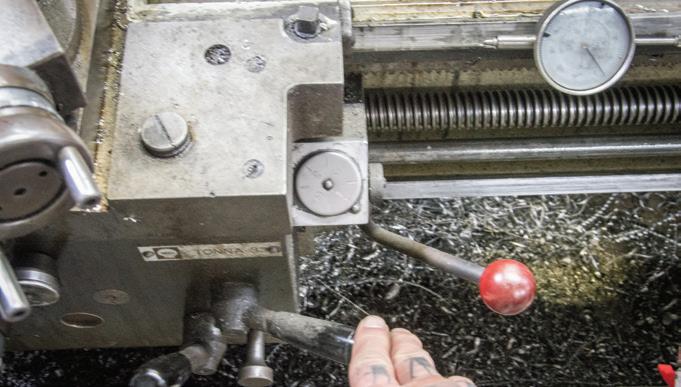
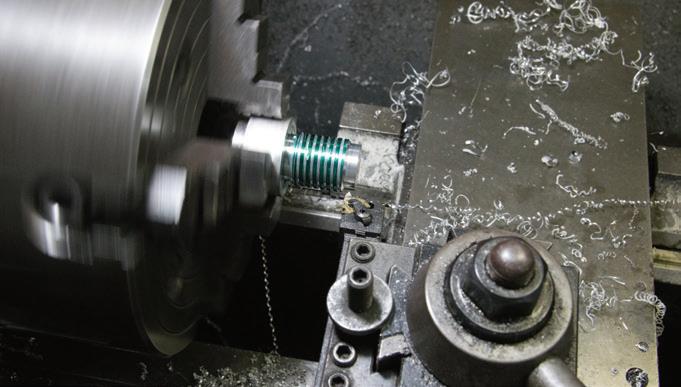
Starting with a simple piece of 6061 aluminum chucked up in the lathe. Three jaw chucks are quick and easy. A four jaw chuck creates more clamping power and the part must be indicated in as each jaw moves independently. The first operation is to face the material. Learning to get your speeds and feeds correct will yield an excellent finish. I’m always pushing myself to do everything just a little bit better than I did before.
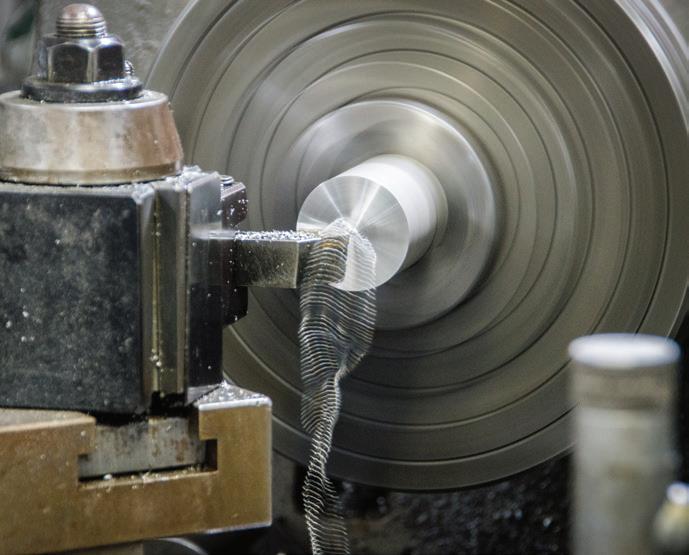

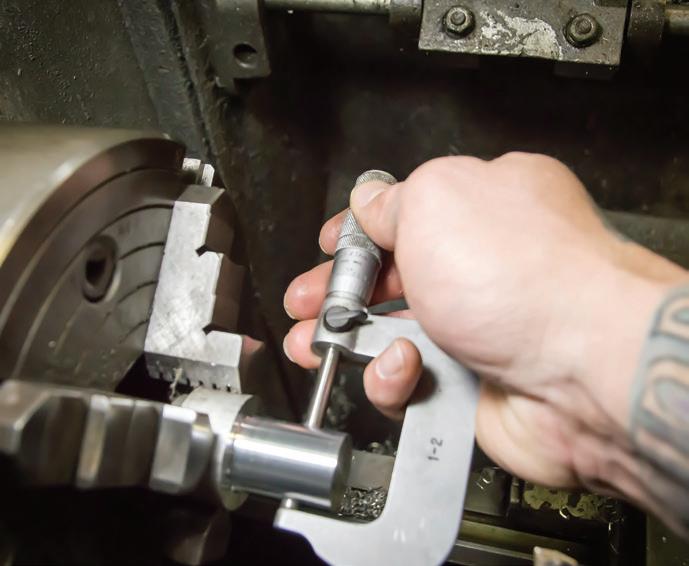
The outer diameter of the threads are achieved by turning the length of the threads. In this case the diameter of the threaded section of the oil cap is 1”. Precision is the key to any quality part. I always choose to mic my parts rather than using calipers. Strive for perfection even in areas where it’s not necessary.
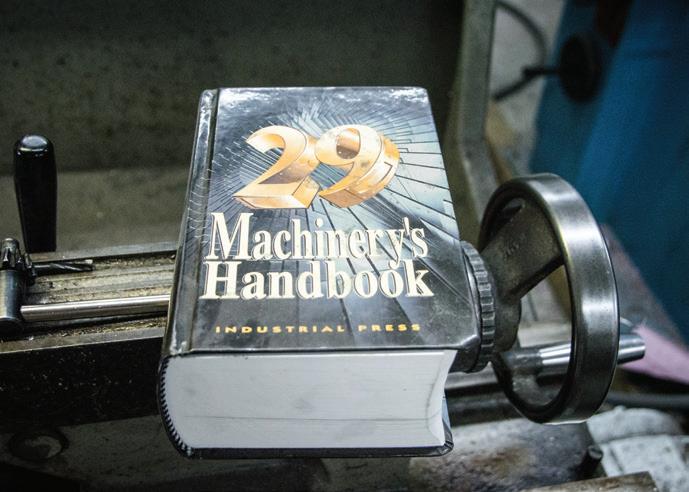
If precision and quality are attributes you strive for in machine work, then a copy of the Machinery’s Handbook is essential. This book is essentially the bible for all operations pertaining to manual machine work.
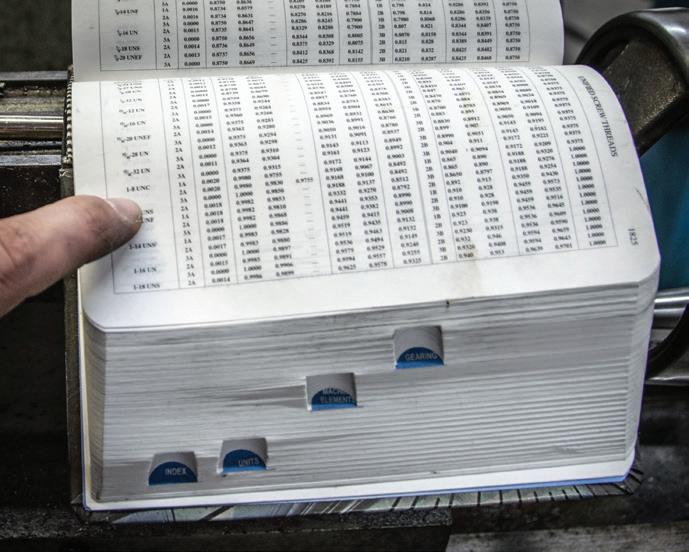
The threading section of the handbook will provide all the information needed to cut the 1” – 8 threads.
Before cutting the threads, I will turn a lead in that will allow the oil cap to easily index and line up in the threaded bung. This lead in must be smaller than the minimum diameter provided in the handbook.
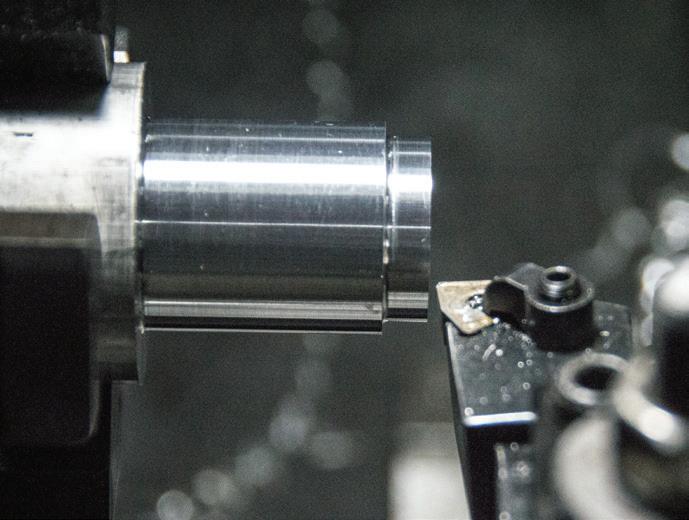
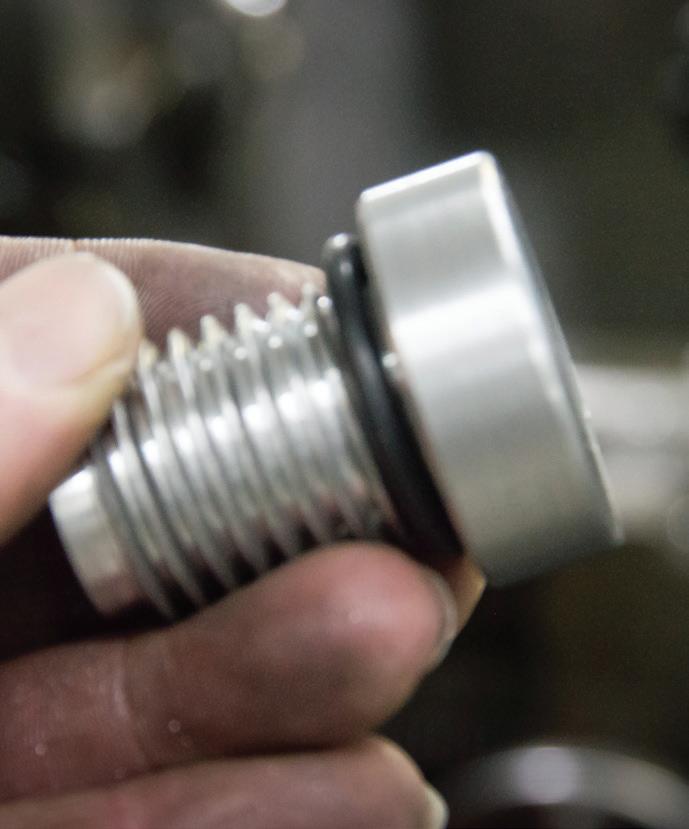
A grooving tool is used to cut an O-ring groove. This groove will also serve as a stopping point for the threading tool.
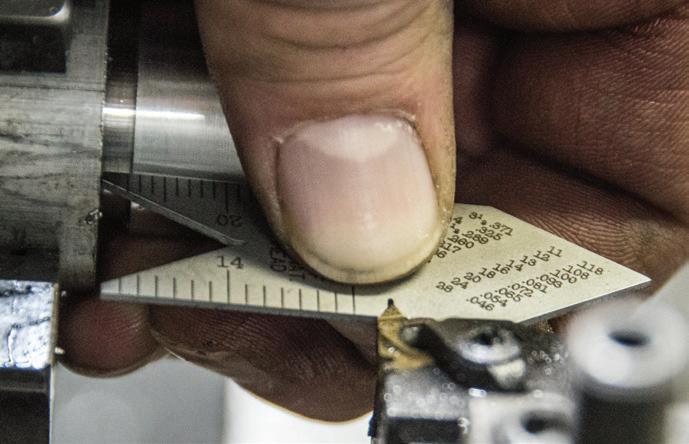
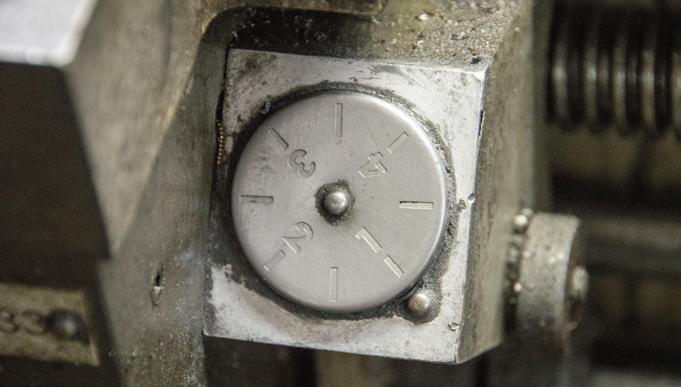
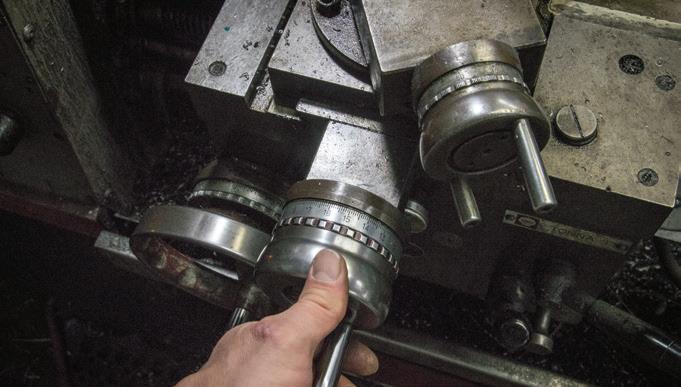
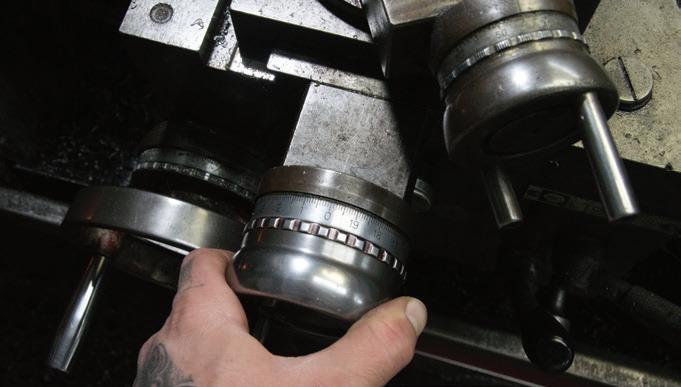
Setting up the lathe and threading tool is critical. First, the compound rest is set at 29.5 degrees. The threading tool cuts a 60-degree angle. Therefore, setting the compound to a 30-degree angle would seem proper, but the .5 degree offset ensures that the cutter only cuts on the leading edge, while the trailing edge “cleans” the remaining burr. The tool can be hand ground from a high-speed steel blank, or a carbide insert can be used. It is imperative that the tool is set perpendicular to the workpiece. A thread gauge (as seen here) or indicator can be used to square the cutter to the z axis.
Any lathe equipped with a gear box and lead nut should have some guide which instructs the setup of the machine to determine the thread pitch.
All the levers are turned to their appropriate places and the machine is set to turn the 1”-8 thread.
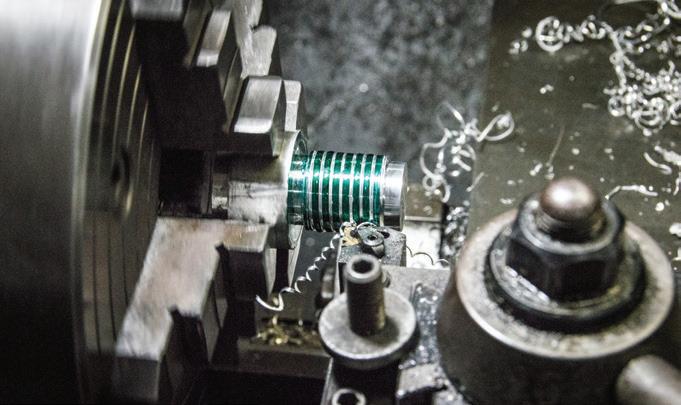
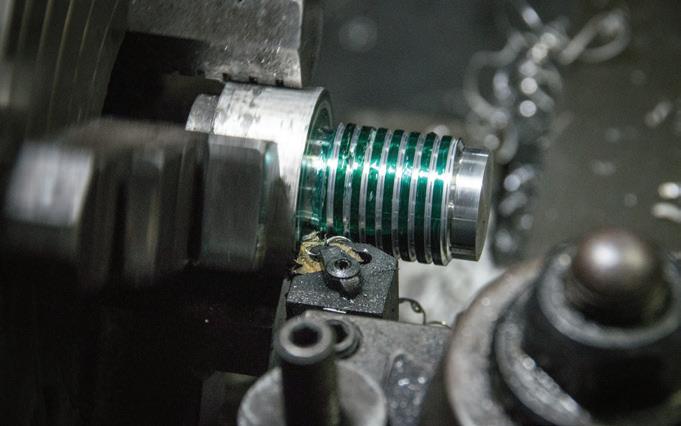
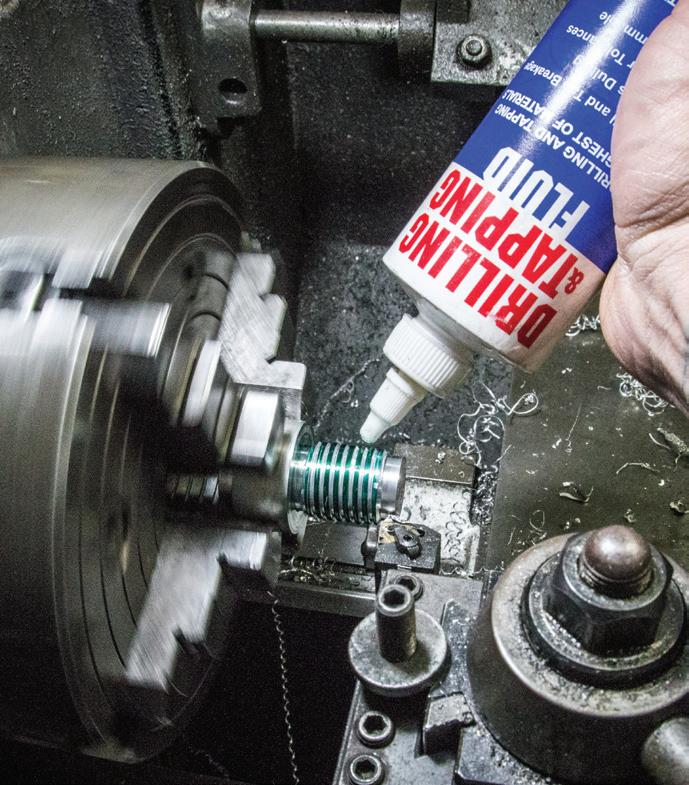
The use of layout dye is not necessary but it is very helpful in providing contrast, so the development of the threads can more easily be seen.
Understanding the threading dial on the lathe is important to cutting a clean thread. It has a deeper complexity when you get into complicated thread pitches but for the basic threads we cut the rule is that on even thread pitches you can engage the half nut on any of the 8 lines. On an odd thread pitch you need to engage only on the numbered lines. To keep it simple, when I thread, I only engage on the numbered lines no matter what thread pitch I’m using. This ensures that the cutter always tracks along the same path.
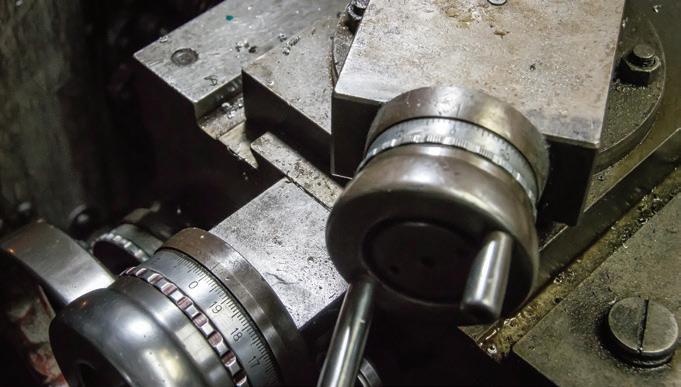
With everything set up I move the threading cutter to touch off on the workpiece and zero the dials on the compound rest and the cross slide. The compound rest will be determining the depth of cut as the cutter is advanced along the 29.5 degree angle that was already established. .005” cuts are taken until the thread depth approaches its final diameter.
After advancing the compound rest .005”, the half nut is engaged on the lead screw and the cutter will advance at the appropriate feed rate.
As the cutter advances the contrast to the layout dye allows the operator to monitor the cutting process.
The half nut must be manually disengaged as the cutter enters the groove at the base of the cap. This is critical. If it is stopped too early the

cutter will circle and tear through the existing threads. If it is stopped too late the cutter will crash into the workpiece.
Once the cutter is stopped the cross slide is used to back the cutter up far enough to clear all the thread as it is returned to the starting point.
Once returned to the starting point the compound can be advanced another .005”
The cross slide is returned to zero every time the cutter is repositioned at the start. This dictates that the only advancement in the x axis will come from the 29.5 degree advancement of the compound rest.
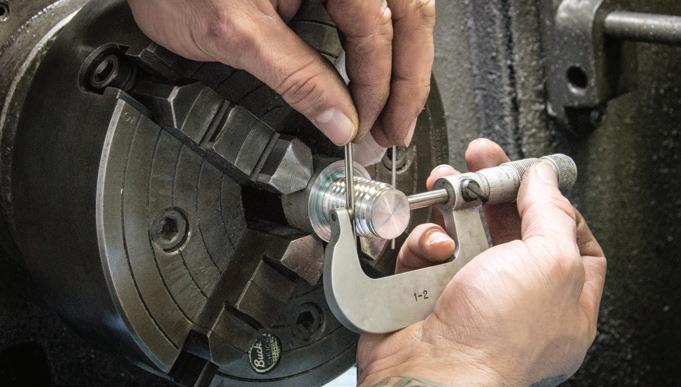
Before each pass it is prudent to liberally apply a cutting oil. This will lubricate the cutter and minimize heat buildup in the workpiece. There are essentially 2 methods used to determine the depth of the thread. The most precise is the use of a mic around thread gauge wires. This is a difficult operation and requires you to pretend you are an octopus. It takes a lot of practice to hold the three wires square and measure precisely. Once the measurement is made there is mathematical formula used to determine the measurement in relation to the minimum diameter as found in the Machinery’s Handbook. The details of this process are beyond the scope of this tech, but I’d be happy to discuss the process with anyone interested.
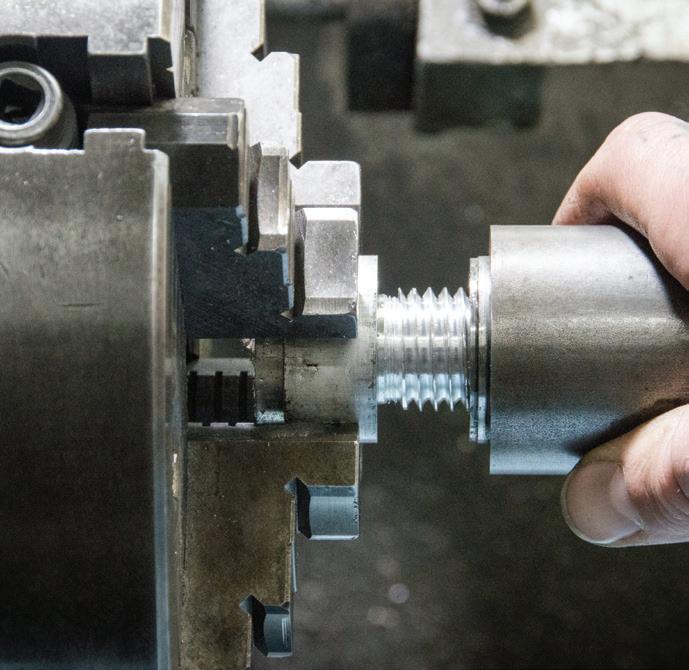
The second method is the use of a “go, no-go” gauge. This can simply be a piece of scrap that has been tapped to the proper thread diameter and pitch. This method is not as precise as the wires and the operator must be care full to slowly creep up on the final cuts so as to not over cut the threads and create a loose fit. After the threading procedure is complete the cap is threaded into a bung and held in the lathe so that the tops side can be finished appropriately

Point threading on a lathe is an advanced skill and demands a great deal of concentration. Although CNC lathes can crank these out all day with easy, there is something very gratifying for a craftsman to hold a truly handmade thread after the process is complete.