SET UP & INSTALLATION INSTRUCTIONS PRINTER SETUP
VISIT DECOPAC.COM FOR PHOTOCAKE PRINTER MAINTENANCE VIDEOS!
NOTE: DO NOT CONNECT TO WI-FI DO NOT UPDATE FIRMWARE
CONTENTS

• Printer
• Power Cable
• USB Cable

• Removable Output Tray
• Sample Pack of Ink Cartridges
* Remove all clear plastic protective wrap, foam and blue tape from the Printer.
7. Press and hold the Power button for 3 seconds to power on the Printer. Printer set up
1. Unpack the Printer completely. Remove all tape and Styrofoam inserts.
2. Extend the Input Tray on the back of the Printer.
3. Adjust the gray paper feed guides to their furthest position.
4. Extend the Printer’s Output Tray, then lift the tab up on the end of the extension.
5. Slide the removable Output Tray onto the Printer’s Output Tray extension ensuring the extension tab slides through the slot on the removable tray.
6. Connect the Power Cable into the back of the Printer. Note: It is key to plug into the surge protector.
Step 1: Installing Inks
-Select Preferred Language
- Select 'No' when asked if you wish to setup using the Epson smart panel App
-Insert inks when the screen prompts you to
- Install ink tanks matching the colors to the indicated position of each of them in the carriage.
- Once all Inks are installed, select 'Start'

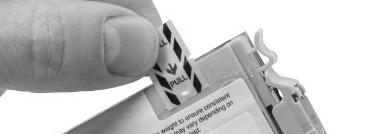
Ensure removal of yellow pull tab!

Step 2:
Initializing Inks
-Close Lid
-Allow inks to charge (This process can take several minutes)
- Select 'Done' once you see the Initialization complete message
- Select 'Adjust Later' when you see a message that says ' Align the Print Head to get the best print quality'
-Home Screen will display when complete
Step 3: Connect Printer
Step 4: Perform Color Test
Connect the Printer to the Controller using the provided USB cable.
-Insert a piece of paper into the rear paper feed tray
-Print a Color Test via the PhotoCake system
-Select Preferred Language
- Select 'OK' when asked if you wish to continue setup without the App
-Insert inks when the screen prompts you to
- Install ink tanks matching the colors to the indicated position of each of them in the carriage.
- Once all Inks are installed, select 'Installed'

Ensure removal of yellow pull tab!

-Close Lid
-Allow inks to charge (This process can take several minutes)
- Select 'To adjustments' once you see the Initialization complete message
- Select 'Adjust Later' when you see a message that says 'Align the Print Head to get the best print quality'
- Select 'Dismiss' on the Print Head adjustment complete message
-Home Screen will display when complete
Connect the Printer to the Controller using the provided USB cable.
-Insert a piece of paper into the rear paper feed tray
-Print a Color Test via the PhotoCake system
(1-800 -332-6722) ESPAÑOL: 1-800-898-3063 FAX: 763-502-0534 PHOTOCAKE® TECHNICAL ASSISTANCE: 1-800-644-1228

