5 minute read
MULTI-PERSPECTIVE CHARACTERIZATION OF TOOL PERFORMANCE
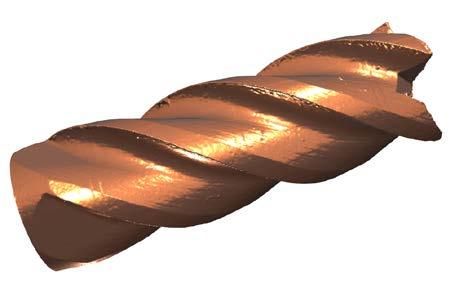
One of the critical applications of optical metrology in tooling is the dimensional characterization of cutting tools to ensure they perform optimally and have a long service life. Roughness measurements can also be used to predict how removed material will exit the tool in the aim of preventing clot formation or overheating. In addition, optical metrology can provide local measurements to help identify issues such as chipping or coating peeling, which indicate if a tool needs to be replaced or repaired. In the following study, all these characterizations, which come in very different orders of magnitude, were managed using one, unique set-up: Sensofar S neox Five Axis and SensoMap software.
Advertisement
The S neox Five Axis system features a rotational module, which allows for the complete measurement of sample shape. This is particularly useful in the tooling industry, where precise measurements of cutting tool geometries are critical to achieving optimal performance.
The system offers three technologies: Confocal, Interferometry and Active Illumination Focus Variation (AiFV), allowing measurement of roughness, cutting edge, shape of tools and micro-tools. In this particular case, AiFV is the preferred choice due to its fast measurement speeds and superior ability to measure slopes.
After acquiring the necessary data, we analyzed the mesh data comprehensively. This is where SensoMap software proves extremely useful, particularly its Shell Module, which allows users to extract dimensional and roughness information by navigating from mesh to topographical data and then to profile data.
Dimensional Analysis
Several measurements were performed using parametric profiles generated from shell data to comprehensively understand the end mill geometry.
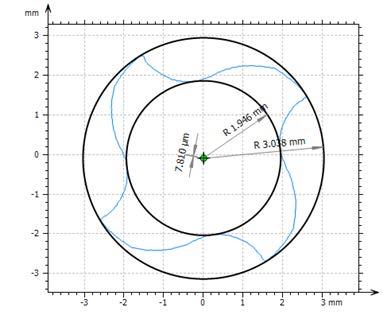
Firstly, cross sections were extracted perpendicular to the cutting axis of the end mill at multiple locations along the flute length to determine whether the tool maintained consistent external diameter. Additionally, we calculated the concentricity between the inner and outer circles to check for any tool run-out.
Another measurement allowed us to examine the pitch of the helix. To achieve this, we fitted the tool to a cylinder and unrolled it. Next, we extracted a profile perpendicular to the helix angle and measured pitch distance. By using advanced measurement techniques and software, such as those employed in this analysis, manufacturers can optimize their processes, reduce costs, and improve product quality, ultimately contributing to better business and customer outcomes.
Roughness Analysis
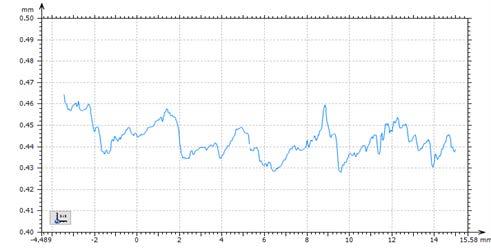
A profile was extracted from the previously unrolled cylinder and roughness parameters according to ISO 4278 were calculated.
We were thus able to ensure a clean surface finish on edges rather than a rough one, which can negatively impact the quality and performance of the tool.
Peeling Assessment
One of the most important features of cutting tools is their coating, which significantly impacts their durability and ability to withstand high-stress processes. The SensoMap Shell Module was used to evaluate peeling through extraction of topographies from the mesh. Then, using the Particle Analysis tool, we were able to focus on the areas where peeling occurred and determine the extent
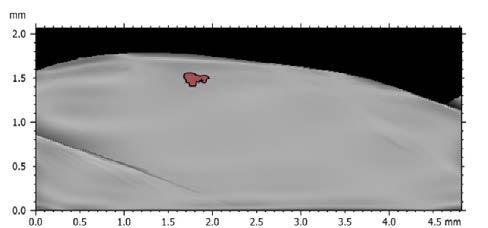

AUTHOR of damage. This allowed us to understand peeling area dimensions thus aiding investigation into whether it was limited to the coating or if some material was missing due to chipping.
By identifying the extent of coating peeling and chipping, appropriate action can be taken to ensure that the tool remains in optimal condition and performs to its fullest potential.
Conclusion
The combination of SensoMap software and the S neox Five Axis made it possible to characterize end mill dimensions, roughness and peeling defects. With this innovative technology, manufacturers can achieve unprecedented levels of precision and accuracy, making it possible to produce high-quality products that meet the demands of today’s market.
Natalia Bermejo Gijón-Bonales, Product Specialist at Sensofar Metrology
INSTRUMENTS & SOFTWARE USED
Senosofar S neox Five Axis system & SensoMap software powered by Mountains®

LEARN MORE www.sensofar.com/metrology/industry-research/sneox-fiveaxis/
WHAT ARE THE DIFFERENCES BETWEEN ISO 4287 AND ISO 21920?
Until recently, profile parameters were defined in three international standards: ISO 4287 (main parameters), ISO 13565 (Rk parameters) and ISO 12085 (R&W motif parameters). 25 years after their implementation, it was time to modernize, correct and extend these standards. This was the aim of ISO 21920, a standard in three parts published in Dec 2021.
François Blateyron, senior surface metrology expert at Digital Surf and member of ISO Technical Committee 213, describes the main changes.
ARE THE FORMER STANDARDS STILL VALID?
The new ISO 21920 standard officially replaces ISO 1302, ISO 4287, ISO 4288, ISO 13565-2 and -3 which were withdrawn at the end of 2021. However, existing specifications made on technical drawings published before the new standards are still valid and bound to the former standards. Specifications made on new drawings may refer to either the new standard or the former standards. This is possible by adopting the new “root symbol” defined in ISO 21920-1, meaning that parameters are defined in ISO 21920-2 and decision rules are described in ISO 21920-3, or keep the existing symbol defined in ISO 1302, which means that parameters are defined in ISO 4287 or ISO 13565, and decision rules are described in ISO 4288.
However, their definition in the new standard is slightly different so it may create different results.
Reason 1: different
Operation Workflow
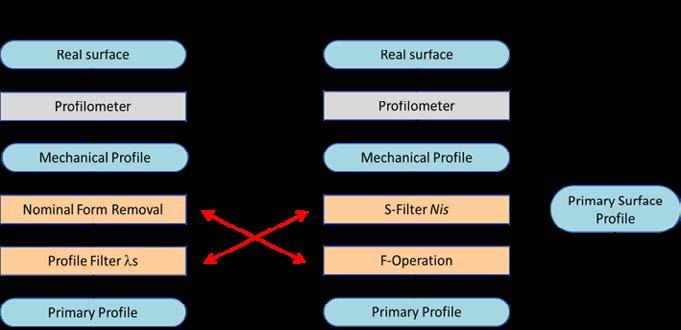
The first important change concerns the order of some operations. In ISO 4287, the primary profile is obtained after a nominal form removal followed by a lambda S filter. In ISO 21920-2, these operations are reversed, in order to be aligned with standard practice for surfaces. In the end, the disparity in results will be small, but for some profiles, especially those that contain form, the parameters may show significant differences. Procedures will have to take this into account when verifying specifications based on ISO 21920.
Reason 2: definition on the evaluation length instead of the
sampling length
Although the former standards can still be used, they are no longer official international standards and are considered as obsolete with respect to current industry practices. It is expected that the switch to the new standard will take several years, but ISO 21920 will become the dominant standard.
ARE THE PARAMETER VALUES THE SAME?
Most ISO 4287 parameters are still included in ISO 21920-2. Designers and metrologists will still be able to specify tolerances on Ra or Rz or Rsk.
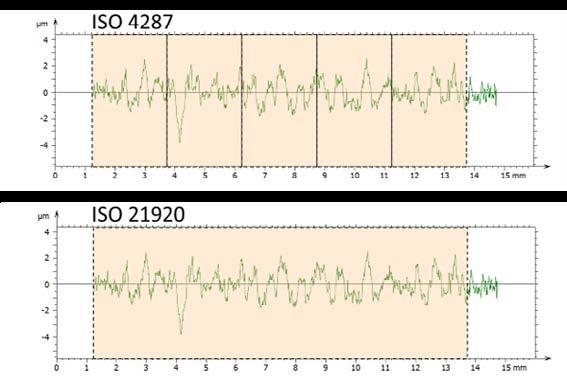
The second major change concerns the definition of parameters that are no longer averaged over sampling lengths. In ISO 4287, parameters were estimated on each sampling length (5 by default) and the final value was indeed the average of these estimators. The aim of this procedure was to stabilize results when measured by workshop profilometers, in production. Now, this precaution is no longer needed and only one value is calculated over the evaluation length. The only exception is for parameters related to peaks and pits (Rp, Rv, Rz) that are still calculated on section lengths to avoid unstable results.
Be prepared to cope with parameter differences
When compared on the same profiles, the two standards show satisfactory correlations on most parameters, but some parameters are more sensitive to the changes and will give different results on the same profiles. It will be necessary, for industrial users, to evaluate the impact on their workpieces and potentially update the tolerance limits on their technical drawings. However, this should not discourage users to adopt the new standard.
Left. Modified workflow with inversion of the S-Filter and F-Operation.
Welcome To The Future
Despite potential parameter differences, the new standard is better suited to modern product specifications. Besides the differences on existing parameters, the new standard also introduces new parameters that are highly adapted to modern engineered surfaces.
Left. Parameters are now defined on the evaluation length and no longer averaged.

Left. Differences depend on the parameter and on the profile: Rq values are virtually unaffected whereas differences in Rsk can be more significant.
It is the responsibility of designers and metrologists to update their knowledge and understanding of the new standard.
Surface texture specifications cannot be limited to Ra and ISO 21920 offers a wide range of parameters adapted to the surfaces of the 21st century.
MountainsMap® 9.3 software, as well as partner packages based on it, includes the ISO 21920 standard as well as the former ones.
Additional Resources
▶ A deeper look at ISO 21920, in our Surface Metrology Guide: guide.digitalsurf.com/en/guide-iso-21920-parameters.html
