
8 minute read
GUGLATECH FUEL FILTER

by dirtbiketest

GUGLATECH FUEL FILTER BY: JIMMY LEWIS
ROOST - Cleans your fuel before it causes problems - Easy install, Easy use - Can be cleaned easily
Advertisement
ENDO
- Won’t take water out of ethanol gas
- If a lot of water is present, the filter must be drained - Expensive at first glance
WHAT IT IS - A pre-filter for your fuel
The Guglatech fuel filter has a funny name but it’s designed to strain out everything but gas when filling your tank or fuel can. The filter is a sleeve or tube made with the company’s proprietary HDM3D material that is claimed to trap particles down to 10 microns, and prevents contaminants like water from passing through. The filter is designed to catch the bad stuff before it gets to the fuel pump’s pre-filter, or worse yet, into the carb or fuel injector. This simple to install filter is meant as a first line of defense for your fuel pump or carb. Retail price ranges from $60-$190 depending on the application.
HOW IT WORKS - Takes the dirt and particles out of bad gas - Easy installation with minimal tools - Won't stop water in ethanol gasoline
We’ve been using the Guglatech filters in a few of our bikes for the better part of the last year and a half. Typically, we get clean gas here in the United States at most stations we are familiar with and frequent. So gas coming from a higher-volume retailer isn’t much of an issue for the most part. But with anything, we have had some issues. Some cases are self-caused, like using dirty gas cans with debris in them. Some bad gas comes from a bad

batch or the bottom of the tank at a gas station every so often. Don’t believe us? Look at the bottom of your gas tank or gas can next time it is near empty. The results may surprise you!
Guglatech filters slide right into the tank with a lip or rim on the filter that mates to the mouth of the gas tank. Best Rest Products (the US Importer) also makes a nifty tool to help push the filter down into the tank and open it up. Install takes all of two minutes on the bikes we utilized. We also used one designed for slipping on the nozzle of the fuel pump at a gas station.
With the filter installed, we gassed up bikes like normal and never experienced any issues to report as far as fuel filtration goes. After a while, we pulled out the filters and examined the membrane and noticed a fair amount of particles trapped. In one instance, we even found some larger gunky material. The filter works at taking out stuff that would largely contribute to shortening the life of the fuel pump’s filter or plug injectors or small jets. Clean gas flows right through the filter in our smaller-sized units at the pace of a normal fuel station pump speed. If the gas is dirty or the filter is dirty from use over time, the pass-through slows down accordingly. Especially when water is present.
For racing and quick-fill applications, the filter may not pass the gas quick enough. We have seen plenty of demonstrations of this filter not letting water pass through it, but this is highly dependent on the gasoline you are using. If you have non-ethanol gasoline, the filter will remove the water in fuel (and most anything else that will separate from the gas if it sits around) without having to let it sit for some time. The more water present, the slower the gas begins to pass. The Guglatech will actually start to overflow if there is that much water, yet that seems very uncommon and only happened when we were messing around for testing purposes. Of note when new, we added only water to the filter and small droplets were slowly able to pass through at the seams and where the ink was on the membrane. However, after repeating this test later after gas had already passed through the filter, it held watertight enough that it would take a long time for any water to pass into our tank or can.
Over time, we cleaned out the Guglatech filter by back flushing it using gasoline and examined the debris across a white paper towel. The filter’s contents revealed a lot more contamination than we’d thought. The company says fuel injector cleaner can be used for cleaning also. We used soap and water, additionally back flushing the filter, which worked for getting the filter looking more clean but the company advised that the soap can contribute to plugging the filter also. Our bad.
With ethanol gas, the ethanol absorbs quite a bit of water and will drag it through the filter. So be aware of this if using ethanol gas–as this blend always has a bit of water in suspension. Gas with ethanol added is also sensitive to temperature changes, and especially in areas with high humidity, so passing water will occur. The filter tries to separate free-standing water, but the ethanol wins this battle of chemistry.
In areas with sketchy gas, often when traveling in remote areas, this filter can be a huge advantage and possibly save you lots of time and hassle as a simple and effective smart measure. The filter was also great for recovering gas that had been stored in dirty cans or tanks where ordinary filters would only get the big stuff. At $60-$110 depending on the application, the Gugklatech fuel filter is cheap insurance (comparatively) from the problems dirty fuel can cause and it will really prolong the life of your internal fuel filters and especially fuel injectors.
BROUGHT TO YOU BY
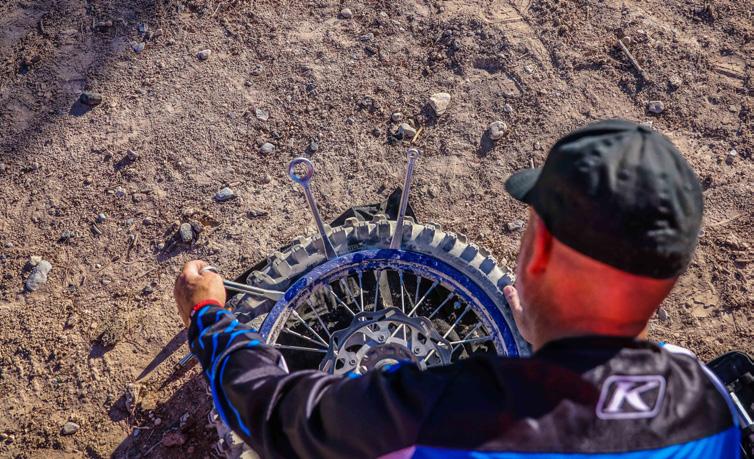
TRAILSIDE TIRE CHANGE BY: JIMMY LEWIS Changing tires is hard enough for most riders in perfect conditions, but what do you do if forced to do it out on the trail? We’ll give you some insight based on years of experience learning the rights and wrongs of the process.

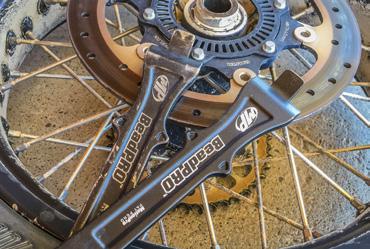
Have the right tools. How do you make sure? Use them in a garage tire change to verify it. The basics are: wrenches/sockets to remove the axle, wrench/socket for the rim lock, something to keep dirt out of the bearings, valve core remover, compact tire irons, and a compact tire pump. An extra valve core and a valve stem nut can come in handy too.

How do you hold up the bike? What do you use for a stand? Or do you even need one? Logs are great, rocks can work, and we’ve even laid a bike over on the side or dropped/hung the bike on a ledge to allow easier wheel removal. The answer is to use what is available. Often a little hunting for a proper nature-made stand can really save time and effort. And remember the “balance” of the bike will drastically change when the wheel comes off, so expect that.
A great place to store the axle is in the muffler. Also, keep the loose parts away from the working area because we all know how hard it is to find parts that have been kicked or buried in the dirt, or even worse, sand.

The techniques for the actual tire change do not change on the trail. So if you do not have these techniques, they will not manifest in this time of need. So yes, practicing this in the garage is a good idea. If your tire requires breaking the bead off the rim, having specialty tire irons can go a long way. Or you can ride the flat tire till it breaks off the bead or becomes hot and easier to remove, yes we have done this in a pinch. If equipped, loosen the rim lock(s) first.
You can use a shop rag to keep dirt out of the wheel bearings, but there are some tough and compact changing mats that give you a much-improved workspace.

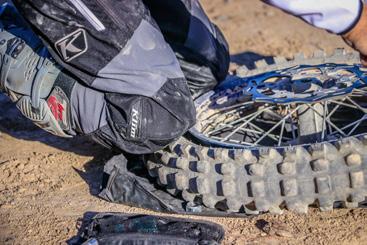
Since you should have knee protection on, put those knees to good use in keeping the tire down into the dish of the rim as you work. Do you take the tire off the rim or just replace the tube, out and in? It depends on the type of flat and if you need to be sure that whatever caused the original flat will not cause another one. If there is any doubt, take the tire off the rim to inspect and clean it out.
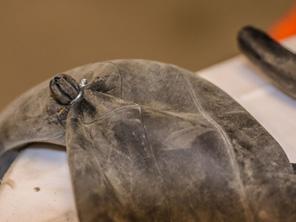
What do you put back in the tire? A new tube would be ideal, but out on the trail, the truthful answer is, whatever you have available. In order of preference, here is a list: new tube of the correct size, new tube of incorrect size (ie, 21" front tube stuffed in the rear tire, that is why most riders carry only a spare front tube), or patch the flat tube. But wait, there’s more! If desperate, you can rely on the last resort/Hail Mary methods. We’ve pulled the part of the tube with the pinch in it, secured wire around the tube beneath the hole, and isolated the leak by twisting the wire tightly (it worked.) You can use heavy zip ties to secure a flat tire to the rim if no other solution is found. And we have even stuffed leaves and pine needles into a flat tire as sort of an “organic
mousse.” When you’re screwed...remember you could have been better prepared.


