
2 minute read
mommy and me


By Melanie Danner
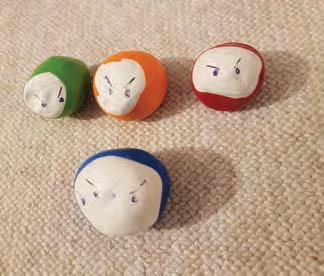
STRESS BALL NINJAS (Pinterest)
TOOLS AND SUPPLIES:
Balloons – white for the face, and other colors for the ninja mask
Scissors
Sandwich baggies – either fold-over or ziploc (if you use ziploc, you’ll have to cut the zipper off)
Flour or play dough
Ballpoint pen
DIRECTIONS: Fill a baggie with 3/4 cup of flour (or play dough).
Fold over the baggie and squeeze out all the air. Cut the blowing end off of a white balloon so that you are left with a round balloon with a hole.
Stuff the baggie filled with flour or play dough into the balloon.
Cut off the blowing end of another balloon. Cut an opening for the ninja face. Then, stretch this balloon over the white balloon with the opening facing the opposite way (so that the flour baggie can’t come out).
Add a ninja face with a ballpoint pen.
Time to destress and relax.
PIPE CLEANER TURTLES (Pinterest)

TOOLS AND SUPPLIES:
Colored pipe cleaners
Googly eyes
Scissors
Glue gun/glue
DIRECTIONS:
First, coil a brown or tan pipe cleaner into a circle. Bend the pipe cleaner so that the center of the circle is raised. Tuck in the end. Make a second coil.
Second, make the head, legs, and tail with segments of green pipe cleaners.
Glue the eyes to the head, and then glue the head to the underside of the top shell.
Then glue on the legs and tail.
Last, glue the second coil to the bottom of the shell. Enjoy a new lovable pet!
FLAPPING BUTTERFLY (Pinterest)
TOOLS AND SUPPLIES:
Butterfly template (we used a color page image)
Paper/Card stock
Colored pencils/Markers
Plastic drinking straws (smaller)
Plastic drinking straws (larger)
Scissors
Tape
Glue Ruler
DIRECTIONS:
First, print your butterfly on paper or card stock
Use a black marker to outline the butterfly and color the butterfly with colored pencils or markers.
Cut out the butterfly.
On the scrap paper or cardstock draw a rectangle
1-1/4 inches high and 4-1/2 inches long. Cut out the rectangle.
Measure 3/4 inch from each of the short ends and mark with a pencil.
Next, fold the cardstock on these marks. Then fold the cardstock in half in the other direction so the folded tabs face outwards.
Fold the butterfly in half, and then unfold it, setting the decorated side face down.
Add glue to the tabs of the butterfly backing and attach the tabs to the center of the butterfly. (Make sure to line up the crease in the butterfly with the tabs and fold.)
Cut off about 2 inches from the straw with the larger diameter. (We cut off the bendy part of the straw.)
Cut a slit in the straw 2-1/2 inches long. Rotate the straw 180 degrees and make another slit the same length, directly across from the first slit.
Cut a 2-inch slit in the smaller straw. Again, turn it 180 degrees, and make another 2-inch slit, directly across from the first slit.
Open the two flaps in the smaller straw and slide it over the folded backing of the butterfly. Center it and tape it in place on the paper or cardstock.

Take a 3-inch piece of tape and attach the flap of the larger straw to the wing so there's about 1-1/2 inches of tape on the wing and 1-1/2 inches of tape on the straw flap. Then take another piece of tape and wrap it tightly around the first piece of tape on the straw flap.
Repeat on the second wing.
Unfold the butterfly and see how the straws control the movement of the butterfly's wings.
Hold the longer (inside) straw with one hand and use your other hand to move the shorter (outside) straw up and down.


