Mitsubishi 8DC9 Engine Assembly Specs ( 3 pages )
8DC9 Head bolt tightening torque value 8DC9 Head bolt tightening sequence 8DC9 Engine parts assembly tightening toque values 8DC9 Valve Lash Adjustment 8DC9 Valve Lash Clearance
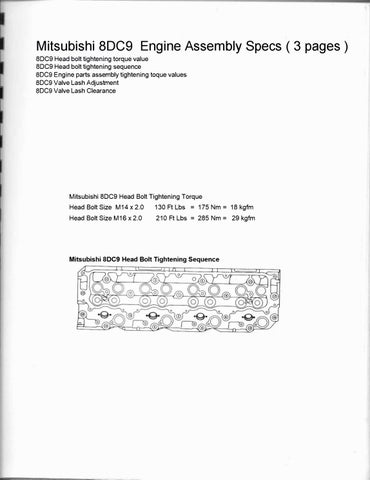
Mitsubishi 8DC9 Head Bolt Tightening Torque
Head Bolt Size M14 x 2.0
130 Ft Lbs
Head Bolt Size M16 x 2.0
210 Ft Lbs
=
175 Nm
=
=
285 Nm
=
Mitsubishi 8DC9 Head Bolt Tightening Sequence
18 kgfm 29 kgfm
SERVICE STANDARDS AND SPECIFICATIONS [8DC9 ] Unit: Nm(kgf m) Location tightened Cylinder head bolt
Screw size O.D x pitch (mm)
Tightening torque
Remarks
M14 x 2.0
175 (18)
Wet
M16 x 2.0
285 (29)
Wet
Rocker bracket bolt
M12 x 1.75
49 (5)
Rocker cover screw
M8 x 1.25
3.9 (0.4)
Rocker adjusting screw lock nut
M10 x 1.25
59 (6)
Side cover bolt
M10 x 1.5
2.9 (0.3)
Connecting rod nut
M16 x 1.5
225 (23)
Wet
Main bearing cap bolt
M18 x 2.5
370 (38)
Wet
Main bearing cap side bolt
M14 x 2.5
175 (18)
Wet
Balance weight mounting bolt
M16 x 1.5
Wet. Refer to Item (18)
Crankshaft pulley bolt
M14 x 1.5
175 (18)
Front cover bolt
M10 x 2.0
31 (3.4)
Torsional damper mounting bolt
M12 x 2.0
98 (10)
Camshaft gear nut
M27 x 1.5
265 (27)
Wet
Flywheel bolt
M16 x 1.5
315 (32)
Wet
Check valve (oil jet position)
M12 x 1.75
34 (3.5)
Wet
Idler gear shaft bolt
M16 x 2.0
115 (12)
PTO idler gear shaft bolt
M16 x 2.0
155 (16)
PTO shaft nut (for mounting collar)
M18 x 1.5
125 (12.8)
PTO idler shaft nut
M18 x 1.5
125 (12.8)
Idler shaft nut
Camshaft gesr side
M16 x 1.5
98 (10)
(for mounting collar)
PTO gear side
M16 x 1.5
155 (16)
M12 x 1.75
69 (7)
Flywheel housing bolt
SERVICE PROCEDURE
Inspection and Adjustment of Valve Clearance [8DC9] The valve clearance should be checked and adjusted when the engine is cold. 1.
Crank the engine to align the pointer of the inspection window of the flywheel housing with the inscribed mark 1.4 of the flywheel. Check the push rods, and the piston whose push rod is not pushing up the rocker is at the top dead center of the compression stroke. On some engines, a pointer is also provided on the front of engine. When the inscribed line maked 1, 4 on the crankshaft pulley aligns with this pointer, the piston in No. 1 or No. 4 cylinder is at the top dead center on the compression stroke.
D68E0264
2.
When the piston in No.1 cylinder is at the top dead center on the compression stroke, inspect and adjust valve clearance in respect to the valves marked O in the table below. Cranking the crankshaft one turn, proceed to inspect and adjust valve clearance in respect to the remaining valves marked X. When the piston in No. 6 cylinder is at the top dead center on the compression stroke, inspect and adjust valve clearance in respect to the valves marked X. Cranking the crankshaft one turn, proceed to inspect and adjust valve clearance in respect to the remaining valves marked O.
Cylinder No.
1
2
Valve arrangement
In.
Ex.
In.
No. 1 at TDC on compression stroke
O
O
O
No. 6 at TDC on compression stroke
3.
D68E0265
3 Ex.
In.
4 Ex.
In.
5 Ex.
O X
X
In.
6 Ex.
In.
X
Measure the clearance between the rocker arm and valve cap with a specified thickness gauge to see if it meets specification. Check the valve clearance by inserting Thickness Gauge (special tool) between the rocker arm and valve cap. If the clearance is incorrect, loosen the lock nut and correct the clearance by turning the adjusting screw. After adjustment of the clearance, turn down the lock nut to secure the adjusting screw. NOTE: After the lock nut has been turned down, reconfirm the clearance.
Engine parts for excavators, cranes, and heavy equipment, Hino, Mitsubishi, Nissan, Contact: EngineParts@HeavyEquipmentRestorationParts.com Phone: 269 673 1638
Ex.
Ex.
O
O X
7
X
X
8 In.
Ex.
O X
In. O
X
