9 minute read
Training Tips: Plaiting perfection
TRAINING TIPS
Plaiting perfection
Plaiting: the struggle is real! We asked show prep expert LAURA CHAMPION for her top tips.
First getting into showing horses when she was just twelve years old, eagle-eyed attention to detail and tons of repetition has enabled Laura Champion to make her mark on the show horse scene.
After her trainer had given her two mane plaiting demonstrations, Laura was told the job was now up to her, so she got stuck into perfecting the art. “All the kids would have their ponies tied up around the stables, and one by one I would go round and practise plaiting them up,” she recalls. That practise made perfect and Laura became so skilled that her friends started paying her to plait their ponies for competitions. “I got maybe ten bucks and a ride on their horse, and it was great!” she laughs. Now thirty, Laura’s show preparation expertise has become an essential part of her full-time gig. “I professionally plait for anything from Ag shows to Royals, for Horse of the Year and anything in between,” she says. Along the way, she was lucky enough to groom for renowned show hack rider Mark Kenzig, which really refined her technique. So, what is a good plait versus a bad plait, and how can we all improve on ours?
A perfect plait
Chances are you’re going to braid your horse’s mane the day before the show, so the plaits have to withstand being covered with a hood, being knocked about by the horse, and travel to the venue.
Laura’s number one tip is tension. “My favourite motto is if your hands aren’t hurting, you’re not doing it tight enough!” she grins. The initial plait has to be so snug and firm that by the time you sew it in, it’s not going anywhere.
Specifically, you need to apply more tension when you are first starting the plait. That’s how you stop those little wispy, flyaway bits. The quality of the plait is what affects the overall quality of a finished rosette, and if Laura is not happy with it at this stage, she’ll undo it and plait it again.
Laura always braids a mane the same way. Starting near the poll, she first divides the mane into even sections: “I don’t stick to a certain number of braids, I divide according to the individual horse to do their head and neck justice,” she explains. To enhance the horse’s natural conformation, a pony with a shorter neck looks best with smaller braids and more
of them, while a really big Warmblood requires fewer, slightly larger braids. “But you don’t want to go too big,” she cautions, pointing out that golf ball sized rosettes are never attractive.
A rough mane division guide is to use two to three fingers’ worth of hair, which results in a tightly finished braid about one finger wide. Before plaiting the entire mane, Laura recommends doing one braid right through from plait to completed rosette to check if the hair division you have chosen works. Then simply mark the width off on your mane comb with a piece of thread and you’re good to go.
Laura usually uses a standard three strand braid and, pulling downward, goes to the left, then to the right, and then takes the middle to the left, but notes there are alternatives available too: “An upside down plait will give a different look to the braid. It can make a skinnier neck look fatter,” she explains. Each plait is then secured with rubber bands and the very ends of the hair are trimmed off before sewing the rosettes. “And I always check every braid is even, and every one is exactly the same,” she adds.
If there is a left over wispy bit near the wither, which is not enough to bunch into a rosette, Laura recommends using hair gel on the morning of the competition to smooth it down and keep it flat. “Pulling it into a braid may compromise the hair, and there’s a risk of pulling the hair out and making the problem worse,” says Laura, who gives the same advice when mane is missing due to a neck rug rub: “The best plan is to change your regular mane care routine to help rectify this situation for future events, as forcing the hair into a rosette may result in losing the whole chunk.”
To band or sew
While Laura uses rubber bands to tie off a braid, she is firmly in the sewing camp when it comes to securing her rosettes. In her opinion, sewing done well is a thousand times better than banding because it’s much more secure, a key reason why her rosettes stay in place. “I’ve had clients attend three day shows and my braids last the duration of the event,” she says.
A big, blunt needle is best for sewing, as it greatly reduces the risk of pricking the horse’s neck. To get started, first tie off the thread at the bottom of the braid. Laura recommends sewing up through the banded end and wrapping the thread around the band before sewing back down through the plait from the top, which effectively knots the thread back on itself.
To create the rosette, thread the needle up under the base of the braid and push
RIGHT: Mark the appropriate width off on your mane comb, and divide mane into even sections. Secure the braids with rubber bands and check they’re all the same size.
LOW IN STARCH, SUGAR NSC & IRON
High in Amino Acids, Antioxidants, Omega 3 & Biotin
DR JENNIFER STEWART’S all-4-feet®
ALL-IN-ONE NUTRIENT-DENSE FEED REPLACER
VETERINARY FORMULA 10kg PELLETS
EQUINE CLINICAL NUTRITION
BVSc, BSc, PhD A UNIQUE COMBINATION OF ORGANIC & INORGANIC CALCIUM
For all horses, especially those grazing pastures with soluble & insoluble oxalates.
18kg BLOCKS
Contact us for advice on Equ E ine in ne ne Nu Nutri tr t tio ot ti n & n& & Eq Equ uiin ine e C Cli in ni ic c ca al N lN Nl utr utriti tion onq i i io i i Equine Nutrition & Equine Clinical Nutrition
Avai Ava aAv labl abl ab lab e Au eA A Austra sttra ras liaa-l a wide wid ask asks yo you uy r r lo lo olr cal c ca a p prro o od dr u uce uc uce ce stor sto e & e & e vet ve vet etv te cl clin cliin nl linic ic cic A bl b eAu u ralia w a ou o l to ore & & c Available Australia-wide ask your local produce store & vet clinic to o o o order e der som ms so e in e n if f if fi the thhey they ey yht d do o on n’t ’t a at l lr r r re e ea ady s dy dy ystock ockto it. it too d rd ei e ’ d o i to order some in if they don’t already stock it. 0 0419 04194 121 2112 2 314 314314 0419 121 314
through the centre, close to the horse’s neck. Turn the needle and thread back towards yourself through the centre, then sew through the banded end of the braid, creating a plaited loop. Thread the needle through the now folded end of the newly created braid loop, and finally sew back under and into the base of the braid.
If correctly done, all thread should be hidden underneath the plait. Stitching back and forth a few times and pulling tight secures the rosette in place. Laura doesn’t tie it off, but leaves a good five centimetres of thread hanging out: “When the horse is bending and stretching its neck overnight, the thread will work itself in and you won’t be able to see it in the morning,” she explains. Yet another reason why her braids stay in so well.
Laura tends not to use products like wax or plaiting sprays to braid a mane; that all-important tension is her secret weapon. A wet mane or a water spray bottle can be useful for getting a grip on all the pieces of hair, but other than that, spraying with hairspray or similar to give the rosettes some final touch holding power is all she needs.
Forelock tips
For a forelock, however, Laura may opt to use a wax stick to get all those soft, loose pieces of hair to comply. “It’s more about being able to get a good grip, rather than for keeping the hair in place,” she says.
A French braid is the standard plait for a forelock, but there are two different styles. A regular French braid is good for a horse with a thick mop in front. If your horse is lacking in the fringe department, doing an upside-down French braid will give the forelock more volume.
RIGHT: Tie off the thread at the bottom of the braid and sew back down through the plait. For the rosette, thread the needle under the base of the braid to create a plaited loop. Thread the needle through the loop, and sew back under and into the base of the braid. ABOVE: Laura and Jaytee Serenity have had a successful show ring partnership.
A great trick for pulling the end of the forelock plait under and out of sight is to feed a piece of wire down from the top of the braid, hook it onto the banded end of the plait and gently pull it back through. A quick stitch to secure it in place is the last step.
Preparation is key
A thoroughly washed mane always results in a better finish. Laura doesn’t even mind if it’s freshly shampooed right before she gets started, but she is strictly against any conditioner: “Do not condition the mane, forelock or dock of the tail!” she warns, “slippery hair does no favours for grip.”
Ongoing preparation always trumps a one-off wash. As far as day-to-day care goes, Laura is a big believer in using pull-on or zip-up hoods. She recommends that hoods are washed and changed at least once a week, and that the mane is washed at the same time. In the lead-up to a show, the hood should be removed at least four times a week to brush out the mane and let it get some fresh air and sun to keep it in great condition.
Another tip for creating beautiful rosettes is to ensure the mane is the right thickness and length. It should be an even thickness all the way along, as this is the only way to ensure the plaits will be even and consistent. The length of the mane should be roughly the same length as your index finger, which is handy as everyone has a finger on them to measure against when plaiting up!
Finally, practise is the name of the game. Your plaiting attempts shouldn’t be left until the day before the show if you want your work to look great. Laura suggests plaiting one braid at the start of every ride – and remember, if your hands aren’t hurting, you’re not doing it tight enough!
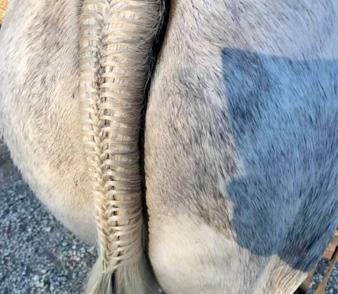
LEFT: Feed a piece of wire down from the top of the forelock braid, hook it onto the banded end of the plait and gently pull back through. Stich to secure it in place. ABOVE: Laura demonstrates tail braiding over at Equestrian Hub.
Connect with Laura at LVT Equine, and drop over to Equestrian Hub for Laura’s plaiting demo, including how to braid a tail.


