3 minute read
Faraday Ice Pail


Charge Sensor
Faraday Ice Pail
Faraday originally used his ice pail to show that:1. When a charged object is enclosed in a hollow conductor, it induces a charge on the inside of the conductor equal in size and opposite in sign to its own; on the outside of the conductor a charge equal in size, and of the same charge as the object, is induced. 2. The total charge inside a hollow conductor is always zero.
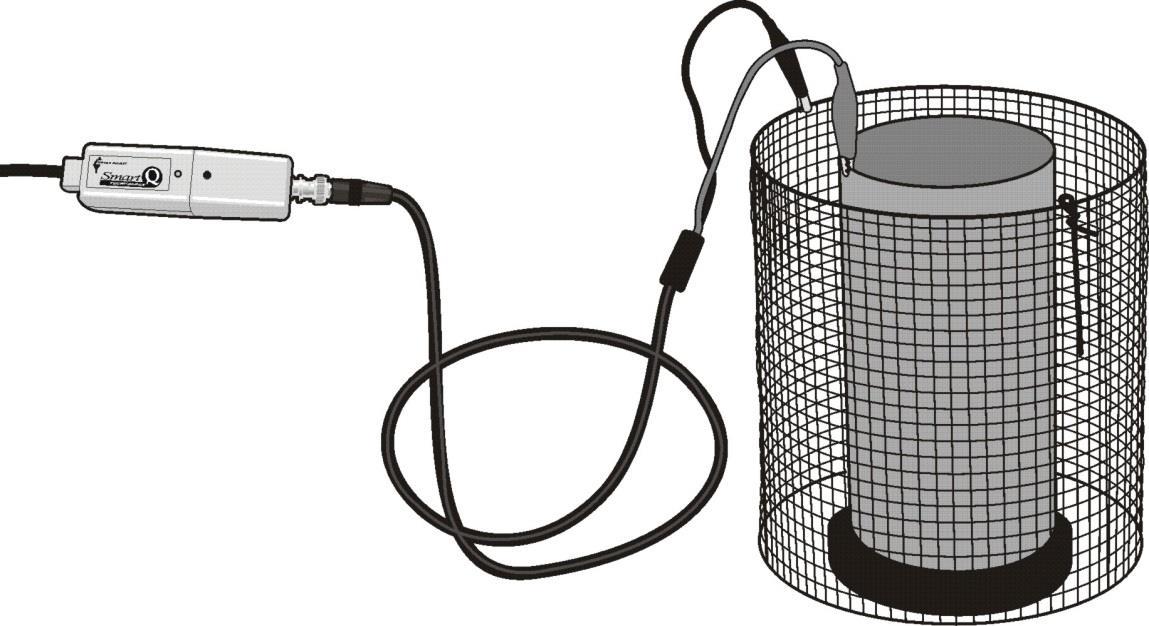
In addition to proving the above principles, the Faraday ice pail is a useful device for sampling and comparing charge. It operates on the principle that a charge placed inside a conducting surface will induce an equal charge on the outside of that surface. Faraday’s ice pail was a modest pail about 27 cm tall and not a bucket-sized container. Use a cylindrical container for the ice pail, the length of the cylinder should be at least two, if not three times the diameter. It will work better if the cylinder has a closed base. We used an outer shield made from a cylinder of 1 cm galvanised steel metal mesh (without a bottom). The metal ice pail is placed inside the shield with an even space separating them. The ice pail should be placed on a non-conductive platform (a block of dry wood is ideal).
The outer mesh cylinder is connected to ground and shields the ice pail, which is used for the investigation. It is preferable for the person performing the experiment to be continually grounded to prevent stray charges e.g. by continuously touching the outer shield with one hand. A piece of wire secured to the mesh shield can be used to ground the ice pail; the wire needs to be long enough to touch the lip of the ice pail. It can also be used to ground or discharge conductors as needed.
Charge sensor
Black clip connected to shield Even gap between ice pail & shield
Red clip connected to ice pail
Ice pail
Grounding wire
Wire mesh shield
Non-conductive platform e.g. block of dry wood
You will also need either: A conductor mounted on an insulating handle e.g. the disc from a small electrophorus, which can be charged by induction (see page 9.). Or mounted, conducting ‘Charge producers’ which are charged by rubbing them together.
1. Set up the experiment as shown in the diagram. The range of the Smart Q Charge sensor should be set to ±100 or ±220 nC.
2. Connect the red lead from the Charge sensor to the ice pail. 3. Connect the black lead (ground) to the outer mesh shield.
Grounding wire
Charge Sensor
4. Ground the ice pail by touching with the wire attached to the wire shield. Any charge built up on the ice pail will travel across the wire to the outer shield then out to ground. Lift the ground wire back up. 5. Open the EASYSENSE program and select EasyLog from the Home screen. Press the reset ground button to discharge the Sensor (Test mode from the Tools menu can be used to check the value is zero). 6. Click on the Start icon to begin. Charge one of the mounted conductors and then insert the conductor into the lower part of the ice pail, without allowing it to touch the bottom or sides, and then remove. Do not discharge the conductor. (Result A) 7. Ground the ice pail and press the reset ground button on the Sensor. 8. Right click in the graph area and use Add Text to label the graph. Select the Overlay icon. 9. Click on the Start icon, and lower the conductor into the lower half of the ice pail but this time touch the inside of the ice pail so it makes a good contact, remove the rod (Result B).
Do not ground the ice pail or charge/discharge to conductor.
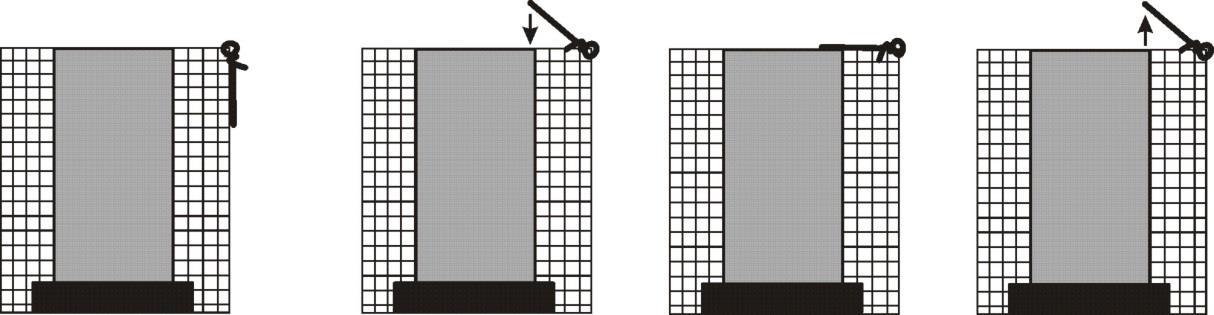

10. Click on the Start icon and lower the conductor into the ice pail, touch the side and withdraw it (Result C). 11. Ground the ice pail and repeat 10 (Result D). 12. Press reset on the Sensor. Ground the ice pail then repeat the investigation using a conductor with the opposite charge.
Note: If the ice pail proves difficult to discharge (zero), breathe gently over it. The ions in the moisture in the breath will be enough to neutralise any residual charge.


