1 minute read
Operations Model adjustments


X-PRINT can help users adjust and place the model to obtain the optimal printing results.


Move: Select the model you would like to move to open the adjustment tools on the right. Click the first tool to move the model in the ways you like: Set exact coordinates of the 3D model; Drag arrow handles to move the model along its X, Y, and Z axes; Left-click and drag the model to move along its X and Y axes.
Click [Place on baseplate] to make the model adhere to the baseplate. Click [Center] to place the model in the center. Click [Reset] to reset all moving modifications to the selected model.
Scale: Select the model you would like to scale and click the second tool in the right-side toolbar to scale the models. You can set the exact model size in millimeters, or set a multiple of the original model size. You can also drag the scale handles to scale the model. Tick [Scale] to ensure the model's proportions are consistent while scaling. Tick [Apply to All] to scale all models uniformly. Click [Maximum size] to scale the model to maximum printable size. Click [Reset] to return the model to its original size.
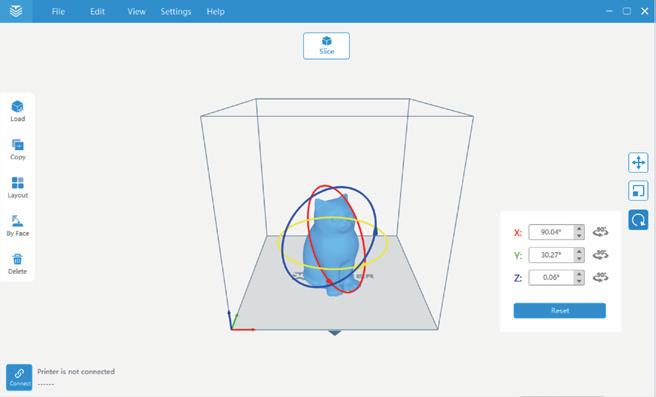
Rotate: Select the model you would like to rotate and click the third tool in the right-side toolbar to rotate the model. You can rotate the model by setting the exact rotate degrees or dragging rotate hoops around the model. You can also click each [90 degree] button to rotate the model by 90 degree along each axis.
Click [Reset] to reset all rotations of the selected model.
Copy
Select the model and click the [Copy] button in the left side toolbar to open Copy Settings panel. Enter the number you want to copy and click the [OK] button.
Layout
Click the [Layout] button in the left side toolbar and all models will be automatically placed in optimized position to ensure better printing results.
By Face
Select the [By Face] button in the left side toolbar. You can click on any face of the 3D model to automatically align this face to the baseplate.
Delete
Select the model you would like to delete and click the [Delete] button in the left side toolbar to delete the model, or go to X-PRINT menu and click 'Edit > Delete'. To quickly delete the model, select the model and press 'Del'.
Undo / Redo
Go to X-PRINT menu and click 'Edit > Undo/Redo' to do these operations. The shortcut for 'Undo' is 'ctrl+Z'. The shortcut for 'Redo' is 'ctrl+Y'.


