82 minute read
Troubleshooting Alerts


(APP_w207) Autosteer temporarily unavailable
Autosteer is currently unavailable. This could be a temporary condition due to external conditions that include:
Advertisement
• Missing or faded lane markers • Narrow or winding roads • Poor visibility due to rain, snow, fog, or other weather conditions • Extremely hot or cold temperatures • Bright light due to other vehicle headlights, direct sunlight, or other light sources
If the alert is caused by a temporary factor like these, no action or service is typically needed. Continue to your destination. The alert will clear and Autosteer will be available once the condition is no longer present.
Please note that the minimum speed to initiate Autosteer when there is no vehicle detected ahead of you and while driving on a road with visible lane markings is 18 mph (30 km/h), unless certain vehicle and environmental conditions are met. If a vehicle is detected ahead of you:
• You can initiate Autosteer at any speed under 90 mph (150 km/h). • You can even initiate Autosteer when stationary, provided the other vehicle is at least 5 feet (150 cm) in front of you.
This alert will be present if you have temporarily exceeded 90 mph (150 km/h) with Autosteer active, and Autosteer will not be available for the rest of your current drive.
• NOTE: If this alert becomes active while you are driving in Germany, Autosteer should again be available once your vehicle is traveling below 90 mph (150 km/h).
If Autosteer is not available by the time you reach your destination, and remains unavailable during your next planned drive, the problem might be one of these issues:
• Damage or obstruction caused by mud, ice, snow, or other environmental factors • Obstruction caused by an object mounted on the vehicle, like a bike rack • Obstructions caused by adding paint or adhesive products like wraps, stickers, or rubber coatings to your vehicle • A damaged or misaligned bumper
The solution might be as simple as washing your vehicle. If you do not find any obvious obstructions or you find damage to the vehicle, schedule service at your convenience. Your vehicle is OK to drive in the meantime.
For more information, see Autosteer on page 96.
(APP_w218) Autosteer speed limit exceeded Take control of steering wheel
Autosteer is unavailable because your vehicle has exceeded the maximum speed limit for this driver assistance feature. Autosteer is only available at speeds up to 90 mph (150 km/h).
Take immediate control of the steering wheel and maintain control until you reach your destination. Your vehicle is OK to drive.
In most cases, Autosteer will not be available for the rest of your current drive. To reset it, you will need to bring the vehicle to a complete stop and shift into Park. When you shift into Drive to travel to your next destination, Autosteer should again be available.
Please note that the minimum speed to initiate Autosteer when there is no vehicle detected ahead of you and while driving on a road with visible lane markings is 18 mph (30 km/h), unless certain vehicle and environmental conditions are met.
If a vehicle is detected ahead of you:
• You can initiate Autosteer at any speed under 90 mph (150 km/h). • You can even initiate Autosteer when stationary, provided the other vehicle is at least 5 feet (150 cm) in front of you.
NOTE: If this alert becomes active while you are driving in Germany, Autosteer should again be available once your vehicle is traveling below 90 mph (150 km/h).
If Autosteer is not available during your next drive, and remains unavailable throughout subsequent drives, schedule service at your convenience. Your vehicle is OK to drive in the meantime.
For more information, see Autosteer on page 96.
Traffic-Aware Cruise Control and Autosteer are unavailable because the radar located in the front bumper area of your vehicle has no or low visibility. Continue to your destination. Your vehicle is OK to drive.
Traffic-Aware Cruise Control and Autosteer will remain unavailable as long as the radar lacks adequate visibility. This could be a temporary obstruction caused by factors like snow, ice, dirt, or mud. If the alert is caused by a temporary factor like these, no action might be needed: the condition might clear during your drive.
If the alert persists throughout your drive, examine the front bumper before your next planned drive and attempt to clear any obstruction.
• See the About Autopilot on page 88 sections “How It Works” and “Cleaning Cameras and Sensors” for more on the radar location and care needed if clearing dirt / debris from that area of the vehicle. • See Cleaning on page 177 for general cleaning tips and cautions.
Once the radar regains adequate visibility, the alert will clear and both Traffic-Aware Cruise Control and Autosteer should again be available.
If this alert persists throughout subsequent drives but no obstruction is visible on the front bumper where the radar is located, schedule service at your earliest convenience. Your vehicle is OK to drive in the meantime.
Traffic-Aware Cruise Control and Autosteer are unavailable because one or more of the front cameras in your vehicle is blocked or blinded by external conditions. Continue to your destination. Your vehicle is OK to drive.
Traffic-Aware Cruise Control and Autosteer will remain unavailable while a front camera lacks adequate visibility. Cameras can be blocked or blinded due to many factors that include:
• Dirt or debris on the camera surface • Environmental conditions like rain, fog, snow, or dew • Bright sunlight or glare from another light source • Condensation (water droplets or mist) on the camera surface
This is often a temporary issue that will clear up when condensation evaporates or a particular environmental condition is no longer present.
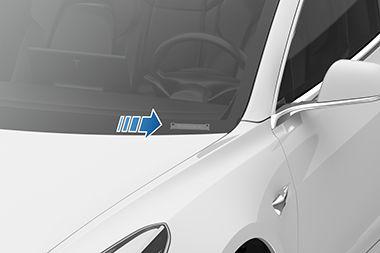
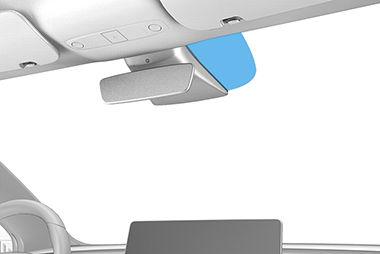
If the alert does not clear by the end of your drive, inspect and clean the front camera area at the top center of the windshield before your next planned drive. Check the camera surface for condensation, dirt, or other debris and attempt to clear any obstruction. See the About Autopilot on page 88 sections “How It Works” and “Cleaning Cameras and Sensors” for more on front camera location and tips for careful cleaning.
Although condensation on the inside of the front camera enclosure cannot be wiped clean, you can usually clear it quicker by following these steps:
1. Pre-condition the cabin with the temperature set to High and A/C turned ON. 2. Turn on the front windshield defroster.
Once all front cameras regain adequate visibility, the alert will clear and both Traffic-Aware Cruise Control and Autosteer should again be available.
If this alert persists throughout subsequent drives but no front camera obstruction is visible, schedule service at your earliest convenience. Your vehicle is OK to drive in the meantime.
(APP_w224) Cruise control unavailable Continue driving to allow cameras to calibrate
Traffic-Aware Cruise Control and Autosteer are unavailable because the cameras on your vehicle are not fully calibrated. Continue to your destination. Your vehicle is OK to drive.
Traffic-Aware Cruise Control and Autosteer will remain unavailable until camera calibration is complete.
Your vehicle must maneuver with great precision when features like Traffic-Aware Cruise Control and Autosteer are active. Before these features can be used for the first time, the cameras must complete an initial self-calibration. Occasionally, one or more cameras can become uncalibrated.
For your convenience, a calibration progress indicator is displayed on the touchscreen. Calibration typically completes after your vehicle has driven 20-25 miles (32-40 km), but the distance varies depending on road and environmental conditions. For example, driving on a straight road with highly visible lane markings helps the cameras calibrate quicker.
See Drive to Calibrate Cameras on page 89 for more information.
When calibration is complete, Traffic-Aware Cruise Control and Autosteer should be available.
If the alert persists and camera calibration has not completed after your vehicle has driven 100 miles (160 km) or more, or Traffic-Aware Cruise Control and Autosteer remain unavailable despite successful camera calibration, schedule service at your earliest convenience. Your vehicle is OK to drive in the meantime.
(APP_w304) Camera blocked or blinded Clean camera or wait for it to regain visibility
One or more of the vehicle cameras is blocked or blinded due to external conditions. When the cameras cannot provide accurate visual information, some or all Autopilot features may be temporarily unavailable.
Cameras can be blocked or blinded due to many factors, including:
• Dirt or debris on the camera surface • Environmental conditions like rain, fog, snow, or dew • Bright sunlight or glare from another light source • Condensation (water droplets or mist) on the camera surface
Continue to your destination. Your vehicle is OK to drive.
This is often a temporary issue that will be resolved when condensation evaporates or a particular environmental condition is no longer present.
If the alert does not clear by the time you reach your destination, check camera surfaces for condensation, dirt, or other debris.
For camera locations, see About Autopilot on page 88.
Clean the cameras as necessary before your next planned drive. For recommended cleaning procedures, see Cleaning Cameras and Sensors on page 90.
If you continue to see this alert after cleaning the cameras, check the inside surfaces of the door pillar camera enclosures for condensation.
Although condensation inside the camera enclosures cannot be wiped clean, you can usually clear it faster by following these steps:
1. Pre-condition the cabin with the temperature set to High and A/C turned ON. 2. Turn on the front windshield defroster. 3. Direct the air vents toward the door pillar cameras.
For more information on clearing condensation from camera enclosures, see Cleaning Cameras and Sensors on page 90.
If the alert does not clear by the end of your next planned drive, despite cleaning the indicated camera(s) and following recommended steps to clear condensation, schedule service at your next convenient opportunity. Your vehicle is OK to drive in the meantime.
(CC_a001) Unable to charge - Insufficient grounding Proper wiring or outlet grounding must be verified
What this alert means:
No ground connection detected in the Wall Connector.
What to do:
Make sure the Wall Connector is properly grounded. If uncertain, consult your electrician to ensure proper grounding at your circuit breaker or power distribution box and that appropriate connections are made to the Wall Connector.
What this alert means:
Ground fault. Current is leaking through an unsafe path. Possible Line to ground or Neutral to ground fault.
What to do:
Try again by disconnecting the Wall Connector from the vehicle and reconnecting. If the problem persists, turn OFF the circuit breaker servicing the Wall Connector, wait 10 seconds, turn the circuit breaker ON again, then try reconnecting the Wall Connector to the vehicle. If the problem persists, contact Tesla.
What this alert means:
Wall Connector hardware issue. Possible issues include:
1. Contactor not working 2. Self-test of internal ground fault monitoring circuit failed 3. Thermal sensor disconnected 4. Other hardware component issues
What to do:
An internal issue was detected by the Wall Connector.
1. Try charging again by disconnecting the Wall Connector from the vehicle and reconnecting. 2. If the issue persists, turn OFF the circuit breaker for the Wall Connector, wait 10 seconds, and turn the circuit breaker ON again. Then try reconnecting the Wall Connector to the vehicle. 3. If the issue persists, check for loose connections. a. Make sure there is no power to the Wall Connector. b. Remove the face plate and inspect the wiring terminals for any loose connections. c. Contact an electrician if necessary to make sure all wires are properly connected and torqued according to the instructions in the Wall Connector Installation Manual.
4. Once all connections have been checked and made secure, restore power to the Wall Connector and try charging again by reconnecting to the vehicle. 5. If the issue persists, the Wall Connector needs service. Schedule a service appointment through your Mobile App.
What this alert means:
Ground fault. Current is leaking through an unsafe path. Possible Line to ground or Neutral to ground fault.
What to do:
Try again by disconnecting the Wall Connector from the vehicle and reconnecting. If the problem persists, turn OFF the circuit breaker servicing the Wall Connector, wait 10 seconds, turn the circuit breaker ON again, then try reconnecting the Wall Connector to the vehicle. If the problem persists, contact Tesla.
What this alert means:
Over current protection.
What to do:
Reduce the vehicle's charge current setting. If the problem persists and the attached vehicle is manufactured by Tesla, contact Tesla. If the problem persists and If the attached vehicle is not manufactured by Tesla, contact the original manufacturer.
What this alert means:
Over or under voltage protection.
What to do:
Consult your electrician to ensure appropriate voltage on the circuit breaker that services the Wall Connector.
What this alert means:
Over or under voltage protection.
What to do:
Consult your electrician to ensure appropriate voltage on the circuit breaker that services the Wall Connector.
(CC_a009) Unable to charge - Input wired incorrectly Input wiring to Wall Connector must be corrected
What this alert means:
Input miswired: possibly Line and Neutral are swapped.
What to do:
The wiring between the wall power and the Wall Connector has been incorrectly installed. Consult your electrician.
What this alert means:
Wall Connector hardware issue. Possible issues include:
1. Contactor not working 2. Self-test of internal ground fault monitoring circuit failed 3. Thermal sensor disconnected 4. Other hardware component issues
What to do:
An internal issue was detected by the Wall Connector.
1. Try charging again by disconnecting the Wall Connector from the vehicle and reconnecting. 2. If the issue persists, turn OFF the circuit breaker for the Wall Connector, wait 10 seconds, and turn the circuit breaker ON again. Then try reconnecting the Wall Connector to the vehicle. 3. If the issue persists, check for loose connections. a. Make sure there is no power to the Wall Connector. b. Remove the face plate and inspect the wiring terminals for any loose connections. c. Contact an electrician if necessary to make sure all wires are properly connected and torqued according to the instructions in the Wall Connector Installation Manual.
4. Once all connections have been checked and made secure, restore power to the Wall Connector and try charging again by reconnecting to the vehicle. 5. If the issue persists, the Wall Connector needs service. Schedule a service appointment through your Mobile App.
(CC_a011) Unable to charge - Wall Connector too hot Let Wall Connector cool and try again
What this alert means:
Over temperature protection (latchoff).
What to do:
Make sure the Wall Connector is not covered by anything and that there is no heat source nearby. If the problem persists in normal ambient temperatures (under 38°C), contact Tesla.
(CC_a012) Unable to charge - Wall connection too hot Outlet or Wall Connector wiring must be checked
High temperature detected by Wall Connector alerts indicate the building connection to the Wall Connector is getting too warm, so charging has stopped to protect the wiring and Wall Connector.
This is not typically an issue with your vehicle or your Wall Connector, but rather an issue with the building wiring. This may be caused by a loose building wiring connection to the Wall Connector and can be fixed quickly by an electrician.
If the Wall Connector is plugged into a wall outlet, make sure:
• The plug is fully inserted into the receptacle / outlet • The plug / outlet area is not blocked or covered by anything • There is no heat source nearby
If the issue persists or the Wall Connector is hard-wired, contact an electrician to inspect the building wiring connection to the Wall Connector. They should make sure that all wires are properly connected and torqued according to the installation guide for the Wall Connector.
Wall Connector installation guides can be found here.
(CC_a013) Unable to charge - Charge handle too hot Check charge handle or charge port for debris
What this alert means:
Over temperature protection (latchoff).
What to do:
Make sure the connector is fully inserted into the charge inlet in the vehicle's charging port, is not covered by anything, and there is no heat source nearby. If the problem persists in normal ambient temperatures (under 38°C), contact Tesla.
What this alert means:
Wall Connector hardware issue. Possible issues include:
1. Contactor not working 2. Self-test of internal ground fault monitoring circuit failed 3. Thermal sensor disconnected 4. Other hardware component issues
What to do:
An internal issue was detected by the Wall Connector.
1. Try charging again by disconnecting the Wall Connector from the vehicle and reconnecting. 2. If the issue persists, turn OFF the circuit breaker for the Wall Connector, wait 10 seconds, and turn the circuit breaker ON again. Then try reconnecting the Wall Connector to the vehicle. 3. If the issue persists, check for loose connections. a. Make sure there is no power to the Wall Connector. b. Remove the face plate and inspect the wiring terminals for any loose connections. c. Contact an electrician if necessary to make sure all wires are properly connected and torqued according to the instructions in the Wall Connector Installation Manual.
4. Once all connections have been checked and made secure, restore power to the Wall Connector and try charging again by reconnecting to the vehicle. 5. If the issue persists, the Wall Connector needs service. Schedule a service appointment through your Mobile App.
What this alert means:
A communication error occurred between the Wall Connector and the vehicle.
What to do:
Try again by disconnecting the Wall Connector from the vehicle and reconnecting. If possible, plug the vehicle into another Wall Connector or a Mobile Connector to determine if the vehicle is able to communicate with other charging equipment. If the problem persists, contact Tesla.
What this alert means:
Wall Connector hardware issue. Possible issues include:
1. Contactor not working 2. Self-test of internal ground fault monitoring circuit failed 3. Thermal sensor disconnected 4. Other hardware component issues
What to do:
An internal issue was detected by the Wall Connector.
1. Try charging again by disconnecting the Wall Connector from the vehicle and reconnecting. 2. If the issue persists, turn OFF the circuit breaker for the Wall Connector, wait 10 seconds, and turn the circuit breaker ON again. Then try reconnecting the Wall Connector to the vehicle. 3. If the issue persists, check for loose connections. a. Make sure there is no power to the Wall Connector. b. Remove the face plate and inspect the wiring terminals for any loose connections. c. Contact an electrician if necessary to make sure all wires are properly connected and torqued according to the instructions in the Wall Connector Installation Manual.
4. Once all connections have been checked and made secure, restore power to the Wall Connector and try charging again by reconnecting to the vehicle. 5. If the issue persists, the Wall Connector needs service. Schedule a service appointment through your Mobile App.
(CC_a021) Unable to charge - No primary Wall Connector Check that primary unit is powered and available
What this alert means:
Circuit Breaker Sharing Network: Need one (and only one) Wall Connector set to Master.
What to do:
Only one Wall Connector can be set to a master configuration. All other linked Wall Connectors must be set to paired (position F). Set one of the Wall Connectors to Master and all others to paired.
(CC_a022) Unable to charge - More than 1 primary unit Ensure only 1 Wall Connector is set as primary
What this alert means:
Circuit Breaker Sharing Network: Need one (and only one) Wall Connector set to Master.
What to do:
Only one Wall Connector can be set to a master configuration. All other linked Wall Connectors must be set to paired (position F). Set one of the Wall Connectors to Master and all others to paired.
(CC_a023) Unable to charge - Too many Wall Connectors Ensure no more than 3 units paired with primary
What this alert means:
Circuit Breaker Sharing Network: More than three Wall Connectors are paired with the same Master.
What to do:
One or more paired Wall Connectors must be moved to a different circuit and disconnected (unpaired) from this Circuit Breaker Sharing Network.
(CC_a024) Unable to charge - Low Wall Connector current Primary unit current setting must be increased
What this alert means:
Incorrect rotary switch setting.
What to do:
Make sure there is no power to the Wall Connector. Remove the face plate and adjust the rotary switch to a valid operating current setting. The correlation between switch setting and current is printed on the inside of the Wall Connector. You can also refer to the Set the Operating Current section in the Wall Connector Installation Manual. If the Wall Connector is set up for load sharing (paired with other Wall Connectors), the rotary switch of the master unit must be set to an operating current setting that allows each paired Wall Connector to receive at least 6A of charge current. Example: Three Wall Connectors are paired for load sharing. The master unit needs to be set to a current of at least 3 * 6A = 18A or greater.
What this alert means:
Wall Connector hardware issue. Possible issues include:
1. Contactor not working 2. Self-test of internal ground fault monitoring circuit failed
3. Thermal sensor disconnected 4. Other hardware component issues
What to do:
An internal issue was detected by the Wall Connector.
1. Try charging again by disconnecting the Wall Connector from the vehicle and reconnecting. 2. If the issue persists, turn OFF the circuit breaker for the Wall Connector, wait 10 seconds, and turn the circuit breaker ON again. Then try reconnecting the Wall Connector to the vehicle. 3. If the issue persists, check for loose connections. a. Make sure there is no power to the Wall Connector. b. Remove the face plate and inspect the wiring terminals for any loose connections. c. Contact an electrician if necessary to make sure all wires are properly connected and torqued according to the instructions in the Wall Connector Installation Manual.
4. Once all connections have been checked and made secure, restore power to the Wall Connector and try charging again by reconnecting to the vehicle. 5. If the issue persists, the Wall Connector needs service. Schedule a service appointment through your Mobile App.
What this alert means:
Wall Connector hardware issue. Possible issues include:
1. Contactor not working 2. Self-test of internal ground fault monitoring circuit failed 3. Thermal sensor disconnected 4. Other hardware component issues
What to do:
An internal issue was detected by the Wall Connector.
1. Try charging again by disconnecting the Wall Connector from the vehicle and reconnecting. 2. If the issue persists, turn OFF the circuit breaker for the Wall Connector, wait 10 seconds, and turn the circuit breaker ON again. Then try reconnecting the Wall Connector to the vehicle. 3. If the issue persists, check for loose connections. a. Make sure there is no power to the Wall Connector. b. Remove the face plate and inspect the wiring terminals for any loose connections. c. Contact an electrician if necessary to make sure all wires are properly connected and torqued according to the instructions in the Wall Connector Installation Manual.
4. Once all connections have been checked and made secure, restore power to the Wall Connector and try charging again by reconnecting to the vehicle. 5. If the issue persists, the Wall Connector needs service. Schedule a service appointment through your Mobile App.
(CC_a028) Unable to charge - Incorrect switch setting Wall Connector rotary switch must be adjusted
What this alert means:
Incorrect rotary switch setting.
What to do:
Make sure there is no power to the Wall Connector. Remove the face plate and adjust the rotary switch to a valid operating current setting. The correlation between switch setting and current is printed on the inside of the Wall Connector. You can also refer to the Set the Operating Current section in the Wall Connector Installation Manual. If the Wall Connector is set up for load sharing (paired with other Wall Connectors), the rotary switch of the master unit must be set to an operating current setting that allows each paired Wall Connector to receive at least 6A of charge current. Example: Three Wall Connectors are paired for load sharing. The master unit needs to be set to a current of at least 3 * 6A = 18A or greater.
What this alert means:
What to do:
Try again by disconnecting the Wall Connector from the vehicle and reconnecting. If possible, plug the vehicle into another Wall Connector or a Mobile Connector to determine if the vehicle is able to communicate with other charging equipment. If the problem persists, contact Tesla.
(CC_a030) Unable to charge - Primary / paired unit mismatch Wall Connector current ratings must match
What this alert means:
Circuit Breaker Sharing Network: The paired Wall Connectors have different maximum current capabilities.
What to do:
Only Wall Connectors with the same maximum current capabilities can be paired in a load-sharing (circuit breaker sharing) network. Inspect the type labels on the Wall Connectors to make sure the current capabilities match. It is further recommended to only pair Wall Connectors with the same part number, as an easy way to make sure paired units are compatible.
(CC_a041) Charge rate reduced - Wall connection hot Outlet or Wall Connector wiring must be checked
High temperature detected by Wall Connector alerts indicate the building connection to the Wall Connector is getting too warm, so charging has been slowed to protect the wiring and Wall Connector.
This is not typically an issue with your vehicle or your Wall Connector, but rather an issue with the building wiring. This may be caused by a loose building wiring connection to the Wall Connector and can be fixed quickly by an electrician.
To regain normal charge speed, contact an electrician to inspect the building wiring connection to the Wall Connector. They should make sure that all wires are properly connected and torqued according to the installation guide for the Wall Connector.
Wall Connector installation guides can be found here.
The charge port is unable to detect whether a charge cable is inserted or the type of charge cable connected.
If this alert appears while a charge cable is connected, it should be determined whether the issue is caused by the charging equipment or the vehicle. Try charging the vehicle using different external charging equipment (charge cable, charging station, charging stall, etc.).
• If the vehicle begins charging, the issue was likely with the equipment. • If the vehicle still does not charge, the issue may be with the vehicle.
If this alert appears while a charge cable is not connected or if the issue is suspected to be with the vehicle, inspect the charge port inlet and the charge cable connector for any obstructions (use a flashlight as necessary). Debris, moisture, and/or foreign objects present in the charge port inlet or the charge cable connector can prevent the charge port from properly detecting charge cables.
It is recommended that any debris / foreign objects be removed and any moisture be allowed to dry. Afterward, try re-inserting the cable into the charge port. Charging should now be possible.
As this alert is usually specific to external charging equipment and power sources, and it does not typically indicate an issue with your vehicle that can be resolved by scheduling service, it is recommended that you:
• Try charging with multiple, different types of charging equipment. • Make sure any charge port inlet obstruction has been removed.
You can also try charging your vehicle using a Tesla Supercharger or Destination Charging location, all of which can be located through the map on your vehicle's touchscreen display. See Range Assurance on page for more details. Additional third-party charging stations may also be available in your area to help you to pinpoint the issue.
For more information on troubleshooting Mobile Connector or Wall Connector status lights, refer to the product's Owner's Manual at Charging & Adapter Product Guides. If using other external charging equipment, refer to the manufacturer's provided documentation for troubleshooting tips.
For more information on charging, see Charging Instructions on page 164.
Your vehicle is unable to charge because it cannot communicate effectively with the external charging equipment. It cannot sense a valid control pilot signal coming from the charging equipment.
First, confirm the lack of effective communication is caused by the external charging equipment rather than an issue with your vehicle. This is usually the case.
Try charging the vehicle using different external charging equipment (including charge cable, charging station, or charging stall).
• If the vehicle begins charging, the issue was likely with the equipment. • If the vehicle still does not charge, the issue may be with the vehicle.
If the issue is suspected to be with the vehicle, inspect the charge port inlet and the charge cable connector for any obstructions (use a flashlight as necessary). Debris, moisture, and/or foreign objects present in the charge port inlet or the charge cable connector can prevent the charge port from properly communicating with the charging equipment.
It is recommended that any debris / foreign objects be removed and any moisture be allowed to dry. Afterward, try re-inserting the cable into the charge port. Charging should now be possible.
As this alert is usually specific to external charging equipment and power sources, and it does not typically indicate an issue with your vehicle that can be resolved by scheduling service, it is recommended that you:
• Try charging with multiple, different types of charging equipment. • Make sure any charge port inlet obstruction has been removed.
You can also try charging your vehicle using a Tesla Supercharger or Destination Charging location, all of which can be located through the map on your vehicle's touchscreen display. See Range Assurance on page for more details. Additional third-party charging stations may also be available in your area to help you to pinpoint the issue.
For more information on troubleshooting Mobile Connector or Wall Connector status lights, refer to the product's Owner's Manual at Charging & Adapter Product Guides. If using other external charging equipment, refer to the manufacturer's provided documentation for troubleshooting tips.
For more information on charging, see Charging Instructions on page 164.
(CP_a043) Charge port door sensor fault Charge port may not operate as expected
One of the charge port door sensors is not functioning normally. When this occurs, the charge port may be unable to accurately sense the charge port door position and the charge port may not operate as expected.
• The charge port latch may intermittently remain engaged when the charge port door is opened. • The charge port light may illuminate only intermittently when the charge port door is opened.
If you encounter these or similar behaviors while the alert is present, try closing the charge port door and then opening it again to restore normal function.
For more information, see Opening the Charge Port on page 164.
For more information on charging, see Charging Instructions on page 164.
Charging stopped because communication between the vehicle and the external charging equipment was interrupted.
Confirm whether the external charging equipment is powered by looking for any status lights, displays, or other indicators on the equipment.
If the equipment is not powered, try to restore the external charging equipment’s power source.
• If attempting to charge at a public station and power is unable to be restored, contact the station operator. • If attempting to charge at a private station (for example: charging at home) and power is unable to be restored, contact an electrician.
If the equipment is powered, try charging the vehicle using different external charging equipment.
• If the vehicle begins charging, the issue was likely with the equipment. • If the vehicle still does not charge, the issue may be with the vehicle.
As this alert is usually specific to external charging equipment and power sources, and it does not typically indicate an issue with your vehicle that can be resolved by scheduling service, it is recommended that you:
• Make sure the external charging equipment is powered. • Try charging with multiple, different types of charging equipment.
You can also try charging your vehicle using a Tesla Supercharger or Destination Charging location, all of which can be located through the map on your vehicle's touchscreen display. See Range Assurance on page for more details. Additional third-party charging stations may also be available in your area to help you to pinpoint the issue.
For more information on troubleshooting Mobile Connector or Wall Connector status lights, refer to the product's Owner's Manual at Charging & Adapter Product Guides. If using other external charging equipment, refer to the manufacturer's provided documentation for troubleshooting tips.
(CP_a051) Charge port may not open when pressed Use another method to open the charge port
One of the charge port door sensors is not communicating properly. This may cause the charge port to not recognize the request to open when the charge port door is pressed.
You can still use all other usual methods to open the charge port door:
• Request that the charge port door open using your vehicle touchscreen. • Request that the charge port door open using your Tesla Mobile App. • With your vehicle unlocked, press the charge handle button on any Tesla charge cable, including a Wall
Connector, Mobile Connector, or Supercharger. • Hold and press the trunk button on your key fob.
For more information, see Opening the Charge Port on page 164.
(CP_a053) Unable to charge - Charge station not powered Check power source or try a different station
Charging cannot begin because the charging equipment is not ready. A charge handle is detected, but the charging station is not communicating with the vehicle. This issue could occur because:
• The charging station is not powered. • The control pilot signal between the charging station and the vehicle is interrupted.
Try charging the vehicle with different charging equipment or at a different charging station.
If the vehicle starts to charge, the issue was likely with the equipment.
If using a Tesla Mobile Connector or Wall Connector, first check the status lights on the front. If no status lights are visible, check the power source and contact an electrician to inspect the building wiring connection to the wall outlet or the Wall Connector to confirm that all wires are properly connected and torqued.
If using other external charging equipment, consult the product's owner's manual to learn how to confirm that the station is powered. Contact an electrician to inspect the building wiring and charging equipment as necessary.
If the vehicle still does not charge, the issue may be with the vehicle.
As this alert is usually specific to external charging equipment and power sources, and it does not typically indicate an issue with your vehicle that can be resolved by scheduling service, it is recommended that you:
• Try charging with different charge equipment / at different stations.
You can also try charging your vehicle using a Tesla Supercharger or Destination Charging location, all of which can be located through the map on your vehicle's touchscreen display. See Range Assurance on page for more details. Additional third-party charging stations may also be available in your area to help you to pinpoint the issue.
For more information on troubleshooting Mobile Connector or Wall Connector status lights, refer to the product's Owner's Manual at Charging & Adapter Product Guides. If using other external charging equipment, refer to the manufacturer's provided documentation for troubleshooting tips.
(CP_a054) Charge port latch not engaged Fully insert charge cable or check for obstruction
The charge port latch is unable to latch the charge cable in the charge port inlet. If the latch is not engaged, AC charging (for example, charging with a Tesla Mobile Connector or Wall Connector) will be limited to 16A and DC Fast Charging / Supercharging will be unavailable.
The charge port light will pulse amber if this alert appears during AC charging and will be solid amber if this alert appears when attempting to DC Fast Charge / Supercharge.
If your vehicle begins charging and the charge port light pulses green, the charge cable may not have been fully inserted before. The latch may not have engaged during previous attempts because the cable was not fully inserted. AC charging should no longer be limited, and DC Fast Charging / Supercharging should be available.
If charging is still limited or the vehicle will not charge at all, inspect the charge port inlet and the charge cable connector for any obstructions (use a flashlight as needed). Debris and/or foreign objects in the charge port inlet or the charge cable connector can prevent you from fully inserting the charge cable. If the cable is not fully inserted, the charge port latch will not engage.
It is recommended that any debris / foreign objects be removed. Afterward, try re-inserting the cable into the charge port inlet. AC charging should no longer be limited, and DC Fast Charging / Supercharging should be available.
As this alert is usually specific to external charging equipment and power sources, and it does not typically indicate an issue with your vehicle that can be resolved by scheduling service, it is recommended that you:
• Make sure the charge cable is fully inserted during charging. • Make sure any charge port inlet obstruction has been removed.
You can also try charging your vehicle using a Tesla Supercharger or Destination Charging location, all of which can be located through the map on your vehicle's touchscreen display. See Range Assurance on page for more details. Additional third-party charging stations may also be available in your area to help you to pinpoint the issue.
For more information on troubleshooting Mobile Connector or Wall Connector status lights, refer to the product's Owner's Manual at Charging & Adapter Product Guides. If using other external charging equipment, refer to the manufacturer's provided documentation for troubleshooting tips.
For more information on charging, see Charging Instructions on page 164.
Charging stopped because communication between the vehicle and the external charging equipment was interrupted.
Confirm whether the external charging equipment is powered by looking for any status lights, displays, or other indicators on the equipment.
If the equipment is not powered, try to restore the external charging equipment’s power source.
• If attempting to charge at a public station and power is unable to be restored, contact the station operator. • If attempting to charge at a private station (for example: charging at home) and power is unable to be restored, contact an electrician.
If the equipment is powered, try charging the vehicle using different external charging equipment.
• If the vehicle begins charging, the issue was likely with the equipment. • If the vehicle still does not charge, the issue may be with the vehicle.
As this alert is usually specific to external charging equipment and power sources, and it does not typically indicate an issue with your vehicle that can be resolved by scheduling service, it is recommended that you:
• Make sure the external charging equipment is powered. • Try charging with multiple, different types of charging equipment.
You can also try charging your vehicle using a Tesla Supercharger or Destination Charging location, all of which can be located through the map on your vehicle's touchscreen display. See Range Assurance on page for more details. Additional third-party charging stations may also be available in your area to help you to pinpoint the issue.
For more information on troubleshooting Mobile Connector or Wall Connector status lights, refer to the product's Owner's Manual at Charging & Adapter Product Guides. If using other external charging equipment, refer to the manufacturer's provided documentation for troubleshooting tips.
(CP_a056) Charging stopped - Charge cable disconnected Close charge port - Press brake pedal and retry
Charging has stopped because your vehicle has detected that the connection between the charge port and charge cable has been unexpectedly interrupted.
Before disconnecting a charge cable, make sure you first stop charging.
With some external charging equipment, charging may be stopped by pressing the button on the charge handle.
You can also stop charging from your vehicle touchscreen, your Tesla Mobile App, or the charging station.
For more information, see Stopping Charging on page 165.
For more information on charging, see Charging Instructions on page 164.
(CP_a057) Charging equipment reports error Check equipment for error code or message
Charging was interrupted because the external charging equipment has reported a fault that prevents the vehicle from charging.
Inspect the external charging equipment and look for status lights, displays, or other status indicators on the equipment. Consult the equipment owner’s manual for further troubleshooting instructions.
Try charging the vehicle with different charging equipment or at a different charging station.
• If the vehicle starts to charge, the issue was likely with the equipment. • If the vehicle still does not charge, the issue may be with the vehicle.
As this alert is usually specific to external charging equipment and power sources, and it does not typically indicate an issue with your vehicle that can be resolved by scheduling service, it is recommended that you:
• Try charging with different charge equipment / at different stations.
You can also try charging your vehicle using a Tesla Supercharger or Destination Charging location, all of which can be located through the map on your vehicle's touchscreen display. See Range Assurance on page for more details. Additional third-party charging stations may also be available in your area to help you to pinpoint the issue.
For more information on troubleshooting Mobile Connector or Wall Connector status lights, refer to the product's Owner's Manual at Charging & Adapter Product Guides. If using other external charging equipment, refer to the manufacturer's provided documentation for troubleshooting tips.
(CP_a058) Unable to AC charge - Unplug and retry Or try DC Fast Charging / Supercharging
Your vehicle is unable to AC charge because it has detected one of the following conditions and has tried to charge too many times without success:
• The charge port is unable to detect whether a charge cable is inserted or detect the type of charge cable connected. • Your vehicle is unable to sense a valid pilot control signal coming from the charging station, so it cannot communicate effectively with the external charging equipment. • Communication between your vehicle and the external charging equipment has been interrupted. • The external charging equipment has reported an error that prevents your vehicle from charging.
When this alert is present, there will always be at least one other alert present that identifies a more specific condition.
For more information and troubleshooting suggestions, it is recommended that you check in your vehicle touchscreen under Controls > Service > Notifications for other recent alerts that involve charging.
(CP_a066) Charging equipment not ready See equipment instructions to start charging
Charging cannot begin because the charging station is communicating to your vehicle that either the external charging equipment is not ready or charging is not authorized. The control pilot signal that communicates between the charging station and your vehicle indicates that your vehicle is not allowed to start charging. This could occur because:
• The charging station is actively delaying charging. For example, this can happen because the station has a scheduled charging feature activated. • The charging station requires further activation before the charge session can begin. Some additional authentication may be needed before the station will start charging your vehicle. ◦ For example: a charging card, a mobile app, or a credit card may be required.
Check the charging station for any instructions that explain the steps necessary to enable charging. For example, look for a touchscreen terminal, LED status indicators, printed instructions, or a payment interface that might provide guidance. If you cannot enable charging on the current charging station, try charging the vehicle with different charging equipment or at a different charging station.
• If the vehicle starts to charge, the issue was likely with the equipment. • If the vehicle still does not charge, the issue may be with the vehicle.
As this alert is usually specific to external charging equipment and power sources, and it does not typically indicate an issue with your vehicle that can be resolved by scheduling service, it is recommended that you:
• Try charging with different charge equipment / at different stations.
You can also try charging your vehicle using a Tesla Supercharger or Destination Charging location, all of which can be located through the map on your vehicle's touchscreen display. See Range Assurance on page for more details. Additional third-party charging stations may also be available in your area to help you to pinpoint the issue.
For more information on troubleshooting Mobile Connector or Wall Connector status lights, refer to the product's Owner's Manual at Charging & Adapter Product Guides. If using other external charging equipment, refer to the manufacturer's provided documentation for troubleshooting tips.
(CP_a078) Cable blocked - Charge port latch may be frozen Try preconditioning on HI with Mobile App
The charge port latch cannot unlatch the charge cable, and cold ambient temperature is detected.
To remove any strain on the cable, re-insert the charge cable fully into the charge port inlet. Try again to unlatch the charge cable.
If the charge cable still cannot be removed, the charge port latch may be frozen.
Use your Tesla Mobile App to precondition your vehicle on HI for approximately 30 - 45 minutes. This should help thaw any ice on the charge port latch so the charge cable can be removed.
NOTE: Be sure to use your Mobile App to precondition the vehicle. Setting your climate control for the cabin to HI using the touchscreen is not effective.
If the charge cable still cannot be removed, try the manual release cable in your vehicle’s trunk.
1. Make sure your vehicle is not actively charging. ◦ Press the charging icon in the bottom menu area of your vehicle touchscreen to display the charging screen. ◦ If necessary, press Stop Charging.
2. Open the rear trunk. 3. Pull the charge port release cable downwards to unlatch the charge cable. ◦ Note: The release cable is located on the left hand side of the rear trunk. It may be recessed within an opening of the trunk interior trim.
4. Pull the charge cable from the charge port.
For more information on using the manual release cable, see Manually Releasing Charge Cable on page 166.
For more information on charging, see Charging Instructions on page 164.
(CP_a079) Charge rate reduced - Charge port may be frozen Try preconditioning on HI with Mobile App
The charge port latch is unable to secure the charge cable in the charge port inlet, and cold ambient temperature is detected. If the latch is not engaged, AC charging (for example, charging with a Tesla Mobile Connector or Wall Connector) will be limited to 16A and DC Fast Charging / Supercharging will be unavailable.
The charge port light will pulse amber if this alert appears during AC charging, and it will be solid amber if this alert appears when attempting to DC Fast Charge / Supercharge.
Try re-inserting the charge cable fully into the charge port inlet.
If your vehicle begins charging and the charge port light pulses green, the charge cable may not have been fully inserted before. The latch may not have engaged during previous attempts because the cable was not fully inserted. AC charging should no longer be limited, and DC Fast Charging / Supercharging should be available.
If charging is still limited or the vehicle will not charge at all, inspect the charge port inlet and the charge cable connector for any obstructions (use a flashlight as needed). Debris and/or foreign objects in the charge port inlet or the charge cable connector can prevent you from fully inserting the charge cable. If the cable is not fully inserted, the charge port latch will not engage.
It is recommended that any debris / foreign objects be removed. Afterward, try re-inserting the cable into the charge port inlet. AC charging should no longer be limited, and DC Fast Charging / Supercharging should be available.
If you have checked for and cleared any debris or foreign objects, but charging is still limited or your vehicle will not charge at all, the charge port latch may be frozen. Use your Tesla Mobile App to precondition your vehicle on HI for approximately 30 - 45 minutes. This should help thaw any ice on the charge port latch so the charge cable can be properly inserted.
NOTE: Be sure to use your Mobile App to precondition the vehicle. Setting your climate control for the cabin to HI using the touchscreen is not effective. As this alert usually indicates a temporary condition due to cold ambient temperature or a charge port inlet obstruction, and it does not typically indicate an issue with your vehicle that can be resolved by scheduling service, it is recommended that you:
• Make sure the charge cable is fully inserted during charging. • Make sure any charge port inlet obstruction has been removed. • Use your Tesla Mobile App to precondition your vehicle on temperature setting HI for approximately 30 - 45 minutes before trying to charge again.
If the alert remains present, limited AC charging should still be available.
For more information on charging, see Charging Instructions on page 164.
(CP_a101) Charge rate reduced - Wall connection hot Outlet or Wall Connector wiring must be checked
High temperature detected by Wall Connector alerts indicate the building connection to the Wall Connector is getting too warm, so charging has been slowed to protect the wiring and Wall Connector.
This is not typically an issue with your vehicle or your Wall Connector, but rather an issue with the building wiring. This may be caused by a loose building wiring connection to the Wall Connector and can be fixed quickly by an electrician.
To regain normal charge speed, contact an electrician to inspect the building wiring connection to the Wall Connector. They should make sure that all wires are properly connected and torqued according to the installation guide for the Wall Connector.
Wall Connector installation guides can be found here.
(CP_a102) Unable to charge - Wall connection too hot Outlet or Wall Connector wiring must be checked
High temperature detected by Wall Connector alerts indicate the building connection to the Wall Connector is getting too warm, so charging has stopped to protect the wiring and Wall Connector.
This is not typically an issue with your vehicle or your Wall Connector, but rather an issue with the building wiring. This may be caused by a loose building wiring connection to the Wall Connector and can be fixed quickly by an electrician.
To regain normal charge operation, contact an electrician to inspect the building wiring connection to the Wall Connector. They should make sure that all wires are properly connected and torqued according to the installation guide for the Wall Connector.
Wall Connector installation guides can be found here.
(DI_a175) Cruise control unavailable
Cruise Control, including Traffic-Aware Cruise Control, is currently unavailable. Take control and drive your vehicle manually.
Continue to your destination. Your vehicle is OK to drive.
Cruise Control might become unavailable due to many factors, including:
• Driver input or behavior: ◦ Unbuckling the driver’s seat belt ◦ Not closing the doors, front trunk, or trunk ◦ Canceling a Cruise Control request ◦ Trying to activate Cruise Control below minimum speed of 18mph (30 km/h)
• Environmental / external conditions • Vehicle System Restraints: ◦ May include camera or radar lack of visibility
• Valet Mode is active: ◦ For more information, see Valet Mode on page 46.
Cruise Control may also be unavailable when Track Mode is active on Performance Model 3 vehicles. For more information, see Track Mode on page 68.
When any condition preventing Cruise Control activation is no longer present, Cruise Control should be available.
If this alert persists throughout subsequent drives, schedule service at your convenience. Your vehicle is OK to drive in the meantime.
For more information, see Traffic-Aware Cruise Control on page 91.
(DI_a184) Autopark canceled Take control
Autopark has been canceled. You need to park or finish parking your vehicle manually.
Once the parking maneuver is complete, apply the brakes and shift into Park. Your vehicle will otherwise remain freerolling.
Autopark can be canceled due to many factors, including the following:
• Driver input or behavior ◦ Using the gear stalk ◦ Moving the steering wheel ◦ Pressing the accelerator pedal ◦ Pressing the brake pedal ◦ Opening a door and/or exiting the vehicle ◦ Pressing the Cancel button on the touchscreen
• Environmental / external conditions ◦ Steep slope / grade ◦ Weather conditions affecting visibility / sensor function
◦ Curb cannot be detected
• A trailer is attached to the vehicle • Vehicle system constraints
Autopark should be available again during your next drive.
If this alert persists throughout subsequent drives, schedule service at your earliest convenience. Your vehicle is OK to drive in the meantime.
For more information, see To Cancel Parking on page 112 and Limitations on page 112.
(DI_a185) Autopark aborted
Autopark has aborted and the Electronic Parking Brake has been applied. You need to park or finish parking your vehicle manually.
Once the parking maneuver is complete, apply the brakes and shift into Park. Your vehicle will otherwise remain freerolling.
Autopark can abort due to many factors, including the following:
• Driver input or behavior ◦ Using the gear stalk ◦ Moving the steering wheel ◦ Pressing the accelerator pedal ◦ Pressing the brake pedal ◦ Opening a door and/or exiting the vehicle ◦ Pressing the Cancel button on the touchscreen
• Environmental / external conditions ◦ Steep slope / grade ◦ Weather conditions affecting visibility / sensor function ◦ Curb cannot be detected
• A trailer is attached to the vehicle • Vehicle system constraints
Autopark should be available again during your next drive.
If this alert persists throughout subsequent drives, contact Tesla Service at your earliest convenience. Your vehicle is OK to drive in the meantime.
For more information, see To Cancel Parking on page 112 and Limitations on page 112.
(DI_a201) Regenerative braking temporarily reduced Regen will increase as vehicle is driven
Regenerative braking performance has been temporarily reduced to below 65% of its full capacity. The exact reduction is indicated by the dashed lines on the power meter.
While this alert is present, the deceleration rate of the vehicle due to regenerative braking will be reduced and more brake pedal application will be required to slow the vehicle (similar to what is needed in a gas-powered, non-electric, vehicle).
This alert is expected under the following conditions:
• Battery is near full charge: ◦ Regenerative braking is reduced when the battery is at 95% charge or higher.
• Battery is cold: ◦ The battery may not be warm enough for full regenerative braking performance (possibly at the beginning of a drive). ◦ In extremely cold climates, this alert may remain present indefinitely and regenerative braking may remain reduced, as driving the vehicle may not warm the battery enough to fully restore performance.
Typically, driving will clear this alert because it will reduce the battery charge level below 95% and sufficiently warm the battery.
This is a completely normal part of vehicle operation and should not cause alarm. The notice on the screen is for your information only.
For more information on regenerative braking, see the Regenerative Braking section in the Owner’s Manual. Regenerative Braking on page 62.
(DI_a245) Vehicle Hold feature unavailable Keep brake pedal pressed while stopped
Vehicle Hold is currently unavailable due to system constraints. When stopping, use the brake pedal to bring your vehicle to a complete stop and keep your vehicle stationary.
Continue to your destination. Your vehicle is OK to drive.
If Vehicle Hold is not available during your next drive, contact Tesla Service. Your vehicle is OK to drive in the meantime.
For more information, see Vehicle Hold on page 67.
(ESP_a118) Assist for low brake performance activated To stop, keep brake pedal firmly pressed
Hydraulic Fade Compensation is active. This brake assist function activates temporarily to make sure you have full braking capability in conditions where reduced braking performance is detected by your vehicle.
Continue to press the brake pedal as you normally would, and do not "pump" (repeatedly press and release) the pedal as this will interrupt the function.
This alert will clear when your vehicle comes to a stop or you are no longer pressing the brake pedal. It may still be displayed for up to 5 seconds afterward.
When this assist function activates, you may feel the brake pedal pull away from your foot and notice a strong increase in brake pressure. You may also hear a pumping sound coming from the brake hydraulic unit at the front of the vehicle. This will usually last for a few seconds, depending on road surface and vehicle speed. This is completely normal and does not indicate any issue with your vehicle.
Reduced braking performance is usually temporary, and can occur for a number of reasons including high brake temperatures after heavy brake use, or driving in extremely cold or wet conditions. It can also indicate that your brake pads or rotors have worn to the point that normal replacement is needed.
If you continue to experience reduced braking performance which does not improve over time, please contact Tesla service at your convenience for a brake inspection.
(PCS_a017) Charging stopped - Power lost while charging Check power source and charging equipment
Power has been lost during charging. This could result from the charging equipment losing power from the source (for example, a wall outlet) or from an issue with the charging equipment.
This alert is often accompanied by other alerts that can help you identify and troubleshoot the issue. Start by investigating any other displayed alerts that relate to charging issues.
Alternatively, you can check Mobile Connector or Wall Connector status lights to confirm power to the device, and also refer to the product owner’s manual for troubleshooting information based on blink codes. If using other (nonTesla) external charging equipment, check for a display or other user interface that provides troubleshooting help.
If there is clearly no power to the charging equipment, check the circuit breaker for the wall outlet / Wall Connector to make sure it has not tripped.
Further troubleshooting tips based on equipment type:
• If using a Mobile Connector, try charging the vehicle with a different wall outlet. ◦ If the vehicle starts to charge, the issue was likely with the original wall outlet. It is recommended that you contact an electrician to inspect the building wiring connection to that outlet. ◦ If the vehicle still does not charge, the issue may be with the Mobile Connector.
• If using a Wall Connector, try charging the vehicle with different charging equipment like a Mobile Connector powered by a separate wall outlet. ◦ If the vehicle starts to charge, the issue was likely with the Wall Connector. Contact an electrician to inspect the building wiring connection to the Wall Connector. They should make sure that all wires are properly connected and torqued according to the installation guide for the Wall Connector.
As this alert is usually specific to external charging equipment and power sources, and it does not typically indicate an issue with your vehicle that can be resolved by scheduling service, it is recommended that you:
• Try charging with different wall outlets. • Try charging with different charging equipment.
You can also try charging your vehicle using a Tesla Supercharger or Destination Charging location, all of which can be located through the map on your vehicle's touchscreen display. See Range Assurance on page for more details. Additional third-party charging stations may also be available in your area to help you to pinpoint the issue.
For more information on troubleshooting Mobile Connector or Wall Connector status lights, refer to the product's Owner's Manual at Charging & Adapter Product Guides. If using other external charging equipment, refer to the manufacturer's provided documentation for troubleshooting tips.
(PCS_a053) Charge rate reduced - Unexpected voltage drop Remove extension cords / Have wiring inspected
Charging speed has been reduced because the onboard charger in your vehicle has detected a large voltage drop during charging.
Likely causes of this issue include:
• Problems with the building wiring and/or the wall outlet. • An extension cord or other wiring that cannot support the requested charge current.
This issue can also result from turning on electric devices that draw a lot of power from the same branch circuit while the vehicle is charging.
If this issue has occurred multiple times at your normal charging location, contact an electrician to inspect the electrical installation. They should check the following:
• Any installed charging equipment and its connection to the building wiring. • The building wiring, including any wall outlet used with a Mobile Connector. • The electrical connection to the power utility line where it enters the building.
Discuss with the electrician whether the charge current on the vehicle should be lowered, or if the installation should be upgraded to support a higher charge current.
As this alert is usually specific to external charging equipment and power sources, and it does not typically indicate an issue with your vehicle that can be resolved by scheduling service, it is recommended that you:
• Try charging with multiple, different types of charging equipment at different locations. • Contact an electrician to inspect the wiring and equipment at your normal charging location.
You can also try charging your vehicle using a Tesla Supercharger or Destination Charging location, all of which can be located through the map on your vehicle's touchscreen display. See Range Assurance on page for more details. Additional third-party charging stations may also be available in your area to help you to pinpoint the issue.
For more information on troubleshooting Mobile Connector or Wall Connector status lights, refer to the product's Owner's Manual at Charging & Adapter Product Guides. If using other external charging equipment, refer to the manufacturer's provided documentation for troubleshooting tips.
(PCS_a054) Charging stopped due to large voltage drop Remove extension cords / Have wiring inspected
Charging has been interrupted because the onboard charger in your vehicle has detected an unusually large voltage drop.
Likely causes of this issue include:
• Problems with the building wiring and/or the wall outlet. • An extension cord or other wiring that cannot support the requested charge current.
This issue can also result from turning on electric devices that draw a lot of power from the same branch circuit while the vehicle is charging.
If this issue has occurred multiple times at your normal charging location, contact an electrician to inspect the electrical installation. They should check the following:
• Any installed charging equipment and its connection to the building wiring. • The building wiring, including any wall outlet used with a Mobile Connector. • The electrical connection to the power utility line where it enters the building.
Discuss with the electrician whether the charge current on the vehicle should be lowered, or if the installation should be upgraded to support a higher charge current.
As this alert is usually specific to external charging equipment and power sources, and it does not typically indicate an issue with your vehicle that can be resolved by scheduling service, it is recommended that you:
• Try charging with multiple, different types of charging equipment at different locations. • Contact an electrician to inspect the wiring and equipment at your normal charging location.
You can also try charging your vehicle using a Tesla Supercharger or Destination Charging location, all of which can be located through the map on your vehicle's touchscreen display. See Range Assurance on page for more details. Additional third-party charging stations may also be available in your area to help you to pinpoint the issue.
For more information on troubleshooting Mobile Connector or Wall Connector status lights, refer to the product's Owner's Manual at Charging & Adapter Product Guides. If using other external charging equipment, refer to the manufacturer's provided documentation for troubleshooting tips.
(UI_a013) Air pressure in tires very low PULL OVER SAFELY - Check for flat tire
This alert indicates that one or more of the tires on your vehicle is extremely low or flat.
The tire pressure monitoring system (TPMS) has detected that the air pressure in one or more of your tires is significantly lower than the recommended cold pressure (RCP). This recommended pressure is displayed on the Tire and Loading information label.
You should pull over carefully as soon as possible. In a safe location, check for a flat tire.
You can request Tesla roadside assistance options (mobile tire, loaner wheel, tow) if required. See Contacting Tesla Roadside Assistance on page 197 for more information.
In a non-emergency situation, it is recommended that you visit your local Service Center for assistance.
In the Cards area of your vehicle's touchscreen, swipe to the right or left to access Tire Pressures. The Tire Pressures card should display currently measured tire pressures and allow you to view cautions or warnings related to pressures that are not within acceptable limits.
For more information, see Cards under Touchscreen Overview on page 4.
See Maintaining Tire Pressures on page 171 for detailed information on how to keep the tires properly inflated.
The alert will clear once the TPMS has a consistent tire pressure measurement for each of your tires within 3 psi of the recommended cold pressure.
• The alert and Tire Pressure indicator light may still be present immediately after you have filled your tires to the recommended cold pressure, but both should clear once you have driven a short distance. • You may need to drive over 15 mph (25 km/h) for at least 10 minutes for the Tire Pressure Monitoring System to measure and report your updated tire pressures.
For more information on tire pressure, inflation, and maintenance, see Tire Care and Maintenance on page 171.
(UI_a014) Air pressure below recommendation for tires Check pressure and refill air as needed
This alert does NOT indicate that there is a flat tire.
The tire pressure monitoring system (TPMS) has detected that the air pressure in one or more of your tires is at least 20% lower than the recommended cold tire pressure. This recommended pressure should be displayed on the Tire and Loading information label.
In the Cards area of your vehicle's touchscreen, swipe to the right or left to access Tire Pressures. The Tire Pressures card should display currently measured tire pressures and allow you to view cautions or warnings related to pressures that are not within acceptable limits.
For more information, see Cards under Touchscreen Overview on page 4.
See Maintaining Tire Pressures on page 171 for detailed information on how to keep the tires properly inflated.
This alert may appear in cold weather because the air in your tires naturally contracts when it becomes cold, decreasing tire pressures.
• Although drops in tire pressure are expected in colder weather, air should still be added to maintain the recommended cold tire pressure. • The alert may clear as the vehicle is driven. This is because the tires will warm up and the tire pressure will increase. ◦ Even if the alert clears, the tires should still be refilled with air once they have cooled. For the best experience with your vehicle, the recommended cold tire pressure should be maintained at all times.
The alert should clear once the Tire Pressure Monitoring System detects that each of your tires is inflated to the recommended cold pressure.
• The alert and Tire Pressure indicator light may still be present immediately after you have filled your tires to the recommended cold pressure, but both should clear once you have driven a short distance. • You may need to drive over 15 mph (25 km/h) for at least 10 minutes for the Tire Pressure Monitoring System to measure and report your updated tire pressures.
If you repeatedly see this alert for the same tire, have the tire inspected for a slow leak. You can visit a local tire shop or schedule service using your Tesla Mobile App.
For more information on tire pressure and inflation, see Tire Care and Maintenance on page 171.
(UMC_a002) Unable to charge - Mobile Connector GFCI tripped Unplug charge handle from charge port and retry
The vehicle cannot charge because the ground-fault circuit interrupter (GFCI) in the Mobile Connector has tripped.
Like the GFCI in a wall outlet, this feature is designed to stop the flow of electricity when there is a problem. It has interrupted charging to protect your vehicle and the charging equipment.
This could happen for many reasons. The problem could be in the charge cable, the charge handle, the charge port, or even an onboard vehicle component.
Inspect the charge port as well as the charge handle for pooled water or unusual levels of moisture.
• If you find excessive moisture, wait and let both the inside area of the charge port and the exposed portion of the charge handle dry sufficiently before trying again.
Inspect the charge equipment for damage.
• If the cable is in any way damaged or deteriorated, do not use it. Try different charging equipment instead. • If the cable is in good condition, try charging again with the same Mobile Connector.
If the issue persists and prevents charging, try charging with different charging equipment.
As this alert is usually specific to external charging equipment and power sources, and it does not typically indicate an issue with your vehicle that can be resolved by scheduling service, it is recommended that you:
• Try charging with multiple, different types of charging equipment.
You can also try charging your vehicle using a Tesla Supercharger or Destination Charging location, all of which can be located through the map on your vehicle's touchscreen display. See Range Assurance on page for more details. Additional third-party charging stations may also be available in your area to help you to pinpoint the issue.
For more information on troubleshooting Mobile Connector status lights and charging issues, refer to the product's owner's manual.
The vehicle cannot charge, or charging is interrupted, because either the Mobile Connector:
• Detects the wall outlet voltage is too high.
OR
• Detects an unexpected increase in supply voltage from the wall outlet.
Try charging the vehicle with a different wall outlet.
If the vehicle starts to charge, the issue was likely with the original wall outlet. It is recommended that you contact an electrician to inspect the building wiring connection to that outlet.
If the vehicle still does not charge when you try a different wall outlet, try charging at a different location.
As this alert is usually specific to external charging equipment and power sources, and it does not typically indicate an issue with your vehicle that can be resolved by scheduling service, it is recommended that you:
• Try charging with different wall outlets. • Try charging with different charging equipment.
You can also try charging your vehicle using a Tesla Supercharger or Destination Charging location, all of which can be located through the map on your vehicle's touchscreen display. See Range Assurance on page for more details. Additional third-party charging stations may also be available in your area to help you to pinpoint the issue.
For more information on troubleshooting Mobile Connector status lights and charging issues, refer to the product's owner's manual.
The vehicle cannot charge, or charging is interrupted, because either the Mobile Connector:
• Does not detect enough supply voltage from the wall outlet.
OR
• Detects an unexpected drop in supply voltage from the wall outlet.
Try charging the vehicle with a different wall outlet.
If the vehicle starts to charge, the issue was likely with the original wall outlet. It is recommended that you contact an electrician to inspect the building wiring connection to that outlet.
If the vehicle still does not charge when you try a different wall outlet, try charging at a different location.
As this alert is usually specific to external charging equipment and power sources, and it does not typically indicate an issue with your vehicle that can be resolved by scheduling service, it is recommended that you:
• Try charging with different wall outlets. • Try charging with different charging equipment.
You can also try charging your vehicle using a Tesla Supercharger or Destination Charging location, all of which can be located through the map on your vehicle's touchscreen display. See Range Assurance on page for more details. Additional third-party charging stations may also be available in your area to help you to pinpoint the issue.
For more information on troubleshooting Mobile Connector status lights and charging issues, refer to the product's owner's manual.
High temperature detected by Mobile Connector alerts indicate the outlet used to charge is becoming too warm, so charging has stopped to protect the outlet.
This is not typically an issue with your vehicle or your Mobile Connector, but rather an issue with the outlet. A warm outlet may be caused by a plug that is not fully inserted, a loose building wiring connection to the outlet, or an outlet that is beginning to wear out.
To regain normal charge operation, make sure your adapter is fully plugged into the outlet. If charging speed does not return to normal, contact an electrician to inspect the outlet and building wiring connections to the outlet and complete any repairs needed.
If the outlet is worn, it should be replaced with a high-quality outlet. Consider upgrading to a Tesla Wall Connector for greater convenience and highest charging speed.
High temperature detected by Mobile Connector alerts indicate the outlet used to charge is becoming too warm, so charging has been slowed to protect the outlet.
This is not typically an issue with your vehicle or your Mobile Connector, but rather an issue with the outlet. A warm outlet may be caused by a plug that is not fully inserted, a loose building wiring connection to the outlet, or an outlet that is beginning to wear out.
To regain normal charge speed, make sure your adapter is fully plugged into the outlet. If charging speed does not return to normal, contact an electrician to inspect the outlet and building wiring connections to the outlet and complete any repairs needed.
If the outlet is worn, it should be replaced with a high-quality outlet. Consider upgrading to a Tesla Wall Connector for greater convenience and highest charging speed.
(VCFRONT_a180) Electrical system power reduced Vehicle may shut down unexpectedly
The electrical system cannot maintain the voltage required to support all vehicle features.
If this alert is present while you are driving, it is possible your vehicle will shut down unexpectedly.
It is also possible that your vehicle will not restart after the current drive.
It is recommended that you eliminate or reduce your use of any non-essential features. This can help your vehicle maintain adequate electrical power for essential functions. It may also prevent your vehicle from shutting down before you reach your immediate destination, although this is not guaranteed.
If this alert remains active, schedule service immediately. Without service, your vehicle may shut down unexpectedly or may not restart.
(VCFRONT_a182) 12V battery must be replaced - Schedule service Software will not update until battery is replaced
The 12V battery is showing degraded performance and needs to be replaced. Until the 12V battery is replaced, vehicle software updates will not complete.
It is recommended that you have the 12V battery replaced at your earliest convenient opportunity.
You can schedule service via the Tesla Mobile App, or with an independent service provider that offers 12V battery replacement for your vehicle. Please note that independent service provider options may vary, based on your vehicle configuration and your location.
Your vehicle is OK to drive with this alert present. However, if you delay the 12V battery replacement, your vehicle may eventually not have enough power to start or to restart after a recent drive.
If the 12V battery is too low to turn on the vehicle or open the doors, follow the instructions in Jump Starting the 12V Battery on page 202.
For more information on the battery system, see Battery Information on page 162.
(VCFRONT_a192) Electrical system power reduced Non-essential features may be unavailable
Some non-essential features, like seat heaters or cabin heating / cooling, may be unavailable or may operate at a reduced level. This is expected behavior designed to help your vehicle maintain adequate electrical power for essential functions.
This alert may be present due to various vehicle conditions. For more information and further recommended actions, check for other alerts specific to conditions affecting your vehicle’s electrical system.
(VCFRONT_a402) Electrical system backup power is unavailable Vehicle will consume more energy while idle
The backup power source for the electrical system is not available or cannot provide the voltage required to support all vehicle features.
The primary source of electrical power, the high voltage battery system, will continue to support vehicle functions, even when your vehicle is idle. For more information on the high voltage battery, see About the Battery on page 162.
You may notice that your vehicle consumes more energy than usual when you are not driving it, or that your vehicle displays a lower projected range than you would normally expect after charging. This is normal vehicle behavior when this alert is present, and it will continue until the backup power source is restored.
Continue to your immediate destination. Your vehicle is OK to drive.
It is recommended that you limit or avoid your use of any non-essential features. This can help your vehicle maintain adequate electrical power for essential functions.
While your vehicle is OK to drive when this alert is present, there is a chance that an issue affecting the primary power source could cause your vehicle to shut down unexpectedly.
It is recommended that you schedule service at your earliest opportunity, so the backup power source for the electrical system can be restored.
(VCSEC_a221) Air pressure below recommendation for tires Check pressure and refill air as needed
This alert does NOT indicate that there is a flat tire.
The tire pressure monitoring system (TPMS) has detected that the air pressure in one or more of your tires is at least 20% lower than the recommended cold tire pressure. This recommended pressure should be displayed on the Tire and Loading information label.
In the Cards area of your vehicle's touchscreen, swipe to the right or left to access Tire Pressures. The Tire Pressures card should display currently measured tire pressures and allow you to view cautions or warnings related to pressures that are not within acceptable limits.
For more information, see Cards under Touchscreen Overview on page 4.
See Maintaining Tire Pressures on page 171 for detailed information on how to keep the tires properly inflated.
This alert may appear in cold weather because the air in your tires naturally contracts when it becomes cold, decreasing tire pressures.
• Although drops in tire pressure are expected in colder weather, air should still be added to maintain the recommended cold tire pressure. • The alert may clear as the vehicle is driven. This is because the tires will warm up and the tire pressure will increase. ◦ Even if the alert clears, the tires should still be refilled with air once they have cooled. For the best experience with your vehicle, the recommended cold tire pressure should be maintained at all times.
The alert should clear once the Tire Pressure Monitoring System detects that each of your tires is inflated to the recommended cold pressure.
• The alert and Tire Pressure indicator light may still be present immediately after you have filled your tires to the recommended cold pressure, but both should clear once you have driven a short distance. • You may need to drive over 15 mph (25 km/h) for at least 10 minutes for the Tire Pressure Monitoring System to measure and report your updated tire pressures.
If you repeatedly see this alert for the same tire, have the tire inspected for a slow leak. You can visit a local tire shop or schedule service using your Tesla Mobile App.
For more information on tire pressure and inflation, see Tire Care and Maintenance on page 171.
(VCSEC_a228) Air pressure in tires very low PULL OVER SAFELY - Check for flat tire
This alert indicates that one or more of the tires on your vehicle is extremely low or flat.
The tire pressure monitoring system (TPMS) has detected that the air pressure in one or more of your tires is significantly lower than the recommended cold pressure (RCP). This recommended pressure is displayed on the Tire and Loading information label.
You should pull over carefully as soon as possible. In a safe location, check for a flat tire.
You can request Tesla roadside assistance options (mobile tire, loaner wheel, tow) if required. See Contacting Tesla Roadside Assistance on page 197 for more information.
In a non-emergency situation, it is recommended that you visit your local Service Center for assistance.
In the Cards area of your vehicle's touchscreen, swipe to the right or left to access Tire Pressures. The Tire Pressures card should display currently measured tire pressures and allow you to view cautions or warnings related to pressures that are not within acceptable limits.
For more information, see Cards under Touchscreen Overview on page 4.
See Maintaining Tire Pressures on page 171 for detailed information on how to keep the tires properly inflated.
The alert should clear once the Tire Pressure Monitoring System has a consistent tire pressure measurement for each of your tires of at least 30 psi.
• The alert and Tire Pressure indicator light may still be present immediately after you have filled your tires to the recommended cold pressure, but both should clear once you have driven a short distance. • You may need to drive over 15 mph (25 km/h) for at least 10 minutes for the Tire Pressure Monitoring System to measure and report your updated tire pressures.
For more information on tire pressure, inflation, and maintenance, see Tire Care and Maintenance on page 171.
A
ABS (Anti-lock Braking System): 61 absolute speed limit: 124 access panel, removing: 181 accessories: 21 plugging into power socket: 21 accessories, towing: 76 adjacent lane speed: 118 aero covers: 173 air circulation: 132 air conditioning: 132 air distribution: 132 air filter: 135 air vents: 134 airbag, front passenger, disabling: 44 airbags: 42 alarm: 149 all-season tires: 175 Always Show Estimated Round Trip Energy: 140 ambient lights: 54 anti-lock braking (ABS): 61 application launcher: 4 Arcade: 203 audio: 48, 142, 144 equalizer: 144 immersive sound: 144 playing files: 142 steering wheel scroll button: 48 volume control: 142 auto fold: 50 auto high beam: 55 Auto Lane Change: 98 auto tilt: 50 AUTO wipers: 60 automatic emergency braking: 122 automatic navigation: 137 Autopark: 111 autopilot: 118 blind spot collision warning: 118 side collision warning: 118 Autopilot: 88, 91, 96, 98, 111, 113, 121, 124
Auto Lane Change: 98 automatic emergency braking: 121
Autopark: 111
Autosteer: 96 collision avoidance assist: 121 forward collision warning: 121 overtake acceleration: 91 overview: 88 speed assist: 124 speed limit warning: 124 staying within speed limits: 124
Summon: 113
Traffic-Aware Cruise Control: 91 Autopilot components: 88 Autosteer: 96 average range: 71
B
backup camera: 72 battery (12V): 162, 194 complete discharge: 162 specifications: 194 Battery (high voltage): 162, 181, 194 care of: 162 coolant: 181 specifications: 194 temperature limits: 162 battery (key), replacing: 8 blind spot collision warning: 118 Bluetooth: 144, 145 devices, playing audio files from: 144 general information: 145 phone, pairing and using: 145 body repairs: 184 body touch up: 179 Boombox: 205 booster seats: 29 brakes: 61, 122, 181, 192 automatic in emergencies: 122 fluid level: 181 overview of: 61 specifications: 192 Bumper Clearance (Summon): 113
C
cabin air filter: 135 cabin camera: 21 cabin temperature control: 132 Calendar app: 147 calibrating windows: 13 camera (rear view): 72 cameras (autopilot): 88 Camp Mode: 134 car cover: 179 car wash mode: 177 car washes: 177 card: 7 cargo area: 14
cargo volume: 191 carpets, cleaning: 178 CCS (Combo): 161 CE certifications: 208 CHAdeMO: 161 chains: 176 change of ownership: 131 charge port: 164 charge port light: 165 charge port manual release: 166 charge port release cable: 166 charging: 160, 161, 164, 166 charge settings: 166 charging status: 166 components and equipment: 160 instructions: 164 public charging stations: 161 scheduling: 166 charging locations, finding: 139 child protection: 13 disabling rear window switches: 13 child restraint systems: 29 child safety seats: 29 child seats: 44 disabling front passenger airbag: 44 child-protection locks: 12 cleaning: 177 climate controls: 132 coat hangers: 21 cold weather best practices: 84 collision avoidance assist: 121 connecting to Wi-Fi: 156 console: 19, 21 12V power socket: 21 opening: 19 rear: 19
USB ports: 19 consumption chart: 71 contact information: 197 roadside assistance: 197 copyrights: 205 cruise control: 91
D
DAB radio: 142 dashboard overview: 4 Dashcam: 73 data recording: 206 data sharing: 206 declarations of conformity: 208 delivery mileage: 206 devices: 143, 144
Bluetooth, playing audio files: 144 playing audio files from: 143 dimensions: 189 Dog Mode: 134 dome (map) lights: 54 door handles: 11 door labels: 187 doors: 11, 12
Child Lock: 12 exterior door handles: 11 interior locking and unlocking: 12 locking: 11 opening from exterior: 11 opening from interior: 11
Unlock on Park: 12 unlocking: 11 doors function: 12
Walk-Away Door Lock: 12 drive away locking: 12 Drive gear: 53 driver: 46 profiles: 46 driving: 22, 51, 70 seating position: 22 starting: 51 tips to maximize range: 70
E
Easter Eggs: 203 easy entry, driver profile: 46 ecall: 199 electric parking brake: 63 emergency braking: 121 emergency flashers: 56 Emergency Lane Departure Avoidance: 118 energy: 57, 62 gained from regenerative braking: 62 range information: 57 Energy app: 71 energy use predictions (navigating): 140 Entertainment: 203 Erase & Reset: 131 event data recording: 206 exterior: 2, 54, 177, 179, 189 car cover: 179 cleaning: 177 dimensions: 189 lights: 54
overview: 2 polishing, touch up, & repair: 179
F
factory defaults, restoring: 131 factory reset: 131 fan speed, interior: 132 favorites (Media Player): 143 Favorites (navigation): 138 FCC certifications: 208 features, downloading new: 157 firmware (software) updates: 157 flash drives, playing audio files from: 143 flashers, warning: 56 floor mats: 179 fluids: 169, 181 replacement intervals: 169 reservoirs, checking: 181 fog lights: 54 forward collision warning: 121 front passenger detection: 44 front trunk: 16
G
G-meter: 68 garage doors, opening: 153 gates, opening: 153 GAWR: 187 gears: 53 glovebox: 19 Glovebox PIN: 149 Gross Axle Weight Rating: 187 Gross Vehicle Weight Rating: 187 ground clearance: 189 GVWR: 187
H
Handling Balance (Track Mode): 68 hazard warning flashers: 56 head supports: 23 headlights: 54, 55 after exit: 55 controlling: 54 high beams: 55 heating: 132 high beam headlights: 55 high voltage: 160, 170, 194
Battery specifications: 194 components: 160 safety: 170 hills, stopping on: 67 Home location: 140 HomeLink: 113, 153 programming and using: 153 when using Summon: 113 hood: 16 horn: 48 hub caps: 173
I
i-Size: 29 I'm Feeling Lucky, Hungry: 137 IC certifications: 208 identification labels: 185 instant range: 71 interior: 4, 54, 132, 178, 189 cleaning: 178 dimensions: 189 lights: 54 overview: 4 temperature control: 132 interior cabin camera: 21 internet radio: 142 intrusion detection: 149 ISOFIX: 29
J
J1772: 161 jacking: 183 jump starting: 202
K
Keep Climate On: 134 key: 8, 208
FCC and IC certifications: 208 replacing battery: 8 key card: 7 keys: 6, 9 adding key cards and phone keys: 9 deleting key cards and phone keys: 9 displaying a list of: 9 overview: 6
L
label: 187
Statutory Plate: 187
Tire and Loading Information: 187 lane assist: 118 lane change, automatic: 98 Lane Departure Avoidance: 118
Lap Timer: 68 lifting: 183 lights: 54, 55, 56 hazard warning: 56 headlights after exit: 55 turn signals: 56 load limits: 187 location tracking: 137 locking: 11 lug nut covers: 173 lumbar adjustment: 22
M
maintenance: 169, 171, 177, 180, 181 brake fluid, checking: 181 cleaning: 177 daily checks: 169 fluid replacement intervals: 169 monthly checks: 169 panel, removing: 181 replacing wiper blades: 180 service intervals: 169 tires: 171 washer fluid, topping up: 181 washer jets, cleaning: 180 map orientation: 137 map updates: 141 mats: 179 media: 142 mileage upon delivery: 206 mirrors: 50 mobile app: 158 mobile app access: 158 Mobile Connector: 161, 164 description: 161 using: 164 modifications: 184 motor specifications: 191 my car does what?: 203
N
naming: 130 Navigate on Autopilot: 101 navigating: 137, 138 NCC certifications: 208 Neutral gear: 53
O
Obstacle-Aware Acceleration: 121 Off-Peak Charging: 167 offset from speed limit: 124 Online Routing: 140 opening hood without power: 202 overhang dimensions: 189 overtake acceleration: 91 Owner Information, about: 205
P
Park Assist: 65 Park gear: 53 parking brake: 63 parking, using Autopark: 111 parking, using Summon: 113 parts replacement: 184 personal data, erasing: 131 phone: 6, 145 authenticating as a key: 6 using: 145 phone app: 146 phone key: 6, 9 adding as a key: 9 removing as a key: 9 PIN: 46 PIN to Drive: 149 Post-drive Cooling (Track Mode): 68 power cycling: 51 power socket: 21 power windows: 13 powering on and off: 51 Preconditioning: 167 public charging stations: 161
R
radio: 142 Radio Frequency information: 208 range: 62, 70 driving tips to maximize: 70 regenerative braking: 62 range assurance: 71 Re-route: 140 rear seats, folding and raising: 23 rear view camera: 72 rear window switches, disabling: 13 recent (Media Player): 143 Recents (navigation): 138 recording videos: 73, 151 recording videos (Track Mode): 68 regenerative braking: 62 regenerative braking, in Track Mode: 68 relative speed limit: 124
release notes: 157 restarting the touchscreen: 51 Reverse gear: 53 RFID transponders: 184 roadside assistance: 197 roof racks: 188 rotating tires: 172 Round Trip Energy (navigating): 140
S
safety information: 28, 45 airbags: 45 seat belts: 28 Schedule: 167 schedule service: 158 scheduled charging: 167 scheduled departure: 167 using: 167 seat belts: 26, 27, 178 cleaning: 178 in a collision: 27 overview of: 26 pre-tensioners: 27 wearing when pregnant: 27 seat covers: 25 seat heaters: 132, 134 seating capacity: 187 seats: 22, 132 adjusting: 22 heaters: 132 security settings: 149 sensors: 88 Sentry Mode: 149 service data recording: 206 service intervals: 169 Settings, erasing: 131 shifting gears: 53 Show Calendar Upon Entry: 147 Side Clearance (Summon): 113 side collision warning: 118 slip start: 64 Smart Summon: 115 smartphone: 6 authenticating as a key: 6 Software Reinstall: 157 software reset: 131 software update preferences: 157 software updates: 157 specifications: 189, 191, 192, 194 12V battery: 194 brakes: 192 cargo volume: 191 dimensions: 189 exterior: 189
High Voltage Battery: 194 interior: 189 motor: 191 steering: 191 subsystems: 191 suspension: 192 tires: 194 transmission: 191 weights: 191 wheels: 194 speed assist: 124 Speed Limit Mode: 130 speed limit warning: 124 Stability Assist (Track Mode): 68 stability control: 64 starting: 51 Statutory Plate: 187 steering specifications: 191 steering wheel: 54 lights, controlling: 54 steering, automatic: 96 streaming services: 142 summer tires: 175 Summon: 113 Summon Distance: 113 supercharging: 168 described: 168 idle fees: 168 pay-per-use fees: 168 suspension specifications: 192
T
telematics: 206 temperature: 57, 132, 162
Battery (high voltage), limits: 162 cabin, controls for: 132 outside: 57 Teslacam: 73 tie-down straps: 201 tilt/intrusion detection: 149 Tire and Loading Information label: 187 tire noise: 176 Tire Pressure Monitoring System: 174 overview of: 174 tire pressures, checking: 171 tire pressures, when towing: 76
tires: 171, 172, 175, 176, 194, 195 all-season: 175 balancing: 172 chains: 176 inspecting and maintaining: 171 pressures, how to check: 171 replacing: 172 replacing a tire sensor: 175 rotation: 172 specification: 194 summer: 175 tire markings: 195 wheel configuration: 171 winter: 175 toll system transponders, attaching: 184 torque specifications: 191 touch up body: 179 touchscreen: 4, 48, 157, 178 cleaning: 178 overview: 4 restarting: 48 software updates: 157 tow mode: 76 towing a trailer: 76 towing and accesssories: 76 towing capacity: 76 towing instructions: 200 Toybox: 203 TPMS: 174 overview of: 174 Track Mode: 68 Tracking Disabled: 137 traction control: 64 trademarks: 205 Traffic Light and Stop Sign Control: 104 Traffic-Aware Cruise Control: 91 trailer, towing: 76 transmission specifications: 191 transponders, attaching: 184 Transport Mode: 200 transporting: 200 trip chart: 71 Trip Planner: 140 trunk, adjust opening height: 14 trunk, front: 16 trunk, rear: 14 turn signals: 56
U
Unlock On Park: 12 unlocking: 11 USB devices: 19, 143 connecting: 19 playing audio files from: 143 USB flash drive: 149 USB ports: 19
V
Valet mode: 46 Vehicle Hold: 67 Vehicle Identification Number (VIN): 185 vehicle loading: 187 ventilation: 134 videos and recording: 73, 151 videos and recording (Track Mode): 68 VIN (Vehicle Identification Number): 185 volume control: 4 volume control (media): 142
W
Walk-Away Door Lock: 12 Wall Connector: 161 warning flashers: 56 washer fluid, topping up: 181 washer jets, cleaning: 180 washers, using: 60 weight specifications: 191 wheel chocks: 201 wheels: 172, 173, 194 aero covers, removing and installing: 173 alignment: 172 lug nut covers, removing and installing: 173 replacing: 172 specifications: 194 torque: 194 Wi-Fi, connecting to: 156 windows, calibrating: 13 windshield washer fluid, topping up: 181 winter tires: 175 wiper blades, replacing: 180 wipers, using: 60 Work location: 140
Publication date: 2021/07/23