4 minute read
The Hippie Stomper
Created by Andrew Grillos, an Umpqua Feather Merchants signature tyer, the Hippie Stomper is an attractor dry fly effective in ponds and rivers. This pattern imitates a variety of terrestrials such as beetles, ants and flies. This is a durable fly which floats extremely well and can be used in a tandemconfiguration with another dry fly or with a dropper. The oversized poly wing makes spotting the fly a breeze, whether on a river, choppy water or on a lake—even at long distances.
Material List
Hook – Dry Fly 1X – 10 to 14
Tail – Moose Mane Foam – Top Foam 2MM – Bottom Foam 1MM – Two Colors (black, tan) (red, black)
Legs – Silly Legs
Body – Peacock Hurl – Red Holo Tinsel Floss
Hackle – Grizzly, size to match
Sighter – White Floss
Special Equipment
River Road Creations foam cutters; Gurgler Foam Body Cutter (size to match hook size)


Step 1: Using foam cutter, cut out the top and bottom foam pieces. Top Foam – 2mm Black Bottom Foam – 1mm Green Note: same thickness of foam can be used for both pieces.

Step 2: Place hook in vice and cover with thread. Place a thin layer of head cement over thread. This helps to secure the foam and keep it from rolling. For the tail, take a small amount of moose mane, even the tips and measure equal to the length of the hook shank.

Step 3: Tie in moose mane.

Step 4: Tie in by the small tag created when using the cutter. Tie in the top foam piece first, it will be folded forward, so it will end up on top.

Step 5: Tie in the bottom foam slightly ahead of the first piece. This will make it easier to fold the top piece over and make for a cleaner look.


Step 6: (2 images) Tie in the peacock hurl.

Step 7: To make a more durable fly, wrap the peacock hurl around the tying thread.

Step 8: Wrap forward to the hook point.

Step 9: Tie in the holographic tinsel.

Step 10: Make 3 wraps to create a small hot spot band.

Step 11: Make three more wraps of peacock hurl and tie off.


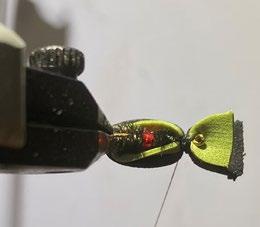
Step 12: (2 images) Fold the lower foam piece forward and tie off. Then fold the top foam piece forward and tie off.

Step 13: Tie in the indicator floss so there is a piece going to the tail and a piece going to the eye of the hook.

Step 14: Select two lengths of the silly legs, approximately three times the length of the hook.


Step 15: (2 images) Tie in legs on the near side and on the far side. Pinch all of the legs and cut them to approximately one hook length.

Step 16: Tie in the grizzly hackle.

Step 17: Make three or four wraps of the hackle between the legs and tie off. Whip finish and tie off.

Step 18: Cut a “V” in the hackle on the bottom of the fly so it will ride lower in the water.
Tim Papich


