OF U4020 MOUNTING OF U4046 & U4047
![](https://assets.isu.pub/document-structure/230120105406-6492827f60f58b39d6a88e431a8ed9d4/v1/6c890cc56ab9825fba6903bd40ae2084.jpeg)
D 4 pcs. Ø8x38mm E 4 pcs. Ø5x40mm
![](https://assets.isu.pub/document-structure/230120105406-6492827f60f58b39d6a88e431a8ed9d4/v1/034cd6ab9fd93111c01068f752a77e3f.jpeg)
![](https://assets.isu.pub/document-structure/230120105406-6492827f60f58b39d6a88e431a8ed9d4/v1/028c11d09960cb5a24cd0d1580229380.jpeg)
![](https://assets.isu.pub/document-structure/230120105406-6492827f60f58b39d6a88e431a8ed9d4/v1/200388bfb3c441f93ca18886b4da4013.jpeg)
![](https://assets.isu.pub/document-structure/230120105406-6492827f60f58b39d6a88e431a8ed9d4/v1/034cd6ab9fd93111c01068f752a77e3f.jpeg)
![](https://assets.isu.pub/document-structure/230120105406-6492827f60f58b39d6a88e431a8ed9d4/v1/6e97f294ee4f2b17a4a30d1f36839e4d.jpeg)
![](https://assets.isu.pub/document-structure/230120105406-6492827f60f58b39d6a88e431a8ed9d4/v1/602052e4f3b56d1e14eb98be8bc3f9fb.jpeg)
![](https://assets.isu.pub/document-structure/230120105406-6492827f60f58b39d6a88e431a8ed9d4/v1/fae92dd3a692e6830a2afe966ab209de.jpeg)
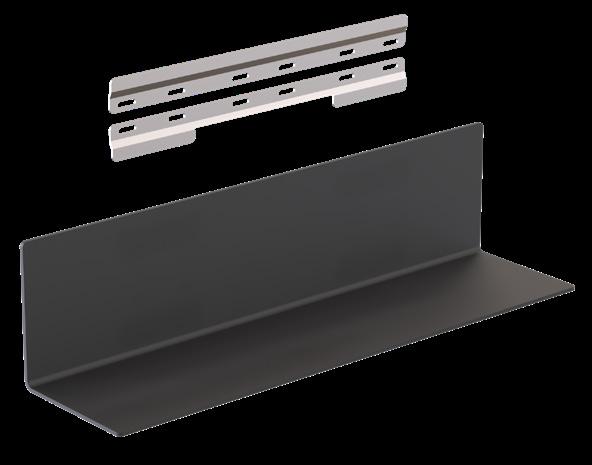
STEP 1: Secure the mounting bar A on the wall as illustrated. Use four D wall plugs and E screws.
60
NOTE: The lower mounting bar B should only be mounted if the shelf is installed in public or any area with the risk of people removing the shelf.
STEP 1: Secure the mounting bar A on the wall as illustrated. Use six D wall plugs and E screws.
D 6 pcs. Ø8x38mm E 6 pcs. Ø5x40mm
NOTE: The lower mounting bar B should only be mounted if the shelf is installed in public or any area with the risk of people removing the shelf.
![](https://assets.isu.pub/document-structure/230120105406-6492827f60f58b39d6a88e431a8ed9d4/v1/98967a1d4ef3fc03a4ab92b850553d48.jpeg)
![](https://assets.isu.pub/document-structure/230120105406-6492827f60f58b39d6a88e431a8ed9d4/v1/b08cdd6e3cf6559d25d5ace917f88e8d.jpeg)
![](https://assets.isu.pub/document-structure/230120105406-6492827f60f58b39d6a88e431a8ed9d4/v1/33e86228b7ea0ba7a460c12cf24cfd73.jpeg)
![](https://assets.isu.pub/document-structure/230120105406-6492827f60f58b39d6a88e431a8ed9d4/v1/b66a69f6795a259d62aa0567c1d797ff.jpeg)
READY TO USE
![](https://assets.isu.pub/document-structure/230120105406-6492827f60f58b39d6a88e431a8ed9d4/v1/d3bd8901827640c2942cabb3c920bdbd.jpeg)
STEP 1: Secure the mounting bar A on the wall as illustrated. Use twelve D wall plugs and E screws.
NOTE: Please use the amount of screws and plugs suitable for your walls and the intended load.
STEP 2: Slide the Shelf C onto the mounting bracket A and B .
D 12 pcs. Ø8x38mm E 12 pcs. Ø5x40mm D 8 pcs. Ø8x38mm E 8 pcs. Ø5x40mm
NOTE: Please use the amount of screws and plugs suitable for your walls and the intended load.
![](https://assets.isu.pub/document-structure/230120105406-6492827f60f58b39d6a88e431a8ed9d4/v1/034cd6ab9fd93111c01068f752a77e3f.jpeg)
![](https://assets.isu.pub/document-structure/230120105406-6492827f60f58b39d6a88e431a8ed9d4/v1/6c890cc56ab9825fba6903bd40ae2084.jpeg)
![](https://assets.isu.pub/document-structure/230120105406-6492827f60f58b39d6a88e431a8ed9d4/v1/034cd6ab9fd93111c01068f752a77e3f.jpeg)
![](https://assets.isu.pub/document-structure/230120105406-6492827f60f58b39d6a88e431a8ed9d4/v1/6c890cc56ab9825fba6903bd40ae2084.jpeg)
![](https://assets.isu.pub/document-structure/230120105406-6492827f60f58b39d6a88e431a8ed9d4/v1/28967bb8eb4288bff37410a2580ae33d.jpeg)
![](https://assets.isu.pub/document-structure/230120105406-6492827f60f58b39d6a88e431a8ed9d4/v1/b9592c32b597210f330b96b85cae8c51.jpeg)
![](https://assets.isu.pub/document-structure/230120105406-6492827f60f58b39d6a88e431a8ed9d4/v1/81dcd505b0814d4d2c81176d34709875.jpeg)
NOTE: The lower mounting bar B should only be mounted if the shelf is installed in public or any area with the risk of people removing the shelf.
READY TO USE
STEP 1: Secure the mounting bar A on the wall as illustrated. Use eight D wall plugs and E screws.
NOTE: The lower mounting bar B should only be mounted if the shelf is installed in public or any area with the risk of people removing the shelf.
![](https://assets.isu.pub/document-structure/230120105406-6492827f60f58b39d6a88e431a8ed9d4/v1/c29bc37504616ff5bb12b79f9b3f0d2f.jpeg)
![](https://assets.isu.pub/document-structure/230120105406-6492827f60f58b39d6a88e431a8ed9d4/v1/f650fb37fcd6c876cce27bf471c74909.jpeg)
![](https://assets.isu.pub/document-structure/230120105406-6492827f60f58b39d6a88e431a8ed9d4/v1/21524fe2b80538fe576f36faa9bc3370.jpeg)
![](https://assets.isu.pub/document-structure/230120105406-6492827f60f58b39d6a88e431a8ed9d4/v1/a8ec9d18def69e449f1193a76c147c94.jpeg)
![](https://assets.isu.pub/document-structure/230120105406-6492827f60f58b39d6a88e431a8ed9d4/v1/e255b3b677f43b7cf3eff1b0abe69ad1.jpeg)
![](https://assets.isu.pub/document-structure/230120105406-6492827f60f58b39d6a88e431a8ed9d4/v1/b9b493729ebac9edf8245ee916cb4414.jpeg)
READY TO
![](https://assets.isu.pub/document-structure/230120105406-6492827f60f58b39d6a88e431a8ed9d4/v1/721729f4875b9b2e0e34a3277912b587.jpeg)
FROST A/S
Headquarter & Showroom
Bavne Allé 32 8370 Hadsten Denmark +45 8761 0032 info@frost.dk
Flagship Showroom
Christian IX’s Gade 5 1111 Copenhagen Denmark +45 5172 6432 showroom-cph@frost.dk
frostdenmark.com
We are also to be found as frostdenmark on Facebook, Instagram, Pinterest and LinkedIn
CLEANING AND MAINTENANCE
Surfaces should be cleaned with a microfiber cloth, glass cleaner or other non abrasive and gentle agents.
ATTENTION:
Never use solvents or aggressive household cleaners like bleach, acids (e.g. descalers) or ammonia-based bathroom cleaner to clean the product. Steel wool and hard brushes can permanently damage the surface of the steel.
EXCLUSION OF LIABILITY
FROST accepts no liability whatsoever for damage to persons or property that occurs or has occurred as a result of improper installation or maintenance, particularly if the safety instructions and other points to note listed are not or have not been observed in full.
WARNING AND HAZARD NOTICES
Improper mounting or use can lead to accidents and serious injuries.