


Whether you’re celebrating a special occasion or simply catching up with loved ones, playing host can be as demanding as it is enjoyable. Before gathering your crew for your next event, make a plan to ensure you get to enjoy the day as fully as your guests.
An ornate spread may be impressive, but your guests are just as likely to appreciate a less demanding menu with a few standout dishes. Offer a single main dish, a couple of tried-and-true sides, some finger foods for snacking and a seasonal dessert. Beverage staples like tea, lemonade and water are all you really need, but if that feels too basic, you can offer a flavor station with fresh fruit like berries and lemon wedges, flavored syrups and other sweeteners. If you’ll be serving alcohol, don’t try to cater to everyone’s favorite. Select neutral white and red wines and one or two beer varieties. A signature cocktail you can premix and serve is another way to add a special touch.
One area many hosts go overboard is theming their events. While setting a theme can be a fun idea, it doesn’t have to be fussy or complicated, and your decorations don’t have to be over the top. Subtle color, centerpieces and serving pieces are all places you can inject some thematic vibes without investing too much time or money. You can also let your theme influence any games or activities you plan, as well as other entertainment like background music.
Thinking ahead about your guests’ comfort can prevent scrambling once the party is underway. Consider needs like seating, where you’ll keep extra food for quick refills and essentials like more toilet paper in the guest bath. Also anticipate accidents like spills and have supplies ready to efficiently correct inevitable incidents. Remember to plan for extra trash bins and if guests will be congregating outdoors, provide extra sunscreen, bug spray and fans.
Depending on the purpose of the party, your entertainment may be pretty clear, but if it’s a casual gathering, you’ll likely want to provide guests some ideas for passing the time. Board games and backyard games are almost always a hit. A playlist that fits your theme can add ambiance and provide background for conversation, but you can also inject some musical fun with karaoke. If you’ll have kids in attendance, provide age-appropriate options for shorter attention spans, too.
After the last guest leaves, you may be ready to call it a night, but taking care of a few quick chores can make cleanup easier in the morning. Load the dishwasher and set it to run overnight,

leaving any tough dishes to soak in hot, soapy water. Check for any spills or stains that need immediate attention and get a jump start on the floors. For a convenient hands-off experience, try the Eufy S1 Pro Robot Vacuum and Mop, which achieves a 99.99% sterilization rate when mopping and, using automated sensors, elevates the mophead and converts to powerful suction for carpeted areas. After cleaning, the robot docks to automatically empty its dustbin, dispose of wastewater and clean its mopping pads, drying them with hot air to inhibit bacterial growth and odors.
Explore more ideas to tackle entertaining (and its aftermath) with ease at eufy.com.


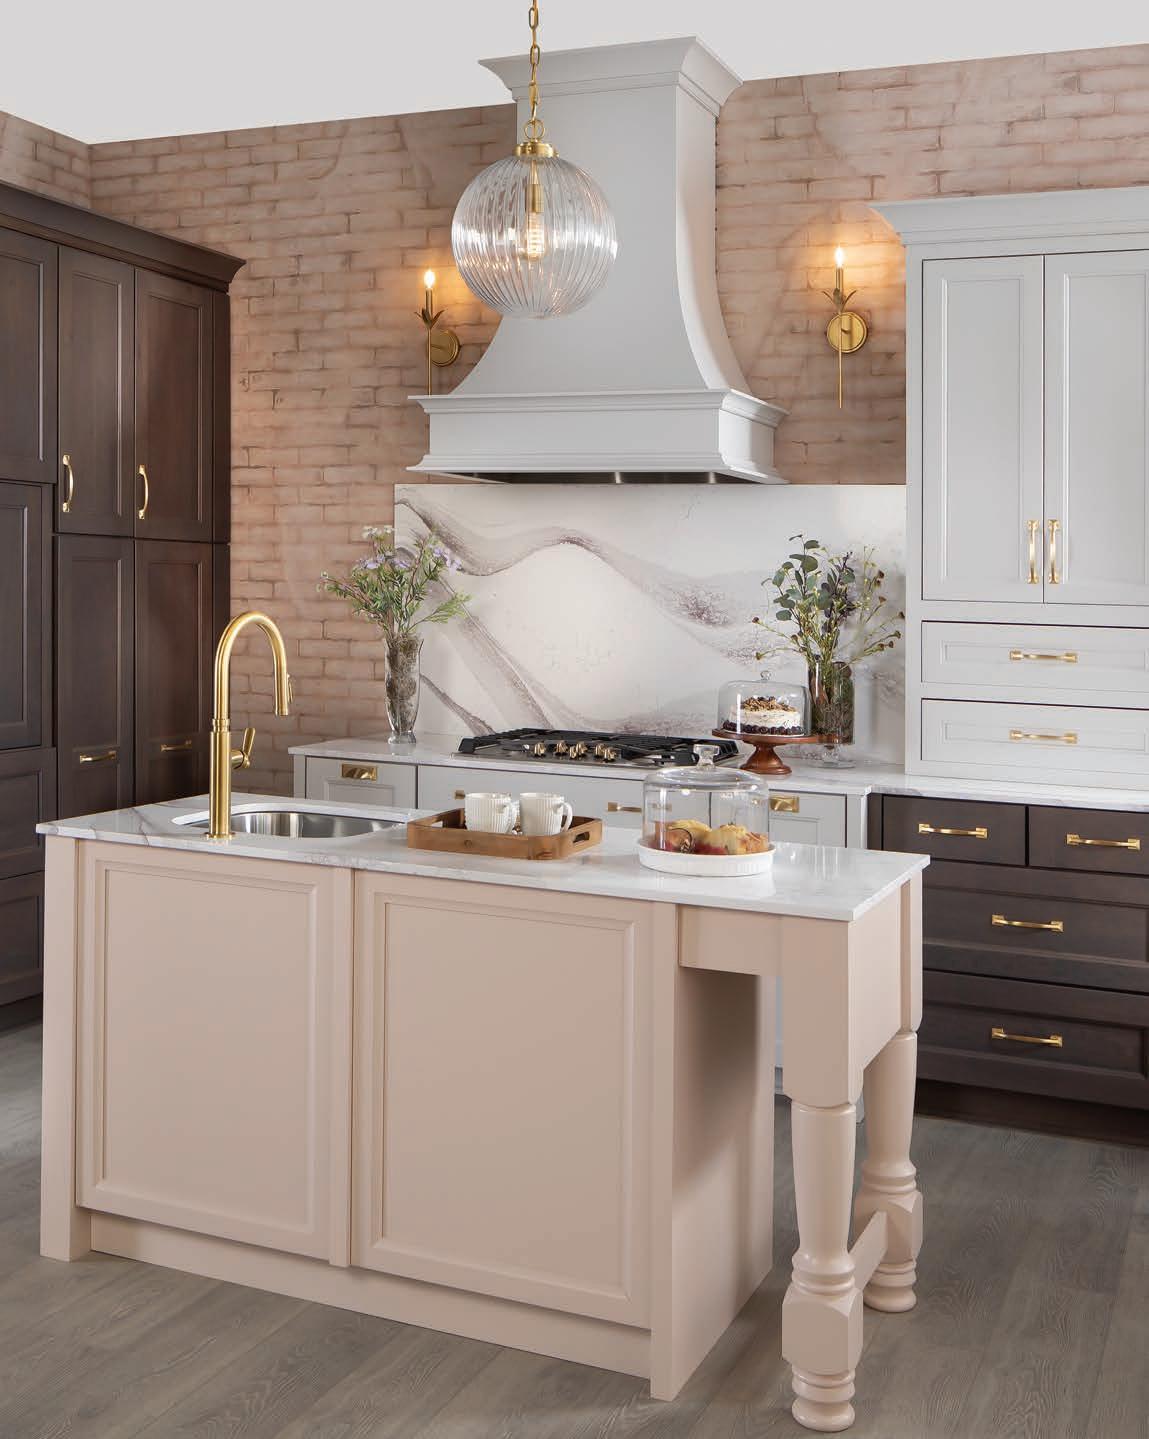
Kitchen upgrades are among the most common renovation projects homeowners tackle. Even so, it’s a big project for a firsttime renovation, and the final results are sure to be stronger with some detailed planning from the start.
Take into account these five tips from the experts at Wellborn Cabinet to help first-time kitchen remodelers achieve the kitchens of their dreams:
Establish a clear and realistic budget. Factor in costs for materials, labor and some extra for unexpected expenses. Sticking to your budget can help ensure you enjoy the outcome of the project while avoiding financial stress. Your contractor can help you strike a balance between your vision and financial resources. You may also find it helpful to consult with a real estate professional who can ensure your plans are in line with the overall value of your home and neighborhood.
Design with practicality in mind. Ensure there’s enough counter space and storage to create an efficient workflow. Consider the kitchen work triangle; that is, be conscious of the travel pattern among the sink, stove and refrigerator.
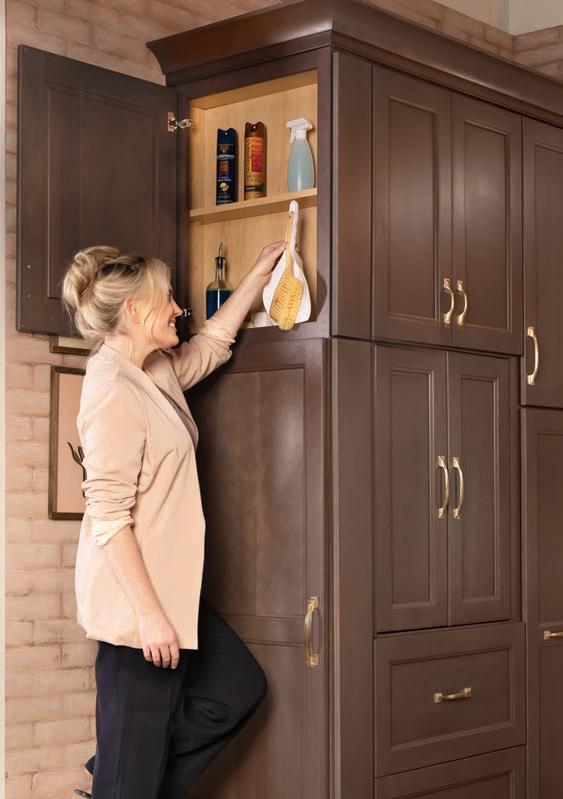
Additionally, look for opportunities to incorporate functional storage in unexpected places. One example is the exposed end of a cabinet run or side of the refrigerator, where there is often wasted space. One example is a shallow cleaning utility cabinet from Wellborn Cabinet that fits a broom, dustpan and everyday cleaning supplies neatly, giving you practical access to frequently used supplies. A variation on this cabinet offers a spice rack designed for easy access to cooking essentials. Other options in the line include an over-fridge cabinet with a combination of shelves, sheet pan or cutting board storage and a trash can-cutting board combination.
Consider factors such as durability, maintenance requirements and compatibility with your design aesthetic when selecting materials for your kitchen. You may be tempted to cut corners and stretch your money further, but quality materials are a critical element of successful renovations. Prioritize high-quality materials that stand the test of time. Durable countertops, solid cabinetry and reliable appliances typically save money in the long run, and they’ll enhance the overall look and value of your kitchen.
Work with experienced contractors and designers. Their expertise can help you avoid common pitfalls and ensure your remodel meets all safety and building codes. What’s more, these professionals have likely encountered and overcome all kinds
of challenges, which means they’ll be well-prepared to help you navigate unexpected obstacles and provide a wealth of knowledge from previous clients to help make recommendations for the perfect finished space.
Be prepared for unexpected challenges and delays. Stay adaptable and open to changes and remember patience is key to achieving the kitchen of your dreams. Materials go on backorder and paperwork gets misplaced all the time. Set a realistic timeline for your project that allows for some hiccups and try to avoid becoming too rigidly attached to any single element of the design, so if you have to make a modification, it doesn’t feel like a monumental sacrifice.
Look for more ideas and inspiration for your kitchen remodel at Wellborn.com.
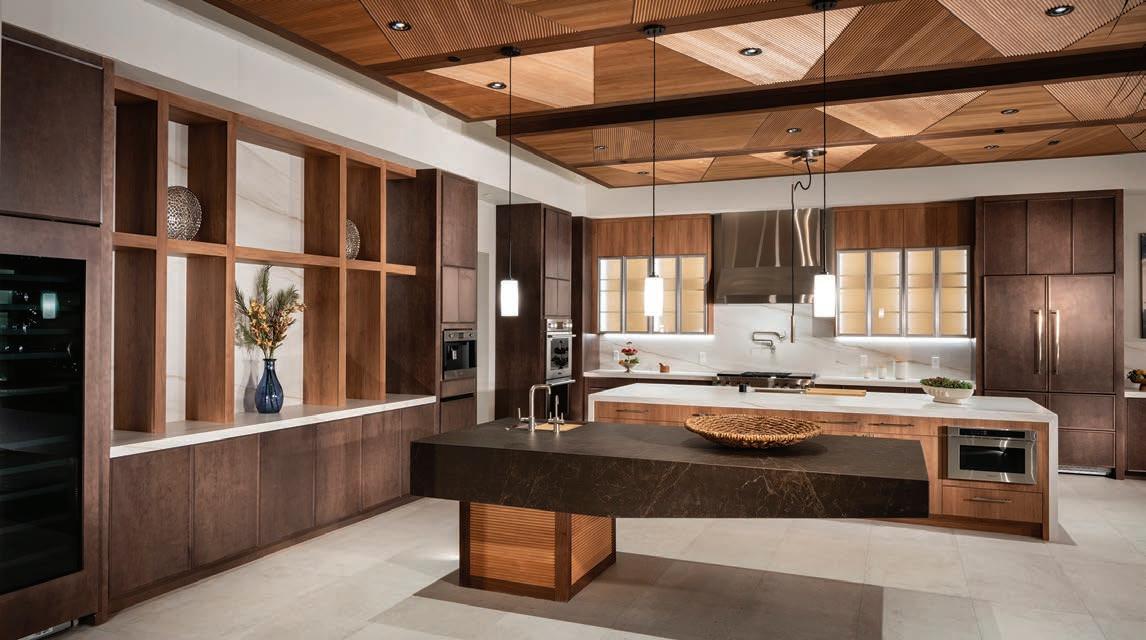
Adding an island to your kitchen offers many functional and aesthetic benefits, and there are styles to suit every type of kitchen
Galley Kitchen Island: This type of island is more functional than design-forward, conveniently adding extra storage and counter space. This conventional configuration works well in most kitchen layouts, both large and small, and can be constructed to fit almost any kitchen.
Table-Style Kitchen Island: If you want a unique addition, an island table is the way to go, whether you opt for a custom-made piece or upcycle an antique. The beauty of a tablestyle island is that it serves a functional and decorative purpose, warming up a modern kitchen and adding personality.
Double Kitchen Island: Incorporating multiple islands - often called a double island kitchen - can improve traffic flow, increase storage space and seating, and create additional space for meal prep, cooking, washing and eating. Plus, islands are ideal for implementing design elements such as complementing materials and finishes, pops of color and unique cabinetry components including door styles and hardware.
Rolling Kitchen Island: This convenient solution adds flexibility with extra storage and counter space. You can easily tuck it away to open up more floor space when done, and this portable island can easily roam around the kitchen so you can place it where you need it.
Two-Tier Kitchen Island: While you can cook and eat on any island, the two-tier creates a clear boundary where you can cook on one side and eat on the other. This all-encompassing island is perfect for larger families and homeowners who like to entertain.
Chef’s Kitchen Island: If you want to showcase your cooking skills or have a private chef cooking for friends and family, a chef’s island is a unique solution. Installation requires the appropriate ventilation and electrical, which may be well worth it if you frequently cook for family or friends.
Round Kitchen Island: Compared to a typical rectangular island, a rounded option is an eye-catching way to add more seating in your kitchen for entertaining family and friends.
L-Shaped Kitchen Island: If you have a lot of space in your kitchen, an L-shaped island can fill the area. The design provides extra cooking space, allowing you to accommodate multiple chefs in the kitchen. You can also add seating for family and friends.
U-Shaped Kitchen Island: Best suited for large, openconcept kitchens, a U-shaped island creates storage space and room to install appliances such as a bar fridge, sink or range with prep space left to prepare meals.
(BPT) - Fall and winter are peak seasons for home fires, according to the National Fire Protection Association (NFPA). To protect your home this Fire Safety Prevention Week, take proactive steps to safeguard against fires, and to be sure your family is ready in case of an emergency.
Here are practical things you can do to prevent fires from starting, and to respond quickly when necessary.
Check your smoke detectors. Every fall and spring check your detectors and replace batteries annually. It’s vital to have working smoke detectors on every level of your home, outside bedrooms and near the kitchen (but at least 10 feet from cooking appliances).
Schedule an electrical inspection. For older homes, or if you haven’t had electrical work done for years, it’s recommended to make sure your home is properly wired and up to current safety codes.
Keep a close eye on kitchen safety. The NFPA reports the kitchen as the most common place for house fires to start. Unattended cooking is a common culprit, so make sure to always closely monitor your stovetop and oven while they’re in use.
Always keep a fire extinguisher handy, and make sure you and other family members know how to use it. Be prepared to use a pan lid to smother a grease fire if one should arise, as water will make it worse.
Consider kitchen appliances with built-in safety features. Some older appliances don’t offer safety features that up-to-date technology has made possible. Today’s electric and induction ranges are considerably safer than traditional gas ovens and stovetops, as there are no open flames, they don’t produce indoor air pollution and they’re not capable of causing gas leaks.

In addition, if you’re concerned about your stovetop accidentally getting turned on, you can now find electric ranges and cooktops that come with a safety locking device that can stop their functions. For example, these models from LG have a built-in safety feature that prevents the burners on the cooktop from being heated when the Lock function is set, even if the touch buttons are pressed: the LG STUDIO 6.3 cubic foot InstaView® Electric Slidein Range with ProBake Convection® and Air Fry (LSES6338N) and the LG 6.3 cubic foot Smart Wi-Fi Enabled ProBake Convection® InstaView® Electric Slide-In Range with Air Fry (LSEL6335F). It is always recommended that you read the owner’s manual to ensure that you use the product as intended in the safest possible manner.

Safeguard your laundry room. Another potential area of concern for fire safety is your laundry room, specifically your clothes dryer. While you may remember to clean the lint filter, many homeowners forget about the dryer’s duct. With too much lint build-up in the duct, restricted airflow can cause dryers to overheat, which could lead to a fire.
To help you remember this important chore, consider an LG Dryer that offers FlowSense® Duct Clogging and Lint Filter Indicators with the LG ThinQ® app - which sends you notifications when it detects a reduction in airflow, prompting you to clean the duct. Regular cleaning based on these alerts helps maintain proper ventilation, reducing risk of overheating and ensuring safer dryer operation.
Models offering this feature include the LG 7.4 cubic foot Ultra Large Capacity Smart Front Load Electric Energy Star Dryer with Sensor Dry & Steam Technology (DLEX5500W), plus larger models like the LG 9.0 cubic foot Mega Capacity Smart Wi-Fi Enabled Front Load Electric Dryer with TurboSteam™ and Built-In Intelligence (DLEX8980V) and the LG 9.0 cubic foot Mega Capacity Smart Wi-Fi Enabled Front Load Gas Dryer with TurboSteam™ and Built-In Intelligence (DLGX8901B). These dryers include the ability to access smart functions to monitor drying cycles and more through the LG ThinQ® app.
Review your emergency plan. Make sure that everyone in your household knows what to do if a smoke detector goes off or there’s a fire in progress. Hold regular family meetings to review exits from each room, and practice where to meet outside in case of emergency. This can make a difference when there are only minutes to exit your home safely.
Being proactive, choosing appliances with safety features and reviewing your emergency plan will all give you more peace of mind when it comes to fire safety this season.
(BPT) - Have you ever walked through a rustic, stone piazza in Italy - or dreamed of it - and wished you could bring a little of that look into your own home? You can. It’s a new design trend, using weathered stone and brick, which are normally associated with outdoor spaces, in your interior designs, creating warmth, timeless beauty and even a bit of drama in your home.
But stone and brick are heavy, oftentimes requiring structural reinforcements when using them in design. The solution? Manufactured stone veneer, or MSV. Its lightweight composition simplifies installation without the need for those additional structural reinforcements. Simply put, it’s easier to use and gives the same look, feel and warmth.
What is MSV? It’s a concrete mixture that is hand-colored with
iron oxide pigments and cast in flexible molds taken from natural stone or traditional brick. Use it for focal points like exterior entrances, interior foyers, mudrooms, fireplaces, walls or kitchen backsplashes.
MSV innovations like those from Westlake Royal Building Products help bring timeless architectural features like archways, fireplaces and textured accent walls into homes. You can use it outside, too, to bring character to patios and outdoor entertaining areas. Stone and brick veneer integrates well with a variety of other materials, adding an organic component that enhances both interiors and exteriors.
Here are some ways to add the timeless look of stone, brick and wood to your interior designs.
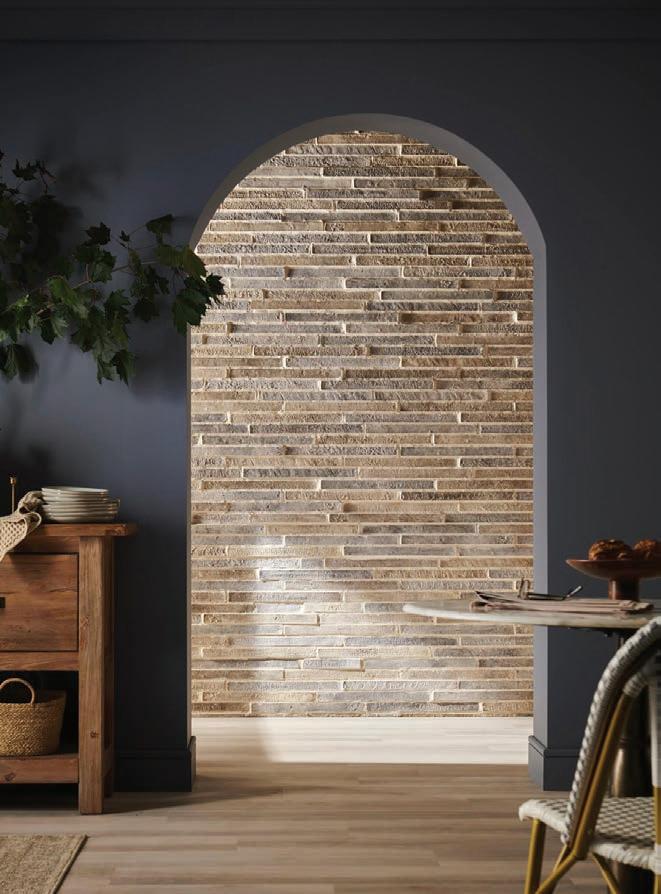
Infuse your home with Italian amorè! Turn your family room into an Italian grotto or your bathroom into an elegant spa with LoreioBrick, by Eldorado Stone. This linear brick veneer was inspired by ancient Roman architecture and lends a timeless air to the space. Pair it with beamed ceilings, wrought-iron fixtures and candles and you’ve got a modern bathroom with its roots in antiquity. Imagine earthy tones and neutral colors, blending classical and modern design.

Country Ledgestone by Cultured Stone is ideal for creating a textural mosaic around a fireplace or on an accent wall. Think “organic modernism” that combines organic textures and nature-inspired elements with minimalist design to create warm, relaxed spaces. The look is long and sleek, offering a relaxing, yet upscale feel to your indoor spaces.
Transform your den or family room into a contemporary lodge with Rivenwood, also by Eldorado Stone. Inspired by slender lengths of saw-cut barnwood, it’s rustic modern, with authentic wood details like nails, breaks and knots. It lends the feel of wide, open spaces, luxury ranch life and relaxing in front of the fire at the end of a long ride through the countryside.
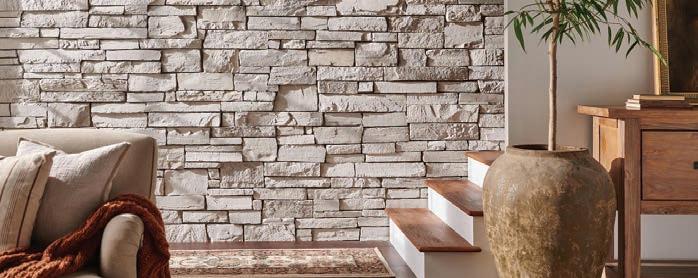
Dutch Quality Stone’s Handformed Brick is a new, tumbled brick veneer. It brings to life old world craftsmanship, with every brick having a unique texture and artisanal charm. The attention to detail adds a rich sense of lineage to the look of your new or renovated space. Handformed Brick is available in three colorways, including the new Snowpack color that was inspired by the crisp, clean essence of freshly fallen snow.


The look of brick, stone and wood will infuse your walls with color, warmth and life, evoking images of ancient Italy, the open frontier or even a blanket of new snow.





Start by looking for the CRS symbol shown above. It’s your assurance that your real estate agent is one of the most experienced and highly trained in the business. If you’re buying or selling a home, call one of the CRS agents on these two pages. One phone call and you’ve made the right choice!

Lawrence M. Lipman, CRS ReMax Collection (615) 364-3333 lipmanhomesandestates.com

Karen Moore, CRS Fridrich & Clark Realty, LLC (615) 327-4800 moorek@realtracs.com

Sean Simons, CRS Fridrich & Clark Realty, LLC (615) 496-4920 NashvilleRealEstate@gmail.com

Sam Coleman, CRS Fridrich & Clark Realty, LLC (615) 210-6057 IAMSAMSHOMES.COM

Price Lechleiter, CRS Pilkerton Realtors (615) 347-4688 pricel@realtracs.com

Alice Moore Weaver, CRS Corcoran Reverie (615) 300-7449 Alice.Weaver@corcorangroup.com

Dan Minor, CRS Parks Properties (615) 383-6600 MinorD@realtracs.com

Starling Davis, CRS, GRI Fridrich & Clark Realty, LLC (615) 327-4800 StarlingDavis@gmail.com

Nancy Tice, CRS Fridrich & Clark Realty, LLC (615) 207-3758 nancyt@realtracs.com
Today, home buying and selling is faster, more complex, and more competitive in every way. Our goal is to make the process a little easier for you. The first step is to choose one of the CRS Realtors on these two pages.
To earn the Certified Specialist (CRS) Designation, every realtor must have significant experience and volume of real estate transactions.
The training available to CRS realtors includes a strong focus on technology and its applications in the real estate business.

Richard Bryan, CRS Fridrich & Clark Realty, LLC (615) 321-9531 www.RichardFBryan.com

Suzanne Elmer, CRS Fridrich & Clark Realty, LLC (615) 496-3728 suzanne@suzanneelmer.com
To help make the home buying and selling process more rewarding, every CRS realtor must have a proven track record in the business, as well as advanced education in related area like finance, technology and marketing.

Charlotte Ann Edwards Broker®, ABR, CRS, ePro, GRI Onward Real Estate - Green Hills (615) 477-4078 CAEdwards@realtracs.com

Christopher Simonsen, CRS Fridrich & Clark Realty, LLC (615) 473-6998 chris@christophersimonsen.com

Steven Myers, Broker, CRS Fridrich & Clark Realty, LLC (615) 330-0555 SteveMyersHomes.com

Every CRS realtor is required to maintain membership in the National Association of Realtors and to abide by its strict code of ethics.

Lucy Smith, CRS Fridrich & Clark Realty, LLC (615) 347-8827 Lucy@LucySSmith.com

Dianne Rucker, CRS ReMax Choice Properties (615) 596-3508 Dianne.Rucker@gmail.com

Donnel Milam, CRS Fridrich & Clark Realty, LLC (615) 400-4211 Donnel@TheMilamGroup.com

(BPT) - If your walls could talk, what would the paint color say about you? You’re bold? Calm? Sophisticated? Whatever the answer would be, painting a wall multiple colors is an affordable, yet impactful, way to uniquely express your personality. A two-toned wall is an interior design technique that utilizes two paint colors on the same wall, allowing you to express your individual style and add dimension to a flat surface. No matter your comfort or skill level, follow these steps to achieve professional-level results and showcase your creativity.
Prepare to paint:
To get ready for painting, gather all necessary supplies, like a drop cloth, primer, a paintbrush, a roller and painter’s tape. Remove as much furniture as possible, covering any large items with a tarp. Using a sponge, wipe the walls with warm soapy water, then repair any cracks or holes with putty and sand the surface smooth. If you’re painting over a dark color, apply a primer as a base coat to ensure an even foundation.
Measure and mark:
To create a dynamic color-blocking effect on your walls, start by determining where the colors will meet and mark the spot with a pencil or chalk, using a straight edge for precision. Color blocking can be executed horizontally or vertically, or with additional creative options like diagonals or geometric patterns. A horizontal scheme splits the wall, making the room feel longer, while a vertical approach enhances the sense of height and openness, especially in open floor plans.
Apply painter’s tape:
Regardless of your chosen approach, using painter’s tape, such as FrogTape® brand painter’s tape, is essential for
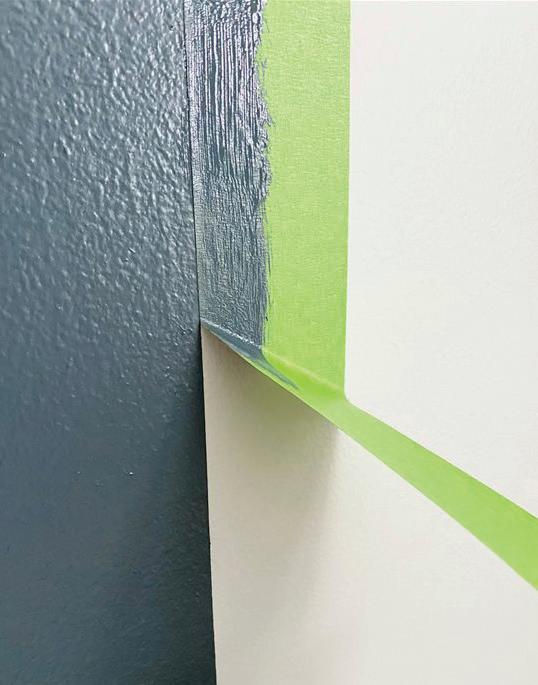
achieving clean lines. It’s treated with exclusive PaintBlock® Technology to seal tape edges and prevent paint bleed - critical in this type of project. Apply the tape along the marked line to create sharp edges where each color begins and ends. Use a firm plastic tool to eliminate gaps and seal edges. And, be sure to tape adjacent surfaces, including baseboards, ceilings and walls.
Paint the light color:
To achieve full coverage, apply the light base color one coat at a time, starting by “cutting in” along the tape with a paintbrush and then using a roller to fill in the rest of the section. Allow each coat to dry before applying the next, using as many coats as needed for the desired look.
Paint the dark color:
After completing the light color, repeat the painting process by cutting in along the tape with small brush strokes and using a roller to fill in the rest of the section. Keep adding coats until you achieve the finished product you have in mind.
Remove the painter’s tape:
For best results, remove the tape while the paint is still wet, pulling slowly at a
45-degree angle to reveal a room that pops with personality.
Two-tone walls can transform a space to reflect your style with just a simple change. With the right supplies, techniques and color selections, you can create a look that you’re proud of, regardless of your skill level. For more step-by-step project tutorials, tips and tricks and creative inspiration, visit FrogTape.com.
(BPT) - The self-care movement is having a moment. Over the summer we observed Self-Care Month from June 24 to July 24, with the symbolic notion of 24/7 (July 24) self-care being top of mind in our stressful world today, not just during that month, but in every month. The World Health Organization even issued guidelines about its importance.
What is self-care? It’s the process of tending to your physical, spiritual and mental health and wellbeing. It can be about mindfulness and meditation, getting out and walking in nature, eating right, focusing on sleep, nurturing social connections and so much more. It’s the completely personal practice of taking care of yourself, whatever that means to you, and doing whatever helps you recharge and renew.
One way to bring more self-care into your life is to start in the bathroom, which has long been an oasis of solitude, pampering and luxury. Any busy parent can tell you they love their alone time in the bathroom, with a luxurious soak in the tub getting much of that glory. But your shower can be an oasis of pampering, too. Here’s how to turn your shower into an oasis of self-care.
Choose the right shower head. They’re not all created equal. A great shower head can elevate the entire shower experience from ordinary to extraordinary, and the technology has evolved to new heights of self-care. Kohler’s Cinq, a single-function showerhead, features a five-layer Aquifer KDF55 filtration system that delivers less chlorine, chemicals and scale so you can experience that perfect glow for your hair and skin.
Kohler’s new SpaViva Handshower & All-in-One Cleansing Device takes that concept up a notch, and brings self-care to your


shower space. It’s an innovative product that combines essential skincare tools with deep clean capability. The two-function handshower offers two spray types, Katalyst Spray that infuses water with more air for a more robust water droplet that retains heat, and the Microbubble Spray that produces tiny bubbles.
The All-in-One Cleansing Device will have you wondering how you ever lived without it. It magnetically docks into the center of the handshower, transforming your showerhead into a multifunction beauty tool. It features four brush heads - Face Brush, Body Brush, Body Massager and Body Scrub - that rotate at a choice of three speeds. It truly is an innovation that turns your shower into a spa. Another plus: It’s a simple retrofit installation that anyone can do.
Set the mood. Create a spa-like atmosphere in your bathroom. Tuck those rubber duckies and other toys away, stow your spouse’s products under the sink and toss any used towels into the laundry basket. Then, dim the lights and break out the candles, your favorite playlist of soothing music and a sprig of eucalyptus or whatever scent you love.
Gather your products. This is the time for pampering, so grab a deep conditioner for your hair, your favorite body wash and other special products.
Practice mindful showering. Focus on the sensations of the warm water, scents, steam and your luxurious products.
Customize the experience. For a truly upscale shower, Kohler’s Anthem+ allows you to control all of your functions digitally. You can control steam and temperature for up to 12 shower outlets from one intuitive interface. Just one great feature: You can preset preferences for up to nine users. So, you can have the shower ready to go just as you like it, and so can your spouse, your teenagers, and any visitors.
With the right tools and a little planning, you can transform your shower from a step-in-step-out dash into a mindful routine of self-care that you can enjoy every morning or whenever the mood strikes.
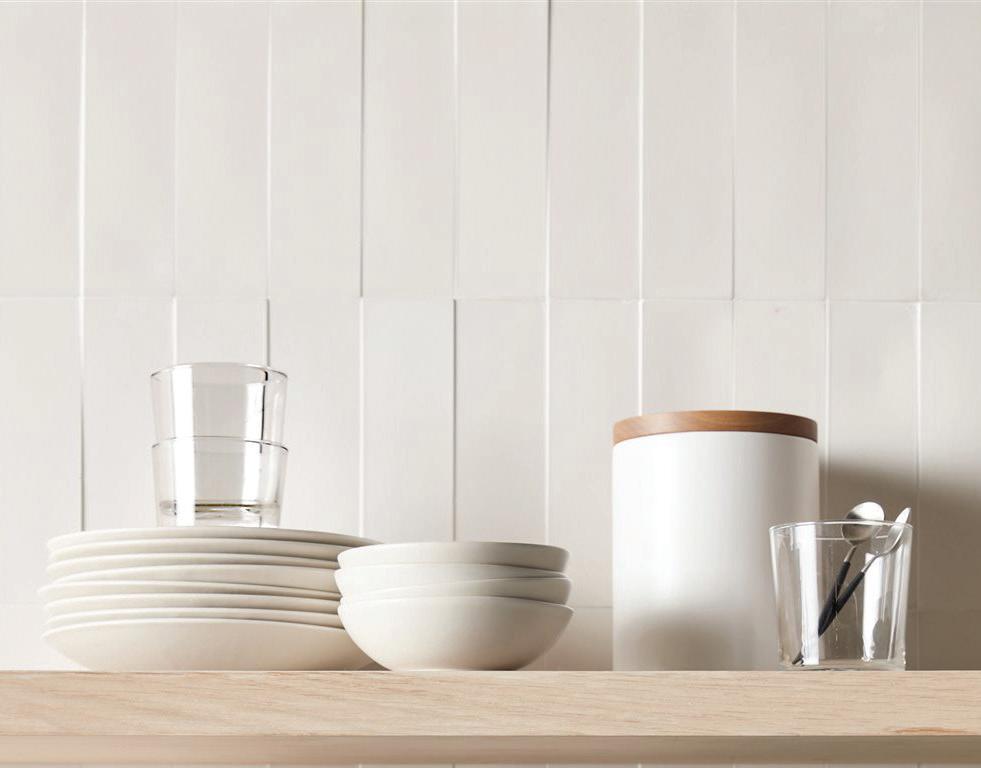
(BPT) - Interior design styles are always changing. Since the 1990s, interior styles have moved from sleekness to warm tones to clean basics and now, to a natural warmth that introduces a holistic balance that is inviting and raw. There are many ways you can invite natural warmth into your home, and one of the easiest ways is by using white.
Whites can easily elevate a space, creating a light and tranquil atmosphere with a touch of elegance. Over time, white has evolved from a bright white with blue undertones to take on more natural hues from wood tones and stones for a softer, more natural and approachable aesthetic.
You don’t have to plan a full design overhaul to embrace warmth in your home design. Check out these four simple ways to incorporate warm whites into your home’s design.
The living room is the heart of your home. Because the living room is often a gathering place for family members or guests, the space should be open and inviting. You can, of course, paint your walls in a warm white with red undertones to reflect natural lighting. However, painting isn’t your only option.
If you’ve been thinking of replacing your
furniture, opt for a creamy white plush sofa or armchairs. You can also add a basket made of natural materials like rattan and fill it with cozy off-white blankets. Don’t forget to accentuate the room with white sheer curtains that can filter natural light for a soft glow.
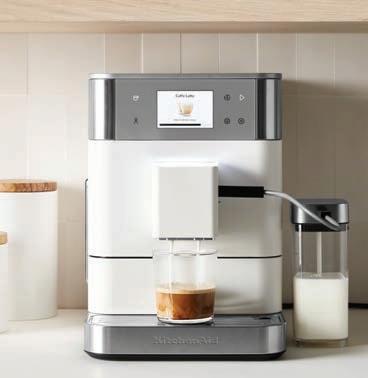
A well-designed kitchen should balance functionality with style. Incorporate warm whites by choosing cabinetry that almost feels taupe in color and pair this with leathered marble countertops. You can complete the look by adding white kitchen tools and appliances; Crate & Barrel does a great job curating color for your kitchen! Kitchen gadgets, especially tools you use every day, can act as an extension of your design. Instead of hiding an appliance, choose appliances that serve as an extension of your kitchen design. For example, coffee lovers should consider the KitchenAid Espresso Collection, which includes semi-automatic and fully automatic espresso machines that were designed specifically for the countertop. With the trend of white color tones in the home increasing, the Whirlpool Design Team created the Porcelain White colorway for the KitchenAid Espresso Collection, available exclusively at Crate &
Barrel and KitchenAid.com.
KitchenAid® Semi-Automatic and Fully Automatic Espresso Machines in Porcelain White are designed to integrate into your home seamlessly and bring everything you love about espresso right to your countertop. They’re also Quiet Markcertified, so you can make your morning cup of Joe without waking up the whole house.
Natural white hues in your bathroom can evoke a sense of serenity and cleanliness, similar to a spa. Using ivorycolored tiles on the walls, countertops and flooring, you can create the illusion of a larger, more open space. You can pair this brilliant tile with unlacquered brass or brushed nickel fixtures for a touch of elegance. Don’t forget to add plush white towels and bathmats!
Turn your bedroom into an escape from the every day by creating a calm environment. If you’re shopping for new furniture, look for an upholstered headboard in natural whites and pair it with a bed frame in white oak. For a quick infusion of style, add crisp white linen bedding and layer with textured throws and cushions in various natural white hues and earth tones for depth and visual interest. Remember to opt for soft, ambient lighting to complete the space.
Are you ready to embrace warmth in your home? Embrace the versatility of whites in your design choices! Use these four easy tips to create a home that is inviting, grounded and on-trend with a color that illuminates your living spaces.

As aging in place and multi-generational households continue trending, integrating universal design principles into home design is essential. Home improvements, such as wider doorways for accessibility, can enrich life quality for people of all ages and abilities. Those desiring to live at home during their later years can benefit from easyto-navigate doorways with sliding doors that accommodate mobility aids, including wheelchairs and walkers. Extended families can also enjoy wider doorways for smooth sailing of kids’ strollers, wheelchairs for elderly or disabled family members and more.
A study by Harvard’s Joint Center for Housing Studies found almost 50% of individuals age 55 and older planning home remodels in the next three years focus on age-proofing their homes. To address this growing demand, Johnson Hardware’s 1500SC Series Pocket Door Frame Kit was designed specifically to improve accessibility and functionality throughout the home.
Compared to traditional swinging
doors, which present obstacles, pocket doors conveniently slide into the wall, freeing up to 14 square feet of floor space. This gives a clear and spacious pathway to maneuver, allowing for easier travel of mobility aids through doorways, more turnaround space and extra room for household items.
Crafted with an emphasis on quality, the Americans with Disabilities Act (ADA)compliant pocket door kit boasts durability and long-term performance. Supporting extra-wide doors up to 4 feet, nearly any type of solid-core door weighing up to 165 pounds can be installed with the frame. Made in the USA, Johnson’s pocket door hardware exceeds the ADA-required minimum clearance width of 32 inches from door face to opposite stop, accommodating up to 60 inches for greater accessibility.
Making it simple to create handicapped accessible openings throughout home interiors, the universal design-inspired soft-close feature requires only 5 pounds of force to slide doors open and shut.
The kit’s preinstalled soft-close door hangers automatically slow the door speed gradually and quietly, helping prevent pinched fingers and door slamming.
To facilitate easier access for individuals with mobility challenges and put your own spin on the pocket door design, choose a decorative raised handle. Following the handicap pocket door installation instructions ensures the raised door handle remains accessible in the doorway when the door is fully open.
The kit can be paired with the 1515 Ply Clip Set, which adds rigidity and strength to the pocket wall. It allows tile, shelving, decor, towel racks and cabinetry to be securely fastened to a solid pocket wall surface. A converging door kit is also available, which connects two pocket door frame headers together, providing an even wider doorway with two converging pocket doors.
For more ideas on how to create accessible spaces using pocket and sliding door hardware, visit johnsonhardware.com or call 574-293-5664.
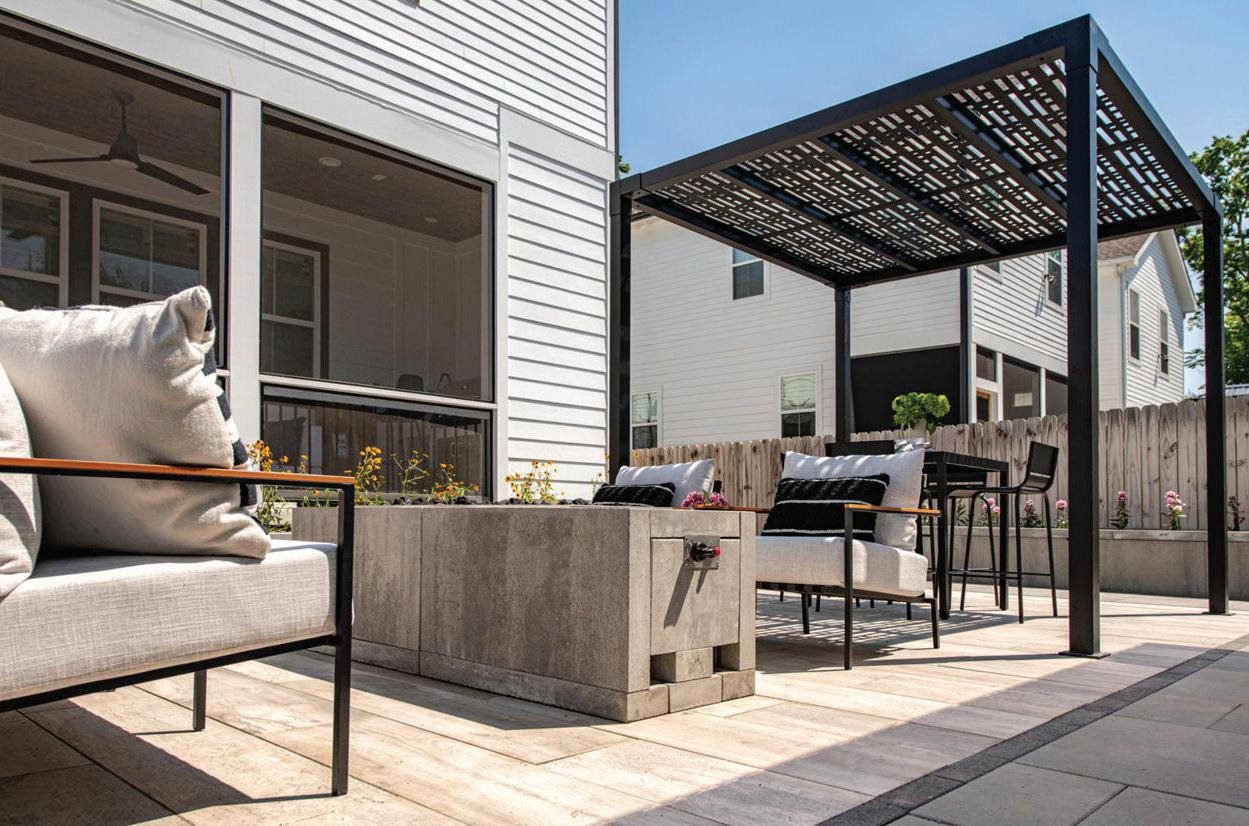
(BPT) Cool off with shading. Is your back patio in the direct sun and your table umbrella not quite cutting it? It’s time for a pergola. These beautiful, decorative features come in many styles, from simple wooden frames to more elaborate metal elements. Pergolas don’t typically have roofs so how do they block the sun? The secret is installing linen or muslin curtains. They block the sun and add a breezy, Mediterranean flair.
Think of your backyard as an outdoor room. Now, imagine how and when you will use it. Designate specific areas for dining, lounging and entertaining. Think about where the sun hits your backyard at certain times of the day. Shady in one part of the yard around
dinner time? That’s where to put your grill and patio table. Sunny spot in the afternoons? Arrange your furniture there under your pergola. Get creative and be thoughtful of your space to increase its functionality. Take inspiration from Belgard Rooms to explore pre-designed outdoor spaces or get an expert’s opinion.
Do you have a grillmaster in your life who loves making meals outdoors? Go beyond the grill and create a complete outdoor kitchen. Belgard’s Elements line of outdoor essentials has everything you need for a truly functional, convenient outdoor cooking space - no more running inside for items you forgot to haul from your indoor kitchen.The line features grills, side burners,

ovens, storage, a compact fridge (yes, you can!), bars and sinks, and every grilling accessory you need to whip up your culinary masterpieces al fresco.
Nothing says “oasis” like flowing, bubbling water. It adds an element of peace and tranquility to your outdoor experience. Incorporate a water feature like a fountain, pond or waterfall to soothe, cool and calm. Imagine sitting in a comfy outdoor armchair next to a bubbling fountain with a good book on a lazy summer afternoon. You can just feel the stress of the day melt away.
Trees, shrubs, flowers and plants add a lush sense of beauty to your backyard oasis, but they also provide natural cooling. A beautiful way to do this is by using a retaining wall like Belgard’s Melville Wall, which is designed to incorporate shrubs and plants. Or try Artforms, a modular panel system that can quickly and efficiently construct raised beds to include native plants and shrubs.
What’s that? Biophilic design is the notion that humans have an inherent need to connect with nature, so permanent design elements like walls and patios should weave in elements of nature. It’s good for your mental and physical health.
By creating a perfect outdoor living space, you can enjoy your backyard all year round.


By Joan Casanova
Humans aren’t the only ones who look forward to autumn harvest. Fall brings a bounty of natural foods for our feathered friends, too. But while they’re feasting on fall’s cornucopia of delicacies, birds are also planning ahead, taking note of yards with bird feeders that can help them weather winter’s cold.
Many of birds’ favorite foods are actually more abundant in fall. Summer weeds ripen with seeds by October. Many berries only begin to emerge in late summer or early winter, and insects are plentiful. You may think there’s no need to feed birds during the fall, but if you want them to find your home in winter, start feeding in autumn.
The birds who visit feeders in fall are scouting, becoming familiar with feeding stations and making decisions on which backyards they’ll visit this winter. The feed you put out in fall lets birds know they’ll be welcomed and fed in your backyard when seriously cold weather arrives - and they no longer have the luxury of exploring for food.
Winter weather is hard on birds. Their calorie requirements increase, food becomes hard to find, snow covers up seeds and ice storms seal away tree buds and wild fruits. Tiny birds must eat one-third to three-quarters of their weight each day. When temperatures dip below zero, easy meals at a feeder can mean the difference between life and death.
An important rule of fall and winter feeding is to be prepared. By stocking up now on premium bird seeds and feed, bird lovers can help secure a wholesome food source without having to brave stormy weather.
It’s important to stock your feeders with high-quality foods that provide birds with the most fat, nutrients and energy. Look for a feed like Cole’s that packs nutrition, preserves freshness and gives you the most feed for your dollar. For example, Cole’s Wild Bird Products’ Oil Sunflower is more than 99% pure and cleaned four times to ensure there are more seeds and fewer sticks in each bag. Feed is also nitrogen-purge packaged, just like potato chips, to ensure freshness and insect-free feed.
In addition to seed, serve up some suet either in the form of Suet cakes for non-seed eating birds or suet mixed with seed. Consider Cole’s Nutberry Suet, which is a seed blend mix of premium fruits, preferred nuts, nutritious insect suet kibbles and whole-kernel sunflower meats that appeals to fruit and insectloving songbirds. Or try Suet Kibbles, bursting with berry flavor and loaded with energy for increased stamina. These feed choices provide fat and a high-protein energy source to assist wild birds in weathering winter and may actually boost their chance of survival.
Just as birds need food year-round, they also look for water. This can be tricky in regions where water spends the winter as ice, but bird lovers can still help in a few ways. Experts suggest leaving icicles on the eaves to provide a regular source of water for birds that drink drops as the icicles melt. Birds are drawn to running water sounds, so spritzers or small fountains are beneficial. In the winter, try using quality bird bath heaters to keep water from freezing, plus they’re more convenient than setting out water every day.
Don’t worry about the birds if you must leave home for a while in winter. Birds are familiar with food sources disappearing. It might take them a while to rediscover your feeders when you return, but they’ll be back, grateful for your assistance.
For more ideas to help birds eat well through winter, and to learn about more feed choices, visit coleswildbird.com.

As the chill of winter approaches, it’s important to prepare your garden to withstand the cold months and emerge vibrant again in the spring.
Before the first frost, take a walk around your garden to assess its current state and begin planning ahead for next growing season. As you review what worked well and make notes for improvements, keep these winterizing tips in mind before the weather turns colder.


Start by identifying plants that need to be moved indoors or to a sheltered location. For those that can survive winter with minimal intervention, like perennials and shrubs, add a thick layer of mulch to insulate plant roots from freezing temperatures and retain soil moisture. For more delicate plants, consider burlap wraps, frost covers or cloches to add an extra layer of protection.
After your final harvest, clear any dead or dying plants to prevent the spread of disease. Turn the soil over and add compost to enrich it for the next growing season. Consider planting cover crops like clover or rye, which can be tilled into the soil in the spring to add organic matter, to help prevent soil erosion and improve soil health during the winter months.
Before storing them for winter, clean and sharpen your garden tools to help prevent rust and have them ready to use again in the spring. Drain fuel from your lawnmower and any other gaspowered equipment and store them in a dry, sheltered location until needed again.


