7 minute read
A Visit to Tunnel Close Clive Burchell


Clive Burchell
My interest in trains has been a life long hobby. I was born into trains as my dad had an OO garden railway called "DAVENTRY GARDEN RAILWAY" which he started in 1969. Dad had trains running every month with the layout open to the public and I became the operator of the controls with him. I had a N gauge layout in my bedroom which would occupy my time. This was sold when I moved out.
Advertisement
My Dad passed away in May 2015, so I decided to build another N gauge layout in his memory. I started construction in August of that year with a 7ft. by 4ft. board, which was stored under our double bed but it soon became apparent that this was not going to be satisfactory so I decided to build a 10ft. x 12ft. shed in our back garden. This soon became my Railway Hobby Room.
My New Layout
My layout is constructed on 10mm plywood with 50mm x 50mm supports underneath. I have kept to direct current (DC) as this is what I had when I was younger and I know how to wire this up.
Tracklaying
When I started to lay the track, I had a rough idea of what I wanted but never had a track plan to follow. The track is Peco code 80 flexitrack and mostly medium radius points. I was undecided whether to use Peco underlay but when I realised how expensive it would be I then thought about using cork as a base for the track.
I asked the question on a Facebook group and was told there was no point using underlay or cork as it would lift the track higher and make no difference to quietening the sound, so I decided to just put the track straight onto the plywood, drilling holes in the sleepers and pin the track down. Eventually I would glue and ballast but not until I was completely happy with the laying and positioning of the track.


Simple Starting Point
I started with two main lines all round with two storage loops and five sidings. I bought a Gaugemaster model Q controller, which controls four tracks, so I decided to change the two storage loops into another two main running lines. The track layout changed again when I decided to add two bays on the inner road. My layout had many alterations and changes over a 12-month period until I was happy with the track layout. Then started the mammoth task of ballasting it all. Many, many hours were spent glueing and ballasting but the more I did the more I was determined to finish the job. The better it looked and started to come to life.
Which Era or No Era?
I do not run a specific era, as I love both steam and diesel from L.M.S., GWR, LNER, SR, early BR crest,
Great Western Star Summer 2021


late BR crest and up to the 80's and 90's, which gives me a very large scope for locos, coaches and wagons to run and also means there is always stock that I want for Christmas and birthday presents.!
My Layout Comes to Life
As I run all era's, I do not have to model a specific year so I have a large selection of model cars from Morros Minors to Ford Cortinas, as well as horse drawn carts, I even have someone pulling a hand
cart for his friends while they are window cleaning on Tunnel Close. Also on Tunnel Close there is a family washing their classic car, another family doing house repairs who needed a skip and, if you look closer you can see a couple having a kiss while waiting for the bus. I came up with the name Tunnel Close as it is on top of the tunnel which also contains my control panel. The control panel is all handmade by me and all wired up by me, which makes it easier for me to find a fault or to add more wires and switches.
The Layout Lights Up!
All the houses light up from a 12-volt transformer with two wires, a red and black, trailing all around the underside of the board, a small hole is drilled into the board and the bottom of the house then a light emitting diode is pushed through this and joined to the wires. This is a very cheap way of lighting up all the houses.
The streetlights are 3-volt with a resistor so they can be connected to the same 12 volt wires, the yard lights are also 3 volt connected to the 12 volt supply, two of the yard lights have blown bulbs so the workmen are up the ladder trying to fix them.
An Interesting Fairground
The fairground rides are made by Fuller and DAPR They are all kits, the Fuller kits are now


discontinued but look fantastic when made, the big wheel was the hardest kit to make up and the most expensive as when you buy the kit you then have to buy the motor and lighting kit. The DAPR kits are 3D printed kits with a 12-volt motor. I have painted the rides and added people to give a better effect. They are powered by a 12-volt controller under the board so the speed is adjustable. The helterskelter, ghost train and 3 small stalls are card kits, but I did put lights in them to give a better effect. I also have hot air balloon rides for people to have a ride in and get a lovely view of the trains and the village.

Plenty of Village Life!
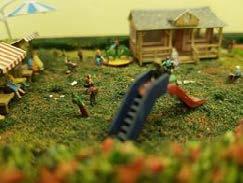
The village is made from Metcalfe card kits, they are made by my lovely wife Sarah as she enjoys making them. Sarah also constructed the farm with the horses, pigs, cows, sheep, bulls, a couple of goats and a dog. The farm is named Hill Top farm as it is on top of the hill. With many building, farm vehicles and many people doing their daily jobs it is a busy place. On the other side of the road is Karen's cafe named after my late sister who also had a cafe in my Dad's OO garden railway village. There is a play area for the kids with slide and climbing frame and a caravan and camping site with 3 lodges overlooking the village.
The Children Enjoy Life!
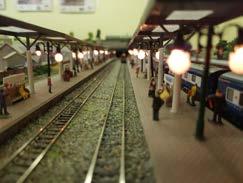
As you travel down the road into the village you come to the local pub and garden centre, across the road is the village school where the kids are having playtime in the playground and on the playing field the local cricket team are having a match. Travelling along the road you come to the T-junction which leads you down to the train station. The station is named Kazaura which is an anagram of my late sister Karen and her daughter Laura. Kazaura was Karen's and Laura's dog breeder’s name.
The station has many lights as well as two lit clocks bought by my wife one Christmas, the station’s loading area is as busy as always with lorries coming and going The platform is handmade as I was unable to find the right size with space for two bays. It is made with a piece of wood bolted to the board with plastic glued on top and block paving effect card glued to this. The canopies are kits joined together to cover the full length. The station building is a Metcalfe kit which again was made by my wife Sarah.
Business is Thriving!
Station Road has a few houses and the local corner shop selling food, groceries and fresh fish that has just been delivered. Travelling along the road brings you to the other corner shop selling everything from your monthly railway magazine to a hammer to knock your nails in with.
Opposite the corner shop is Clive's Auto's named after me as I am a qualified panel beater and paint sprayer and always wanted to own my own garage. Next to the garage is the church where the wedding of James and Sophie is taking place and round the back the funeral of Berti. Travelling up the hill past the bus stop you come to the bridge which takes you out of the village.
There seems to be a lot of police vehicles there as someone has decided to climb up onto the bridge wall, unsure whether he is going to jump or just watch the trains passing beneath him.