BAKING FOR PLEASURE
COMFORTING RECIPES TO BRING YOU JOY

RAVNEET GILL

CONTENTS 6 A NOTE FROM RAV 11 FINDING JOY IN THE KITCHEN 22 Bakes for friends 68 Crowd pleasers 114 Dinner parties 162 Weekend bakes 200 Savoury bakes 244 CONVERSION CHARTS 246 INDEX 252 ACKNOWLEDGEMENTS 254 ABOUT THE AUTHOR
A NOTE FROM RAV
I remember when my first book (The Pastry Chef’s Guide) came out in 2020, I thought I’d release it and go about my day, maybe think about opening my own place eventually, but more importantly, I had a sense of relief and accomplishment because recipes of mine that I wanted to use regularly were now in an ‘easy to carry around in my bag’ sort of format. I received so many messages from chefs and other cooks in kitchens saying how much they enjoyed the handy, straightforward manner of the book, the pick-and-mix style of writing, and the less hand-holding and more practical elements of it.
Nathan Outlaw told his daughter that it would be the only book she would need if she wanted to start out as a pastry chef! Something I still can’t quite believe. But I wrote it for that very purpose, to break down the fundamentals of pastry and give people the base recipes they needed that were reliable enough to eventually ease them into running their own section and creating desserts of their own.
‘ The intention of these recipes is to make them suitable for a home kitchen.’
Little did I know that, fast-forward three years, and I’d be writing this, my third book, after releasing my second book in 2021 (Sugar, I Love You)! Or that I would have the opportunities I am fortunate to have in front of me now, and be married, too, in a home that I own with a cat of my own, finally.
This is the book I couldn’t have written had I still been working full-time in kitchens. It’s a book full of recipes that I’ve been able to create because, for the first time since I started cooking professionally, I can take a moment to do it for pure pleasure, without the haste of service or catering for customers. Instead it’s for enjoyment, for surprising friends and for eating with loved ones, or alone on the sofa.
During my time in professional kitchens, I was so absorbed by and totally engulfed in the lifestyle that often I had very little energy or time to cook or bake the things I enjoyed on my days off. Instead I’d opt for a take-away or to eat out.
My husband, Mattie, who I met working in a restaurant, still works full-time as a chef and his influence on me and my style of cooking, baking and eating is unparalleled. We are both big lovers of eating and find ourselves chatting about how a dish ‘eats’. How it feels, texturally, what it could be and how to get it there. The two of us love hosting, and although the process is usually full of minor kitchen disputes, we create very fun dinners together. We will debate the menu for days, with Mattie focusing on the main course, while I take care of the starter and the dessert (plus the cleaning up!). His passion and knowledge of food makes me a better chef, and as I tested recipes for this book, Mattie was a massive part of making me not second-guess myself and he helped to push my ideas into creating desserts and dishes that have evolved into what we both find delicious.
I hope you will see the joy and love that is within these pages and find recipes that become your own. I also hope that it gives you the space to spend some time doing nice things and putting on spreads for the ones you love.
The intention of these recipes is to make them suitable for a home kitchen. I’ve had to be mindful of the washing up (!), being more resourceful with the amount of ingredients I use, and focusing on one recipe at a time and how it can work around an individual’s schedule.
7
Rav x
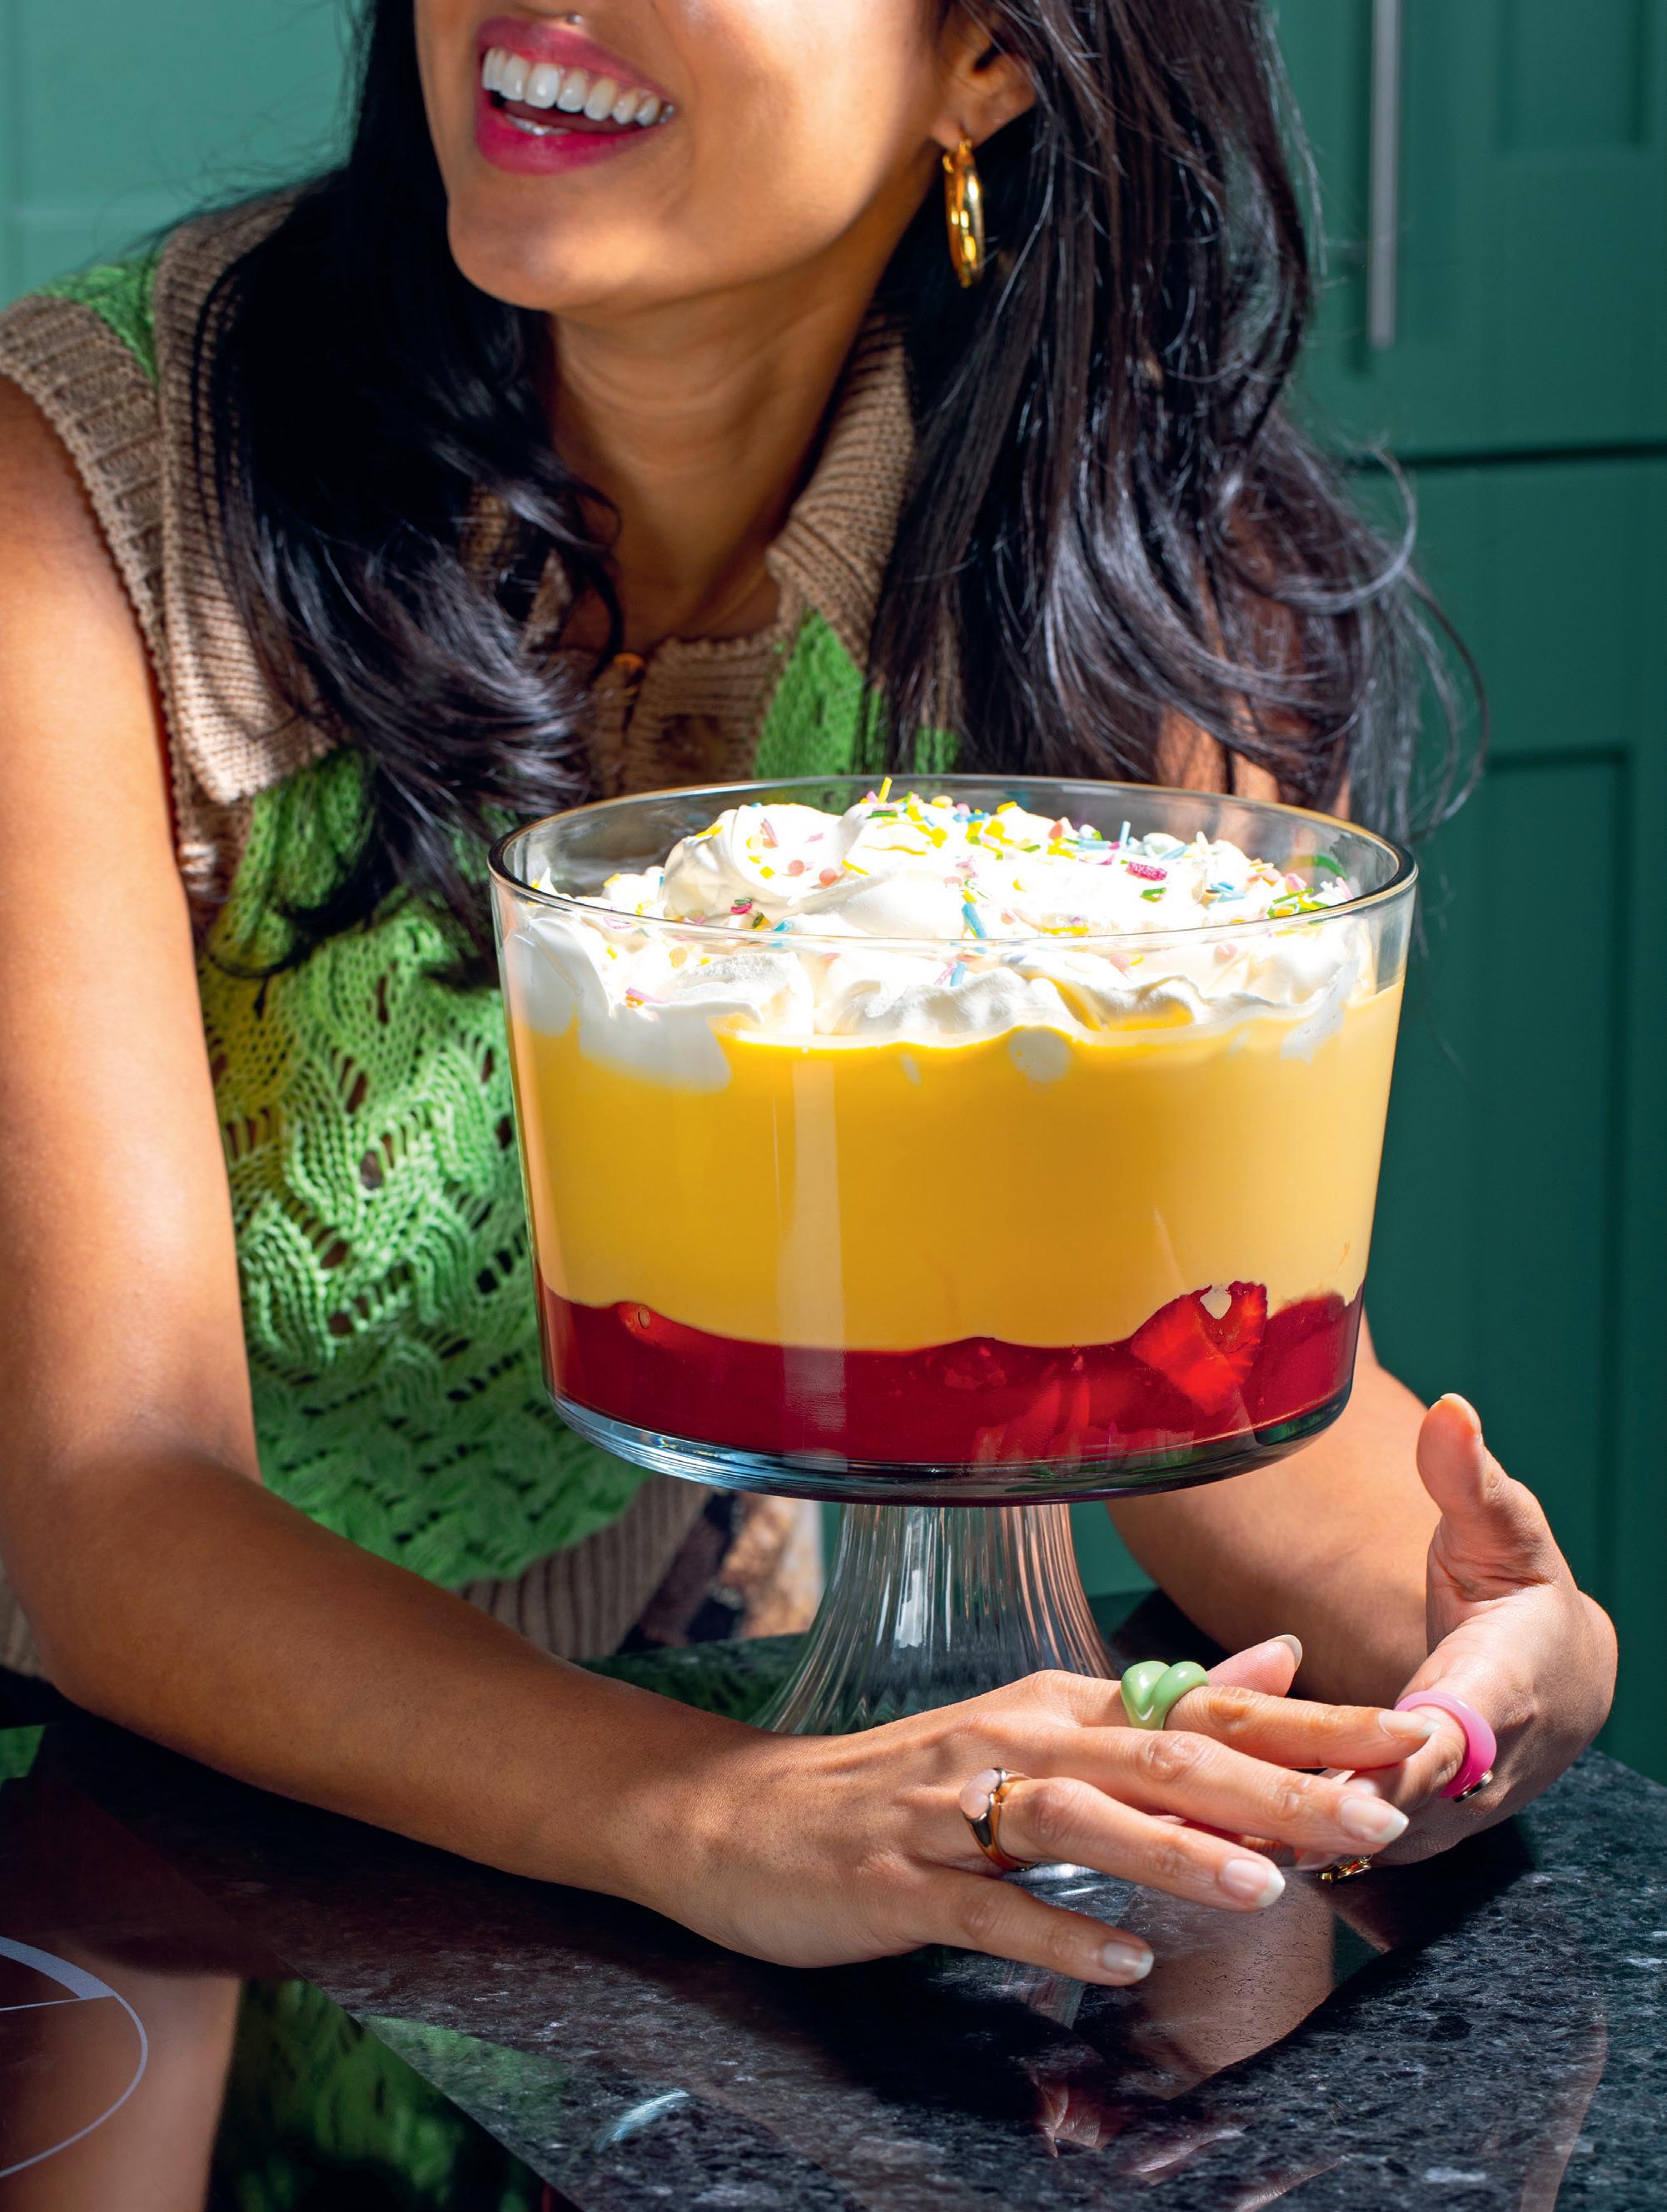
TRIFLE
SERVES 10
Equipment
22 x 22 x 8cm (81/2 x 81/2 x 31/4in) serving dish
8–12 sponge fingers or the equivalent in sponge cake (cut into fingers) sprinkles, to decorate
For the jelly
800ml water
135g caster sugar
300g fresh raspberries
350g fresh strawberries, hulled (halved if large)
7 ‘platinum-grade’ gelatine leaves (I use Dr. Oetker) juice of 1 lime or 1/2 lemon
For the custard
900ml double cream
300ml full-fat milk
225g caster sugar
3 eggs
5 egg yolks
3 heaped tbsp cornflour pinch of Maldon or flaky salt
For the Chantilly cream
450ml double cream
1 tbsp caster sugar pinch of Maldon or flaky salt
1 tsp vanilla extract (optional)
Quick Tip
The softened fruit left in the sieve can be cooled and served with yogurt, if you like.
I absolutely believe that jelly has an important place in a trifle. During the summer months, it’s a nice thing to make your jelly from scratch using fresh berries, but do know that frozen berries work well, too, when the winter needs brightening up. I’m also not against trifle fingers or slices of sponge cake as a base. I’ve tested making trifles with both home-made sponge fingers and shopbought, and after the drenching and submerging of various liquids, creams and custards, I’ve come to realize that there is time better spent elsewhere. Like listening to the birds and drinking a cup of tea.
Make the jelly. In a large pan, add the water, sugar, 200g of the raspberries and 200g of the strawberries and stir well. Bring to a gentle simmer, then switch off the heat, cover and allow this to sit for 30 minutes.
In the meantime, soak the gelatine in ice-cold water until softened, then squeeze out the excess water and set aside ready to dissolve into the fruit mixture.
Strain the fruit liquid through a sieve into a jug (pressing the softened fruit very lightly to get a bit more flavour – see also Quick Tip), then pour the liquid back into the rinsed-out pan and return to the heat. When it’s steaming, remove from the heat, add in the soaked gelatine, use a whisk and stir well until it has dissolved. Stir in the lime or lemon juice.
Allow the mixture to cool at room temperature until it is no longer warm to the touch –the jelly won’t set at this point, don’t worry.
Meanwhile, make the custard. In a blender or food processor, blitz everything together for a minute or two. Pour this mixture into a large pan and heat over a low-medium heat, whisking frequently, until it starts to thicken. It won’t thicken dramatically but you will notice a difference in that it will stop swishing about as easily in the pan.
After 8–10 minutes at this pace, remove from the heat and pour into a heatproof container, then put a piece of baking paper directly on top of the custard (this stops a skin forming). Allow to cool before placing in the fridge for a minimum of 4 hours or until completely cold.
While the custard is chilling, start to assemble the trifle. Arrange the sponge fingers or sponge cake in the bottom of the serving dish of your choice along with the remaining raspberries and strawberries. Pour over the cool fruit jelly mix. Put this in the fridge until the jelly has set (approx. 4 hours).
While this is chilling, make the Chantilly cream. Lightly whip the cream with the sugar and salt until it looks just about whipped. Stir in the vanilla extract, if you like. The cream is now ready to be spooned on top of the custard.
To finish assembling the trifle, gently beat the chilled custard with a large spoon before spooning this over the set jelly mixture. Top with the Chantilly cream. Finish with sprinkles. Serve cold.
This trifle will keep, covered, in the fridge for 3–4 days.
72
73
SERVES 8
Equipment
20cm (8in) round tart tin, 3.5cm (11/4in) deep, fluted or straight-edged; sturdy flat baking tray; rimmed baking tray
For the pastry
100g plain flour
1g/large pinch of Maldon or flaky salt
20g cocoa powder
40g icing sugar
80g cold unsalted butter, cubed, plus extra (softened) for greasing
2 egg yolks
For the chocolate ganache
250ml double cream
30g honey
3g/1/2 tsp Maldon or flaky salt
60g milk chocolate (40–55 per cent cocoa solids), roughly chopped
70g dark chocolate (70 per cent cocoa solids), roughly chopped
For the hazelnut topping
100g blanched whole hazelnuts
100g caster sugar
15g/1 tbsp unsalted butter
100ml double cream
pinch of Maldon or flaky salt
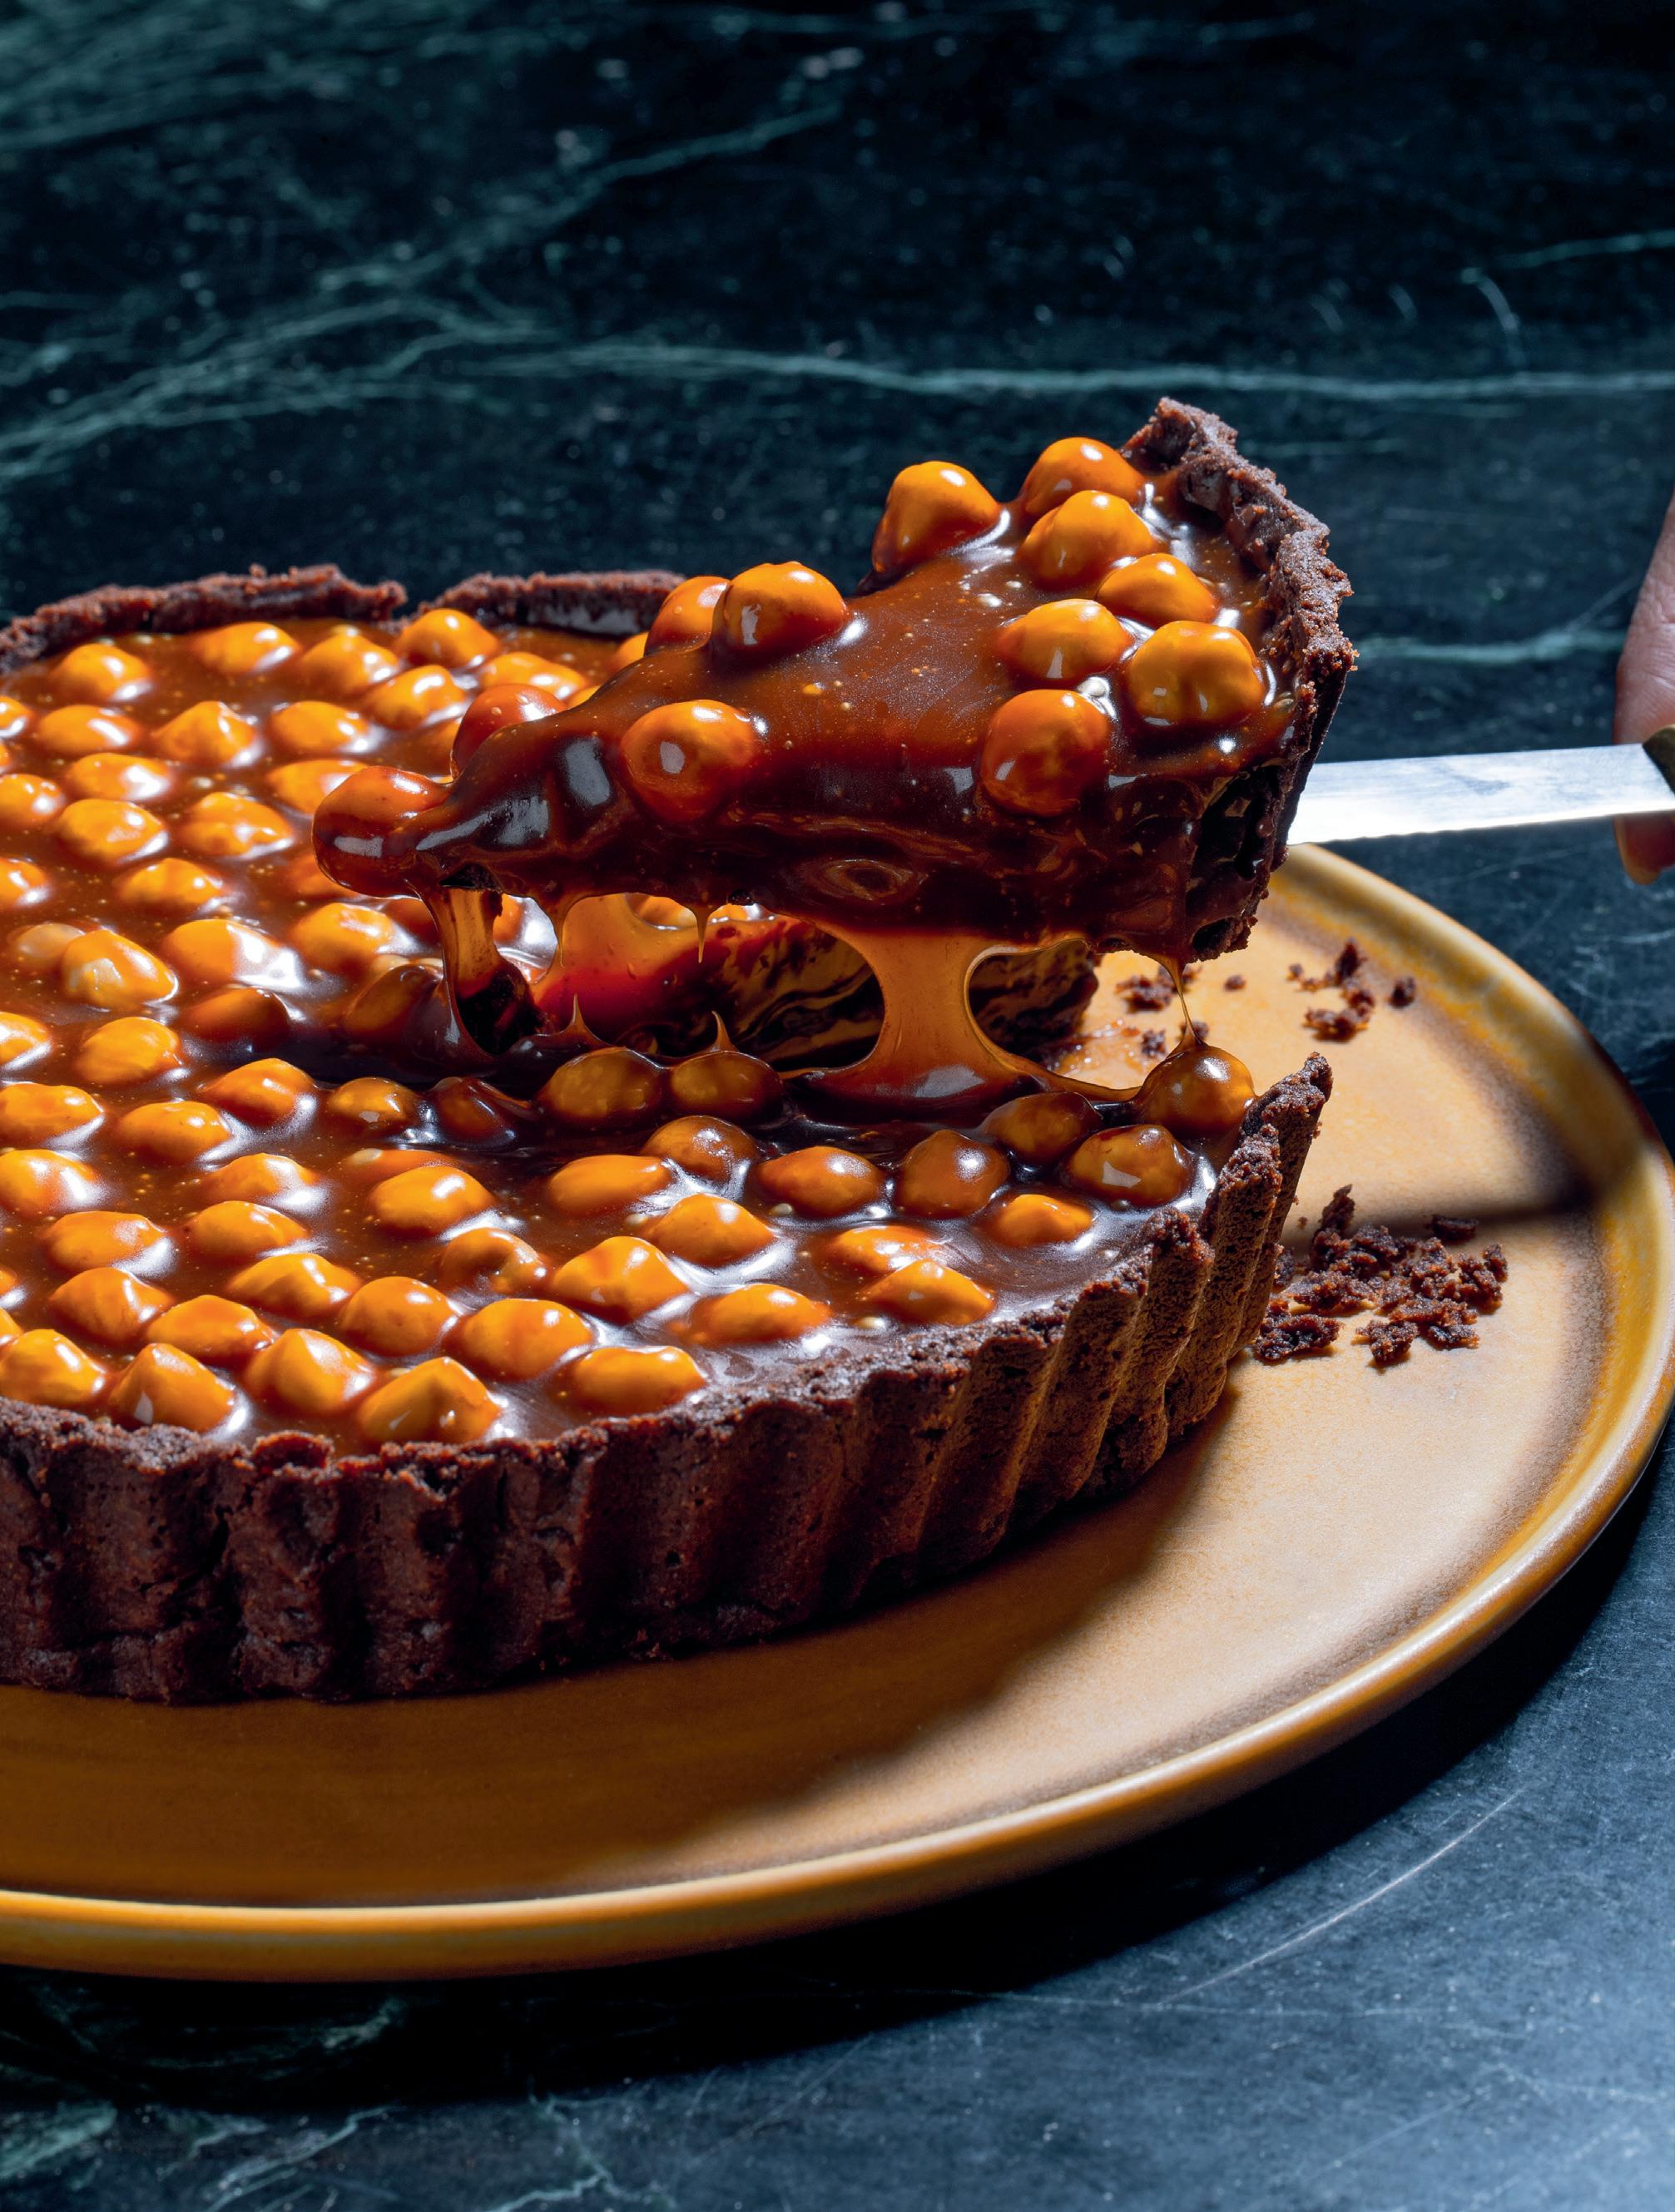
CHOCOLATE AND HAZELNUT CARAMEL TART
This tart is unbelievably fun to put together and the result is really impressive. The hazelnuts sit on top of the silk-like ganache like golden jewels, and texturally, it keeps you coming back for more. It’s one of those desserts that ticks every box, for me and most people I like anyway.
Because of the nature of this tart, with this dough you want a thicker edge that doesn’t need to be too neatly lined, as you are going to press the pastry into the tin directly after it’s made without chilling it first.
Line the base of the tart tin with a circle of baking paper and lightly butter the sides of the tin, then put this in the fridge.
Make the pastry. In a large bowl or the bowl of a stand mixer or food processor, mix together the flour, salt, cocoa powder and icing sugar. Add the cold cubed butter and mix to form breadcrumbs, either with your fingertips, the paddle attachment or pulsed in the food processor. Add the egg yolks in one go and mix briefly to form a dough. Tip this onto your work surface and knead briefly to form a homogeneous dough. Press this pastry into the chilled lined tin, using both thumbs to get it nicely around and up the edges and over the base in an even layer. Refrigerate for 2 hours or until firm.
Preheat the oven to 160°C fan/180°C/gas mark 4. Place the sturdy flat baking tray on a shelf/rack in the centre of the oven to preheat.
Blind-bake the pastry. Line the pastry case with a sheet of baking paper and fill to the top with baking beans or dried rice/lentils. Put this on the preheated baking tray in the oven and bake for 20–25 minutes or until the edges are lightly golden. Carefully remove the baking paper and beans, then return to the oven (on the baking tray) for 15–20 minutes until fully cooked. Remove from the oven and allow to cool completely in the tin.
Make the ganache. In a small saucepan, warm the cream with the honey and salt until steaming. Place all the chopped chocolate into a heatproof bowl. Pour the warmed cream over the chocolate and leave to sit for 30 seconds. Using a whisk, stir the mixture from the very middle, gently and slowly moving it to the outer edges until a smooth ganache forms.
Continued overleaf J
82
106
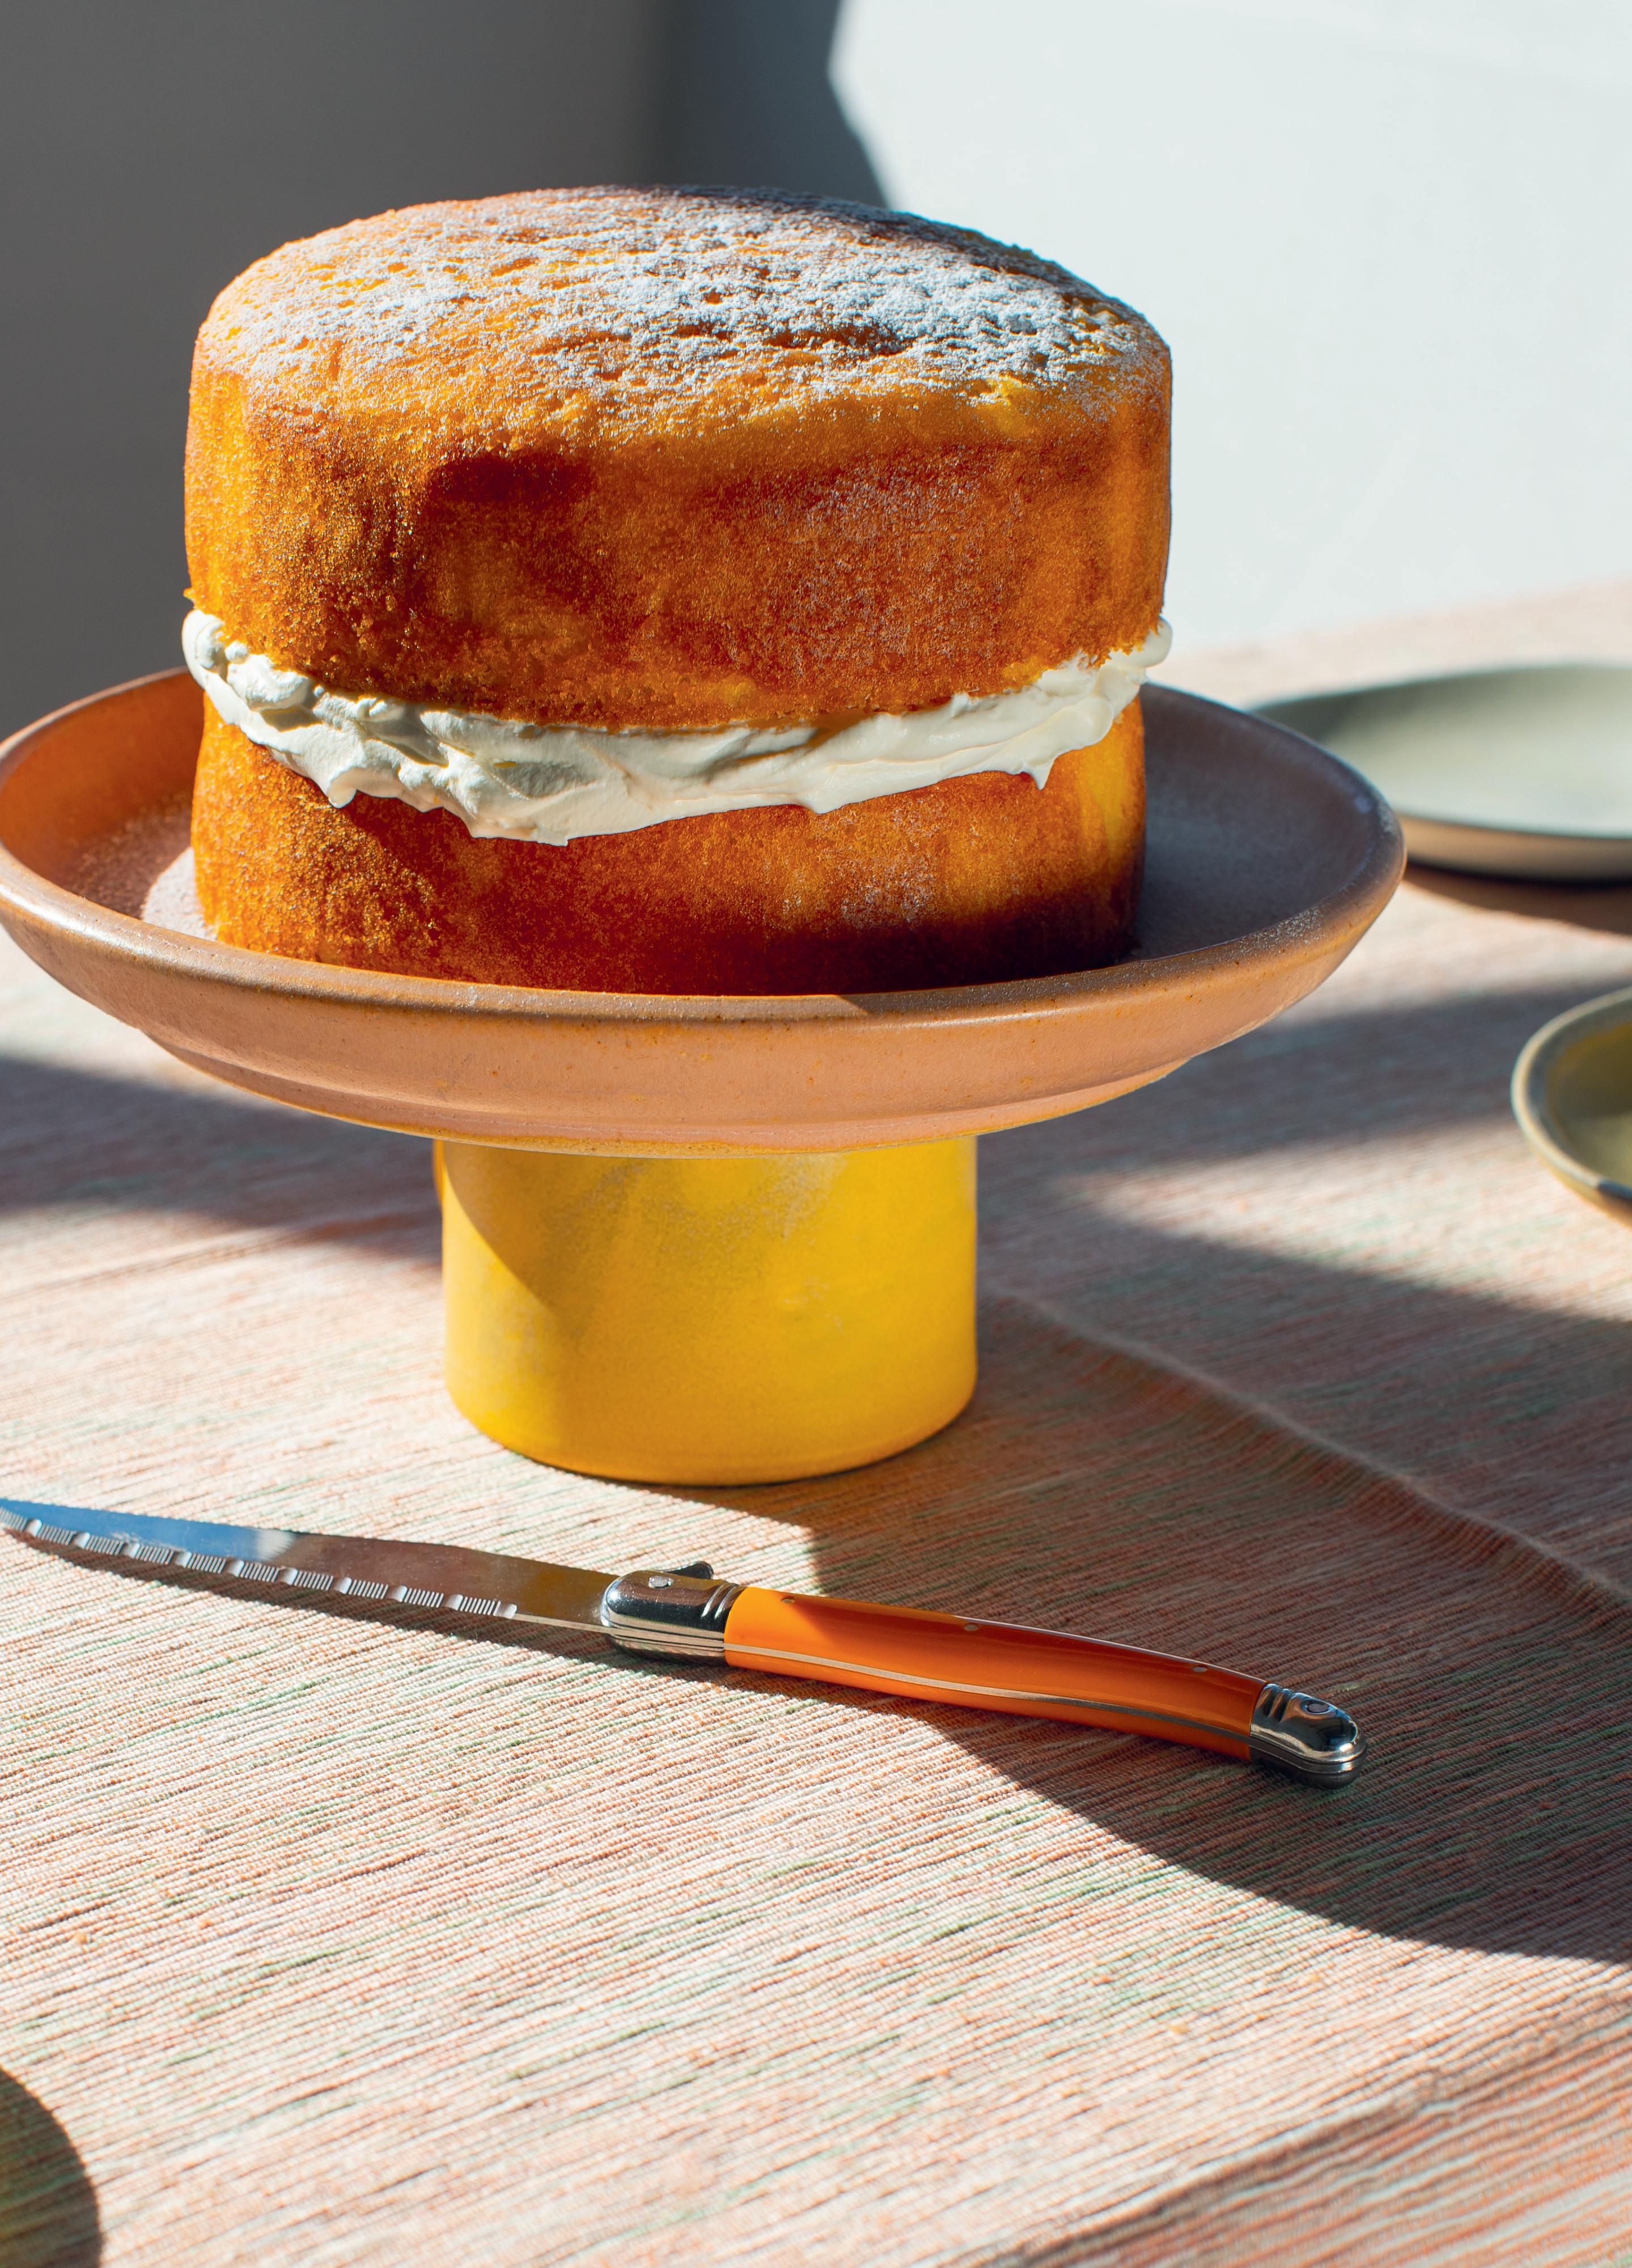
MAKES 1 X 15CM (6IN) CAKE; SERVES 6
LEMON CREAM CAKE
This is another type of cake that my Biji wants on repeat – it’s simple, full of cream and a bit lemony (and hard to resist!).
Equipment
2 x 15cm (6in) sandwich cake tins
For the cake
4 eggs
180g caster sugar
100g unsalted butter, melted, plus extra (softened) for greasing
50ml neutral oil, such as sunflower, vegetable or rapeseed oil
50g soured cream or natural yogurt
pinch of fine salt
finely grated zest of 1 lemon
200g plain flour
21/2 tsp baking powder
For the syrup
120g caster sugar
100ml water
juice of 3 lemons
To finish
180ml double cream
icing sugar, for dusting
Preheat the oven to 160°C fan/180°C/gas mark 4. Lightly grease and line the cake tins with baking paper.
For the cake, in a large bowl, whisk together the eggs and sugar until combined, then whisk in the melted butter, oil, soured cream or yogurt, salt and lemon zest.
In a separate bowl, mix together the flour and baking powder. Add this to the egg mixture and mix well.
Divide the batter evenly between the two prepared cake tins and spread it level.
Bake for 25–30 minutes or until a skewer inserted into the centre of each cake comes out clean.
While the cakes are baking, make the syrup. Heat the sugar and water together in a small pan over a medium heat, stirring until the sugar has dissolved, then add the lemon juice and heat until the syrup is just about to boil. Remove from the heat and cool until warm before using.
Remove the cakes from the oven and allow to cool in the tins for 20 minutes. Prick the surface of each cake all over with a cocktail stick or fine skewer, then evenly pour over the warm syrup. Leave the cakes to sit for 4 hours before removing them from the tins, ready to fill.
To finish, whip the cream in a bowl until soft peaks form. Trim the tops off the cakes to neaten them, if needed, then sandwich them together with the whipped cream. Dust the top of the cake with icing sugar and serve in slices.
This cake will keep in an airtight container in the fridge for up to 3 days.
107
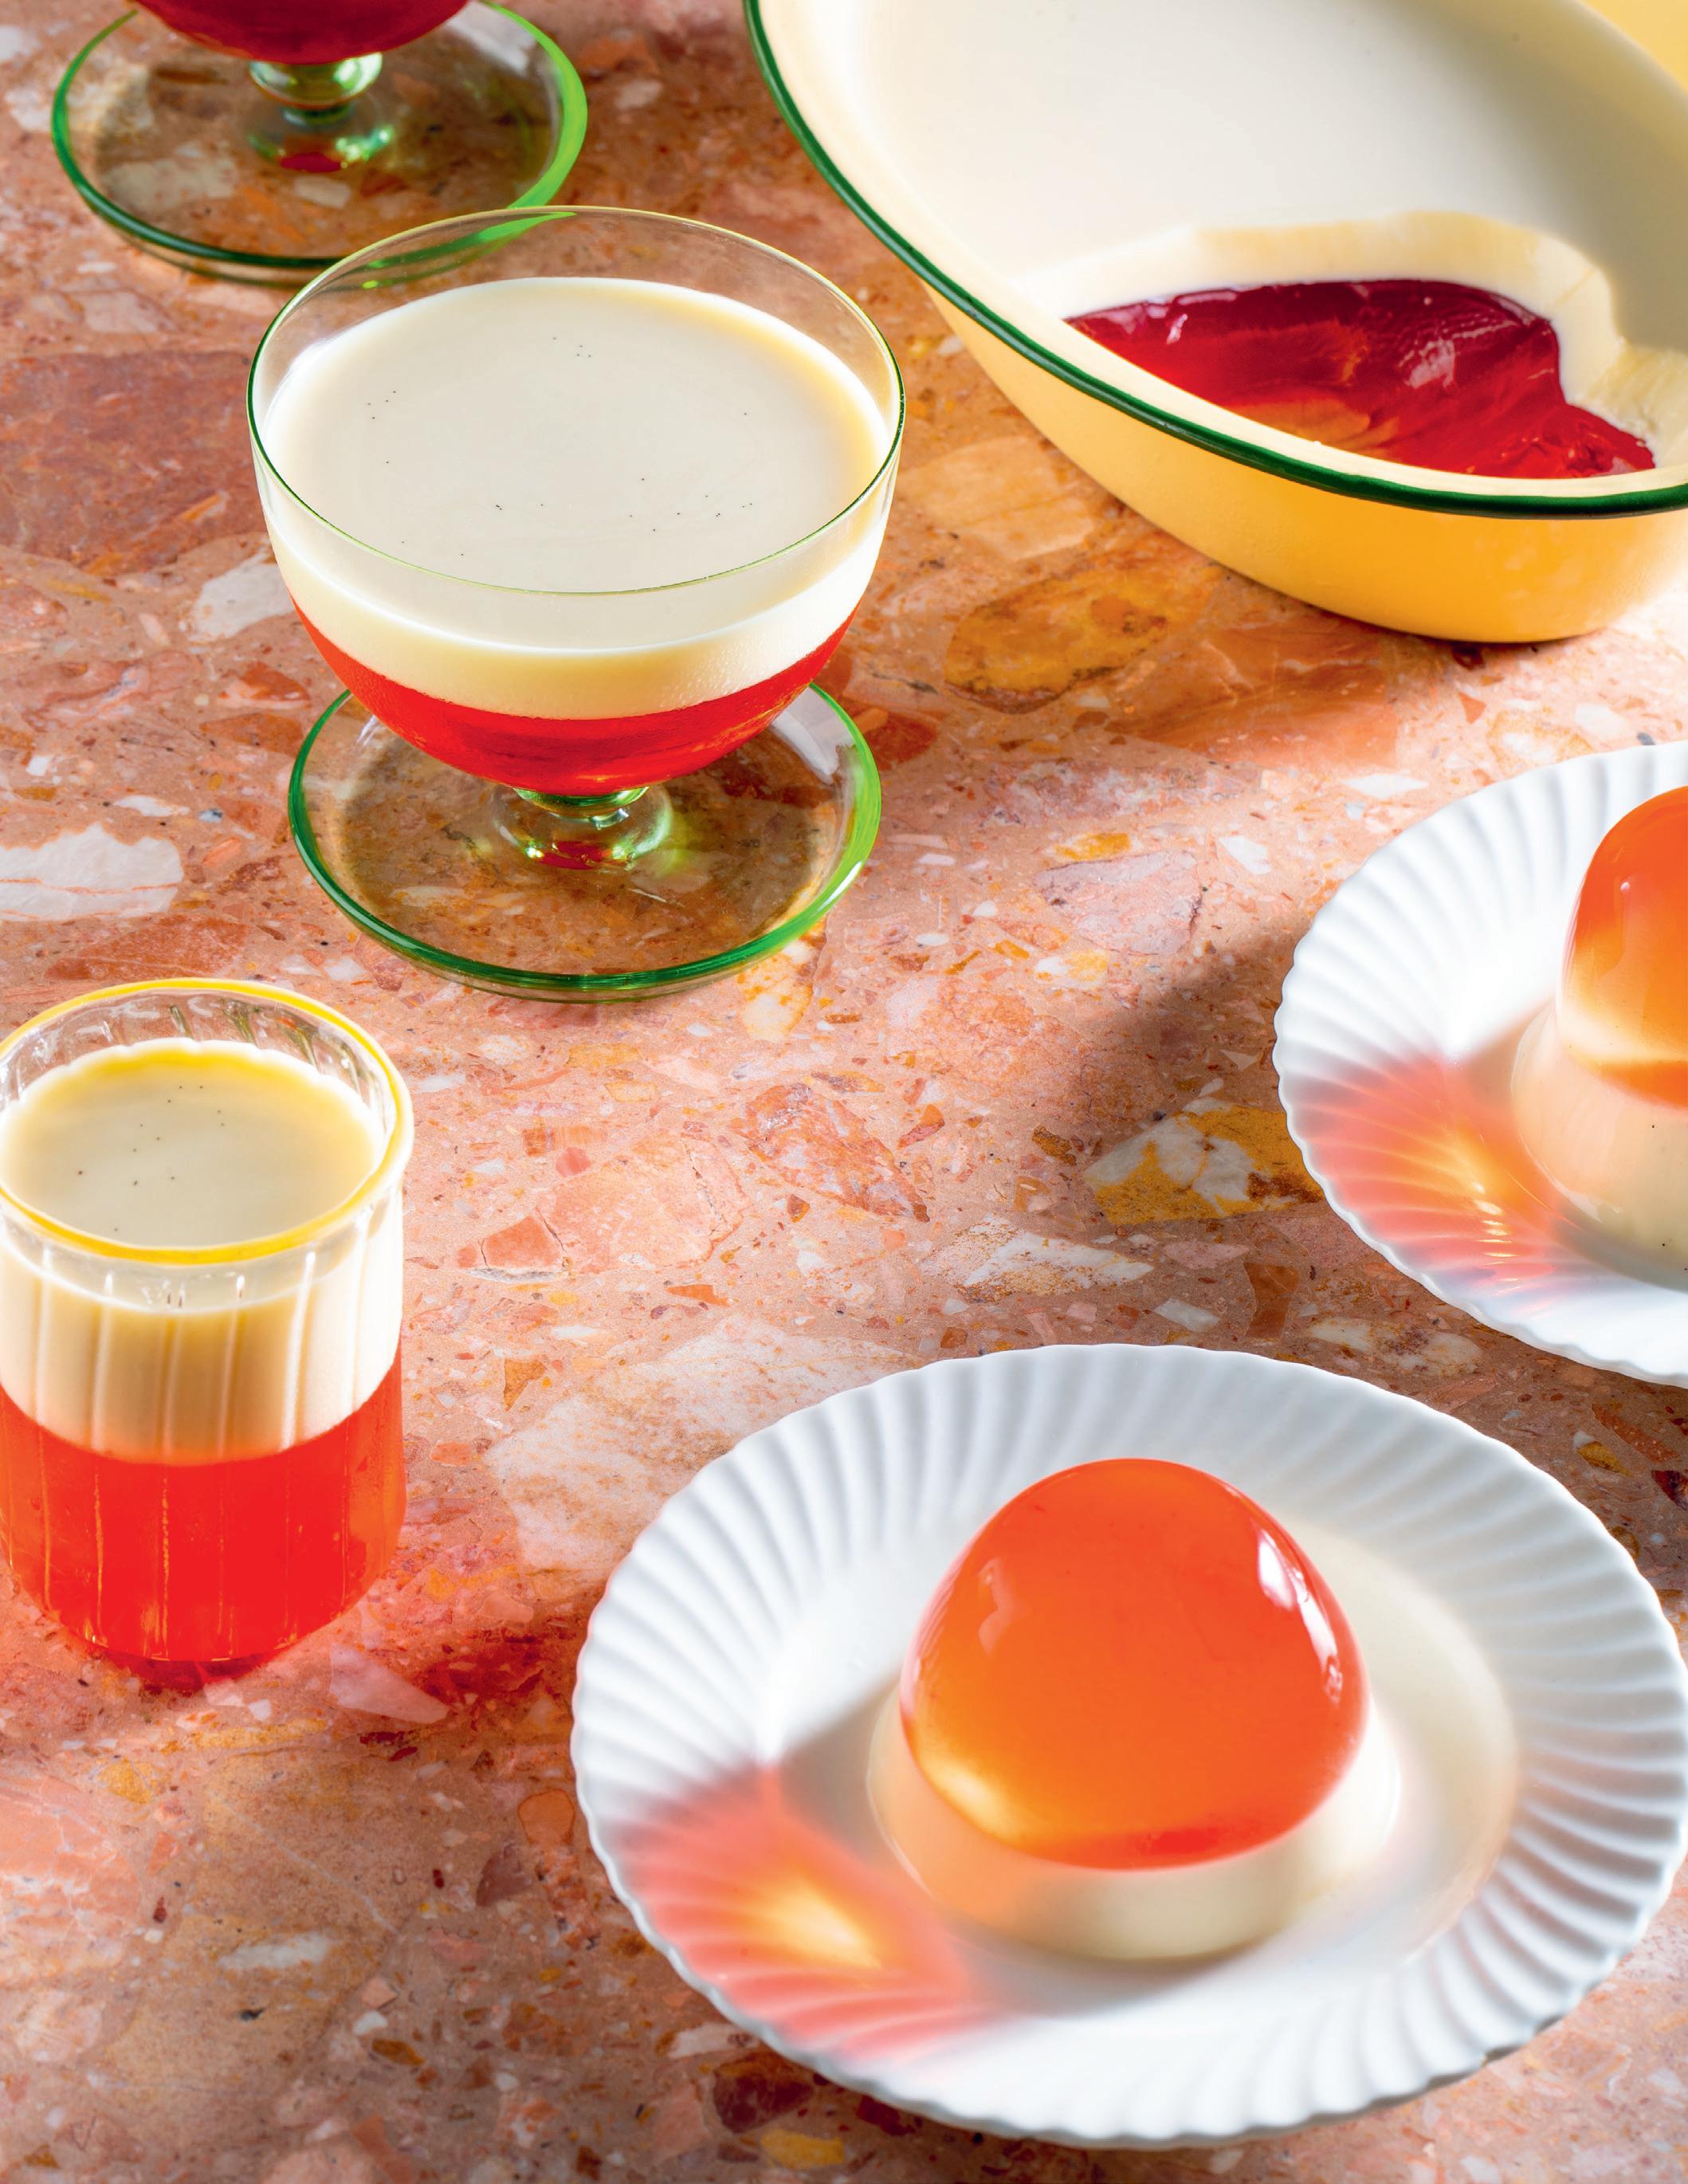
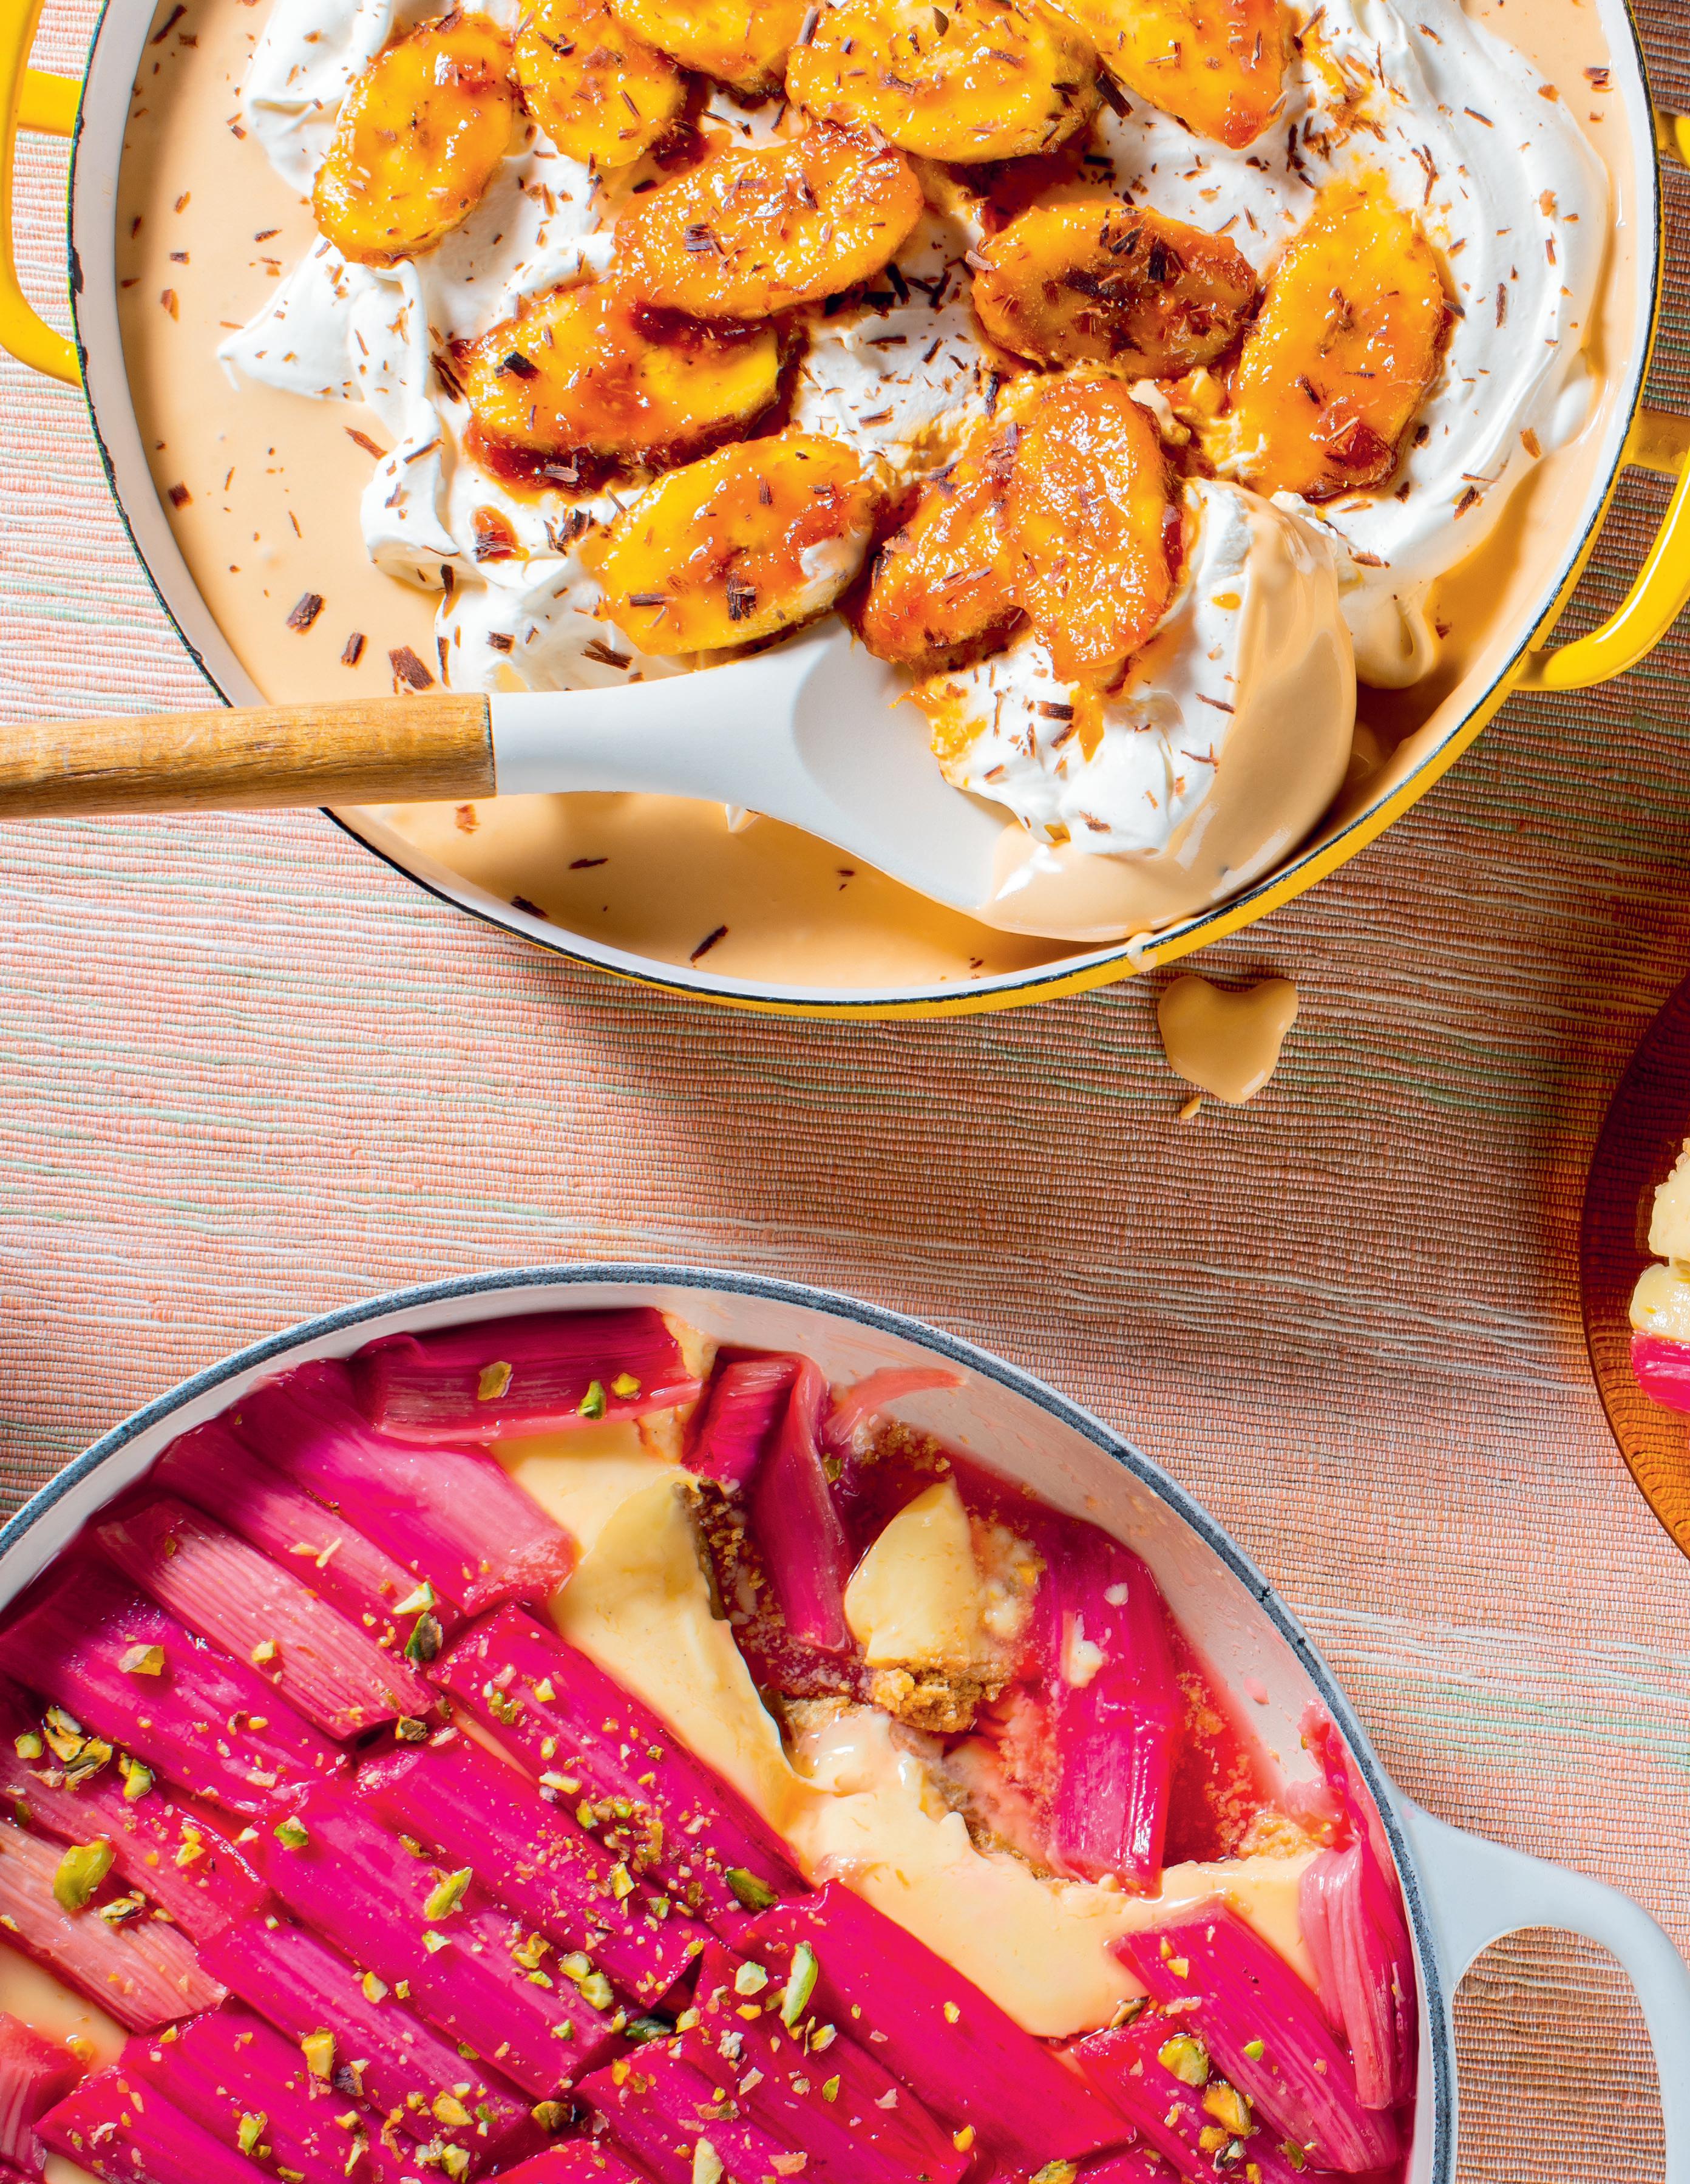
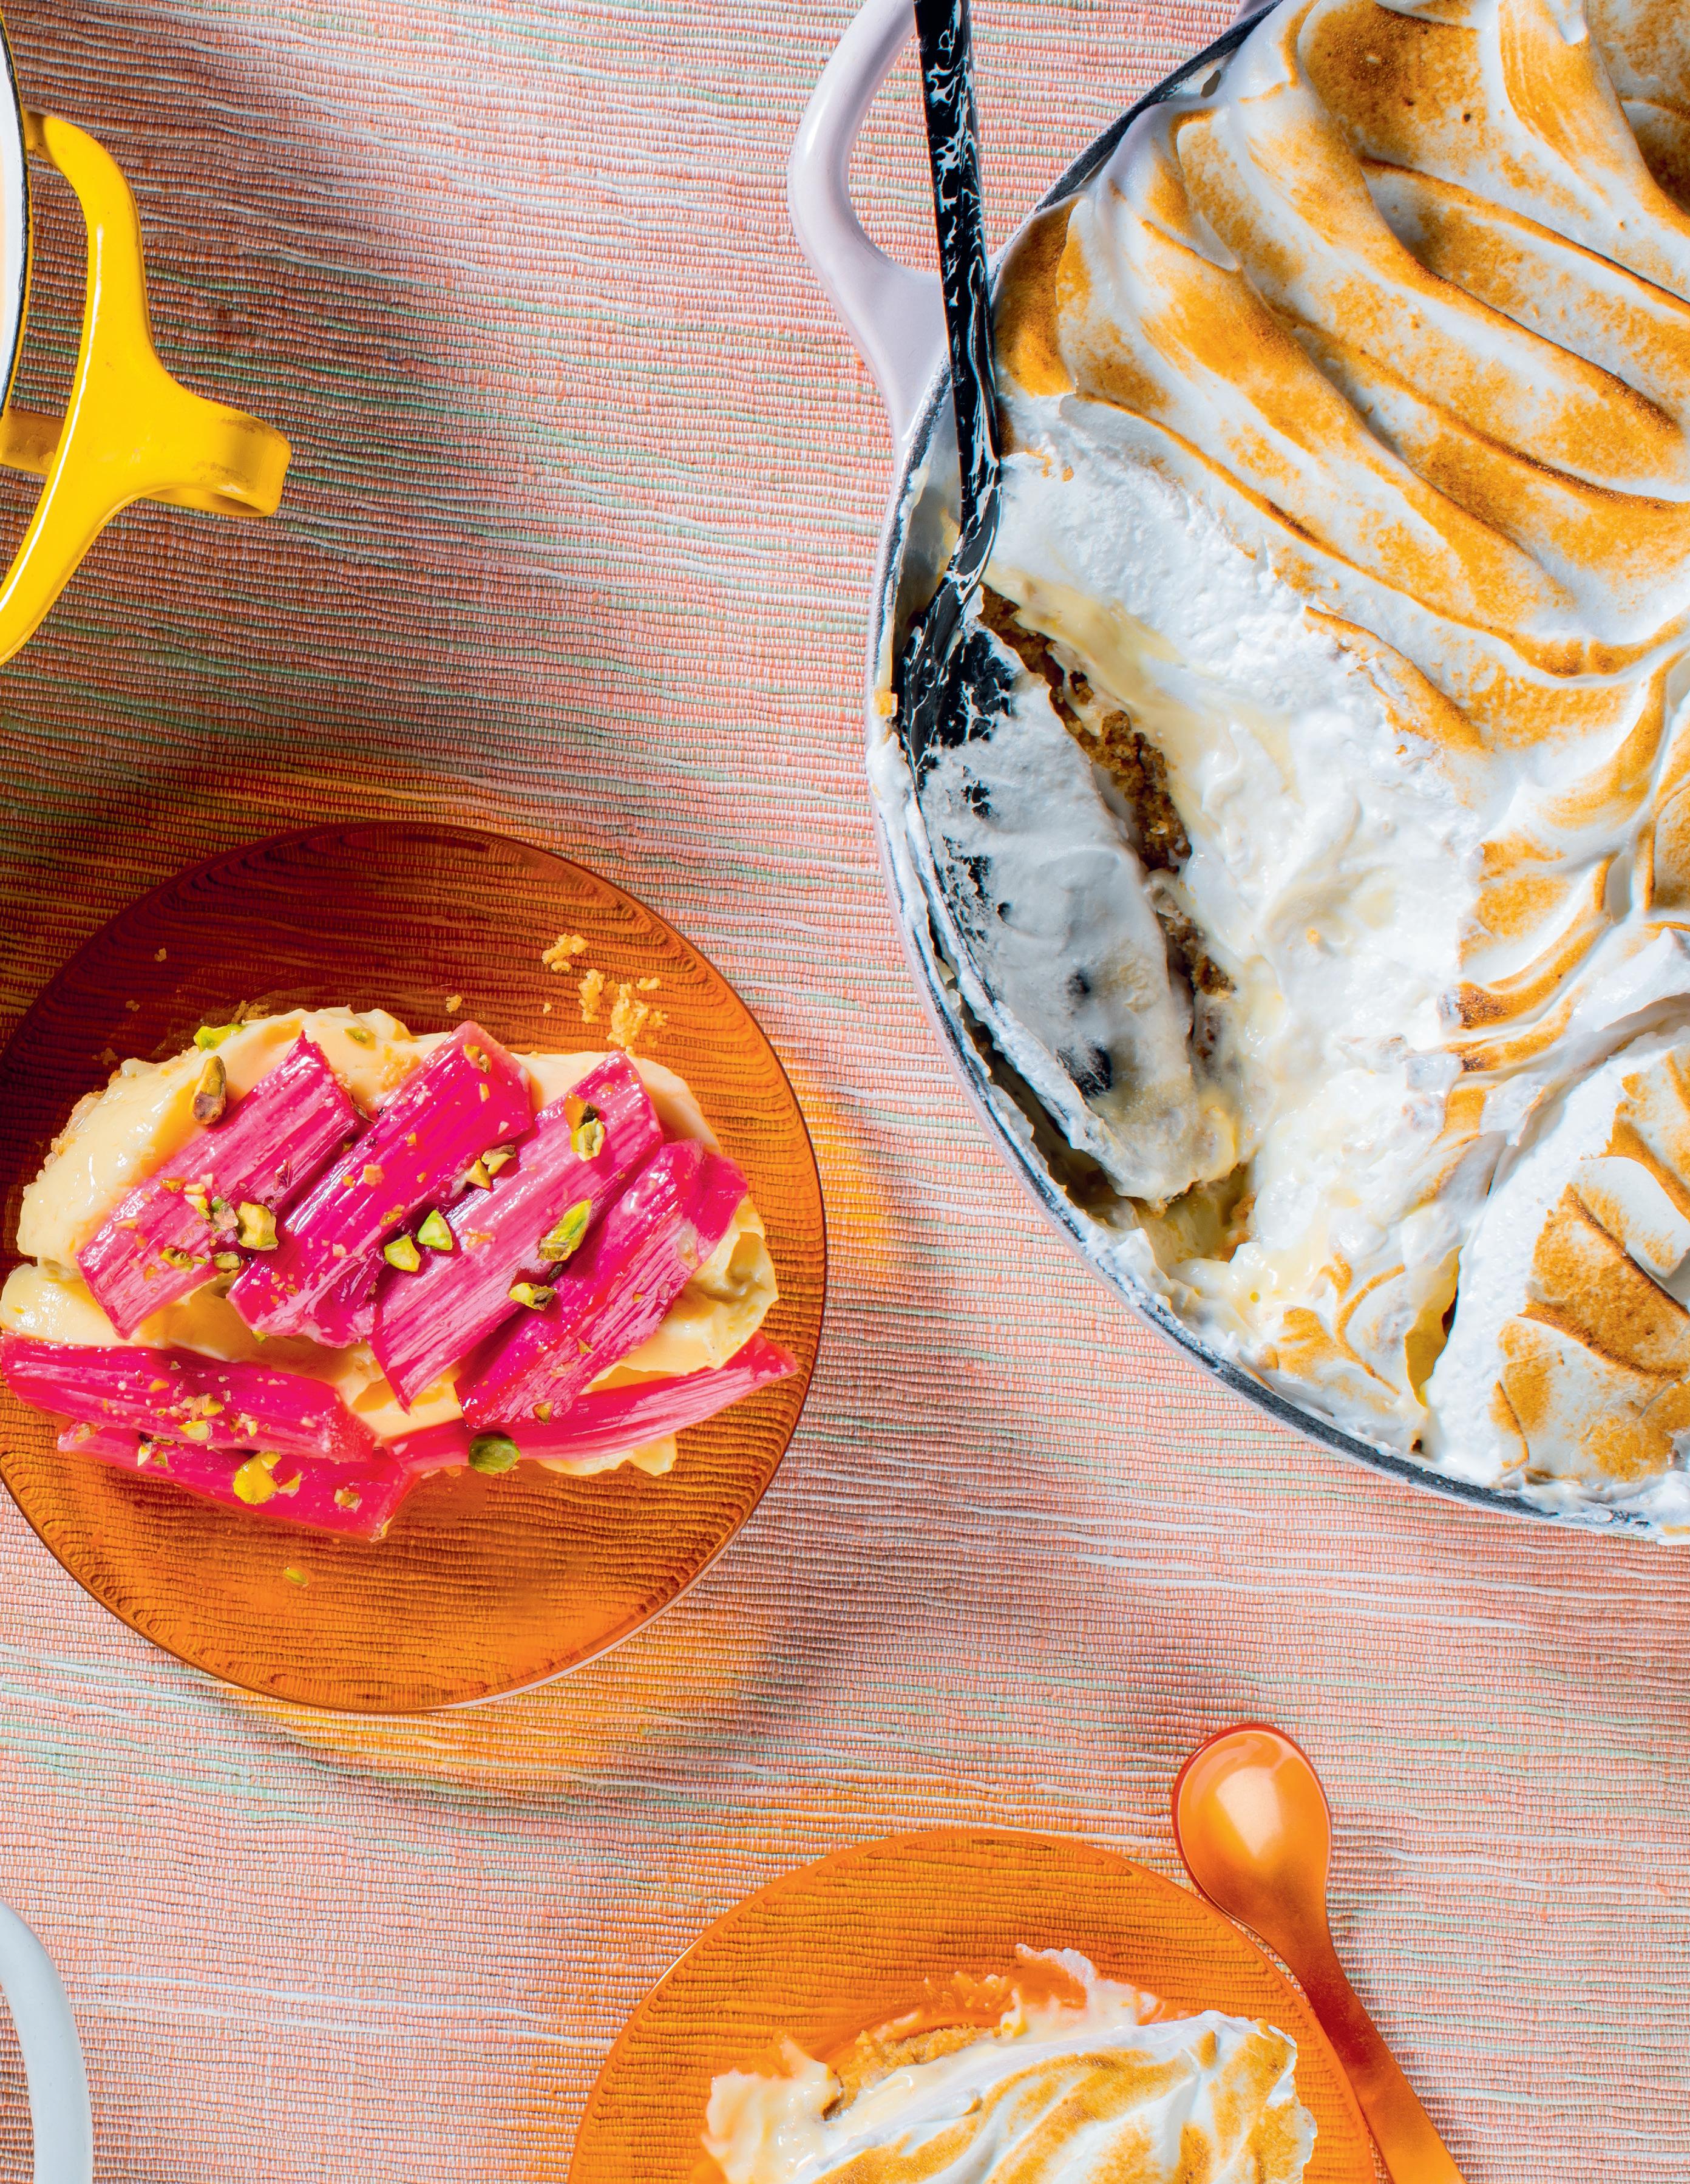
TWO-TONE JELLY –RHUBARB JELLY AND VANILLA PANNA COTTA
The best people like jelly and this one is a thing of beauty, comprising two tones of contrasting colours and flavours, each complementing the other. The jelly can be made in individual dariole moulds, but it can also be set into serving glasses or made as one large jelly.
You’ll need to make this dessert a couple of days or so before you want to serve it, to allow for setting time.
Continued overleaf J
‘ The best people like jelly and this one is a thing of beauty.’
133
Quick Tips
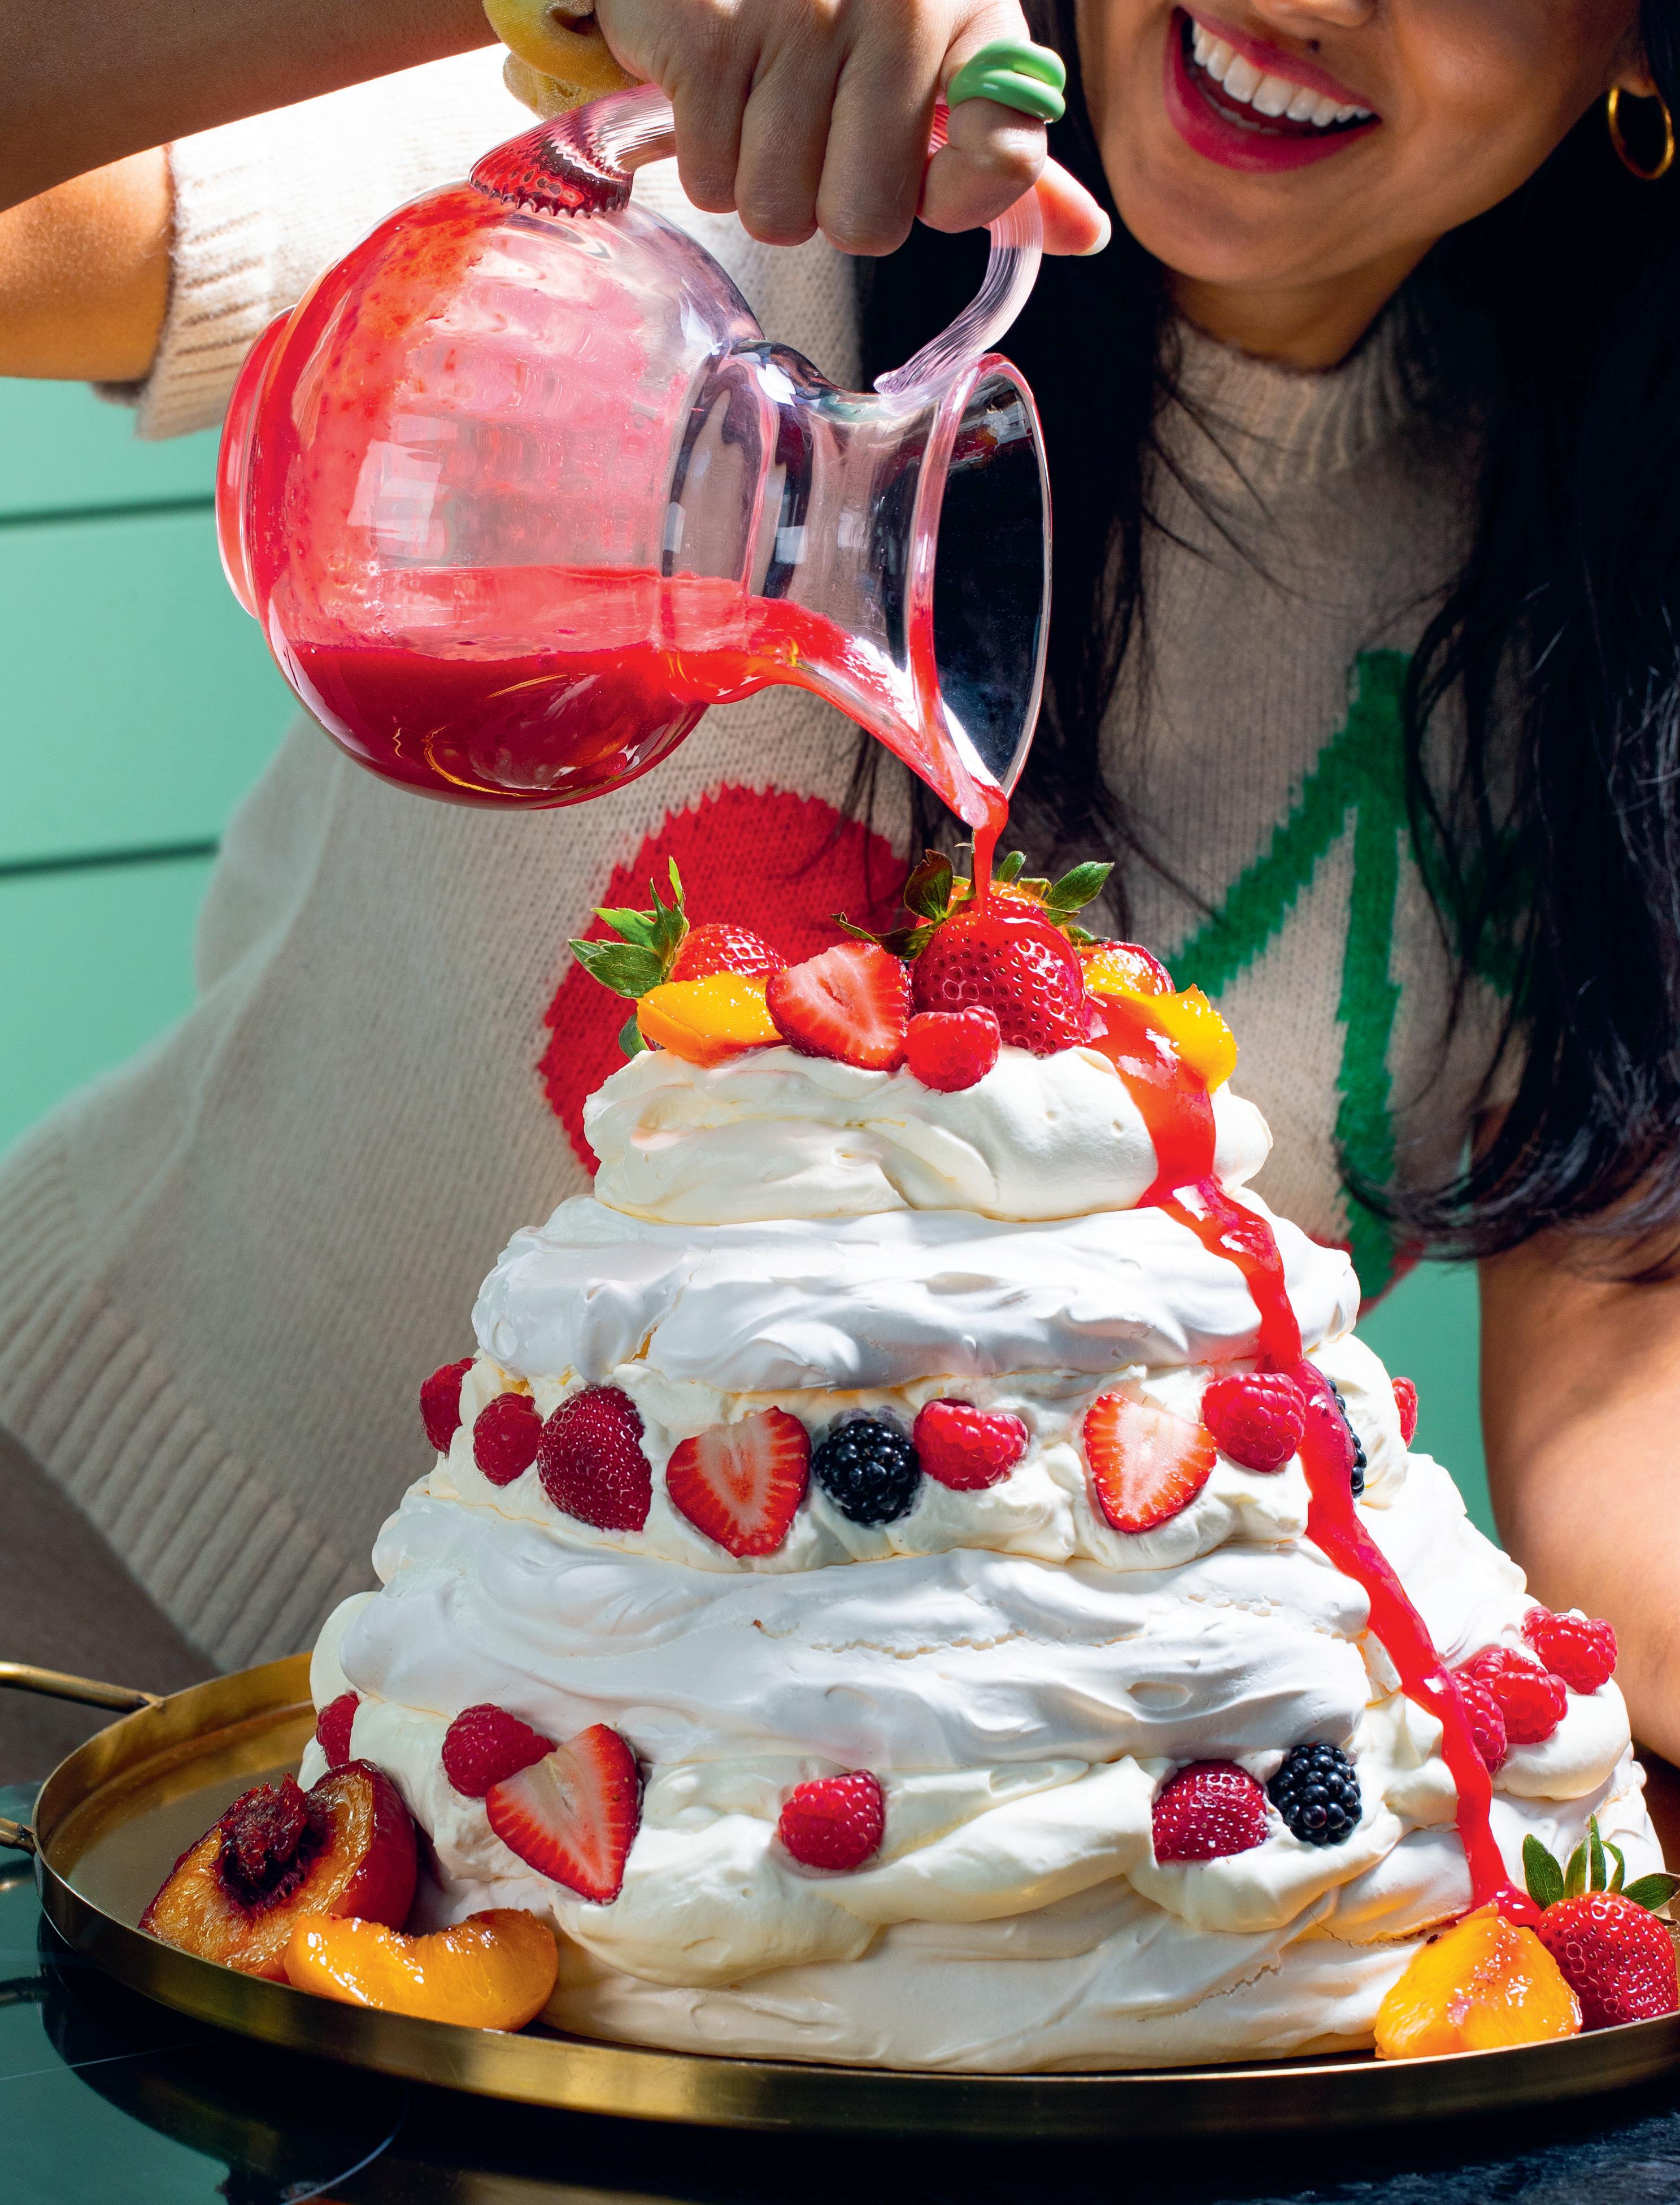
To make a simple raspberry coulis, using a blender or food processor, blend together 300g of fresh raspberries, 70g of icing sugar and the juice of 1/2 lemon, then strain through a fine sieve, discarding the seeds. Taste the coulis and add a little more icing sugar, if needed. Pour it into a jug to serve. Alternatively, you can simply serve ready-made shop-bought coulis from a jar instead.
Once baked and cooled, the meringue layers will keep, tightly wrapped in clingfilm, in a dry place at room temperature or in an empty cold oven, for up to 2 days.
Repeat to make the other two quantities of meringue mixture in the same way.
Spread the meringue (as detailed at the start of the method) into one large flat round on one lined baking tray, into a medium flat round on another lined baking tray, and into a smaller flat round on the third lined baking tray. Place them all in the oven at the same time, each on a different oven shelf.
Bake the larger round for about 3 hours, the medium round for about 2 hours and the smallest round for about 11/2 hours or until dry (but not coloured). You will know when each one is done as it should easily lift off the paper.
Remove the meringues from the oven and leave to cool completely on the baking trays, before carefully peeling off the paper (see Quick Tips).
Make the cream filling. In a large bowl, lightly whip the cream with the sugar, vanilla and salt until it forms soft peaks.
To assemble the pavlova, place the largest meringue layer on a serving platter. Spread with some of the cream filling, then top with some of the fruit. Place the medium-sized meringue layer on top, spread with more cream filling and top with more fruit. Place the smallest meringue layer on top, then top this with the remaining cream filling and fruit.
Serve immediately, cut into slices, with the fruit coulis served in a jug for pouring over.
The pavlova is best eaten freshly made and assembled. If you do have leftovers, they will keep in an airtight container in the fridge for up to 2 days, but the meringue layers will soften.
144
continued
TIERED CELEBRATION PAVLOVA
198
MAKES 4 FONDANTS
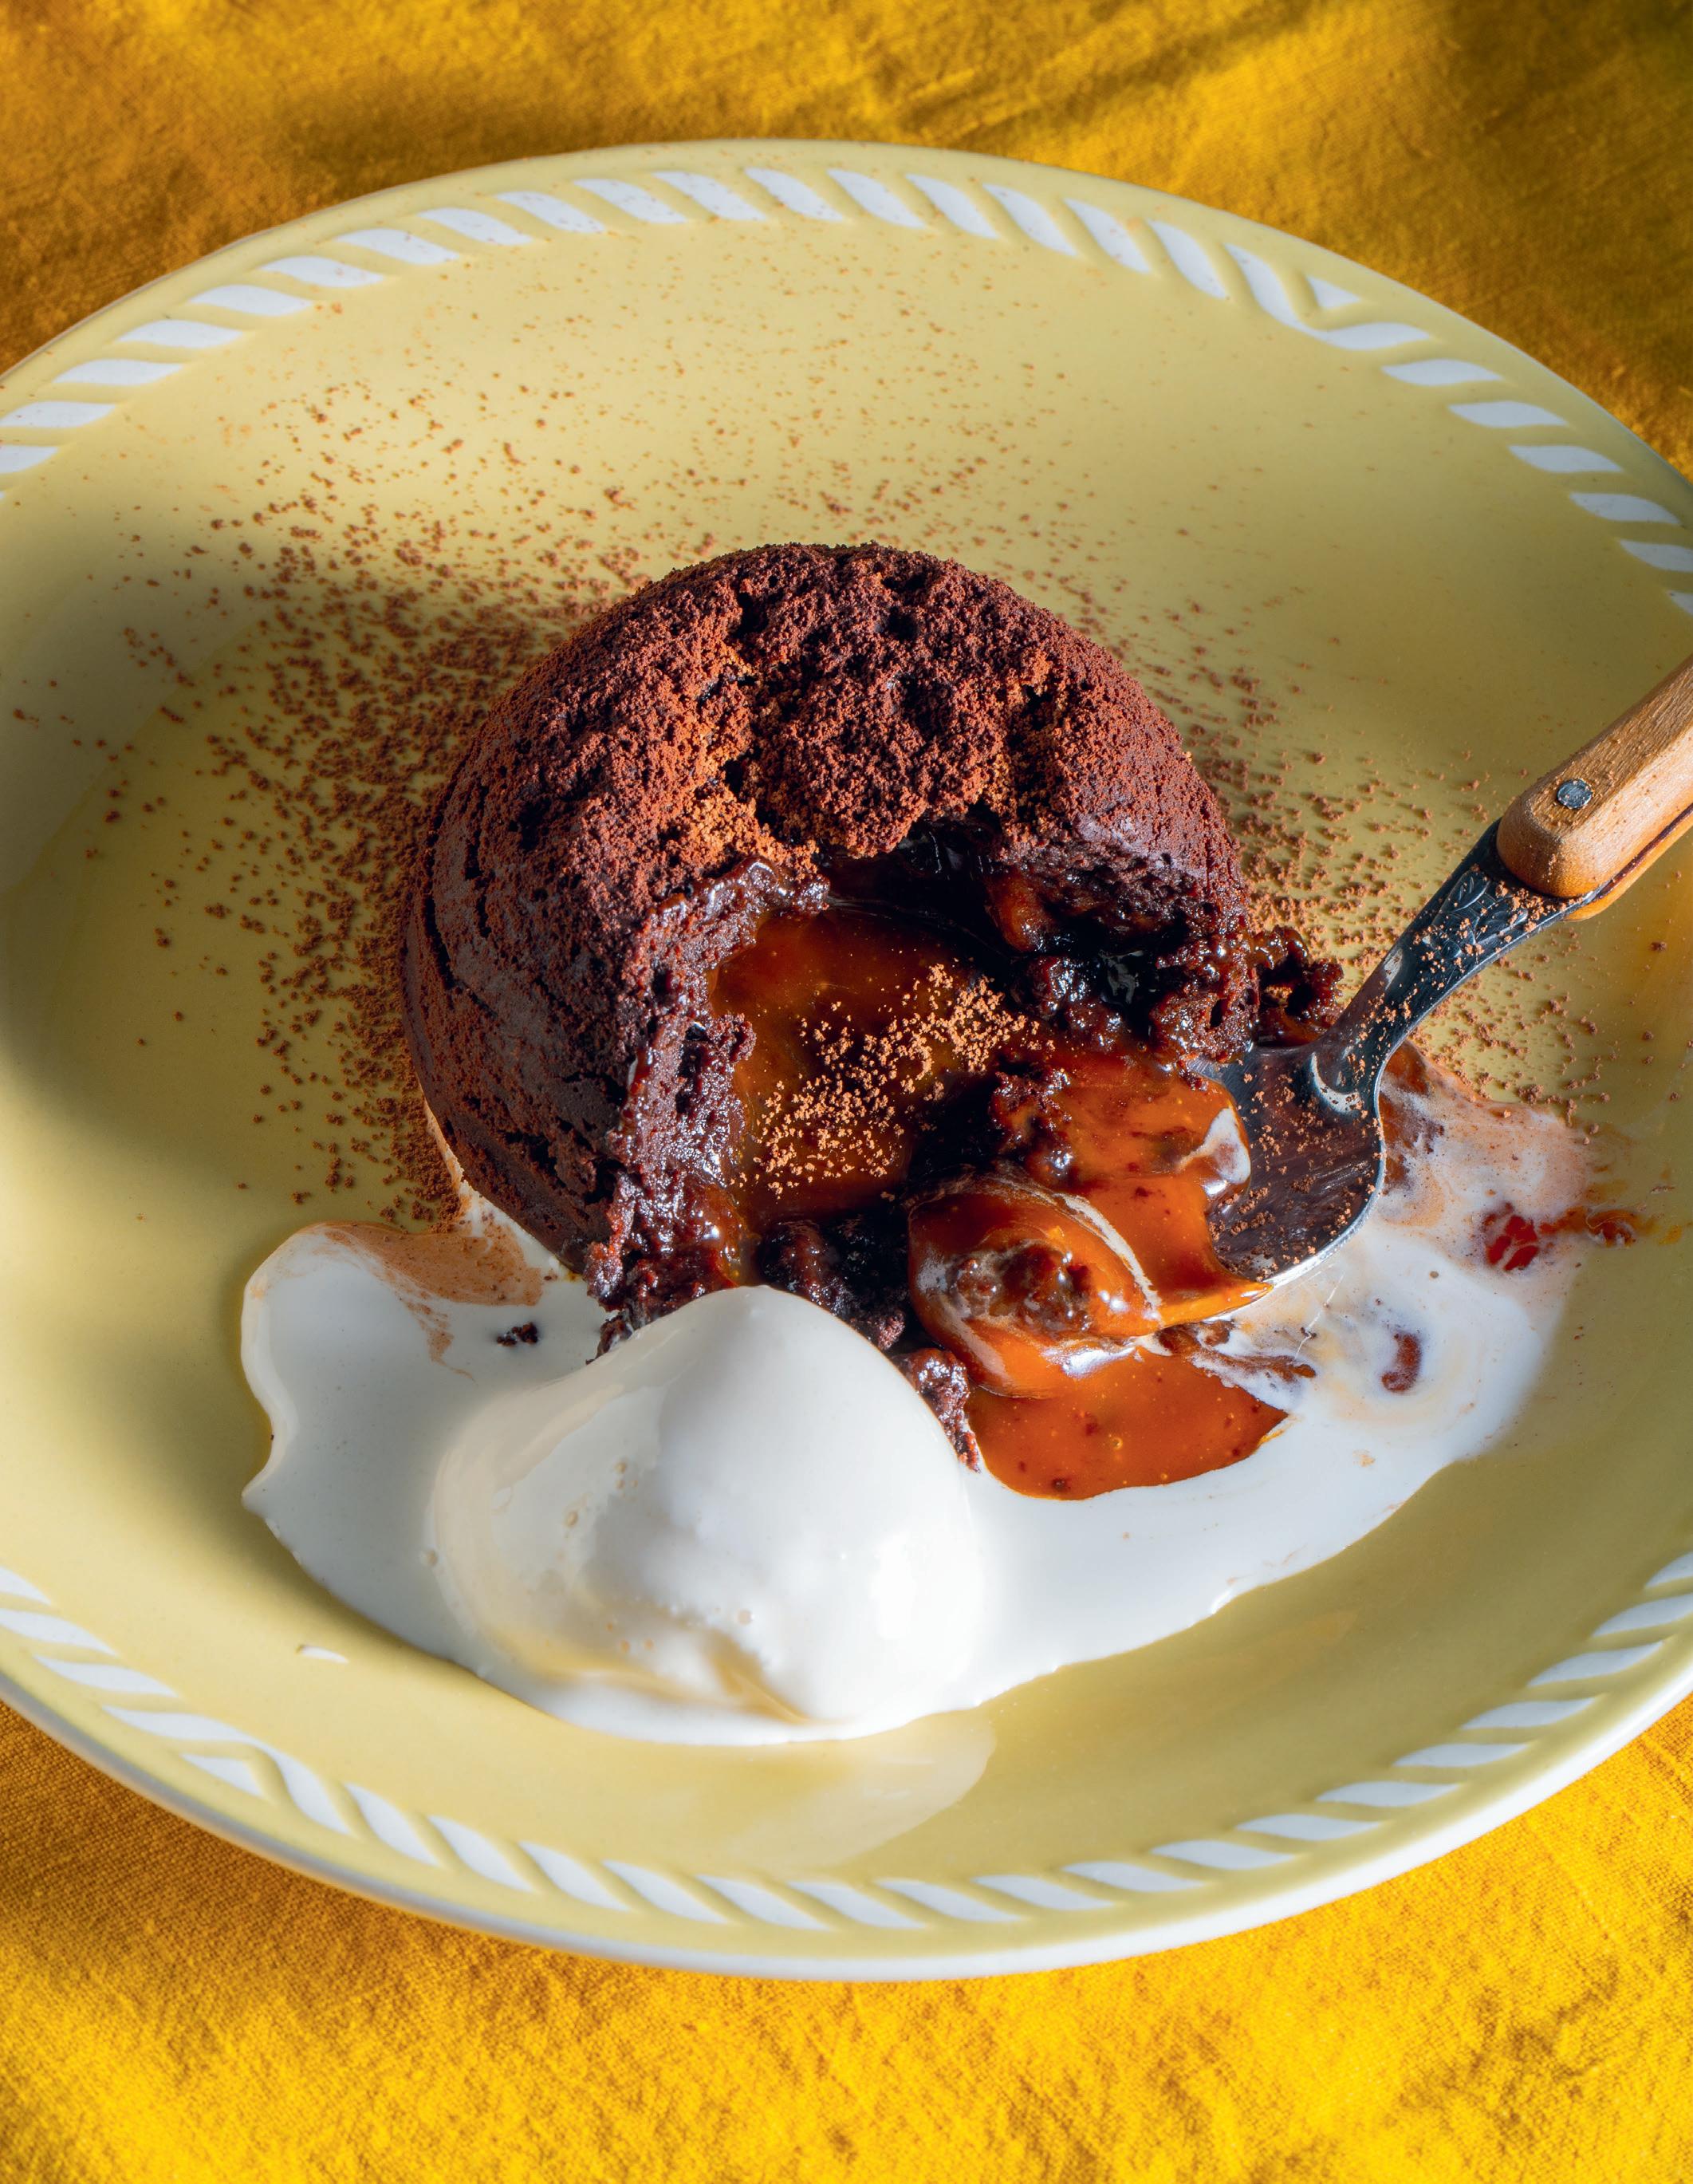
FLOURLESS CHOCOLATE FONDANT WITH A CARAMEL CENTRE continued
Butter the dariole moulds really well and dust with cocoa powder, then place in the fridge.
Equipment
I used 4 dariole moulds, each with a capacity of 140–150ml
80g unsalted butter, plus extra (softened) for greasing the moulds
100g dark chocolate (70 per cent cocoa solids), chopped
2 eggs
2 egg yolks
45g caster sugar
10g/2 tsp cocoa powder, sifted, plus extra for dusting the moulds and serving pinch of Maldon or flaky salt
4 mini caramel-filled chocolate eggs (I used Galaxy Chocolate Caramel Mini Eggs, but you can use any mini caramel-filled chocolate eggs or mini chocolate eggs that have a runny filling, without a hard sugar coating, i.e. mini creme eggs or mini praline eggs would work well, too)
Melt the butter and chocolate together in a heatproof bowl, either over a bain-marie or in short bursts in a microwave until fully melted.
In the bowl of a stand mixer with the whisk attachment, or in a large bowl using an electric handheld whisk, whisk the eggs, egg yolks and sugar together until slightly thickened.
Pour in the melted butter and chocolate mixture and mix well with a wooden spoon or a spatula. Finally, fold in the measured sifted cocoa powder and the salt until a homogeneous mixture forms.
Spoon the mixture into the prepared dariole moulds, dividing it evenly and leaving a 2cm (3/4in) space at the top of each. Take your mini caramel-filled chocolate eggs and push one into the centre of each fondant. Use a spoon to guide the fondant mixture over each caramel egg so it’s covered.
Refrigerate for 4 hours or overnight (you can also freeze them at this point for up to 1 month, then bake from frozen as below, adding on an extra 3–4 minutes baking time).
When you are ready to bake, preheat the oven to 180°C fan/200°C/gas mark 6.
Bake the fondants for 10–12 minutes or until they have risen slightly to the top of the moulds and no longer look wet in the middle.
Take the fondants out of the oven and leave to stand for 1 minute before turning each one out onto a serving plate and carefully removing the mould. Dust with sifted cocoa powder. Serve immediately with ice cream.
These are best eaten straight away.
199
You’ll be pleased to know that I have finally convinced my mum to share her samosa recipe for this book. It’s not that she’s possessive in any way – she just thinks some things are common sense and cannot be written down. However, I managed to persuade her otherwise and her recipe is included in this chapter.
I’ve also included methi (fenugreek) parathas, which were a significant part of my childhood and a subject of debate as to who makes them better – my mum or Biji?
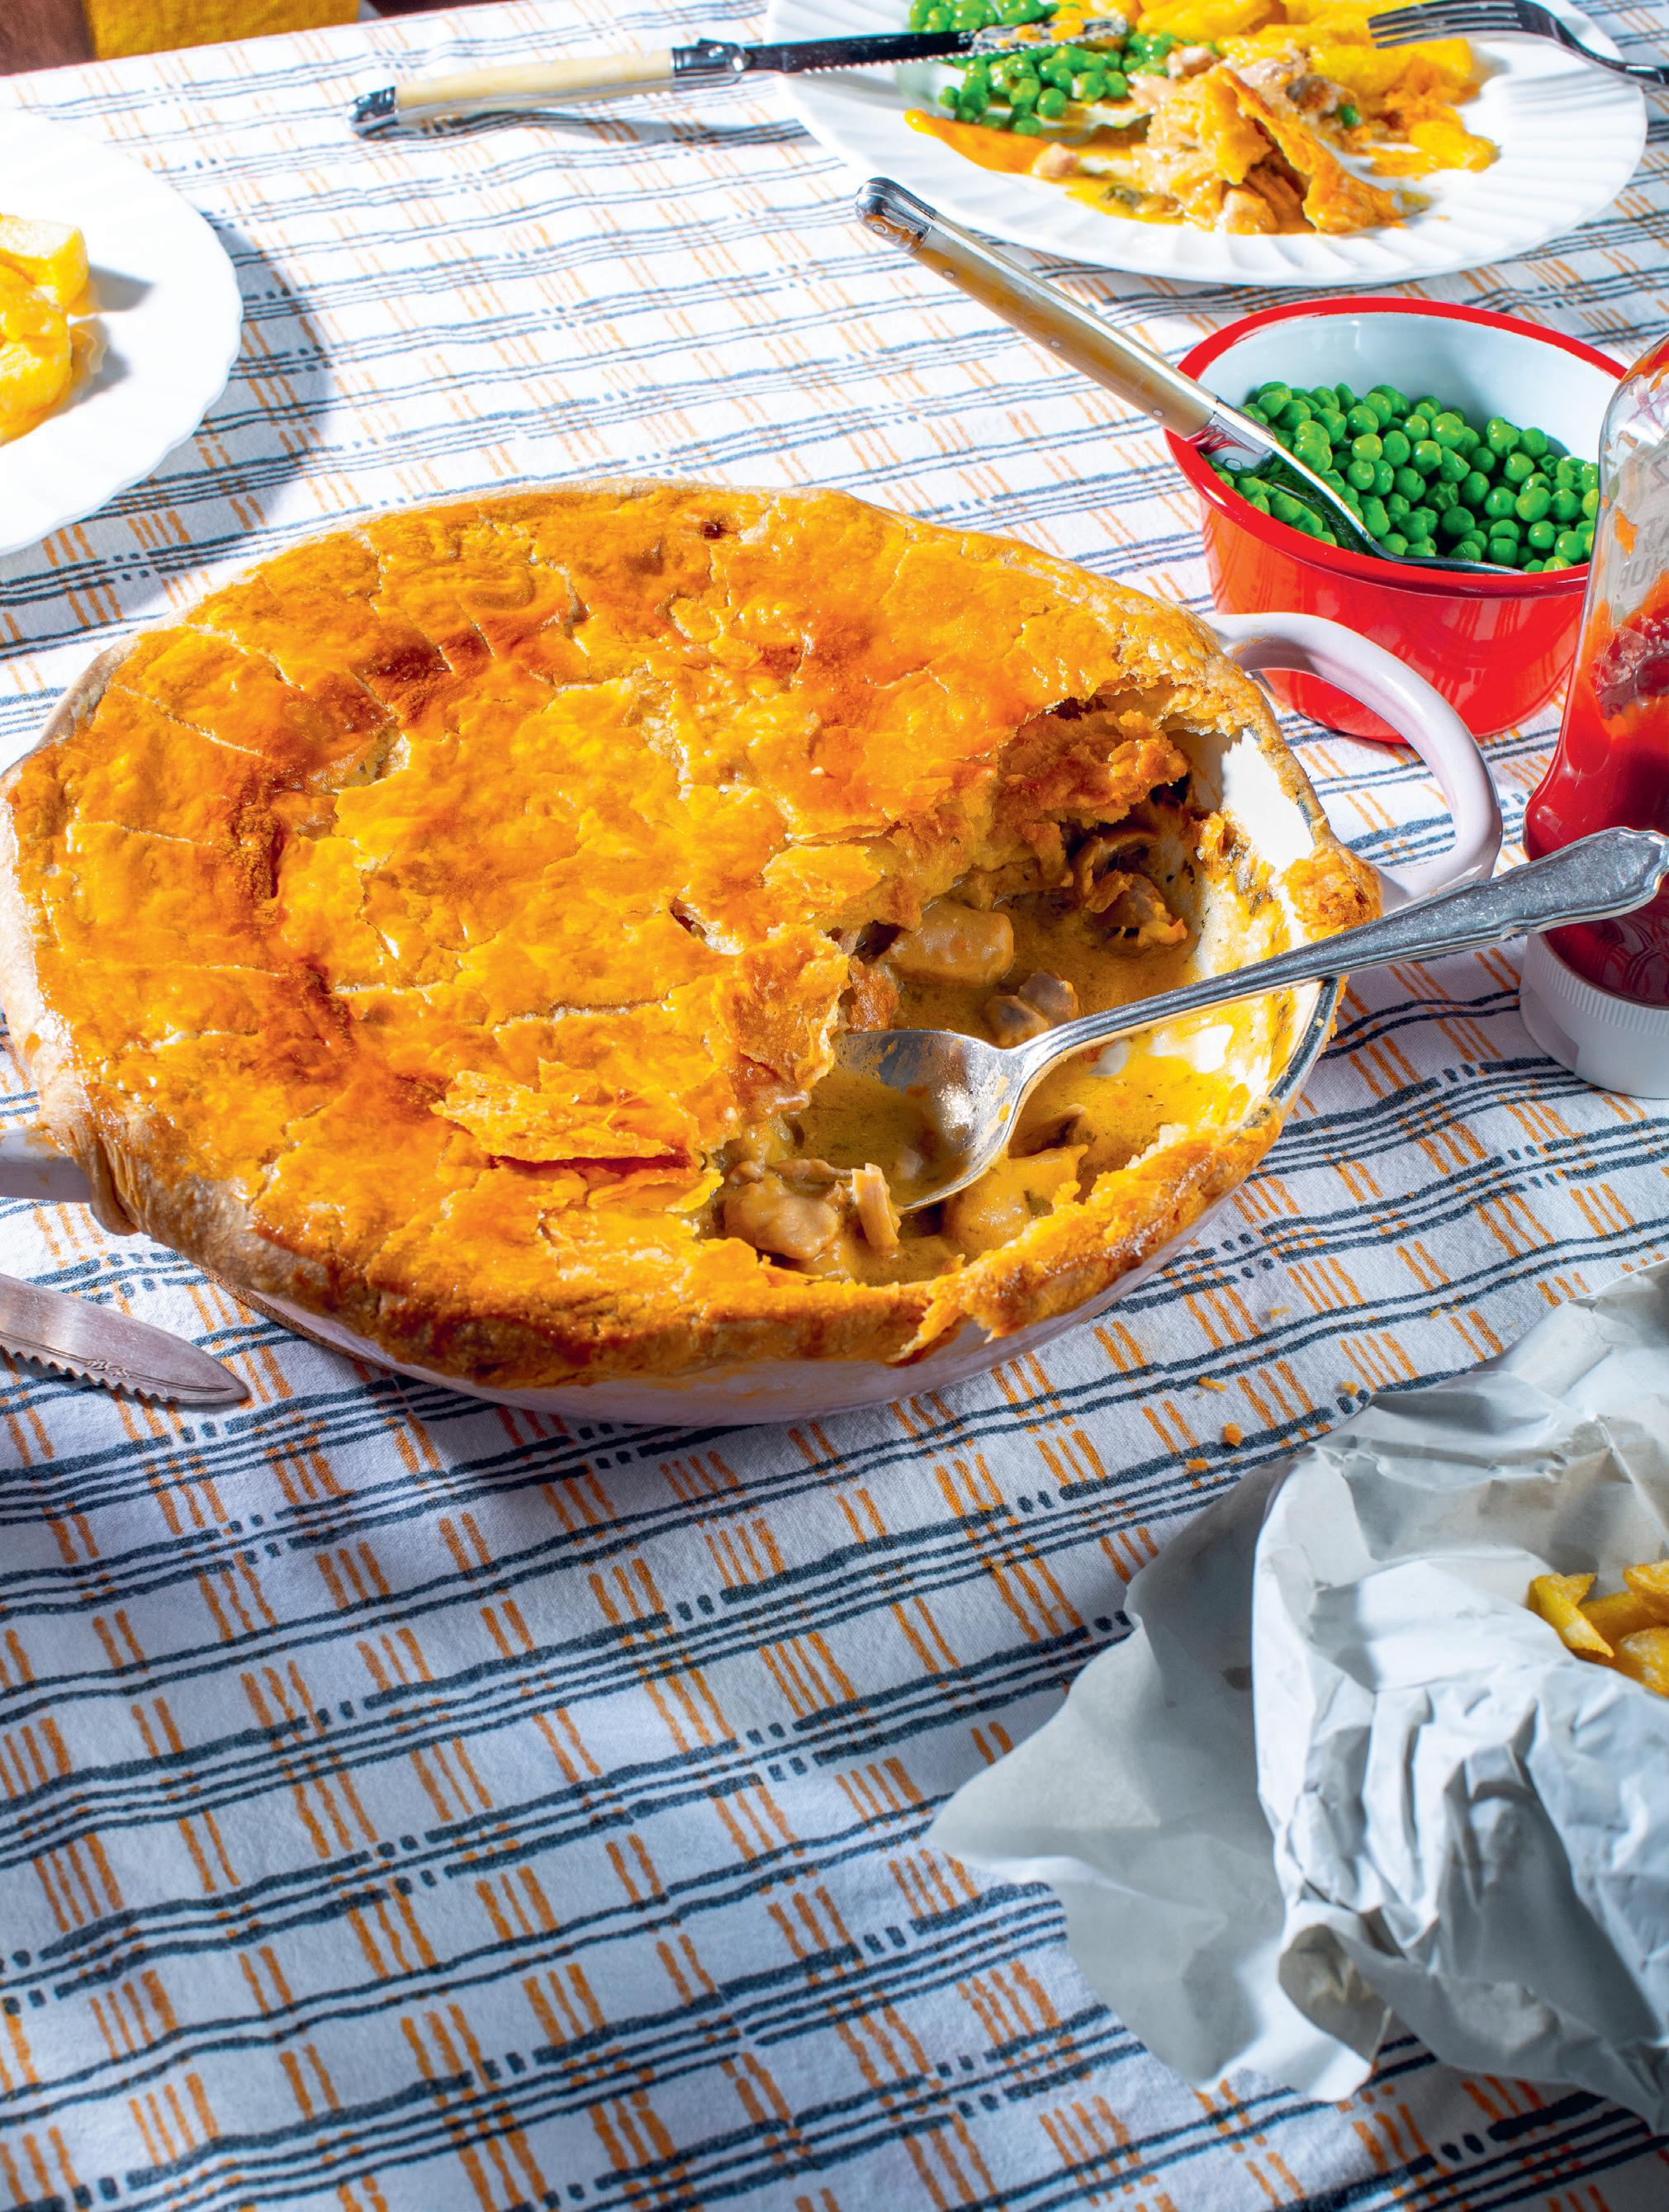
I love this chapter so much that I’ve thoroughly enjoyed testing and writing it. The chicken pie is a massive hit among my friends and has graced my dinner table many times. With savoury dishes, you can freestyle a bit more, switch up the flavours, and adjust the seasoning to suit you, so make sure to taste as you go.
203
SERVES 8
Equipment
28 x 18 x 5cm (11 x 7 x 2in) baking tin
For part 1 (day 1, or 12–16 hours before part 2)
150g strong white flour
1/8 tsp easy-blend dried yeast
150ml tepid water
For part 2 (day 2, or 12–16 hours after part 1)
500g strong white flour
1 tsp easy-blend dried yeast
350ml tepid water
For part 3 (day 2)
15g/1 tbsp Maldon or flaky salt
50ml tepid water
For part 4 (the very last part of day 2)
60ml olive oil, plus extra for greasing
For part 5 (day 3)
60ml olive oil
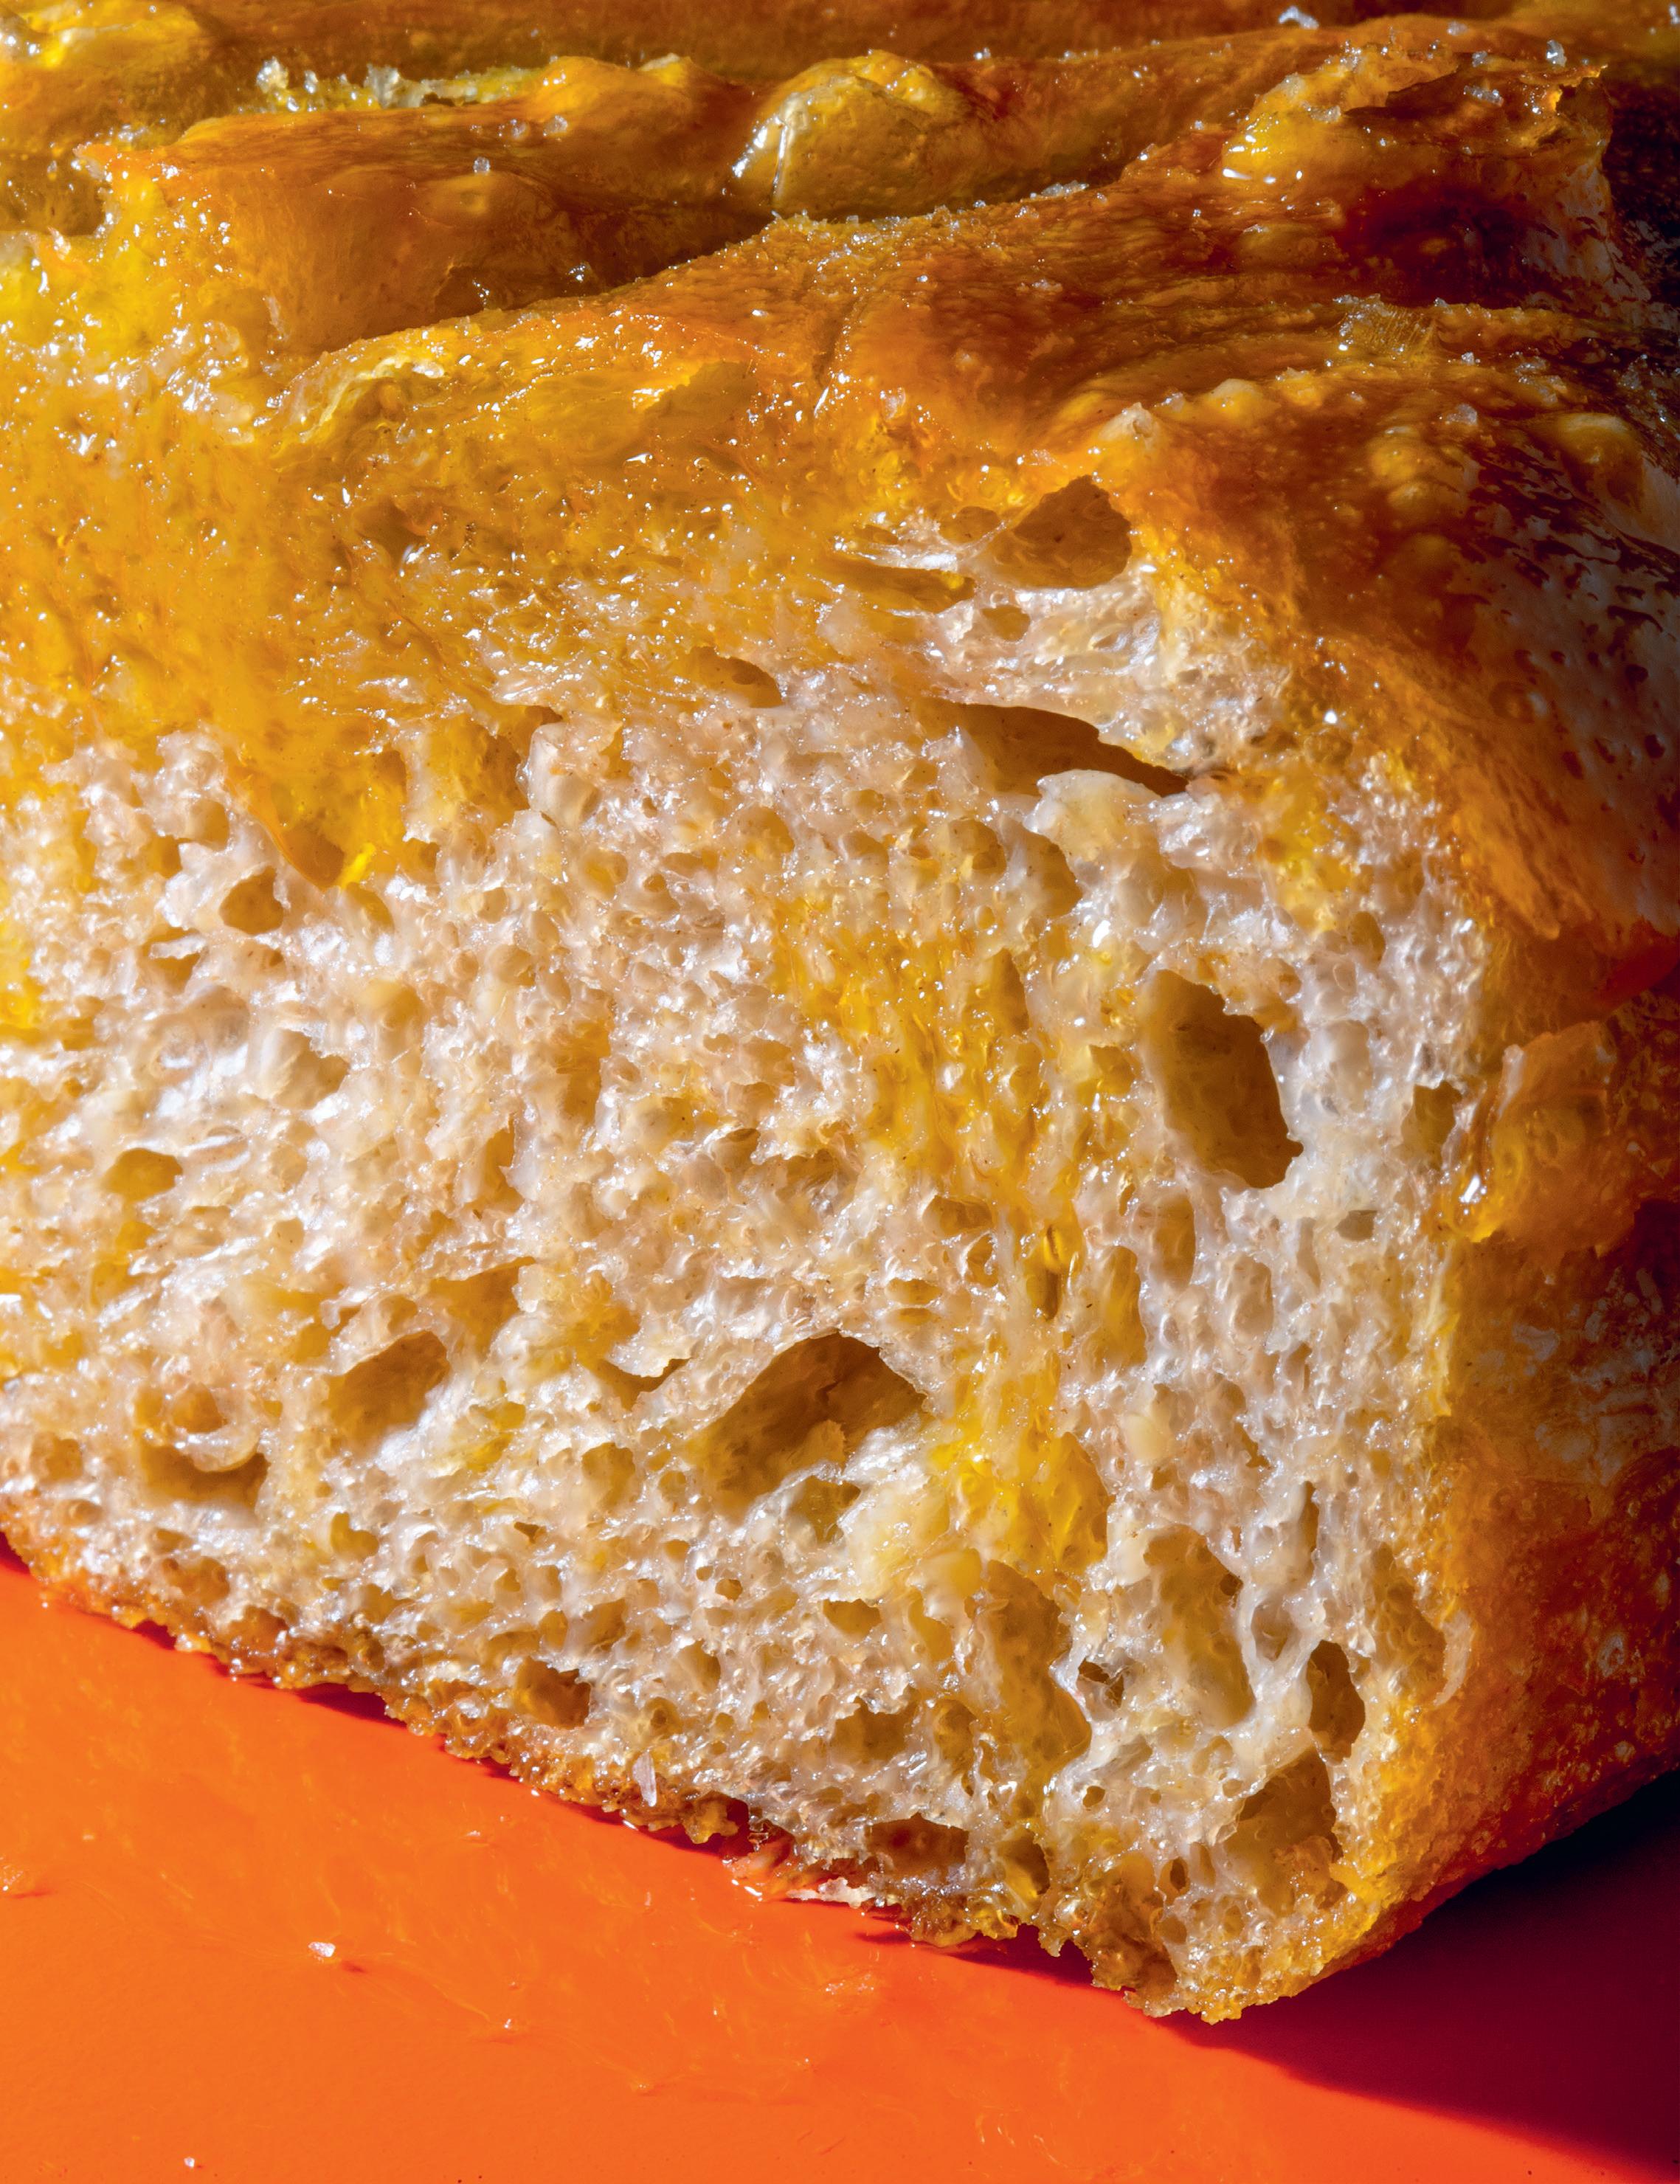
TWICE-BAKED FOCACCIA
Mattie is also a chef, and a very good one, so I’m grateful to have his input in my bakes. He often throws a curveball at me and sometimes it works, sometimes it doesn’t.
During a dinner that we were both throwing together at the last minute, he encouraged me to flip my focaccia over towards the end of its bake to crisp the top and bottom evenly. When Mattie worked at Noble Rot in London, they would do this with their focaccia twice a day for each service and it was glorious, always so crisp, light and fluffy. The oil gets soaked in really nicely so you win on both sides and are met in the middle with this pillowy soft centre.
Ideally, for the best results, you will need to start this focaccia two days before it needs baking with the preparedness to understand that the folding, touch and feel of the dough are all part of the joy.
Day 1 (part 1)
First make a pre-ferment – this is a really simple and fantastic way of improving the flavour of a dough. I use the same method for the Vodka Flatbreads dough (see page 227). Don’t be scared, it’s really really easy to do.
Put the flour and yeast into a container that is approximately double the size of the amount of flour and stir well. Add in the tepid water and mix well using a spoon or your fingertips. Cover loosely and leave at room temperature for 12–16 hours. This is called a poolish. It should bubble and look active during this time and it will rise and deflate slightly; it should smell ripe like a banana rather than acidic when it’s ready.
Day 2 (part 2)
This is where the bulk of the recipe is made. The technique I use means that the ‘work’ is spread out throughout the day, which makes it really good to do in between errands or your job.
Take a really large bowl or a large rectangular container. Using your hands, mix the flour and yeast together in the bowl/container. Add the tepid water to the poolish (from Day 1) and mix roughly, then pour this into the flour/yeast mixture and mix using your hands and fingertips to form a rough dough. Cover loosely and set aside for 30 minutes in a warm place.
224
Continued overleaf J
BAKE THE WORLD A BETTER PLACE WITH OVER 80 FOOLPROOF RECIPES TO DELIGHT FRIENDS AND FAMILY.
Ravneet Gill reconnects with the simple pleasures that made her fall in love with baking. From small bakes to crowd pleasers, frozen desserts to celebration bakes, head to the kitchen, turn up the radio, pop on a pinny, and rediscover the joy of home baking.

• Ravneet is host of Channel 4’s Junior Bake Off. Publication will be supported by broadcast media including Sunday Brunch, Saturday Kitchen, This Morning and Steph’s Packed Lunch, plus dial-moving radio shows and podcasts
• High-profile recipe serialisation will lead blanket coverage across women’s press and specialist food publications
• Digital and social advertising will drive sales from publication through to Christmas and influencer outreach will be amplified to her 140k Instagram followers
Hardback | 9780008603854 | UK £26
eBook | 9780008603861
For publicity enquiries please contact: Pavilion UK: PavilionPressOffice@HarperCollins.co.uk
Australia: jo.munroe@harpercollins.com.au
New Zealand: sandra.noakes@harpercollins.co.nz
@Pavilionbooks @ravneeteats
UNCORRECTED PROOF COPY NOT FOR SALE OR QUOTATION
‘Come for the cakes. Stay for the sass’
Sunday Times
‘An indulgent pleasure trip of sweet and savoury treats’ Michel Roux Jr
‘I love Rav and I love her books’
Nathan Outlaw
