4 minute read
Modifying the Blink Sketch
CHAPTER 6: Hacking Arduino 109
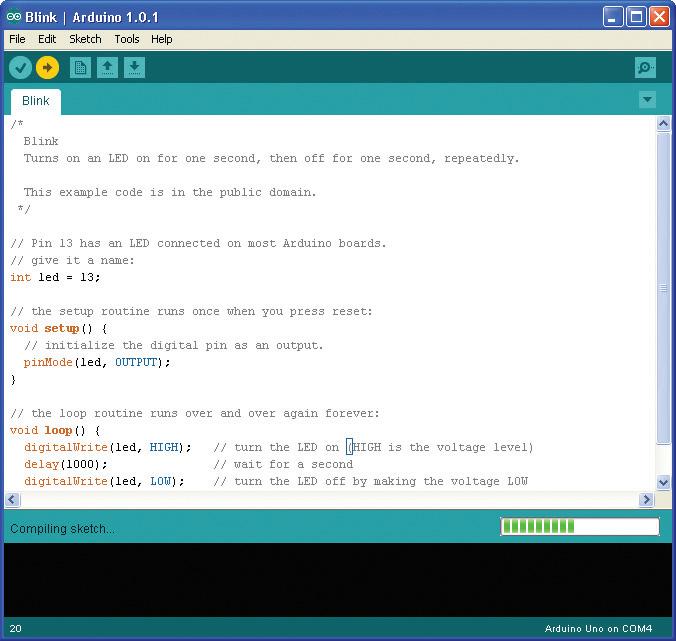
Figure 6-6 Uploading the Blink sketch the sketch has used about 1kb of the 32k of flash memory available for programs on the Arduino.
Note that if you are using a Leonardo, you may have to keep the Reset button depressed until you see the message “Uploading…” in the Arduino software.
Modifying the Blink Sketch
It may be that your Arduino was already blinking when you first plugged it in. That is because the Arduino is often shipped with the Blink sketch already installed.
If this is the case, you might like to prove to yourself that you have actually done something by changing the blink rate. We will now examine the Blink sketch and see how we could change it to make it blink faster.
110 Hacking Electronics
The first part of the sketch is just a comment, to tell someone looking at the sketch what it is supposed to do. This is not actual program code, and part of the preparation for the code being uploaded is for all such “comments” to be stripped out. Anything between “/*” and “*/” is ignored.
/* Blink Turns on an LED on for one second, then off for one second, repeatedly.
This example code is in the public domain. */
We then have a couple of individual line comments that start with //. Just like the block comments earlier, these are simply to inform us of what is happening. In this case, it helpfully tells us to use pin 13 as the pin we will flash. We have chosen that pin because on an Arduino Uno that pin is connected to the built-in “L” LED.
// Pin 13 has an LED connected on most Arduino boards. // give it a name: int led = 13;
The next part of the sketch is the “setup” function. Every Arduino sketch must have a “setup” function, and this function runs every time the Arduino is reset, either because (as the comment says) the reset button is pressed, or the Arduino is powered up.
// the setup routine runs once when you press reset: void setup() { // initialize the digital pin as an output. pinMode(led, OUTPUT); }
The structure of this text is a little confusing if you are new to programming. A function is a section of code that has been given a name (in this case, the name is “setup”). For now, simply use the text just cited as a template and understand that it must start with the first line “void setup() {”. Afterward, you place each of the commands you want to issue on a line ending with “;”, and then mark the end of the function with a “}” symbol.
In this case, the only command we expect the Arduino to carry out is to issue the “pinMode(led, OUTPUT)” command that not unsurprisingly sets that pin to be an output.
CHAPTER 6: Hacking Arduino 111
Next comes the juicy part of the sketch: the “loop” function.
Like the “setup” function, every Arduino sketch must have a “loop” function. Unlike “setup” which only runs once after a reset, the “loop” function runs continuously. That is, as soon as all its instructions have been done, it starts again.
In the “loop” function, we first turn on the LED by issuing the “digitalWrite (led, HIGH)” instruction. We then pause for a second by using the command “delay(1000)”. The value is 1000 for 1000 milliseconds, or one second. We then turn the LED back off again, and delay for another second before the whole process starts over.
// the loop routine runs over and over again forever:
void loop() { digitalWrite(led, HIGH); // turn the LED on (HIGH is the voltage level) delay(1000); // wait for a second digitalWrite(led, LOW); // turn the LED off by making the voltage LOW delay(1000); // wait for a second }
To modify this sketch to make the LED blink faster, change both occurrences of 1000 to 200. These changes are both in the “loop” function, so your function will now look like this:
void loop() { digitalWrite(led, HIGH); // turn the LED on (HIGH is the voltage level) delay(200); // wait for a second digitalWrite(led, LOW); // turn the LED off by making the voltage LOW delay(200); // wait for a second }
If you try to save the sketch before uploading it, you will be reminded that it is a “read-only” example sketch, but the Arduino IDE will offer you the option to save it as a copy, which you can then modify to your heart’s content.
You do not have to do this, of course. You can just upload the sketch unsaved, but if you do decide to save this or any other sketch, you will find that it then appears in the File | Sketchbook menu on the Arduino IDE.
So, either way, click the Upload button again. When the uploading is complete, the Arduino will reset itself and the LED should start to blink much faster.


