1 minute read
How to Drive a Servo Motor with an Arduino
CHAPTER 6: Hacking Arduino 139
The loop reads any input, and if it is a # character, it clears the display. If it is a “/” character, it moves to the second row; otherwise, it just displays the character that was sent.
For example, to send the text displayed in Figure 6-28, you would enter the following into the Serial Monitor:
#Hacking/Electronics
Notice that the LCD library provides you with the “lcd .setCursor” function to set the position for the next text to be written. The text is then written using the “lcd.write” function.
How to Drive a Servo Motor with an Arduino
Servo motors are a combination of motor, gearbox, and sensor that are often found in remote-controlled vehicles to control steering or the angles of surfaces on remote-controlled airplanes and helicopters.
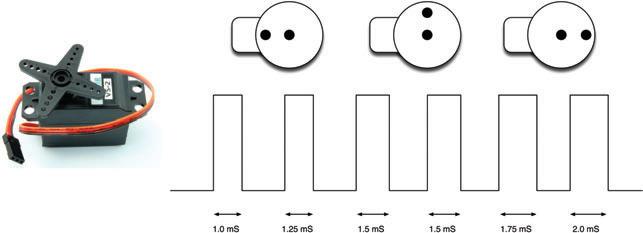
Unless they are special-purpose servo motors, servo motors do not rotate continuously. They usually only rotate through about 180 degrees, but can be accurately set to any position by sending a stream of pulses.
Figure 6-30 displays a servo motor and shows how the length of the pulses determines the position of the servo.
A servo will have three connections: GND, a positive power supply (5 to 6V), and a control connection. The GND connection is usually connected to a brown or black lead, the
Figure 6-30 Controlling a servo motor with pulses


