7 minute read
A Look at the Basics of LVM
from ource ...rch 2013
by Hiba Dweib
This article deals with Logical Volume Management (LVM) and looks at how to set it up.
Many years ago, when 2 GB of storage was considered a lot, I beamed with pride after installing two hard disks, each 2 GB. With 4 GB, I was sure of never running low on space. Such pride is shortlived, as we know. Down the road, it was a limitation when I wanted to install more software into my Linux distro (those were the days when Red Hat Linux was the thing to have) and the disk that had my root partition just didn’t have the space. There had to be some way to resolve the issue; after all, my system had a total of four gigs, right? Was there a way I could, well, ‘combine’ the two drives? Yes, there was: three letters of pure genius, LVM. Logical Volume Management, put simply, is a concept that combines physical drives and makes them appear as contiguous spaces.
Advertisement
The basics of LVM
LVM is a virtual layer that sits sandwiched between the operating system and your storage devices, i.e., hard disks. It creates groups of your hard disks, called Volume Groups (VGs).
OPERATING SYSTEM AND DATA
Figure 1: What LVM actually does (is)
LOGICAL VOLUMES
PHYSICAL DISKS AND VOLUMES Within these VGs, you can create partitions, called Logical Volumes (LVs). The operating system will never know the difference; the behaviour is the same as accessing any regular disk/partition. The benefits of LVM over regular filesystems include: dynamic resizing of VGs, and live snapshots of partitions without unmounting them. Let's now jump right in to how to set up LVM on our system. The OS I'm using for this is Ubuntu 12.10. There are two scenarios in which one would set up LVM: while performing a Linux install, or post-installation. LVM can be configured using command-line and GUI tools. I shall walk you through all of this.

Figure 2: Starting LVM partitioning

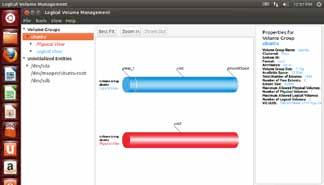
Figure 3: The LVM configuration tool

Figure 4: Initialising a disk/entity
Setting up LVM during Install
Ubuntu’s default installation image does not allow LVM, so we will use the Ubuntu Alternate Install disc. Grab the alternate ISO from the Ubuntu Download page (it's under ‘Additional options’) and boot from it. I would like to go on record to state that I was able to do all the steps below using the standard ISO of Ubuntu 12.10 as well—which means the alternate ISO is not required, even though Internet sources claim one must use the alternate ISO for LVM support.
On the disk partitioning screen (Figure 2), select ‘Erase disk and install Ubuntu’; check the ‘Use LVM with the new Ubuntu installation’ and click ‘Continue’. After selecting the LVM partitioning option on the previous screen, the installer will automatically select the main hard drive to use for initialising the LVM set-up. The installer will then write a basic layout to disk. That’s about it. The installer now installs GRUB—which happens in the MBR, since the BIOS can’t read LVMs. Any extra /boot partition required will automatically be created, and the installer will then proceed with the rest of the installation.
It’s super easy, isn’t it? Now, using LVM tools, you can configure your LVM to add or remove more disks, extend or shrink volumes, etc.
Setting up or configuring LVMs in an existing system
I will show you how to configure or modify the previously created volumes. The same steps may be used to set up a fresh LVM configuration if you have Ubuntu already installed.

Figure 5: Initialising a disk/entity

Figure 6: Initialising a disk/entity

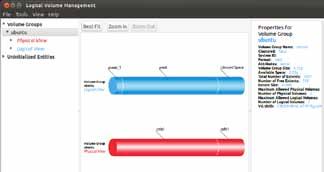
Figure 7: Unused space now available in the existing VG
Let's install the GUI tool ‘system-config-lvm’. Initially available only from the Fedora RPM, this tool is now supported from the Ubuntu repos, thus saving you a lot of work including ‘transcoding’ the RPM to DEB using alien. To install it is now as simple as issuing the following command at a terminal:
sudo apt-get update sudo apt-get install system-config-lvm
Once installation is complete, fire it up from the main menu (search for ‘LVM’), or you can launch it from a terminal with sudo system-config-lvm. The application's main screen is shown in Figure 3.
Next, I will show you how to add a new disk and partition (physical volume) to the volume group, and extend the existing (root) logical volume. So, let’s touch upon adding and editing logical volumes.
Adding a new disk/partition to an existing volume
group: The uninitialised disk is shown in the ‘Uninitialised Entities’ branch; so initialise it by hitting the ‘Initialise
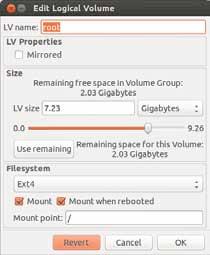
Entity’ button, and the tool proceeds to warn you and perform initialisation (Figures 4 and 5). Once initialised, the partition is moved into the ‘Unallocated Volumes’ (Figure 6) branch. Here, click the ‘Add to Existing Volume Group’ button, which prompts Figure 8: Editing a Logical Volume you to select the volume group (VG) to which you will add this partition. This adds unused space to your ‘ubuntu’ VG (Figure 7). Then edit an LV, and add this unused space into it (Figure 8). Select the LV adjacent to the unused space, and hit the Edit button. Note that you can now extend the volume by dragging the slider. Drag as required, and hit ‘OK’! This will add the unused space to your LV.
This is how LVM configuration is done using the GUI. The command-line provides you with a comprehensive set of commands to do this, but it's risky for a new user, since a wrong command can cause you to lose data.
LVM is very useful, since you can add, extend and remove volumes irrespective of the physical disks in the system; you can combine disks to appear as single drives. LVM eases upgrading and extending disk capacities. Fundamentally, working with LVM is almost the same as working with regular partitions; the only difference is that in the case of LVM, we deal with a ‘logical’ space and its relation to ‘physical’ space—also known as storage virtualisation. I hope this article has whetted your appetite to explore storage technologies in greater depth. Have fun!

By: Siddharth Mankad
The author is a new media designer, with an affinity for physical computing, computer software and code, as well as country music.
Continued from page 66....
Virtualisation layer Security implementation
Physical host • Physical security • Firewall • Intrusion Detection System Host OS • OS hardening • Access control Virtual HAL • Install from genuine source • Avoid stray instances • Apply security patches Guest OS • OS hardening • Access control • Patching Guest application Application-level security installations and controls
Implementing security for a virtualisation infrastructure is a methodical and multi-step process. We need to begin with the physical infrastructure, followed by the installation and the hardening of OS on it. If Xen server is being installed from scratch, getting an infection-free copy of the distribution is critical. The next step is to configure user-level security, enabling access only to administrators, to create, delete or modify the guest OSs. It should be ensured that no stray guest instances are left lingering on the infrastructure, and should be deleted if found. While configuring guest OSs, it is important to remember that each instance may run a different make or version. Hence, a unified patch-management solution that can cater to heterogeneous systems needs to be deployed. The same is true for the anti-virus software.
Besides patching, each OS should be hardened and configured for correct security accesses. As mentioned earlier, the communication between guest instances is not visible on the physical network interface; hence, an intrusion detection system should be deployed. The correct way to do this is to dedicate one guest instance on each virtual infrastructure for the purpose of packet sniffing and intrusion detection. Physical security for virtual servers is very crucial, because stealing a physical machine means stealing more than one VM, thus resulting in serious data theft or infrastructure breakdown. For VMs hosted in the demilitarised zone, a proper perimeter defence system comprising firewalls and UTM devices should be deployed too.
By: Prashant Phatak
The author has over 22 years of experience in the field of IT hardware, networking, Web technologies and IT security. Prashant runs his own firm named Valency Networks in India (http://www. valencynetworks.com) providing consultancy in IT security design, security penetration testing, IT audits, infrastructure technology and business process management. He can be reached at prashant@valencynetworks.com.


