5 minute read
Android Push Notifications with GCM

from n Source ...ber 2012
by Hiba Dweib

cloud messaging
This article explores the use of the Google Cloud Messaging service to send push notifications to applications running on Android phones.
Advertisement
Mobile applications are all about delivering instant information on the move, but who would like to have an application where you keep pressing the Refresh button to fetch the latest updates? An auto-refresh after every minute to check for updates sounds like a solution, but that would involve some major challenges. A mobile device has limited resources in terms of battery life and data transfer limits—not to mention the server load that millions of devices would generate by contacting it every minute.
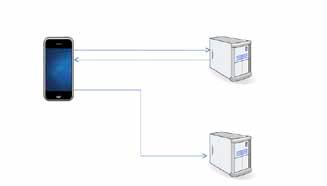
Wouldn’t it be great if the server could automatically tell all the devices that there is new information available for them, as soon as the data arrives? Here, push notifications come to the rescue! Most major mobile OSs offer pretty similar push notification functionality to developers. Apple Push Notifications Service (APNS) for the iPhone, Google Cloud Messaging (previously C2DM) for Android, and Microsoft Push Notifications (MPNS) are the popular services. A typical push notification system follows the journey depicted in Figure 1. On mobile app installation, the device connects to the push notifications’ servers (owned by Google, Apple or Microsoft) and requests for a unique device ID. This is then sent to your application server (see Figure 2) and is used for sending notifications to this device. To send a message, your application server sends the notification content (along with the device ID to which the message is to be sent) to the push server, which takes the responsibility of sending this message to the device, and returns a success/error response to the application server.
The Google Cloud Messaging service was launched at Google’s annual I/O event in June 2012, and it replaced C2DM (cloud to device messaging), which was the beta version. With GCM, the limitation on the number of messages per day was removed, and a multi-cast feature was introduced.
It is possible to implement the server side and client side of GCM by making individual service requests, but Google has made things simpler by providing two easy-to-use libraries. To get started, download the GCM library using the Android SDK, and get the jar files from ‘ANDROID_HOME\extras\google\gcm’.
First, you need to register an application with Google. Go to https://code.google.com/apis/console and create a new project. Navigate to the Services tab and enable the Google Cloud Messaging service for this project. Navigate to the API Access tab and create a new server key, which would be used on the server end to send messages. Also note down the project ID from the URL; this would be used in the Android application to get the messages.
Next, you need to develop an Android application.
Note: You can download the sample server side code and Android application from http://goo.gl/9SDB4.
Create a new Android application, and add gcm.jar from the Android SDK to the CLASSPATH. Modify the manifest file to have the following: • Permissions for Internet, the ability to access accounts and receive GCM messages, as well as a wake lock • A service • A broadcast receiver • A custom permission to prevent other applications from receiving the notifications. • SDK version 8+
Given below is the manifest for my application:
<?xml version=”1.0” encoding=”utf-8”?> <manifest xmlns:android=”http://schemas.android.com/apk/res/android” package=”in.amolgupta.android.gcm” android:versionCode=”1” android:versionName=”1.0” > <uses-sdk android:minSdkVersion=”8” /> <uses-permission android:name=”android.permission.INTERNET” /> <uses-permission android:name=”android.permission.GET_ACCOUNTS” /> <uses-permission android:name=”android.permission.WAKE_LOCK” /> <permission android:name=”in.amolgupta.android.gcm.permission.C2D_ MESSAGE” android:protectionLevel=”signature” /> <uses-permission android:name=”com.google.android.c2dm. permission.RECEIVE” /> <uses-permission android:name=”in.amolgupta.android.gcm. permission.C2D_MESSAGE” /> <uses-permission android:name=”android.permission.GET_ACCOUNTS” /> <uses-permission android:name=”android.permission.USE_ CREDENTIALS” /> <uses-permission android:name=”android.permission.WRITE_ EXTERNAL_STORAGE” /> <application android:icon=”@drawable/ic_launcher” android:label=”@string/app_name” > <activity android:name=”.SamplePushActivity”
Pushing a message
Push notification message to device
Apple/Google servers
Registration
Device requests for device id Apple/Google servers
Send notification message Response
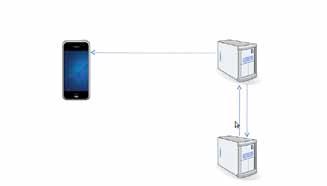
Figure 1: The typical push notification system
Your Application server
android:label=”@string/app_name” > <intent-filter> <action android:name=”android.intent.action.MAIN” /> <category android:name=”android.intent.category. LAUNCHER” /> </intent-filter> </activity> <receiver android:name=”com.google.android.gcm. GCMBroadcastReceiver” android:permission=”com.google.android.c2dm. permission.SEND” > <intent-filter> <action android:name=”com.google.android.c2dm. intent.RECEIVE” /> <action android:name=”com.google.android.c2dm. intent.REGISTRATION” /> <category android:name=”in.amolgupta.android.gcm” />
</intent-filter> </receiver> <service android:name=”.GCMIntentService” /> <activity android:name=”.NoteList” android:label=”@string/title_activity_note_list” > </activity> </application> </manifest>
Write the service that extends GCMBaseIntentService and implements the functions onRegistered(), onUnregistered(), onMessage(), onError(), and onRecoverableError(). Next, you need to write the activity for this application. In the activity, you can call the functions from the jar file to check if the device is GCM enabled or not, and also to check if your manifest file has all the required configurations.
GCMRegistrar.checkDevice(this); GCMRegistrar.checkManifest(this);
Device id sent to application server
Your Application server
Figure 2: Registration
To register the device, call the function GCMRegistrar. register(this, SENDER_ID); here, SENDER_ID is the 12-digit project ID from the API console.
Running this application would register it on the Google server, and return a device ID, which can be sent to the server using a Web service. For simplicity, here let us just copy it to the server-side code.
Last, you need to write the server-side code for the system. To send the push notifications, a Google Web service is called, which can be done with any programming language. Using the gcm-server.jar from the Android SDK, the implementation becomes very simple, and can be integrated into any Java-based system such as your Web services, desktop clients, server-side schedulers, etc. The following lines of code can be used once the JAR has been added to the class path:
Sender sender = new Sender(“<Server key>”); ArrayList<String> devicesList = new ArrayList<String>(); //add the device ids from Android device devicesList.add(“<android device id>”); Message message = new Message.Builder().collapseKey(“1”) .timeToLive(3).delayWhileIdle(true) .addData(“message”,”message text!!”) .build(); MulticastResult result = sender.send(message, devicesList, 1);
Executing this code would push a notification to the Android device. By implementing proper handling of the intents, you can show this message in the notification bar as an alert, or can initiate any other action in the application. There is a limit on the amount of data that can be sent via push notifications; therefore, it is recommended that instead of sending the complete message content, you should only notify the device that there is a new message available, and let it retrieve the actual message with another service call.
By: Amol Gupta
The author works for Infosys Mobility, and has a keen interest in mobile and cloud computing. He likes to explore the various possibilities in the two fields, and how they complement each other. He can be reached at amolgupta1989@gmail.com and http://twitter.com/amolgupta.


