25 minute read
Feature: Photoshop for photographers

from _Issue_04
by Hiba Dweib

Photoshop for photographers

Advertisement


Photoshop for photographers

Are there certain Photoshop functions for certain types of photography? Nick Spence spoke to professionals in their fi eld to fi nd out what tools they use and how they use them
T
he latest version of the world’s premier imaging application includes many enhancements that make the life of the busy photographer that bit easier. From simple stuff like one-click Red Eye correction, to complex Image Warp, Photoshop in each of its versions offers enormous workfl ow potential for photographers.
Advances in camera technology have also been accompanied by dramatic falls in hardware prices on the high street. An enthusiast digital SLR can be picked up for around £500, with better specs than cameras costing thousands 18 months ago. Yet higher spec cameras are on their way, bursting with megapixels and better lenses then you could have ever wished for. And with all these new shiny images on your hands, you need an image editor that can take the hassle out of the dull parts of photo correction, but also offer a tasty selection of creative options for getting the optimum images you can.
The spice of life They are no right or wrong ways of using Photoshop. It’s a versatile tool with versatile users, and with many options for each and every task, there are numerous ways to remove imperfections from those masterpieces. Many photographers use the same tools in different ways, while others prefer old favourites to the latest enhancements, sticking to what they know best. Others learn new tricks from peers and colleagues, and while in the studio and or on location. Some get by perfectly well with Version 6 or 7, while others are already counting down the days to CS3. Some use tools specifi c to their area of expertise. The Crop tool, for example, instantly adds focus to a landscape, but it’s also a tool that’s useful to all.
Photoshop is all about enhancing what’s already there; it can’t turn a poor photographer into a great one. But it’s made professionals out of latter-day enthusiasts, who might previously relied on laboured workfl ows and costly reliance on others. It’s also given photographers much greater control over how their images look in print.
Over the next few pages we’ll speak to professional portrait, landscape and still life photographers, and get an insight into their creative process and the tools and tips they use to produce such dazzling effects. We’re not showing you how to take better pictures; merely revealing what tools the professionals use to boost their photographs. Armed with their invaluable advice, we’ll show how you can achieve professional results every time.
Photoshop for photographers

Going for dark and moody shots is a great way of achieving dramatic portraits
© Steve Brown
Traditional portrait photography has changed dramatically over the last few years as photographers switch to an all-digital workfl ow. A simple head and shoulders shot will barely suffi ce when a stunning portrait can be achieved with Photoshop. Steve Brown (www. stevebrownphoto.co.uk) is a professional photographer specialising mainly in rock portraiture. Steve switched from the 6x7 medium format photography to an all-digital workfl ow essentially due to cost and time
restraints. “With digital I can cut out the fi lm, processing, printing and scanning costs and also time, and take my images from capture to Photoshop with the minimum fuss,” says Steve. His striking work is dark and slightly surreal but grounded in a heightened, cinematic, reality. A look that Steve admits would be diffi cult to achieve without the power of Photoshop. “I try to create images that wouldn’t be possible just ‘through the lens’, but which look so plausible and seamless that people have to ask themselves whether it is real or not.”
Steve uses the Clone tool and more lately the Healing Brush to remove spots and blemishes, cleaning up backgrounds and general touch up work, although he is most reliant on Photoshop adjustment layers. “They give me the ability to always be able to go back and change things, invaluable when you are working on very complex images with lots of elements.” Steve also recommends you learn a few Photoshop keyboard shortcuts, “Once you get used to them, they save so much time.”.
The format of kings Steve is one of many photographers working with the Camera Raw format. It has changed so much about using Photoshop, allowing photographers to retrieve images before any
in-camera processing has been performed. In 2004 Adobe Systems published the Digital Negative Specifi cation (DNG) a unifi ed raw format to help increase use of the format. “It provides the highest possible quality output from the camera but packs as many images onto each memory card as possible,” says Steve. “With a free Camera Raw plug in from Adobe, Photoshop can read the Canon RAW fi les and process them into PSD of TIFF format, so that I can work on them.”
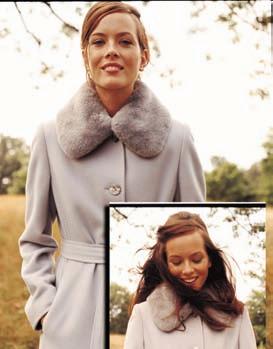
Glenn Honiball is a versatile photographer (he’ll appear in the Still life section) and has some interesting insight into how to brighten up portrait shots. In the images you see above, he used Photoshop to seal a deal. “The client liked the one image of the women with the coat, but did not like her head,” he says. “They had a second shot
© Glenn Honiball
Photoshop gives photographers a great level of freedom. If you don’t like something, replace it, as was the case with this lady’s head
TOP TOOL TIP
Spot Healing Brush
Want to remove imperfections or make loved one’s faces even more attractive? New to Photoshop CS2 is another labour-saving idea from Adobe that does much of the work for you, no need to make a selection or defi ne a source point. Best combined with Edit >Fade Spot Healing Brush function where opacity can be reduced and results achieved more subtle. of her head. I added the head from the one image to the coat image by cropping it out with a selection. I then gradually erased the head image so that it blended in nicely with the image of the coat with the Erase Tool set to low erase opacity.” So if something doesn’t fi t in, get rid of it!
Rise to the occasion Katharine Millichope is a London-based photographer and Photoshop retoucher working alongside partner James Keates (www.jk-photography.net), a freelance photographer specialising in portraiture. The two provide portraits for the likes of model and talent agencies, music management groups, theatrical agents as well as weddings. With everyone snapping away with digital cameras on the big day, professional wedding photography needs to be that extra special to capture that magical day. Katharine says; “The reportage style of wedding photography means that it is more diffi cult to produce

© David Millichope
Katharine Millichope’s father, David, added new life to a portrait by turning a child into a fairy an impressive image on the spot. With little or no input at the time, I rely heavily on the usage of Photoshop afterwards, and shoot with this in mind.” Back in the studio Katharine will start by cropping the shot to add more impact. “After cropping I desaturate to black and white. I always fi rstly make a new layer so that it is possible to erase through to the untreated one. My favourite tool for use in portraiture is the Omni lighting effect, which gives instant impact to an image.”
Katharine adds: “I generally keep the settings so that the Intensity is around 38; the Properties I set to almost matt, Material to metallic, keep the exposure slightly under, and the Ambience down to –35. When the effect is applied, it will give out quite a moody look to the image, so I then bring up the brightness and contrast in Curves.”
As well as the Omni lighting effect on her side in the battle against dull images, Katharine loves the good old Clone Stamp. “Anything can be achieved with this tool. It can be used as a paintbrush and can distort images beyond recognition if necessary,” she says. Katharine’s Top Tip? “Experiment with layers. Apply effects to the top layer, then erase through to the original!”
Whatever type of portrait style you like, you can see that there are lots of Photoshop tools to aid results.
TOP TOOL TIP
Shadow/ Highlight
The Shadow/ Highlight feature, fi rst introduced in Photoshop CS, allows you to correct exposure problems that Levels and Curves may have problems with. This works well with any backlit headshots, where the face is darker than the background. You can bring out detail in areas lost due to poor, harsh or fl ash lighting. Used correctly you can turn a snapshot into a professional portrait. The Shadow/Highlight command also has a Midtone Contrast slider, Black Clip, and White Clip options for adjusting the overall contrast of the image.
Steve Brown
www.stevbrownphoto.com
TOP TOOL TIP
Red Eye Tool
Began life in Photoshop Elements 3, you’re never far away, just two clicks normally, from resolving an issue caused by light from the fl ash bouncing of the retina of the eye. Simple and eff ective you click on the Red Eye Tool to select it, click on the red of each eye to remove it. This Photoshop CS2 tool supports 16-bit images and lets you set pupil size and darkening level. This striking photo shoot of Welsh rockers Bullet For My Valentine was produced by Steve Brown using many of the common popular tools found in Photoshop. “In these pictures, I shot the band first in the studio against a black background and later cut them out in Photoshop using a mixture of channels to create layer masks,” says Steve. “I then went out and shot the different elements of the background. The floor was the trickiest as the perspective had to match that of the band for it to be convincing, so I shot various angles and elevations and picked the best. The midground I took to black to create a simpler, more graphic image, and the sky I colour treated to make it look darker and more ominous. I then used various colour balance, levels and curves layers, as well as Hue/Saturation to desaturate the image, to create the contrasty, desaturated, noirish look. “I use the polygonal lasso tool for cutting out. I find that, feathered by 1 pixel, it is great for going round tricky shapes as you can take your time and define as many points as you want. Once you’ve created a selection you can then fill that with black to mask out the selected area with a layer mask.
“I try to work in such a way that I always have the original file untouched,” Steve says. “So if I want to alter a part of the image I’ll duplicate that part and work on the duplicated layer, or if I want to erase part of a layer to show the layer below I’ll use a layer mask rather than the eraser,” he adds. “Similarly, if I want to change the brightness or contrast of an image or part of an image I’ll use Levels or Curves adjustment layers, then I can always change it back if I change my mind. The slightly noirish feel of the Bullet For My Valentine shots is achieved by upping the contrast (using Levels and Curves layers) and reducing the saturation (with a Hue/Saturation layer). I’ll also combine adjustment layers with layer masks if I want to just brighten a certain area – I’ll apply a layer mask to the adjustment layer so that it only affects a certain part of the image,” Steve adds.
Using Photoshop to composite photos together is a good way of getting the just the mood you want

Photoshop for photographers
Landscape photography, whether rural or urban, is one area that can always benefi t from Photoshop and its many tools and enhancing features. Dan Gulliver has been working as a professional photographer for fi ve years, mainly for corporate architecture commissions for a number of blue chip companies. As Dan is working freelance he likes to “beg, borrow, steal and sob” to get the best cameras to take on location, most recently a Nikon D2X D-SLR and a Canon EOS 5D. Photographing buildings in typical dull British drizzle, Dan faces challenges away from the controlled environment of the studio. A fl exible schedule means Dan can be found working early mornings, late nights and spending weekends wandering the streets adjusting these layers to build strong tone and contrast,” says Dan. Colour correction is an essential part of on-location landscape photography. Light sources can change in seconds, images that appear either gloomy or over-exposed will need colour correcting in Photoshop. Dan enjoys the simplicity of the sometimes-underrated Curves option (found under Adjustments>Levels> Curves) to manually tweak by eye a pictures appearance. You can also use Curves to make precise adjustments to individual colour channels in a photograph as well. The Colour Balance and Brightness/Contrast settings are sometimes best avoided because results can look harsh. Variations (found under Adjustments>Variations) is a great versatile way to colour correct, giving a large pop-up dialog box full of options to edit your images. Dan suggests you can fi ne-tune Variations by using the Fade Variations (found under Edit>Fade Variations) function to lower opacity or change modes.
Colour perfect Dan uses the Hue/Saturation option (found under Image>Adjustments>Hue/Saturation) as another way to measure and adjust colour in Photoshop. You can scroll down the
Hue/Saturation dialog box options under Master to select just the reds, yellows, greens, for example, and apply changes that don’t adversely affect the entire image. The settings can be used to modify the colour settings in a number of photographs, in the case of landscapes, to give a uniformed appearance to a set of outdoor shots. With light changing constantly during the shoot Dan can use the Match Colour (found under Image>Adjustments>Match Colour) to attempt to match up a batch of photographs taken under different natural light to give a uniformed look. He can even colour match with an unrelated photograph – a sunny location for example – to try and add colour to often-dreary winters day.

of London. Sometimes a client requires the deserted look of zombie fl ick 28 Days Later, with streets free of pedestrians, cars and general clutter to best showcase their shiny new building. The strength and serenity of a scene can be ruined, however, when a stray carrier bag is spotted stuck in a tree. Dan uses Photoshop back at base to correct these and resolve problems of light and perspective associated with working outdoors.
Dan will resize the image using Photoshop depending on how the fi nal sized shot is to be used, for example an A4 brochure, larger poster or for exhibition or display. “My fi rst priority”, says Dan, “is looking at the edges on my images in Photoshop and seeing what the eye has missed. I normally start by using the Crop tool to focus the image and strengthen the composition.” After cropping Dan turns his eye to colour. “I start simple with curves, looking at what detail needs to be brought out, then slowly adding layers
Whatever the weather David Millichope is a professional photographer of many years, working with Photoshop on a daily basis. He’s obviously
Making the eff ort to get up early pays its rewards with great shots like this one
TOP TOOL TIP
Vanishing Point
New in Photoshop CS2, the Vanishing Point fi lter works like a massive clone or patch tool allowing you to edit images in perspective. It’s particularly useful to remove areas, or move objects in accurate perspective in landscapes adding uniformity and balance. You can clone, brush, and paste elements with relative ease once mastered within the dedicated Vanishing Point workspace. See our tutorial on p48. no stranger to having to make the odd tweak to photos. “I recently returned from the Lake District on what should have been a brilliantly sunny day in late autumn, the kind of day photographers dream of,” he says. “Unfortunately a bank of cloud had dumped itself on the area and I was left with some rather unfulfi lling grey and dismal shots. Digital photography handles underexposure better than overexposure so I always expose for the sky. The biggest problem with poor light is the lack of tonal range fl atness. This is where Curves are a very important tool but you need to exercise your judgement a lot to get a pleasing effect. The use of the Lasso tool – feathered – is very useful to select out areas for different treatment. In the past, I’ve selected the sky and then used Select/Inverse and Select/Feather/150. This allows me to use Curves on the water and land to increase

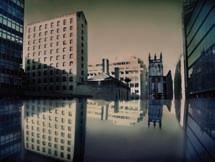
Landscapes
Tweaking an image’s colour in Photoshop is a great way of instantly adding impact and drama
Photoshop is a whizz at sorting out photos that are too dark or pasty to make the grade. As long as the basic information is there, Photoshop can do something with it
© Dan Gulliver
© David Millichope
Dan Gulliver
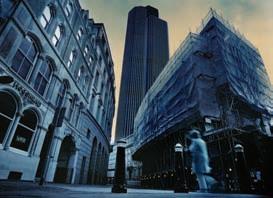
Dan Gulliver produced this striking cityscape for an exhibition on London by night. As he always seems to spend his time, Dan was out on location in the early hours searching for just the right location for the perfect shot. The photo was taken using a 120 film camera and then scanned on a Imacon 949 scanner at something like 2,400dpi to allow for cropping in Photoshop. Dan’s training in traditional print techniques means that he starts with the basics in Photoshop, playing with Curves initially to bring out areas of the photograph. Creating layers, he selects, copies and pastes sections of his image to create blends, changing opacity until he his happy. “I guess I approach Photoshop from a Fine Art prospective, using layers rather like a paint brush, using opacity settings to add weight to some sections and place emphasis on others while darkening others,” Dan says. “I use the Burn tool to darken areas I want to lose or mute, selecting Shadows and sometimes Midtones – but never Highlights – on a low Exposure level for a more subtle look”, Dan adds. “You can use the Fade Burn tool command to look at what you’ve just done and finely tweak it accordingly,” says Dan.
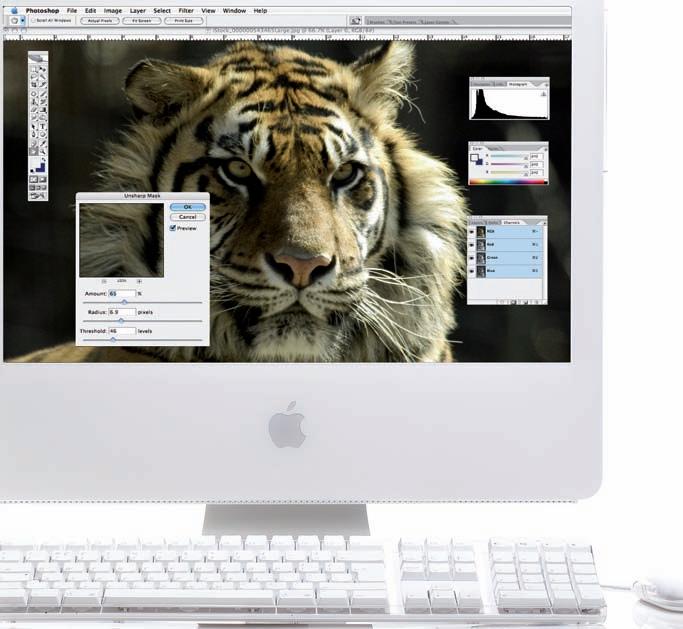
In addition to these, he also uses Gaussian Blur on some shots combined with Unsharp Mask to isolate areas of interest, while dulling others. You can achieve an effective luminous glow on buildings by intense layering and use of Gaussian Blur. “I always produce several versions of the same shot in Photoshop, something more vibrant and graphic, something more muted and conservative depending on the client,” says Dan. “This way you can show prospective clients samples that are similar but different, to try and convince them to go for something a little more graphic or artistic especially when photographing buildings.”
Finally, does Dan have any advice for landscape photographers? “Find time to go back and look at your work with a critical eye; Photoshop is a great tool but you can over-rely on it, creating clichéd images that look like they have been put through the Photoshop mill. The trick is to use Photoshop in a way to make it look like it’s barely been used, retaining the purity of the image. That’s an art in its self,” Dan concludes.
contrast bringing out some more detail. I’ve then used Inverse again so I can work on the sky independently. I’ve duplicated the layer and added a lens fl are (105mm type) into the sky, then ‘painted’ through using the Erase Tool ( set to 25% opacity) and fl attened. This adds a weak sun bursting through the clouds. Finally I’ve applied colour balance to the whole picture increasing both red and yellow to give a warmer evening look. Not an award winning picture but a good ‘stocking fi ller’ type shot.”
Landscape shots are intrinsically linked with colour, whether it be lush green rolling hills or the brilliant white of snow, so using Photoshop to bring out these colours is vital for professional landscape photographers and also for you.
TOP TOOL TIP
Lens Blur
Add selective focus to landscapes with the Lens Blur fi lter. Traditional camera aperture settings can be achieved seamlessly in Photoshop. Create a Layer Mask alpha channel, add a gradient mask to pinpoint focus to a certain plane in a landscape and this will throw the foreground and background out of focus.
This image is okay as it is, but it needs some help to make it truly great
Dan uses layers to build up his editing tasks and keep control over everything that is happening The fi rst step was to clean up the image and get rid of any marks or imperfections
The fi nal image, with all the colour tweaks and layer adjustments. Looks good, doesn’t it?
Photoshop for photographers
Portrait and landscape photography can be a bit more forgiving than still life shots. If a portrait shot has a slight problem with its highlights, for example, that can be compensated for if the person being photographed is stunningly attractive, or if they are in a powerful pose. Get to still life, though, and the shot has to be spot-on because that’s all there is to look at. This is especially true of commercial photography, such as packing and product shots. These require all the tools that Photoshop has on offer in order to sell the products they are photographing. No-one’s going to buy a cream cake if the ad selling it looks as though the cream is a month old. One person who has loads of experience with still life photography is Glenn Honiball (www. retouch.ca). Based in Toronto, Canada, Glenn is a creative, artistic image retouching expert and author of Commercial Photoshop Retouching: In the Studio (O’Reilly). Glenn is a busy man working for ad agencies, design houses, photographers, web, newsprint, packaging, lenticular and personal photo work. He also happens to be a photo retouching veteran, who has slowly seen the industry switch from traditional to digital. Photo retouchers often face unrealistically tight deadlines and potential tantrums from demanding clients wanting frequent changes. In some ways the many wonderful time-saving features of Photoshop have only heightened these demands. Glenn encourages readers to try and produce sharp, expert, extraordinary photos that don’t look retouched.
Glenn has many top Photoshop tips in a 20-year career, enough indeed to fi ll a book. “I think my favourite tool to use in Photoshop would have to be the History Brush,” says Glenn. “With the History Brush I can basically make any correction I wish to the image. I can then take a history snapshot of the correction done and undo it. With that History Snapshot I can then use the History Brush to paint in the correction(s) made to any area of the image I wish. This saves a ton of time as it saves me having to mask off areas in order to make a correction. It also makes the correction look a lot more natural as I can blend the correction as gradually as I wish just by varying the opacity of my History Brush.”
When editing an image, it is vital that the correct area is selected –because the object in still life photos are the only focus, they are under greater scrutiny and need to refl ect this in their quality. “I like to use the Quick Mask Mode to make selections,” Glenn adds. “I have complete control over the selection made because I have the ability with the Quick Mask Mode to paint in my selection with the Brush Tool or the Erase Tool to modify it. Great tool to make selections of diffi cult things like hair or other soft transition areas.”
“When it comes to retouching images, the key is to keep things natural. Nothing is more off putting than an overly-cloned photo:
The Clone tool is perfect for adding in extra detail to make photos stand out and look more attractive
TOP TOOL TIP
Image Warp
Client not happy, and you need to change that logo quickly? Image Warp allows you to create convincing packaging mock-ups with relative ease. Wrap fl at graphics on round surfaces or planes, then tweak the results directly on the screen to make naturallooking packaging etc.
TOP TOOL TIP
Match Colour
Match Colour is the perfect tool for either matching colours between images or adding a diff erent hue to one. Go to Image>Adjustments> Match Colour and select a source to match colour from.
© Glenn Honiball Photoshop in action Glenn uses Photoshop to its full potential when it comes to his work, which he reveals here. For the image ‘Chips’, which you can see to the right, Glenn had to digitally create an effect that wasn’t picked up on in the studio when the image was being shot. “The client wanted to get rid of the potato skins on the french fries,” Glenn explains. “This was done by making selections of other chips and pasting them over the skin. Much cloning was done as well with the Clone tool to conceal the potato skins.” For the mug of hot chocolate, seen to the left, Glenn also bought his Clone skills to the party. “The client wanted to make the hot chocolate appear more appealing. The Clone tool was used to pick-up and create extra bubbles. Marshmallows were added by again cloning from the original ones and by painting them in with the Paint brush tool.
A different world Bristol-based freelance photographer, Paul Nomm (www.paulnomm.com) produces still life shots, mainly various insects, that have been enhanced with Photoshop. Paul works extensively with museums and archives cataloguing rare and interesting specimens for research purposes. Paul is fan of the Quick Mask tool, used for making precise selections especially in his detailed close up
Glenn Honiball
www.retouch.ca

© Glenn Honiball

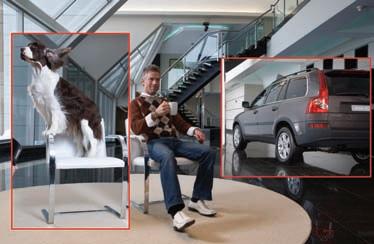
Photoshop means that if something has gone wrong in a photo, it can be sorted out digitally rather than having to redo a photoshoot Glenn Honiball, author of Commercial Photoshop Retouching: In the Studio, talks us through one way to resolving an issue facing professional and enthusiast photographers alike. For ‘Showroom’, many images were used and combined to create the final image. Many elements in the shot were eliminated to create a clean-looking image. Various elements were also cropped out using the Pen Tool to get clean accurate selections. I also used the Pen tool to create accurate selections on the main image so that I could use the Brush tool to paint in large areas to eliminate elements in the main image, like the back wall and staircase. Colour corrections were done with Curve Adjustments and Hue and Saturation.”
still life work. “I apply a quick mask, I fi rst make a rough selection with one of selection tools. I click the Quick Mask button, get the red outline section and then I’m away,” says Paul. “It sounds really basic but it’s ideal for losing the detail you don’t want to keep and adding strength and clarity to your images.
“I regularly use the Threshold tool to acquire the black and white point of the image; from there I mark the points using the colour sampler tool,” says Paul. “When these points are marked I then use the Levels tool to defi ne the black and white in the image. This tool is particular useful for dealing with colour correction.”
Whatever type of still life image you want to take, the important thing to remember is that nearly anything can be fi xed in Photoshop. If you have a gap or something is looking lacklustre, use some of the tools mentioned and you’ll be laughing.
TOP TOOL TIP
Even if you have taken a photo that seems cluttered and beyond hope, it is worth trying to sort it our in Photoshop. Thanks to some nifty clone work, Glenn turned this photo into a clean masterpiece
Smart Objects
Place Vector objects into Photoshop CS2 and resize them as often as you like without comprising your images. Ideal for adding type and logos to your commercial work. Resolves the problem of scaling pasted images and gives a tight sharp fi nish worthy of your client’s name with perfect resolution. You can use Free Transform a Vector Smart Object to scale away, until a client is happy.