
22 minute read
Sounding Off - Part 3

from downmagaz
by Hiba Dweib

Sounding Off
Building an MP3 Sound-Making Robot Part 3
Advertisement
by Gordon McComb
Discuss this article in the SERVO Magazine forums at http://forum.servomagazine.com.
Ever notice how the robots in movies like to make noise? Sound helps them to connect with their human counterparts — cheery advise, warnings, whatever. Audible feedback makes them more interesting. Who can forget the tweeps and braaps of R2-D2, the incessant warnings to Will Robinson by the robot in Lost in Space, or the nasal-sounding jabberings of those countless Daleks?
A Quick Overview of MP3
For the last several months, we’ve been talking about ways to add sound to your robot creations. Simple sounds can be made using just a microcontroller and small speaker; songs and sound effects are easy using a low cost MIDI synthesizer board. This month, you’ll learn how to add recorded effects to your robot using MP3 digital audio files.
In this installment, I’ll show you how to build the Musicbot shown in Figure 1. It uses an Arduino and SparkFun MP3 player shield to play MP3 digital audio files. The shield contains an MP3 decoder, plus a micro-SD card slot for storing all your tunes and effects.
There are numerous digital audio formats; I chose MP3 because it’s well-known and easy to work with. MP3 audio files are compressed, so not only do they take up less space on the storage medium, they reduce the amount of data the Arduino must shuttle every second. That means the Arduino has more time for robotic tasks, like motivating motors or sensing sensors.
First, some basics: MP3 is an audio compression standard originally created for the MPEG-1 format of low resolution video. The technical name for the standard is MPEG-1 Audio Layer III. MP3 was later expanded for use in MPEG-2 video which supports higher resolution images.
Though meant to be paired with video, MP3 audio is perfectly happy living on its own; it’s this variation most people are familiar with. The MP3 format gained popularity in the mid 1990s as a way to save and play sound and music; compared to compact disc audio tracks, it drastically reduces the size of the stored audio file. Whereas an hour long CD might consume 600+ megabytes of disk space, the equivalent file encoded using MP3 could be just a tenth of that. Processing a sound file as MP3 is a two-step procedure: encoding and decoding.
• Encoding transforms the original digital sound to a highly compressed form. A number of methods are used to achieve this compression, including something referred to as perceptual coding. The technique leverages a science known as psychoacoustics which deals with the way the human ear receives and processes sound. For example, certain frequencies of sound cannot (normally) be discerned when accompanied by FIGURE1. The Musicbot uses an ArdBotII robot chassis, Arduino Uno (or compatible) development board, and SparkFun MP3 player shield.
www.servomagazine.com/index.php?/magazine/article/may2012_McComb
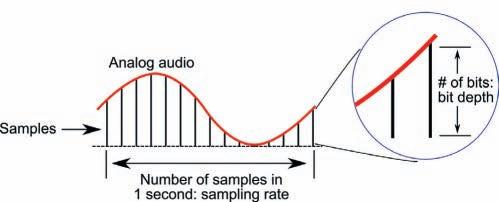
FIGURE 2. Digital sound is created by sampling the audio at regular intervals. The more often the audio is sampled, the higher the sampling rate. Bit depth is the number of bits used to store each sample.
other frequencies. With psychoacoustic modeling, the frequencies that the ear can’t hear anyway are eliminated. That saves data space. • Decoding reverses the process. Data is decompressed, and then may be processed with various audio enhancements such as bass boost and reverb. The MP3 file is composed of multiple frames, each containing a small section of the original audio. The decoding process is built into the MP3 player which can be either software- or hardware-based. For the Musicbot, the player uses separate MP3 decoding hardware since the Arduino is not capable of processing the data all on its own.
MP3 is what’s known as lossy compression; that is, during the encoding process, some data is irretrievably lost. Once removed, it cannot be put back. This is why when you re-compress an MP3 file, it doesn’t sound as good as the original.
Sampling Rates, Bit Depth, and Bit Rates
Regardless of the compression technique used, analog audio is converted to digital data by taking quick snapshots of the sound at regular — but frequent — intervals. This is called sampling, and is shown in Figure 2. The number of times the sound is sampled in one second is the samplingrate. Music on a CD is digitized — converted from analog to digital — at 44,100 times a second. The CD audio is said to have a sampling rate of 44,100 Hz (44.1 kHz).
The instantaneous frequency and volume at each sample of the analog signal is converted to a binary number. The number of bits — called bit depth — of this binary number defines the possible range of digital values that can be stored. The broader the range, the higher the resolution of the sound reproduction. With higher resolution comes better sound.
Assuming a bit depth of 16 bits, the range of values can vary from 0 to 65,536. With an eight-bit depth, the range is only 0 to 255. That’s a significant decrease in resolution, and so audio quality may be greatly diminished.
The bit rate is the calculated product of the sample rate times the bit depth times the number of channels used for the recording — stereo audio clips use two channels. Because the sample rate is expressed as the number of “snapshots” per second, bit rate is likewise expressed as the number of bits processed per second. The higher the bit rate, the larger the encoded file will be. Larger files consume more storage space, and they place increased demands on the decoder which has to process more data each second.
Given a 44.1 kHz sampling rate, bit depth of 16 bits, and two channels, the uncompressed bit rate is 1,411,200 bits per second; more commonly specified as 1.411 megabits per second (mbps). For MP3, the bit rate is noted for compressed data. MP3 supports a wide variety of compressed bit rates — all in kilobits per second (kbps) — spanning a standardized range from about 32 kbps to 320 kbps (but higher and lower values are also permitted). The most common are 96, 128, 160, and 192 kbps.
Bit rates can be variable or constant. Variable bit rates can make the resulting file smaller. The process works by intelligently altering the bit rate to whatever minimum is needed to record the audio. Conversely, constant bit rates use one bit rate, regardless of the actual compression that is required. While variable bit rates allow for small files without unduly sacrificing quality, from a programmatic
Sources
Budget Robotics ArdBotII chassis: Precut body parts, assembly hardware Vishay TSOP38238 infrared receiver Universal remote control www.budgetrobotics.com
Parallax Infrared receiver (#350-00014) www.parallax.com
SparkFun Electronics MP3 player shield (RTL-10779; retail version comes with pin headers) Vishay TSOP38238 infrared receiver (SEN-10266) www.sparkfun.com
Prerecorded sound clips www.robotoid.com
MP3 info at Wikipedia en.wikipedia.org/wiki/MP3
Encoding software Audacity - audacity.sourceforge.net Goldwave - www.goldwave.com
#include <SPI.h> #include <SdFat.h> #include <SdFatUtil.h> #include <SFEMP3Shield.h>
SFEMP3Shield MP3player;
char trackName[] = "track000.mp3";
void setup() {
Serial.begin(9600);
MP3player.begin(); MP3player.SetVolume(10, 10);
standpoint constant // SPI library (comes with Arduino) bit rates are easier // code.google.com/p/sdfatlib to work with. Use a // Part of SdFat // See text constant bit rate whenever you can. // MP3 player object The audio clips for // Char array for filename this project — see Sources for where to find samples you // Serial Monitor for debugging can use — were // Start shield encoded at 160 // Set volume to about 75% kbps constant bit for(int i = 0; i<10; i++) { // Iterate files 000 to 009 rate. Feel free to sprintf(trackName, "track%03d.mp3", i); // Format: track###.mp3 experiment with
MP3player.playMP3(trackName); // Play track other variations.
Serial.println(trackName); while(MP3player.isPlaying()); // Show track name in Serial Monitor // Wait until track is done Table 1 } compares several commonly used void loop() { MP3 bit rates. // Empty loop Compression ratio, } file sizes, and quality comparisons are approximate.
Making MP3 Audio Clips
You can make your own MP3 clips for your robot projects, either by recording them using a microphone or musical instrument, or by converting an already existing audio file. There are numerous free and paid software for creating MP3 files. Two favorites are Audacity and
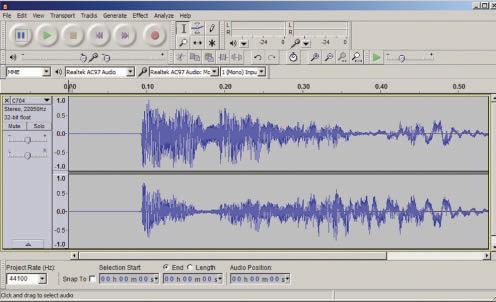
FIGURE 3. Audacity is a popular open source software for recording, editing, and exporting sound files, including MP3 (requires a separate download of the LAME MP3 plug-in).
Using Arduino Libraries
The sketches in this article require the use of several third-party libraries that are not included with the Arduino IDE software. The libraries are available for download from the locations listed below, but for your convenience they are also provided as part of the downloads available on the SERVO website; refer to the link at the start of this article.
The libraries must be moved to your Arduino sketchbook libraries folder. On Windows, this is found at Documents\Arduino\libraries (or My Documents\Arduino\libraries when using Windows XP). If your sketchbook doesn't already have a libraries folder, you'll need to create one first.
The extra libraries are:
SdFat -- code.google.com/p/sdfatlib. Reads the MP3 files on the micro-SD card attached to the SparkFun MP3 player shield.
SFEMP3Shield -- github.com/madsci1016/Sparkfun-MP3Player-Shield-Arduino-Library. Plays and manages MP3 clips. This library, by electrical engineer Bill Porter, makes using MP3 on the Arduino much easier.
IRremote -- arcfn.com/2009/08/multi-protocol-infraredremote-library.html. Handy library written by Ken Shirriff decodes infrared signals from an ordinary universal remote control. Note: As of this writing, the version of the IRremote library on Ken's site is not Arduino 1.0-ready. Use the version included with the sketches for this article.
Important! The Getting Started guide provided by SparkFun for the MP3 player shield talks about modifying the SdFat library to alter the Slave Select (SS) pin used by the Arduino to activate the micro-SD card. This step is not required as long as you use a current version of the SdFat library and the sketches provided with this article. The Slave Select pin is now an optional parameter when setting up the SdFat object.


FIGURE 4. Verify proper settings in the MP3 files you use by checking their properties.
FIGURE 5. Basic breadboard wiring diagram for the Musicbot. The two continuous rotation servos that move the bot are powered from their own 4xAA battery pack. The servo power supply and the Arduino share a common ground. Use double-ended long header pins to attach the servos and other cabling to the breadboard.
FIGURE6. A self-contained capsule speaker incorporates its own amplifier, speaker element, and rechargeable battery.
Goldwave. Audacity is free. Goldwave is paid software; either an outright lifetime purchase, or a less expensive annual license.
Both allow you to record, edit, and export clips to MP3 format. A slate of effects let you modify the sound — add echo and reverb, create a robotic voice, or modify the pitch and speed.
Here are the steps for processing an existing sound file to MP3 in Audacity. It’s not complicated, but it does involve a number of commands that you must select in the proper order.
Note: Before you can create an MP3 file in Audacity, you must first download a copy of the LAME MP3 encoder program. Instructions are provided in the Audacity help. (In Audacity, choose Help->Quick Help, then in the main page click on Index; next, find and click on LAME MP3.) 1. Open an existing WAV or other sound clip (see Figure 3). If prompted, choose the option “Make a copy of the files before editing.” 2. Examine the Project Rate setting in the lower left corner. Set it to 44100, if it’s not already. 3. Choose File->Export. In the Export File dialog box, choose MP3 Filesin the Save as type list. 4. Click the Options button, then select the following:
Bit Rate Mode: Constant
Quality: 160 kbps
Channel Mode: Joint Stereo then click OK. 5. Provide a name for the clip. The Arduino MP3 player code in this month’s installment assumes a specific filename format — tracknnn.mp3 — where nnn is a three-digit number starting at 000. For
Bit Rate Compression Ratio File Size Per Minute*
Quality Similar To
64 kbps 22:1 480K AM Radio 96 kbps 15:1 720K FM Radio 128 kbps 11:1 1 MB TV Sound 160 kbps 9:1 1.2 MB Tabletop CD 192 kbps 7:1 1.4 MB Hi-Fi CD
*Calculated using this standard formula: (Bit Rate * 60) / 8. Table 1.
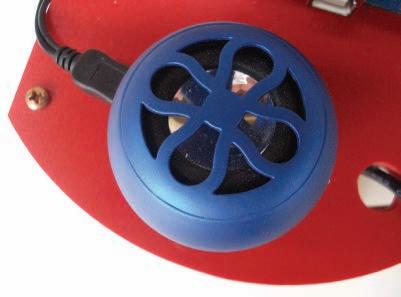
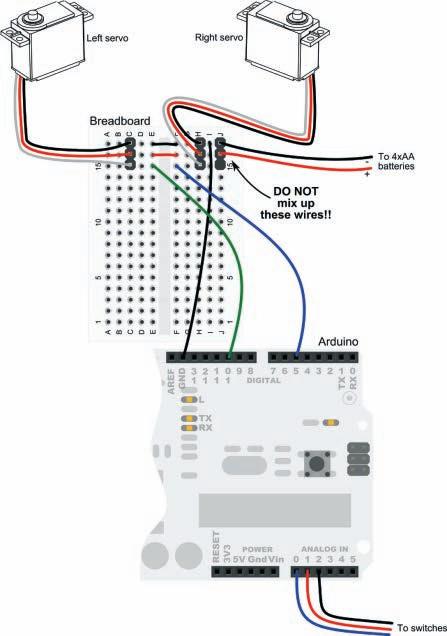
FIGURE 7. A recommended interface circuit for the output of the MP3 player shield. It's important that you don't connect the GBUF line as a ground. You can experiment with the capacitor and resistor values.
example, track000.mp3, track001.mp3, and so forth. (You can use other filenames in the sketches you write, but in order to be used by the MP3 Player shield they must be in standard 8+3 filename format.) 6. Click the Save button. Fill in the metadata fields if you wish to use them. You can leave them blank; the metadata has no effect over the actual playing of the clip.
If the sound you want to export doesn’t already exist, you can record your own directly in Audacity. Connect a microphone to your PC and choose 44100 for the Project Rate. Click on the Record button, then talk, sing, play an instrument, make rude noises, whatever. When you’re done, click the Stop button to terminate recording. Follow Steps 3 through 6 above.
Building and Using the MP3 Player Hardware
As noted, the Musicbot uses an Arduino Uno and a SparkFun MP3 player shield. The shield plugs directly into the Arduino, making all the necessary electrical connections between the two. The shield uses the majority of pins on the Arduino, but there’s still enough free for experimentation. For initial testing of the shield, use a pair of headphones to audition the MP3 sound.
Before placing the shield on the Arduino, however, first load the sketch in Listing 1 to your Arduino (this sketch and the others in this article are for the Arduino 1.0 software). Doing this as a first step ensures there are no I/O pin settings from a previous sketch that could damage the shield. The MP3
FIGURE 8. Full wiring for the servos, bumper switches, and Arduino. Be sure not to cross up the power wiring for the servos, or they may be instantly damaged.

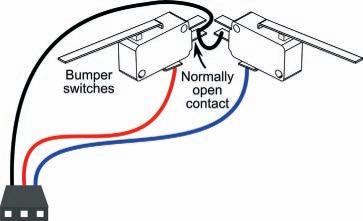
FIGURE9. Connect the twin bumper switches as shown. Many leaf switches have both normally open and normally closed contacts; you want to use the normally open contacts.
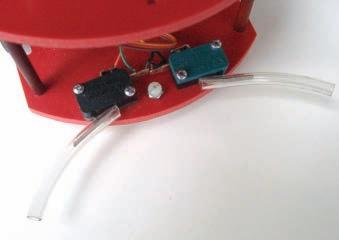
FIGURE10. Use flexible aquarium tubing to extend the reach of the leaf switches. You'll need to gently bend out the leafs to make room for the thickness of the tube.
functionality is provided by third-party libraries that must be added to your Arduino installation. See the Using Arduino Libraries sidebar for details.
Once the sketch is uploaded, carefully attach the shield to the Arduino. Copy up to 10 MP3 clips to a micro-SD card — the card must be formatted for FAT-16 or FAT-32 (FAT-16 preferred), and the filenames should be in the format tracknnn.mp3, where nnn is a number starting with 000. Insert the card into the card reader on the shield. Press the Reset button on the shield; the MP3 files you loaded onto the micro-SD card should play one right after the other, in order of their numbering.
Oops — don’t hear anything? Check the headphone connection, and make sure that the micro-SD card is plugged in completely and correctly. Double-check the naming of the files; they must be in the tracknnn.mp3 format noted above. Verify that the clips have been exported properly. This can be done, for example, in Windows by right-clicking on the file and selecting Properties. Click the Summary tab, and if not already shown, click the Advanced button to show the full list of file properties. (See Figure 4 for details.) Check that
LISTING 2
#include <SPI.h> #include <SdFat.h> #include <SdFatUtil.h> #include <SFEMP3Shield.h> #include <Servo.h>
Servo servoLeft; Servo servoRight; SFEMP3Shield MP3player; // Servo libary(comes with Arduino)
// Define left servo // Define right servo
byte lastPlayed = 255;
void setup() {
Serial.begin(9600);
servoLeft.attach(10); servoRight.attach(5); // Left servo to pin D10 // Right sevo to pin D5
pinMode(A0, INPUT); pinMode(A1, INPUT);
// Set pin A0 to input // Set pin A1 to input pinMode(A2, OUTPUT); // Set pin A2 to output digitalWrite(A0, HIGH); // Activate A0 pullup resistor digitalWrite(A1, HIGH); // Activate A1 pullup resistor digitalWrite(A2, LOW); // Make low for switch ground
MP3player.begin(); MP3player.SetVolume(10, 10); Serial.println ("MP3 started");
void loop() {
if (digitalRead(A0) == 0) { // If right bumper hit triggerTrack(A1, "track001.mp3"); // Play this track reverse(); // Reverse robot for 400 ms delay(400); spinLeft(); // Spin left while(MP3player.isPlaying()) { // Wait while clip is played delay(1);
} forward(); Serial.println("pbRight"); // Go forward again // Display status
if (digitalRead(A1) == 0) { triggerTrack(A0, "track002.mp3"); // If left bumper hit
reverse(); delay(400); spinRight(); while(MP3player.isPlaying()) { delay(1); // Spin right the Bit Rate says 160 kbps, and the Audio sample rate is 44 kHz.
Building the Musicbot
} forward(); Serial.println("pbLeft");
You can build your Musicbot using most any robot base. I’ve made mine with an ArdBotII base, // Trigger Track and motion routines available from my online store void triggerTrack(byte pin, char* track) { Budget Robotics. ArdBotII// Test if an MP3 is playing, and trigger if not the same as before if (lastPlayed != pin && MP3player.isPlaying()) { uses a pair of CNC-machined
MP3player.stopTrack(); // Stop track if another is playing 7” x 5” PVC plastic decks for } easy expansion, and is
MP3player.playMP3(track); // Play the new track powered by two continuous } lastPlayed = pin; // Set this pin number as last played rotation servo motors. Figure 5 shows the wiring for the // Motion routines for forward, reverse, turns, and stop mini solderless breadboard; void forward() { the board serves as a servoLeft.write(180); servoRight.write(0); convenient means to connect } the servo motors to the void reverse() { Arduino. servoLeft.write(0); Use an Arduino Uno or } servoRight.write(180); compatible board, and void spinLeft() { mount the SparkFun MP3 servoLeft.write(0); player shield over it. Use a servoRight.write(0); } void spinRight() { small capsule amplifier (see Figure 6) for sound output. servoLeft.write(180); Depending on the amplifier servoRight.write(180); you use, it may not be } void stopRobot() { servoLeft.write(90); directly compatible with the shield. Figure 7 shows servoRight.write(90); an interface circuit for } providing AC coupling between the shield and the amplifier. This circuit is for one channel only; you need to duplicate the circuit for stereo. The values for the resistors and capacitors are typical. Experiment. Important! As shown in the diagram, do not connect the GBUF pin on the side of the shield to anything. Use the L and R pins, plus the shield’s ground. Leave the GBUF pin — it provides a 1.23V reference voltage for use with headphones — unconnected. The ArdBotII base runs under two separate battery supplies: a 9V battery connects to the power-in plug on the Arduino, while a 4xAA battery holder provides the 4.8V or 6V juice for the servos. Servo power is routed to the solderless breadboard and shared between the two servos. Be absolutely sure not to swap the red and black (+ and –) battery
FIGURE11. Orientation for the Vishay TSOP38238 infrared receiver module. You may use most any IR receiver tuned to operate at 38 kHz. Be sure to check its datasheet to verify the pinout connections.

leads, or the servos may be irreparably damaged. Figure 8 shows the main wiring diagram for the Arduino, servos, servo power, and switches.
Note the ground connection between the servo battery supply and the Arduino. This is necessary for proper operation, as it provides a common ground between all subsystems.
Figure 9 shows how to attach a pair of standard leaf switches to the Musicbot. The switches go on the front of the robot (see Figure 10) and provide an easy way to detect collisions with objects on either side of the bot. The levers on the leaf switches can be extended by using 1/4” (inside diameter) rubber tubing — the kind used in home aquariums. Cut the tube to about 3”, and stuff over the lever. Gently bend out the lever so that the tube actuates the switch when it’s pressed in.
Listing 2 demonstrates how to control the Musicbot using the two leaf switches as bumpers. Whenever one of the bumpers is activated, the robot will briefly reverse then spin to the right or left, depending on which switch made contact.
Load up two short MP3 clips onto your micro-SD card. Name them track000.mp3 and track001.mp3. The ideal length of each clip is 1.5 to two seconds. The length of the clip is important because the Musicbot will spin for as long as the clip plays. Once the clip is finished, the robot will go forward again.
Adding Infrared Remote Control
Extend the sound-playing features of the Musicbot by adding a self-contained infrared receiver module. These work by detecting the high frequency pulses of an infrared remote control, and decoding the signal into a serial data train. Each button on the remote provides a
#include <SPI.h> #include <SdFat.h> #include <SdFatUtil.h> #include <SFEMP3Shield.h> #include <Servo.h> #include <IRremote.h>
Servo servoLeft; Servo servoRight; SFEMP3Shield MP3player; // Servo libary(comes with Arduino) // Infrared remote library; see text
// Define left servo // Define right servo
const int RECV_PIN = A5; // Receiver input pin on A5 IRrecv irrecv(RECV_PIN); // Define IR receiver object decode_results results;
byte lastPlayed = 255;
void setup() {
Serial.begin(9600);
servoLeft.attach(10); // Left servo to pin D10 servoRight.attach(5); // Right sevo to pin D5
pinMode(A0, INPUT);
// Set pin A0 to input pinMode(A1, INPUT); // Set pin A1 to input pinMode(A2, OUTPUT); // Set pin A2 to output digitalWrite(A0, HIGH); // Activate A0 pullup resistor digitalWrite(A1, HIGH); // Activate A1 pullup resistor digitalWrite(A2, LOW); // Make low for switch ground
pinMode(A4, OUTPUT); // IR power, ground pins pinMode(A3, OUTPUT); digitalWrite(A4, LOW); // IR ground digitalWrite(A3, HIGH); // IR power irrecv.enableIRIn(); // Start the receiver
MP3player.begin(); MP3player.SetVolume(10, 10); Serial.println ("MP3 started");
void loop() {
// Make tracks 000 and 001 slightly longer (about 1 second) // Make the other clips shorter, 1/2 second or less if (digitalRead(A0) == 0) { // If right bumper hit triggerTrack(A1, "track000.mp3"); // Play this track; triggers // as #14
reverse(); // Reverse robot for 400 ms
delay(400); spinLeft(); // Spin left while(MP3player.isPlaying()) { // Wait while clip is played delay(1);
} forward(); Serial.println("pbRight"); // Go forward again // Display status
if (digitalRead(A1) == 0) { // If left bumper hit triggerTrack(A0, "track001.mp3"); // Triggers as #15 reverse(); delay(400); spinRight(); // Spin right while(MP3player.isPlaying()) { delay(1);
} forward(); Serial.println("pbLeft"); Continued
if (irrecv.decode(&results)) { // If valid value was received switch (results.value) { // Match button against Sony TV codes case 0x10: Serial.println("1"); break; case 0x810: triggerTrack(2, "track002.mp3"); forward(); Serial.println("2"); break; case 0x410: Serial.println("3"); break; case 0xC10: triggerTrack(5, "track003.mp3"); spinLeft(); Serial.println("4"); break; case 0x210: triggerTrack(5, "track004.mp3"); stopRobot(); Serial.println("5"); break; case 0xA10: triggerTrack(5, "track005.mp3"); spinRight(); Serial.println("6"); break; case 0x610: Serial.println("7"); break; case 0xE10: triggerTrack(8, "track006.mp3"); reverse(); Serial.println("8"); break; case 0x110: Serial.println("9"); break; } irrecv.resume(); // Receive the next value delay(10); // 10ms delay
Button Function
1 Forward 4 Spin Left 5 Stop 6 Spin Right 8 Reverse
// Insert Trigger Track and Motion Routines from Listing 2
You should hear your MP3 clips play at each button press. As in Listing 2, the clips named track000.mp3 and track001.mp3 play when the
different sequence of data. The Arduino can examine this data and determine which button on the remote is being pressed. The IR decoding functionality is provided by a third-party library that must be added to your Arduino installation. See the Using Arduino Libraries sidebar for details.
I’m using a TSOP38238 infrared module from Vishay that is “tuned” to receive IR signals transmitted at 38 kHz; see Sources for details on resellers of this component. Many other IR receivers will also work, such as #350-00014 from Parallax — as long as it is intended for 38 kHz operation and shares the same pinout.
Connect the IR module as shown in Figure 11. Bend the leads at 90 degrees as illustrated. Be sure to properly orient the module, being careful not to reverse the leads in the Arduino pin sockets. Program a universe infrared remote to a Sony TV code — you may need to try several Sony TV codes until you find one that works.
Upload the sketch in Listing 3 to the Arduino. When uploading is complete, open the Serial Monitor window (keep the USB cable to the Arduino plugged in). For this test, you can unplug the batteries for the servos. Press the number buttons on the remote, and note the responses in the window. As you press the number buttons, you should see the numbers echoed in the Serial Monitor window.
Next, load seven MP3 clips — named track000.mp3 to track006.mp3 — onto the microSD card. As in Listing 2, the first two files should be from 1.5 to two seconds in length; the remaining can be shorter — half a second is fine.
Unplug the USB cable, reattach the servo power, and reset the Arduino. Use the remote to operate the robot:
leaf switches are activated.
Making Your Own Sound Co-Processor
Generating various kinds of sounds and effects can consume not only I/O pins, but precious processing time. The more pins and processing that are devoted to generating sound and music, the less your Arduino has for doing its robotic tasks.
In the next and final installment of Sounding Off, you’ll discover how to create your own programmable sound coprocessor, freeing up your Arduino so it can handle more elaborate functions. With the sound co-processor, you’ll be able to create and control all sorts of sound making using simple commands and just a couple of I/O pins. SV

