Online: www.ijtsrd.com e-ISSN: 2456 – 6470
Experimental Investigation of Machining Parameters for Aluminum 6061-T6 Alloy
Hardeep Singh1, Ganga Singh2, Dr. Dinesh Kumar3
1M Tech Scholar, 2Assistant Professor, 3Professor & HOD, 1, 2, 3Department of Mechanical Engineering, Jan Nayak Chaudhary Devi Lal Memorial College of Engineering, Sirsa, Haryana, India
ABSTRACT
In the present work, Turning Parameters were optimized using Taguchi Method. Also, the effect of turning parameters such as rotational speed, feed rate, depth of cut and material removal rate on surface roughness of Aluminum 6061-T6 alloy was investigated. L9 Taguchi’s method was used for designing the experiments and optimization of turning parameters. Nine experiments were conducted with four factors having three levels for each factor. Results revealed that spindle speed has a significant effect onsurface roughness and it is the most dominating factor affecting the surface roughness with contribution of 52.38%. The optimal parameter combination of Aluminum 6061-T6 alloy bar for minimum surface roughness is found to be A2 B1 C2 D i.e., rotational spindle speed (A) at 900 rpm, feed rate (B) at 90 mm/min and depth of cut (C) at 0.8 mm, and material removal rate (D).
KEYWORDS: L9- Taguchi Method; Surface Roughness; Aluminum 6061-T6 alloy; Robust design Method; Turning
How to cite this paper: Hardeep Singh | Ganga Singh | Dr. Dinesh Kumar "Experimental Investigation of Machining Parameters for Aluminum 6061-T6 Alloy" Published in InternationalJournal of Trend in Scientific Research and Development (ijtsrd),ISSN:24566470, Volume-6 | Issue-7, December 2022, pp.13301335, URL: www.ijtsrd.com/papers/ijtsrd52611.pdf
Copyright © 2022 by author (s) and International Journal of Trend in Scientific Research and Development Journal. This is an Open Access article distributed underthe terms of the Creative Commons Attribution License (CC BY 4.0) (http://creativecommons.org/licenses/by/4.0)
I. INTRODUCTION
In the process of machining, raw materials are transformed into desirable components with the required precision and size. Metal cutting is a highly nonlinear and linked thermo-mechanical process, where mechanical work is turned into heat through plastic deformation involved during chip creation as well as due to frictional work between the tool, chip, and work piece.
Robust design Method
The Robust design Method is also known as Taguchi method. The Taguchi method, a statistical technique created byTaguchi and Konishi, was firstdesigned to enhance the quality of manufactured items (developing manufacturing processes), but later its applications were broadened to numerous other engineering disciplines, such as biotechnology. Professional statisticians have praised Taguchi's achievements, particularly those related to the creation of designs for analysing variation. Inorderto
successfully achieve the intended results, process parameters must be carefullychosen and divided into control and noise elements. It is necessary to choose the control elements in a way that cancels out the impact of noise sources. To achieve the best results from the process, the Taguchi Method entails the identification of suitable control parameters. To investigate how different process variables affect the machining process, analysis of variance (ANOVA)is employed.. The method is based on the Taguchi method, and in order to analyse the performance characteristics, the signal to noise (S/N) ratio and analysis of variance (ANOVA) are used.
Turning
Turning is a very simple procedure that typically results in cylindrical surfaces. A lathe is the name of the machine tool used for this kind of activity. One of the most often used operations in experimental work and metal cutting is turning.
Cutting Factors in Turning are as:spindle speed: Speed always refers to the spindle and the work piece. In turning V in m/s is related to the rotational speed of the workpiece by the equation:
V = πDN
Where V is the cutting speed in m/s D is the diameter of the work piece, m; N is the rotational speed of the work piece, rev/s.
Feed: Feed is defined as the distance that a advance into the work during one revolution of the headstock spindle. It is usually given as a linear movement per revolution of thespindle or job. On most power-fed lathes, the feed rate is directly related to the spindle speed and is expressed in mm (of tool advance) per revolution (of the spindle), or mm/rev. F= f*N mm/min
Here, F is the feed in mm per minute, f is the feed in mm/revand N is the spindle speed in RPM
Depth of Cut
Depth of cut is practically self-explanatory. It is the thicknessof the layer being removed (in asinglepass) from the work piece or the distance from the uncut surface of the work to the cut surface, expressed in mm.
Tool nose radius: tool nose radius effects the strength of tool as well as it effects the surface roughness of the work piece very much
II. OBJECTIVE OF THE STUDY
The objective of this study is to illustrate the procedure adopted in usingTaguchiMethodtoalathe facingoperation.Theorthogonalarray,signal-to-noise ratio, and the analysis of variance are employed to study the performance characteristics on facing operation. In this analysis, four factors namelyspeed, feed and depth of cut and material removal rate were considered. Accordingly, a suitable orthogonal array was selected and experiments were conducted. After conducting the experiments the surface roughness was measured and Signal to Noise ratio was calculated. With the help of graphs, optimum parameter values were obtained andthe confirmation experiments were carried out. These results were compared with each other to find the optimum combination of the machining parameters for surface roughness.
III. LITERATURE REVIEW
Rajesh Mahto et al. [1].discussed the process parameter of heat treatment of low carbon steel by using Taguchi approachand Fuggy Logic approach. In bearing industry, when shell of bearing is heat treated then shell has not optimum hardness due to unsuitable process parameter such as carburizing
temperature, carbon potential, holding time and quenching time. So, his aim is to obtain optimizing condition of different parameter in order to get sufficient hardness of low carbon steel as per requirement. Taguchi and Fuggylogic approach both are optimizing software.
P. G. Inamdar et al. [2]. optimise the surface roughness in conventional turning operation using Taguchi Method for thematerialmediumcarbon steel EN8. In this work cutting speed, feed rate and depth of cut are taken as performance parameterstoachieve better surface roughness. Taguchi Method is used to obtained the main parametric effect on the surface roughness using their levels and factors. L9 orthogonal array is used to design the experiments. Also analysis of variance (ANOVA) was carried out with the significance factor of 95%. After the experimentation, it was found that cutting speed has more influenced on the surface roughness in conventional turning process than feed rate anddepth of cut.
Abburi et al. [3]. developed a knowledge-based system for the prediction of surface roughness in turning process. Fuzzyset theoryandneuralnetworks were utilized for this purpose. The authors developed rule for predicting the surface roughness for given process variables as well as for the prediction of process variables for a given surface roughness. Ali. et al. [4]. recognized the importance of achieving dimensional accuracy, good surface finish and maximum material removal rate in the machining process; and optimized the cutting parameters viz. Feed, cutting speed anddepth of cut for maximizing the surface finish and material removal rate for an aluminium alloy 6061. L-8 orthogonal array, signalto-noise ratio, analysis of variation has been employed to studythe process characteristics,and L8 Taguchi method experiment design has been used to optimizethe cutting parameters for the material using uncoated inserts.An experiment has been conducted to confirm and verify the effectiveness of Taguchi optimization method. Surface roughness andmaterial removal rate are found to be maximum at 11.6%and 14%; and minimum at 4.4% and 3.7% respectively. Cutting parameters viz. cutting speed, feed rate and depth of cut are found to be affecting the machining process at 45%, 36% and 19% respectively for minimum surface finish of 0.256 microns with an error percentage of 4.4%
Abhang et al. [5]. carried out the experimental work to optimize the cutting parameters viz. feed rate, depth of cut and lubricant temperature in the turning operation of EN-31 steel alloy by using tungsten carbide inserts. The work aimed at explaining and
demonstrating the systematic procedure of Taguchi parameter design; findingtheoptimalcombinationof cutting parameters using the signal-to-noise ratio; knowing the significance level of each cutting parameter usingANOVA analysis; and therefore, finding out the effect oflubricating temperature on the response i.e. surface finish. Ithas been proved experimentally that better surface finish can be observed with cooled lubricant and higher depth of cuts Al-Ahmari [6]. developed empirical models for tool life, surface roughness and cutting force for turning operation.The process parameters used in the study were speed, feed,depth of cut and nose radius to develop the machinability model. The methods used for developing aforesaid modelswere Response Surface Methodology (RSM) and neural networks (NN).
Ilhan et al. [7]. focused on optimizing turning parameters based on Taguchi method to minimize surface roughness (Ra and Rz). Experiments have been conducted using L8 orthogonal array in a CNC
MATERIAL USED
turning machine. Dry turning tests were carried out on hardened AISI4140 (51HRC)withcoatedcarbide cutting tools. As a result, they observed that the feed rate has the most significant effect on Ra and Rz.
Ahmed [8]. developed the methodology required for obtaining optimal process parameters for prediction of surface roughness in Al turning. For development ofempirical model nonlinear regression analysiswith logarithmic data transformation was applied. The developed model showed small errors and satisfactory results. The study concluded that low feed rate was good to produce reduced surface roughness and also the high speedcouldproducehigh surface quality within the experimental domain.
Choudhary et al. [9]. discussed the development of surface roughness prediction models for turning EN 24T steel (290 BHN) utilizing response surface methodology. A L8- OA factorial design technique was used to study the effects of the main cutting parameters such as spindle speed, feed and depth of cut, nose radius on surface roughness.
For the experiments, we have taken the Aluminum alloy. This Aluminum 6061-T6 alloy contain 95.8 to 98.6 % of aluminum, chromium which range is from 0.04 to 0.35% and copper 0.15, Iron 0.7. First of all we considered the microstructure of cooled Aluminum alloy which contain small amount of Manganese 0.15%, Silica 0.4%, zinc 0.25%.

Table 1 physical properties

Table 2 Mechanical properties
IV. EXPERIMENTAL PROCEDURE
From an Aluminum alloy bar, nine bars were cut bypower hacksaw
Turning operation is started after setting the workmaterial
Turning is done on nine individual bars as per L9-OA
After machining on lathe machine, we measured surface roughness of each bar by surface roughnesstester Two readings (repetition) on each bar was taken byhelp of surface roughness tester.
Taguchi experimental design is done and we find the optimal combination of factors and their levels.
Experimental Design
L9-Taguchi method, a powerful tool for parameter design of performance characteristics, wasusedtodetermine optimal machining parameters for minimum surface roughness in turning process. The optimal level of the
International Journal of Trend in Scientific Research and Development @ www.ijtsrd.com eISSN: 2456-6470
process parameters is the level with the higher S/N ratio. The lower the better criterion forthesurfaceroughness was selected for obtaining optimum machining performance characteristics.
For lower the better criteria, S/N ratio values correspondingto the experimentalvaluesofsurfaceroughnesswas calculated using the below equation.
Nine experimental runs based on the orthogonal array L9 were carried out.
Design of Experiments (DOE)
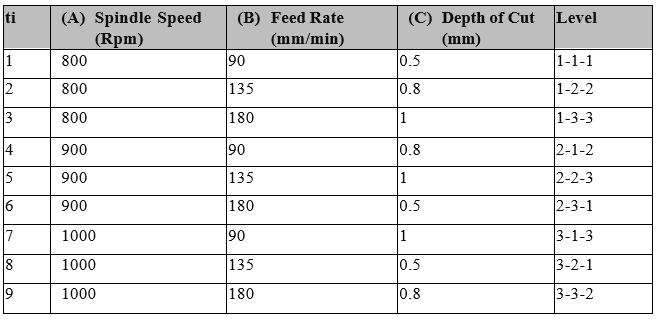
The DOE help for conducting experiments in a more systematic way. The process parameters with their levels are specified in Table no. 3 below.

Table No. 3
Orthogonal Array (OA)
OA allows for the maximum number of main effects to be estimated in an orthogonal manner, with minimum number of runs in experiment, L9 orthogonal array usedas shown in Table 4.
Table 4 Orthogonal array L9
V. RESULTS AND DISCUSSIONS
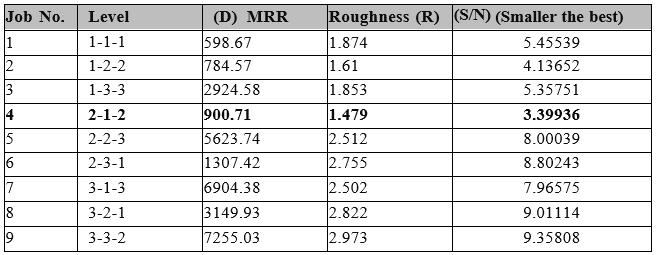
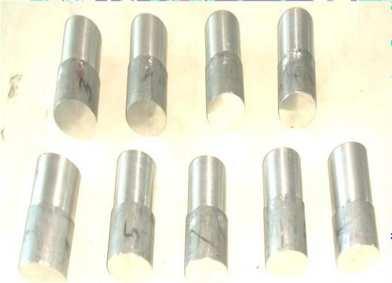
Nine experiments were successfully conducted based onTaguchi L9 method and machined samples are shown in Fig.
1. The experimental results for the surface roughness alongwith corresponding S/N ratios are listed in Table No.5.

Fig 1. Machined work piece
Table 5 Experimental Results and S/N ratio
Analysis of Mean (ANOM) In ANOM, mean value of the S/N ratio at each level of the process parameters is computedby taking arithmetic mean average of S/N ratio at the selected level.
Best combination so generated is A2 B1 C2 D
VI. CONCLUSION
This work presents an experimental study in which turning operation is performed on Aluminum 6061T6 alloy using carbide tool. The effect of four machining parameters namelyspeed, feed rate, depth of cut and material removal rate on the surface roughness was investigated. Experimentation was done as perTaguchi’s L9 orthogonal array. Response variable (surface roughness) was measured, signal to noise ratio values were computed, subsequently, and by investigation it was found that A2 B1 C2 D as best combination.
The analysis of mean is performed to obtainoptimum levelof machining parameters for surface roughness. Following conclusion is drawn from the present study:

Taguchi’s robust designwassuccessfullyusedfor optimizing turning parameters on Aluminum
6061-T6 alloy.

Optimal combination of the machining parameters for surface roughness is found to be A2 B1 C2 D, i.e., at spindle speed (A) at 900 rpm, feed rate (B) at 90 mm/min and depth of cut (C) at 0.8 mm, and material removal rate (D).
Tool Spindle speed contributes maximum (52.38%) followed by depth of cut (31.97 %) and feed rate (15.64%) to minimize the surface roughness.
REFERENCES
[1] Rajesh Mahto, Sunny Kumar, Shashi Kumar, Prof. Prakash kumar, Optimization of Heat Treatment Process Parameter using Taguchi and Fuggy Logic Approach in Bearing Manufacturing Industry by international Research Journal of Engineering and Technology (IRJET) e-ISSN: 2395 -0056
International Journal of Trend in Scientific Research and Development @ www.ijtsrd.com eISSN: 2456-6470
Volume: 04 Issue: 02 | Feb -2017
[2] P. G. Inamdar , N. S. Bagal, V. P. Patil , K. K. Bhosale , V. V. Mane, Optimization of Surface Roughness in Turning Operation of EN8 using Taguchi Method by International Advanced Research Journal in Science, Engineering and Technology National Conference on Design, Manufacturing,Energy&ThermalEngineering (NCDMETE-2017) Vol. 4, Special Issue 1, January 2017
[3] Abburi N. R. and Dixit U. S. “A knowledgebased system for the prediction of surface roughness in turning process” Robotics and Computer Integrated Manufacturing, Volume 22, pp. 363–372.(2006)
[4] Abdallah Ali. BhuveneshRajamony, Abdulnasser Embark., Optimization of cutting parameters for surface roughness in CNC turning machining with aluminum alloy 6061 material‟, IOSR Journal of Engineering04(10); 01-10. (2014).
[5] Abhang L.B. andHameedullah M. „Optimization of machining parametersinsteel turning operation by taguchi method‟ , International conference on Modeling,
Optimization and computing, Procedia engineering, 38, pp 40-48. (2012)
[6] Al-Ahmari A. M. A.”Predictive machinability models for a selected hard material in turning operations”, Journal of Materials Processing Technology, Volume 190, pp. 305–311.(2007)
[7] AsilturkIlhan, AkkusHarun, Determining the effect of cutting parameters on surface roughness in hard turning using the Taguchi method, Measurement 44 1697–1704. (2011)
[8] Ahmed S. G. “Development of a Prediction Model for SurfaceRoughnessinFinishTurning of Aluminum”, Sudan Engineering Society Journal, Volume52,Number 45,pp.1-5.(2006)
[9] Choudhury I.A., EI-Baradie M.A., Surface roughness prediction in the turning of highstrength steel by factorial design of experiments, Journal of Materials Processing Technology 67, 55-61, (1997)
[10] Davim J. Paulo, Gaitonde V.N., Karnik S.R., Investigations into the effect of cutting conditions on surface roughness in turning of free machining steel by ANN models, journal of materials processingtechnology205, 16–23. (2008).
