

Midsummers Night’s Dream
Breakdown Bible
Director: Aileen Gonsalves
Designer: Hannah O’Brain, Ella
McAnuff, Emmy Carter
Supervisor: Sophie Canniffe
Assistante Supervisor: Amelia Bavin
Breakdown Artist: Lilli Jeffries
Student Number: 2100292


Script Breakdown


1-7
Athens
The Palace of Theseus
Day
7-11
Athens
Day
Theseus is trying to marry Demetrius and Hermia but Hermia and Lysander are in love.
Hermia and Lysander plan to run away
Helena is in love with Demetrius but he doesn’t love her back
Theseus
Hippolyta
Philostrate
Egeus
Hermia
Lysander
Demetrius
Helena
Quince is giving all the actors there roles for their next play
Quince's House they all agree to meet for rehearsels in the woods
I 11-17 A Wood near Athens
Quince
Snug
Bottom
Flute
Snout
Starveling
Act II
Aftern oon
Puck and Moth meet Moth
Titania arrives back from her travels Puck
Oberon and Titania are in a fight 3 Faires
Oberon orders puck to get him a flower that he will use to make Titania full in love with the first thing she lays her eyes on
Oberon Helena chaces Demetrius into the woods confessing her love as he rejects her
Titania Oberon askes puck to make Demetrius fall in love with Helena using the flower
Demetrius
Helena
II
18-22
Another part of the Woods Evenin g
While Titania Sleeps Oberon uses the enchanted flower on her
Puck finds Hermia and Lysander sleeping and confuses them for Helena and Demetrius and usues the flower on Lysander
Lysander gets woken by Helena and falls in love with her
Titania
Moth
Other Faries
Oberon
Lysander
Hermia
Helena
Demetrius
Act III
I 23-27 The Wood Morning The group of actors meet in the woods to start rehearsals
II
27-36
Titania
Puck gives Bottom an Ass's head Quince Titania wakes up and falls in love with Bottom
Snug
Bottom Ass's Head Wear when reentre
Flute
Snout
Starveling
Puck
Peaseblossom
Cobweb
Moth
Mustardseed
Another part of the Wood Evening Oberon and Puck meet and realise puck has confused the Lovers
I 36-42 The Same part of the Woods Day
Oberon
They use the flower on Demetrius Puck
Demetrius awakes and falls in love with Helena
Hermia
The Lovers Fight
Demetrius Puck and Oberon fix their mistake
Act IV
Titania and Bottom ejoy each others company with the other faries
Oberon fixes Titania and they forgive each other
Demetrius and Helena awake and are in love with each other
Lysander and Hermia awake and are in love with each other again
Bottom awakes and no longer has a Ass's head
Lysander
Helena
Lysander
Demetrius
Helena
Hermia
Titania
Brokendown clothes
Muddy and a little bit torn
Brokendown clothes
Muddy and a little bit torn
Bottom No Longer has donkey head taken off after he wakes up
Cobweb
Peaseblossom
Moth
Mustardseed
Oberon
Other Faries
Puck
Theseus
Hippolyta
Egeus
I
II
42-44
Athens Day
Quince's House
Bottom is returned with is friends and they talk of performing at the Lovers wedding
Quince
Flute
Snout
Starveling
Snug
Bottom
Act V
44-51
Athens Day
The Palace of Theseus
The Acotors perform their play to the lovers
Puck closes the play
Theseus
Hippolyta
Philostrate
Lysander
Helena
Hermia
Demetrius
Quince
Wedding Costumes
Snout Wall Costume Hole Needed through the costume
Bottom (Pyramus) Pyramus Costume
Flute (Thisbe) Thisbe Costume
Snug (Lion) Lion Costume
Starveling (Moonshine)
Puck
Oberon
Titania
Moonshine Costume


Costume Plot
Research


A Midsummer Night’s Dream
A Midsummer Night’s Dream is a comedy play written by William Shakespeare, likely written between the years 1595-1596 and published in 1600. The play weaves together multiple stories about a four lovers, a group of armature actors and mischievous fairies.
The story starts in Athens where Theses, the duke, and his wife Hippolyta are trying to arrange Demetrius to marry Hermia, the daughter of Egeus, however Hermia is in love with Lysander, and they plan to run away together. Helena, who is in love with Demetrius, tells Demetrius of their plans and they follow them into the woods.
The plays focus changes to the group of actors where we meet Bottom, Quince, Flute, Snug, Snout and Starveling, they discuss their roles for their upcoming play.

The next scene changes again to an ancient wood near Athens where the fairies live. Titania, queen of the fairies, arrives back from her travels with her newly adopted child, Oberon, king of the fairies, arrives as well and they argue about custardy of the child, for revenge Oberon asks for help from another fairy called Puck to trick the queen into falling in love with a monster using a magic flower that makes you fall in love with the first person you see. Oberon sees Demetrius running away from Helena as she confesses her love for him, Oberon then asks puck to fix their relationship.
Later, in the woods Hermia and Lysander find a place to rest, Puck finds them and confuses them for Helena and Demetrius and uses the flower on Lysander, Helena finds Lysander and wakes him up making Lysander fall in love with Helena.
Figure 4: Poster for A Midsummer Night’s Dream (Hoffman, 1999)

The actors make their way into the woods to rehearse their new play, puck finds them and gives Bottom an ass’s head, Titania wakes up seeing bottom and falls in love with him.
Everything turns onto a mess with the lovers, Oberon notices Pucks mistake and fixes his mistake. Oberon also realises he went too far with this revenge against Titania and reverses the spell, turning Bottom back into a man. Theseus finds the lovers and agrees for Lysander and Hermia to be together and for Demetrius and Helena to be together, the actors are reunited and prepper to perform their play to the Lovers and the Duke. The final scene shows the actors perform their tragic romance to the lovers and the Duke.
Titania:
Titania is the queen of the fairies and wife to Oberon. Her character is based on the fairy queen from traditional folklore, the fairy queen doesn’t have a name, but Shakespeare took her name from Ovid’s Metamorphosis which the daughters of Titans are called ‘Titania's’.
She is one of Shakespeare’s strongest female characters, as she is shown to stand up for herself in her argument with Oberon. However, she also shows how women can be oppressed by powerful men as Oberon uses magic to make her lovesick girl that would do anything to please a man.

Figure 5: Bottom (Kevin Kline) and Titania (Michelle Pfeiffer) in A Midsummer Night’s Dream (Hoffman, 1999)
Figure 6: Titania (Vivien Leigh) in A Midsummer Night’s Dream (Guthrie, 1937)

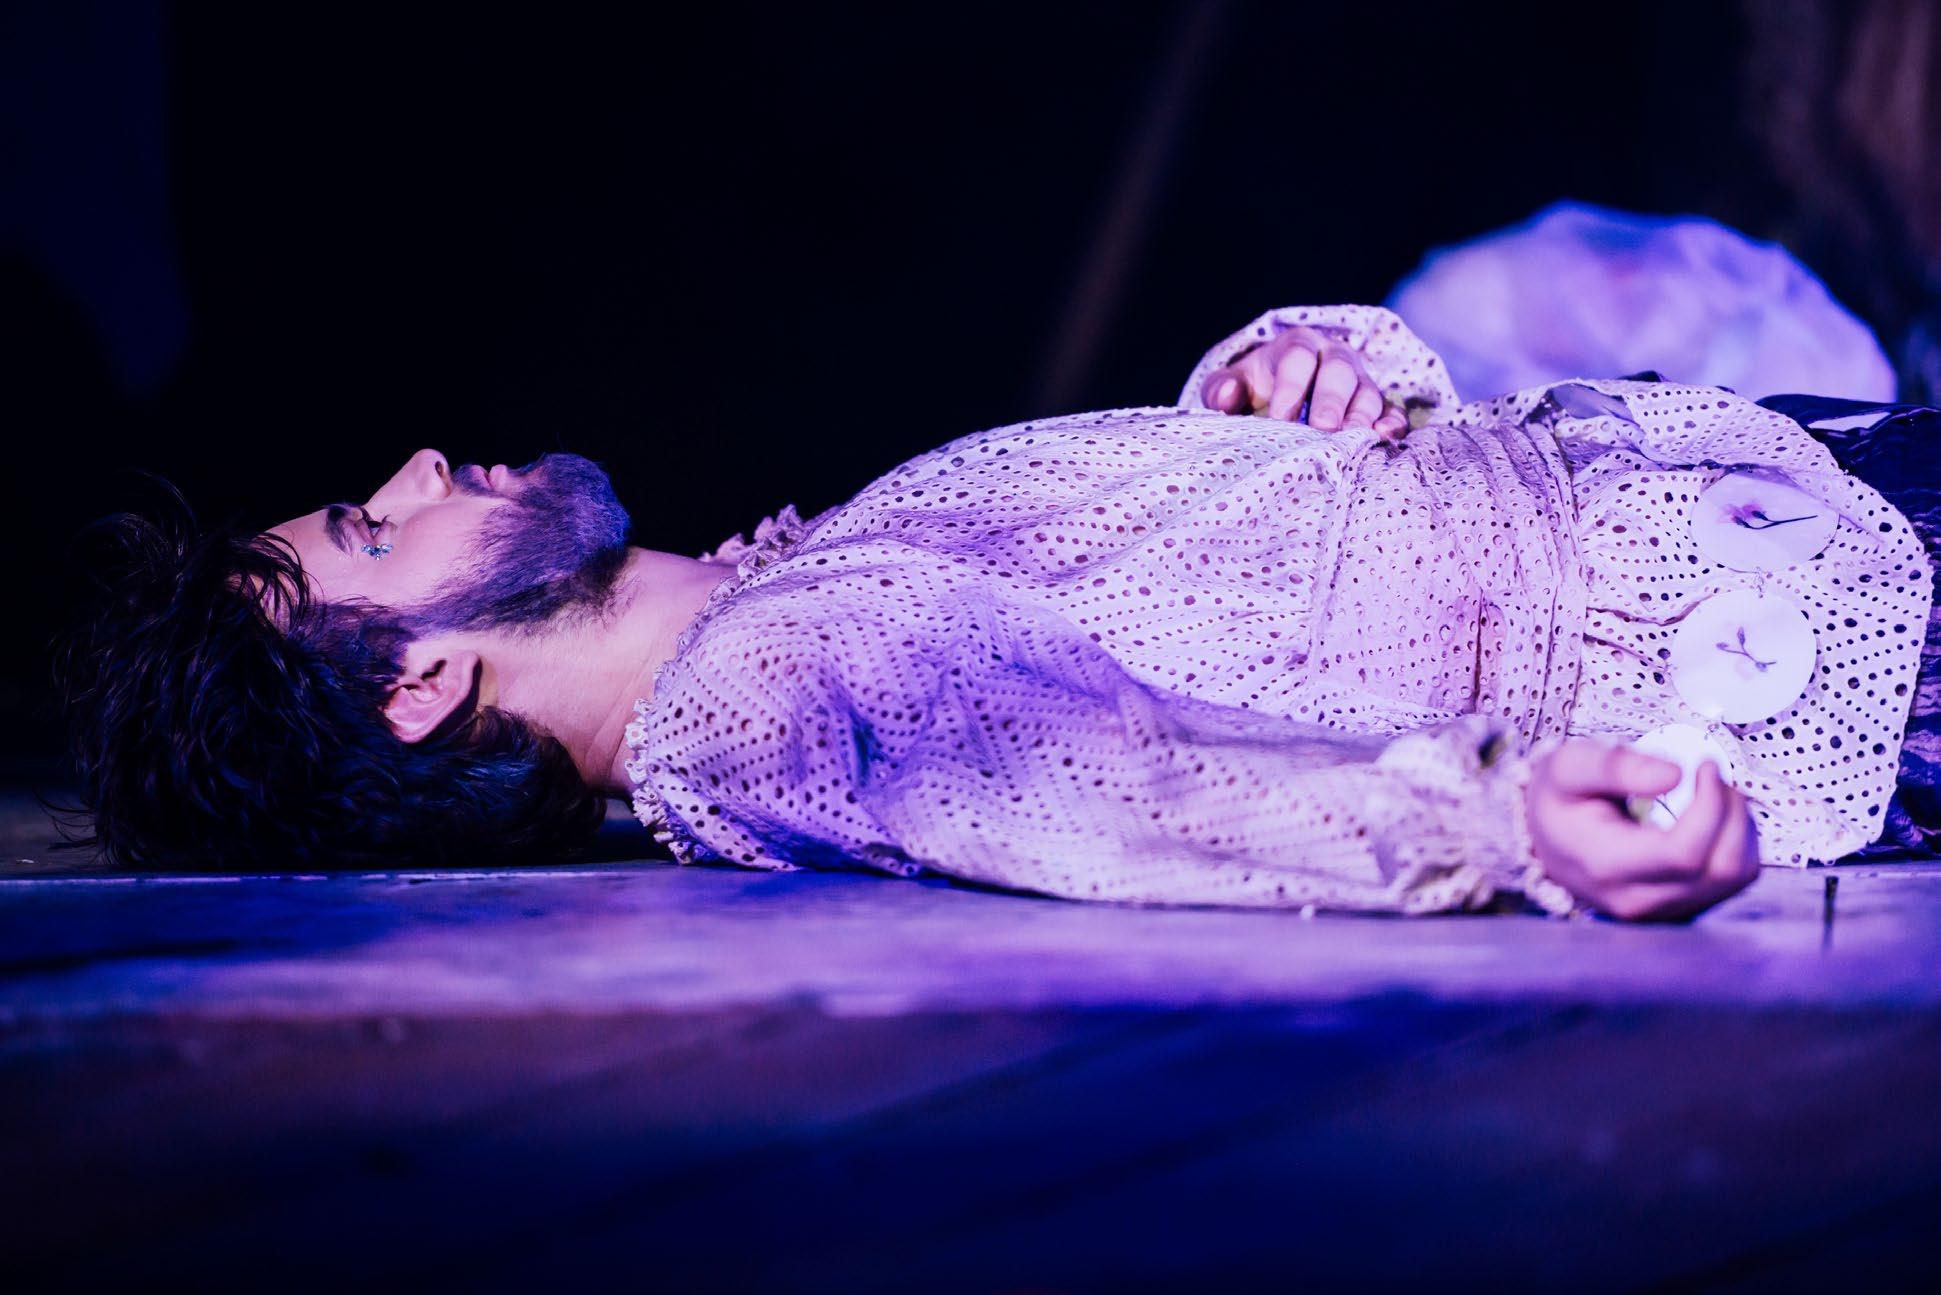
Nick Bottom:
Bottom is an armature actor which brings a lot of comedic elements to the play form being obnoxious to his own actions to being given the head of and Ass.
He also has a big ego; he thinks he is good enough to play all the characters in their play. Also, after his head turns into an Ass’s head and Titania falls in love with him, he happily accepts the attention he was given by the fairies.
Oberon:
Oberon is the King of the fairies and the husband of Titania. He tries to act omnipotent towards his wife and the lovers, he involves himself in the lovers' relationships causing them to have more complicated problems from when they first arrived in the woods.
He also uses the same trick on Titania to make her fall in love with Bottom with and Ass’s head to make her make a fool out of herself. Overall, he plays the typical power-hungry male figure that needs to have control over everyone in his life.
7: Oberon (Steven McRea) in The Dream (Ashton, 2017)
Figure 8: Illustration of Nick Bottom

Figure
Demetrius:
He is one of the lovers and was chosen by Hermia’s father Egeus to be betrothed to him, but she refuses to marry him, also he was previously betrothed to Helena who is still in love with him. He is quite a cruel character; at the beginning of the play, he’s mean towards Helena saying he hates her and feels sick to look at her. He’s also very stubborn not getting hints from Hermia that she doesn’t love him.
Lysander:
He is another one of the lovers, he’s in love with Hermia even though no one approves of their relationship, so they plan to run away together. He’s and romantic and loyal character, he impressed Hermia with poetry and presents and stays loyal to her throughout the play, despite being brainwashed by the fairies.
Hermia:
She again is one of the lovers, she’s in love with Lysander but is betrothed to Demetrius and plans to run away with Lysander. She is independent and fierce and shows a couple of times throughout the play to stand up for herself, once when she is told to marry Demetrius and another time when Lysander is tricked to be in love with Helena.
Helena:
Helena is the last of the lovers, she has been previously engaged to Demetrius and is still in love with him. Throughout the play she’s frustrated and stressed that Demetrius doesn’t love her back them her frustration changes as Demetrius and Lysander both fall in love with her.

Figure 9: The Lovers form A Midsummer Night’s Dream (Dieterle, 1935)
British Folklore
Folklore is traditional myths, stories and beliefs of a community that is traditionally passed down by generations through stories and music. It is important to a community's history and cultural identity; it can often show insights to shared experiences and the community's way of life. They usually tell stories of magical creatures, monsters or of gods and goddesses and heroes.
The Green Man:

10: The Green Man
The Green Man is a being that is usually associated with nature and the protection of the natural world, he is often seen as a symbol of fertility and rebirth. He is commonly depicted to have a man's face that’s made from leaves and surrounded by leaves.
The Black Shuck:
The Black Shuck is usually depicted as a large black wolf like dog with glowing eyes, it is said to be found around the east Anglian region of England. It often appears to lone travellers or people who are lost, it is associated with death and bad luck..
The Brownie:
Brownies are small household spirits the does chores and helps around the house in exchange for gifts, food or clothes. However, if its offended or mistreated it can turn into a mischievous creature.

11: A Brownie
Figure
Figure
Fairies:
There are hundreds of types of fairies, they can be small to giant, some have wings that can fly, and some can just appear and disappear at will. Fairy is usually a term that is used to describe a human like spirit or magical being. They go by many names Pixies, Nymphs, Little People, Hidden People, Gnomes, Sprites and Goblins.
Origins:
The first record of Fairies was in the 13th century described by Gervase of Tilbury.
Fairy or Fairie comes from the old French word Fea or Fay which originated from the Latin word Fata which translates to ‘the Fates’.
This could explain why people believe these beings have the ability to play with people's destiny or be able to see their future.

Figure 12: Illustration of a Group of Fairies
It is believed that the origins of fairies in Celtic nations of the British Isles could have been describing a race of diminutive people that were driven into hiding by invading populations, but the story goes they were pushed into inhabitable places slowly becoming smaller and smaller. Until the 13th century, people started to associate fairies with magical characteristics, and they could rage between any size.
Another origin comes from British Paganism, where they were worshiped as minor gods and goddesses such as nymphs or sprits, they also believed that they worked for druids by helping them out with their magical deeds.
Another origin comes from Christian Mythology which probably changed the story of traditional folklore, so it fit with Christian Mythology. The fairies came around the same time the angles revolted, and God ordered to shut the gates of heaven, those who were in heaven remained angles and those who were in hell remained demons, but the beings stuck in-between on earth became fairies.

Lifestyle:
They are believed to live in their own realm, which can be found in any natural environment such as forests or near rivers.
It is said they rarely come out during the day and prefer to come out at night, were they dance, frolic, play music and cause mischief, they love all things beautiful and pleasurable.
It is known that if you kind to the fairies and treat them with respect they can help you and grant you wishes but they are more known to cause mischief by pranking humans.

Figure 13: Dancing Fairies by August Malmstrom, 1866
Figure 14: A Midsummer Night’s Dream by Gustave Dore
Break down Techniques
“Break Down” is a term used to describe when an artist creates effects required on a costume that has been influenced by environmental conditions and factors. It can vary from making a costume look worn, old, sweaty, dirty and muddy or covered in blood.
A breakdown artist needs to think about the context behind the costume they need to ask questions about the characters lifestyle or situation.
Questions such as:

15: Costume from
• What's the characters finical situation
• Why are they dirty, if so, would they try and clean the dirt off?
• What kind of dirt is it, is it muddy or dusty?
• How old if the blood on them and where has it come from?

It is important for the artist to stick to realism that helps connect the audience with the character by making the story more believable, instead of the actors looking to fake.
16:
Figure
Harry Potter
Figure
Before and After of a broken-down shoe
Tools:
Many different tools can be used to create rips and tares in clothing.
• Steak knife
• Seam unpicker
• Files
• Nail brushes
• Ruffer
• Craft knife
• Cheese graters
• Scissors
• Sandpaper
• Pliers
Each tool creates different levels of distress, some for more details and controlled rips and some for chaotic distress.

17: close up of distress

Figure 18: The Sadness (Jabbaz,2021)
Blood:
Sweat:
Sweat patches can be created using a mixture of water, oils and glycerine. Tea bags of watered down tea mixtures can be used to make old sweat staining on white clothing.
Blood can be made from different watered-down dye solutions with different thickeners can be added to change the consistency. The colour of blood can vary depending how old it is, fresh blood is fairly bright red but not to pinkish but as blood starts to dry is becomes darker making it seem brown or black.
Figure
Dirt, Dust and Mud:
For dirt and debris, the artist needs to know where the dirt has come from.
• Is it sand from the desert. If so what desert and what type of sand is it?
• is it mud, if so, is it wet or dry, what kind of soil is it?
• Is it dust from a falling building?
Fake dirt can be made from many different safe to use powers which you can leave as a dust from or add liquids to make into a mud.


Figure 19: Stanislaus Katczinsky played by Alberecht Schuch in All Quite on the Western Front (Berger, 2022)
Aging:
Costumes would require aging if a character has owned an item of clothing for a long period of time. Aging could range from wrinkling a shirt to making the costume look decayed.
Tea staining is always a popular technique to discolour garments. Areas with high contact levels such as hem lines, necklines (especially on collars), knees and elbows would start to be worn down. This can be mimicked from using a file or sandpaper on the worn-down area.
Figure 20: Distressed Dress worn by Lily Collins who played Lucy Pace in Priest (Stewart,2011)
Notes Taken form How costumes are destroyed of movies & TV:
By Insider
The video is interviewing breakdown artist Sarah Blostein, about the work that she does and the techniques she has used for films and TV shows she has worked on such as The Boys (2019-present) and Ready or Not ( Gillet & Bettinelli-Olpin, 2019)
• Every piece of clothing on a film need some kind of manipulation
• Mainly its form use
• Stuff such as bullet holes might need a little more manipulation to stand out better to the audience rather than making it look realistic
• Such as painting black paint around the holes to mimic (which wouldn’t happen in real life)
• Steak knife can be used to rip clothes, but they are hard to control
• Craft knives and seam rippers are easier to use
• Files,ruffers and nail brushes creates more destructive tares
• Cheese garters are good for tougher material.
• Fresh blood is a brighter shade of red ( #68190C / #6E2C21)
• As it dries it becomes darker ( #2C1F19)
• Two separate shirts for the old and new blood
• The two shirts need to match up perfectly
• Blood drips on plastic (print on t-shirts)
• Blood soaks into fabric
• Silicone makes the blood look thicker and wet
• Latex is good for clots
• Clothing must reflect the context
• You have to think about the context and the story behind the characters clothes.
• Using real dirt is unpredictable as it can stain
• Ground up nonpermanent powder for mud stains
• Diatomaceous Earth can be used to simulate dust
• Cellulose (used for house instulation) can also be used for bigger chunks of debris
• Sweat stains can be simulated with a mixture of glycerin,water and oils
• It is sprayed on and is also anit-run so you can control where is goes
• For more expensive costumes samples would be made to be sewn onto the costumes
• They can collaborate with the make-up department to create wounds you can see through the rips.
Lino Printing
Lino printing is a printing technique which involves cutting the design into a sheet of lino, also known as linoleum.
Linoleum is made from linseed oil. The linseed oil is heated in thin layers causing it to thicken and turn a rubbery texture, it is then pressed into a mesh to help it hold together.

It was first invented by Fredrick Walton in 1860 who was trying to find a cheap alternative rubber for floor covering, which it is still used for today. It was first adopted by the German Expressionist movement as a cheaper alternative to using woodcut for printing, its smoother texture allowed for more solid, fluid lined prints and its softness allowed for quicker and less strenuous work to carve.

After World War II they became popular in schools due to their affordability and they were relatively safer to use than carving wood. After the DIY and crafts movement in 1950s lino has remained a popular artistic hobby.
Figure 21: Different coloured Linoleum
Figure 22: Carved into Lino Print
Lino Printing is simple and easy to do at home. You will need:
• Linoleum Block
• Lino Cutting tools
• Lino Printing ink
• Printmaking brayer (Ink Roller)
• A flat tray to roll the ink onto You will also need pens of pencils to draw out you design onto the lino.
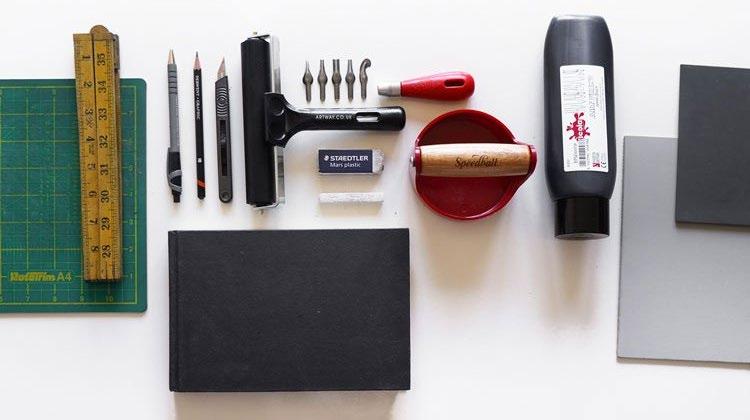
Figure 23: Equipment needed for lino printing
To lino print first you’ll need to sketch your image and trace it into the lino using tracing paper or carbon paper. Once it's on the lino you can carve out the design, using the right size gouges, carve into the negative space making sure that the areas that you want to be printed will stay raised. Once the design is cut out you can roll the ink out onto a flat surface, you can also mix two colours by rolling them together with the brayer. Then roll it out on the lino making sure it has even coverage. Place the lino block facing down onto your paper or fabric, roll over the lino using a clean brayer, pressing down hard to ensure the ink would print evenly, them peel it off. Once you done with the print wash the print and brayer with water.
Single Colour Lino Print:
This is the simplest style of lino printing. You cut the design once and only use one colour, usually black on a white background as it has the biggest contrasts.
You would follow the same steps and tools as I have mentioned previously.

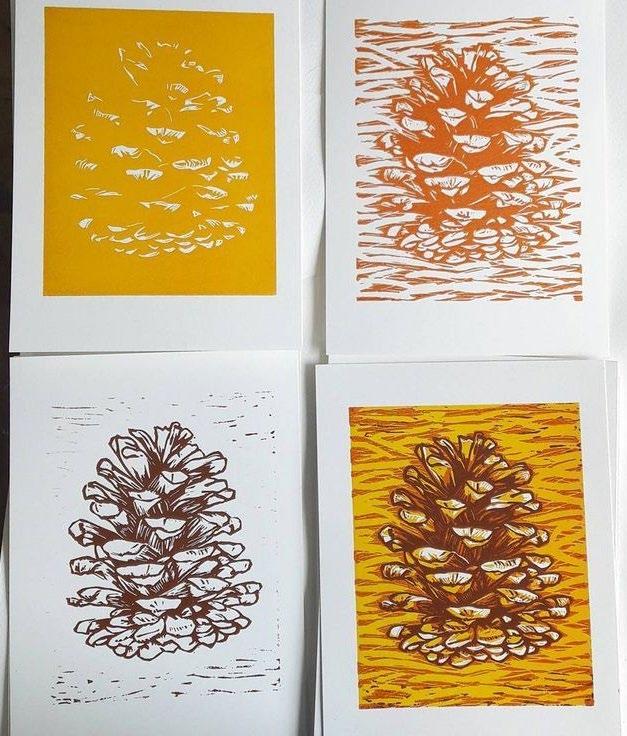
Reduction Lino Printing:
This is when multiple colours and layers is used for the print. They are usually printed form one piece of lino, cutting into it again once you’ve printed the first layer. It can be done with multiple sheets of lino but it's easier to line up with the same lino sheet.
The first print is usually to mark out the silhouette of the patten, all the layers after that slowly build up the image, using a different colour for each layer.
Figure 24: Single coloured lino print
Figure 25: Reduction Lino Printing
Ancient Greek Architecture
Ancient Greek architecture is known for its giant temples, theatres and statues. It will go on to influence Ancient Roman architecture which goes on to provide the foundation ideas for classical architectural styles in western architecture.


Figure 26: Knossos, Crete
Materials:
They used simple materials that were easily accessible to them. Wood was used for support and roof beams; it was also used for furniture and decorations. Plaster was also commonly used for installing sinks and bathtubs.
Unbaked brick or mudbrick is an air-dried brick which is made from clay, water, sand and loam. This was typically used for walls in wealthy, upper class homes or building. Figure 27: Mudbrick
Limestone and marble was also commonly used in Greek architecture, it was used for walls, columns, temples, public buildings and statues. It is the geology of Greece that gives it’s iconic almost white look. Greece is primarily made up of sedimentary rocks such as limestone and sandstone. Sedimentary rock is formed from sediment such as sea creature skeletons, that falls to the bottom of bodies of water and over time gets compressed forming more solid rocks. It gets its pale colouring form high levels of calcium carbonate from the sea creature skeletions.
Forest Floors
The Forest floor is the last layer in a forest's ecosystem. It has the lowest levels of sun light which stops the growth of plants like grass but plants that don’t require as much light such as moss and fungus tends to thrive here.


The soil provides water and nutrients for trees and other plants through their roots. The nutrients are provided by the decomposing leaves and other organic material which decomposes into the forest floor.
The colour of the soil varies depending on the minerals found in the soil. Reddish soil is a result from the ground having iron oxide and clay, usually with a acidic Ph level. Yellowish soils again have iron oxide but with lower nutrient levels.
Forests mostly have dark soils, this is due to the soil being highly fertile with high nutrients levels, it could also be due to the soils level of moister as soil tends to get darker as it gets wet.
Figure 28: Forest Floor
Figure 29: Forest Ground

Breakdown Process


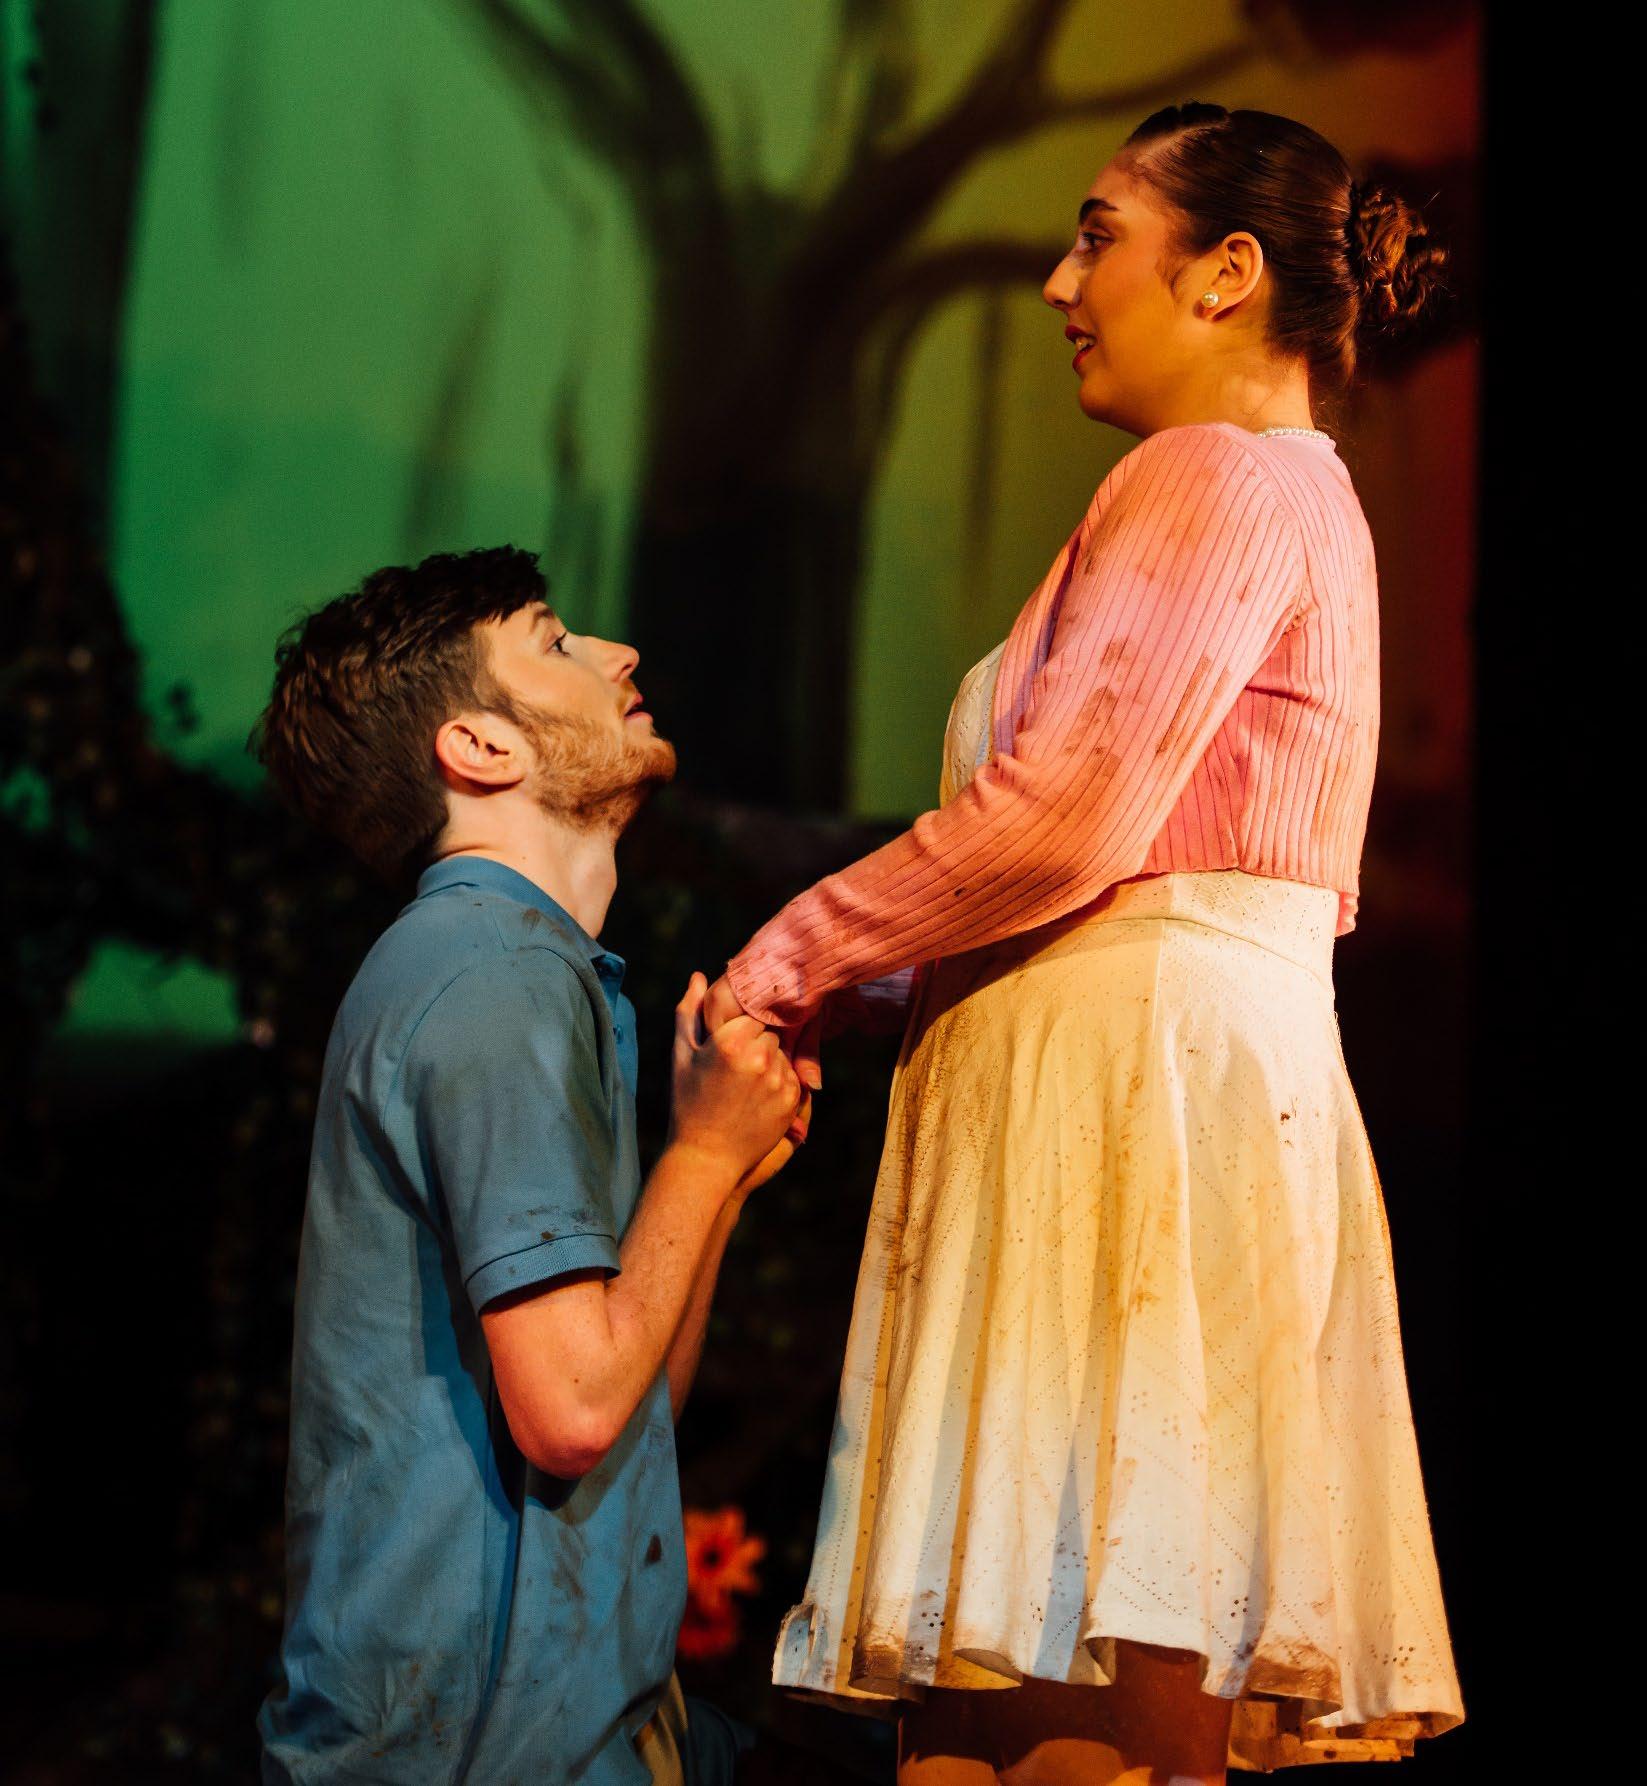
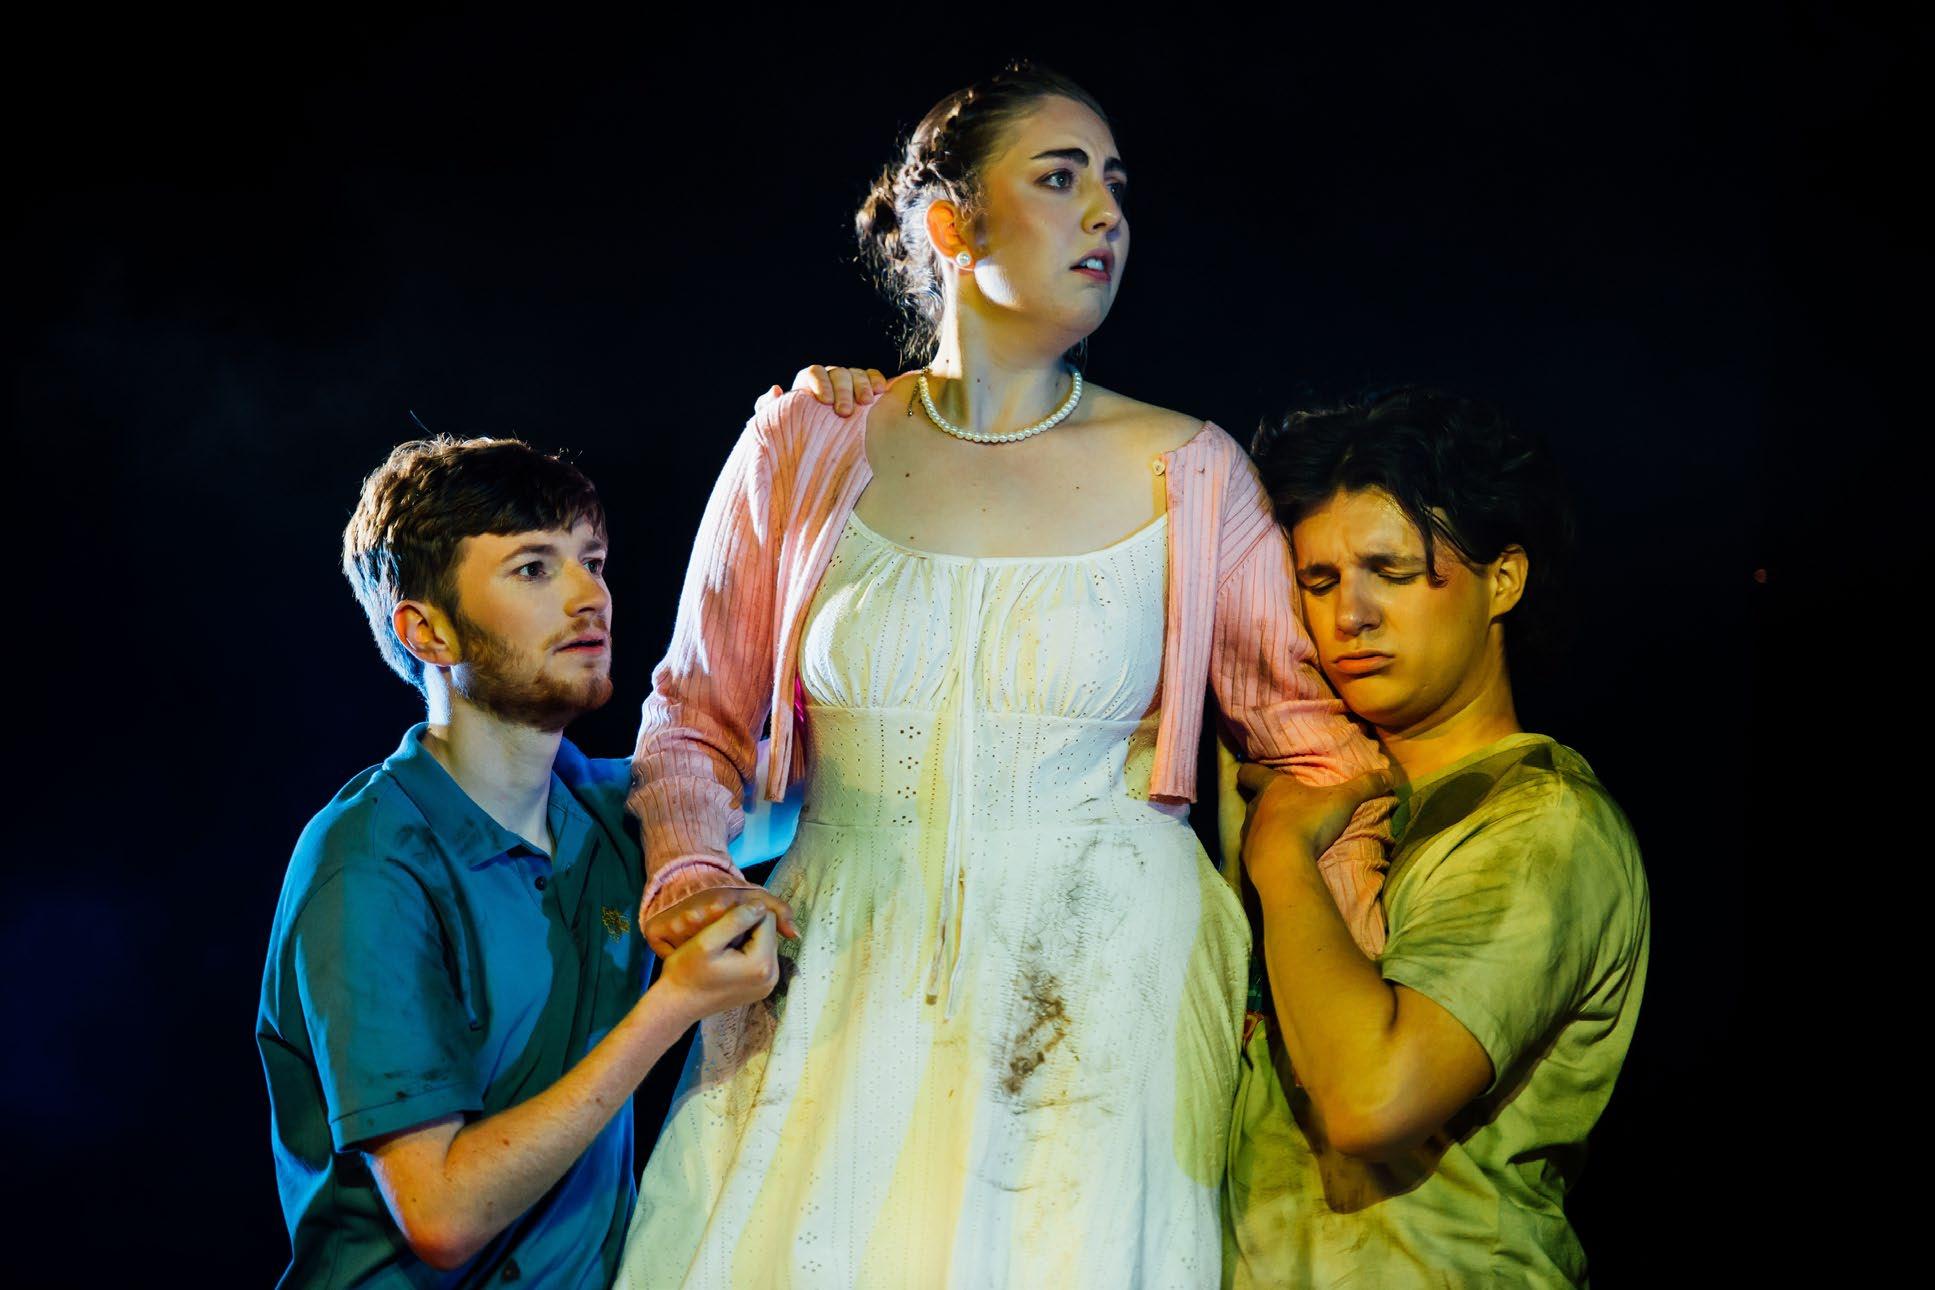
The Lovers

By Hannah O’Brien

By Hannah O’Brien

By Hannah O’Brien

By Hannah O’Brien
Mud Stains

Stick to dark shades of brown (mix pigment into the Fullers Earth)


Wet mud marks leaves clumps (use PVA and Vaseline mixture for those)
Dry mud will still stain but leaves dusty looking marks (use water mixture)

Wet mud has water marks around it from when the fabric absorbs the water (use Vaseline or paint)
Different Ways to Make Mud
Throughout the play the Lovers spend a long time in the wood, eventually their clothes would get dirty from lying down on the ground to sleep to just walking around the woods, which is shown form Act III Scene II . I sampled different ways to make mud stains and marks.

The Fullers earth by itself creates a chalky type of mud so it would need to be made darker to look like rich mud you find in woods.
Fullers earth with PVA creates a thick, half wet mud look.
First, I tested mixing Fullers earth with different substances.
PVA Glue:
I first mixed fullers earth with PVA glue, seen on the sample on the left, and I also tried it with brown pigment with, seen on the bottom sample.


The mixture creates a dry dusty look when a thin layer is applied to the fabric.
When a thick layer is applied to the fabric it creates this thick dry look, by cracking.
Water:
I them mixed the Fuller Earth with water, as seen on the left, I again added brown pigment to darken it down, as seen on the bottom sample. You can get the same affect by adding just pigment to the Fullers Earth.

This would be best used on clothes that have got muddy a while ago of got dirty in dry or hot climates.

The Vaseline mixture crates a wet mud smudge when a thin layer is applied but when it is applied in a thick layer it doesn’t dry. Both samples, the one above and to the right were left to dry naturally.
Vaseline:
Next, I mixed the Fullers Earth with Vaseline, as seen in the sample on the left, and did the same mixture but added pigment to it, shown in the sample below.


For this sample, the top two marks were a mixture of brown pigment and Vaseline then ironed down, leaving a wet mud patch to the fabric. The mark below is Vaseline, Fullers Earth and Pigment that has been ironed in, it creates a thicker wet mud look with the grease mark forming around the mark adding to the stain.
35
Latex:
I mixed Fullers Earth and Latex together, after of 5 seconds of the substances being mixed the concoction had solidified, making it unusable. As shown in the figure to the left.
Instead, I mixed latex and pigment together. When the mixture is applied to the fabric in a thin layer it again creates a muddy damp mark, as shown in the bottom marks in the figure on the right. However, when a thick layer of latex is applied to the fabric it dries shinny and rubbery, this makes a fresh wet mud stain look, as seen in the figure below.


For this sample I used the same first layer as the other sample, but the second layer is PVA glue mixed with Fuller Earth and brown pigment.
This again creates the look that the mud has soaked into the trouser hem, but the PVA mixture makes it look like the character is walking through thicker mud that has started to build on the hem of their trousers.
For this sample I layered the Vaseline, pigment mixture as the first layer with the latex, pigment mixture as the second layer. This creates a runny wet mud look.
They Vaseline layer adds a damp patch as the wet mud begins to soak into the hem of the trousers. The mud would start to be splattered up the back of the trousers from the mud being flicked off the characters shoes while walking.


For this sample I made a dryer mud look form old mud stains. The character could have marks down the front of their thighs from rubbing their dirty hands down their trousers. I used the water mixtures to crate this look.
Mud would get caught in seams and stuck in groves on the clothes, I used the PVA mixture to squish into the metal clasps. I also used the water mixture up the side seam.
I also used subtle breakdown to the sample before adding any mud. I used sandpaper to wear down high contact areas such as the belt loops, zip fly and button, and the base of the pocket form objects rubbing from the inside of the trouser pocket.
Iron on Printing
For Lysander and Hermia’s costumes they have a logo on their T-shirts. We decided that the design was to intricate and would require to many layers for screen printing or lino printing, so we decided to use iron transfer paper.

Once cut you peel off the protective layer and place on you desired garment.
Place parchment paper over the top of the design and iron on for a couple of minutes while pressing down hard.
Once ironed down leave to cool.
The logo design was provided by the designer, Hanna O’Brian.
The iron on transfer paper was quite simple to use. You first print you design onto the paper and cut it out, so there is no white space left.

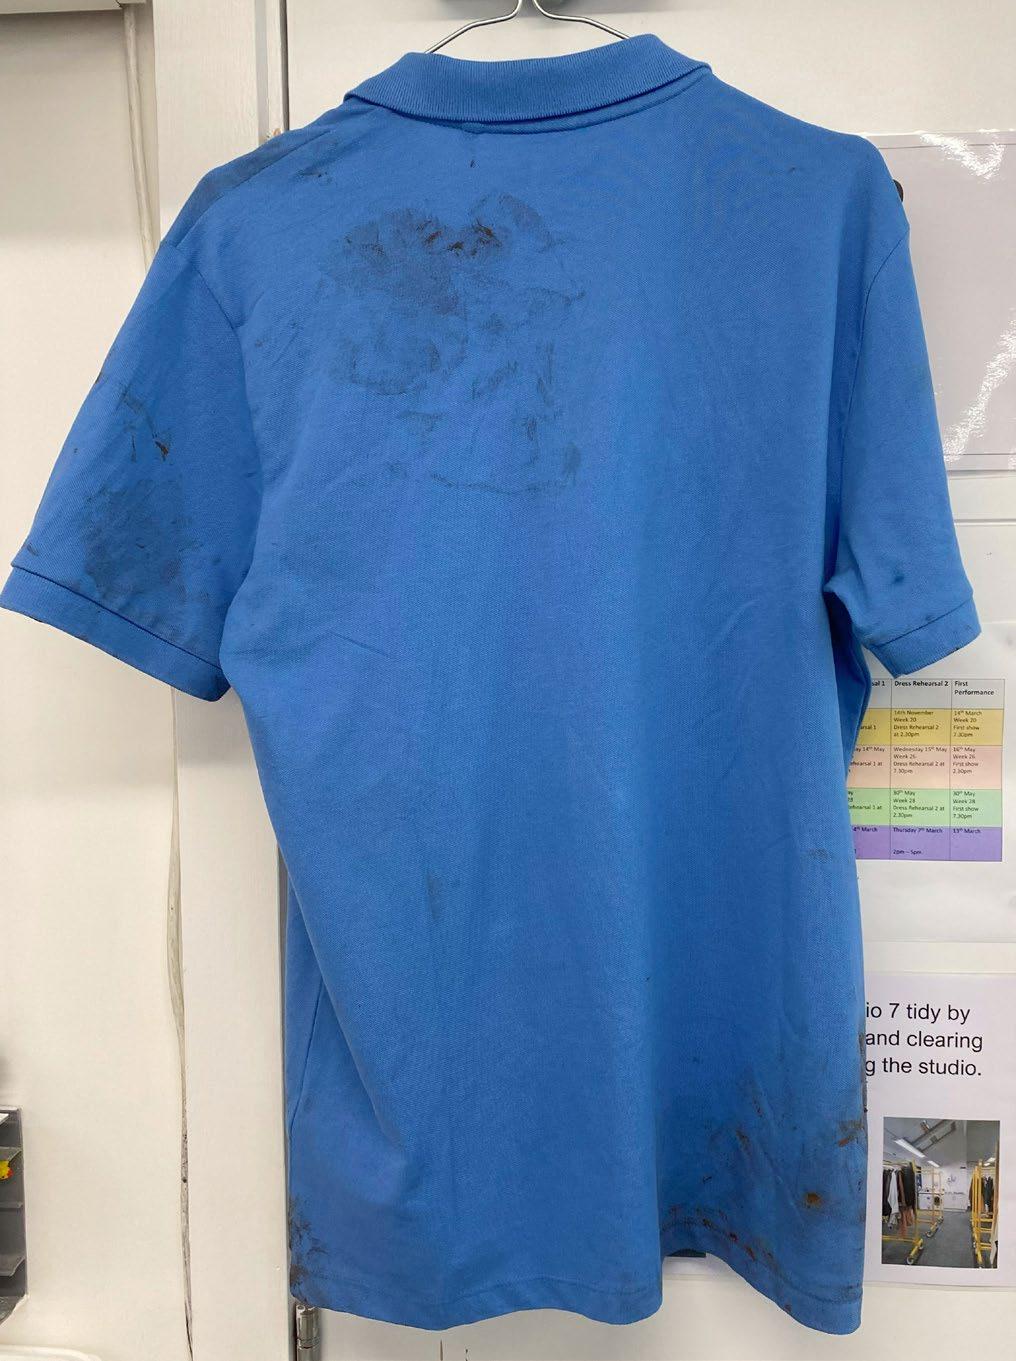
Demetrius Outcomes

Front and back of Demetrius shirt before breakdown.


Front and back of Demetrius trousers before breakdown.


I used a mixture of water and fullers earth as the bottom layer them added a mixture of PVA Glue and fullers' earth as a top layer of the mud patches.
Front and back after breakdown.
I added patches of mud around the polo shirt, form the character sleeping on the ground.

Front and back of Demitrius trousers after breakdown.


Over the top of the Vaseline, I added a mixture of PVA and Fullers Earth, to be the thicker mud that clings to the hem of the trousers.
For the trouser hems I wanted to look like they have been strolling through mud for a while.
For the first layer I ironed in dyed Vaseline.


For the bottom layer I added a mixture of water and fuller earth and then for the top layer I used a mixture of PVA Glue and fuller's earth.
Down the front, back and side of the thighs I smeared fake mud down them from wiping his hands down his trousers and sleeping on the ground.
I also added smaller mud patches around his belt loops and fly. This is marks form his muddy hands when touching his trousers.

Pre-Assessment
Front Back Side


• His shirt needed to be more muddy

Helena’s Outcomes


Front and back of Helena’s dress before Breakdown

Front and Back of Helena’s cardigan before breakdown


Helena’s shoes before breakdown.
Helena’s shoes are the only pair of shoes out of the lovers that needed breakdown because they were sourced and looked too new compared to the rest of her costume.


I added mud stains to her back form her having to sleep o the ground.
I used a mixture of water and Fullers Earth for this and genteelly applied it with my hands.
The front and back of Helena’s cardigan after breakdown.


I added mud around the ends of her sleeves from her having muddy hands from sleeping on the ground and it's rubbed off.
I used a mixture of Fullers Earth and water for this, and I darkened it down using brown pigments.
I created snags and pulls on the cardigan with a seam ripper from branches catching on her clothes.


I also added mud patches around her buttons and button hoops form the mud on her hands rubbing off when she needs to do up her cardigan.
I again used water and fullers earth for this.
I added mud stains to the hem of her cardigan using a mixture of water and fullers Earth.


For Helena's dress I used Fullers Earth and Vaseline, Fullers Earth and water and brown dye.
Front and back of Helena’s dress after breakdown.
I found this dress hard to work with due to it being such a strong white colour and it was made from a cheap, stretch synthetic fabric.


I also added mud stains using water and fuller's earth on the back from when she's had to sit in the dirt.
I added splatters up the back of the skirt with brown dye from mud that would have been kicked up from shoes.
I also added brown Vaseline to the hem of the skirt in patches.


Helena’s shoes after breakdown.
I scuffed them up and applied brown dye-naflow to slightly stain and dull down the shoe while also highlighting the scuffs.


I scuffed up the ends, heels and other points on the shoes where the foot would rub against. I used a cheese grater as the shoe was to hard for any other tool.

Pre-Assessment
Front Side Back


• Cardigan needed to be a lot more muddy
• Upper part of dress more muddy
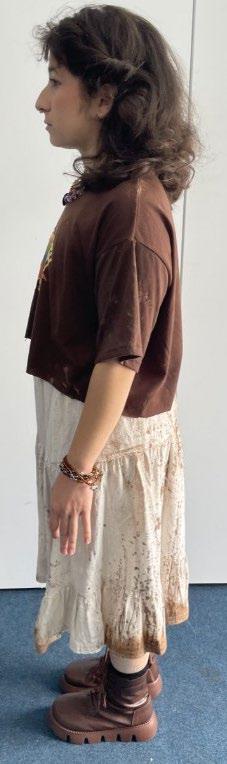
Lysander’s Outcomes

Lysanders shirt before

Lysanders T-shirt

Back of Lysanders trousers before breakdown
Front of Lysanders trousers before breakdown


Front, side and back of Lysanders shirt after breakdown.


I used a seam unpicker to pull at the fabric weave to create snags, I also used it to make tiny rips which I then frayed using a soft haired brush.
I added small snags and tares on the shoulder hem and collar, down the sleeves and other areas that could have been possibly could on bushes and branches while walking through the woods.


I used a mixture of Fullers Earth and water; I rubbed it between my hands and gently applied it around the shirt.
I added dry mud patches all over Lysanders shirt, from the character needing to sleep on the ground and walk through trees and bushes.


The figure to the left is the first layer of sweat stains I added to the shirt. I added sweat stains because the play is set in Athen's summer where the summer temperatures are hot so the characters would start to get sweaty after a couple of days in the woods.

The figure above is the second layer and the figure to the left is the third layer of the sweat stains.
I used a week dark green dye for the sweat stains and slowly build them up over time letting the dye soak into the shirt to form a natural damp patch.

I didn’t add any mud to the T-shirt as it is worn under his shirt, but I did add sweat patches as well.
Front and back of Lysanders Tshirt after breakdown and logo.
Before adding the logo on the front, I washed and dried it several times to fluff up the T-shirt. Afterwards we added the logo.


First layer, I used tea bags to dye the underarm due to the beige colour of the Tshirt.
I let the liquid absorb into the T-shirt naturally to make the sweat patch seam more real.
Underarm before any dying.


Once both underarms were done, I washed the T-shirt again which blended out all the layers.
Second layer.


Due to Lysanders trousers being brown I had to adapt my techniques, so the mud is visible. I had to make the fullers earth much darker than the original colour, I also layered two mixtures the first layer I used water and Fullers Earth then the top layer I used PVA Glue and Fullers earth to add texture to make it more visible.
I added mud patches on his knees and back from kneeling and sitting down on the ground I also added it down the side and front of his thighs from lying in the dirt and wiping his muddy hands down his trousers.
Front and back for Lysanders trousers after breakdown.


For the top layer I added a PVA Glue and Fullers Earth for the thicker mud that has been kicked up onto the trouser hem that is making it damp.
For the hem of his trousers, I wanted it look like they have been waling though thick mud for a while. For the first layer as seen in the figure on the left I ironed in dark brown Vaseline to make the trouser hems look damp.

Pre-Assessment
Front Side


• Shirt needs to be dirtier
Back

• His shirt is being taken off in Act 3 scene 2 so his T-shirt needs to be muddy as well
Hermia’s Outcomes

Hermia’s skirt before breakdown
Hermia’s T-shirt before breakdown


Hermia’s T-shirt after breakdown and logo.

I used a mixture of water and fullers earth and applied it using my hands.
I added mud patches all over the T-shirt especially on the back from her sleeping on the ground.


For the bigger mud patches on her skirt I used a mixture of water and fullers earth and applied it with my hands.
Hermia’s skirt after breakdown.


Along the hem of the skirt a applied a dyed Vaseline, which I applied using my hands making sure to push it upwards on the skirt to make It look like its been soaked in.


I also splattered brown dyena-flow up the back of the skirt form mud that could have been kicked up from her shoes.

Pre-Assessment
Front Side Back


Show Photos

After the Pre-Assessment it was decided that the costumes needed to be even more muddy as it won't been seen on stage.
On all the costumes garments I added more mud stains using ‘Dirty Down’ crayons and sprays.


By Hannah O’Brien
Hermia’s Dye samples
Hermia's dress I the end wedding scene needed to match to Lysanders waist coat as the supervisors couldn’t find a dress and waistcoat to match.

This is the dresses original dress fabric; it is 100% polyester.
I chose to use Dylon dye as it had the closest colour matches to the waist coat, disperse dye had a limited about of green dyes and can't be mixed together.
I used the regular dye solution of Dylon dye, in the dye bath I has 2 litres of hot water, 5 grams Dylon dye and 30 grams of salt.


Outcome

Before dyeing and alterations
(alterations done by supervisors)
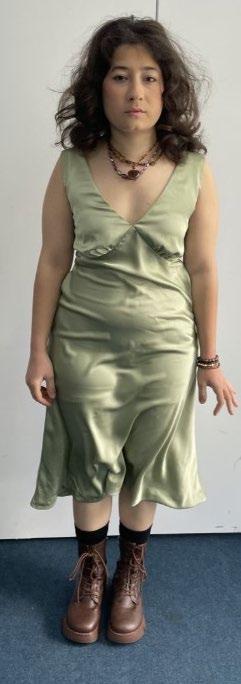
After dyeing
I dyed the dress in a dye bath with 32g of olive-green Dylon dye, 60g of salt and 20L of warm water.
Show Photos


Fairy World
By Ella McAnuff
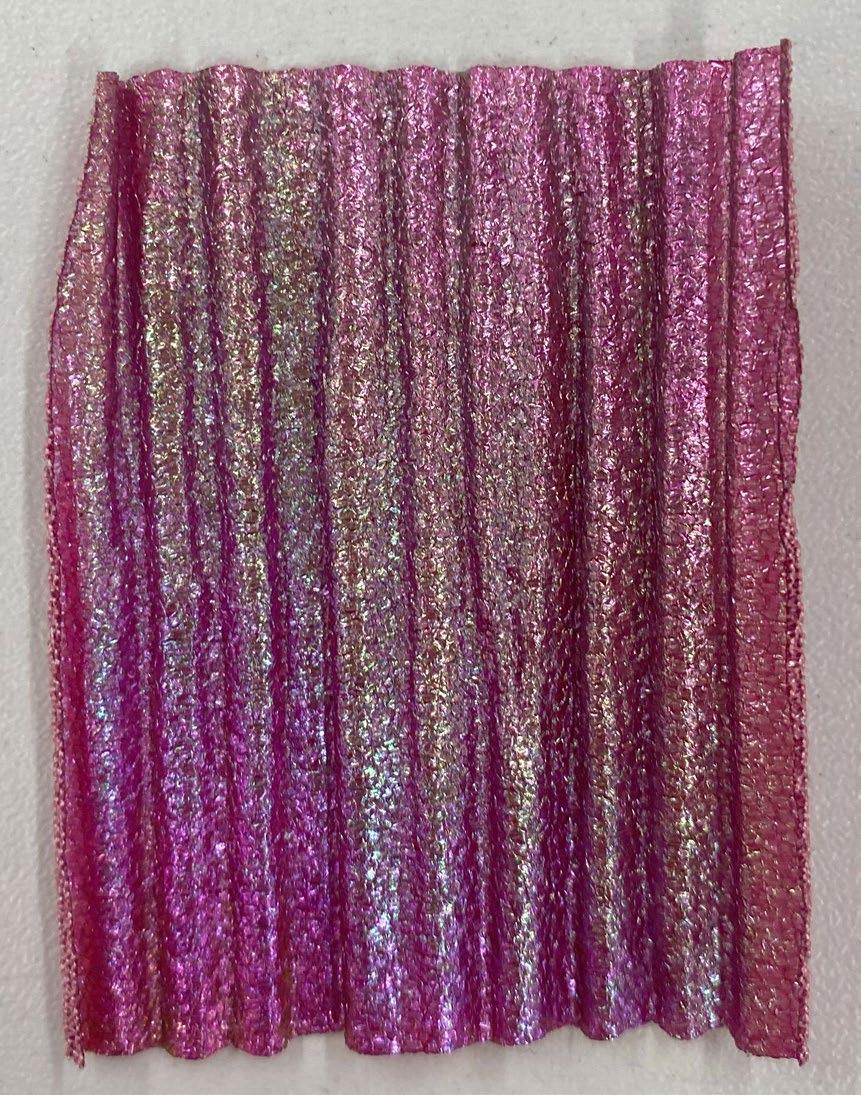
Ombre Dye Samples
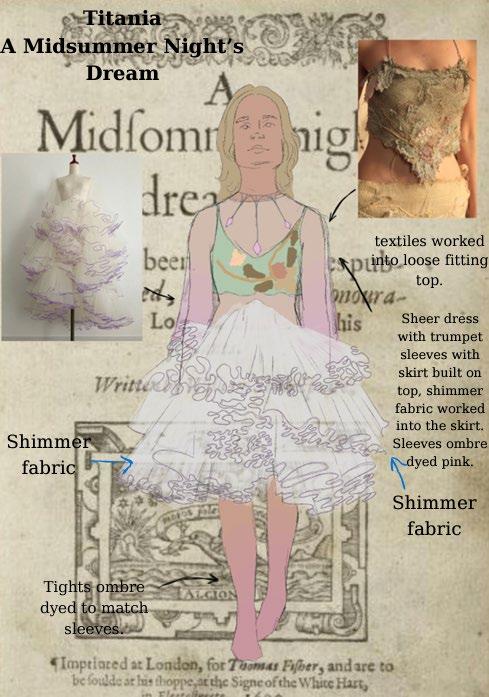
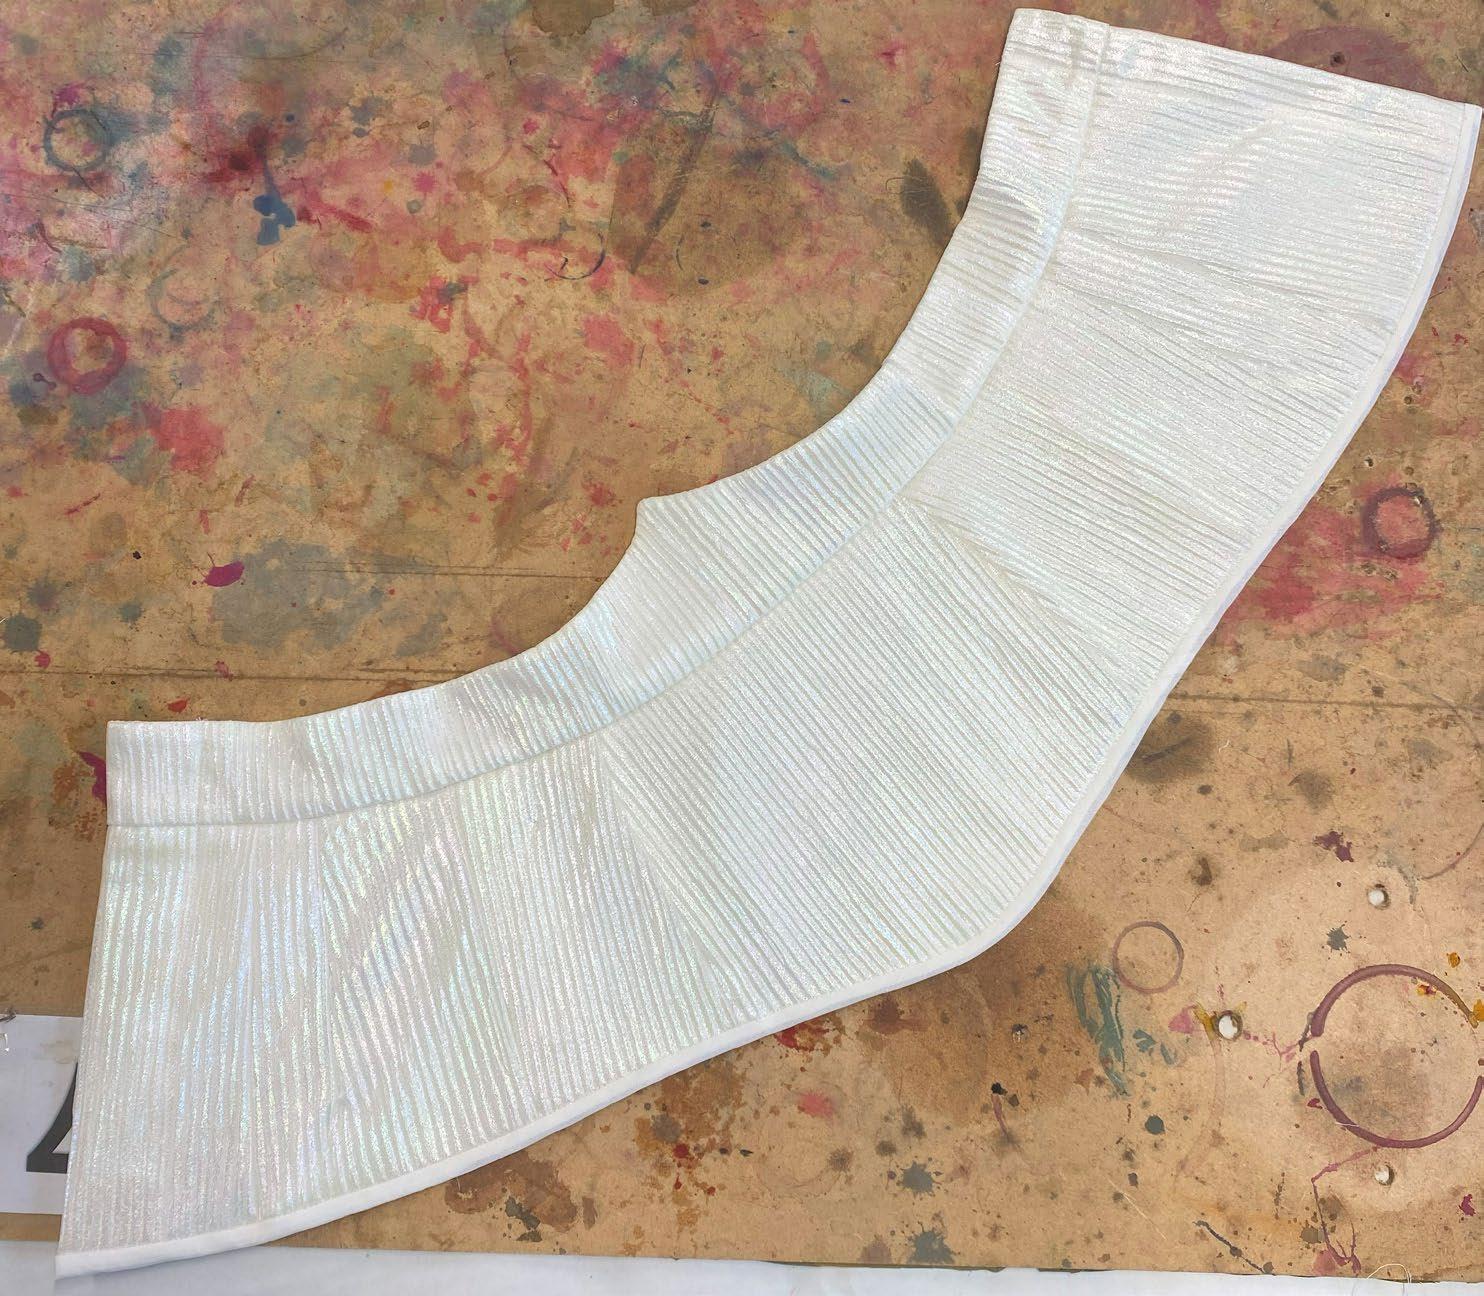
For Titania’s dress the sleeves, underskirt and tights needed to be ombre dyed a shade of pink, also her shoes need to match the bottom of her tights.

White synthetic holographic fabric with no dye.
Disperse dye would have to be used on this fabric. I made the same dye solution, 2L of water, 1ml acetic acid and 1/4 gram of dye powder.


Fuchsia Red 10 Seconds Scarlet Red 10 Seconds
Fuchsia Red 5 Minutes Scarlet Red 5 Minutes


Fuchsia Red 10 Minutes Scarlet Red 10 Minutes


The designer chose the Fuchsia red as it went well with the fabric that lined the top skirt.

Fuchsia Red Ombre
Scarlet Red Ombre


Red 5 Minutes
Fuchsia Red 10 Seconds
I used the same dye solution for to sample the colours for Titania’s tights.
Scarlet Red 10 Seconds
Red 5 Minutes


Fuchsia
Scarlet
10 Minutes

30 Minutes


10 Minutes

30 Minutes


Fuchsia Red
Scarlet Red
Fuchsia Red
Scarlet Red
Fuchsia Red 1 Hour Scarlet Red 1 Hour

Sample

While Ombre Dying the tights I came across a problem. The tights absorb the dye solution, causing it to travel up the tights bringing the dye with it, losing the ombre pattern.
For the actual pair of tights that will need to be ombré I will wet the tights beforehand, so the dye solution won't travel up the tights.
The Fuchsia Red is going to be used on the final costume as it’s the closest match to the ombré on the dress.
Fuchsia Red Ombre
Outcomes

Front and back of titania’s dress.

Front Side Back


Yoke After
Yoke Before


Titania’s before and after ombre dye


For the first attempt of dyeing the shoes I used the same dye bath as I used for her dress and left them in for 3 hours.

Titania's shoes before dying

After the second made fitting it was decided that the shoes needed to darker.
I made a disperse dye bath with 1 gram of Disperse fuchsia red with 1ml of acetic acid and 2 litres of hot water and I left them in for 5 minutes.
Show Photos


By Ella McAnuff
Dye Samples
During the second made fitting the designer decided that the blouse for please blossom is to white against the rest of the costume and needs to be dyed a light shade of brown.

10 Seconds
Original fabric with no dye
For the samples I only used 1 ½ litres of water with two tea bags. As the fabric is a natural fibre due to the burn test I did it should be dyed by the tea well.


5 Minutes

10 Minutes 15 Minutes 30 Minutes


Outcomes

Pleaseblossoms top before dying.


Top after dying I dyed it in a bath of 6 litres of water with 8 tea bags for 10 seconds.
The ties after dying.
I dyed the ties in a bath of 6 litres water with 12 tea bags for an hour.

Pre-Assessment
Front Side Back


Show Photos

During the dress runs the director though Pleaseblossom’s shirt still looked to bright and clean compared to the other fairies. Also, he is a part of the forest he wouldn’t be so clean.
To make him look dirtier I used a ‘Dirty Down’ spray in burnt umbra and dark brown, I sprayed light patches all over the shirt.

By Ella McAnuff
Outcome
During the Pre-assessment and the first tech day it was decided that the costume looked to flat and clean compared to the rest of the fairies. As she is Moth the designer and the director wanted her costume to look like it been moth eaten.

Front before breakdown

Side before breakdown Back Before Breakdown


I burnt the edges and folds of the waterfall fills to make it look moth eaten.

I then lightly sprayed it with dark down ‘dirty down’ spray to dull down the blue fabric to make her look more earthy.

I didn’t spray it with the dirty down to keep the light, magical look to them.
I also burnt holes through the sleeves again to make it look moth eaten.

Show Photos


Mechanicals


Snout

By Emmy Carter
Ancient Greek Walls


Stick to the Sandstone/Limestone colouring
Keep to the Rectangular brick styles of an easy repetitive pattern

Printing Wall Pattern
For Snouts wall costume for the play in Act V Scene I. the costume designer and set designer agreed on the wall being based on the Ancient Greek style of wall but also make the wall look hand made as the characters would have made the costumes themselves.

I created a basic outline to transfer onto the lino.
Lino:
For the lino sample I started by making a pattern from walls I looked at from local churches.


The Lino
Before and after applying printing paint.

I transferred the outline onto the lino and cut out the pattern. I mixed up the printing paint with rollers and rolled it onto the lino.

Second Attempt
First Attempt

Due to the Lino paint being expensive and needing a thick layer of paint to achieve a solid print the lino won't be the best option for printing on the wall. However, this could be used on other characters costumes such as Bottom’s T-shirt.
Sponge:
For another way for printing, I thought of what you can use around the house to print with, which the characters would have access to. I used regular cleaning sponges with acrylic paint.


The soft side is better for printing as the sourer side doesn’t pick up the paint as well. However, it creates a texture similar to rough brick walls.
Soft side of sponge
Sourer side of sponge

Potato:
Another item that the character would has access to print with is potatoes.
I cut the potato in half then cut it into rectangle, dried it out and used the same acrylic paint to print with.
Soft side of sponge with full and half sponge used.

This technique can be achieved with any hard vegetable, such as a turnips, carrots or swede.

The potato keeps to the homemade look while also creating a brick texture.
The designer also wanted to have foliage on the wall to tie into the set.
I found the leaves that are going to be used on the floor of the set and decided to use them on the wall as well.

Snout’s Outcomes

The wall before printing and after fitting adjustments
After Fitting:
The calico was pinned to the correct length as width and an interfacing will be added around the neckline to hold the structure.
The potato and sourer sponge was decided to be used together with the leaves attached to the wall.


For the wall I used potato's and sponges in different sizes with wonky lines as it has been made by armatures.
I also added leaves on the wall, which are being used on the stage.
Front and back of the completed wall.


I added two tea rings and splatters from an actor carelessly putting his tea down on the costume.

Show Photos


Snug

By Emmy Carter
Paint Marks
Have Paint smears from wet paint
brushes sitting in pockets

Maybe have base layers of smudged paint white/black


Build up different layers of paint
Focus paint build up on hips and front of thighs from whipping wet paint brushes and hands
Use puff binder to create thick parts of paint

Maybe have paint splatter on bottom of trousers from dropping paint
Paint Splatters
The character Snug is a painter and needs a pair of dungarees broken-down to have paint marks and stains on them. The paint stains need to match with the overall colours of the set and costumes.

Sample of new paint damage.
This is paint marks on a pair of relatively new pair of jeans or dungarees. It would have some accidental marks on them which have been smudged due to the character trying to clean the paint off.

The Last couple of layers I added black paint to make the jeans look a little bit grubbier. I also added puff binder.
The First couple of layers of what an old pair of jeans or dungarees.
It would have many different paint marks that haven’t been attempted to be wiped off, due to the character giving up on cleaning them. It would also have paint smears on the hips and thighs from wiping dirty brushes and hands, this will also be around pockets from the character putting dirty brushes there.


Before I put on any layers of paint, I subtly broke down areas would have been worn down such as the pockets, fly and belt hoops. I used different levels of sandpaper.
I added puff binder to look like the paint have been heavily built up on areas that would have more paint marks than others.

Snug’s Outcomes

Front and back of dungarees from before breakdown.


Front and back of after dungarees breakdown.


I imagined this character being clumsy and messy. They wipe their dirty hands down themselves and wipe their dirty paint brushes down themselves.
On both sides of the dungarees, I layered up differed colours of acrylic paint on the hips and down the front and back of the thighs.


I also added multiple different coloured paint splatters all over the dungarees from paint dripping on them while painting.


I also painted the end of one of the toggles as I can image them accidently being dunked inro paint while they bend over to get something.
I put dirty paint brushes in pockets to leave smudged form keeping used paint brushes in their pockets.

Show Photos


Bottom

By Emmy Carter
Men's Graphic T-shirts


The graphic design that sits along the chest Most
Small logo that sits on the left side of the chest
Big graphic design on the back that matches the logo on the front
Printing Pattern Ideas
On Bottoms T-shirt in Act 3 Scene 1 he has a small graphic along the centre of his chest. The designer was open minded about what the pattern can be.

I cut out different size flowers to test the right size of the pattern. I also sampled different shapes to create different patterns.
I decided a floral pattern would go well, as it would match the floral lining on the inside of his chef's jacket and go with tree designs on his trousers.


I also tested the different patterns as on the design the T-shirt has three separate colours. These could work for the print along the chest.
I sampled the two sizes to see what size would be better for the costume.


Cluster pattern, I used different size flowers and different shades of purple and layered them up.
These could work for a large graphic patten on the back of the shirt.
Repeating pattern, I used different size flowers and different shades of purple.

Jean Tree Pattern
On Nick Bottom’s design he has a tree design coming from the bottom of his jeans. I’ve sampled different ways to create the design.

For the sample to the right, I painted the pattern on the jeans using bleach.
This again has a subtle pattern but would be more noticeable on darker jeans.
For the first sample I painted the pattern on with dye. I made a Dylon solution ¾ of Navy-Blue and ¼ of black, 30g salt in 2L of warm water.
This technique creates a more subtle pattern to the jeans. However, it would be more noticeable on lighter jeans.


For the sample to the right, I used foiling. Like flocking I painted fabric adhesive and dried it out, I them placed the foil onto the pattern and ironed it on.
This created a more eye-catching pattern; it also can create a cracked pattern the mimics bark form trees.
For the sample to the left, I used flocking. I painted of a layer of fabric adhesive and dried it out, then I placed the flocking over the top of the pattern and ironed it on.
The flocking is very difficult to stick to denim, but it can create a nice texture when it sticks properly.


Over the top of the dye pattern, I painted on puff binder. I mixed the puff binder with black pigment, then heated it up with a heat gun to make it grow.
The puff binder creates a solid texture which can be manipulated to the way you want it.
For this sample I started with painting the pattern on with the dye solution I used for the first sample.


Once to puff binder was set, I painted the fabric adhesive over the top of the puff binder, I left it to dry naturally. Once it was dry I placed the foil over it and ironed it down.
The foil creates even more texture on the puff binder and gives it a magical look.
For this sample I layered foiling over puff binder. I first mixed the puff binder with red and blue pigment to make it purple, then heated it up with a heat gun to get it to grow.

Bottom’s Outcomes

Front before printing


Side before printing Back before printing
During this fitting they marked out where they wanted the prints and, in the patterns, they want them.

For this I used navy blue Dylon dye. I made up a day bath of 5g Dylon dye, 30g of salt and 2L of hot water. I hand painted it on using a paint brush.
Bottoms jeans before dying.
It was decided to just paint the tree pattern on with dye as the characters is male the designer wanted a more subtle pattern.


Back of T-shirt after printing.
Front of T-shirt after printing.


For the front of the T-shirt I put a singular flower logo on the left side of the chest in a regular shade of purple.
On the back of the T-shirt I made a gridded pattern using different size and shape flowers in different shades of purple.

Show Photos


(Green Dress)
Green)
Aldi
Wallisdown Rd
Bournemouth
BH10 4HZ
Website: https://www.aldi.co.uk/
Website: https://www.amazon.co.uk/
AUB
7 Fern Barrow
Wallisdown
Poole
BH12 5HH
Website: https://store.aub.ac.uk/
Hobbycraft
Unit C9
Retail Park
Redlands
Branksome
Poole
BH12 1DN
Website: https://www.hobbycraft.co.uk/


CPD Hours
• Note Taker and Dresser for Pippa’s Fittings
• Making Pucks Fabric for A Midsummer Night's Dream
• Help Dye garments for La Casa Nova (Modern)
• Mask Painting for La Casa Nova (Period)
• Note Taking for La Casa Nova Pre-assessment (Period)
• Photographer for La Casa Nova (Modern)
Bibliography:
BBC (N.D) BBC Bitesize [Online] Available: https://www.bbc.co.uk/bitesize/topics/zxgcwmn/articles/z6x48hv#zxrqxg8 [Accessed: 15 April 2024]
BBC (N.D) BBC Bitesize [Online] Available: https://www.bbc.co.uk/bitesize/topics/zxgcwmn/articles/zph8jsg#zcy4dnb [Accessed: 17 April 2024]
BBC (N.D) BBC Bitesize [Online] Available: https://www.bbc.co.uk/bitesize/articles/zhtkwnb#zhqhfdm [Accessed: 17 April 2024]
BBC (N.D) BBC Bitesize [Online] Available: https://www.bbc.co.uk/bitesize/topics/zxgcwmn/articles/zt69dp3#zrsrkhv [Accessed: 17 April 2024]
BBC (N.D) BBC Bitesize [Online] Available: https://www.bbc.co.uk/bitesize/articles/znpdqfr#zcv9wsg [Accessed: 17 April 2024]
Bevington, DB (2024) Britanica [Online] Available: https://www.britannica.com/topic/A-MidsummerNights-Dream-play-by-Shakespeare [Accessed: 15 April 2024]
Boddy-Evans, MB (2019) The Spruce Crafts [Online] Available: https://www.thesprucecrafts.com/anintroduction-to-lino-printing-2578530 [Accessed: 29 April 2024]
Cartwright, MC (2013) World History Encyclopaedia [Online] Available: https://www.worldhistory.org/Greek_Architecture/ [Accessed: 27 April 2024]
Castelow, EC (N.D) Historic UK [Online] Available: https://www.historic-uk.com/CultureUK/TheOrigins-of-Fairies/ [Accessed: 17 April 2024]
Castelow, EC (N.D) Historic UK [Online] Available: https://www.historic-uk.com/CultureUK/TheGreen-Man/ [Accessed: 17 April 2024]
Chelsea (N.D) Ancient Greek Architecture [Online] Available: https://ancientgreekarchitectures.weebly.com/materials.html [Accessed: 27 April 2024]
Cross, TC (2023) Greek Reporter [Online] Available: https://greekreporter.com/2023/06/04/geologygreece-countrys-beautiful-landscape-formed/ [Accessed: 27 April 2024]
DeLong, WD (2022) ati [Online] Available: https://allthatsinteresting.com/black-shuck [Accessed: 17 April 2024]
Eberl, KE (2023) Family Handyman [Online] Available: https://www.familyhandyman.com/article/what-the-color-of-your-garden-soil-means/ [Accessed: 29 April 2024]
Harper, DH (N.D) Online Ethology Dictionary [Online] Available: https://www.etymonline.com/word/fairy [Accessed: 17 April 2024]
Hickman, LH (2024) Hickman Designs [Online] Available: https://hickmandesign.co.uk/resources/printmaking-guides/lino-printingprocess/#A_Brief_History_of_Lino_Printing [Accessed: 29 April 2024]
Hoffman, MH (1999) A Midsummer Night’s Dream [Amazon Prime Film] Italy. Twentieth Century Fox.
Insider (2021) How Costumes Are Destroyed For Movies & TV. YouTube [Online] Available: https://www.youtube.com/watch?v=cKi00WlJo1c [Accessed: 30 April 2024]
Jamieson, LJ (2019) ThoughtCo. [Online] Available: https://www.thoughtco.com/bottomcharacter-analysis-2984572 [Accessed: 17 April 2024]
Jamieson, LJ (2019) ThoughtCo. [Online] Available: https://www.thoughtco.com/characteranalysis-of-helena-and-demetrius-2984573 [Accessed: 17 April 2024]
Johnson, BJ (N.D) Historic UK [Online] Available: https://strangebritain.co.uk/myths-legendsfolklore-in-britain [Accessed: 17 April 2024]
Lewthwaite, KL (2018) Woodland Trust [Online] Available: https://www.woodlandtrust.org.uk/blog/2018/07/types-of-moss-in-the-uk/ [Accessed: 29 April 2024]
Malakoff, DM (2020) Science [Online] Available: https://www.science.org/content/article/five-charts-will-change-everything-you-knowabout-mud [Accessed: 29 April 2024]
Mambrol, NM (2020) Literary Theory and Criticism [Online] Available: https://literariness.org/2020/07/26/analysis-of-william-shakespeares-a-midsummer-nightsdream/ [Accessed: 15 April 2024]
Monks, AM (2019) Costume at the National Theatre. London: The National Theatre. Musgrove, JM (2003) Make-up, Hair and Costume for Film and Television. Oxford: Taylor & Francis Group.
Mythical Creatures (2023) Black Dogs [Online] https://www.bbc.co.uk/sounds/brand/m001tgpb [Accessed: 17 April 2024]
Schafer, KS (2011) Knowledge Project [Online] Available: https://www.nature.com/scitable/knowledge/library/the-physical-environment-withinforests-24202119/ [Accessed: 29 April 2024]
Unknown (N.D) No Sweat Shakespeare [Online] Available: https://nosweatshakespeare.com/characters/titania-midsummer-nights-dream/ [Accessed: 16 April 2024]
Unknown (N.D) No Sweat Shakespeare [Online] Available: https://nosweatshakespeare.com/characters/oberon-midsummer-nights-dream/ [Accessed: 16 April 2024]
Unknown (N.D) Shakespeare Birthplace Trust [Online] Available: https://www.shakespeare.org.uk/explore-shakespeare/shakespedia/shakespearesplays/midsummer-nights-dream/ [Accessed: 15 April 2024]
Unknown (N.D) Sparknotes [Online] Available: https://www.sparknotes.com/shakespeare/msnd/character/titania/ [Accessed: 16 April 2024]
Unknown (N.D) Sparknotes [Online] Available: https://www.sparknotes.com/shakespeare/msnd/character/oberon/ [Accessed: 16 April 2024]
Unknown (N.D) Strange Britain [Online] Available: https://strangebritain.co.uk/mythslegends-folklore-in-britain [Accessed: 17 April 2024]
Victoria Stare Government (N.D) Agriculture Victoria [Online] Available: https://vro.agriculture.vic.gov.au/dpi/vro/vrosite.nsf/pages/soilhealth_interpret_colour [Accessed: 29 April 2024]
Walker, SW (2023) Owlcation [Online] Available: https://owlcation.com/humanities/Faerielore-of-the-British-Isles [Accessed: 17 April 2024]
Warner Brothers Studio London (N.D) The Making of Harry Potter [Online] Available: https://www.wbstudiotour.co.uk/at-home/costume-distressing/ [Accessed: 30 April 2024]
Wikipedia (2023) Wikipedia [Online] Available: https://en.wikipedia.org/wiki/Geology_of_Greece [Accessed: 27 April 2024]
Wikipedia (2024) Wikipedia [Online ] Available: https://en.wikipedia.org/wiki/A_Midsummer_Night%27s_Dream [Accessed: 15 April 2024]
Wikipedia (2024) Wikipedia [Online] Available: https://en.wikipedia.org/wiki/Mudbrick [Accessed: 2024]
World Atlas (N.D) WorldAtlas [Online] Available: https://www.worldatlas.com/articles/thefour-main-layers-of-a-rainforest.html [Accessed: 29 April 2024]
Figure List:
Figure 1-2: Lilli Jeffries (2024) Script Breakdown [Table] In Possession of the Author.
Figure 3: Lilli Jeffries (2024) Costume Plot [Table] In Possession of the Author.
Figure 4: Poster for A Midsummer Night’s Dream, Moria, A Poser for A Midsummer Night’s Dream (Hoffman, 1999) [Online Image] Available: https://www.moriareviews.com/fantasy/midsummer-nights-dream-1999.htm
Figure 5: Bottom (Kevin Kline) and Titania (Michelle Pfeiffer) in A Midsummer Night’s Dream (Hoffman, 1999), Cineplex, Bottom (Kevin Kline) and Titania (Michelle Pfeiffer) in A Midsummer Night’s Dream (Hoffman, 1999) [Online Image] Available: https://www.cineplex.com/movie/william-shakespeares-amidsummer-nights-dream/Photos
Figure 6: Titania (Vivian Leigh) in A Midsummer Night’s Dream (Guthrie, 1937), Gods and Foolish Grandeur, Titania (Vivian Leigh) in A Midsummer Night’s Dream (Guthrie, 1937) [Online Image] Available: https://godsandfoolishgrandeur.blogspot.com/2014/12/vivien-leigh-as-titaniain-midsummer.html
Figure 7: Oberon (Steven McRea) in The Dream (Ashton, 2017), Gramilano, Oberon (Steven McRea) in The Dream (Ashton, 2017) [Online Image] Available: https://www.gramilano.com/2017/06/photo-album-of-tonights-royal-balletprogramme-with-zenaida-yanowsky-and-roberto-bolle-as-marguerite-andarmand/?utm_source=twitter&utm_medium=social&utm_campaign=gramilan osocial
Figure 8: Illustration of Nick Bottom, A Cheery Begger, An Illustration of Nick Bottom with an Ass’s head [Online Image] Available: https://cheerybeggar.wordpress.com/2012/10/12/the-wisdom-ofnick-bottom/ Figure 9:The Lovers form A Midsummer Night’s Dream (Dieterle, 1935), Academy Award Best Picture Winners, ?: The Lovers form A Midsummer Night’s Dream (Dieterle, 1935) [Online Image] Available: https://www.oscarchamps.com/2015/04/07/1935-a-midsummer-nightsdream/
Figure 10: The Green Man, Magic Murals, Illustration of the Green Man [Online Image] Available: https://www.magicmurals.com/green-man.html
Figure 11: A Brownie, Wikipedia, An Illustration of a brownie [Online Image] Available: https://en.wikipedia.org/wiki/Brownie_(folklore)#
Figure 12: Illustration of a group of Fairies, Flicker, An illustration of a group of fairies [Online Image] Available: https://www.flickr.com/photos/internetarchivebookimages/14764819814
Figure 13: Dancing Fairies by August Malmstrom, 1866, Art.com, Dancing Fairies by August Malmstrom, 1866 [Online Image] Available: https://www.art.com/products/p53655211440/product.htm
Figure 14: A Midsummer Night’s Dream by Gustave Dore, Pintrest, A Midsummer Night’s Dream by Gustave Dore [Online Image] Available: https://i.pinimg.com/originals/08/68/c1/0868c1c606230a46ec15fadd200d2534.j pg
Figure 15: Costume from Harry Potter, Warner Brothers Studios, Before and after costume form Harry Potter [Online Image] Available: https://www.wbstudiotour.co.uk/at-home/costume-distressing/
Figure 16: Before and after of a broken-down shoe, Pintrest, Before and after of a broken-down boot made to look dirty [Online Image] Available: https://www.pinterest.de/pin/530932243551754126/
Figure 17: Close up of distress, Warner Brothers Studio, Close up of distress on costume form Harry Potter [Online Image] Available: https://www.wbstudiotour.co.uk/at-home/costume-distressing/
Figure 18: The Sadness (Jabbez,2021), Collider, The Sadness (Jabbez, 2021) [Online Image] Available: https://collider.com/bloodiest-horror-films-of-all-time/
Figure 19: Stanislaus Katczinsky played by Alberecht Schuch in All Quite on the Western Front (Berger, 2022), The Cinemaholic, Stanislaus Katczinsky played by Alberecht Schuch in All Quite on the Western Front (Berger, 2022) with mud on his collar [Online Image] Available: https://thecinemaholic.com/is-stanislaus-katkatczinsky-based-on-a-real-ww1-soldier/
Figure 20: Distressed Dress worn by Lily Collins who played Lucy Pace in Priest (Stewart,2011), Icollector.com, Distressed Dress worn by Lily Collins who played Lucy Pace in Priest (Stewart,2011) [Online Image] Available: https://www.icollector.com/Lily-Collins-Lucy-Pace-distressed-costume-fromPriest_i13226803
Figure 21: Different coloured linoleum, Don Pedro + Home Design, Different coloured linoleum [Online Image] Available: https://donpedrobrooklyn.com/linoleum-vs-vinyl-flooring-comparison/
Figure 22: Carved into lino print, Zieler, Pattern carved into lino print [Online Image] Available: https://www.zieler.co.uk/design-ideas-for-lino/
Figure 23: Equipment needed for lino printing, Hickman Design, Equipment needed for lino printing [Online Image] Available: https://hickmandesign.co.uk/resources/printmaking-guides/lino-printingprocess/#A_Brief_History_of_Lino_Printing
Figure 24: Single Coloured Lino Print, Pinterest, Single Colourerd Lino Print of the country side [Online Image] Available: https://www.pinterest.co.uk/lbickerton1/linocut/
Figure 25: Reduction Lino Printing, Pinterest, Reduction Lino Printing of a Pine Cone [Online Image] Available: https://www.pinterest.com.au/pin/465348573991012112/ 160
Figure 26: Lilli Jeffries (2022) Knossos, Crete [Photograph] In Possession of Author.
Figure 27: Mudbrick, Deviant Art, Mudbrick or Unbaked Brick [Online Image] Available: https://www.deviantart.com/lemondjinn/art/Mudbrick-wall381293052
Figure 28: Forest Floor, fineartamerica, Forest Floor [Online Image] Available: https://fineartamerica.com/featured/a-beautiful-forest-floor-shaunacollins.html
Figure 29: Forest Ground, Texturify, Forest Ground [Online Image] Available: https://texturify.com/stock-photo/forest-soil005-8695.html
Figure 30 – 33: Hannah O’Brian (2024) The Lovers Designs [Images] In Possession of Author.
Figure 34 – 38: Lilli Jeffries (2024) Mud Stain Moodboard [Photographs] In Possession of Author.
Figure 39 – 51: Lilli Jeffries (2024) Fake Mud Samples [Photographs] In Possession of Author
Figure 52 - 53: Lilli Jeffries (2024) Iron on samples [Photographs] In Possession of Author.
Figure 54 - 68: Lilli Jeffries (2024) Demetrius Outcomes [Photographs] In Possession of Author.
Figure 69 - 91: Lilli Jeffries (2024) Helena’s Outcomes [Photographs] In Possession of Author.
Figure 92 – 118: Lilli Jeffries (2024) Lysander’s Outcomes [Photographs] In Possession of Author.
Figure 119 – 133: Lilli Jeffries (2024) Hermia’s Outcomes [Photographs] In Possession of Author.
Figure 134 – 143: Lilli Jeffries (2024) Lovers Broken down Production Photos [Photographs] In Possession of Author.
Figure 144: Hannah O’Brian (2024) Hermia’s Wedding Outfit Design [Image] In Possession of Author.
Figure 145 - 156: Lilli Jeffries (2024) Hermia’s Dress Samples [Photographs] In Possession of Author.
Figure 147 – 148: Lilli Jeffries (2024) Hermia’s Dress Outcomes [Photographs] In Possession of Author.
Figure 149 – 150: Lilli Jeffries (2024) Hermia’s Green Dress Production Photos [Photographs] In possession of Author.
Figure 151: Ella Mcanuff (2024) Titania’s Design [Image] In Possession of Author.
Figure 152 - 177: Lilli Jeffries (2024) Titania’s Samples [Photographs] In Possession of Author.
Figure 178 - 189: Lilli Jeffries (2024) Titania’s Outcomes [Photographs] In Possession of Author.
Figure 190 – 192: Lilli Jeffries (2024) Titania’s Production Photos [Photographs] In Possesson of Auhtor.
Figure 193: Ella Mcanuff (2024) Pleaseblossom Design [Image] In Possession of Author.
Figure 194 - 200: Lilli Jeffries (2024) Pleaseblossom Samples [Photographs] In Possession of Author.
Figure 201 - 207: Lilli Jeffries (2024) Pleaseblossom Outcomes [Photographs] In Possession of Author.
Figure 208 – 209: Lilli Jeffries (2024) Pleaseblossom Production Photos [Photographs] In Possession of Author.
Figure 210: Ella Mcanuff (2024) Moth Design [Image] In Possession of Author.
Figure 211 - 221: Lilli Jeffries (2024) Moth Outcomes [Photographs] In Possession of Author.
Figure 222 – 223: Lilli Jeffries (2024) Moths Production Photos [Photographs] In Possession of Author.
Figure 224: Emmy Carter (2024) Snouts Designs [Image] In Possession of Author.
Figure 225 - 228: Lilli Jeffries (2024) Wall Moodboard [Images] In Possession of Author.
Figure 229 - 240: Lilli Jeffries (2024) Wall Printing Samples [Photographs] In Possession of Author.
Figure 241 - 246: Lilli Jeffries (2024) Snout Wall Costume Outcomes [Photographs] In Possession of Author.
Figure 249: Emmy Carter (2024) Snugs Designs [Images] In Possession of Author.
Figure 250 - 254: Lilli Jeffries (2024) Paint Stain Moodboard [Images] In Possession of Author.
Figure 255 - 259: Lilli Jeffries (2024) Snugs Paint Stain Samples [Photographs] In Possession of Author.
Figure 260 - 269: Lilli Jeffries (2024) Snugs Outcomes [Photographs] In Possession of Author.
Figure 273: Emmy Carter (2024) Bottom Designs [Images] In Possession of Author.
Figure 274 - 280: Lilli Jeffries (2024) T-Shirt Graphic Pattern Moodboard [Images] In Possession of Author.
Figure 281 - 288: Lilli Jeffries (2024) Bottoms T-shirt samples [Photographs] In Possession of Author.
Figure 289 – 296: Lilli Jeffries (2024) Jean Pattern samples [Photographs] In Possession of Author.
Figure 297 – 305: Lilli Jeffries (2024) Bottoms T-shirt and Jeans Outcomes [Photographs] In Possession of Author.
Figure 306 – 307: Lilli Jeffries (2024) Bottoms Production Photos [Photographs] In Possession of Author.
Figure 308: Lilli Jeffries (2024) Breakdown and dye Budget Sheet [Table] In Possession of Author.