
18 minute read
Seeing the value in more green screen time
INTERFACEONLINE.CO.NZ
Seeing the value in more green screen time
Advertisement
Once only the preserve of blockbuster Hollywood movies and network television, green screening is becoming an increasingly popular and accessible learning activity – and for good reason. Here we discover how this fun and effective visual technique is producing awesome results in classrooms around the country.
Illusion is the first of all pleasures.
VOLTAIRE, WRITER AND PHILOSOPHER
If you’ve ever watched a blockbuster movie or a weather report, then you’ve almost certainly seen the magic of green screen compositing – or chroma keying – in action. This fun and effective visual technique lets film and TV producers record people in front of a plain green backdrop, then replace the backdrop with all sorts of images and special effects. Today, the technology is no longer the preserve of film industry and TV networks. Green screening is becoming an increasingly popular and accessible activity in schools and learning environments – and for very good reason. First, some background. The earliest green screens weren’t green at all, they were blue. In 1940, Lawrence W Butler used the technique on The Thief of Baghdad, which won him the Academy Award for special effects.
Why is it now green?
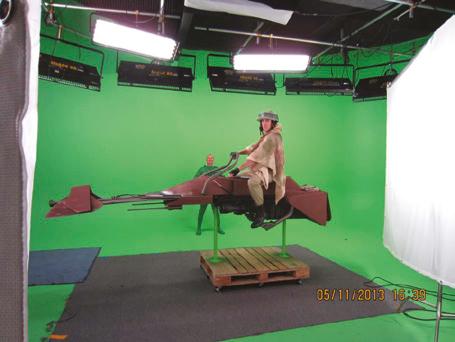
Technically, you can use any colour background – the original Marry Poppins film, for example, used white to allow her to fly across the London skyline. Blue screen was more popular at first because it worked better with celluloid film. Green screen is now more common in digital filmmaking – and the name has stuck. A vibrant, almost neon green is the standard choice. The reason for green is because people are generally not green and the colour is well away from the orange-red part of the spectrum. In order for the effect to fully work, the background must use a colour that isn’t used elsewhere in the shot – and green is nothing like human skin tone. Of course, people wear green clothes and occasionally have green hair or green makeup, but all those things can be changed in a way that skin colour can’t be.
How do green screens work?
Green screen is a visual effects (VFX) technique where two images or video streams are layered – or composited – together. Video production equipment called a chroma keyer looks at the chrominance data. It singles out the selected colour (usually the green) and digitally removes it by rendering it transparent. This lets the background image you want to use show through.
A LONG TIME AGO IN A GALAXY THAT’S NOT REALLY THERE
Technology and tips
What was once a tricky and laborious affair is now far, far easier. Some devices come with the technology already installed. Alternatively, there are a number of apps you can install that make the process pretty easy and straightforward. There’s plenty of tutorials online to get you going. Some practical things to consider are: • Make sure your green screen is as flat and smooth as possible; • Lighting is important and it’s worth investing in decent lights. The green screen should be lit really well, and the foreground illuminated separately; • Remove anything green from the foreground subject; • Have as much space between the subject and the green screen as possible; and • Do a rough edit on the footage before chroma keying (so you’re not editing something you won’t use).
Why use green screening?
This technique offers so many engaging opportunities for students to learn. It’s fairly easy to do, can be done on a low budget, works across multiple subject areas and year levels, and it produces some awesome results. From floating in space to standing in front of the pyramids, visiting an alien planet to meeting the Queen, it can all be done from the comfort of your classroom. In the following few pages, learn how other teachers have used green screening to amazing effect. The INTERFACE Team.
CLOUDY WITH THE CHANCE OF TRANSPARENCY
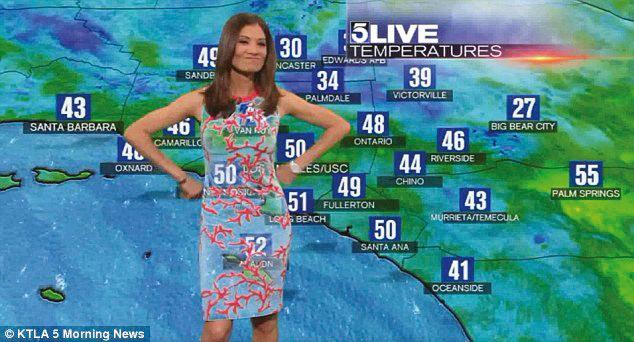
Just jump in and have a try, as the show must go on! By Brett Abbott, Kaniere School
We went a little ‘Green Screen Crazy’ last year with two big projects. With our normal schedule put on hold due to ‘you know what’, we did our whole school production on a green screen. ‘Snow White and the Matific Monsters’ was a mix of green screen and real-life scenery around the school. It was a laugh a minute with lots of really bad special effects, but we had a load of fun. We also turned to the green screen at the end of the year with our prizegiving. Normally it takes place in our beautiful town hall was instead done in a little classroom against the screen, with a majestic curtain background looking like a stage put in afterwards. This has been my first year on a MacBook. With its built-in green screen capability, a new classroom built with a green wall and Covid rearing its head, it seemed appropriate to give the technology a try. Our Biannual Senior Show was going to be difficult to run with no crowds. From memory, the idea came up either from the Principal or a staff meeting, and we just decided to run with it. We really had little to lose.

Make kids fly
Being a small West Coast school, and one with a big digital focus, we thought let’s just jump in and have a go. I was already impressed by the capabilities of iMovie and, to be honest, we ‘YouTubed’ what to do and tried it out. We learned about things like power boxes on the wall and about the limited space on a computer, but we got there in the end. The school production was a mix of outside and green screen inside shots. Castle scenes and Hollywood were just a mix of royalty free pictures obtained online. As we got smarter (and braver), we decided to make kids fly with the use of a cube and an outside shot for the backdrop, moving the camera upwards with a child lying prone on the cube we found that we could do all kinds of special effects.
Truck and horse
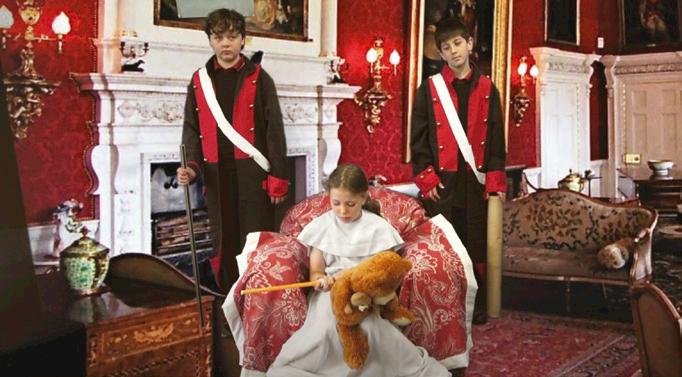
There were plenty of memorable moments. Doing a mediaeval tale was perhaps a mistake as the number of times a milk tanker or truck would go past meant a few bloopers happened. Even a swearing neighbour managed to cause Snow White to blush a few times. We started to have fun with sound effects and the screen tech as we got more into it. A slow walking horse was brought in for the prince to ride but with some speeding up of the film and the insertion of running hoof sound effects we had quite a comical prince entering one scene.
Our students took a lot of responsibility for the movie. The Year 5s and 6s had the important acting rolls and the school sung all the songs, which were then placed into the movie. The kids were brilliant and, by the end of the production, were very capable blue/green screen technologists. They also savoured the ‘have a go’ mentality, often suggesting changes, modifications, and ideas that we would use.
Problem solving
My advice to anyone thinking about green screening is just have a go. YouTube has a bunch of good tutorial videos and our students, even at Year 5/6 level, are good at problem solving technology issues. Also, finishing something like this does take up a lot of time. Editing bits together and putting in sound effects made the whole process quite long. Many hours were swallowed up messing around with mere seconds of footage. But you will learn heaps of wonderful skills that can be used elsewhere in the school, not necessarily for a filmed production. Lastly, don’t take it too seriously. If you get frustrated, like with all technology, put it down, go have a cup of tea and come back to it later.
Brett Abbott is the classroom teacher for Kereru - Class at Kaniere School on the West Coast.


By Lindi Newth, Bromley School
There are many reasons why I use green screen in the classroom. It really engages and excites students, making learning fun and memorable. It’s a creative and interesting way to make learning visible. It allows students and their audiences to really immerse themselves and connect more deeply with the content and the stories they’re telling. We’re so fortunate to have educational consultant Mandy Dempsey work alongside us for Digital Technology inspiration and technical support. This is where I learned the basics. Everything else I picked up by giving it a go and learning from my many, many mistakes, and through a lot of just pushing buttons to see what might happen. There are many green screen tutorials on YouTube, but I learned most from my students and nutting it out with them. Our students at Bromley School see no boundaries. They have some amazing ideas on ways in which green screen could help with their learning and make it visible to others in an engaging way.
Changing perspectives
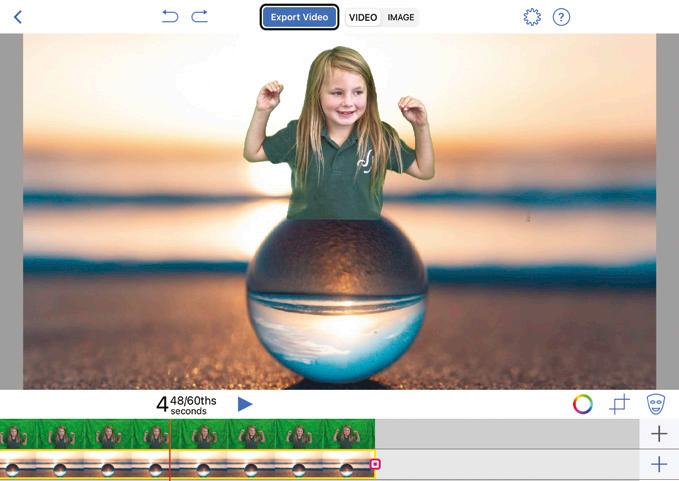
One of our biggest successes was our project ‘In Dialogue with Insects’. After surveying students from other classes, we found that insects were not well understood or liked. My students wondered that if they could give insects a voice and share with others just how important insects were, would people change their perspectives on insects? After many weeks of research, students wrote reports about their chosen insect. They used the Green Screen app by Do Ink (doink.com) to video themselves reading their reports. Then, they took these videos and put their faces and videos on their digital drawings of insects, turning the students themselves into the insects they researched – literally giving insects a voice! You are guaranteed to laugh many times watching students use a green screen. Their reactions are hilarious when they watch their final outcome and see themselves flying around as a butterfly or creating a meditation video while sitting on top of a bubble! Another great aspect of green screening is it can capture the voices of the shy or less confident children. Also, it doesn’t always have to be the students in front of the green screen! As part of our Brave Shadow movie entry into the 2019 Digi Awards, my class used clay to create things that made them scared. They took photos of their creations in front of the green screen. Next, they used Chatterpix (duckduckmoose.com) to make their clay talk and explain why it made them scared. Lastly, students uploaded their videos behind a chosen background.

VIRTUAL LEARNING: CLASSVR
Shade of green
I have found a couple of minor issues when green screening. As our Bromley School uniform is green, ensuring the correct shade of green used for the screen is important. Ensuring the screen is positioned properly, so it’s smooth and without any shadows, as well as getting the lighting right, are also factors that affect the outcomes.
Using green screening has many strong links to the Digital Curriculum, like designing and developing a digital outcome for a meaningful purpose. Students have to think carefully about their audience’s interests and what will help engage them, maximising the message being presented. Students develop their computational thinking by having to follow a sequential process. They also learn to debug when they encounter problems.
Reflect and think

Green screening often requires at least two students, the camera person and the speaker, to work together and communicate. They need to reflect and think critically about how their videos look and sound, and then take the necessary steps and changes, requiring patience and persistence. My advice for teachers is to let your students guide you. We don’t need to have all the technical skills and ideas. Start exploring the technology with your students by creating a simple video until you get the hang of it. Relax and have fun, and don’t get caught up in the end product. Children now have this digital tool in their kete, so our future green screen plans are in their hands! Lindi Newth teaches at Bromley School in Christchurch.
Get out of this world with green screening
By Bex Rose, Using Technology Better With auditions done and dusted, and rehearsals for Brookby School’s 2020 production about to kick off, the kids were pumped and the excitement that rippled across the community was electric. Then, out of nowhere a sudden handbrake, the Covid lockdown, which swiftly stopped us dead in our tracks. The production seemed done for. How were we going to disappoint 126 excited children, smashing their performance dreams to smithereens? “What about if you filmed it?” asked our school’s PLD facilitator, Using Technology Better’s Lead Technology Trainer, Mark Herring. This innovative problem solver had just given us a lifeline we were eager to grab onto. We were all ears. “If you rework the script into scenes that can be filmed in front of a green screen,” he explained, “the kids could still perform, all while keeping numbers in the room within the Covid Protection Framework. kids will love it!”
And that was the beginning of what was to be one of the most successful school productions I have ever been part of.
Planning and upskilling
Now, we aren’t going to suggest that this was a simple ‘flick the switch and turn it to a film’ situation. It was quite the undertaking for two key staff members, Melissa Powdrell and Ally Chapman. Not long back to school after a long lockdown, these two dedicated teachers juggled their daily responsibilities of running a classroom, while working closely alongside Mark, to form a clear and concise plan. This plan involved serious upskilling in iMovie, watching numerous ‘how to’ YouTube tutorials on green screening and completely re-working the script that was originally designed to be a stage performance. In order to produce a successful green screen movie, we needed a ‘recipe’ to ensure the movie would be a success. This is the recipe we followed: • Equipment – What equipment will we need? iPad/s? iMovie? What props will you need? This is the ideation phase, too, as the ideas will determine what you will need; • Ingredients – What will the setting be? Who are the characters? This is also where you need to start formatting the plan, mind mapping and storyboarding the ideas; and • Method – This is the how. We’ve created this 10-step process for using iMovie (right). When life gives you lemons, it’s the perfect opportunity to make lemonade. And that’s the approach we’ve taken to cope with lockdowns; an opportunity to shift pedagogy, reflect on what we’re doing and how we’re doing it, and make changes to meet the needs of the ever-changing society at large. I was one of the lucky teachers to experience this transformative approach in action. Now I’m a teacher-turnedUTB-Technology-Trainer who helps other educators experience similar transformation in their schools. Get in touch and I can help you navigate the RAPLD funds process, which means this kind of support costs your school nothing at all! I look forward to making movies with you soon. Bex Rose is a UTB Technology Trainer (and formerly of Brookby School in Auckland) and can be contacted at
bex@usingtechnologybetter.com
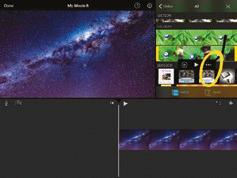
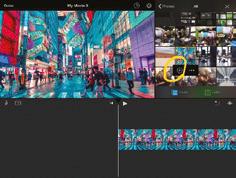
10 steps to green screen in iMovie
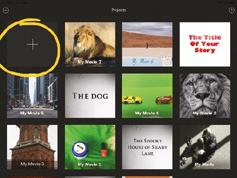
1. Click on the + to create a new project, or click on an existing project to open it.
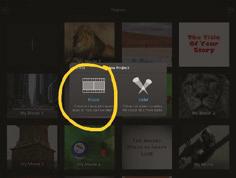
2. Select Movie
3. Click ’Create Movie’
4. Finding images for settings and saving in camera roll on iPad. Look in the Media Library to find the photo you want to use as your background.
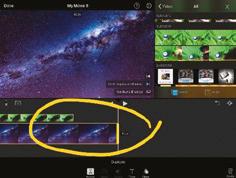
5. Click on the + and add it to your timeline 6. Click on the image in the timeline to make any changes to it, like turning off the Ken Burns zoom effect. When you select something on the timeline it will go yellow around the edge.
7. Move the playhead (white line) to where you want the video overlay to go.
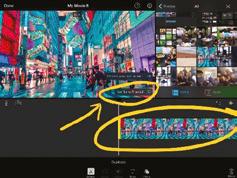
8. media library: find your video that you filmed with a green screen. Click on the three dots.
9. Choose Green/Blue screen
10. Adjust the length of the image so that it is long enough for the entire video.




Shortest disaster movie leads to longer lasting TV show
By Simon Pearse, CHB Technology Centre
I started at the CHB Tech Centre 11 years ago. Part of my remit was to get the TV station the school had purchased up and running. After several years, we gave it up as a bad job, but I had been inspired by the ideas of what a TV station could do.
With an IT extension group we made a movie for a local Hawke’s Bay competition called The Shortest Ever Disaster Movie. We had a lot of fun creating it, especially the parts where I had to make it look like the roof was falling in during an earthquake. I threw cardboard, paper and lots of flour at the kids as they dived under the tables! Our movie won the competition – which was awesome and got me thinking again about the TV idea.
From that point on, I researched ways of creating a live TV show experience for my students, including the green screening I’d first seen working briefly and badly with the original TV studio equipment. I visited a couple of local schools who had some serious gear and proper TV studios set up, one broadcasting to all classes several times a week. This was not something that would fit with our programmes or that we could justify spending many thousands of dollars on, but it inspired me to continue to develop a unit around the idea of a ‘Live TV’ show.
Choosing groups
I did some fundraising and eventually bought a top-of-the-range iMac, some professional TV studio software (BOINX) to run on it and, using the original camcorders and a green screen cloth, we ran a successful unit of five two-hour lessons. Following this, further fundraising got us professional camera and autocue set up, a large pot of Chroma Green paint and some stands we painted with it to sit behind the news anchor desk. The unit started with the class choosing groups of three of four students to work together. One group was the live TV team consisting of the most organised class member (director), the techiest student (editor) and the two most confident students (news anchors). The other groups would pre-record interviews using iPads, so needed a reporter, camera operator and interviewee, plus script writer, although all students in the group were tasked with this.
We brainstormed a story line and decided which group would do what. Whilst the pre-recorded interviews were being developed and filmed, the live team wrote the script for the news anchors and the editor got to grips with the TV studio software.
Ladders and wall

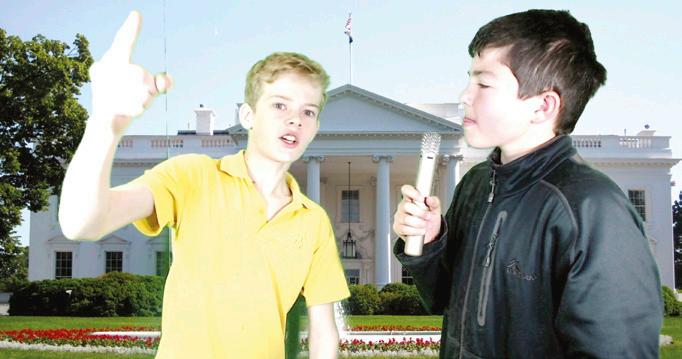
During the final lesson, the pre-recorded item groups became the studio audience, the editor made cards to hold up to instruct the audience when to laugh, boo, clap, etc., and ran the show, instructing the news anchors when to start and stop, and loading the pre-recorded videos into the appropriate places. One very memorable story involved three country schools working cooperatively together, interviews with Donald Trump standing in front of the White House, a Mexican lady showing how she had thwarted Trump’s plans to keep her out by using a ladder to climb over his wall, and an alien invasion of America that couldn’t be stopped by Trump building a wall, as the aliens had bought ladders with them. Much fun was had by all! We also had murder mysteries, game shows, comedies and debates, all with varying degrees of success.
All sorts of silliness
The biggest challenge was getting to grips with the software, and I would have benefitted hugely from having someone locally who could have helped make the whole ‘live’ recording process much smoother. From a tech perspective, the learning outcomes revolved around systems and digital technologies, but there were many more positive outcomes for the students that fit across the curriculum, from literacy to cooperative learning. Several years on, the green screening aspect is much more accessible with most tablets, to my knowledge, coming with that capability, or able to download apps that do. And one of the things I loved most about the green screening is that, during break times, other students would come into my class and get shown how to green screen by my students, rather than having a break. They quickly learnt how to record videos of them getting up to all sorts of silliness. The last time I planned to run this unit we went into the first lock down. No plans at the moment but, hopefully, we can fit it into our programme next year. Simon Pearse teaches at the CHB Tech Centre, which is based at Waipawa School in Hawke’s Bay.


