
20 minute read
László Czifrák: Experience from the Conservation of the Zsolnay Architectural Ceramics in the
from Restoring Art Nouveau – Architectural Decoration in the Danube Region
by Iparművészeti Múzeum // Museum of Applied Arts Budapest
Experience from the Conservation of the Zsolnay Architectural Ceramics in the Entrance Hall of the Budapest Museum of Applied Arts
The aim of this article is to highlight the exquisiteness and specific character of Zsolnay ceramics, which had become well-known by the end of the nineteenth century and were an important and expressive tool in Hungarian architectural decoration of the era. The uniqueness of these Zsolnay decorative ceramics originates from their high standard of craftsmanship, a great result of human ambition, zeal and empirical knowledge. It is more surprising, however, that this small family workshop took little more than two or three decades to reach the level of the large European porcelain and faience factories. In the beginning, their craftsmanship was mostly focused on the manufacture of porcelain faience and smaller decorative pieces. As market demands broadened and Zsolnay realized the opportunities in architecture, the production and development of architectural ceramics received additional focus from him as well. Zsolnay had a very close personal relationship with the great contemporary figures of Hungarian architecture, such as Frigyes Schulek, Ödön Lechner, Imre Steindl and others. 1 Some of these were good friends of his and even stayed at the Zsolnay factory as guests, which is verified by the memoirs of his daughter. The following quotation is taken from her memoirs:
Advertisement
“The architects lived with us. Our most frequent guests were Frigyes Schulek and Ödön Lechner, and this was the time when their lifelong friendship with my father and our family started.” 2
In the preliminary period, architectural ceramic decorations were first made of terracotta. The Italian term terracotta means “fired ground”, and it means clay that is shaped and fired after a cleaning process. It is usually unglazed but sometimes is painted with engobe before firing, such as the ornamental ceramics of the Hungarian Parliament Building and the Opera House. In the history of architecture, the term architectural terracotta became popular in the nineteenth century for the fired clay made for exterior facings. Terracotta and majolica were preferred in both the Neo-Gothic and Neo-Renaissance styles due to the inspiration from these historic periods. 3
However, following the initial experiences, the raw material of the traditional terracotta was altered, and thanks to additional material experiments, Vilmos Zsolnay and his team of experts developed their very own and unique raw material. This special ceramic type was given the name ‘pyrogranite’, and it was constantly being mass produced and further developed through research from 1890 forward. Due to this, he created a material that was suitable for durable building decorations. From the end of the nineteenth century, numerous buildings in Budapest and a significant number of cities in the countryside were decorated with pyrogranite. 4 Zsolnay pyrogranite proved to be a much more durable material for architectural decorations than those based on limestone, mortar or plaster, and mass production was also simpler since it used a set of negative forms. 5
It is important to note, that over the period of more than one hundred years that has passed, these materials have also been damaged by the effects of weather, wars, and ever-increasing pollution. Because of this, by the end of the twentieth century the condition of these architectural ceramics had deteriorated to such an extent, that their restoration has today become increasingly urgent. However, due to the aforementioned sources of damage, there have been constant efforts at repair, but the methods employed were not always professional and so in certain cases their condition worsened even more drastically. This was because the earlier experts had not gained enough experience to develop appropriate techniques. Therefore, it is significant that since
WWII the maintenance of the surfaces was not appropriate. As a result of these problems, the decorations have been completely destroyed in many cases. Precisely due to this, it is essential to examine the previous restoration attempts, so that the faults and errors originating from procedures that were not as professional as today’s standards might be fixed with a better conceived execution. It must also be mentioned that while these restoration projects were inadequate in many cases, they were fortunate in that they held the materials together in their original positions.
The reparation of the damage after the wars was complex, since in many cases not only restoration was necessary, but new elements had to be produced. As a result of the new pieces, the materials of the new and old items differed, so their ability to withstand damage (results of war, effects of weather and the environment, and mechanical damage) also varied. All these types of damage were characteristic of the decorative elements in the lobby of the Museum of Applied Arts in Budapest prior to the restoration work.
The phases for the restoration of the lobby of the Museum of Applied Arts
The restoration of the ceramics in the lobby was performed in two major phases between 2008 and 2010. (Figs 1–2)
First, in 2008, the side walls of the lobby had to be restored, because these ceramics had become detached from the surface due to water damage to such an extent that a collapse was imminent.
These decorative elements were made with a special glazing technique that was called ‘ruby-colored luster glaze’. This is a unique type of eosin glaze that was devel
1. The Museum of Applied Arts, Budapest
2. The lobby of the main entrance to the Museum of Applied Arts
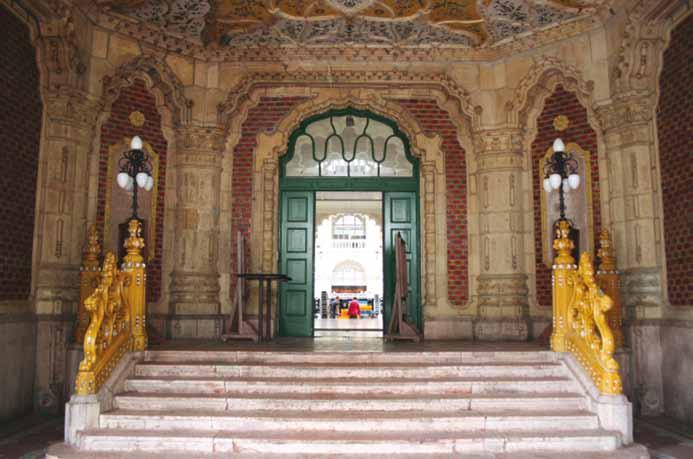
oped for the millennium of the Hungarian Conquest by Zsolnay and Vince Wartha – who was a great figure among Hungarian chemists. The special characteristic of this glaze is a prism effect that creates a rainbow shine with a ruby-colored luster (the “millennium Technique”).
The idea of using this method comes from a famous master of ceramics from Gubbio – named Giorgio Andreoli – who became famous for applying this glaze along with many other ceramic techniques. 6
These unique tiles were produced specifically for this lobby, so the expert restoration and maintenance of the original forms were essential. Unfortunately, they had begun to come loose, and as a result of this the ceramic tiles were pushed together. Because of this stress, certain tiles fractured or broke in half in the middle. This stress was so powerful that at certain points there was a good 5–6 cm between the tile and the wall itself. In order to avoid these tiles falling off, the first step was to temporarily stabilize the ceramics and to precisely pinpoint the number of the elements in need of restoration. Every element that had to be removed received a number because it was important that every single one had to be returned to their original place after the restoration. While performing the step-by-step removal, a safety net had to be put up, which prevented detached parts from falling and breaking. The removal procedure was done from top-tobottom, in consistent lines. As a result of this line-by-line removal, it was possible to avoid having the lower pieces on the detached surface fall off. We performed the removal procedure down to the very last line of tiles.
The wall behind the removed ceramics was cleaned properly, and the level of moisture damage was examined. Because previously these walls had been dried from the inside, the water damage was not severe. This was important, because after the restoration, the tiles could only be replaced on a physically stable and clean brick wall surface. The pieces that had been removed, nearly 500 tiles, were taken to a workshop. (Figs 4–5)
Here, every piece was individually treated. During this restoration, the old mortar layer was removed, the
3. The plan for the ceiling in the main entrance hall
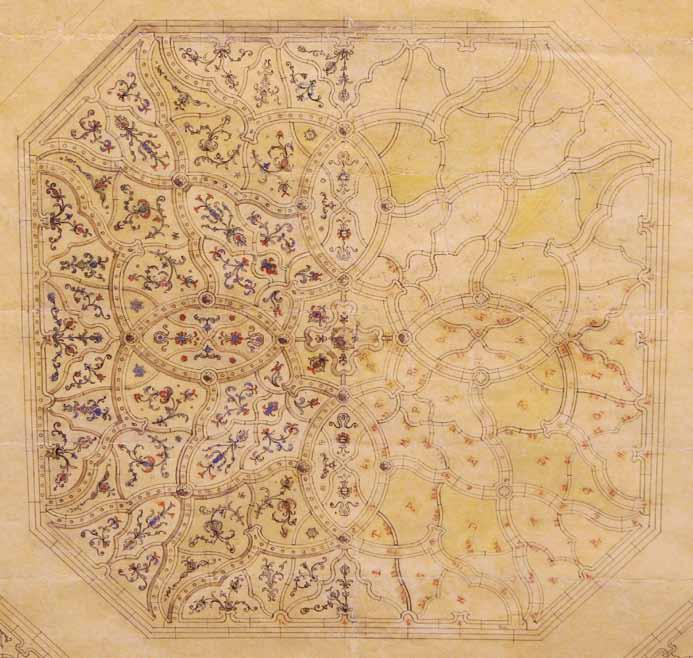
back side was cleaned, and a detergent-based cleaning procedure was used on the front side. After the cleaning, every broken piece was precisely adhered together, paying attention to perfectly match the glazed surfaces. We used a two-component epoxy adhesive, which ensured the original durability of the pieces. After the readhesion process, the replacement of the missing parts was the next step. These tiles were treated with a special glaze, called ruby-colored luster glaze that is extremely sensitive to mechanical effects. Because of this, we had to choose a material for the replacement that was easy to work with and did not harm the original glaze during the restoration process, such as during the sanding or polishing of the surface of the material of the rebuilt parts, which could have been harmful. If the sanding and polishing were too powerful and not performed properly, the original ruby-colored luster glaze could get scratched. Since the original glazed pieces were so sensi
tive, the restoration process was quite long. This was made even more difficult because the painting of the rebuilt surfaces could only be done with an immeasurably thin layer of paint. A restoration process with such a thin layer of paint can only be performed using an airbrush technique. (Fig. 6) Because of the exquisiteness of the ruby-colored luster glaze, the colors are very different, so every single piece had a different, so-called prism effect. This is a unique and typical effect of the luster and the eosin glaze. As a result, it was necessary to mix a different tone of color for every individual piece. However, since this retouch technique uses a very thin paint layer, which is also very sensitive, it is important to treat the pieces with a protective coating. This
4. The ceiling in the main entrance hall, before restoration

5. Decorative elements with ruby-colored luster glaze. The types of damage: gunshots, mechanical damage, damage due to leaks and fractures due to tension
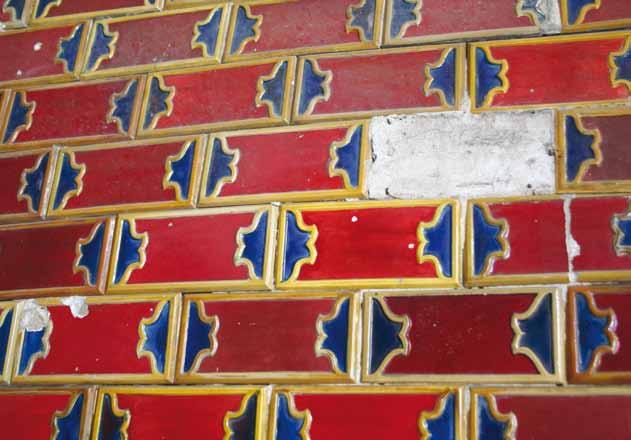
6. The numbered tiles during their removal
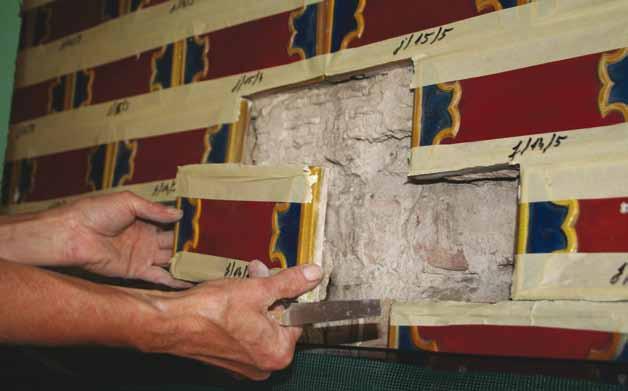
7. All the removed tiles were properly cleaned, and damaged tiles were taken to our workshop for further restoration processes
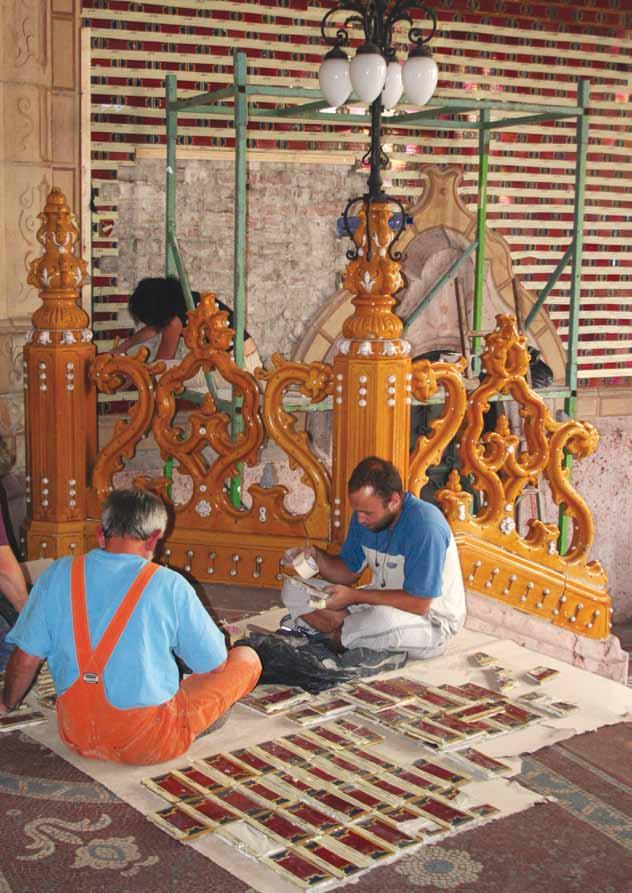
8. Broken pieces were glued together, and missing parts were recreated. Sometimes it was necessary to use an airbrush to create a thinner layer of paint
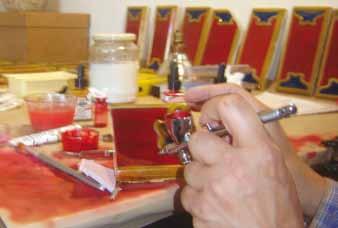
protective layer was a double component acrylic and polyurethane varnish. This layer is strong enough to stand up to mechanical and UV damage. After finishing the restoration of the damaged tiles in the workshop, we transported them to the building and replaced them in their original positions according to their numbers. 7 (Fig. 7)
In the second phase, in 2010, the ceiling of the lobby had to be restored. (Figs 8–9) In addition to structural damage, a great deal of mechanical decay had been caused on the surface of the ceramics during the Hungarian Revolution of 1956. This damage had been restored and they did not seem to be in a bad condition, but after up-close examination it turned out that the previous work and the ceiling were in a critical state. In addition to the natural signs of aging missing pieces and cracks were noted on numerous parts of the cladding of the columns in the lobby as well as on the ceiling.
It is quite difficult to precisely determine the origins of this damage, although it is a fact that after the construction work on the metro line near the building, numerous physical distortions were spotted in the structures of the ceramic casings, to which the constantly receding line of damp had an additional stretching effect. This structural damage was further exacerbated due to the freeze-thaw cycle in the winter season. The effects of the resonance of the urban traffic may have further worsened the state of the structurally damaged pieces. After the state of conservation assessment of the ceiling decorations in the lobby, we defined the precise
procedure for local treatment. It was important to uncover all the preceding treatment efforts, in order to evaluate their static and structural status. However, to do this we first had to complete the cleaning process for the unglazed pyrogranite elements using the wet dolomite-blasting technique. Unlike a chemical based cleaning process, the wet dolomite-blasting cleaning process is an alternative that, if optimized to the target element’s surface sensitivity, then an even and aesthetically pleasing result can be achieved that could otherwise not be guaranteed in the case of elements of this large a size.
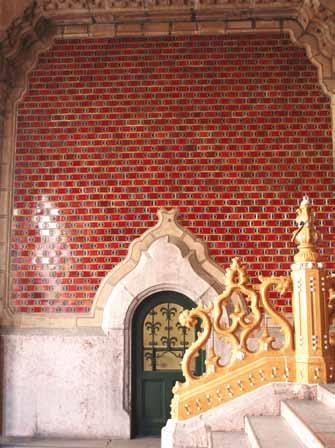
9. The wall covered with ceramics after their conservation and reinsertion
The surface of the unglazed pyrogranite elements was affected by rather aggressive contamination due to the heavy traffic and air pollution along Üllôi út in recent decades. The sooty, smoky, granular build up that has accumulated over decades on the surface allows the polluting substances to seep into deeper capillaries of the ceramics after a solvent-based moist treatment. In order to achieve an effective cleaning according to the test
10. After the cleaning and the removal of the ceiling ceramics in bad condition, the problems turned out to be critical
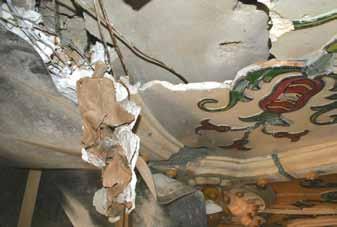
cleanings, first a low-pressure wet dolomite-blasting technique was applied through a so-called Jos spreader which treats the surface gently and can be controlled, so the elements with varying levels of contamination and pollution could be cleaned easily, safely and at an even quality. The other very important aspect of the application of the dolomite-blasting technique in the determination of the cleaning process is that we were not able to use chemicals that were either too acidic or too alkaline. The absorption of these chemicals can also cause chemical damage to the structure of the ceramic in the long run. The dolomite-blasting mechanical surface cleaning was only performed in the case of unglazed pyrogranite elements, and in accordance with the testcleanings we used a low-pressure wet dolomite-blasting procedure. Under constant supervision, this gently removed the strongly cured build up from the capillaries of the unglazed elements, but it did not cause any kind of damage to the outer structure of the pyrogranite, and so the original surface remained unscathed. Upon completing the cleaning process, we started removing the damaged surfaces. (Fig. 10) The structural damage to
11a–b The damaged surface before dismantling and after restoration
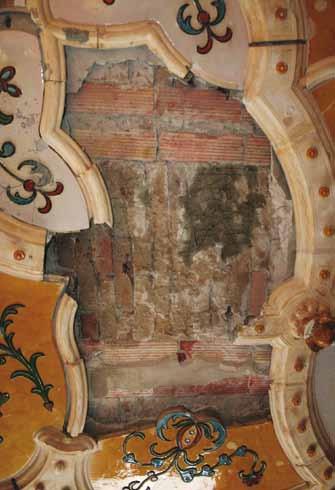
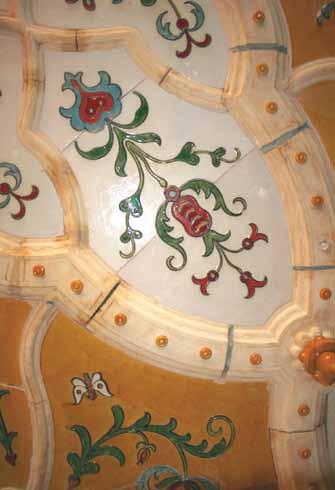
the ceiling, which in most cases was not limited to surface cracks but included actual cross section fractures, had also caused distortions in the levels of the flat surfaces in numerous cases. The structural status of the ceiling elements had been weakened because of this damage, and upon exploration we discovered structural damage that had been concealed before the restoration work. After the removal of the damaged ceramic elements from the ceiling, we discovered damage that lied behind the décor. (Fig. 11a–b) The spalling of the plasterwork was typical, so its treatment was also an important task before the reinstallation of the restored ceramic elements. However, this mortar spalling was not typical of all the surfaces, and even the brick structure behind them was in top quality. However, in order to allow the restoration process to continue without further disturbance, a thorough material and wiring study was necessary. 8 According to a professional suggestion coming from restoration experts, the Museum of Applied Arts hired additional professionals in order to determine whether the prospective restoration processes were feasible according to the plans without the full removal of the ceiling elements. Thanks to the precision and thoroughness of the examination results, the work processes were able to proceed undisturbed. The results of this progression are included in the appendix.
Appendix
The description of the dismantling and the restoration processes
At the points where the ceiling decorations were unaffected by mechanical damage, and where we didn’t find structurally distorted or loosened elements, the structural state was favorable. Because of this, demolition was only justified in the areas where there was severe damage or additions alien to the structure. The reparation of these was necessary in order to achieve a professional restoration, and to reinforce structural integrity. On some parts of the ceiling, cement/mortar-like unpainted additions were visible. These subsequent substitutions were removed where necessary and were replaced with new, professional additions.
However, some of these subsequent reparations had so strongly bonded with the original material, that their
12. The main entrance hall after restoration

removal would have endangered the remaining unharmed elements, so we put an even cement layer over them after a surface treatment. This cement layer could restore the original aesthetics. During the mechanical cleaning process, we removed the cracked, aged and fractured adhesions, mortars and additions. We injected Akepox 5000 epoxy resin into the cracks where we discovered dislocations, which served to solidify the cracks. The copper wiring that was removed was treated with the aforementioned substance, so future corrosion would not form on these surfaces originating from the forces of stress. After reinforcement and cleaning, the cracks between the unglazed pyrogranite elements were filled with a colored, hydraulic binding-based frost-resistant mortar (Ardex X7 G) to form a strong bond between the damaged elements.
In choosing the material appropriate for the replacement of the minor missing parts of the ceiling elements, we intended to choose a material that would closely resemble the mechanical characteristics of the original material and would be durable against environmental effects. It was also important that it should provide protection for the original parts of the object as well. In accordance with these considerations, we chose the Ardex X7 G substance for additions, which is a waterbased adhesive mortar. This material has a slow binding time, minor shrinkage, and medium solidity, with hydraulic binding, delicate resin supplements and added
ground quartz flour, which provides excellent characteristics after drying.
The supplemented surfaces were not even in all places after the binding, so in order to achieve an even surface that could be retouched, an additional thin layer was still necessary. Using this thin layer, we were able to make the surface profile of the added elements identical to that of the original glazed elements. This was done with Kaim Dolomitspachtel; however, this material had to be treated with a thin protective polish before the retouching process, so the surface would have the necessary strength.
To repair and fill smaller damaged areas, imperfections and thinner glaze spots we used the same hydraulic repair paste, Kaim Dolomitspachtel, which can be easily polished and painted. During the retouching of the additions we worked according to the color hues of the original surfaces, so the ensuing reparations had a unified appearance with the original surfaces. We first applied a double component IMPA acryl-polyurethane copolymer protective polish onto the retouched surface. This has a good impregnating ability and also provides an adequate level of UV protection for the restored elements. After the drying of the polish, we made the entire surface hydrophobic. As a result, the restored surface received protection against air pollution.
The surfaces of the decorative tiles had a great deal of serious damage and it was necessary to repair and preserve each piece carefully and individually while keeping the undamaged original parts safe.
We continued the restoration process of the cleaned tiles with the adhesion and gluing of the broken pieces. We used Akepox 2010 epoxy glue to attach the broken pieces together. This provided adequate mechanical strength to the layers and is also durable over the long term against weathering as well as corrosive and harmful pollutants in the air and the environment.
The material used when repairing the damaged, unglazed pieces was the IMPA Canova product, which is a double component frost-resistant epoxy resin that is quite suitable for exterior cladding. The loaded epoxy resin has a mechanical resistance after the curing process
13. The ceiling in the main entrance after restoration
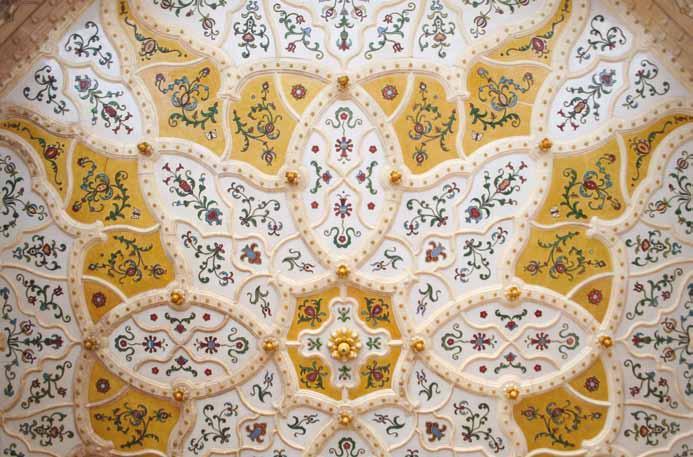
that is capable of repairing major damaged areas or cracks and also resists solvents and weathering. With the help of this replacement material, it is even possible to make the surfaces of the additions similar to the original. At the same time, this type of epoxy replacement material provides strong structural reinforcement for the damaged parts.
It was necessary to restore the structurally reinforced and supplemented decorations in order to achieve the original aesthetic appearance of these elements in a unified manner. For this, we used acrylic paints. We chose these because the bright color hue of the original glazed surface could be easily recreated with this type of paint and it would retain its color after the protective polishing. After drying, we used a double component IMPA acryl-polyurethane copolymer protective polish on the retouched surfaces that has a good impregnating ability and provides an adequate level of UV protection for the restored elements.
The layer that protects the restored surfaces is a modified silicone gel, which is 100% UV resistant and is also quite resistant to environmental effects in the long term. The surface treatment material provides constant protection against humidity.
Due to the high surface tension of the material, the moisture on the surface condenses into small drops and rolls off without leaving any kind of trace on the ceramics. The thoroughly cleaned surfaces were treated with the impregnating material by rolling and brushing, and then we wiped it again with a micro-fiber tissue in order to avoid spots.
A Zsolnay gyár’ [The Role of Architectural Ceramics in Historicism. The Zsolnay Manufactory], in Zádor, A. (ed.), A historizmus mûvészete Magyarországon [The Art of Historicism in Hungary], Budapest, 1993, 255–266; Papp, G. Gy. – Veress, K., ‘A Zsolnay-épületkerámia a 19–20. század építészetében’ [Zsolnay Architectural Ceramics in the Architecture of the 19th and 20th Centuries], Magyar Iparmûvészet 2001, no 1., 14–21. 2 Zsolnay, T., – M. Zsolnay, M. – Sikota, Gy., Zsolnay. A gyár és a család története 1863–1948. A gyár története 1948–1973 [Zsolnay. The History of the Manufactory and the Family 1863–1948.
The History of the Manufactory 1948–1973], Budapest, 1975, 159. 3 Mendöl, Zs., op. cit.; Csenkey, É. (ed), Hungarian Ceramics from the Zsolnay Manufactory, 1853–2001, New Haven, 2003. 4 Mendöl, Zs., Zsolnay Ceramics in the Service of Architecture. Hungarian
Ceramics from the Zsolnay Manufactory, New York, 2002, 169–180.
Notes 1 Mendöl, Zs., ‘Az építészeti kerámia szerepe a historizmusban.
For long lasting protection, the surface impregnation process should be repeated every three years, which will be possible to perform in 2–3 days using mobile scaffolding.
Conclusion
The ruby-colored luster glaze ceramic tiles and ceiling ornaments of the lobby of the Museum of Applied Arts in Budapest were made according to a unique design, and therefore they are very special and important amongst the types of Zsolnay architectural ceramics. (Fig. 12) The ornamental ceramics of the museum precisely represent Vilmos Zsolnay’s brilliant and unique achievements and developments in architectural ceramics. (Fig. 13) The protection and professional restoration of these ceramics are a high priority and important duty for Hungarian cultural heritage in order to preserve them for posterity. The technique employed and the experience gained during this project fostered the proper planning of similar later restoration projects for architectural ceramics. 9
5 Merényi, Gy., Zsolnay építészeti kerámia az Osztrák–Magyar Monarchia korában [Zsolnay Architectural Ceramics in the Austro-Hungarian Monarchy], Budapest, 2015; Mattyasovszky-Zsolnay, L., Finomkerámiai kézikönyv I–II. [Handbook of Fine Ceramics I–II], Budapest, 1953–1954. 6 Wartha, V., Az agyagipar technológiája [The Technology of Clay
Industry], Budapest 1892. 7 Based on the result of restoration work on site. 8 Czifrák, L., Final Documents of Restoration Work of the Entrance Hall of the Budapest Museum of Applied Arts Submitted to the National Office of Cultural Heritage, Budapest, Kulturális Örökségvédelmi Hivatal (KÖH), 2009. 9 Restoration Project team members: László Czifrák, Zsuzsa Herczeg,
Krisztián Rajna, Zita Rostás, Zoltán Sipeki, Nóra Szatmári, Ildikó Szoliva, Lilla Szórádiné Heizer, and Gyula Tóth.

