
9 minute read
Simplified layering technique for superior-quality posterior restorations
Presentation of a bilaminar histo-anatomical layering approach By Dr Gianfranco Politano, Rome/Italy, and Assoc. Prof. Marleen Peumans, Leuven/Belgium
Flowable bulk-fill materials and medium-translucency composite resins offer an efficient method for restoring posterior teeth. This article presents a fast and straightforward layering protocol on the basis of two different cases.
Advertisement
Today, there is a strong trend towards streamlining dental materials and procedures. We would like to show that simplification and good quality are not a contradiction in terms when posterior teeth are restored with proven direct materials. Furthermore, we have developed a method to heighten our efficiency which involves a simplified layering protocol and a composite material that is easy to adapt to the remaining tooth structure.
Straightforward and efficient
In this article, we present a simplified layering protocol for the placement of direct composite restorations in posterior teeth. In the two cases described, we used Tetric EvoFlow Bulk Fill as the dentin replacement and a medium-translucency nanohybrid composite A2/A3 (IPS Empress® Direct and Tetric® EvoCeram) as the enamel replacement. Clinical experience has shown that the combination of these two material used with a bilaminar histo-anatomical layering method results in restorations that blend in seamlessly with the surrounding tooth structure. In the two cases, a simplified layering protocol was used to place superior-quality restorations in posterior teeth in only 30 minutes.
One of the benefits of streamlined products and procedures is that clinical protocols are easier to standardize, thereby reducing the risk of error. If we look at the different steps of the clinical procedure, we see quite clearly that cavity preparation cannot be simplified. To ensure the longevity of the restoration, the cavity must be properly prepared according to the biomechanical analysis.
However, with regard to the adhesive protocol, it can defi
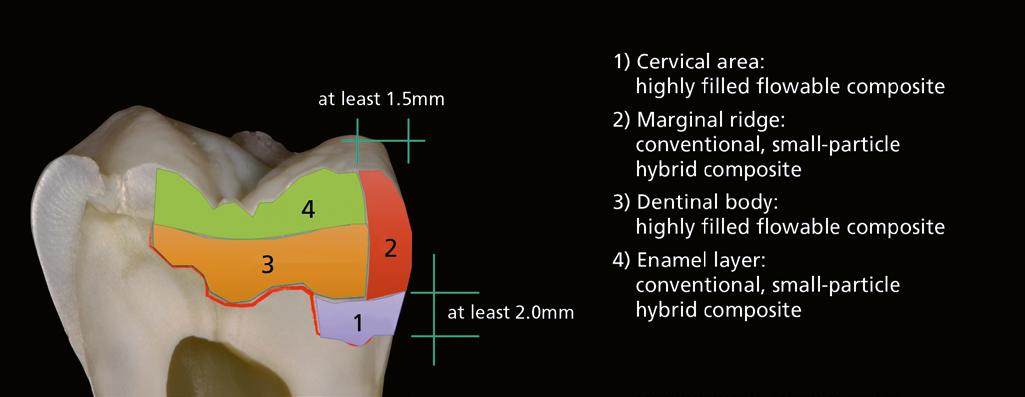
1. Application of the histo-anatomical bilaminar layering technique The objective is to copy the natural tooth. Therefore, the histo-anatomical build-up of the natural tooth has to be reproduced: The natural occlusal dentin is concave, while the enamel is convex. This biological fact (Bazos et al., 2011) has to be taken into consideration during the composite layering process. As a result, the dentin composite will be layered in a concave way and the enamel composite in a convex way (Fig.1). Layering according to this “bilaminar” technique is simple. In the prepared occlusal cavity, the enamel and dentin can be clearly distinguished so that the dentin and enamel composite can be efficiently applied in the correct spatial order. An additional advantage of the bilaminar histo-anatomical technique is that there is minimal risk of making visual mistakes when grinding in the occlusion.
2. Selection of the composite materials for dentin and enamel replacement A highly filled flowable composite resin should be selected as the dentin replacement. This type of material readily adapts to the cavity margins, the cavity floor and the overlaying conventional composite layer (Fig. 2). In addition, flowable composites show low shrinkage stress because of the elastic bonding effect. A flowable composite is easy to apply as a dentin replacement, since it automatically assumes the concave shape of the dentin. Very deep cavities are quickly filled with a product such as Tetric EvoFlow Bulk Fill, for example. This flowable composite resin has a high filler content of 52 vol %. The patented light initiator Ivocerin in combination with the Aessencio Technology enables you to apply this flowable composite in 4-mm thick layers, which nevertheless can be reliably cured. During the polymerization process the translucency of the flowable composite drops from 28% to a low < 10% which is very similar to that of natural dentin. Furthermore, the material has convenient self-levelling prop
01 — The natural occlusal dentin layer has a concave shape, while the enamel layer is convex.

1

2 2 1
erties, and it optimally adapts to cavity walls. Finally, Tetric EvoFlow Bulk Fill shows low shrinkage stress, as the material contains an elastic resinous filler known as a shrinkage stress reliever, in addition to the standard fillers. The dental enamel is replaced using a medium-translucency material (A2/A3) that imitates the optical properties of natural dental enamel. The esthetic IPS Empress Direct materials and the clinically proven Tetric EvoCeram composite are suitable for this purpose. As described, the enamel material must be applied in a convex way, according to the successive cusp build-up technique: that is, the cusps are built up in individual steps. An enhanced esthetic effect can be attained by characterizing the occlusal fissures with a brown stain (IPS Empress Direct Color Brown). This results in the optical separation of the cusps. In addition, the stain seals the fissures, thereby decreasing the possibility of plaque accumulation and simplifying the polishing of the occlusal surface.
3. Layering protocol for Class II restorations When the proximal box of a Class II cavity is filled, the layering process starts with the placement of a highly filled flowable composite in the cervical part of the cavity. This layer should be at least 2 mm in thickness (Fig. 3). The aim is to improve the marginal adaptation in the cervical area of the preparation. The proximal enamel wall is built up with conventional nanohybrid enamel composite in order to obtain the best possible physico-mechanical properties within the marginal ridge area. Once the Class II cavity has been transformed into a Class I cavity further layering can take place as described above. The layering procedure is further simplified and accelerated by using Tetric EvoFlow Bulk Fill as the dentin replacement, since this material is applied in one step (in the box and the occlusal part). Nevertheless, the maximum thickness of this layer must not exceed 4 mm. In the last step of this clinical procedure the functional requirements are checked and the restoration is finished and polished. These steps can be simplified by ensuring the following points:
A precise evaluation of the occlusion and articulation of the initial situation will prevent any over-contouring of the occlusal surface. In the treatment of Class II cavities, the correct selection and positioning of the matrix band will avoid the use of excessive amounts of composite material. When the cusps are modelled according to the successive cusp build-up technique, attention must be paid to giving the cusps the correct inclination and to leaving enough space for the antagonist cusp. This will significantly reduce the time needed for adjusting the occlusion as well as finishing and polishing.
The restorations are easy to finish and polish to a high surface gloss with the three silicone polishers of the Astropol set. The polishers must be used in the correct order: that is, in decreasing grit size. The grey polishers are suitable for finishing the occlusal surfaces and the margins. They are operated at a speed of 10,000 rpm with water-cooling. These polishers remove the scratches that were created by the diamond bur when the occlusion was ground in. Subsequently, the green and then the pink polishers are used to polish the restoration to a high gloss shine.
A 35-year-old patient requested us to replace the amalgam restorations in her first and second lower molars. She complained of pain in the last molar when she chewed. The clinical pictures showed unacceptable restorations in both of the teeth (Fig. 4). After having applied the universal adhesive system Adhese Universal, we replaced the dentin with Tetric EvoFlow Bulk Fill (Fig.5). This flowable composite resin has very good self-levelling properties and automatically assumes a concave shape. In the second molar, the flowable bulk-fill material was applied in one increment in the occlusal part and in the proximal area of the preparation and subsequently polymerized with the Bluephase light curing device (light output 1200 mW/cm 2 ) for 20 seconds. The manufacturer recommends light curing of 10 seconds. The layer did not exceed 4mm in thickness. Due to the Aessencio Technology, the opacity of the flowable material increased significantly during the light curing process (Fig. 5). Next, we replaced the enamel with the medium-translucency Tetric EvoCeram A3 material using the successive cusp build-up technique. We stained the fissures with IPS Empress Direct Color Brown (Fig. 6). Once we had removed the rubber dam, we checked the occlusion. As the cusps had been built up
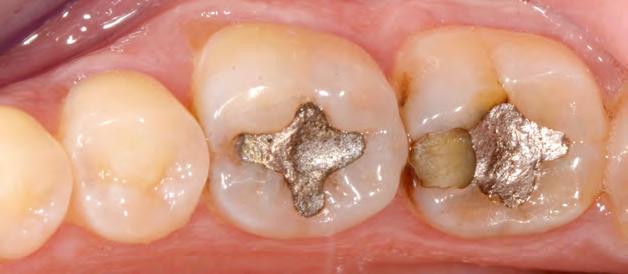
04 — Case 1: Defective restorations in two lower molars
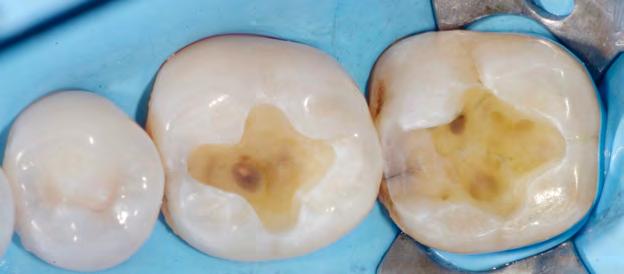

05 — Replacement of the dentin layer using Tetric EvoFlow Bulk Fill. Due to the Aessencio Technology, the opacity of the composite increases during the polymerization process.

06 — Replacement of the enamel with a medium-translucency composite (Tetric EvoCeram A3) using the successive cusp build-up technique. The fissures were characterized with IPS Empress Direct Color Brown.
07 — Ergebnis nach Ausarbeitung und Politur 07 — Result after finishing and polishing
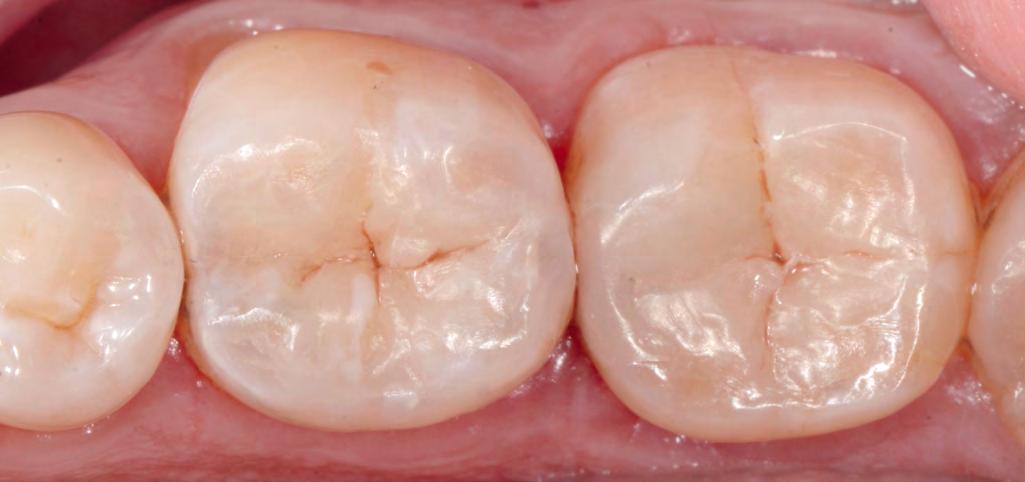
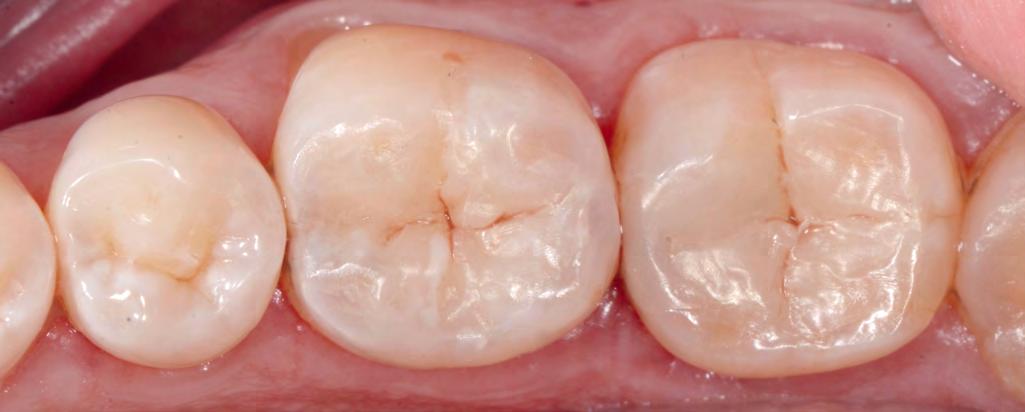
in the correct way, only minimal adjustments were required. We finished and polished the composite restorations using the three polishers from the Astropol composite polishing kit. The surfaces of the completed restorations were attractive in their simplicity and blended in seamlessly with the surrounding tooth structure (Fig. 7).
Case 2
A thirty-year-old patient presented with defective restorations in two lower molars (Fig. 8). We placed a rubber dam and removed the old restorations. In the process, we found numerous carious lesions (Fig. 9). We removed the infected dentinal tissue with a round tungsten carbide bur at a low
08 — Case 2: The two molars required direct composite restorations.
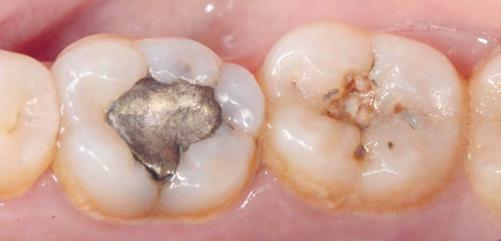

09 — When the old restorations were removed, numerous caries lesions were revealed.


12 — Ergebnis nach Ausarbeitung und Politur. Die Schmelzschicht wurde Höcker für Höcker mit IPS Empress Direkt Enamel (A2) rekonstruiert. 12 — Result after finishing and polishing. The enamel layer was rebuilt one cusp at a time with IPS Empress Direct Enamel (A2).


speed. Next, we cleaned the prepared cavities by air-abrading them with aluminium oxide particles (30 μm). We did not reduce the slightly undermined buccal cusp of the first molar, as it was not exposed to heavy loading during occlusion and articulation (Fig. 10).
The composite was placed using a bilaminar approach. The concave dentin layer was replaced with Tetric EvoFlow Bulk Fill.
Conclusion
Superior-quality composite restorations can be placed in posterior teeth in a normal time frame. The bilaminar histo-anatomical layering protocol significantly simplifies the treatment process. A highly filled flowable bulk-fill composite showing a dentin-like opacity and an enamel composite resin exhibiting medium translucency are key elements of this protocol.
After the polymerization step, the composite showed a significant increase in opacity, and the material effectively masked the discoloured bottom of the cavities (Fig. 11). We used IPS Empress Direct Enamel in shade A2 to replace the enamel. Subtle staining of the fissures with IPS Empress Direct Color Brown created an optical separation of the cusps. The finished and polished restorations looked very attractive and could not be distinguished from the natural tooth structure (Fig. 12).
Dr Gianfranco Politano Studio di odontoiatria Dr Daniele Puzzilli Via dell’Umanesimo, 199 00144 Rome/Italy gianfrancopolitano@yahoo.it Assoc. Prof. Marleen Peumans KUL Faculty of Medicine Universiteit Leuven Department of Oral Health Sciences Kapucijnenvoer 7 B-3000 Leuven/Belgium marleen.peumans@uzleuven.be


