
14 minute read
Pros and Cons of Bone-on-Bone Contact in Yogasana Practice – Mel Robin, PhD
by IYNAUS
PROS AND CONS OF BONE-ON-BONE CONTACT IN YOGASANA PRACTICE
BY MEL ROBIN, P h D
Advertisement
Although bone-on-bone contact poses a seemingly unsolvable problem for yogasana beginners in some postures, it also can be an aid to performance in certain others. The aim of this article is to present several examples of how to overcome bone-on-bone contact when it is detrimental to postural alignment and joint opening and how to encourage such contacts when it offers opportunities for achieving a deeper descent into the posture while remaining aligned. This discussion focuses on bone-on-bone contact within the hip; however, a more complete discussion of this and related points involving the spine, the elbows, the shoulders, and so forth, appear in my new book, A Handbook for Yogasana Teachers: The Incorporation of Neuroscience, Physiology, and Anatomy into the Practice, available through amazon.com.
Definitions Bone-on-Bone Contact. Virtually every bone in the body is in end-to-end contact with another; thus is it that our skeleton is formed. Nonetheless, when in the extreme positions common to yogasana practice, the two bones forming a joint can interfere with one another, limiting alignment or range of motion. Also possible is the incidental contact between bones not otherwise involved in the formation of a joint.
While working in the yogasanas, it may happen that further depth in a posture seems unattainable, no matter how large the effort. When up against such a dead end, it is likely that a bone is being pressed against a second bone, and progress halts because such bone-onbone contact is insurmountable. Rather than wait decades for the bones to change their shapes by remodeling and then progressing from there, it is far better to find a new approach to the yogasana that redirects the action away from bone-on-bone compression and toward muscle and connective tissue tensile stretching. This rephrasing of the problem is a wise choice, for tensile muscle stretching responds much more quickly to practice than does boneon-bone compression and its attendant discomfort.
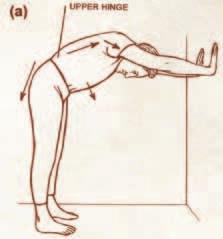
Bending at upper and Lower hinges. When bending forward, backward, or laterally from Tadasana, there are two distinct ways of performing the bend. Thus, the bend can occur within the upper hinge formed by the lower vertebrae and the ribcage. This involves unavoidable ribon-rib contact in the thoracic spine, especially when the bending is forward or lateral, or vertebra-on-vertebra contact when bending backward. Such upper-hinge bending (Figure 1A) will be firmly resisted because it is very difficult to proceed beyond the point of multiple bone-on-bone contacts. This is especially so when trying to descend in Parivrtta Janu Sirsasana, for example, where rib-on-pelvis contact is inhibiting when bending at the upper hinge.
In contrast, maintaining the proper spinal alignment, the bend can occur instead at the hip joints of the lower hinge (Figure 1B). Although bending at the lower hinge sidesteps the problems of vertebra-on-vertebra, rib-on-pelvis, and rib-on-rib contacts associated with improper spinal alignment, lower-hinge bending can be problematic because the femur may suffer from bone-on-bone contact within the hip.
Figure 1. (A) the beginning student bending at the upper hinge in Ardha uttanasana. (B) the experienced student bending at the lower hinge.

Anchors. Bone-on-bone contact in yoga is not universally to be avoided, for it also can be used advantageously. Guruji speaks of actions in which the energy generated in a particular region of the body is not allowed to leak into regions where it is not required; that is, it must be confined to the region of greatest importance to the posture. In this case, the effort may be brought to a sharper focus anatomically by forming a bone-on-bone anchor against which to work. As a simple example, when in Astavakrasana (Figure 343, Light on Yoga, 1966), the pressure of the ankle of the lower leg pressing down on the ankle of the upper leg keeps the lower leg off the floor! Anchoring through bone-on-bone contact is discussed below with regard to Bakasana (Figure 406, Light on Yoga).
As a more concrete example, sit facing an empty chair, arms hanging at your sides, and rotate the upper arms laterally and then medially; note how readily the hands follow the upper-arm rotation, whereas little or nothing seems to be happening in the shoulder region. Next, repeat the exercise but with the hands on the chair seat, thumbs hooked, or anchored, on the front edge, so that they cannot follow the lateral rotation of the upper arms. This anchoring of the hands focuses the effect of lateral arm rotation totally on the shoulder blades, which press into the ribcage, lifting and opening it! The ribcage is similarly affected when the thumb and index mounds are anchored to the floor medially, whereas the upper arms are rotated laterally in both Pincha Mayurasana and Adho Mukha Svanasana, in Parvatasana when the thumb tips press onto one another, and in Dandasana when the thumb tips are anchored by pressing onto the floor.
the hip Joint trikonasana Done three ways. 1. Stand with your back against the wall, with the feet apart and parallel to one another and turned forward, as in Tadasana. Keeping the feet parallel, move into Trikonasana 1 (to the right), setting the right hand as far down the right leg as possible while keeping the head and shoulders on the wall (Figure 2A). The right hand cannot go further down the right leg, even though the bending takes place at the lower hinge, because with the feet in parallel alignment and the back body on the wall, the upper rim of the right hip’s acetabulum (the socket within the pelvis into which the ball of the femur head inserts to form the ball-and-socket hip joint; Figure 2B) presses into the greater trochanter as one leans to the right (Figure 2C). It is impossible to go deeper after these bones come into contact.
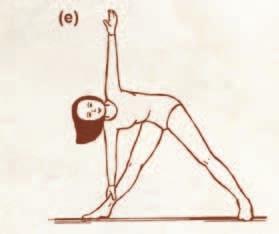
2. From Trikonasana 1, back still on the wall, turn the right foot, knee, and ankle completely to the right and see how much further the right hand can slide down the leg! In this case, one has laterally rotated the greater trochanter so as to point backward and so has avoided a collision with the acetabulum (Figure 2D). Note that although the right thigh is rolled laterally, placing the femoral neck behind the rim of the acetabulum in Trikonasana 2
(to the right) allows a deeper bend at the right hip. The right groin remains behind that of the left, whereas proper alignment requires that we work to press them forward more equally. To this point, we have rotated the femur in the acetabulum, but have not moved the joint forward. To do this as well, we form an anchor in the right leg by pressing the big toe mound heavily onto the floor through medial rotation of the lower leg while rotating its femur laterally! This combination of antisense counter-rotations not only avoids boneon-bone contact in the hip, but also presses the right hip and buttock forward, placing the hip more beneath the left buttock! As the bone-on-bone contact recedes at the right hip of Trikonasana 2 (Figure 2E) when the right femur is rotated laterally and the right big toe mound is anchored on the floor, the depth of the lateral bend and the tensile stress on the hamstring muscles at the back of the right leg increase while the right groin moves forward.
3. The bone-on-bone contact associated with bending laterally also can be avoided by bending the upper body and pelvis forward so that the greater trochanter again assumes a rearward position relative to the acetabulum. Start first in Tadasana, with the feet together and parallel, and then step the feet apart left and right with maximal separation, feet parallel, and the back body on the wall. Acting at the lower hinge only, bend to the right as far as the right hip will allow (Figure 2A), and then allow the back body to move off the wall as you fold forward into Prasarita Padottanasana; place the hands on the floor just under the shoulders. Note that in this position, one could more closely approach placing the head on the mat by further separation of the feet, but at the same time such further separation would lead to increased bone-on-bone contact in both hips, for Prasarita
Padottanasana is essentially Trikonasana performed simultaneously to the left and right. Note, however, that although the feet were spread maximally when upright, when bent forward, although parallel, the feet now can be separated even further without increasing discomfort in the hip joints. In fact, the deeper one bends forward, the further the feet can be spread laterally without discomfort, and the closer one approaches placing the head on the mat!

The apparent reduction of the bone-on-bone contact in the hips as one enters Prasarita Padottanasana arises because the acetabulum (dashed line in Figure 2B) is not equally deep at all points of the compass. When standing in Tadasana, weight bearing within the hip understandably is fully in that part of the acetabulum marked “N,” and so this is the part of the acetabulum that is thickest and most prominent and that results in bone-on-bone contact when in Trikonasana 1. However, that part of the acetabulum marked “S” rarely bears weight, and so is thin and offers little or no bone-on-bone contact with the greater trochanter. However, when one goes from feet-separated Tadasana to Prasarita Padottanasana
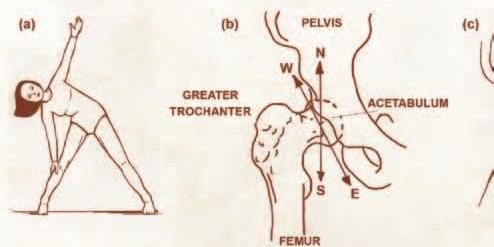
Figure 2 (continued). (d) rotation of femur to avoid contact with acetabulum in trikonasana 2. (e) trikonasana 2.

(Trikonasana 3), the pelvis rotates about the hips so that in the latter, the bone-on-bone contact is the greater trochanter against the acetabulum-south, rather than the greater trochanter against the acetabulum-north, as it is when in Tadasana or Trikonasana 1. Consequently, the deeper you bend in Prasarita Padottanasana, the weaker is the bone-on-bone contact in the hips, and the more you then can spread your legs and further lower your head. This release of bone-on-bone contact when bending forward is the force driving beginning students toward a forward bend in Trikonasana 2. The avoidance of bone-on-bone contact in the hip by rolling the pelvis forward is most evident in Guruji's demonstration of Parighasana (Figure 39, Light on Yoga) and is implied in his demonstration of Parsvaikapada Sirsasana (Figure 210, Light on Yoga). Bone-on-bone contact within the hips is irrelevant in Parivrtta Trikonasana 2 and in Parsvottanasana because both begin with a forward bend over the forward leg.
With your head as close to the floor as possible while in Trikonasana 3, that is, your feet separated as widely as possible (and still parallel), begin to move toward Tadasana while maintaining the maximal separation between your feet. As you move toward vertical with the feet separated maximally, you will soon enter the region of greater trochanter against acetabulum-north contact while still folded forward, and you will find that returning to vertical is next to impossible because there is now a very strong sense of bone-on-bone contact in the hips; this leaves one in a state of strong lordosis (lumbar extension) and far from Tadasana verticality! A similar effect can be found when doing this Tadasana-toTrikonasana 3 routine while lying on the back on the floor.

Anantasana. The lessons learned in going from Trikonasana 1 to Trikonasana 2 apply only partially to Anantasana (Figure 290, Light on Yoga). Start by lying on your right side in preparation for lifting the left leg in Anantasana, with ankles fully flexed and all of the front body including the toes facing forward. From here, lift the straight left leg as high as you can, keeping its toes still pointing forward, so that the line of the flexed left foot remains parallel to that of the flexed right foot. After the leg is as high as it will go, only then allow the left thigh to rotate laterally so that its toes then face upward; note how much farther you can now lift the leg! Again, without this lateral rotation, the Anantasana leg lift is impeded by the collision of the greater trochanter with the acetabulum (Figure 2C). The problem of pressing the right groin forward in Anantasana such that the two buttocks align more vertically is addressed if the foot on the upper leg is immobilized, as when the hand holding the forwardpointing foot does not allow it to turn laterally, even though that is the action of the femur. Similar considerations apply to Vasisthasana.
Virabhadrasana i and ii. Although we readily cut in sharply on the hip of the forward leg in Trikonasana 2 while bending at the lower hinge, in Virabhadrasana II, it is a cutting in on the hip of the back leg that keeps the spine vertical. This cutting in can prove difficult because the
hip of the back leg suffers from the same greater trochanter–acetabulum contact met in the front leg of Trikonasana 1. However, the back leg in Virabhadrasana II does not have a large range of motion for the lateral rotation that might minimize bone-on-bone contact in the back hip because the foot is set as in Trikonasana 1 or is even rotated medially. Ease this type of congestion by rotating the femur of the back leg laterally, by introducing a little upperhinge bending, or both.
Backbending As one pushes up into Urdhva Dhanurasana, the entire spine may be in pain because the boney spinous processes within both the lumbar and thoracic regions press onto their neighbors. Because of the increasing level of discomfort, no further spinal extension seems possible. These symptoms of vertebra-on-vertebra contact are relieved by bending again at the lower hinge, which reduces painful spinal compression by transforming the compressive vertebralon-vertebral stress instead into tensile stretching of the quadriceps muscles of the upper legs.
Regarding the possible role of bone-on-bone contact while backbending, the possibility exists that starting in Tadasana, dropping back so as to set the pelvis far behind the heels results in contact between the greater trochanter and the acetabulum at the west or rearward position (Figure 2B). In this case, the medial rotation of the anterior thighs in Urdhva Dhanurasana that we all learned in Iyengar kindergarten realigns the femoral neck with respect to the acetabulum, and thereby eases bone-on-bone pressure in the hips.
Bakasana. This posture is performed with the legs bent and the inner knees perched outside the bent arms. First, sit in Baddha Konasana with your knees apart, soles of the feet together with all toes touching their left and right counterparts. Focusing on the feet, rotate them so that the soles of the feet now stand on the floor as for Tadasana, with the big toe mounds pressed downward, whereas those of the little toes are pulled up. With this transition to strong yoga feet, note that this change of relative foot position strongly draws the thighs closer together.
In Bakasana, the beginner often carries the feet more or less in the Baddha Konasana position with the knees apart and soles of the feet more or less facing inward toward one another. However, if you can manage to keep the inner knees outside the upper arms while bringing the feet instead into the strong-foot Tadasana position, with heels and big toes touching and soles of the feet facing backward, then the knees are strongly forced onto the bent arms. In this way, working the feet as in Tadasana, one gains the shin-on-arm advantage of having the legs essentially glued to the arms, thanks to the bone-on-bone anchors in the toes! The leg and foot position needed to pin the knees to the arms is demonstrated by Guruji in Malasana I (Figure 318 in Light on Yoga). In this, the thighs squeeze the side body, holding the upper legs in close so that the arms can join behind the back. If the soles of the feet instead were in Baddha Konasana position, then the knees would flop to the ground and the hands could not grasp. Taking advantage of the feet as anchors as in Malasana, one then can work on straightening the arms in Bakasana without the knees sliding down the arms. Finally, try bending at the lower hinge instead of the upper hinge in Bakasana, because this latter action reduces rib-onrib contact while favoring the thoracic curvature appropriate to Tadasana.
Conclusions When up against bone-on-bone contact, random stretching, twisting, and turning may set you free, but a more rational approach is first to consider the skeletal anatomy of the posture, and then to find a new approach that converts bone-on-bone resistance into a more manageable muscle-stretching action. Paradoxically, in certain other postural situations, the application of bone-on-bone contact can prove to be just what the guru ordered regarding going deeper into the posture. It is hoped that this article will give you some insight into when to avoid bone-on-bone contact and when to embrace it.


