7 minute read
Tech Reviews
by Todd Sheridan Perry
Blender 2.91
Learning how to be a 3D artist involves understanding technique, workfow and best practices more than knowing specifc programs. Sure, you can dive into Maya or Houdini or 3ds Max or Cinema 4D, etc. But as a budding artist, the cost of these programs may be out of your price range. This is where Blender comes in: It’s robust, full-featured, is actually used in production and it’s open source — more robust by including collisions. Users already had ways to pull surfaces around to create wrinkles and buckling in cloth while retaining the surface area, but the collisions now allow one to drape cloth on characters. There are also sophisticated FX with volumes where you can convert fuid volumes to meshes or vice-versa, meshes to volumes. And you can displace these volumes with procedural textures.
which means it’s totally free.
Blender 2.91 is the latest build— and frankly, I’m a little embarrassed that I haven’t given it the attention that it deserves. The list of features is exhaustive, and ranges from modeling to sculpting to animation to cloth to volumes, to even things that other 3D programs have very little of: internal compositing, tracking, editing and 2D/3D hybrid drawing tools.
For me, a few of the brighter highlights in 2.91 are as follows: The Grease Pencil feature is designed to be for 2D animation, while existing in 3D space. The strokes become editable objects. And, traditional 2D tools like onion skinning provide a familiar workfow. New Grease Pencil features in 2.91 include the ability to import black and white images and convert them to Grease Pencil objects. Also, you can paint masks which will act as hold-outs between foreground and background animations.
Cloth tools had been introduced in earlier versions, but the developers have taken this feature further. Cloth sculpting has been made
The list goes on and on. But, despite the fact that a Blender review is long overdue, and I’m glossing over just how powerful the program is, my primary reason for bringing it up now — in an issue focused on education — is how accessible it is. Everyone with a computer can use it, which means everyone can learn 3D (and 2D) animation without the expense of a software license. While there are many offers of educational or indie licenses of competing 3D programs — $750 can still be out of range for someone just starting out. Blender removes those limitations.
As a helpful hint that I frequently applied when I was frst starting out, I would use tutorials from other software packages, and learn how to do them in the package I was using. For example: I had learned 3ds Max initially, so when Maya was released, I would use Max tutorials to force myself to rethink the approach and recreate it in Maya. Blender is as powerful as most other programs out there. There are hundreds of hours of training for it. But try looking at Maya or Cinema 4D or 3ds Max tutorials and try to recreate them in Blender. By doing so, you are learning the techniques and methodology of working in 3D, and not just where the correct buttons are in the software.
Website: blender.org Price: Free!
Foundry’s Katana 4.0
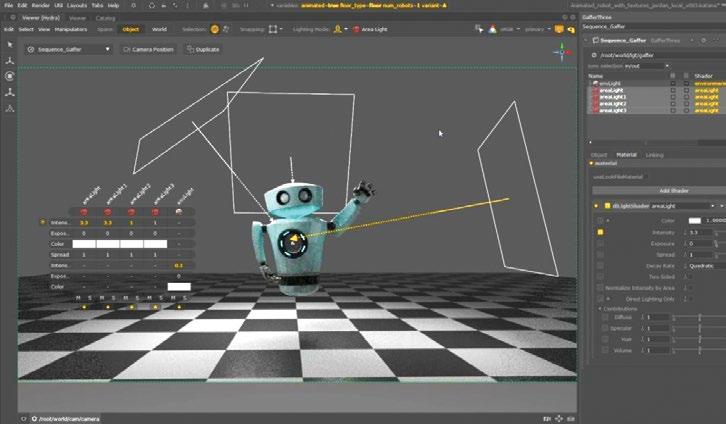
Late last year, Foundry released the 4.0 version of its look development/scene assembly/lighting tool Katana. Within that release are some substantial improvements in workfow and effciency, but none more important (in my opinion), than the UX for lighting artists.
The new Lighting Tools function within the Hydra viewport dramatically increased productivity for look development and lighting. Within the viewport, you get progressive render feedback as you make changes. This isn’t anything new, but the way you make the changes is. Now, through click and gestures (which defnitely is optimized for Wacom tablets), you can place and adjust lights. Clicking the surface of the model, you create a light based on how you want it to act on the surface at that point. In the Katana 4.0 workfow, you click on the surface that you want illuminated — and that could be where you want the light, or a specular kick, or a refection, or even how you want the shadow to land. Then, the light is created pointed at that spot. Through some modifer keys and pen gestures, you can move the light closer or further away, because as all cinematographers know, the proximity of the light is one factor for how bright it is, due to exponential falloff. Or, again with a gesture, scale the light up or down — which will modify the intensity and the softness of shadows. You also have a foating interface within the Hydra Viewer of the most critical parameters of the light you have selected — or all the lights. There is a default set, but you can show more or fewer parameters if you want. The major point is that everything you need to make your lighting adjustments is right there at your fngertips.
Since progressive rendering is what this is all about — the fast iterative nature of lighting

— Katana 4.0 can render multiple preview renders at the same time. So, you can launch a preview with parameters, the computer can chew on that image while you move on to make a new iteration. In earlier versions, you’d have to wait until that frst image was done (or you cancelled it) before you began working again. This is optimized further through Katana Queue, where you can tap into a render farm for your preview renders as well as your own workstation.
There are many more advances in the way items are organized and displayed in the catalog, USD utilization, and how the network material nodes can be iterated, spawn children and shared with other artists. But it’s the aforementioned workfow and UX changes for the artists that get me the most excited. I totally encourage the update because this version is pretty darn robust!
Website: foundry.com/products/katana Pricing by request
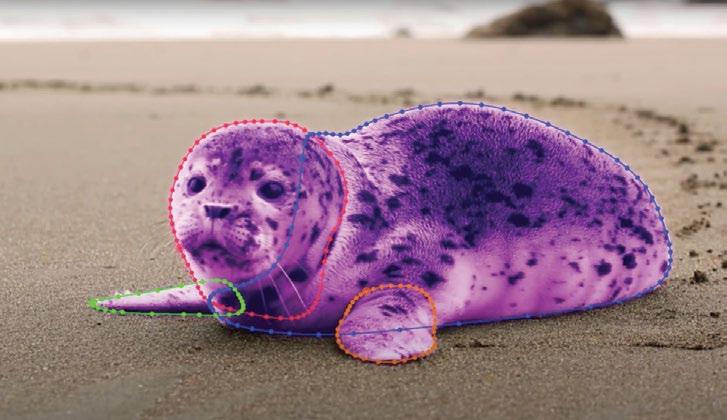
neath the primary planar tracker for added effciency as it utilizes the gross movement to drive the wrap track. This makes it faster than transitional optical fow processes. Once planar tracked, you can choose between two approaches: automatic and uniform. Automatic mode analyzes areas of contrast to identify useful areas to track, while uniform mode creates a uniformly dense mesh over the entire surface. Further, you can control the mesh track points manually to inform Mocha Pro what you want tracked, and by adding points, you can add detail and density to the mesh. And because the mesh warp is calculated under the planar, you can use a smooth parameter to tell Mocha Pro how locked or loose you want the mesh warp in relation to the planar track.
The mesh warp data is not just for tracking stuff onto other things. It can also be used to assist in rotoscoping highly deformable objects as well as completely stabilizing the deformed surface to make patching and decaling much easier. And while all of this data (tracks and mattes) can be exported to host programs outside of Mocha Pro (as it always has), Boris FX has upped the ante by allowing you to export the mesh data into a 3D animated alembic fle. The alembic fle retains UV maps based on the frame you decide on, so your tracked element will stick to your footage as seen through the provided camera. This is extremely useful if you need to add fancy 3D things like new lighting or proper refections. I should also mention that Boris FX has bolstered the AdjustTrack features, to make fxing fnicky, drifting tracks way easier. By adding a layer to the primary track, artists can make interpolated keyframes to shore up the track. But more important, you can add additional control points within the boundaries of the planar track to aid the points of the plane that might have gotten lost when it was occluded or lost in motion blur. Moving and nudging points creates adjustments to all points to keep things nice and smooth.
In addition, for the techy techs out there, Boris FX has brought over Python from the standalone Mocha Pro into the plugin version so that custom tools will be available to use or create from within the host software.
Website: borisfx.com/products/mocha-pro Price: $37 (per month), $297 (per year)
Todd Sheridan Perry is an award-winning VFX supervisor and digital artist whose credits include Black Panther, Avengers: Age of Ultron and The Christmas Chronicles. You can reach him a todd@teaspoonvfx.com.
Borix FX’s Mocha Pro 2021
Last year, I was working on a project where I had to insert photos into a book where the pages were bending and distorting. It was a tracking nightmare where planar tracks weren’t going to do it, and Nuke’s vectors didn’t work either because of refections moving across the pages. I sure could have used
Mocha Pro 2021 way back in 2020!
The latest Mocha Pro now has a mesh warp tracker, called PowerMesh, for those crazy situations as mentioned above. Also, my problem wasn’t even as heinous as some. At least my photos were relatively stable — it wasn’t like a tattoo on skin, or a logo on a t-shirt, or a rip in some blowing curtains. These are the situations where PowerMesh shines.
As a sub-process, PowerMesh works under-


