9 minute read
Tech Reviews


Eddy for Nuke 2.7
Fluid simulations are a big deal in visual effects. They are used extensively for smoke, fre, explosions, water, etc. There isn’t a summer tentpole flm that doesn’t have these. They are complex and take a lot of time to calculate. They take a lot of time to write to disk and take up a lot of disk space. Plus, the way VFX workfows are setup always requires a lot of time and feedback from supervisors or clients … there are always notes. So in 2015, four smart guys (Andreas Soderstrom, Christoph Sprenger, Niall Ryan and Ronnie Menahem) founded the company VortechSFX in Wellington, New Zealand in order to tighten the iteration cycle by moving fuid simulations into the compositing stage within Nuke — and to increase calculation speeds by throwing everything to the GPU. And Eddy is the result. In a nutshell, Eddy works inside of Nuke’s 3D world — very much like you would in a more traditional package like Houdini or Maya. And it works in a similar way to other fuid packages, using a volume of voxels to calculate movement of the fuids with forces, temperature, buoyancy, etc. Although, you can also generate lighter volumes using math and noise nodes to create things like clouds or fog, to atmosphere that don’t require complex simulations.
The second part of Eddy deals with lighting and rendering these volumes. The renderer is also on the GPU, and can render in both scanline or progressive modes. So, iterating on the lighting and shading can be quick in progressive mode so you can see how it is ftting into the comp and dynamically tweak for better integration — because you are already in your comp. The render does support AOV output including Deeps — the beneft being that you don’t necessarily have to write out the deep data to disk, but instead calculate at render time. These benefts may vary depending on your GPU capacity versus your network speed and size. Incorporating into a traditional pipeline is crucial for the usefulness of a tool and Eddy has plenty of hooks to work within various workfows. It is able to bring in Alembic and OBJ fles for interaction of volumes with animation. Importing and exporting VDB fles are supported, so traditional volume solves from, say, Houdini, can be imported to be rendered or drive other features in Eddy. Python and API hooks are available for larger facilities to work with Eddy— or expand on it. The latest release (2.7.0) includes nodes that expand on integrating particle systems to better control Eddy-generated particles within the Eddy ecosystem including how particles are emitted, affected by forces and even particle channel manipulation.
Overall, Eddy is an incredibly powerful and fast tool, and while it won’t supplant full hero FX (and it’s not designed to), it moves a lot of the lighter lifting downstream. Arguably, dust hits, chimney smoke, cold breath, fog and such make up the majority of FX work — quantitatively speaking — and Eddy can take care most of that work in Nuke, allowing the FX department to destroy cities. It has a bit of a learning curve, but for those already familiar with putting together fuid systems, it’s not much of a leap, and because it lives in Nuke, it’s possible to have Eddy artists putting together subscripts that compositors can bring into their comps. If Nuke is already part of your ecosystem, and you are doing a lot
by Todd Sheridan Perry
of smokey, steamy, fery stuff, you may want to look into this.
Website: vortechsfx.com/eddy Price: Complete Eddy, $2,495; Annual Upgrade, $295
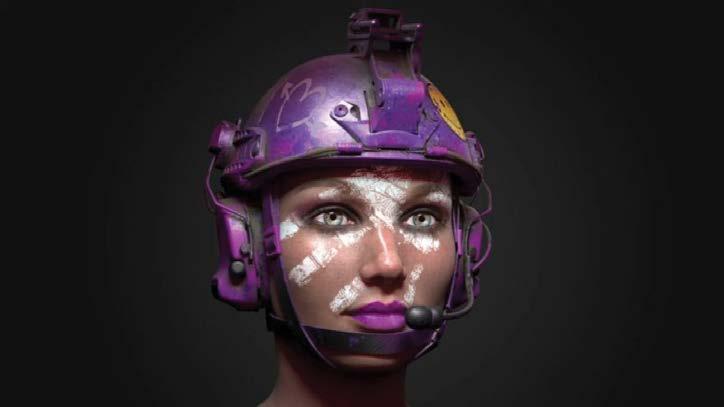
Foundry’s Mari 4.7
Mari, along with its competitor in crime Substance Painter/Designer, have really changed the landscape of texture painting and look development. And now with Mari up to 4.7 in its development cycle, the workfows have been established and tools are now being incorporated that refne those processes and make the experience even more effective and effcient for the artists. Not to mention how artists work together in a team. The primary addition in Mari 4.7 is called Custom Procedurals. It’s sort of like sharing materials, but much more elegant. In the past, when you developed a look for something you like — say, a dirt that looks pretty cool — you would tell people, “I have this pretty cool dirt!” and they’d say, “Send it on over!” But when you sent it over, the node network would be messy, not named effectively, and some textures and resources would be missing. With Custom Procedurals, you are bundling up your network and expose the key parameters people need to use it. It’s like a
Gizmo in Nuke (or Mari for that matter), and people coming from Houdini would recognize the approach like making Houdini HDAs. But unlike
Gizmos, Custom Procedural can be added to a shelf and used as a node or in a layer, if that’s your preferred workfow. Just make sure that your Geo-Channels are set if the Custom Procedural is dependent on them. The procedurals can be set to be used as a color, scalar to drive math in channels or masks. Thanks to Mari, artists can access your dirt from the shelf, and they don’t have to deconstruct your messy node network (no judgments!). Material Isolation is another new feature, one that I fnd incredibly useful for look dev. It’s one of those things that makes you ask, “How did we do this before?” This is mainly a display thing, but the information it provides the artists is incredible. Material Isolation gives you a way to view components of your material with a Current
Material shader in the context of the lighting.
Meaning: instead of looking at the end result of the shader on a model— which, let’s face it, can get quite slow quite quickly — you can look at the underlying base shader, then the shader that
makes up the fecks of paint and then the decals, and so on — to see how they look not as a fat shaded object, but with the renderer. This is all done without the burden of turning on and off different layers. Plus, with material in isolation, you can refne it and see what the changes are doing, without the “pollution” of the other layers.
The new release’s other important additions include: a revamped shelf UI for viewing, organizing, and searching for materials, textures and masks. Saving out bake points has also been made more effcient by providing a spreadsheet-type system for selecting and editing parameters for baking out multiple streams— and tools have been put in to bake fles to TX fles for specifc renderers. Mari is incredibly robust, and more so the beefier the CPU and GPU hardware you throw at it. In the past, Mari was signifcantly more expensive than Substance, but with subscription-based pricing systems, the two are starting to have parity.
Website: foundry.com/products/mari Price: $2,280 (Rent, $749/quarter)
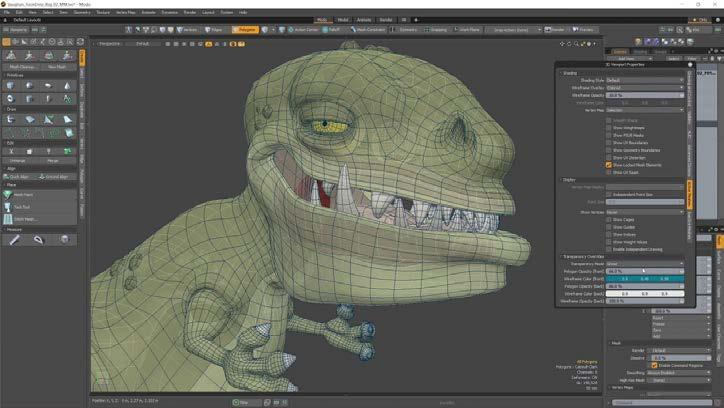
Foundry’s Modo 14.2
justments (also available as a procedural node). You can chamfer problematic sharp corners to clean up ugly corners. And for making control loops on close edges as you prep for Sub-Ds, the Mitering Offset gives you control to add in those extra edges quickly and easily. In procedural modelling, MeshFusion is really the touchstone for how clean and quick Boolean operations can be. In 14.0 Foundry an embossing toolset was added for complex Booleans — but once you completed the operation, additional operations were diffcult. But a Bezier (parametric) sharp corners function in 14.2 provides more control and functionality to continue to modify the results after the initial Boolean.
A number of weight map tools were added to control the distribution of maps. Weight maps provide control when you apply operations to the model to act as a mask for how much of the operation will affect the vertices. Grow weight expands the map. Border allows you to use the weight map as an edge for other maps. Flood will give you a kind of height selection assessing vertices by height, and then assigning verts to the map. Jitter makes a map of random values based on parameters you provide through a curve interface. Modo 14.2’s UV mapping now includes Real World Size as an option. I am normally focused on VFX use — in which the real-world scale does get used — but Modo is big in the world of product development, where digital prototypes of things will eventually become real things, and so seeing what objects will really look like is crucial. AxF (Appearance Exchange Format) materials come from X-Rite scanners for reproducing real world materials, and Foundry has made sure that Modo supports the materials and the corresponding real-world scales.
As mentioned before, beyond modelling, Modo has other features like rigging and animation. A 14.2 rigging feature that I found to be some outside-of-the-box thinking is the Rig Clay. In most rigging workfows, control splines are provided for animators to easily grab — which is much more convenient than grabbing the internal bones and such. But it can make for cluttered viewports. Modo embeds the controls into the mesh, so that when animators hover over areas, they highlight. And when the animator moves the highlighted area, the character deforms in the way the rigger had intended. I’m really just skimming the highlights of 14.2, and you should really check out the advances for the entire Modo 14 series. There is really a bit for everyone. And personally, while in my day job, I’m frequently in other 3D software packages, I really do prefer the modelling workfow of Modo. It just feels nice and intuitive.
Website: foundry.com/products/modo Price: $1,909 (perpetual), $440 (single user upgrade)
Todd Sheridan Perry is an award-winning VFX supervisor and digital artist whose credits include Black Panther, Avengers: Age of Ultron and The Christmas Chronicles. You can reach him at todd@teaspoonvfx.com.
Modo is Foundry’s modeling tool which was frst introduced in 2006. It is an incredibly powerful tool, but doesn’t get as much play as it should — at least in the visual effects and animation world. It was already a powerful direct modelling tool, and by Modo 10 it had incorporated procedural modelling as well. And now, for 14.2 — the third release in 2020, there are noticeable advances in nearly all of the areas— modelling, texturing, rigging and rendering. For direct modeling, we have a bunch of tools to assist in beveling (change a square edge to a sloping one) and chamfering (cutting away to make a symmetrical sloping edge), which are defnitely tricky when trying to maintain proper topology. In 14.2, there is a Chamfer Edit allowing you to go back into a chamfer to make ad-