JET HEADED GYPSY Cheers to getting rid of the starving artist mentality and to living a life of abundance!
Menu
J U N E 9 , 2 0 1 9 B Y J E T H E A D E D GY P S Y
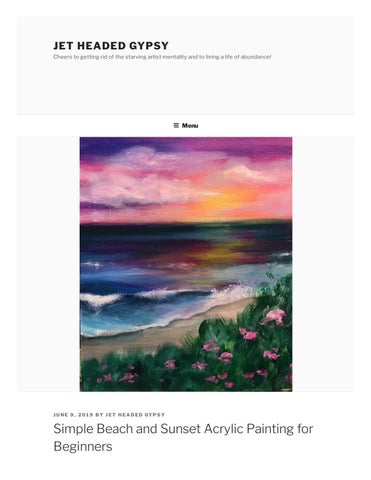
Simple Beach and Sunset Acrylic Painting for Beginners
This is an easy and fun exercise which can be completed within roughly three hours! The reference used in Simple Beach and Sunset Acrylic Painting for Beginners can be found here.
Materials used: Canvas 25x30cm Various brushes of your choice – I prefer using at brushes instead of round ones. I recommend using a different brush for each colour and then some large at brushes for blending. Acrylic paint, System 3 paints are quite nice to use and they’re affordable A jar with water for cleaning the brushes – I usually don’t wash my brushes while painting, since the residual water on the brush thins the paint and makes blending a bit more tricky. Other people prefer using water though, so see what works for you. Some tissue paper for drying the brushes.
Draw your horizon line and start painting the sky Start off by deciding where your horizon line will be. It’s a good idea to never put the horizon line in the dead centre of the canvas, because this makes your painting look very static. You want the viewer’s eye to travel throughout your painting. I used yellow paint to do this,
since yellow is easy to paint over. Once you have this down, you can add some yellow horizontal brush strokes for the sun. Make sure that not all your brush strokes are exactly the same length. Before this dries, immediately work in some pink. I used pink and white for this, alternating between white and pink every time I dip my brush into paint. With your pink paint, go over the tips of your yellow lines in order to blend the two colours a little bit. Also paint the sides as you go along. If you choose to hang the painting without framing it, it will give it more of a nished look.
Add the purple If you don’t have purple and you need to mix it, use pink and blue instead of red and blue to mix a vibrant purple. The reason why pink works better is because the red pigment is quite pricy. So paint companies add other pigments into the red paint,
such as orange, to make it more affordable for us. If we mix this affordable red paint with blue, it gives us a more darker purple. Apply your purple paint as indicated in the picture here on the right hand side of the painting. You can then use pink and white paint to blend it into the pink sky. The way you do this is to paint and blend the pink paint on the very edges of the purple shape. If you go all over the purple, your painting will end up looking muddy.
Paint the Sea Paint lines with various colours as indicated here. Use a large at brush to gently go over the lines you have painted to create a blended look. If you use horizontal strokes, your sea will look
more calm. The more you make zig zag movements with your blending brush, the rougher the sea will look. Colours I used was dark blue, light blue, white and purple. For the area where the sun is re ecting on the water, I added white, orange, yellow and pink.
Add the sand Use white and brown paint to create the sand. You can blend this out a bit more to create a smoother texture. For the top area, the sand that is further away from you, use more white to make it appear lighter. This creates a sense of
depth in your painting. Useful tip: Objects that are further away are generally lighter. This is called aerial perspective.
Add the sea froth Use a brush like the one here. Add a little bit of of paint to the brush and dab it all over the line where the sea and sand meet.
Add a thin shadow under the wave Start by drawing a line right under the froth. You need to do this throughout the painting, but do small sections at a time so that the paint does not dry when you dry to blend it.
Blend the line for a softer look Use a clean, dry brush for blending. Have a look here where the brush is positioned on the painting. You will only blend the very edge of the line to create a gradient. If you go over the entire line, it will just create a mess and not fade away from the sea froth. (I
hope this makes sense).
Make the front of the sea look more shallow In order to make the sea in the front look more shallow, make use of light blue paint. Your brush strokes are also important here. Where you previously painted everything in a horizontal direction, you are now going to paint the front area in a diagonal direction, slightly over the foam
. So you will start from the bottom, where the foam is, and make your brush strokes upward leaning to the left. Look at the direction in which the arrow goes here.
Add Greenery – Optional Use different greens, blues and some white to create short brush strokes for the greenery. When you get to the top of the plant, make sure you make your brush strokes with an upward swoop. This will make the end of the brush
stroke look thinner and it will end up looking more like twigs. Afterwards you can also add some owers. You can achieve this by just adding some quick dots and short brush strokes.
Paint the clouds Start off by adding a generous amount of paint in a line as indicated in the picture. Remember to keep the lines rather short in order to avoid the paint drying on you before you get to blend it.
Blend the clouds Now is the time to make those clouds look like candy oss! You can achieve this by blending in circles on the outer edges of the line. Take a look where my brush is positioned in the picture here. Once you are done, you can repeat this step by adding another line of paint on top of the cloud and lightly blend this too. The second layer will make the cloud appear more white.
Try not to overthink this part too much. Clouds are organic, so any shape will look ne. The most important part is that the edges of the cloud isn’t too harsh. You can x this by just blending it more outward.
Aand you’re done! I really hope enjoyed painting your sunset! Usually we don’t get much time to do creative things like this when we are in a full time job plus responsibilities at home. I came across this opportunity a couple of months ago where you can learn how to start your own online business through the six gure mentor program.
Imagine being able to do creative things like painting this sunset in the middle of the week, instead of sitting at work and wishing for the weekend to come! SFM also makes it possible for you to travel more! Since you have your own online business, you only need a laptop and a wi connection to keep it running. They provide you with step by step guidance on how to build a business based on something that you love and they have an amazing community that is super supportive as well. I am one of their students and since I have been with them, my life has changed so drastically! If you’re interested, you can sign up for free online workshops by clicking on the link below. Send me Free Workshops Jet Headed Gypsy – Simple Beach and Sunset Acrylic Painting for Beginners – Top of Page
j
s
b
g
f
ART TUTORIALS
Leave a Reply Your email address will not be published. Required elds are marked * Comment
Name *
Email *
Website
Save my name, email, and website in this browser for the next time I comment. Post Comment
PREVI O US
Learning to draw Human Anatomy
Privacy Policy Earnings Disclaimer
Af liate Disclaimer
Proudly powered by WordPress